WooCommerce Zapier offers seamless integration with over 6,000 cloud apps and services via the
Zapier web automation service.
With this integration, you can automate tasks, synchronise data efficiently, and connect with the tools essential to your business. By reducing manual effort, WooCommerce Zapier streamlines your processes, enhancing efficiency and setting the stage for growth. Embrace the intelligent, scalable, and automated solutions WooCommerce Zapier provides to elevate your online store.
Supports more than
70 triggers across
10 resources:
Supports more than
20 actions:
- You can use Zapier to create Order, Order Note, Product, Customer, Coupon, User Membership, Subscription or Subscription Note data from a Zap.
- You can use Zapier to find existing Order, Order Note, Product, Customer, Coupon, Membership Plan, User Membership, Subscription or Subscription Note data from a Zap.
- You can use Zapier to update existing Order, Product, Customer, Coupon, User Membership or Subscription data from a Zap.
Please review our
Frequently Asked Questions or fill out our
Pre-Sales enquiry form, and we will happily answer your questions about WooCommerce Zapier.
You can
purchase WooCommerce Zapier from the Woo Extension Store.
All purchases include one year (12 months) of updates and support, and have a 30-day money-back guarantee, allowing you to try WooCommerce Zapier risk-free.
Please review the WooCommerce Zapier
System Requirements before purchasing.
After purchasing, please proceed to the
Installation guide for details on how to install WooCommerce Zapier.
Buy Now
WooCommerce Memberships Support
Now includes support for the WooCommerce Memberships
plugin with new
Membership Plan and
User Membership resources. This update adds a total of 4 actions and 17 triggers to WooCommerce Zapier.
WooCommerce Zapier Plugin Version 2.10 Required: Please ensure you update the WooCommerce Zapier plugin to version 2.10.0 to use this functionality.
Support for WooCommerce Cart and Checkout Blocks
WooCommerce’s Cart and Checkout Blocks feature is now fully supported by WooCommerce Zapier.
Please see the new
Cart and Checkout Blocks Compatibility section for full details.
WooCommerce Zapier Plugin Version 2.10 Required: Please ensure you update the WooCommerce Zapier plugin to version 2.10.0 to use this functionality.
Improved Error Handling for Triggers and Actions
The Task History screen within WooCommerce now includes errors along with successful events that occur when running Zaps. You can see extended details about why an event failed.
This screen also now supports filtering by task status and/or searching your task history, making it much easier to manage your WooCommerce store’s automation activity.
Please see the new
Task History and
Error Codes chapters for full details.
WooCommerce Zapier Plugin Version 2.10 Required: Please ensure you update the WooCommerce Zapier plugin to version 2.10.0 to use this functionality.
New Subscription Note Trigger and Actions
Subscription notes are now supported in Zaps, including a new
Subscription Note Trigger, as well as new
Create Subscription Note and
Find Subscription Note actions.
New Order Note Trigger and Actions
Order notes are now supported in Zaps, including a new
Order Note Trigger, as well as new
Create Order Note and
Find Order Note actions.
Support Updating Existing Array (Line Item) Data
Added a new
ID field for data arrays, also known as line item data. This new field will provide additional functionality and flexibility.
This new field will be applicable to various data arrays including but not limited to
Line Items,
Meta Data,
Shipping Lines,
Fee Lines,
Coupon Lines and many more.
You can see detailed information about all input fields for various resources in the following links:
Support for WooCommerce High-Performance Order Storage
WooCommerce’s High-Performance Order Storage (HPOS) feature is now fully supported by WooCommerce Zapier.
Please see the new
HPOS Compatibility section for full details.
Full Support for Variable Product and Product Variations
Variable products and individual product variations are now fully supported in Zaps, including
Create Product,
Update Product and
Find Product actions.
Please see the
Product Actions and
Variable Products sections for full details.
5 New “Product” Trigger Rules
Easily trigger Zaps when a Product’s stock status changes or a product reaches the low stock threshold.
Please see the
Product Trigger Rules section for full details on the new product trigger rules.
New “Update Product Price” Action
We introduced an intelligent new action that makes it easy to update an existing product or variation’s regular price or sale price. Users can choose between ID or SKU when identifying the product, and decide how to apply the incoming value (set as a new value, increment by or reduce by a fixed amount or percentage). It allows users to set a product’s sale price relative to the product’s regular price.
Please see the
Update Product Price action section for full details.
New “Update Product Stock Quantity” Action
We introduced a new intelligent action that adopts how to target the product and how to change the stock quantity. Users can choose between ID or SKU and decide how to apply the incoming value (set as a new value, increment by or reduce by). For example, it allows users to process stock intake without knowing the current quantity beforehand.
Please see the
Update Product Stock Quantity action section for full details.
17 New “Status Changed To …” Trigger Rules
Easily trigger Zaps when an Order, Subscription
or Booking
changes to a specific status, without needing to use multi-step Zaps.
Please see the
Trigger Rules section for full details on the new trigger rules.
Transfer Existing Data
Easily move data in bulk by
transferring data through an existing Zap.
See
here for full details.
WooCommerce Bookings Support
WooCommerce Bookings
is now supported –
see here for more details.
Two-Way Integration
The WooCommerce Zapier integration is two-way, and now supports Actions. You can use Zaps to create new and update existing Order, Product, Customer, Coupon, Booking
, or Subscription
data in WooCommerce.
New Triggers
WooCommerce Zapier now has four times (4x) the number of available trigger events, giving you 3 times as many opportunities and reasons to send your WooCommerce store data to Zapier.
Simplified Zap Creation
The Zap creation process is simplified and is now fully managed via the zapier.com interface. There is no more requirement to create corresponding Zapier Feeds in WooCommerce.
New Resources (Data Types)
WooCommerce Zapier Version 2 adds support for
Products and
Coupons, in addition to the already supported Orders, Customers and Subscriptions
.
Powered by REST API
Giving you increased access to more data fields as well as more robust and reliable data delivery via WooCommerce webhooks.
Secure by Design
Secure HTTPS communication between WooCommerce and Zapier, as well as a new authentication method, will help improve data confidentiality and integrity.
And More
Please see the
release notes for full details of recent changes and improvements.
To use WooCommerce Zapier, you will need to purchase
the WooCommerce Zapier extension from the Woo Extension Store.
You will also need a Zapier Account.
Zapier Offers Both Free and Paid Plans:
WooCommerce Zapier can be used with a free Zapier plan, however, advanced functionality such as Premium Apps and Multi-step Zaps (to use Filter and Paths) are only available for paid plans.
Free plans also limit the number of tasks per month, so WooCommerce stores with higher order volumes will be more likely to need a paid Zapier plan.
For further pricing information see Zapier’s Plans & Pricing page.
If you don’t have one, you can sign up on the
Zapier website. Select the
Sign Up button or just enter your information in the available form.
The WooCommerce Zapier plugin has the following
software and
configuration requirements.
Software Requirements
To use WooCommerce Zapier, you must ensure that your website meets the following minimum software requirements:
| Software |
Minimum Version |
Recommended Version |
| PHP |
7.2 |
8.2 |
| WordPress |
6.0 |
Latest release |
| WooCommerce |
6.5 |
Latest release |
Configuration Requirements
To use WooCommerce Zapier, the following additional requirements must also be met:
| Item |
Requirement |
| WooCommerce/WordPress Account |
Account needs to be an administrator role |
| WordPress Permalinks |
Pretty permalinks enabled |
| HTTPS |
Site needs to be accessible via https:// |
| WooCommerce REST API |
Running and operational |
| WordPress Cron |
Running and operational |
| Zapier Account |
Free or paid plans |
WooCommerce Extensions
WooCommerce Zapier also integrates directly with other WooCommerce Extensions.
To use WooCommerce Zapier’s specific features(s) for an extension, you will need to ensure that you have the minimum version of the extension installed.
There are two different methods to install your WooCommerce Zapier extension:
1. One-Click Install/Update Method
If you have connected your Woo account to your website, go to your
WordPress Dashboard —>
Side Menu —>
WooCommerce —>
Extensions —>
My Subscriptions screen and click the one-click
Download button next to WooCommerce Zapier. This is also the easiest way to keep your WooCommerce Zapier plugin up to date.
This
article explains how you can connect your account to your WooCommerce store to activate in-dashboard one-click downloads/updates.
Trouble Updating WooCommerce Zapier?:
If you encounter an error updating WooCommerce Zapier, see here for suggestions.
2. File Upload
You can also log in to your WooCommerce.com account and go to the
Downloads page to download the latest zip file of the extension to your computer.
From your WordPress Dashboard, go to the
Side Menu —>
Plugins screen and click the
Add New and then
Upload Plugin button at the top of the page. Select the zip file from your computer and click the
Install Now button then the
Activate button to activate WooCommerce Zapier.
Tip: Some web browsers automatically unarchive downloaded Zip files. Make sure this functionality is disabled.
We also suggest going to
WordPress Dashboard —>
Side Menu —>
WooCommerce —>
Extensions —>
My Extensions screen to connect your Woo account, so that you have access to future WooCommerce Zapier versions from within your WordPress Dashboard.
Finally, it is best to go to the
WordPress Dashboard —>
Side Menu —>
WooCommerce —>
Status screen, and review the Active Plugins section to ensure that the WooCommerce Zapier plugin is up to date.
Congratulations!:
WooCommerce Zapier is now installed.
Please proceed to the Usage guide for details on how to use WooCommerce Zapier.
Once you have
installed the WooCommerce Zapier plugin on your WooCommerce store, configuring your Zaps/integrations (
Triggers and
Actions) is done via the
Zapier.com website.
Tip: If you haven’t created a Zap before, please refer to Zapier’s key concepts article before proceeding.
To create a WooCommerce Zap, we recommend using one of the
Zap templates, as it is typically quicker than hand-crafting your Zap from scratch.
Tip: The actual fields and data can vary depending on the WordPress and WooCommerce versions installed and by installed plugins and settings. If you are using an Actions template, please refresh the fields to make sure everything is updated to match your store.
If you would like to start from scratch, go to your
Zapier dashboard page on zapier.com and press the
Create Zap button on the left sidebar to set up a new Zap. Alternatively, you can start typing directly on that page.

When you create your first WooCommerce Zap, you will be asked to choose your WooCommerce account.
The authentication process involves the Zapier.com service connecting to your WooCommerce store using your WordPress administrator username and password.
Please ensure you complete the authentication dialogue window correctly:
- In the WordPress Site Address (URL) field, enter the URL to your WordPress website’s home (front) page. Be sure the URL starts with
https:// and does not include the trailing slash.
For example: https://example.com
If in doubt, go to the WordPress Dashboard —> Side Menu —> Settings —> General screen and copy the Site Address (URL) field value and paste it into the WordPress Site Address (URL) field in the authentication dialogue window.
- In the WordPress Username field, enter your administrator username or email address that you use when logging into the WordPress dashboard.
- In the WordPress Application Password field, create an Application Password for your WordPress administrator account, and enter it here.
Use a WordPress Application Password:
Using an application password (rather than your regular password) improves compatibility with security-related plugins and services. See details in the [Security Plugins](#security-plugins) chapter.

To set up an Application Password, go to **WordPress Dashboard** --> **Side Menu** --> **Users** --> **Profile** screen and press the "Add New Application Password" button. Please [see here for details](#application-passwords).

Can't see the Application Passwords settings in WordPress? Please [see here for suggestions](#application-passwords).

rnatively, if you are unable to create an Application Password, you can use your regular WordPress password.
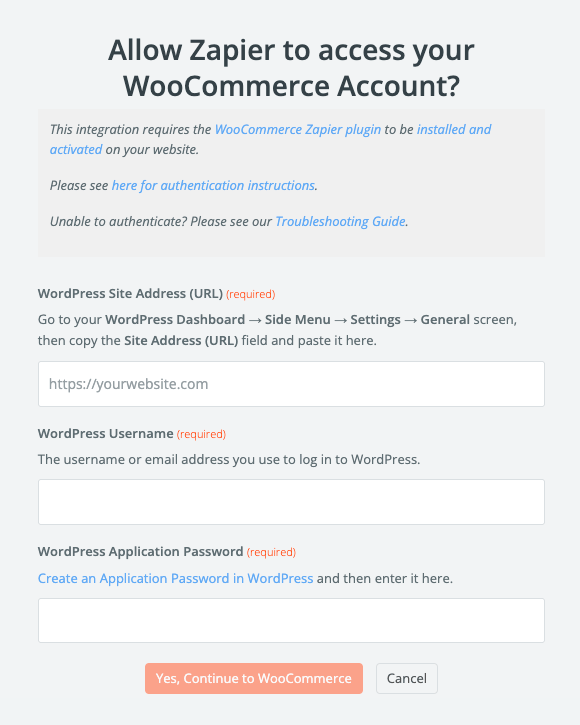
Click the
Yes, Continue button to complete the process.
Congratulations, you have successfully authenticated!
What’s next?
- If you would like to send WooCommerce data to your Zap, please continue to the Trigger chapter.
- Alternatively, if you would like to create new (or update existing) WooCommerce data from your Zap, please go to the Action chapter.
Note: If you encounter issues while authenticating, please refer to our Troubleshooting Authentication Errors documentation.
This feature allows you to send WooCommerce data to a Zapier Zap.
Step 1: Trigger step
- In the Choose App & Event step, search for the WooCommerce app and click it.
- Select the Resource (data type) in the Choose Trigger Event dropdown — for example, Order if you would like to send WooCommerce orders to Zapier.
- In the Choose Account step, click on the Sign in to WooCommerce button to authenticate your Zapier account with your WooCommerce store.
If you are already authenticated, you can choose the previously used authentication from the WooCommerce account dropdown menu instead.
Note:
Use the WordPress [Application Password](#application-passwords) feature to authenticate.

If you encounter issues while authenticating, please refer to our [Troubleshooting Authentication Errors](#authentication-errors) documentation.
- The Customise… step
- In the Find Data step, click the Test & Continue button to retrieve sample data from your WooCommerce store.
Find Data:
When retrieving sample data from your store, it isn't contextual to the Trigger Rule you have chosen for the Zap. Find Data simply retrieves your most recent store data (regardless of status) when getting sample data.

However, once you turn on your Zap, the trigger rule will apply and should only send relevant data to Zapier.
Step 2: Action step
- In the Choose App & Event step, choose a service to send your WooCommerce data to.
- Finish configuring the Action step. Please see Zapier’s instructions on setting up your Zap action for more details.
Transferring Existing Data:
Once your Zap is published, it will operate on data that is added or changed from that point forward.
If you need to process existing data through your Zap, you can transfer your existing data using your new Zap.
Tip: To ensure reliable and timely delivery of your WooCommerce data to Zapier, we recommend setting up a server cron job.
Actions allow you to create new (or update existing) WooCommerce data from a Zapier Zap.
Step 1: Trigger steps
- In the Choose App & Event step, choose a service to get the source data from.
- Finish configuring the Trigger.
Step 2: Action steps
- In the Choose App & Event step, select the WooCommerce app.
- Choose the Action in the Choose Action Event dropdown — for example, Create Order.
- In the Choose Account step, click on the Sign in to WooCommerce button to authenticate your Zapier account with your WooCommerce store.
If you are already authenticated, you can choose the previously used authentication from the WooCommerce account dropdown menu instead.
Note:
Use the WordPress [Application Password](#application-passwords) feature to authenticate.

If you encounter issues while authenticating, please refer to our [Troubleshooting Authentication Errors](#authentication-errors) documentation.
- The Customise… step
- Fill in all of the WooCommerce input fields that you want to send data to. You can choose data fields from the Trigger part of your Zap, or you can type in hard-coded values.
- In the Send Data step, click the Test & Continue button to finish the Action configuration.
Transferring Existing Data:
Once your Zap is published, it will operate on data that is added or changed from that point forward.
If you need to process existing data through your Zap, you can transfer your existing data using your new Zap.
Tip: To ensure reliable and timely delivery of your WooCommerce data to Zapier, we recommend setting up a server cron job.
This feature allows you to create new data in WooCommerce from a Zapier Zap. For example, you could create a Zap that creates a new Customer in WooCommerce whenever they subscribe to your mailing list.
Configure your Zap as seen in the
Create an Action chapter above, and in the
Choose Action Event dropdown select the corresponding
Create Action.
The Zapier Integration (and WooCommerce itself) is quite relaxed when creating a new Resource. You can create
orders,
products, and
subscriptions without any input, but that’s probably not what you want.
- For the Create Coupon action, you must provide at least the Coupon code.
- For the Create Customer action, you must provide at least the Customer email address.
The required fields are clearly labelled in the Zapier interface.
Tip:
For more details on each data field, please consult the relevant Field Definitions documentation.
This feature allows you to update existing data in WooCommerce from a Zapier Zap. For example, you could create a Zap that updates the inventory (stock) level of a WooCommerce product using Zapier.
If you know the
ID of a WooCommerce Resource (for example coming from a previous step), you can update that resource with the new
Update Action.
Configure your Zap as seen in the
Create an Action chapter above, and in the
Choose Action Event dropdown select the corresponding
Update Action.
Note: Resource ID is Required for Update Steps:
An update action always requires a valid top-level ID to be specified. This ensures that your Zap knows which record to update. On the other hand, any non-top-level ID is optional. If you leave it empty, WooCommerce will create a new entry, such as a new Meta Data item.
To help identify the correct Resource ID, you can add a Find step before your update step. The result of your Find step will contain the Resource ID, which you can then use in the Update step.
Tip:
For more details on each data field, please consult the relevant Field Definitions documentation.
This feature allows you to search for existing WooCommerce data from a Zapier Zap. For example, you could search for a product based on its SKU before updating it in WooCommerce.
Configure your Zap as seen in the
Create an Action chapter above, and in the
Choose Action Event dropdown select the corresponding
Find Action.
After finding a Resource you can immediately create one if it is not found. This is a great way to implement synchronisation functionality between two apps using Zapier.

Alternatively, after searching you can add an additional step
to your Zap to use the found Resource/data.
Tip:
See the Product Types chapter for a full list of supported WooCommerce product types and functionalities.
For more details on each data field, please consult the relevant Field Definitions documentation.
Meta Data (Custom Fields)
WooCommerce is designed to be flexible and extensible. Part of this extensibility is a meta data capability, which extensions/plugins can use to store their additional information/data.
For example, whenever an order is created in WooCommerce, information is often stored in the order’s meta data. Payment gateways (such as Stripe) will often store their fee and/or net revenue information in Order Meta Data.
Moreover, if you are using Custom Fields in your store, then they will typically be stored in meta data also.
In the context of WooCommerce Zapier and your Zaps, the meta data that is available for use in your Zaps is as follows:
Using in Triggers and Searches
WooCommerce meta data is automatically expanded into individual fields to make them more accessible and usable in subsequent steps in your Zaps. Furthermore, for
Create… Actions a list of fields is provided for adding multiple meta data records during creation.
For example, if an Order has a
stripe_fee meta data field, you can access it using the
Meta Data Stripe Fee field in Zaps.
Important:
Several caveats apply when using Meta Data in your Zaps:
- Meta Data fields in WooCommerce are unstructured and typically vary from one resource to another.
For example, if multiple payment gateways are used, one order may contain a specific meta data field (key), however, another order may not. This means a meta data field(s) can be missing or can be different in each task. Consider adding a Path or Filter step to your Zap, to conditionally perform separate actions depending on which Meta Data fields exist.
- WooCommerce meta data fields can have multiple values for a single key. In this case, the last meta data value for that key is the one that is used in Zaps. i.e. the first value is overwritten by the second value.
- The existing Meta Data, Meta Data Key and Meta Data Value fields are still present for backward compatibility reasons, however, we do not recommend using these.
When creating or configuring your Zap, the sample data chosen in the
Find Data step in your trigger needs to contain the meta data fields that you would like to use in your Zap.
This makes it much easier to complete your Zap setup because the fields will be available in your Action step(s) in your Zap.
Using in Actions (Creates)
In Create Actions, you will see a
Meta Data List input section, and the
Meta Data input fields are labelled as “Legacy”:

The
Meta Data List input field lets you add (set) multiple meta data records at once.
- In the left-hand field, enter the name (key) of the meta data record you would like to add.
- In the right-hand field, enter the desired value for the meta data field (you can also use template variables from previous steps when setting the value).
- If you would like to add/set multiple meta data records, click the plus icon and fill in that key and value also.
The
Meta Data (Legacy) fields aren’t typically used, as we recommend using the newer
Meta Data List input fields instead.
Zapier also allows you to transfer your existing data from one app to another, moving data in bulk.
After setting up your Zap (and having it trigger from only that point onwards), you can also use the
Transfer existing data option to move/send data in bulk.
You can use it to move WooCommerce data in bulk from WooCommerce to another app of your choosing. Or you can use it to bulk move data from other apps into WooCommerce.
See
here for a great summary of this feature.
Use Cases
Below are some examples of what you can achieve using this feature.
Bulk Exporting WooCommerce Data
You can use WooCommerce Zapier to bulk export WooCommerce data to another app.
- Bulk Export Orders from WooCommerce
- Bulk Export Products from WooCommerce
- Bulk Export Customers from WooCommerce
- Bulk Export Coupons from WooCommerce
- Bulk Export Bookings from WooCommerce
- Bulk Export Membership Plan from WooCommerce
- Bulk Export User Membership from WooCommerce
- Bulk Export Subscriptions from WooCommerce
This is particularly useful if you ever change one of your underlying systems. For example, if you change your CRM to a new system, you can bulk import WooCommerce data into your new system.
Bulk Importing Data Into WooCommerce
You can use WooCommerce Zapier to bulk import data from another app into WooCommerce:
- Bulk Import Orders into WooCommerce
- Bulk Import Products into WooCommerce
- Bulk Import Customers into WooCommerce
- Bulk Import Coupons into WooCommerce
- Bulk Import Subscriptions into WooCommerce
Usage
Please consult the following articles for detailed instructions:
WooCommerce as a Source
When using WooCommerce as a
source,
all WooCommerce Triggers are available for use.
You select your nominated WooCommerce trigger resource, then configure your destination action and map fields, similar to how you map fields in the Zap Editor interface.
Zapier will then retrieve all of your WooCommerce data and display it in the interface.
Info: It may take some time to retrieve all existing data from your WooCommerce store. Please be patient while data is retrieved.
You can then filter and/or search your WooCommerce data, and tick the record(s) that you would like to send to your destination app.
This allows you to easily select all (or some) of your existing WooCommerce data with a few clicks.
WooCommerce as a Destination (Action)
If using WooCommerce as a
destination (action), you can send data from
any of Zapier’s supported source apps, and send that data to WooCommerce.
All existing WooCommerce Actions are available for use.
In a Zap you can have additional steps between the Trigger and Action steps:
- Use a Find step to access additional data.
- Use the Filter or Paths built-in apps to implement advanced logic or support multiple outputs.
- Use the Formatter built-in app to transform field values.
- Use the Code built-in app to transform data structures, or calculate new fields.
Note: Multi-step Zaps require a paid Zapier account. You can add multiple steps in a Zap to combine individual functionalities.
Find Steps
For accessing additional data in your Zap, you can add a Find step between your Trigger and Action steps in your Zap configuration.
You can see a list of available search (find) actions in the
Actions and Searches documentation.
Finding Products from Orders
Tip: See the Product Types chapter for a full list of supported WooCommerce product types and functionalities.
If you are using one of the
Order Triggers, and want to use the line item product category (or tag) in a subsequent action step as well, you can create a Zap that utilises a Find Product step.
There are two separate ways to implement this, depending on which
Trigger you are using:
Line Item in an Order —> Find Product
If you are using the
Line Item in an Order trigger, you can configure your Zap like this:
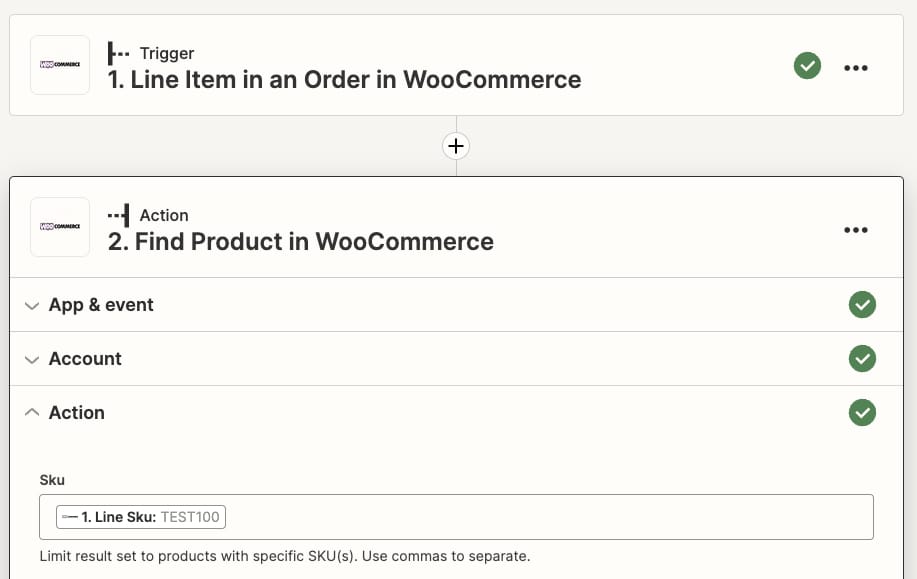
Find Product Zap Configuration” />
Ensure you are using a
Line Item in an Order step as Step 1, then add a
Find Product action as Step 2.
If your store uses product SKUs, choose to search by
SKU, and insert the
Line Product SKU field from Step 1 into it. This instructs the
Find Product step to search using the correct (unique) product SKU from the order’s line item.
If your store does not use product SKUs and uses a mix of simple and variable products, then it will not be possible to use a single
Find Product step to search for the product or variation due to the way the WooCommerce Order Line Item stores the Product ID and Variation ID in different fields. Instead, we highly recommend adding SKUs to all of your products and variations and then using a Find Product Step to search by SKU.
In step 3 of your Zap (the action) you can utilise the
categories —>
name (or
tags —>
name) array which you can then use in the next step of your Zap.
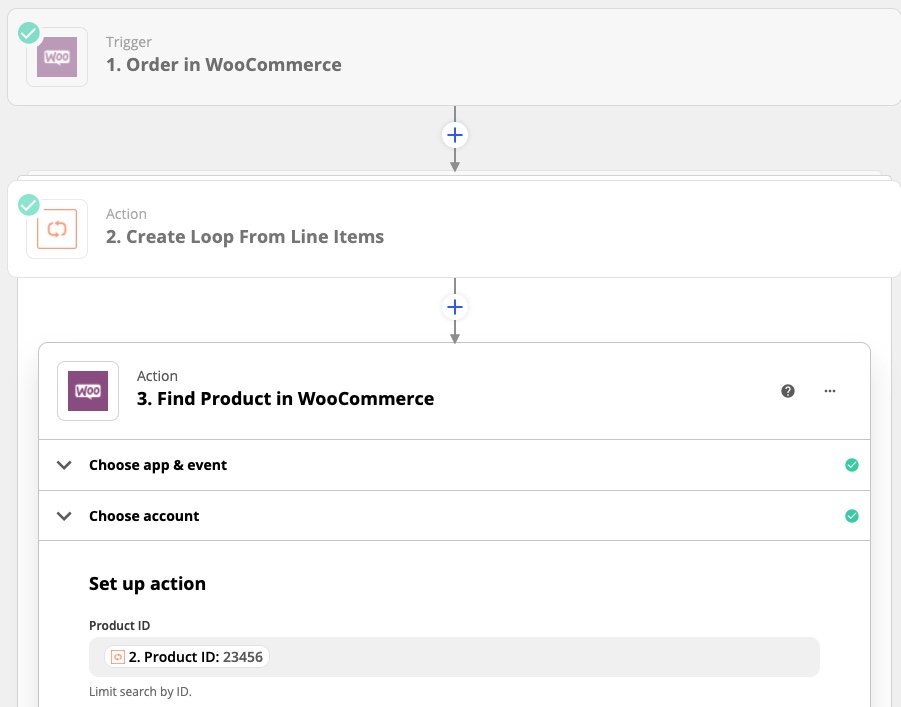
Order —> Looping by Zapier —> Find Product
If you are using the
Order trigger, an alternative approach is to use a
Looping by Zapier step in your Zap like this:

Looping by Zapier –> Find Product Zap Configuration” />
Please see the
Looping by Zapier chapter below for more details.
Filter by Zapier
Filter by Zapier allows you to add special conditions to Zaps. For example, using a filter you could configure a Zap to:
- act only on orders for a specific product category
- act only on orders that exceed a specified order value
- act only on orders that are to be shipped to a specific country
Please see
Zapier’s help articles for more information on how to use filters in your Zaps.
Paths by Zapier
Paths by Zapier allows you to add branching logic to Zaps. The main advantage of using Paths is that you can create up to three different outputs (paths) within a single Zap.
Please see
Zapier’s help article for more details.
Looping by Zapier
Adding a
Looping by Zapier action to your Zap lets you perform your desired action more than once per Zap. This is particularly useful with WooCommerce Order triggers, which have multiple line items.
Typically, you would use the
Create Loop From Line Items option, with a configuration like this:
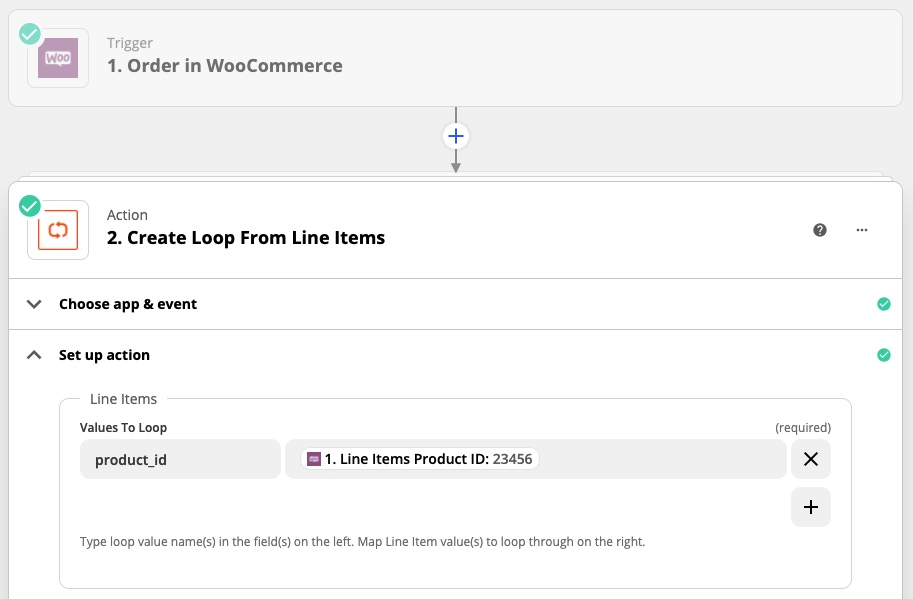
Which would allow you then use the
2. Product ID field in a subsequent step (such as a Find Product step):
Please see
Zapier’s help article for more details on how to use Looping by Zapier.
Warning: Looping by Zapier is currently a Beta Zapier app and is subject to change.
Formatter by Zapier
With
Formatter by Zapier, you format data in Zaps. For example, you can split or combine field contents, convert between different number or date formats, or even transform the whole data structure.
Please see
Zapier’s help article for more details.
Line Itemizer
Various parts of WooCommerce Zapier require line-item-enabled data sources. See the
Actions and Searches chapter for a full list of these fields.
The
Line Itemizer transform in the
Formatter by Zapier app allows you to easily convert comma-separated text or values into line items that can be used in WooCommerce Zapier Actions.
An Example: Adding Multiple Product Attributes to a Product
The
Line Itemizer transform can be used to generate multiple product attributes that are used as part of a
Create Product or
Update Product action to add multiple Product Attributes to a WooCommerce Product.
In WordPress, go to
WordPress Dashboard —>
Side Menu —>
Products —>
Attributes, to see the list of store-wide Product Attributes.
On that screen, hover over one of the attributes you’d like to use and then click on
Edit to edit that attribute. Your browser URL bar will show something similar to
/wp-admin/edit.php?post_type=product&page=product_attributes&edit=123. Make a note of the
edit=123 part of that URL. This part tells you the attribute’s ID (in this example, it is
123).
Repeat the above process for all attributes that you would like to use in your Zap.
Return to your Zap Editor, and before your WooCommerce
Create Product or
Update Product action, add a new
Formatter by Zapier —>
Line Itemizer step.
In the
Set up action step, enter
Attributes into the
Line-item(s) Group Name field.
In the
Line-item Properties section, type
id in the left field, then add another row and type
value:
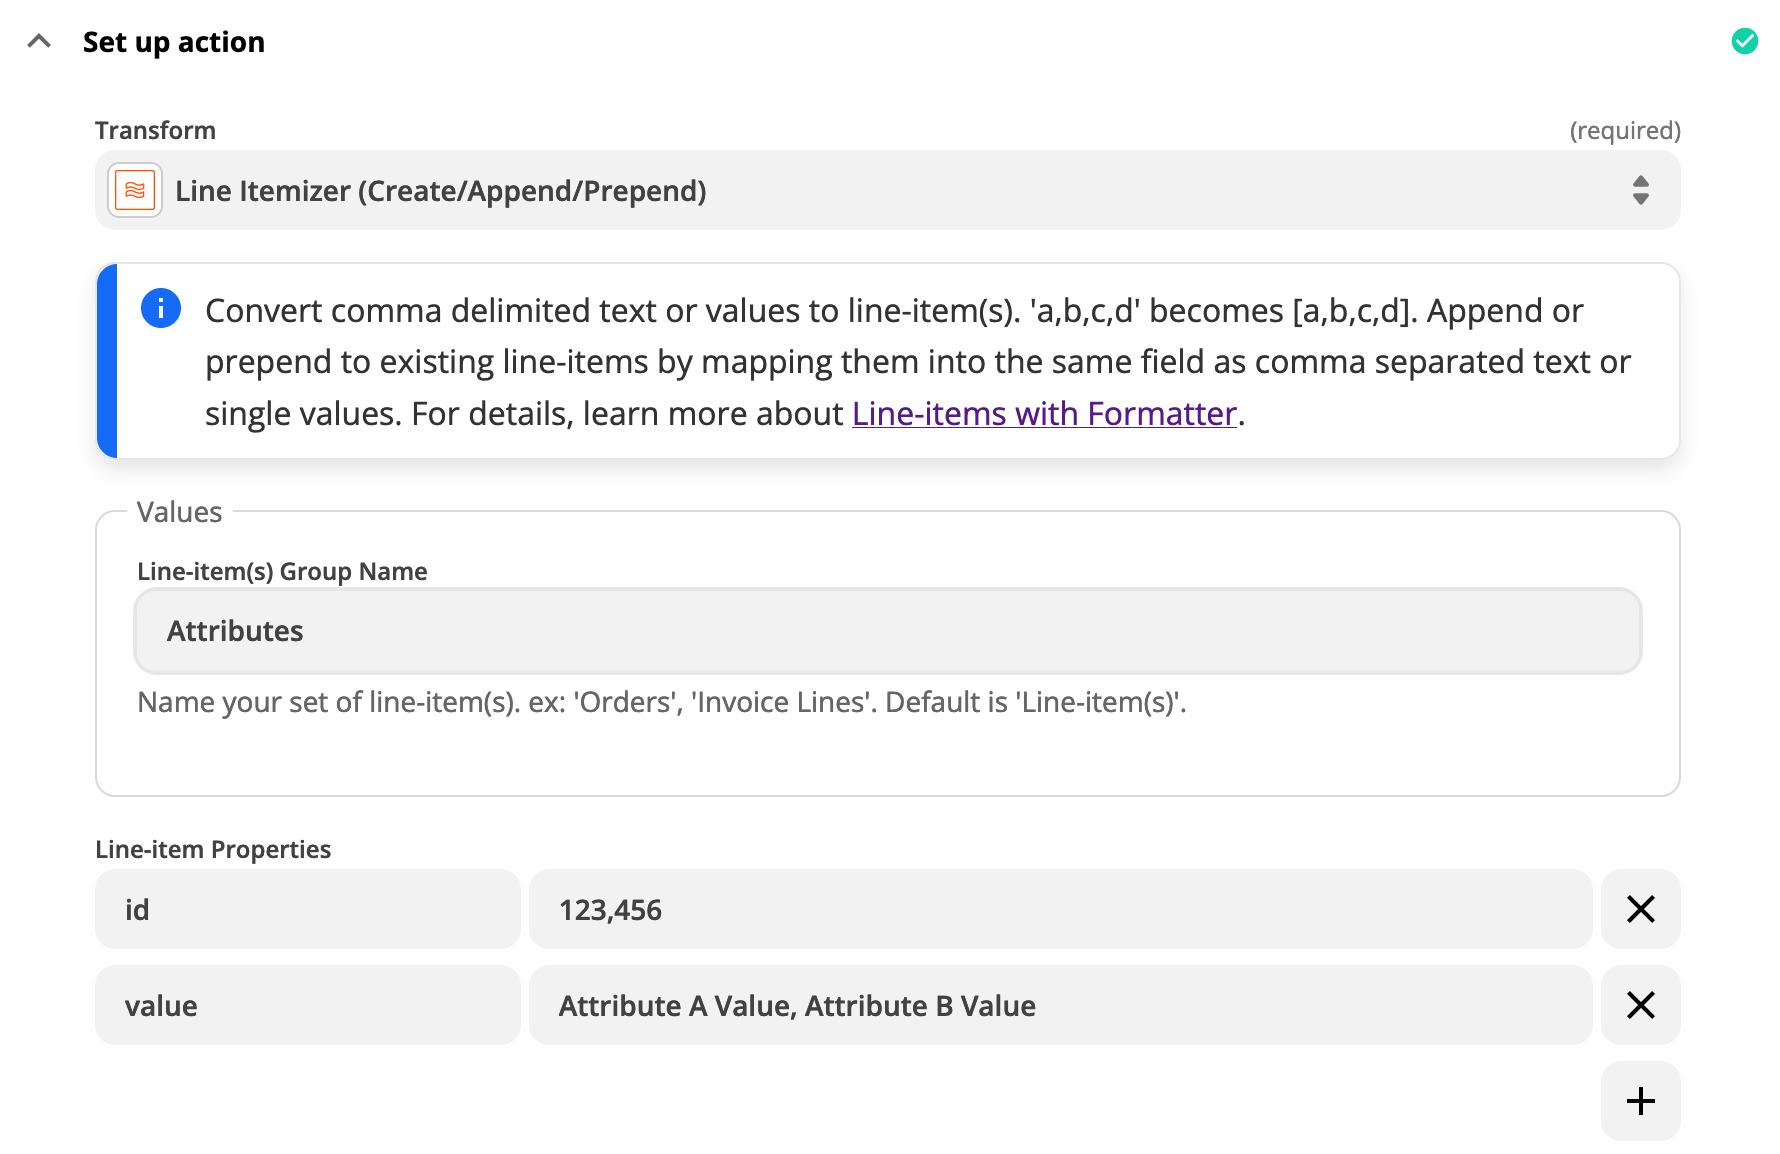
The right-hand
id field will be a comma-separated list of Attribute IDs for your store that you would like to assign to the product.
The right-hand
value will be a comma-separated list of Attribute Values for the above Attribute IDs. Typically, this field won’t have manually typed values, it will instead have a comma-separated list of actual values from Step 1 of your Zap.
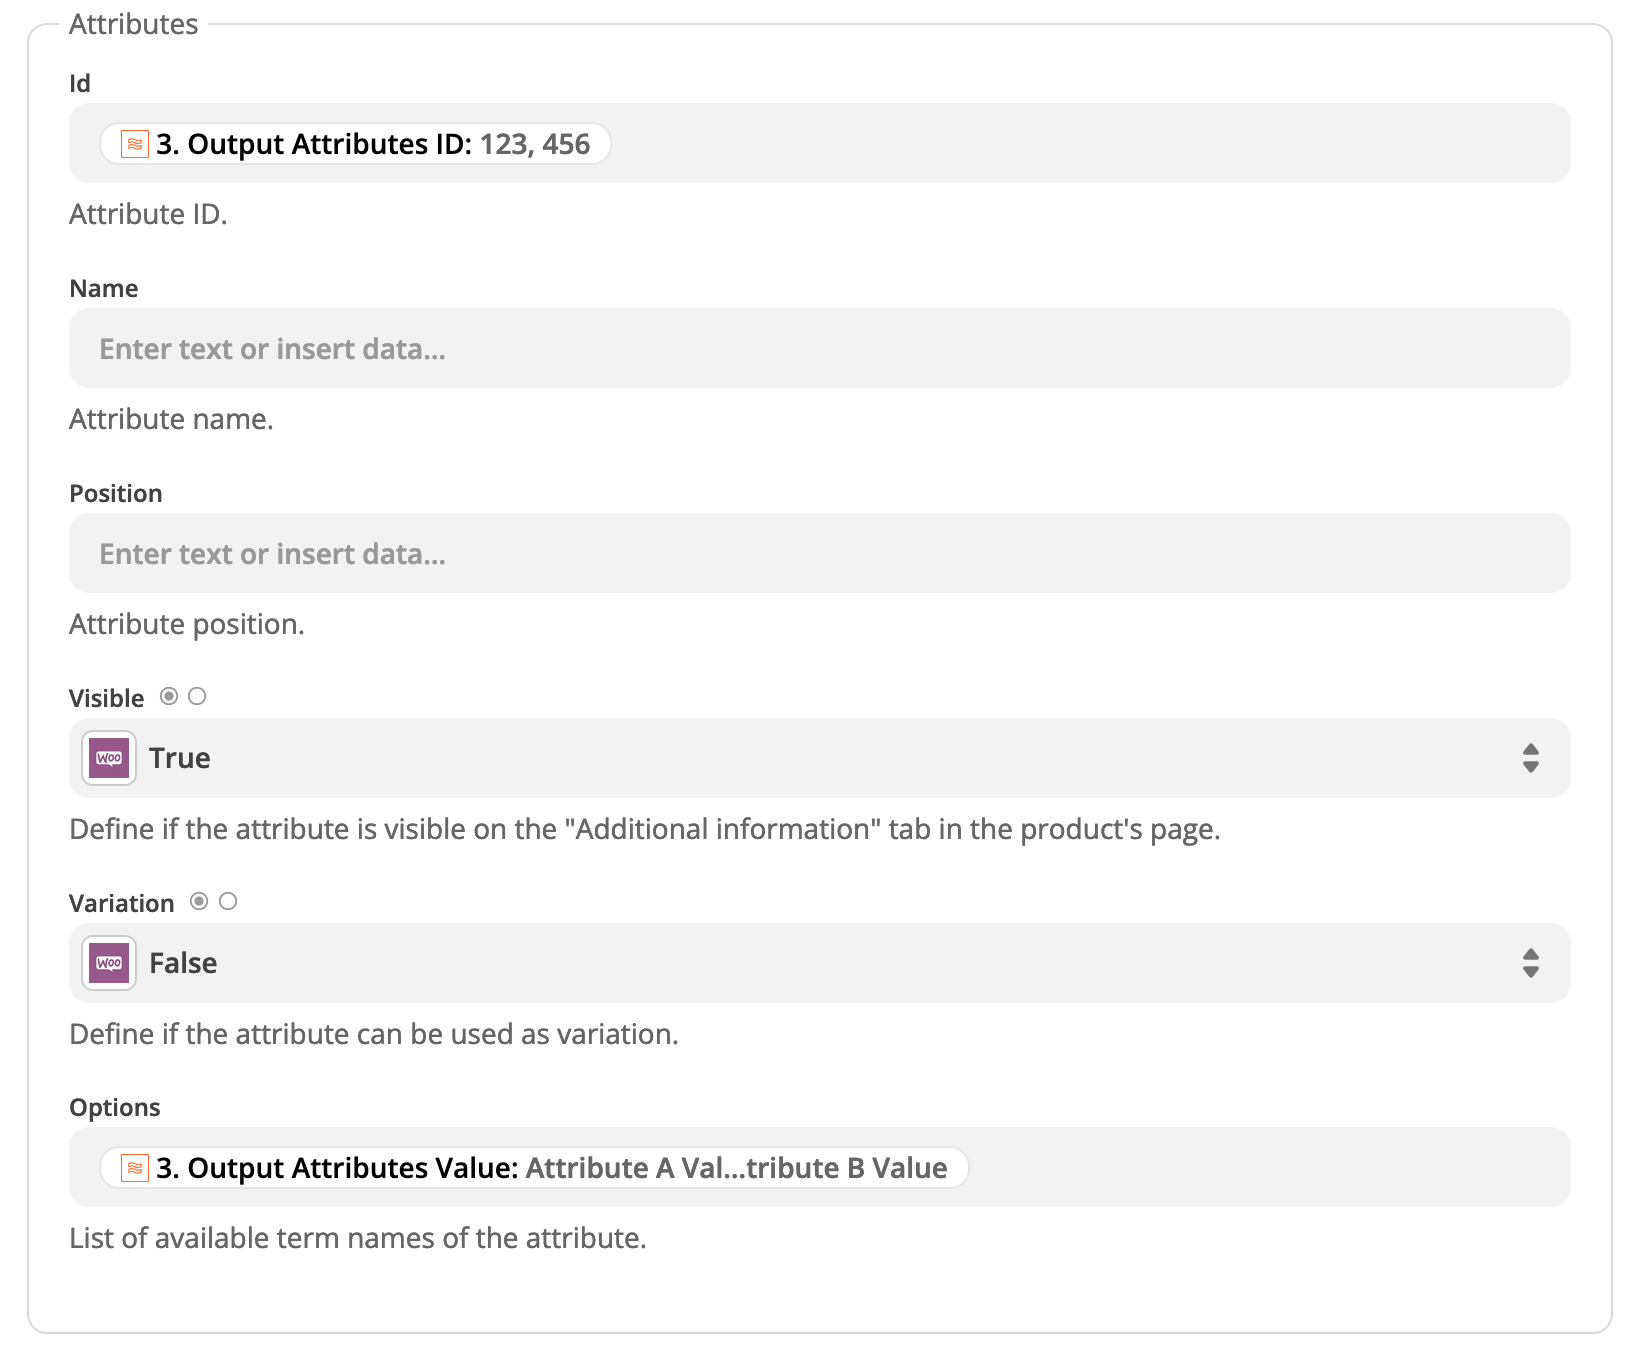
The output of this new Formatter step will be an array (list) of attribute IDs and their values.
You then pass that output to your
Create Product or
Update Product step by editing your
Create Product or
Update Product step and configuring it similarly to this:
When your
Create Product or
Update Product step executes, it will “loop” over each item in the attributes list, and send them all to WooCommerce when creating/updating the product.
The result should be a product in WooCommerce that has multiple attributes and values assigned to it.
This same technique can be used for any other line-item aware field in WooCommerce Zapier. See the
Actions and Searches chapter for a full list of these line-item-enabled fields.
Code by Zapier
By adding the
Code by Zapier step to your Zap, you can add fields based on the trigger data. For example, you can restructure, simplify or calculate new values. The output can be usable in the subsequent steps.
Please see
Zapier’s help article for more details on how to use Javascript code in your Zaps.
Below are some examples of what you can achieve using a Code by Zapier step.
Heads Up:
The following code snippets are provided as examples only.
We are unable to provide support for writing custom code, so you may need to enlist the support of a Certified Zapier Expert or Web Developer.
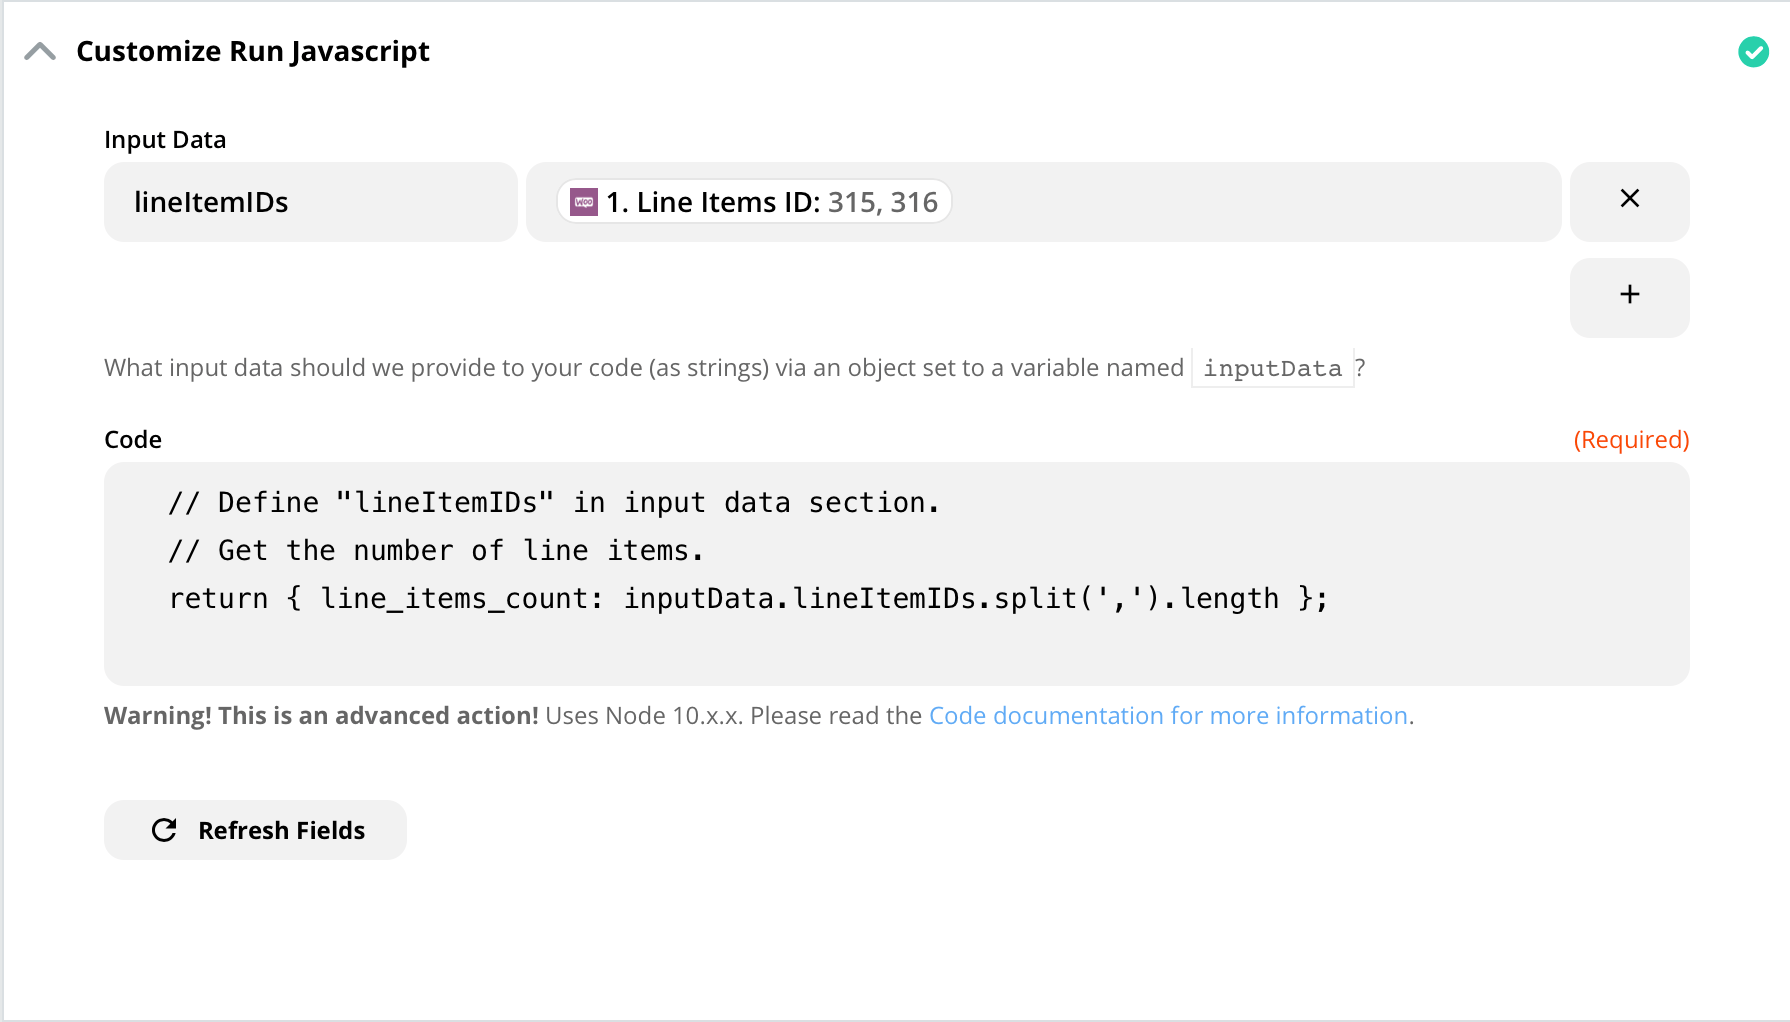
Add “Line Items Count” Field to an Order
// Define "lineItemIDs" in the Input Data section.
// Get the number of line items.
return { line_items_count: inputData.lineItemIDs.split(',').length };
- Add a Code by Zapier step to your Zap and choose Run Javascript for the Event Action.
- Define
lineItemIDs by choosing the 1. Line Items ID in the Input Data section.
- Copy the above code snippet and paste it into the Code section.
The step should look like this:
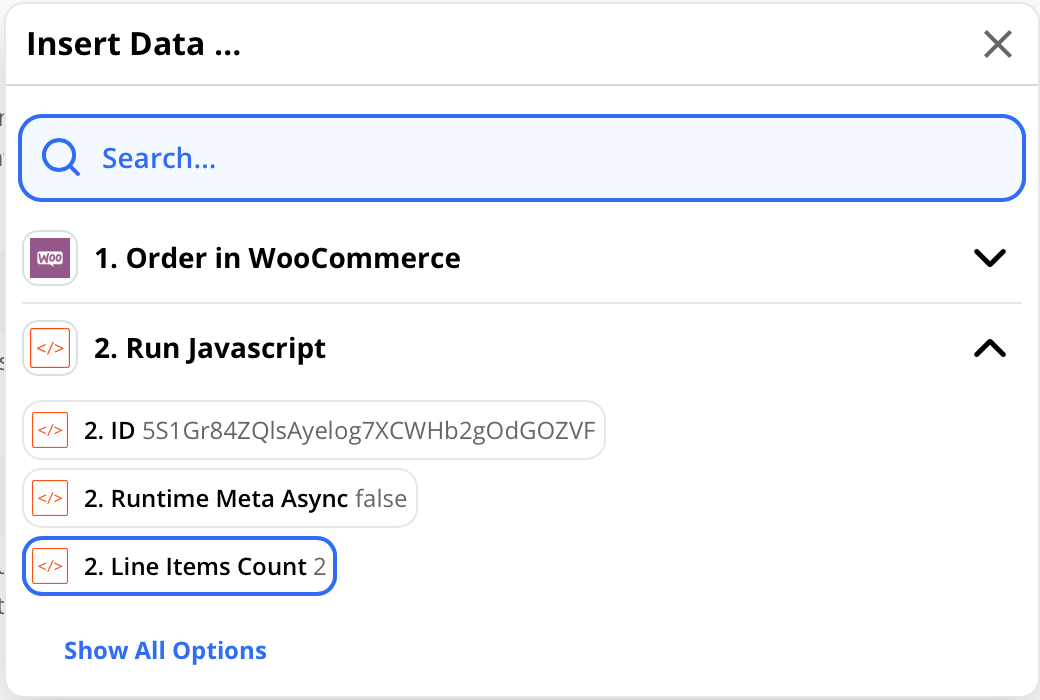
The result would show in the subsequent steps like this:
Add Meta Data Fields to a Trigger
Heads Up: Looking for the meta data code example? Individual meta data fields are now accessible without needing to add a Code by Zapier step. Please see here for more details.
Performing Different Actions For Different Products Ordered
Each Zap that uses the
Order trigger will apply to all orders (and thus all products) by default, however, it is possible to perform different actions based on the product ordered.
To set this up, we recommend using the
Line Item in an Order trigger (instead of the
Order trigger) because the
Line Item in an Order trigger fires individually for each individual line item ordered, rather than firing only once per order. This allows you to automate based on the individual product(s) ordered.
Step 1 of your Zap should be the
WooCommerce app, with
Line Item in an Order as the trigger. You’ll likely use the
Order paid or
Order created trigger rule.
Step 2 of your Zap should be either a
Paths by Zapier or
Filter by Zapier step. Step 2 is where the conditional logic is added to only act on a specific product.
For example, using a
Paths by Zapier step, you can set up several paths for different products in your store, which would look something like this:
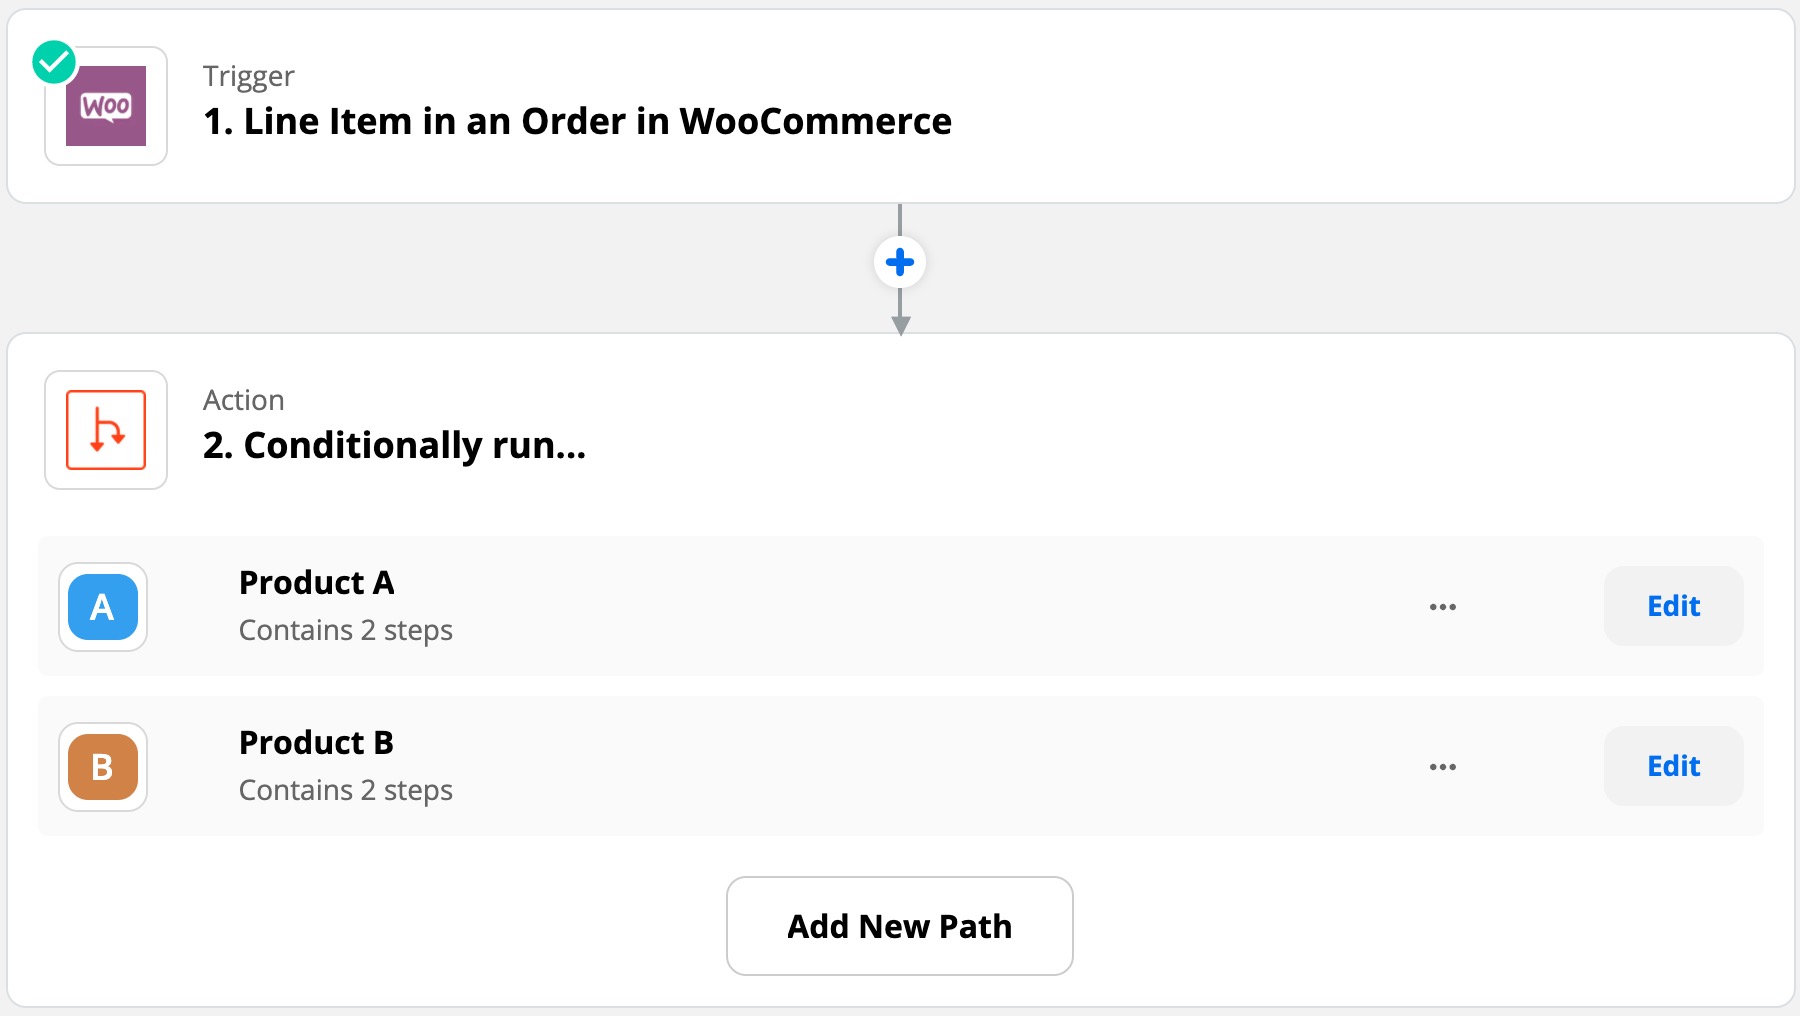
For each path configuration, you would set up criteria such as the following, which is based on the name of the product ordered:
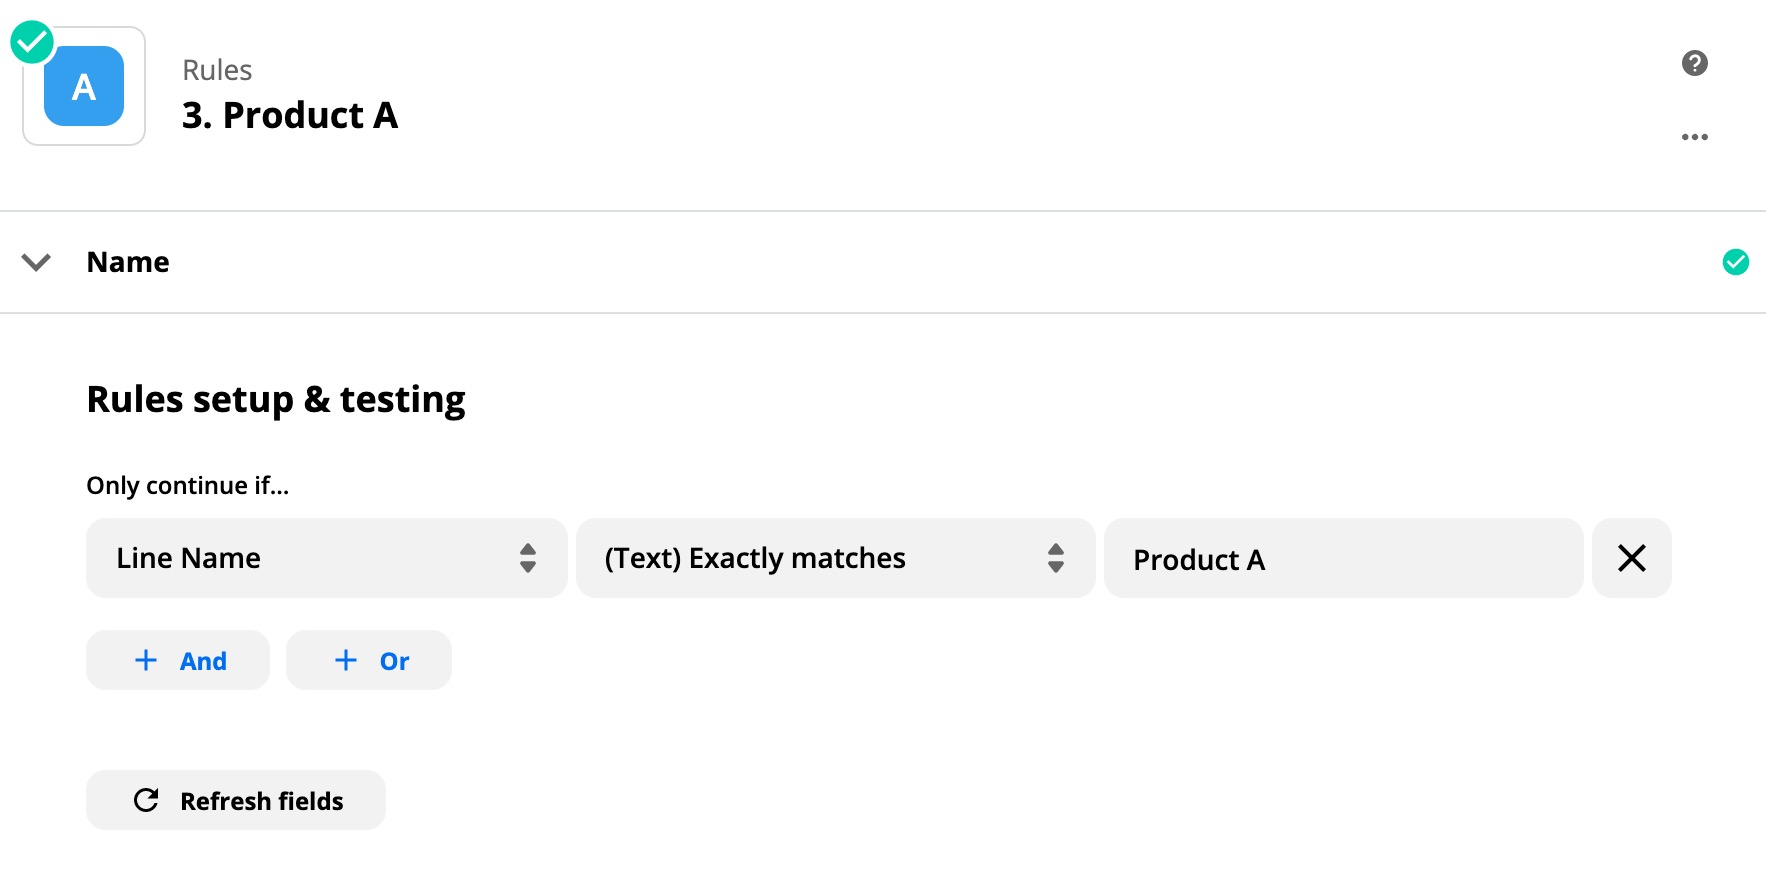
Then inside each path, you would perform your desired action.
For more details on how to use Paths in your Zaps,
please see this Zapier help article.
Warning: Zapier has a limit on the number of paths (and steps) in a Zap, so if you need more paths or steps, then you will need multiple Zaps.
You can see previously sent information to Zapier on the
Zapier.com Task History page.
If a task encounters a problem, it will be stopped. Zapier can distinguish between issues and will automatically stop affected task(s).
If the problem prevents not just that specific task but any later task as well, then the task will be stopped and marked as “Errored.” If repeated errors occur, then the corresponding Zap is also disabled.
Alongside the above error, Zapier can stop and mark a task as “Halted” if the problem will not prevent future tasks from being completed successfully.
For more troubleshooting tips, please consult the
Troubleshoot Zaps documentation.
Tip:
You can resubmit halted or errored tasks from the Zapier Task History page if you need to.
Please look at the Issues with Tasks chapter if you have any problems.
You can find more information on the Task History Help page on Zapier.com.
To manage, modify, or delete existing connections, please refer to the Zapier Help’s
Manage your Zaps page.
Orders are an essential part of the eCommerce process. They represent an “order event” followed by its various stages, such as payment, fulfilment, or shipping.
For triggers, the Order resource is accessible in two separate ways in the WooCommerce Zapier Integration:
- The Order trigger, described here, creates a separate Zapier Task for every order in your store.
- On the other hand, the Line Item in an Order trigger is a great way to send every order line item (product) data independently to Zapier, because it creates a separate Zapier Task for every single line item (product) ordered in your store.
See the key differences in this
Frequently Asked Questions chapter.
You can choose between the two types of behaviour in your Zap when you are
configuring the trigger step. Both triggers support the same set of Trigger Rules, but produce slightly different data fields.
Other Order resources:
Orders also have other (child) resources that can be accessed in Zapier Integration:
Using Woo Subscriptions?:
If you are using the Woo Subscriptions extension, these Order trigger rules will also trigger for subscription signup and subscription renewal orders.
If you are using a Subscription trigger in another Zap, you may wish to exclude subscription signups and renewals from your order Zap by using the following setup:
- Zap Step 1: Use the Order trigger and your desired trigger rule (e.g. Order paid).
- Zap Step 2: A WooCommerce Find Product action:
- Product ID equals 1. Line Items Product ID (the product ID from step 1)
- Zap Step 3: A Filter step:
- Only continue if:
- 2. Type
- (Text) Does not contain
subscription
- Zap Step 4: Your desired action.
The above setup will ensure that your order Zap only triggers when a non-subscription product is purchased.
A Trigger Rule defines an event (or multiple events) that will cause WooCommerce data to be sent to a Zapier Zap.
The following trigger rules are available to trigger your Zaps when order data in your WooCommerce store is added, changed or deleted.
Order created
Triggers when an order is created.
Note:
The Order created trigger rule will trigger for every order received (both paid and unpaid).
If you would like to trigger your Zap only when you receive a paid order, then consider using the Order paid trigger rule instead.
Order deleted
Triggers when an order is deleted (trashed).
Only the ID field is available: Due to limitations in how WooCommerce handles deleted events, only the ID of the deleted resource is sent to Zapier when using this trigger rule. No other data fields are available.
Order paid
Triggers when an order is paid for. Occurs for real-time payment gateways (such as Stripe, PayPal, or most other credit card gateways).
Tip for offline/deferred payment methods:
The Order paid trigger rule will not typically fire for offline/deferred payment methods such as Direct Bank Transfer (BACS), Check/Cheque or Cash on Delivery (COD).
If you are using an offline/deferred payment method, you have several choices:
- Use the Order created trigger rule, which will trigger for both paid and unpaid orders.
- Use an Order status changed trigger rule, such as Order status changed to Processing or Order status changed to Completed.
Order restored
Triggers when an already trashed order is restored from the trash.
Order status changed
Order statuses are an important part of the order processing and fulfilment flow in WooCommerce. The following diagram shows the typical order status life cycle in WooCommerce:
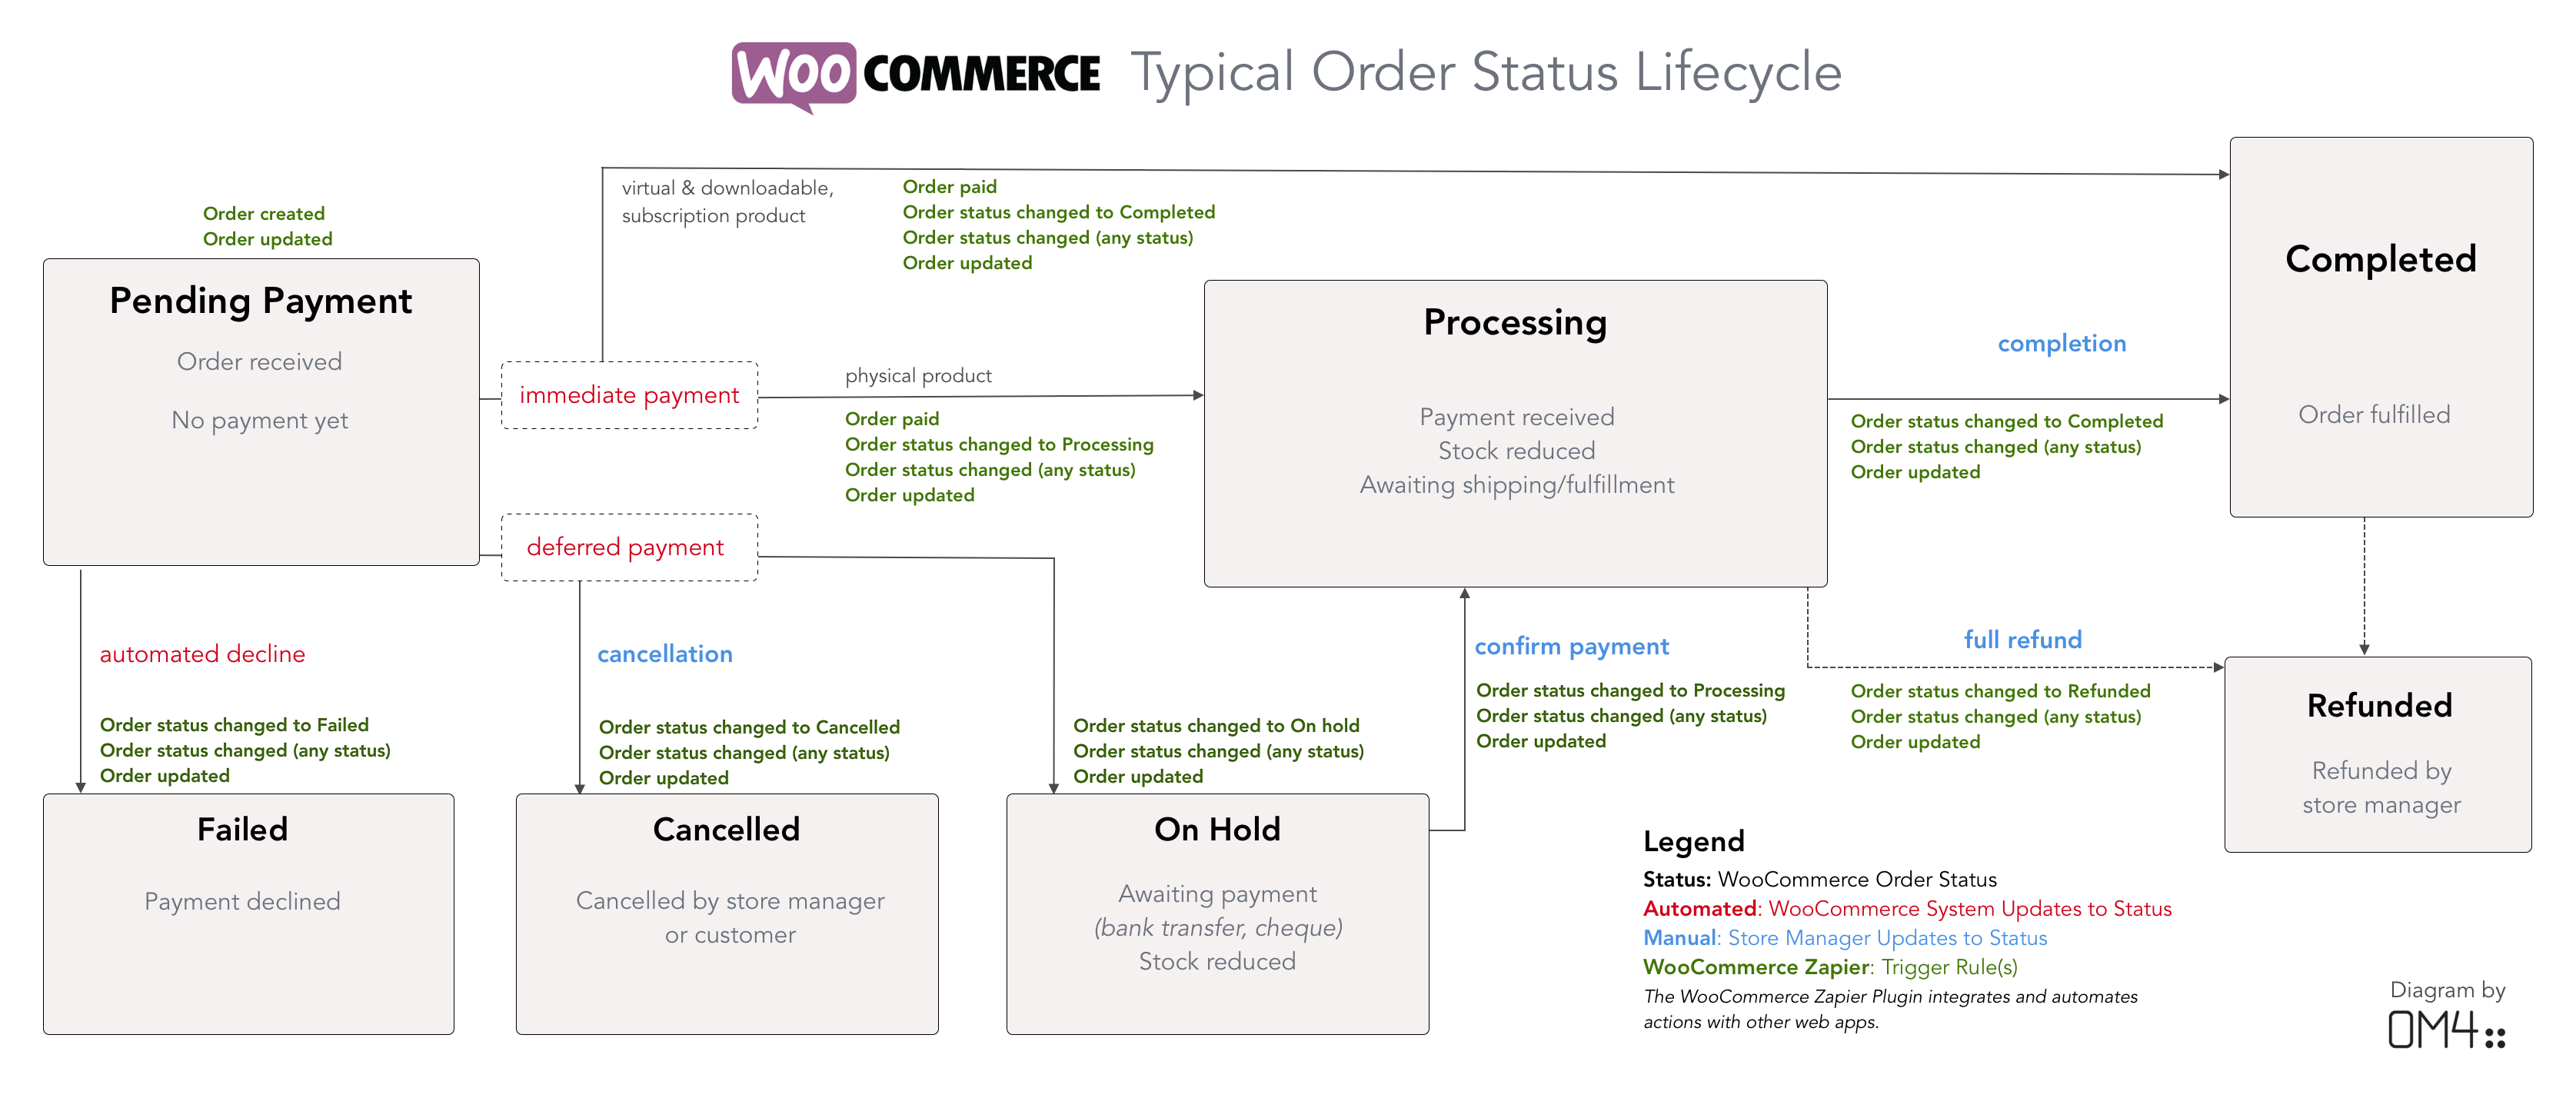
More details on the order status life cycle in WooCommerce can be found in the
WooCommerce documentation.
The
Order status changed (any status) trigger rule will trigger every time an order changes status to
any status, including when an order is first created.
If you are interested in specific status change(s) only, you may wish to use a more specific
Order status changed to … trigger rule.
Below is a full list of Order status changed trigger rules:
- Order status changed (any status)
- Order status changed to Cancelled
- Order status changed to Completed
- Order status changed to Failed
- Order status changed to On hold
- Order status changed to Processing
- Order status changed to Refunded
WooCommerce Zapier Plugin Version 2.4 Required:
Please ensure you update the WooCommerce Zapier plugin to version 2.4.0 or later to use these Trigger Rules.
WooCommerce Zapier version 2.4.0 renamed Order status changed to Order status changed (any status) to make it more clear that this trigger rule will trigger for any status change.
Order updated
Triggers when an order is updated/edited/changed/modified, including when an order is refunded.
An action is an event a Zap performs after it is triggered. Actions allow you to create new or update existing WooCommerce data from a Zap.
Searches let you find existing WooCommerce data in a Zap, and then use it later in a subsequent step.
The following actions are available for use in your Zaps to create, update or find orders.
Line-Item Enabled Data Fields: Coupon Lines, Fee Lines, Line Items, Meta Data, Shipping Lines, Refunds: To specify multiple values for these field(s), the values must be sent in a line-item aware format. Please see here for details on how the Line Itemizer can be used to achieve this.
Stock Quantity does not get updated by default:
If WooCommerce manages product inventory, creating or updating an order via Zapier does not change the stock quantity of the products in the order.
You will need to adjust it manually, for example, by adding the following steps to your Zap after the Create/Update Order step:
- Add a Looping by Zapier step to loop over each Line Item from the Order step.
- Add an Update Product Stock Quantity step to “Reduce Stock Quantity By” the total quantity of each Line Item in the order.
Create Order
Creates a new Order in WooCommerce.
Create Input Fields
Update Order
Updates (modifies) an existing Order in WooCommerce.
Note: Resource ID is Required for Update Steps:
An update action always requires a valid top-level ID to be specified. This ensures that your Zap knows which record to update. On the other hand, any non-top-level ID is optional. If you leave it empty, WooCommerce will create a new entry, such as a new Meta Data item.
To help identify the correct Resource ID, you can add a Find step before your update step. The result of your Find step will contain the Resource ID, which you can then use in the Update step.
Update Input Fields
Find Order
Searches for an existing Order in WooCommerce. Optionally create one if none are found.
We recommend using the following search fields:
- Search: Searches the Billing Address, Shipping Address, Billing Last Name or Billing Email fields for the specified string/term/phrase.
- Order ID: Searches for the specified (numeric) order ID.
Tip: Search Sort Order:
Searches return the first result found, and make it available in your Zap’s subsequent action step.
Each search has a default sort order, so when defining your Search step, you can use the Order and Orderby fields to choose (for example) whether the most recent result or the oldest result is returned from your search.
Search Input Fields
| NAME |
TYPE |
DESCRIPTION |
| Id |
integer |
Unique identifier for the resource. |
| Parent Id |
integer |
Parent order ID. |
| Number |
string |
Order number. |
| Order Key |
string |
Order key. |
| Created via |
string |
Shows where the order was created. |
| Version |
string |
Version of WooCommerce which last updated the order. |
| Status |
string |
Order status. |
| Currency |
string |
Currency the order was created with, in ISO format. |
| Date Created |
date-time |
The date the order was created, in the site’s timezone. |
| Date Modified |
date-time |
The date the order was last modified, in the site’s timezone. |
| Discount Total |
string |
Total discount amount for the order. |
| Discount Tax |
string |
Total discount tax amount for the order. |
| Shipping Total |
string |
Total shipping amount for the order. |
| Shipping Tax |
string |
Total shipping tax amount for the order. |
| Cart Tax |
string |
Sum of line item taxes only. |
| Total |
string |
Grand total. |
| Total Tax |
string |
Sum of all taxes. |
| Prices Include Tax |
boolean |
True the prices included tax during checkout. |
| Customer Id |
integer |
User ID who owns the order. 0 for guests. |
| Customer Ip Address |
string |
Customer’s IP address. |
| Customer User Agent |
string |
User agent of the customer. |
| Customer Note |
string |
Note left by customer during checkout. |
| Billing |
object |
Billing address. |
| Billing —> First Name |
string |
First name. |
| Billing —> Last Name |
string |
Last name. |
| Billing —> Company |
string |
Company name. |
| Billing —> Address 1 |
string |
Address line 1 |
| Billing —> Address 2 |
string |
Address line 2 |
| Billing —> City |
string |
City name. |
| Billing —> State |
string |
ISO code or name of the state, province or district. |
| Billing —> Postcode |
string |
Postal code. |
| Billing —> Country |
string |
Country code in ISO 3166-1 alpha-2 format. |
| Billing —> Email |
string |
Email address. |
| Billing —> Phone |
string |
Phone number. |
| Shipping |
object |
Shipping address. |
| Shipping —> First Name |
string |
First name. |
| Shipping —> Last Name |
string |
Last name. |
| Shipping —> Company |
string |
Company name. |
| Shipping —> Address 1 |
string |
Address line 1 |
| Shipping —> Address 2 |
string |
Address line 2 |
| Shipping —> City |
string |
City name. |
| Shipping —> State |
string |
ISO code or name of the state, province or district. |
| Shipping —> Postcode |
string |
Postal code. |
| Shipping —> Country |
string |
Country code in ISO 3166-1 alpha-2 format. |
| Payment Method |
string |
Payment method ID. |
| Payment Method Title |
string |
Payment method title. |
| Transaction Id |
string |
Unique transaction ID. |
| Date Paid |
date-time |
The date the order was paid, in the site’s timezone. |
| Date Completed |
date-time |
The date the order was completed, in the site’s timezone. |
| Cart Hash |
string |
MD5 hash of cart items to ensure orders are not modified. |
| Meta Data |
array |
Meta data. |
| Meta Data —> Id |
integer |
Meta ID. |
| Meta Data —> Key |
string |
Meta key. |
| Meta Data —> Value |
any |
Meta value. |
| Line Items |
array |
Line items data. |
| Line Items —> Id |
integer |
Item ID. |
| Line Items —> Name |
any |
Product name. |
| Line Items —> Parent Name |
string |
Parent product name if the product is a variation. |
| Line Items —> Product Id |
any |
Product ID. |
| Line Items —> Variation Id |
integer |
Variation ID, if applicable. |
| Line Items —> Quantity |
integer |
Quantity ordered. |
| Line Items —> Tax Class |
string |
Tax class of product. |
| Line Items —> Subtotal |
string |
Line subtotal (before discounts). |
| Line Items —> Subtotal Tax |
string |
Line subtotal tax (before discounts). |
| Line Items —> Total |
string |
Line total (after discounts). |
| Line Items —> Total Tax |
string |
Line total tax (after discounts). |
| Line Items —> Taxes |
array |
Line taxes. |
| Line Items —> Meta Data |
array |
Meta data. |
| Line Items —> Sku |
string |
Product SKU. |
| Line Items —> Price |
number |
Product price. |
| Line Items —> Image |
object |
Properties of the main product image. |
| Tax Lines |
array |
Tax lines data. |
| Tax Lines —> Id |
integer |
Item ID. |
| Tax Lines —> Rate Code |
string |
Tax rate code. |
| Tax Lines —> Rate Id |
string |
Tax rate ID. |
| Tax Lines —> Label |
string |
Tax rate label. |
| Tax Lines —> Compound |
boolean |
Show if is a compound tax rate. |
| Tax Lines —> Tax Total |
string |
Tax total (not including shipping taxes). |
| Tax Lines —> Shipping Tax Total |
string |
Shipping tax total. |
| Tax Lines —> Meta Data |
array |
Meta data. |
| Shipping Lines |
array |
Shipping lines data. |
| Shipping Lines —> Id |
integer |
Item ID. |
| Shipping Lines —> Method Title |
any |
Shipping method name. |
| Shipping Lines —> Method Id |
any |
Shipping method ID. |
| Shipping Lines —> Instance Id |
string |
Shipping instance ID. |
| Shipping Lines —> Total |
string |
Line total (after discounts). |
| Shipping Lines —> Total Tax |
string |
Line total tax (after discounts). |
| Shipping Lines —> Taxes |
array |
Line taxes. |
| Shipping Lines —> Meta Data |
array |
Meta data. |
| Fee Lines |
array |
Fee lines data. |
| Fee Lines —> Id |
integer |
Item ID. |
| Fee Lines —> Name |
any |
Fee name. |
| Fee Lines —> Tax Class |
string |
Tax class of fee. |
| Fee Lines —> Tax Status |
string |
Tax status of fee. |
| Fee Lines —> Total |
string |
Line total (after discounts). |
| Fee Lines —> Total Tax |
string |
Line total tax (after discounts). |
| Fee Lines —> Taxes |
array |
Line taxes. |
| Fee Lines —> Meta Data |
array |
Meta data. |
| Coupon Lines |
array |
Coupons line data. |
| Coupon Lines —> Id |
integer |
Item ID. |
| Coupon Lines —> Code |
any |
Coupon code. |
| Coupon Lines —> Discount |
string |
Discount total. |
| Coupon Lines —> Discount Tax |
string |
Discount total tax. |
| Coupon Lines —> Meta Data |
array |
Meta data. |
| Refunds |
array |
List of refunds. |
| Refunds —> Id |
integer |
Refund ID. |
| Refunds —> Reason |
string |
Refund reason. |
| Refunds —> Total |
string |
Refund total. |
| Payment Url |
string |
Order payment URL. |
| Is Editable |
boolean |
Whether an order can be edited. |
| Needs Payment |
boolean |
Whether an order needs payment, based on status and order total. |
| Needs Processing |
boolean |
Whether an order needs processing before it can be completed. |
> WooCommerce 8.5 Order Attribution Tracking Data:
>
ommerce 8.5 introduced an [Order Attribution Tracking](https://woocommerce.com/document/order-attribution-tracking/) feature to help store owners understand where their orders are coming from.

ou have enabled Order Attribution Tracking in your store, the data is stored in Order Meta Data, which makes it accessible in your **Order** Zaps via the following fields:

ta Data Wc Order Attribution Device Type
ta Data Wc Order Attribution Referrer
ta Data Wc Order Attribution Session Count
ta Data Wc Order Attribution Session Entry
ta Data Wc Order Attribution Session Pages
ta Data Wc Order Attribution Session Start Time
ta Data Wc Order Attribution Source Type
ta Data Wc Order Attribution User Agent
ta Data Wc Order Attribution Utm Source

 data will be available in your Zaps for all orders created after you have enabled Order Attribution Tracking in your store.
| NAME |
TYPE |
DESCRIPTION |
| Id |
string |
Combined Order ID and Product ID. |
| Order Id |
integer |
Unique identifier for the resource. |
| Order Parent Id |
integer |
Parent order ID. |
| Order Number |
string |
Order number. |
| Order Order Key |
string |
Order key. |
| Order Created via |
string |
Shows where the order was created. |
| Order Version |
string |
Version of WooCommerce which last updated the order. |
| Order Status |
string |
Order status. |
| Order Currency |
string |
Currency the order was created with, in ISO format. |
| Order Date Created |
date-time |
The date the order was created, in the site’s timezone. |
| Order Date Modified |
date-time |
The date the order was last modified, in the site’s timezone. |
| Order Discount Total |
string |
Total discount amount for the order. |
| Order Discount Tax |
string |
Total discount tax amount for the order. |
| Order Shipping Total |
string |
Total shipping amount for the order. |
| Order Shipping Tax |
string |
Total shipping tax amount for the order. |
| Order Cart Tax |
string |
Sum of line item taxes only. |
| Order Total |
string |
Grand total. |
| Order Total Tax |
string |
Sum of all taxes. |
| Order Prices Include Tax |
boolean |
True the prices included tax during checkout. |
| Order Customer Id |
integer |
User ID who owns the order. 0 for guests. |
| Order Customer Ip Address |
string |
Customer’s IP address. |
| Order Customer User Agent |
string |
User agent of the customer. |
| Order Customer Note |
string |
Note left by customer during checkout. |
| Order Billing |
object |
Billing address. |
| Order Billing —> First Name |
string |
First name. |
| Order Billing —> Last Name |
string |
Last name. |
| Order Billing —> Company |
string |
Company name. |
| Order Billing —> Address 1 |
string |
Address line 1 |
| Order Billing —> Address 2 |
string |
Address line 2 |
| Order Billing —> City |
string |
City name. |
| Order Billing —> State |
string |
ISO code or name of the state, province or district. |
| Order Billing —> Postcode |
string |
Postal code. |
| Order Billing —> Country |
string |
Country code in ISO 3166-1 alpha-2 format. |
| Order Billing —> Email |
string |
Email address. |
| Order Billing —> Phone |
string |
Phone number. |
| Order Shipping |
object |
Shipping address. |
| Order Shipping —> First Name |
string |
First name. |
| Order Shipping —> Last Name |
string |
Last name. |
| Order Shipping —> Company |
string |
Company name. |
| Order Shipping —> Address 1 |
string |
Address line 1 |
| Order Shipping —> Address 2 |
string |
Address line 2 |
| Order Shipping —> City |
string |
City name. |
| Order Shipping —> State |
string |
ISO code or name of the state, province or district. |
| Order Shipping —> Postcode |
string |
Postal code. |
| Order Shipping —> Country |
string |
Country code in ISO 3166-1 alpha-2 format. |
| Order Payment Method |
string |
Payment method ID. |
| Order Payment Method Title |
string |
Payment method title. |
| Order Transaction Id |
string |
Unique transaction ID. |
| Order Date Paid |
date-time |
The date the order was paid, in the site’s timezone. |
| Order Date Completed |
date-time |
The date the order was completed, in the site’s timezone. |
| Order Cart Hash |
string |
MD5 hash of cart items to ensure orders are not modified. |
| Order Meta Data |
array |
Meta data. |
| Order Meta Data —> Id |
integer |
Meta ID. |
| Order Meta Data —> Key |
string |
Meta key. |
| Order Meta Data —> Value |
any |
Meta value. |
| Line Id |
integer |
Item ID. |
| Line Name |
any |
Product name. |
| Line Parent Name |
string |
Parent product name if the product is a variation. |
| Line Product Id |
any |
Product ID. |
| Line Variation Id |
integer |
Variation ID, if applicable. |
| Line Quantity |
integer |
Quantity ordered. |
| Line Tax Class |
string |
Tax class of product. |
| Line Subtotal |
string |
Line subtotal (before discounts). |
| Line Subtotal Tax |
string |
Line subtotal tax (before discounts). |
| Line Total |
string |
Line total (after discounts). |
| Line Total Tax |
string |
Line total tax (after discounts). |
| Line Taxes |
array |
Line taxes. |
| Line Meta Data |
array |
Meta data. |
| Line Sku |
string |
Product SKU. |
| Line Price |
number |
Product price. |
| Line Image |
object |
Properties of the main product image. |
| Order Tax Lines |
array |
Tax lines data. |
| Order Tax Lines —> Id |
integer |
Item ID. |
| Order Tax Lines —> Rate Code |
string |
Tax rate code. |
| Order Tax Lines —> Rate Id |
string |
Tax rate ID. |
| Order Tax Lines —> Label |
string |
Tax rate label. |
| Order Tax Lines —> Compound |
boolean |
Show if is a compound tax rate. |
| Order Tax Lines —> Tax Total |
string |
Tax total (not including shipping taxes). |
| Order Tax Lines —> Shipping Tax Total |
string |
Shipping tax total. |
| Order Tax Lines —> Meta Data |
array |
Meta data. |
| Order Shipping Lines |
array |
Shipping lines data. |
| Order Shipping Lines —> Id |
integer |
Item ID. |
| Order Shipping Lines —> Method Title |
any |
Shipping method name. |
| Order Shipping Lines —> Method Id |
any |
Shipping method ID. |
| Order Shipping Lines —> Instance Id |
string |
Shipping instance ID. |
| Order Shipping Lines —> Total |
string |
Line total (after discounts). |
| Order Shipping Lines —> Total Tax |
string |
Line total tax (after discounts). |
| Order Shipping Lines —> Taxes |
array |
Line taxes. |
| Order Shipping Lines —> Meta Data |
array |
Meta data. |
| Order Fee Lines |
array |
Fee lines data. |
| Order Fee Lines —> Id |
integer |
Item ID. |
| Order Fee Lines —> Name |
any |
Fee name. |
| Order Fee Lines —> Tax Class |
string |
Tax class of fee. |
| Order Fee Lines —> Tax Status |
string |
Tax status of fee. |
| Order Fee Lines —> Total |
string |
Line total (after discounts). |
| Order Fee Lines —> Total Tax |
string |
Line total tax (after discounts). |
| Order Fee Lines —> Taxes |
array |
Line taxes. |
| Order Fee Lines —> Meta Data |
array |
Meta data. |
| Order Coupon Lines |
array |
Coupons line data. |
| Order Coupon Lines —> Id |
integer |
Item ID. |
| Order Coupon Lines —> Code |
any |
Coupon code. |
| Order Coupon Lines —> Discount |
string |
Discount total. |
| Order Coupon Lines —> Discount Tax |
string |
Discount total tax. |
| Order Coupon Lines —> Meta Data |
array |
Meta data. |
| Order Refunds |
array |
List of refunds. |
| Order Refunds —> Id |
integer |
Refund ID. |
| Order Refunds —> Reason |
string |
Refund reason. |
| Order Refunds —> Total |
string |
Refund total. |
| Order Payment Url |
string |
Order payment URL. |
| Order Is Editable |
boolean |
Whether an order can be edited. |
| Order Needs Payment |
boolean |
Whether an order needs payment, based on status and order total. |
| Order Needs Processing |
boolean |
Whether an order needs processing before it can be completed. |
> WooCommerce 8.5 Order Attribution Tracking Data:
>
ommerce 8.5 introduced an [Order Attribution Tracking](https://woocommerce.com/document/order-attribution-tracking/) feature to help store owners understand where their orders are coming from.

ou have enabled Order Attribution Tracking in your store, the data is stored in Order Meta Data, which makes it accessible in your **Line Item in an Order** Zaps via the following fields:

der Meta Data Wc Order Attribution Device Type
der Meta Data Wc Order Attribution Referrer
der Meta Data Wc Order Attribution Session Count
der Meta Data Wc Order Attribution Session Entry
der Meta Data Wc Order Attribution Session Pages
der Meta Data Wc Order Attribution Session Start Time
der Meta Data Wc Order Attribution Source Type
der Meta Data Wc Order Attribution User Agent
der Meta Data Wc Order Attribution Utm Source

 data will be available in your Zaps for all orders created after you have enabled Order Attribution Tracking in your store.
Data Fields May Differ in Your WooCommerce Store:
WooCommerce Zapier utilises WooCommerce’s REST API. Data field names, descriptions, and values can vary from one WooCommerce store to another.
Your store’s data, fields, and trigger rules may differ from this documentation due to any of the following:
- WordPress versions and the locale/language used.
- Your WooCommerce versions and the features enabled.
- Your active WordPress plugins and WooCommerce extensions.
- Any custom code that overrides or changes how the WooCommerce/WordPress REST API operates.
Note: The field definitions are generated using the following settings:
- WordPress v6.4 with the
en_US locale.
- WooCommerce v8.5 with tax and coupon functionality enabled.
- The WooCommerce Bookings, WooCommerce Memberships, and Woo Subscriptions plugins were active.
Order Note
Order Notes are the notes attached to individual orders.
They are used to keep track of internal notes, such as order status changes, fulfilment notes, or customer notes such as notes about a customer’s preferences, or order history.
When viewing an existing order in WooCommerce, you can see the order notes in the
Order notes section on the right of the screen.
WooCommerce Zapier Plugin Version 2.8 Required: Please ensure you update the WooCommerce Zapier plugin to version 2.8.0 to manage Order Notes.
A Trigger Rule defines an event (or multiple events) that will cause WooCommerce data to be sent to a Zapier Zap.
The following trigger rules are available to trigger your Zaps when order note data in your WooCommerce store is added or deleted.
Order Note created
Triggers when an order note is added to an order.
Note: The Order Note created trigger rule will trigger for all order notes that are added (both customer notes and private notes).
Order Note deleted
Triggers when an order note is deleted.
Only the ID field is available: Due to limitations in how WooCommerce handles deleted events, only the ID of the deleted resource is sent to Zapier when using this trigger rule. No other data fields are available.
Heads Up: WooCommerce does not allow updating an order note.
An action is an event a Zap performs after it is triggered. Actions allow you to create new WooCommerce data from a Zap.
Searches let you find existing WooCommerce data in a Zap, and then use it later in a subsequent step.
Create Order Note
Creates a new order note in WooCommerce, attached to an existing Order.
Tip: When creating an order note, if the Customer Note field is set to True, then the note will be emailed to the customer. If Customer Note is set to False, then the note will be private and only visible to store administrators.
Create Input Fields
Find Order Note
Searches for an existing order note in WooCommerce. Optionally create one if none are found.
Tip: Search Sort Order:
Searches return the first result found, and make it available in your Zap’s subsequent action step.
Each search has a default sort order, so when defining your Search step, you can use the Order and Orderby fields to choose (for example) whether the most recent result or the oldest result is returned from your search.
Search Input Fields
| NAME |
TYPE |
DESCRIPTION |
| Id |
integer |
Unique identifier for the resource. |
| Order Id |
integer |
Order ID |
| Author |
string |
Order note author. |
| Date Created |
date-time |
The date the order note was created, in the site’s timezone. |
| Note |
string |
Order note content. |
| Customer Note |
boolean |
If true, the note will be shown to customers and they will be notified. If false, the note will be for admin reference only. |
Data Fields May Differ in Your WooCommerce Store:
WooCommerce Zapier utilises WooCommerce’s REST API. Data field names, descriptions, and values can vary from one WooCommerce store to another.
Your store’s data, fields, and trigger rules may differ from this documentation due to any of the following:
- WordPress versions and the locale/language used.
- Your WooCommerce versions and the features enabled.
- Your active WordPress plugins and WooCommerce extensions.
- Any custom code that overrides or changes how the WooCommerce/WordPress REST API operates.
Note: The field definitions are generated using the following settings:
- WordPress v6.4 with the
en_US locale.
- WooCommerce v8.5 with tax and coupon functionality enabled.
- The WooCommerce Bookings, WooCommerce Memberships, and Woo Subscriptions plugins were active.
You can send
Products data to Zapier, or you can create or update products from an external source.
Product Types
WooCommerce comes with multiple types of products out of the box. Please consult the following tables for details.
Info: Extensions can extend available data and introduce other product types. Please see the Plugin Compatibility chapter for details.
Integration Functionality by Product Type:
| Product type |
Triggers |
Actions and Searches |
Order Context |
| Simple product |
Yes |
Yes |
Yes |
| Grouped product |
Yes |
Yes |
N/A |
| External/Affiliate product |
Yes |
Yes |
N/A |
| Variable product |
Yes |
Yes |
Yes |
| Bookable product |
Yes |
Yes |
Yes |
| Simple subscription |
Yes |
Yes |
Yes |
| Variable subscription |
Yes |
Yes |
Yes |
Data Availability by Product Type
| Product type |
Inventory |
Shipping |
Attributes |
Variations |
| Simple product |
Yes |
Yes |
Yes |
N/A |
| Grouped product |
N/A |
N/A |
Yes |
N/A |
| External/Affiliate product |
N/A |
N/A |
Yes |
N/A |
| Variable product |
Yes |
Yes |
Yes |
Yes |
| Bookable product |
N/A |
Yes |
Yes |
N/A |
| Simple subscription |
Yes |
Yes |
Yes |
N/A |
| Variable subscription |
Yes |
Yes |
Yes |
Yes |
Legends:
Yes: Supported.
N/A: Functionality or data is not provided by WooCommerce.
Product Data in Order Context
While every order contains one or more products as a line item, not all product data is included by default. Please compare the
Order Data Structure or
Line Item in an Order Data Structure with the
Product Data Structure above for availability. If you need additional product data fields while working with an Order, consider adding a
Find Product step to your Zap.
Variable Products
In WooCommerce, a product with variable attributes is constructed as multiple interconnected products. The parent product that connects everything and holds shared information, which you can edit in the WooCommerce dashboard, has a
variable product type. For each variation, a separate product is created and stored as a
product variation. This latter product holds selected attributes for the variable product. For example, an individual product variation has a price, SKU or stock level information for a particular attribute.
In the Zapier interface, you can see IDs of linked variations in the
variations field for a variable product. On the other hand, the variable product ID is visible in the
parent_id field for a product variation.
Heads Up: You can’t edit a variation name directly in the WooCommerce dashboard. Instead, the name is automatically constructed with the used product attributes and the selected values.
Sending or Receiving a Variable Product
Triggers are supported for variable products as well as their product variations. They do not behave differently from any other supported product type.
Important: – When using the Product created or Product updated trigger rules with a variable product, every individual variation will be sent as a separate task alongside the parent product task.
Actions are also supported for individual variations. I.e., you can create, update and search for a variable product, as well as its individual product variations.
WooCommerce Zapier Plugin Version 2.6 Required: Please ensure you update the WooCommerce Zapier plugin to version 2.6.0 to use this functionality.
Variable Products as Order Line Item
In
Order Triggers, when a line item represents a variable product, WooCommerce combines field data from the parent and the selected variation. While the
line_items —>
product_id (and some other field sources) are the variable product, most of the information is selected from the used product variation. For example, the actual used product ID is visible in the
line_items —>
variation_id.
For
Order Actions or Searches, you can add a variable product to an order as long you know the ID or SKU of a variation and the product already exists in your WooCommerce store.
Notable Order Field Sources:
| Field |
Source |
| line_items —> product_id |
Variable product |
| line_items —> variation_id |
Product variation |
| line_items —> name |
Product variation |
| line_items —> price |
Product variation |
| line_items —> sku |
Product variation |
| line_items —> tax_class |
Variable product |
Tip: If you want to use Zapier to create an order in WooCommerce for a variable product, consider using the individual variation’s SKU rather than variation ID.
A Trigger Rule defines an event (or multiple events) that will cause WooCommerce data to be sent to a Zapier Zap.
The following trigger rules are available to trigger your Zaps when product data in your WooCommerce store is added, changed or deleted.
Product created
Triggers when a product is created.
Triggers for every individual product variation in a variable product, and the parent product as well.
Product deleted
Triggers when a product is deleted (trashed).
Only the ID field is available: Due to limitations in how WooCommerce handles deleted events, only the ID of the deleted resource is sent to Zapier when using this trigger rule. No other data fields are available.
Product restored
Triggers when an already trashed product is restored from the trash.
Product stock low
Triggers when an existing product or product variation’s stock quantity reaches the low stock threshold.
Tip: Configuring the low stock threshold:
The default low stock threshold for your store can be configured in WooCommerce —> Settings —> Products —> Inventory then entering a value in the Low stock threshold field.
The low stock threshold can also be configured on a per-product basis by editing the product in WooCommerce, and then:
- For regular products, go to the Product Data —> Inventory —> Low stock threshold field and enter a value in the Low stock threshold field and save the product.
- For individual variations, go to the Product Data —> Variations tab and for each variation enter a value in the Low stock threshold field and save each variation.
Stock management must be enabled for each product:
The default stock management feature for your store can be configured in WooCommerce → Settings → Products → Inventory —> Manage stock checkbox. (Enabled by default).
Stock management feature must be enabled for a product as well for this trigger rule to work:
- For regular products, go to Product Data —> Inventory —> Stock management —> then ticking the Track stock quantity for this product and saving the product.
- For individual variations, edit the product in WooCommerce, then go to Product Data —> Variations, then edit each variation and tick the Manage stock? checkbox and save each variation.
WooCommerce Zapier Plugin Version 2.6 Required: Please ensure you update the WooCommerce Zapier plugin to version 2.6.0 to use this functionality.
Product stock status changed
Product stock statuses in WooCommerce are an important aspect of product management in WooCommerce.
The standard product stock statuses in WooCommerce are:
- In stock
- On backorder
- Out of stock
If your product has stock management enabled, then the stock status of your product will change automatically based on the stock quantity of your product.
Below is a full list of Product stock status changed trigger rules:
- Product stock status changed (any status)
- Product stock status changed to in stock
- Product stock status changed to on backorder
- Product stock status changed to out of stock
The
Product stock status changed (any status) trigger rule will trigger every time an existing product changes status to
any status.
If you are interested in specific product stock status change(s) only, you may wish to use a more specific
Product stock changed to … trigger rule.
Stock management must be enabled for each product:
The default stock management feature for your store can be configured in WooCommerce → Settings → Products → Inventory —> Manage stock checkbox. (Enabled by default).
Stock management feature must be enabled for a product as well for this trigger rule to work:
- For regular products, go to Product Data —> Inventory —> Stock management —> then ticking the Track stock quantity for this product and saving the product.
- For individual variations, edit the product in WooCommerce, then go to Product Data —> Variations, then edit each variation and tick the Manage stock? checkbox and save each variation.
WooCommerce Zapier Plugin Version 2.6 Required: Please ensure you update the WooCommerce Zapier plugin to version 2.6.0 to use this functionality.
Product updated
Triggers when a product is updated/edited/changed/modified.
Triggers for every individual product variation in a variable product, and the parent product as well.
An action is an event a Zap performs after it is triggered. Actions allow you to create new or update existing WooCommerce data from a Zap.
Searches let you find existing WooCommerce data in a Zap, and then use it later in a subsequent step.
The following actions are available for use in your Zaps to create, update or find products.
Line-Item Enabled Data Fields: Downloads, Categories, Images, Attributes, Meta Data: To specify multiple values for these field(s), the values must be sent in a line-item aware format. Please see here for details on how the Line Itemizer can be used to achieve this.
Create Product
Creates a new product or product variation in WooCommerce.
Creating a Variable Product
To create a variable product, set
Type to
variable or
variable-subscription, and specify one or more product
Attributes with
Variation set to
true.
For example, to create a variable product with a custom
Size attribute, you would specify something like the following:
- Type:
variable
- Attributes —> Name:
Size
- Attributes —> Variation:
true
- Attributes —> Options:
Small, Medium, Large
If you already have a store-wide global attribute named
Size, you can use that instead of creating a new custom attribute:
- Type:
variable
- Attributes —> Name:
pa_size (or whatever the slug of the global attribute is)
- Attributes —> Variation:
true
- Attributes —> Options:
Small, Medium, Large
Once the Create Product action has been run, you can then create product variation(s) using a subsequent
Create Product action(s).
WooCommerce Zapier Plugin Version 2.6 Required: Please ensure you update the WooCommerce Zapier plugin to version 2.6.0 to use this functionality.
Creating a Variation
To create a product variation, you must already have its parent Variable Product or Variable Subscription Product
created.
In the
Create Product step, set
Type to
variation or
subscription_variation, and then in the
Parent Id field, enter the ID of the parent variable product that the variation should belong to:
- Type:
variation
- Parent Id —>
123 (where 123 is the ID of the parent variable product)
- Attributes —> Name:
Size
- Attributes —> Option:
Small
The above example will create a new variation with a Size of Small.
WooCommerce Zapier Plugin Version 2.6 Required: Please ensure you update the WooCommerce Zapier plugin to version 2.6.0 to use this functionality.
Create Input Fields
Update Product
Updates (modifies) an existing product or production variation in WooCommerce.
This action lets you change almost any aspect of an existing product. See the
Update Product Data Fields section for a full list of fields that can be updated.
If you would like to update the product’s pricing or stock quantity, we recommend using the dedicated
Update Product Price or
Update Product Stock Quantity actions instead. These separate actions also support relative price and stock quantity adjustments.
Note: Resource ID is Required for Update Steps:
An update action always requires a valid top-level ID to be specified. This ensures that your Zap knows which record to update. On the other hand, any non-top-level ID is optional. If you leave it empty, WooCommerce will create a new entry, such as a new Meta Data item.
To help identify the correct Resource ID, you can add a Find step before your update step. The result of your Find step will contain the Resource ID, which you can then use in the Update step.
Updating a Product Variation
To update a product variation, set the
ID field to the individual variation’s ID.
Updating Variation Attributes: You must specify all or none of the Attributes fields for a variation. If any attribute is present, any other attributes that are not specified will be removed from the variation.
WooCommerce Zapier Plugin Version 2.6 Required: Please ensure you update the WooCommerce Zapier plugin to version 2.6.0 to use this functionality.
Update Input Fields
Update Product Price
WooCommerce Zapier Plugin Version 2.6 Required: Please ensure you update the WooCommerce Zapier plugin to version 2.6.0 to use this functionality.
Modifies an existing product or product variation’s regular price or sale price in WooCommerce.
This action targets a specific product or product variation by SKU or ID. It also supports the calculation of new (relative) prices by increasing or decreasing the prices by the specified amount or percentage.
It also allows users to set a product’s sale price relative to the product’s regular price.
Note: You can use ID or SKU to identify a product to update in this action: A valid SKU or a valid ID can be used in your Zap to identify which existing product to update.
The following adjustment types are available for use in this action:
- Set Regular Price To
- Increase Regular Price By (fixed amount or percentage)
- Decrease Regular Price By (fixed amount or percentage)
- Set Sale Price To
- Increase Sale Price By (fixed amount or percentage)
- Decrease Sale Price By (fixed amount or percentage)
- Set Sale Price to Regular Price Decreased By (fixed amount or percentage)
This action returns a subset of the product data fields. See the
Update Product Price Data Fields section for more information.
Update Product Price Data Fields
| NAME |
TYPE |
DESCRIPTION |
| Id |
integer |
Unique identifier for the resource |
| Sku |
string |
Unique identifier |
| Price |
string |
Current product price |
| Regular Price |
string |
Product regular price |
| Sale Price |
string |
Product sale price |
| On Sale |
boolean |
Shows if the product is on sale |
Update Product Stock Quantity
WooCommerce Zapier Plugin Version 2.5 Required: Please ensure you update the WooCommerce Zapier plugin to version 2.5.0 to use this Action.
Modifies an existing product or product variation’s stock quantity in WooCommerce.
Tip: Stock management must be enabled for each product:
WooCommerce’s stock management feature must be enabled for each product you want to update using this action.
This can be done by editing the product in WooCommerce, then going to Product Data —> Inventory —> Stock management —> then ticking the Track stock quantity for this product checkbox and saving.
For individual variations, edit the product in WooCommerce, then go to Product Data —> Variations, then edit each variation and tick the Manage stock? checkbox and save.
This action targets a specific product or product variation by SKU or ID. It also supports the calculation of new (relative) stock quantity by increasing or reducing the current stock quantity by the specified amount.
Note: You can use ID or SKU to identify a product to update in this action: A valid SKU or a valid ID can be used in your Zap to identify which existing product to update.
The following adjustment types are available for use in this action:
- Set Stock Quantity To
- Increase Stock Quantity By
- Reduce Stock Quantity By
This action returns a subset of the product data fields. See the
Update Product Stock Quantity Data Fields section for more information.
When this action runs, it will automatically set the relevant product’s
Stock Status to
In Stock or
Out of Stock depending on the new stock quantity. If the product has backorders enabled, then the
Stock Status will be set to
On Backorder when the quantity goes to zero or negative
Update Product Stock Quantity Data Fields
| NAME |
TYPE |
DESCRIPTION |
| Id |
integer |
Unique identifier for the resource |
| Sku |
string |
Unique identifier |
| Stock Quantity |
integer |
Stock quantity |
| Stock Status |
string |
Controls the stock status of the product |
Find Product
Searches for an existing product or product variation in WooCommerce. Optionally create one if none are found.
All available search fields can be viewed here. We recommend using the following search fields:
- SKU: Searches for the specified product SKU.
- Product ID: Searches for the specified (numeric) product or variation ID.
- Search: Searches the Product Name and Product Description fields for the specified string/term/phrase.
Finding Top-Level Products Only:
By default, a Find Product step will search across all product types, including product variations.
If you only want to find top-level products (i.e. not variations), then you can use the Parent Id search field and set it to 0 (zero).
Tip: Finding Products from Orders: Please see here for some suggestions on how to find WooCommerce products from WooCommerce Order Line Items.
Tip: Search Sort Order:
Searches return the first result found, and make it available in your Zap’s subsequent action step.
Each search has a default sort order, so when defining your Search step, you can use the Order and Orderby fields to choose (for example) whether the most recent result or the oldest result is returned from your search.
WooCommerce Zapier Plugin Version 2.6 Required: Please ensure you update the WooCommerce Zapier plugin to version 2.6.0 to use this functionality.
Search Input Fields
| NAME |
TYPE |
DESCRIPTION |
| Id |
integer |
Unique identifier for the resource. |
| Name |
string |
Product name. |
| Slug |
string |
Product slug. |
| Permalink |
string |
Product URL. |
| Date Created |
date-time |
The date the product was created, in the site’s timezone. |
| Date Modified |
date-time |
The date the product was last modified, in the site’s timezone. |
| Type |
string |
Product type. |
| Status |
string |
Product status (post status). |
| Featured |
boolean |
Featured product. |
| Catalog Visibility |
string |
Catalog visibility. |
| Description |
string |
Product description. |
| Short Description |
string |
Product short description. |
| Sku |
string |
Unique identifier. |
| Price |
string |
Current product price. |
| Regular Price |
string |
Product regular price. |
| Sale Price |
string |
Product sale price. |
| Date on Sale from |
date-time |
Start date of sale price, in the site’s timezone. |
| Date on Sale to |
date-time |
End date of sale price, in the site’s timezone. |
| Price Html |
string |
Price formatted in HTML. |
| On Sale |
boolean |
Shows if the product is on sale. |
| Purchasable |
boolean |
Shows if the product can be bought. |
| Total Sales |
integer |
Amount of sales. |
| Virtual |
boolean |
If the product is virtual. |
| Downloadable |
boolean |
If the product is downloadable. |
| Downloads |
array |
List of downloadable files. |
| Downloads —> Id |
string |
File ID. |
| Downloads —> Name |
string |
File name. |
| Downloads —> File |
string |
File URL. |
| Download Limit |
integer |
Number of times downloadable files can be downloaded after purchase. |
| Download Expiry |
integer |
Number of days until access to downloadable files expires. |
| External Url |
string |
Product external URL. Only for external products. |
| Button Text |
string |
Product external button text. Only for external products. |
| Tax Status |
string |
Tax status. |
| Tax Class |
string |
Tax class. |
| Manage Stock |
boolean |
Stock management at product level. |
| Stock Quantity |
integer |
Stock quantity. |
| Stock Status |
string |
Controls the stock status of the product. |
| Backorders |
string |
If managing stock, this controls if backorders are allowed. |
| Backorders Allowed |
boolean |
Shows if backorders are allowed. |
| Backordered |
boolean |
Shows if the product is on backordered. |
| Low Stock Amount |
integer |
Low Stock amount for the product. |
| Sold Individually |
boolean |
Allow one item to be bought in a single order. |
| Weight |
string |
Product weight (kg). |
| Dimensions |
object |
Product dimensions. |
| Dimensions —> Length |
string |
Product length (cm). |
| Dimensions —> Width |
string |
Product width (cm). |
| Dimensions —> Height |
string |
Product height (cm). |
| Shipping Required |
boolean |
Shows if the product need to be shipped. |
| Shipping Taxable |
boolean |
Shows whether or not the product shipping is taxable. |
| Shipping Class |
string |
Shipping class slug. |
| Shipping Class Id |
string |
Shipping class ID. |
| Reviews Allowed |
boolean |
Allow reviews. |
| Post Password |
string |
Post password. |
| Average Rating |
string |
Reviews average rating. |
| Rating Count |
integer |
Amount of reviews that the product have. |
| Related Ids |
array |
List of related products IDs. |
| Upsell Ids |
array |
List of up-sell products IDs. |
| Cross Sell Ids |
array |
List of cross-sell products IDs. |
| Parent Id |
integer |
Product parent ID. |
| Purchase Note |
string |
Optional note to send the customer after purchase. |
| Categories |
array |
List of categories. |
| Categories —> Id |
integer |
Category ID. |
| Categories —> Name |
string |
Category name. |
| Categories —> Slug |
string |
Category slug. |
| Tags |
array |
List of tags. |
| Tags —> Id |
integer |
Tag ID. |
| Tags —> Name |
string |
Tag name. |
| Tags —> Slug |
string |
Tag slug. |
| Images |
array |
List of images. |
| Images —> Id |
integer |
Image ID. |
| Images —> Date Created |
date-time |
The date the image was created, in the site’s timezone. |
| Images —> Date Modified |
date-time |
The date the image was last modified, in the site’s timezone. |
| Images —> Src |
string |
Image URL. |
| Images —> Name |
string |
Image name. |
| Images —> Alt |
string |
Image alternative text. |
| Has Options |
boolean |
Shows if the product needs to be configured before it can be bought. |
| Attributes |
array |
List of attributes. |
| Attributes —> Id |
integer |
Attribute ID. |
| Attributes —> Name |
string |
Attribute name. |
| Attributes —> Position |
integer |
Attribute position. |
| Attributes —> Visible |
boolean |
Define if the attribute is visible on the “Additional information” tab in the product’s page. |
| Attributes —> Variation |
boolean |
Define if the attribute can be used as variation. |
| Attributes —> Options |
array |
List of available term names of the attribute. |
| Default Attributes |
array |
Defaults variation attributes. |
| Default Attributes —> Id |
integer |
Attribute ID. |
| Default Attributes —> Name |
string |
Attribute name. |
| Default Attributes —> Option |
string |
Selected attribute term name. |
| Variations |
array |
List of variations IDs. |
| Grouped Products |
array |
List of grouped products ID. |
| Menu Order |
integer |
Menu order, used to custom sort products. |
| Meta Data |
array |
Meta data. |
| Meta Data —> Id |
integer |
Meta ID. |
| Meta Data —> Key |
string |
Meta key. |
| Meta Data —> Value |
any |
Meta value. |
Data Fields May Differ in Your WooCommerce Store:
WooCommerce Zapier utilises WooCommerce’s REST API. Data field names, descriptions, and values can vary from one WooCommerce store to another.
Your store’s data, fields, and trigger rules may differ from this documentation due to any of the following:
- WordPress versions and the locale/language used.
- Your WooCommerce versions and the features enabled.
- Your active WordPress plugins and WooCommerce extensions.
- Any custom code that overrides or changes how the WooCommerce/WordPress REST API operates.
Note: The field definitions are generated using the following settings:
- WordPress v6.4 with the
en_US locale.
- WooCommerce v8.5 with tax and coupon functionality enabled.
- The WooCommerce Bookings, WooCommerce Memberships, and Woo Subscriptions plugins were active.
The
Customer resource represents a buyer who registers to your site. If you are relying on this resource, you can enforce registration by disabling
Guest Checkout.
Tip: WooCommerce stores customer data alongside WordPress user data. If you customise WordPress Roles and Capabilities feature, make sure to not rename the Customer role, it may interfere with the plugin functionality.
A Trigger Rule defines an event (or multiple events) that will cause WooCommerce data to be sent to a Zapier Zap.
The following trigger rules are available to trigger your Zaps when customer data in your WooCommerce store is added, changed or deleted.
What is a Customer?: A Customer in WooCommerce is someone with a user account to log in to your store. People purchasing as a guest (without logging into an account) are not considered customers.
Customer created
Triggers when:
- a customer registers (creates an account) in your WooCommerce store.
- a WordPress user account (with any role) is created.
Tip: For this to trigger, your WooCommerce store would normally be configured to allow customers to create an account.
Note: This trigger rule does not trigger when someone purchases as a guest without registering for an account. Please use one of the Order trigger rules if you would like guest purchases to be sent to Zapier.
Customer deleted
Triggers when a customer is deleted.
Note: There is no trash functionality for customers (users) in WordPress.
Only the ID field is available: Due to limitations in how WooCommerce handles deleted events, only the ID of the deleted resource is sent to Zapier when using this trigger rule. No other data fields are available.
Customer updated
Triggers when a customer (or any WordPress user) is updated/edited/changed/modified.
The following actions are available for use in your Zaps to create, update or find customers.
What is a Customer?: A Customer in WooCommerce is someone with a user account to log in to your store. People purchasing as a guest (without logging into an account) are not considered customers.
Line-Item Enabled Data Field: Meta Data: To specify multiple values for these field(s), the values must be sent in a line-item aware format. Please see here for details on how the Line Itemizer can be used to achieve this.
Create Customer
Creates a new Customer in WooCommerce.
Create Input Fields
Update Customer
Updates (modifies) an existing Customer in WooCommerce.
Note: Resource ID is Required for Update Steps:
An update action always requires a valid top-level ID to be specified. This ensures that your Zap knows which record to update. On the other hand, any non-top-level ID is optional. If you leave it empty, WooCommerce will create a new entry, such as a new Meta Data item.
To help identify the correct Resource ID, you can add a Find step before your update step. The result of your Find step will contain the Resource ID, which you can then use in the Update step.
Update Input Fields
Find Customer
Searches for an existing Customer in WooCommerce. Optionally create one if none are found.
All available search fields can be viewed below. We recommend using the following search fields:
- Email: Searches for the specified customer email address.
- Search: Searches the Customer Username, Customer Email, Customer URL, Customer Display Name fields for the specified string/term/phrase.
- Customer ID: Searches for the specified (numeric) customer ID.
User Roles:
The default search behaviour when searching for Customers is to limit the search to users with the “Customer” Role. However, if you want to broaden the result, please select another item in the dropdown. For example, you can choose “All” to search for every user of the WooCommerce store, including administrators.
Consult the search fields table for available Roles.
WordPress Multisite:
If you are using the Create WooCommerce Customer if it doesn’t exist yet option in your Find Customer Zap, and you are also using WordPress multisite, please read the following.
The following error can occur if an email address exists in your multisite network, but isn’t assigned as a customer on an individual site in your network:
Communication error. 400 Bad Request.
registration-error-email-exists
An account is already registered with your email address. Please log in.
This is a limitation in how Multisite is designed, and how WooCommerce itself is designed to work with multisite.
WordPress Multisite stores user (and thus customer) accounts in one place (network-wide), and is then added to an individual site in your network when required.
If you encounter this error, the workaround is to go to WordPress Dashboard → Side Menu → Users → Add New and manually add the user with a Customer role to your sub-site.
Tip: Search Sort Order:
Searches return the first result found, and make it available in your Zap’s subsequent action step.
Each search has a default sort order, so when defining your Search step, you can use the Order and Orderby fields to choose (for example) whether the most recent result or the oldest result is returned from your search.
Search Input Fields
| NAME |
TYPE |
DESCRIPTION |
| Id |
integer |
Unique identifier for the resource. |
| Date Created |
date-time |
The date the customer was created, in the site’s timezone. |
| Date Modified |
date-time |
The date the customer was last modified, in the site’s timezone. |
| Email |
string |
The email address for the customer. |
| First Name |
string |
Customer first name. |
| Last Name |
string |
Customer last name. |
| Role |
string |
Customer role. |
| Username |
string |
Customer login name. |
| Billing |
object |
List of billing address data. |
| Billing —> First Name |
string |
First name. |
| Billing —> Last Name |
string |
Last name. |
| Billing —> Company |
string |
Company name. |
| Billing —> Address 1 |
string |
Address line 1 |
| Billing —> Address 2 |
string |
Address line 2 |
| Billing —> City |
string |
City name. |
| Billing —> State |
string |
ISO code or name of the state, province or district. |
| Billing —> Postcode |
string |
Postal code. |
| Billing —> Country |
string |
ISO code of the country. |
| Billing —> Email |
string |
Email address. |
| Billing —> Phone |
string |
Phone number. |
| Shipping |
object |
List of shipping address data. |
| Shipping —> First Name |
string |
First name. |
| Shipping —> Last Name |
string |
Last name. |
| Shipping —> Company |
string |
Company name. |
| Shipping —> Address 1 |
string |
Address line 1 |
| Shipping —> Address 2 |
string |
Address line 2 |
| Shipping —> City |
string |
City name. |
| Shipping —> State |
string |
ISO code or name of the state, province or district. |
| Shipping —> Postcode |
string |
Postal code. |
| Shipping —> Country |
string |
ISO code of the country. |
| Shipping —> Phone |
string |
Phone number. |
| Is Paying Customer |
boolean |
Is the customer a paying customer? |
| Avatar Url |
string |
Avatar URL. |
| Meta Data |
array |
Meta data. |
| Meta Data —> Id |
integer |
Meta ID. |
| Meta Data —> Key |
string |
Meta key. |
| Meta Data —> Value |
any |
Meta value. |
Data Fields May Differ in Your WooCommerce Store:
WooCommerce Zapier utilises WooCommerce’s REST API. Data field names, descriptions, and values can vary from one WooCommerce store to another.
Your store’s data, fields, and trigger rules may differ from this documentation due to any of the following:
- WordPress versions and the locale/language used.
- Your WooCommerce versions and the features enabled.
- Your active WordPress plugins and WooCommerce extensions.
- Any custom code that overrides or changes how the WooCommerce/WordPress REST API operates.
Note: The field definitions are generated using the following settings:
- WordPress v6.4 with the
en_US locale.
- WooCommerce v8.5 with tax and coupon functionality enabled.
- The WooCommerce Bookings, WooCommerce Memberships, and Woo Subscriptions plugins were active.
Only available if the Coupon functionality is enabled in your WooCommerce store. (Enabled by default).
A Trigger Rule defines an event (or multiple events) that will cause WooCommerce data to be sent to a Zapier Zap.
The following trigger rules are available to trigger your Zaps when coupon data in your WooCommerce store is added, changed or deleted.
Coupon created
Triggers when a coupon is created.
Coupon deleted
Triggers when a coupon is deleted (trashed).
Only the ID field is available: Due to limitations in how WooCommerce handles deleted events, only the ID of the deleted resource is sent to Zapier when using this trigger rule. No other data fields are available.
Coupon restored
Triggers when an already trashed coupon is restored from the trash.
Coupon updated
Triggers when a coupon is updated/edited/changed/modified.
The following actions are available for use in your Zaps to create, update or find coupons.
Line-Item Enabled Data Field: Meta Data: To specify multiple values for these field(s), the values must be sent in a line-item aware format. Please see here for details on how the Line Itemizer can be used to achieve this.
Create Coupon
Creates a new Coupon in WooCommerce.
A common use case of this action is to automatically create a unique coupon code for each customer that joins your mailing list.
To achieve this, in your Zap’s
Create Coupon action, you would set the
Email Restrictions data field to your customer’s email address from the Trigger (step 1) part of your Zap:

When automatically creating Coupons in Zaps, it’s usually best to use simple, unique alphanumeric coupon codes.
You can add a
Code by Zapier step to your Zap which automatically generates an alphanumeric coupon code (a-z, 0-9 and hyphens only) based on the customer’s email address:
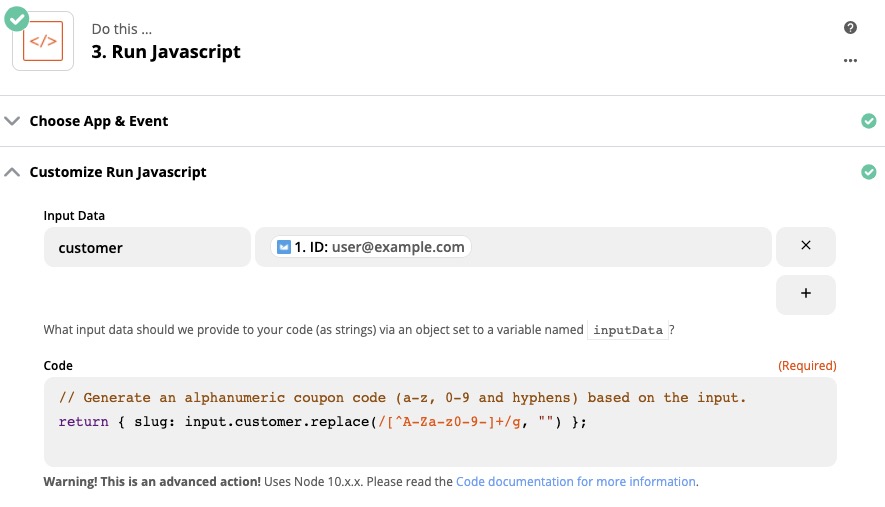
Input Data:
customer —> User Email Address From Step 1 in Your Zap (or any other uniquely identifiable information such as a customer name).
// Generate an alphanumeric coupon code
// (a-z, 0-9 and hyphens) based on the input.
return { slug: input.customer.replace(/[^A-Za-z0-9-]+/g, "") };
You can then use the result of this Code by Zapier step in your
Create Coupon action:
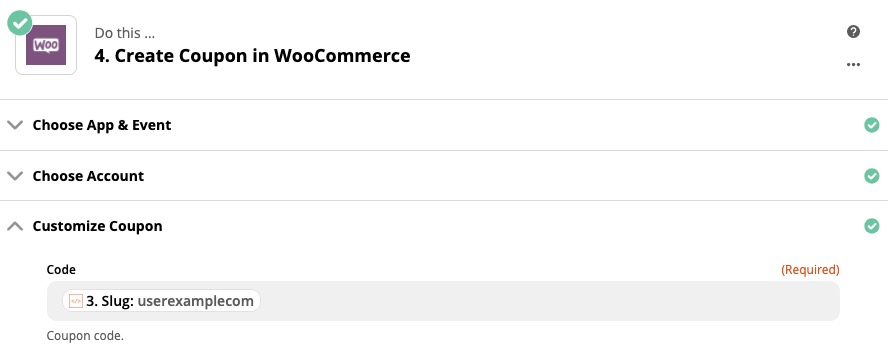
Tip: Using the WooCommerce URL Coupons Extension?: Please see here for some suggestions.
Create Input Fields
Update Coupon
Updates (modifies) an existing Coupon in WooCommerce.
Note: Resource ID is Required for Update Steps:
An update action always requires a valid top-level ID to be specified. This ensures that your Zap knows which record to update. On the other hand, any non-top-level ID is optional. If you leave it empty, WooCommerce will create a new entry, such as a new Meta Data item.
To help identify the correct Resource ID, you can add a Find step before your update step. The result of your Find step will contain the Resource ID, which you can then use in the Update step.
Update Input Fields
Find Coupon
Searches for an existing Coupon in WooCommerce. Optionally create one if none are found.
All available search fields can be viewed here. We recommend using the following search fields:
- Code: Searches for the specified coupon code.
- Search: Searches the Coupon Name and Coupon Description fields for the specified string/term/phrase.
- Coupon ID: Searches for the specified (numeric) coupon ID.
Tip: Search Sort Order:
Searches return the first result found, and make it available in your Zap’s subsequent action step.
Each search has a default sort order, so when defining your Search step, you can use the Order and Orderby fields to choose (for example) whether the most recent result or the oldest result is returned from your search.
Search Input Fields
| NAME |
TYPE |
DESCRIPTION |
| Id |
integer |
Unique identifier for the object. |
| Code |
string |
Coupon code. |
| Amount |
string |
The amount of discount. Should always be numeric, even if setting a percentage. |
| Status |
string |
The status of the coupon. Should always be draft, published, or pending review |
| Date Created |
date-time |
The date the coupon was created, in the site’s timezone. |
| Date Modified |
date-time |
The date the coupon was last modified, in the site’s timezone. |
| Discount Type |
string |
Determines the type of discount that will be applied. |
| Description |
string |
Coupon description. |
| Date Expires |
date-time |
The date the coupon expires, in the site’s timezone. |
| Usage Count |
integer |
Number of times the coupon has been used already. |
| Individual Use |
boolean |
If true, the coupon can only be used individually. Other applied coupons will be removed from the cart. |
| Product Ids |
array |
List of product IDs the coupon can be used on. |
| Excluded Product Ids |
array |
List of product IDs the coupon cannot be used on. |
| Usage Limit |
integer |
How many times the coupon can be used in total. |
| Usage Limit per User |
integer |
How many times the coupon can be used per customer. |
| Limit Usage to X Items |
integer |
Max number of items in the cart the coupon can be applied to. |
| Free Shipping |
boolean |
If true and if the free shipping method requires a coupon, this coupon will enable free shipping. |
| Product Categories |
array |
List of category IDs the coupon applies to. |
| Excluded Product Categories |
array |
List of category IDs the coupon does not apply to. |
| Exclude Sale Items |
boolean |
If true, this coupon will not be applied to items that have sale prices. |
| Minimum Amount |
string |
Minimum order amount that needs to be in the cart before coupon applies. |
| Maximum Amount |
string |
Maximum order amount allowed when using the coupon. |
| Email Restrictions |
array |
List of email addresses that can use this coupon. |
| Used by |
array |
List of user IDs (or guest email addresses) that have used the coupon. |
| Meta Data |
array |
Meta data. |
| Meta Data —> Id |
integer |
Meta ID. |
| Meta Data —> Key |
string |
Meta key. |
| Meta Data —> Value |
any |
Meta value. |
Data Fields May Differ in Your WooCommerce Store:
WooCommerce Zapier utilises WooCommerce’s REST API. Data field names, descriptions, and values can vary from one WooCommerce store to another.
Your store’s data, fields, and trigger rules may differ from this documentation due to any of the following:
- WordPress versions and the locale/language used.
- Your WooCommerce versions and the features enabled.
- Your active WordPress plugins and WooCommerce extensions.
- Any custom code that overrides or changes how the WooCommerce/WordPress REST API operates.
Note: The field definitions are generated using the following settings:
- WordPress v6.4 with the
en_US locale.
- WooCommerce v8.5 with tax and coupon functionality enabled.
- The WooCommerce Bookings, WooCommerce Memberships, and Woo Subscriptions plugins were active.
The
Booking resource represents a booked timeslot, as described in the
WooCommerce Bookings plugin. See the
Bookings documentation for more details.
Please see the
Product chapter for information about the
Bookable product.
Please see the
announcement post for some examples of how you could use WooCommerce Booking data in your Zaps.
Only available if the WooCommerce Bookings plugin is installed.:
You may choose Booking in the Zapier.com interface without installing the WooCommerce Bookings plugin, however, the functionality will not work without WooCommerce Bookings, which is sold separately by WooCommerce.
The minimum required WooCommerce Bookings version is 1.15.55.
Please ensure you are using WooCommerce Zapier plugin version 2.2.0 or later.
The following trigger rules are available to trigger your Zaps when booking data in your WooCommerce store is added, changed or deleted.
Booking cancelled
Triggers when a booking is cancelled. Either by the customer, an administrator or automatically if the order is not finished.
Booking created
Triggers when a booking is first created.
Note:
The Booking created trigger rule will trigger when a customer adds a bookable product to their cart. Before they proceed to the checkout to complete and pay for their order.
If you would like to trigger your Zap only when you receive a paid booking, then consider using the Booking ordered trigger rule instead.
Booking deleted
Triggers when a booking is deleted (trashed).
Only the ID field is available: Due to limitations in how WooCommerce handles deleted events, only the ID of the deleted resource is sent to Zapier when using this trigger rule. No other data fields are available.
Booking ordered
Triggers when an order is placed containing a booking, which is the same time that the
Order created trigger rule.
Booking restored
Triggers when an already trashed booking is restored from the trash.
Booking status changed
Booking statuses are an important part of the booking processing and fulfilment flow in WooCommerce.
More details on the booking status life cycle in WooCommerce can be found in the
WooCommerce Bookings documentation.
The
Booking status changed (any status) trigger rule will trigger every time a booking changes status to
any status, including when a booking is first created.
If you are interested in specific status change(s) only, you may wish to use a more specific
Booking status changed to … trigger rule.
Below is a full list of Booking status changed trigger rules:
- Booking status changed (any status)
- Booking status changed to Cancelled
- Booking status changed to Complete
- Booking status changed to Confirmed
- Booking status changed to In Cart
- Booking status changed to Paid
- Booking status changed to Pending Confirmation
WooCommerce Zapier Plugin Version 2.4 Required:
Please ensure you update the WooCommerce Zapier plugin to version 2.4.0 or later to use these Trigger Rules.
WooCommerce Zapier version 2.4.0 renamed Booking status changed to Booking status changed (any status) to make it more clear that this trigger rule will trigger for any status change.
Booking updated
Triggers when a booking is updated/edited/changed/modified, including any status change.
Not available.
| NAME |
TYPE |
DESCRIPTION |
| Id |
integer |
Unique identifier for the resource |
| All Day |
boolean |
A boolean describing if the booking is for an entire day. |
| Cost |
string |
Total booking cost. |
| Customer Id |
integer |
ID of customer that purchased the booking. |
| Date Created |
date-time |
The time the booking was created. |
| Date Modified |
date-time |
The time the booking was last updated. |
| Date End |
date-time |
The end time of the booking. |
| Google Calendar Event Id |
string |
A unique ID of a synced booking event to Google Calendar. |
| Order Id |
integer |
The order ID linked to the booking. |
| Order Item Id |
integer |
The unique order line item ID of the booking. |
| Parent Id |
integer |
The unique item ID of the parent post. |
| Person Counts |
array |
The number of persons by person type within the booking. |
| Product Id |
integer |
The unique product ID linked to the booking. |
| Resource Id |
integer |
The unique resource ID linked to the booking. |
| Date Start |
date-time |
The start time of the booking. |
| Status |
string |
The current status of the booking. |
| Local Timezone |
string |
The local timezone used when the booking was purchased. |
Data Fields May Differ in Your WooCommerce Store:
WooCommerce Zapier utilises WooCommerce’s REST API. Data field names, descriptions, and values can vary from one WooCommerce store to another.
Your store’s data, fields, and trigger rules may differ from this documentation due to any of the following:
- WordPress versions and the locale/language used.
- Your WooCommerce versions and the features enabled.
- Your active WordPress plugins and WooCommerce extensions.
- Any custom code that overrides or changes how the WooCommerce/WordPress REST API operates.
Note: The field definitions are generated using the following settings:
- WordPress v6.4 with the
en_US locale.
- WooCommerce v8.5 with tax and coupon functionality enabled.
- The WooCommerce Bookings, WooCommerce Memberships, and Woo Subscriptions plugins were active.
Membership Plan
The
Membership Plan resource is a collection of settings and conditions according to which customers can gain access to restricted content, products, and member-only discounts, among other benefits.
This resource is described in the
WooCommerce Memberships plugin. For more details, see the
WooCommerce Memberships Plans documentation.
Other Membership Resource:
In addition to Membership Plans, there is another resource that can be accessed in the Zapier Integration:
Only available if the WooCommerce Memberships plugin is installed:
You may choose Membership Plan or User Membership in the Zapier.com interface without installing the WooCommerce Memberships plugin, however, the functionality will not work without WooCommerce Memberships, which is sold separately by WooCommerce.
The minimum required WooCommerce Memberships version is 1.25.0.
WooCommerce Zapier Plugin Version 2.10 Required: Please ensure you update the WooCommerce Zapier plugin to version 2.10.0 to use this functionality.
The following trigger rules are available to activate your Zaps when membership plan data in your WooCommerce store is added, changed, or deleted.
Membership Plan Created
Triggers when a new membership plan is created.
Membership Plan Deleted
Triggers when a membership plan is deleted (trashed).
Only the ID field is available: Due to limitations in how WooCommerce handles deleted events, only the ID of the deleted resource is sent to Zapier when using this trigger rule. No other data fields are available.
Membership Plan Restored
Triggers when a previously trashed membership plan is restored from the trash.
Membership Plan Updated
Triggers when a membership plan is updated/edited/changed/modified, including when a plan is created, changes status, or is restored from the trash.
Only the search action can be used in your Zaps with the membership plans resource.
Find Membership Plan
Searches for an existing Membership Plan in WooCommerce. Does not support creation.
Tip: Search Sort Order:
Searches return the first result found, and make it available in your Zap’s subsequent action step.
Each search has a default sort order, so when defining your Search step, you can use the Order and Orderby fields to choose (for example) whether the most recent result or the oldest result is returned from your search.
Search Input Fields
| NAME |
TYPE |
DESCRIPTION |
| Id |
integer |
Unique identifier of the membership plan. |
| Name |
string |
Membership plan name. |
| Slug |
string |
Membership plan slug. |
| Status |
string |
Membership plan status. |
| Access Method |
string |
Membership plan access method. |
| Has Subscription |
boolean |
Marks a membership plan that has at least one subscription product that can give access upon purchase.
_Only available if the Woo Subscriptions plugin is installed._ |
| Has Subscription Installment |
boolean |
Marks a membership plan whose duration is not bound to a tied subscription, but where the subscription handles installment billing.
_Only available if the Woo Subscriptions plugin is installed._ |
| Access Product Ids |
array |
List of products that can grant access to the membership plan. |
| Access Length Type |
string |
Duration type of the membership. |
| Subscription Access Length |
integer |
Membership plan access duration in seconds, when tied to a subscription.
_Only available if the Woo Subscriptions plugin is installed._ |
| Subscription Access Length Type |
string |
Duration type of the membership plan when access is tied to a subscription.
_Only available if the Woo Subscriptions plugin is installed._ |
| Access Length |
integer |
Membership plan access duration in seconds. |
| Access Start Date |
date-time |
The date when access will start, in the site timezone. |
| Access End Date |
date-time |
The set date when access will end for fixed-length membership plans, in the site timezone. |
| Subscription Access Start Date |
date-time |
The date when access will start, when tied to a subscription, in the site timezone.
_Only available if the Woo Subscriptions plugin is installed._ |
| Subscription Access End Date |
date-time |
The set date when access will end for fixed-length membership plans tied to a subscription, in the site timezone.
_Only available if the Woo Subscriptions plugin is installed._ |
| Date Created |
date-time |
The date when the membership plan was created, in the site timezone. |
| Date Modified |
date-time |
The date when the membership plan was last updated, in the site timezone. |
| Meta Data |
array |
Membership plan additional meta data. |
| Meta Data —> Id |
integer |
Meta ID. |
| Meta Data —> Key |
string |
Meta key. |
| Meta Data —> Value |
any |
Meta value. |
Some fields are only available if the Woo Subscriptions plugin is installed:
The following membership plan fields are available only if the Woo Subscriptions plugin is installed:
- Has Subscription
- Has Subscription Installment
- Subscription Access Length
- Subscription Access Length Type
- Subscription Access Start Date
- Subscription Access End Date
If Woo Subscriptions is not installed, these fields will not be available.
Data Fields May Differ in Your WooCommerce Store:
WooCommerce Zapier utilises WooCommerce’s REST API. Data field names, descriptions, and values can vary from one WooCommerce store to another.
Your store’s data, fields, and trigger rules may differ from this documentation due to any of the following:
- WordPress versions and the locale/language used.
- Your WooCommerce versions and the features enabled.
- Your active WordPress plugins and WooCommerce extensions.
- Any custom code that overrides or changes how the WooCommerce/WordPress REST API operates.
Note: The field definitions are generated using the following settings:
- WordPress v6.4 with the
en_US locale.
- WooCommerce v8.5 with tax and coupon functionality enabled.
- The WooCommerce Bookings, WooCommerce Memberships, and Woo Subscriptions plugins were active.
User Membership
The
User Membership resource is created when a customer gains access to a membership. Each user membership is linked to one user and one membership plan only. Additionally, a membership has a status and a start date.
This resource is described in the
WooCommerce Memberships plugin. For more details, see the
WooCommerce Memberships User Memberships documentation.
Other Membership Resource:
In addition to User Memberships, there is another resource that can be accessed in the Zapier Integration:
Only available if the WooCommerce Memberships plugin is installed:
You may choose Membership Plan or User Membership in the Zapier.com interface without installing the WooCommerce Memberships plugin, however, the functionality will not work without WooCommerce Memberships, which is sold separately by WooCommerce.
The minimum required WooCommerce Memberships version is 1.25.0.
WooCommerce Zapier Plugin Version 2.10 Required: Please ensure you update the WooCommerce Zapier plugin to version 2.10.0 to use this functionality.
The following trigger rules are available to activate your Zaps when user membership data in your WooCommerce store is added, changed, or deleted.
User Membership Created
Triggers when a new user membership is created.
User Membership Deleted
Triggers when a user membership is permanently deleted.
Only the ID field is available: Due to limitations in how WooCommerce handles deleted events, only the ID of the deleted resource is sent to Zapier when using this trigger rule. No other data fields are available.
User Membership status changed
User Membership statuses are an important part of the membership processing and tracking in WooCommerce.
A user membership’s status can be changed by a store owner, a member, or an automatically scheduled event
, such as renewals or expiration.
More details on the user membership statuses in WooCommerce can be found in the
User Membership Statuses documentation.
The
User Membership status changed (any status) trigger rule will trigger every time a user membership’s status changes to
any status. It will always be triggered on status changes, regardless of what initiated the status change.
If you are interested in specific status change(s) only, you may wish to use a more specific
User Membership status changed to … trigger rule.
Below is a full list of User Membership status changed trigger rules:
- User Membership status changed (any status)
- User Membership status changed to Active
- User Membership status changed to Cancelled
- User Membership status changed to Complimentary
- User Membership status changed to Delayed
- User Membership status changed to Expired
- User Membership status changed to Free Trial*
- User Membership status changed to Paused
- User Membership status changed to Pending Cancellation
- Only available if the Woo Subscriptions plugin is installed: The User Membership status changed to Free Trial trigger rule is available only if the Woo Subscriptions plugin is installed.
User Membership Transferred
Triggers when a user membership is transferred from one user to another.
User Membership Updated
Triggers when a user membership is updated, including any status change.
The following actions are available for use in your Zaps to create, update, or find user memberships.
Create User Membership
Creates a new user membership in WooCommerce.
Create Input Fields
Update User Membership
Updates an existing user membership in WooCommerce.
Note: Resource ID is Required for Update Steps:
An update action always requires a valid top-level ID to be specified. This ensures that your Zap knows which record to update. On the other hand, any non-top-level ID is optional. If you leave it empty, WooCommerce will create a new entry, such as a new Meta Data item.
To help identify the correct Resource ID, you can add a Find step before your update step. The result of your Find step will contain the Resource ID, which you can then use in the Update step.
Update Input Fields
Find User Membership
Searches for an existing user membership in WooCommerce. Optionally create one if none are found.
Tip: Search Sort Order:
Searches return the first result found, and make it available in your Zap’s subsequent action step.
Each search has a default sort order, so when defining your Search step, you can use the Order and Orderby fields to choose (for example) whether the most recent result or the oldest result is returned from your search.
Search Input Fields
| NAME |
TYPE |
DESCRIPTION |
| Id |
integer |
Unique identifier of the user membership. |
| Customer Id |
integer |
Unique identifier of the user the membership belongs to. |
| Plan Id |
integer |
Unique identifier of the plan the user membership grants access to. |
| Status |
string |
User membership status. |
| Order Id |
integer |
Unique identifier of the order that grants access. |
| Product Id |
integer |
Unique identifier of the purchased product, or its variation, that grants access. |
| Date Created |
date-time |
The date when the user membership is created, in the site timezone. |
| Start Date |
date-time |
The date when the user membership starts being active, in the site timezone. |
| End Date |
date-time |
The date when the user membership ends, in the site timezone. |
| Paused Date |
date-time |
The date when the user membership was last paused, in the site timezone. |
| Cancelled Date |
date-time |
The date when the user membership was cancelled, in the site timezone. |
| View Url |
string |
The URL pointing to the Members Area to view the membership. |
| Profile Fields |
array |
User membership profile fields. |
| Profile Fields —> Slug |
string |
Profile field slug. |
| Profile Fields —> Value |
any |
Profile field value. |
| Meta Data |
array |
User membership additional meta data. |
| Meta Data —> Id |
integer |
Meta ID. |
| Meta Data —> Key |
string |
Meta key. |
| Meta Data —> Value |
any |
Meta value. |
| Subscription Id |
integer |
Unique identifier of a subscription the user membership is tied to.
_Only available if the Woo Subscriptions plugin is installed._ |
Only available if the Woo Subscriptions plugin is installed: The Subscription Id user membership field is available only if the Woo Subscriptions plugin is installed.
Data Fields May Differ in Your WooCommerce Store:
WooCommerce Zapier utilises WooCommerce’s REST API. Data field names, descriptions, and values can vary from one WooCommerce store to another.
Your store’s data, fields, and trigger rules may differ from this documentation due to any of the following:
- WordPress versions and the locale/language used.
- Your WooCommerce versions and the features enabled.
- Your active WordPress plugins and WooCommerce extensions.
- Any custom code that overrides or changes how the WooCommerce/WordPress REST API operates.
Note: The field definitions are generated using the following settings:
- WordPress v6.4 with the
en_US locale.
- WooCommerce v8.5 with tax and coupon functionality enabled.
- The WooCommerce Bookings, WooCommerce Memberships, and Woo Subscriptions plugins were active.
The
Subscription resource represents a recurring payment as described in the
Woo Subscriptions plugin. See the
Subscriptions documentation for more details.
Please see the
Products chapter for
Simple subscription and
Variable subscription information. The availability of data fields and behaviour for the “Variable subscription” product are similar to the WooCommerce built-in variable products. For details, please see the
Variable Products chapter.
Only available if the Woo Subscriptions plugin is installed.:
You may choose Subscription in the Zapier.com interface without installing the Woo Subscriptions plugin, however, the functionality will not work without Woo Subscriptions, which is sold separately by WooCommerce.
The minimum required Woo Subscriptions version is 4.2.0.
Other Subscription resources:
Subscriptions also have other (child) resources that can be accessed in Zapier Integration:
The following trigger rules are available to trigger your Zaps when subscription data in your WooCommerce store is added, changed or deleted.
Subscription created
Triggers when a subscription is created.
Triggers for both paid and unpaid subscriptions:
The Subscription created trigger rule will trigger for every new subscription (both paid and unpaid).
See the tip below if you would like to perform a Zap for successful (paid) subscriptions only.
How to trigger paid subscription signups only:
If you would like to trigger your Zap only when a paid subscription is created, you can use the following Zap setup:
- Zap Step 1: Use the Subscription status changed to Active trigger rule.
- Zap Step 2: A WooCommerce Find Order step:
- Order ID equals 1. Parent ID (the subscriptions’ Parent ID)
- This will find the order that created the subscription.
- Zap Step 3: A Formatter by Zapier step, with the Date / Time Event and Compare Dates Transform:
- Start Date equals 2. Date Created (the order’s Date Created from Step 2)
- End Date Value equals 1. Subscription Date Paid (the Subscription Date Paid from Step 1)
- This will calculate the number of days between the original order date and the subscription date paid.
- Zap Step 4: A Filter step:
- Only continue if :
- 3. Output Days
- (Text) Exactly matches
0
- Zap Step 5: Your desired action.
The above setup should mean that the Zap only triggers when a subscription is first paid for. It should filter out subsequent subscription renewals, which also change a subscription’s status to Active.
This setup works because the date_paid subscription field changes to a new date every time the subscription renews, so steps 2 to 4 in the above Zap setup should mean that the Zap only continues for the initial payment (when the Subscription first changes status to active).
Subscription deleted
Triggers when a subscription is deleted (trashed).
Only the ID field is available: Due to limitations in how WooCommerce handles deleted events, only the ID of the deleted resource is sent to Zapier when using this trigger rule. No other data fields are available.
Subscription renewal failed
Triggers when a subscription has just had a renewal payment fail.
Note: This is not triggered for failed payments on the initial order or a switch order. It is only triggered for failed payments on renewal orders.
Subscription renewed
Triggers when a subscription renewal payment is completed successfully. It is triggered for both automatic and manual renewal payments.
Important: This is not triggered for payments on the initial order or a switch order. It is only triggered for successful payments on renewal orders.
Subscription status changed
Subscription statuses are an important part of the subscription processing and fulfilment flow in WooCommerce.
A subscription’s status can be changed by a store owner, subscriber or an automatically scheduled events, like renewals or expiration.
More details on the subscription status life cycle in WooCommerce can be found in the
Subscription Status Guide documentation.
The
Subscription status changed (any status) trigger rule will trigger every time a subscription changes status to
any status, including when a subscription is first created. It will always be triggered on status changes, regardless of what initiated the status change.
If you are interested in specific status change(s) only, you may wish to use a more specific
Subscription status changed to … trigger rule.
Below is a full list of Subscription status changed trigger rules:
- Subscription status changed (any status)
- Subscription status changed to Active
- Subscription status changed to Cancelled
- Subscription status changed to Expired
- Subscription status changed to On hold
- Subscription status changed to Pending Cancellation
WooCommerce Zapier Plugin Version 2.4 Required:
Please ensure you update the WooCommerce Zapier plugin to version 2.4.0 or later to use these Trigger Rules.
WooCommerce Zapier version 2.4.0 renamed Subscription status changed to Subscription status changed (any status) to make it more clear that this trigger rule will trigger for any status change.
Subscription switched
Triggers when a user
upgrades or downgrades their subscription from the
My Account page.
Note: Triggered when the switch order status changes to processing or completed and runs after all the switching and updating has happened.
Subscription updated
Triggers when a subscription is updated/edited/changed/modified/renewed/failed, including any status change.
The following actions are available for use in your Zaps to create, update or find subscriptions.
Line-Item Enabled Data Fields: Coupon Lines, Shipping Lines, Line Items, Removed Line Items: To specify multiple values for these field(s), the values must be sent in a line-item aware format. Please see here for details on how the Line Itemizer can be used to achieve this.
Create Subscription
Creates a new Subscription in WooCommerce.
Create Input Fields
Update Subscription
Updates (modifies) an existing Subscription in WooCommerce.
Note: Resource ID is Required for Update Steps:
An update action always requires a valid top-level ID to be specified. This ensures that your Zap knows which record to update. On the other hand, any non-top-level ID is optional. If you leave it empty, WooCommerce will create a new entry, such as a new Meta Data item.
To help identify the correct Resource ID, you can add a Find step before your update step. The result of your Find step will contain the Resource ID, which you can then use in the Update step.
Update Input Fields
Find Subscription
Searches for an existing Subscription in WooCommerce. Optionally create one if none are found.
All available search fields can be viewed here. We recommend using the following search fields:
- Search: Searches the Billing Address, Shipping Address, Billing Last Name or Billing Email fields for the specified string/term/phrase.
- Subscription ID: Searches for the specified (numeric) subscription ID.
Tip: Search Sort Order:
Searches return the first result found, and make it available in your Zap’s subsequent action step.
Each search has a default sort order, so when defining your Search step, you can use the Order and Orderby fields to choose (for example) whether the most recent result or the oldest result is returned from your search.
Search Input Fields
Known Issues with Subscription Dates:
The following subscription date fields have incorrect values and should not be used:
- Date Created
- Date Modified
- Start Date
- Trial End Date
- Next Payment Date
- End Date
The values for these fields do not take into account the timezone offset of the store. For example, if the store is in the UTC+2 timezone, the Date Modified field will be 2 hours earlier than it should be.
| NAME |
TYPE |
DESCRIPTION |
| Id |
integer |
Unique identifier for the resource. |
| Parent Id |
integer |
Parent order ID. |
| Status |
string |
Order status. |
| Order Key |
string |
Order key. |
| Number |
string |
Order number. |
| Currency |
string |
Currency the order was created with, in ISO format. |
| Version |
string |
Version of WooCommerce which last updated the order. |
| Prices Include Tax |
boolean |
True the prices included tax during checkout. |
| Date Created |
date-time |
The date the order was created, as GMT. |
| Date Modified |
date-time |
The date the order was last modified, as GMT. |
| Customer Id |
integer |
User ID who owns the order. 0 for guests. |
| Discount Total |
string |
Total discount amount for the order. |
| Discount Tax |
string |
Total discount tax amount for the order. |
| Shipping Total |
string |
Total shipping amount for the order. |
| Shipping Tax |
string |
Total shipping tax amount for the order. |
| Cart Tax |
string |
Sum of line item taxes only. |
| Total |
string |
Grand total. |
| Total Tax |
string |
Sum of all taxes. |
| Billing |
object |
Billing address. |
| Billing —> First Name |
string |
First name. |
| Billing —> Last Name |
string |
Last name. |
| Billing —> Company |
string |
Company name. |
| Billing —> Address 1 |
string |
Address line 1. |
| Billing —> Address 2 |
string |
Address line 2. |
| Billing —> City |
string |
City name. |
| Billing —> State |
string |
ISO code or name of the state, province or district. |
| Billing —> Postcode |
string |
Postal code. |
| Billing —> Country |
string |
Country code in ISO 3166-1 alpha-2 format. |
| Billing —> Email |
string |
Email address. |
| Billing —> Phone |
string |
Phone number. |
| Shipping |
object |
Shipping address. |
| Shipping —> First Name |
string |
First name. |
| Shipping —> Last Name |
string |
Last name. |
| Shipping —> Company |
string |
Company name. |
| Shipping —> Address 1 |
string |
Address line 1. |
| Shipping —> Address 2 |
string |
Address line 2. |
| Shipping —> City |
string |
City name. |
| Shipping —> State |
string |
ISO code or name of the state, province or district. |
| Shipping —> Postcode |
string |
Postal code. |
| Shipping —> Country |
string |
Country code in ISO 3166-1 alpha-2 format. |
| Payment Method |
string |
Payment method ID. |
| Payment Method Title |
string |
Payment method title. |
| Transaction Id |
string |
Unique transaction ID. |
| Customer Ip Address |
string |
Customer’s IP address. |
| Customer User Agent |
string |
User agent of the customer. |
| Created via |
string |
Shows where the order was created. |
| Customer Note |
string |
Note left by customer during checkout. |
| Date Completed |
date-time |
The date the order was completed, in the site’s timezone. |
| Date Paid |
date-time |
The date the order was paid, in the site’s timezone. |
| Cart Hash |
string |
MD5 hash of cart items to ensure orders are not modified. |
| Line Items |
array |
Line items data. |
| Line Items —> Id |
integer |
Item ID. |
| Line Items —> Name |
any |
Product name. |
| Line Items —> Sku |
string |
Product SKU. |
| Line Items —> Product Id |
any |
Product ID. |
| Line Items —> Variation Id |
integer |
Variation ID, if applicable. |
| Line Items —> Quantity |
integer |
Quantity ordered. |
| Line Items —> Tax Class |
string |
Tax class of product. |
| Line Items —> Price |
string |
Product price. |
| Line Items —> Subtotal |
string |
Line subtotal (before discounts). |
| Line Items —> Subtotal Tax |
string |
Line subtotal tax (before discounts). |
| Line Items —> Total |
string |
Line total (after discounts). |
| Line Items —> Total Tax |
string |
Line total tax (after discounts). |
| Line Items —> Taxes |
array |
Line taxes. |
| Line Items —> Meta |
array |
Line item meta data. |
| Tax Lines |
array |
Tax lines data. |
| Tax Lines —> Id |
integer |
Item ID. |
| Tax Lines —> Rate Code |
string |
Tax rate code. |
| Tax Lines —> Rate Id |
string |
Tax rate ID. |
| Tax Lines —> Label |
string |
Tax rate label. |
| Tax Lines —> Compound |
boolean |
Show if is a compound tax rate. |
| Tax Lines —> Tax Total |
string |
Tax total (not including shipping taxes). |
| Tax Lines —> Shipping Tax Total |
string |
Shipping tax total. |
| Shipping Lines |
array |
Shipping lines data. |
| Shipping Lines —> Id |
integer |
Item ID. |
| Shipping Lines —> Method Title |
any |
Shipping method name. |
| Shipping Lines —> Method Id |
any |
Shipping method ID. |
| Shipping Lines —> Total |
string |
Line total (after discounts). |
| Shipping Lines —> Total Tax |
string |
Line total tax (after discounts). |
| Shipping Lines —> Taxes |
array |
Line taxes. |
| Fee Lines |
array |
Fee lines data. |
| Fee Lines —> Id |
integer |
Item ID. |
| Fee Lines —> Name |
any |
Fee name. |
| Fee Lines —> Tax Class |
string |
Tax class of fee. |
| Fee Lines —> Tax Status |
string |
Tax status of fee. |
| Fee Lines —> Total |
string |
Line total (after discounts). |
| Fee Lines —> Total Tax |
string |
Line total tax (after discounts). |
| Fee Lines —> Taxes |
array |
Line taxes. |
| Coupon Lines |
array |
Coupons line data. |
| Coupon Lines —> Id |
integer |
Item ID. |
| Coupon Lines —> Code |
any |
Coupon code. |
| Coupon Lines —> Discount |
string |
Discount total. |
| Coupon Lines —> Discount Tax |
string |
Discount total tax. |
| Refunds |
array |
List of refunds. |
| Refunds —> Id |
integer |
Refund ID. |
| Refunds —> Reason |
string |
Refund reason. |
| Refunds —> Total |
string |
Refund total. |
| Billing Interval |
integer |
The number of billing periods between subscription renewals. |
| Billing Period |
string |
Billing period for the subscription. |
| Start Date |
date-time |
The subscription’s start date. |
| Trial End Date |
date-time |
The subscription’s trial date |
| Next Payment Date |
date-time |
The subscription’s next payment date. |
| End Date |
date-time |
The subscription’s end date. |
| Resubscribed from |
string |
The subscription’s original subscription ID if this is a resubscribed subscription. |
| Resubscribed Subscription |
string |
The subscription’s resubscribed subscription ID. |
| Removed Line Items |
array |
Removed line items data.
_Note: Always empty._ |
| Removed Line Items —> Id |
integer |
Item ID.
_Note: Always empty._ |
| Removed Line Items —> Name |
any |
Product name.
_Note: Always empty._ |
| Removed Line Items —> Sku |
string |
Product SKU.
_Note: Always empty._ |
| Removed Line Items —> Product Id |
any |
Product ID.
_Note: Always empty._ |
| Removed Line Items —> Variation Id |
integer |
Variation ID, if applicable.
_Note: Always empty._ |
| Removed Line Items —> Quantity |
integer |
Quantity ordered.
_Note: Always empty._ |
| Removed Line Items —> Tax Class |
string |
Tax class of product.
_Note: Always empty._ |
| Removed Line Items —> Price |
string |
Product price.
_Note: Always empty._ |
| Removed Line Items —> Subtotal |
string |
Line subtotal (before discounts).
_Note: Always empty._ |
| Removed Line Items —> Subtotal Tax |
string |
Line subtotal tax (before discounts).
_Note: Always empty._ |
| Removed Line Items —> Total |
string |
Line total (after discounts).
_Note: Always empty._ |
| Removed Line Items —> Total Tax |
string |
Line total tax (after discounts).
_Note: Always empty._ |
| Removed Line Items —> Taxes |
array |
Line taxes.
_Note: Always empty._ |
| Removed Line Items —> Meta |
array |
Removed line item meta data.
_Note: Always empty._ |
Data Fields May Differ in Your WooCommerce Store:
WooCommerce Zapier utilises WooCommerce’s REST API. Data field names, descriptions, and values can vary from one WooCommerce store to another.
Your store’s data, fields, and trigger rules may differ from this documentation due to any of the following:
- WordPress versions and the locale/language used.
- Your WooCommerce versions and the features enabled.
- Your active WordPress plugins and WooCommerce extensions.
- Any custom code that overrides or changes how the WooCommerce/WordPress REST API operates.
Note: The field definitions are generated using the following settings:
- WordPress v6.4 with the
en_US locale.
- WooCommerce v8.5 with tax and coupon functionality enabled.
- The WooCommerce Bookings, WooCommerce Memberships, and Woo Subscriptions plugins were active.
Subscription Note
Subscription Notes are the notes attached to individual subscriptions. They behave in the same way as
Order Notes.
They are used to keep track of internal notes, such as subscription status changes, fulfilment notes, or customer notes such as notes about a customer’s preferences, or subscription history.
When viewing an existing subscription in WooCommerce, you can see the subscription notes in the
Subscription notes section on the right of the screen.
Only available if the Woo Subscriptions plugin is installed.:
You may choose Subscription in the Zapier.com interface without installing the Woo Subscriptions plugin, however, the functionality will not work without Woo Subscriptions, which is sold separately by WooCommerce.
The minimum required Woo Subscriptions version is 4.2.0.
WooCommerce Zapier Plugin Version 2.9 Required: Please ensure you update the WooCommerce Zapier plugin to version 2.9.0 to manage Subscription Notes.
A Trigger Rule defines an event (or multiple events) that will cause WooCommerce data to be sent to a Zapier Zap.
The following trigger rules are available to trigger your Zaps when subscription note data in your WooCommerce store is added or deleted.
Subscription Note created
Triggers when a subscription note is added to a subscription.
Note: The Subscription Note created trigger rule will trigger for all subscription notes that are added (both customer notes and private notes).
Subscription Note deleted
Triggers when a subscription note is deleted.
Only the ID field is available: Due to limitations in how WooCommerce handles deleted events, only the ID of the deleted resource is sent to Zapier when using this trigger rule. No other data fields are available.
Heads Up: WooCommerce does not allow updating a subscription note.
An action is an event a Zap performs after it is triggered. Actions allow you to create new WooCommerce data from a Zap.
Searches let you find existing WooCommerce data in a Zap, and then use it later in a subsequent step.
Create Subscription Note
Creates a new subscription note in WooCommerce, attached to an existing Subscription.
Tip: When creating a subscription note, if the Customer Note field is set to True, then the note will be emailed to the customer. If Customer Note is set to False, then the note will be private and only visible to store administrators.
Create Input Fields
Find Subscription Note
Searches for an existing subscription note in WooCommerce. Optionally create one if none are found.
Tip: Search Sort Order:
Searches return the first result found, and make it available in your Zap’s subsequent action step.
Each search has a default sort order, so when defining your Search step, you can use the Order and Orderby fields to choose (for example) whether the most recent result or the oldest result is returned from your search.
Search Input Fields
| NAME |
TYPE |
DESCRIPTION |
| Id |
integer |
Unique identifier for the resource. |
| Subscription Id |
integer |
Subscription ID |
| Author |
string |
Order note author. |
| Date Created |
date-time |
The date the order note was created, in the site’s timezone. |
| Note |
string |
Order note content. |
| Customer Note |
boolean |
If true, the note will be shown to customers and they will be notified. If false, the note will be for admin reference only. |
Data Fields May Differ in Your WooCommerce Store:
WooCommerce Zapier utilises WooCommerce’s REST API. Data field names, descriptions, and values can vary from one WooCommerce store to another.
Your store’s data, fields, and trigger rules may differ from this documentation due to any of the following:
- WordPress versions and the locale/language used.
- Your WooCommerce versions and the features enabled.
- Your active WordPress plugins and WooCommerce extensions.
- Any custom code that overrides or changes how the WooCommerce/WordPress REST API operates.
Note: The field definitions are generated using the following settings:
- WordPress v6.4 with the
en_US locale.
- WooCommerce v8.5 with tax and coupon functionality enabled.
- The WooCommerce Bookings, WooCommerce Memberships, and Woo Subscriptions plugins were active.
The WooCommerce Zapier user interface is completely redesigned in version 2.
If you are upgrading from version 1, please go to the
Plugin Interface Changes chapter to see what’s changed and the
Migrating Legacy Feeds chapter for instructions on how to migrate your existing Feeds and Zaps to the new method.
The information below describes the screens and interfaces that you see in your WooCommerce/WordPress dashboard.
Task History
You can find the Task history in your
WordPress Dashboard —>
Side Menu —>
WooCommerce —>
Zapier screen —>
Task History tab.
This is the main place to see every incoming and outgoing task/request for WooCommerce Zapier.
This includes any time that your WooCommerce store’s data is sent to one of your Zapier Zaps or any time that Zapier creates or updates data in your WooCommerce store via one of your Zaps.

The Task History screen also supports filtering by status and/or searching task history records. You can filter by status (Successful or Errored), or search Task Messages and
Error Codes.
WooCommerce Zapier Plugin Version 2.10 Required: Please ensure you update the WooCommerce Zapier plugin to version 2.10.0 to use this functionality.
Task Errors:
If you see any tasks with an Error status, please consult the Error Codes chapter for further guidance.
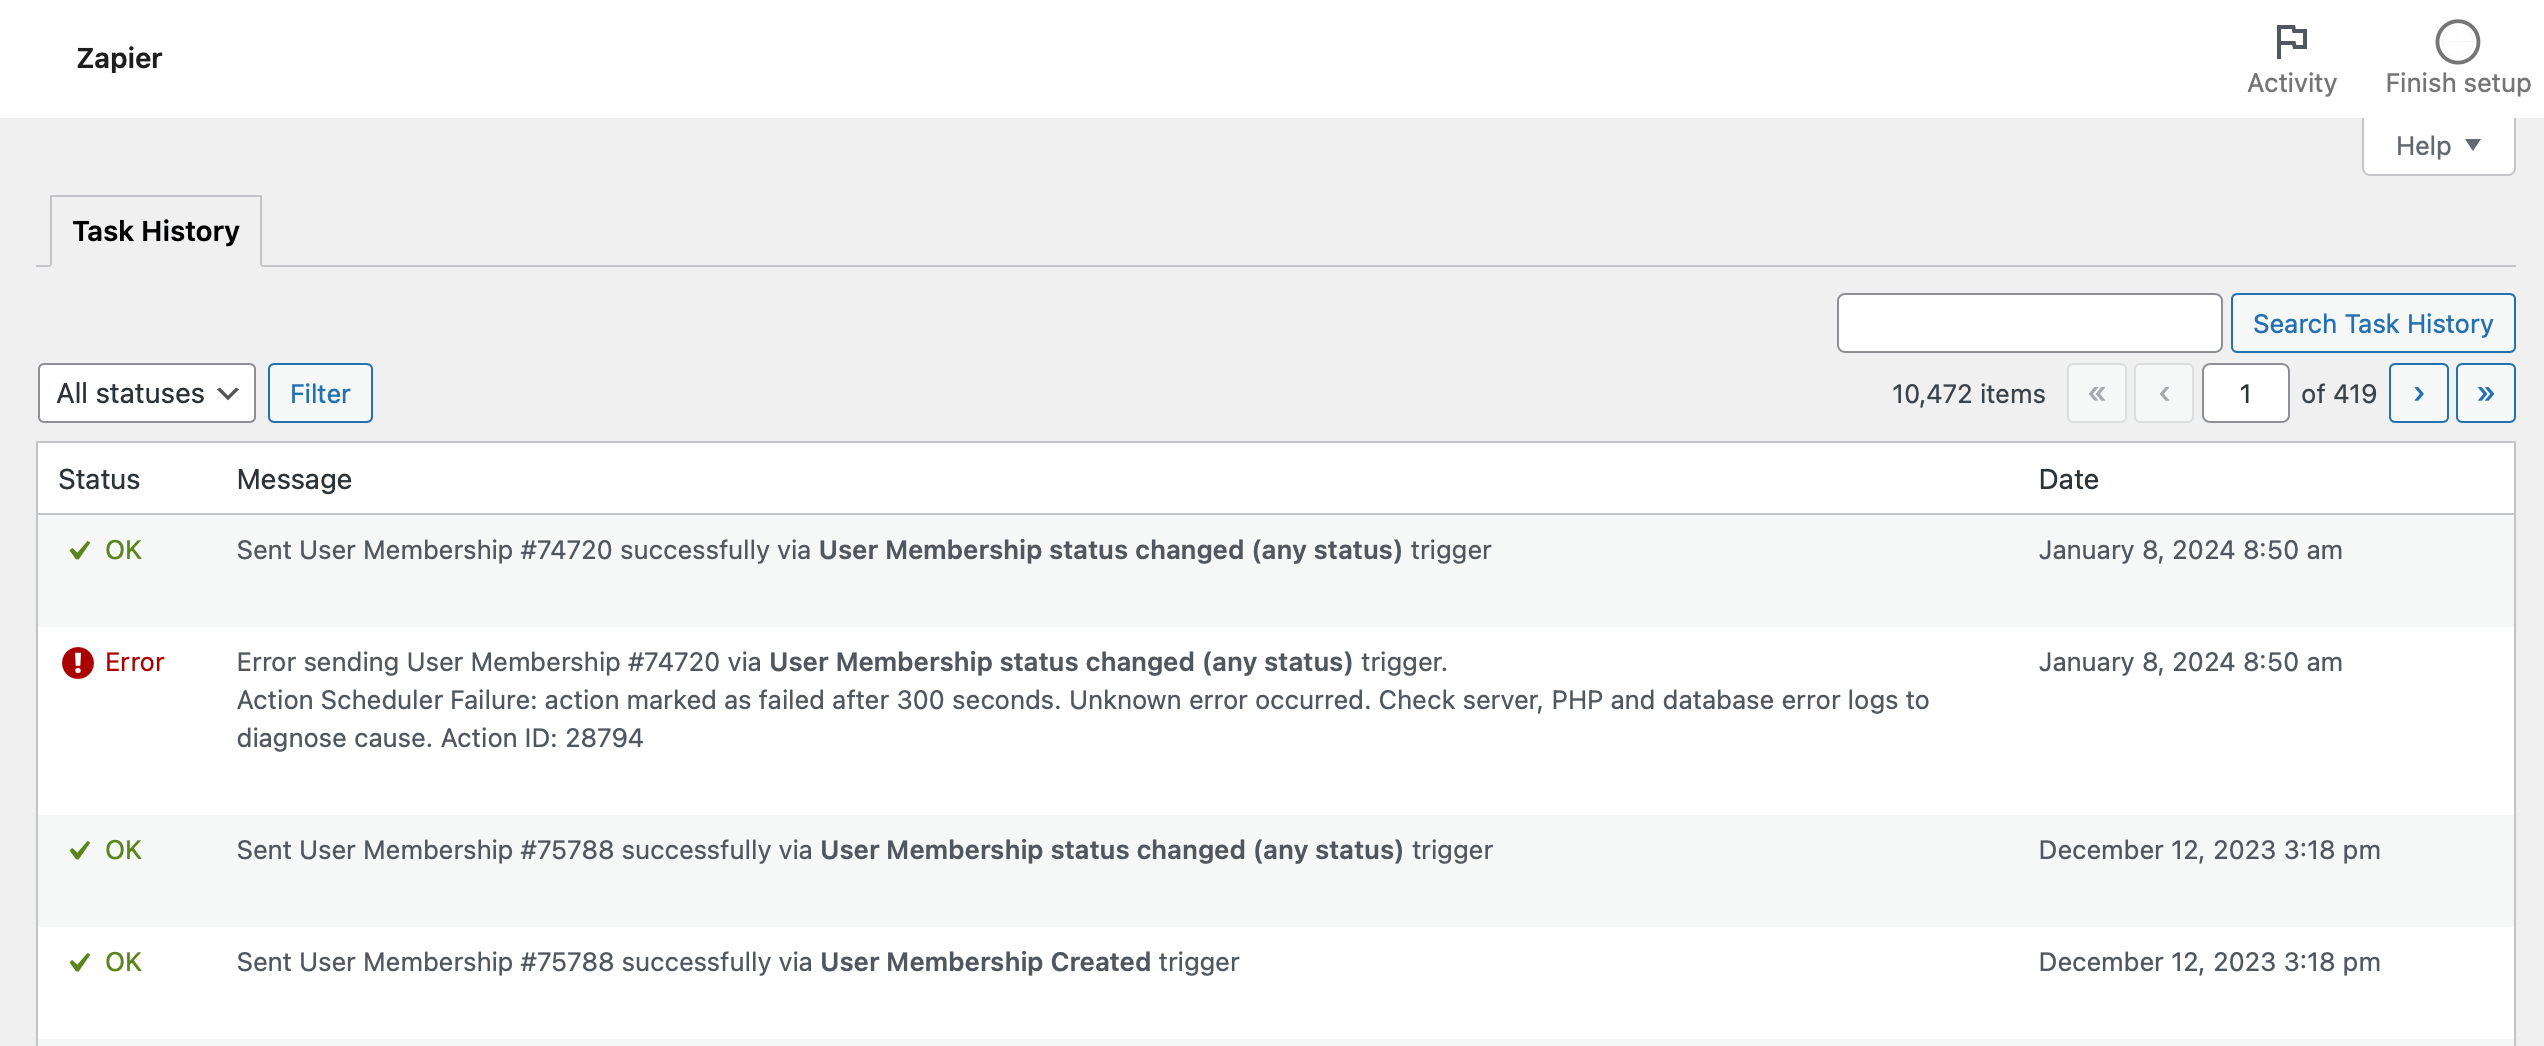
Resource History
Every supported Resource screen (except for Customer) has a
WooCommerce Zapier History metabox, located at the bottom of the screen when viewing/editing the Resource.
For example, when you are editing an item, you can see the Task History for that particular item.
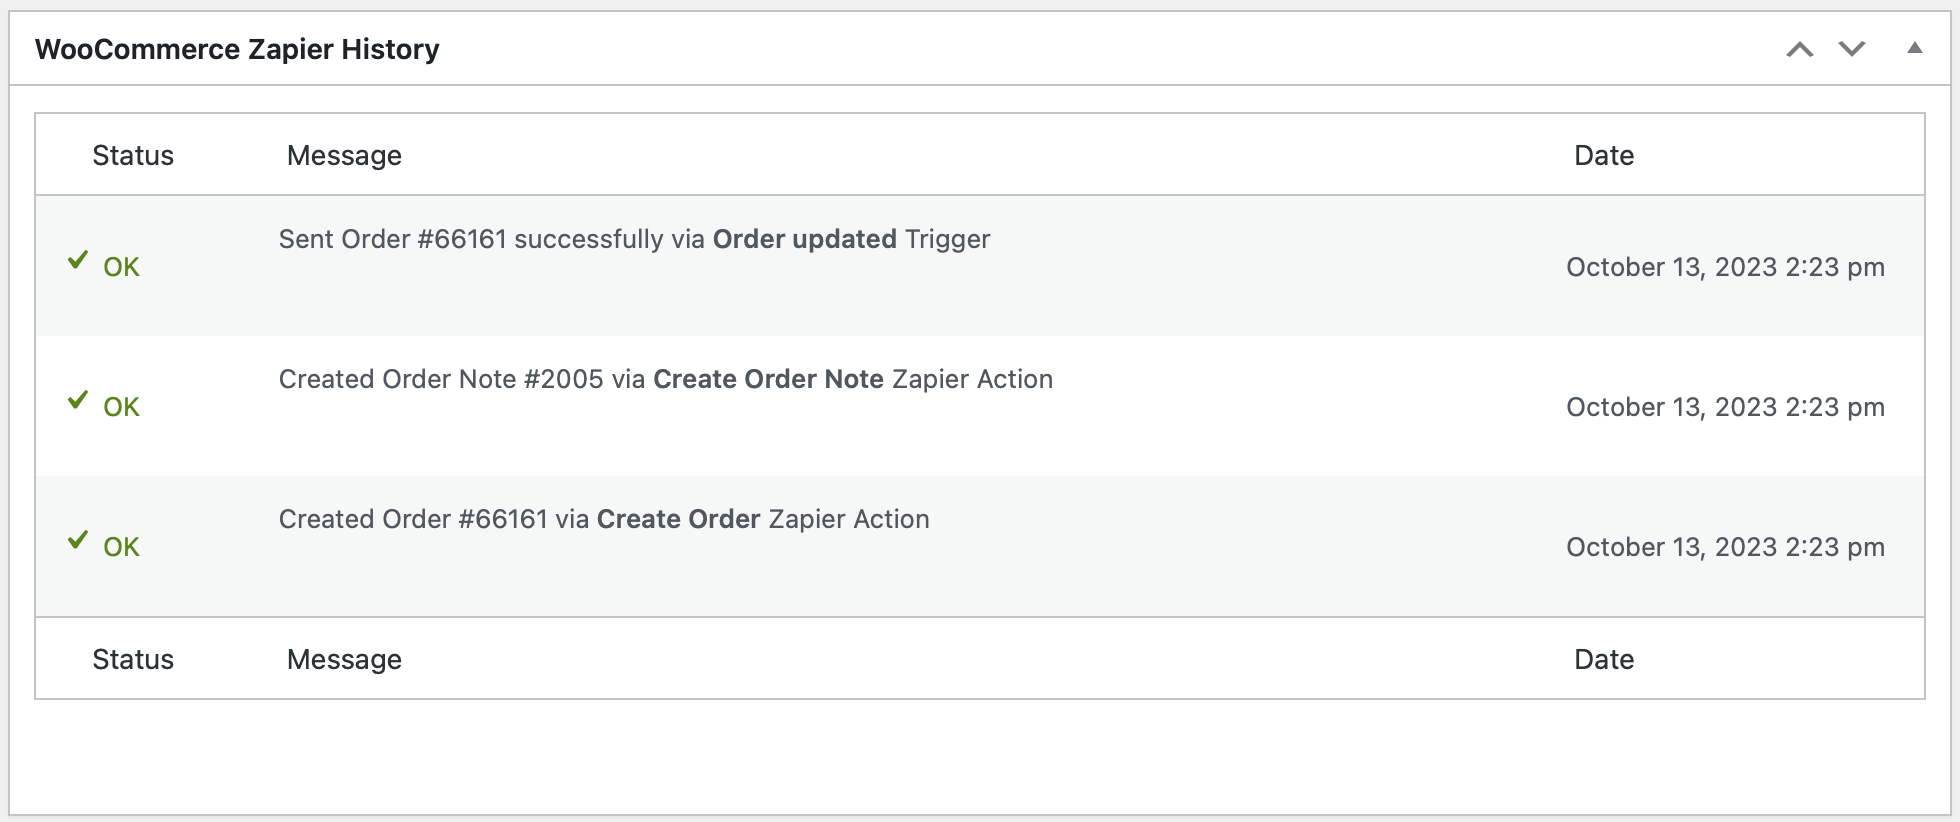
You can disable (hide) this metabox by clicking the
Screen Options button on the top right corner and deselecting the
WooCommerce Zapier History under the
Boxes section and then applying (saving) the screen options.
Note: There is no dedicated “Customer” screen in WooCommerce. WooCommerce stores customers in the WordPress User screen.
Legacy Feeds
Available only if you have upgraded to version 2 from the previous 1.x version
Location:
WordPress Dashboard —>
Side Menu —>
WooCommerce —>
Zapier screen —>
Legacy Feeds tab.
If you have upgraded from the 1.x version, and you haven’t yet migrated your Zaps, you can see all existing Legacy Zapier Feeds. There is no option in version 2 to create a new Zapier Feed, but you can still edit and/or delete your existing one if you need to.
Legacy Feeds and Zaps must be migrated by 30 April 2022:
All Legacy Feeds and Zaps must be migrated to the new WooCommerce Zapier app before 30 April 2022 (2 years after version 2 was released).
Any Zaps using the WooCommerce (Legacy) app after this date are no longer supported.
Please refer to the
Migration Guide for details on how to migrate these legacy Zaps.
Note: When you delete your last Legacy Feed and empty the trash, the Legacy Feeds tab will disappear from WooCommerce and will no longer be accessible.
Status Screen
You can keep track of the overall status of the Zapier integration by going to the
WordPress Dashboard —>
Side Menu —>
WooCommerce —>
Status screen and then scrolling to the
WooCommerce Zapier section towards the bottom of the screen. You can see a detailed explanation of each row if you hover over the question mark with your pointer.
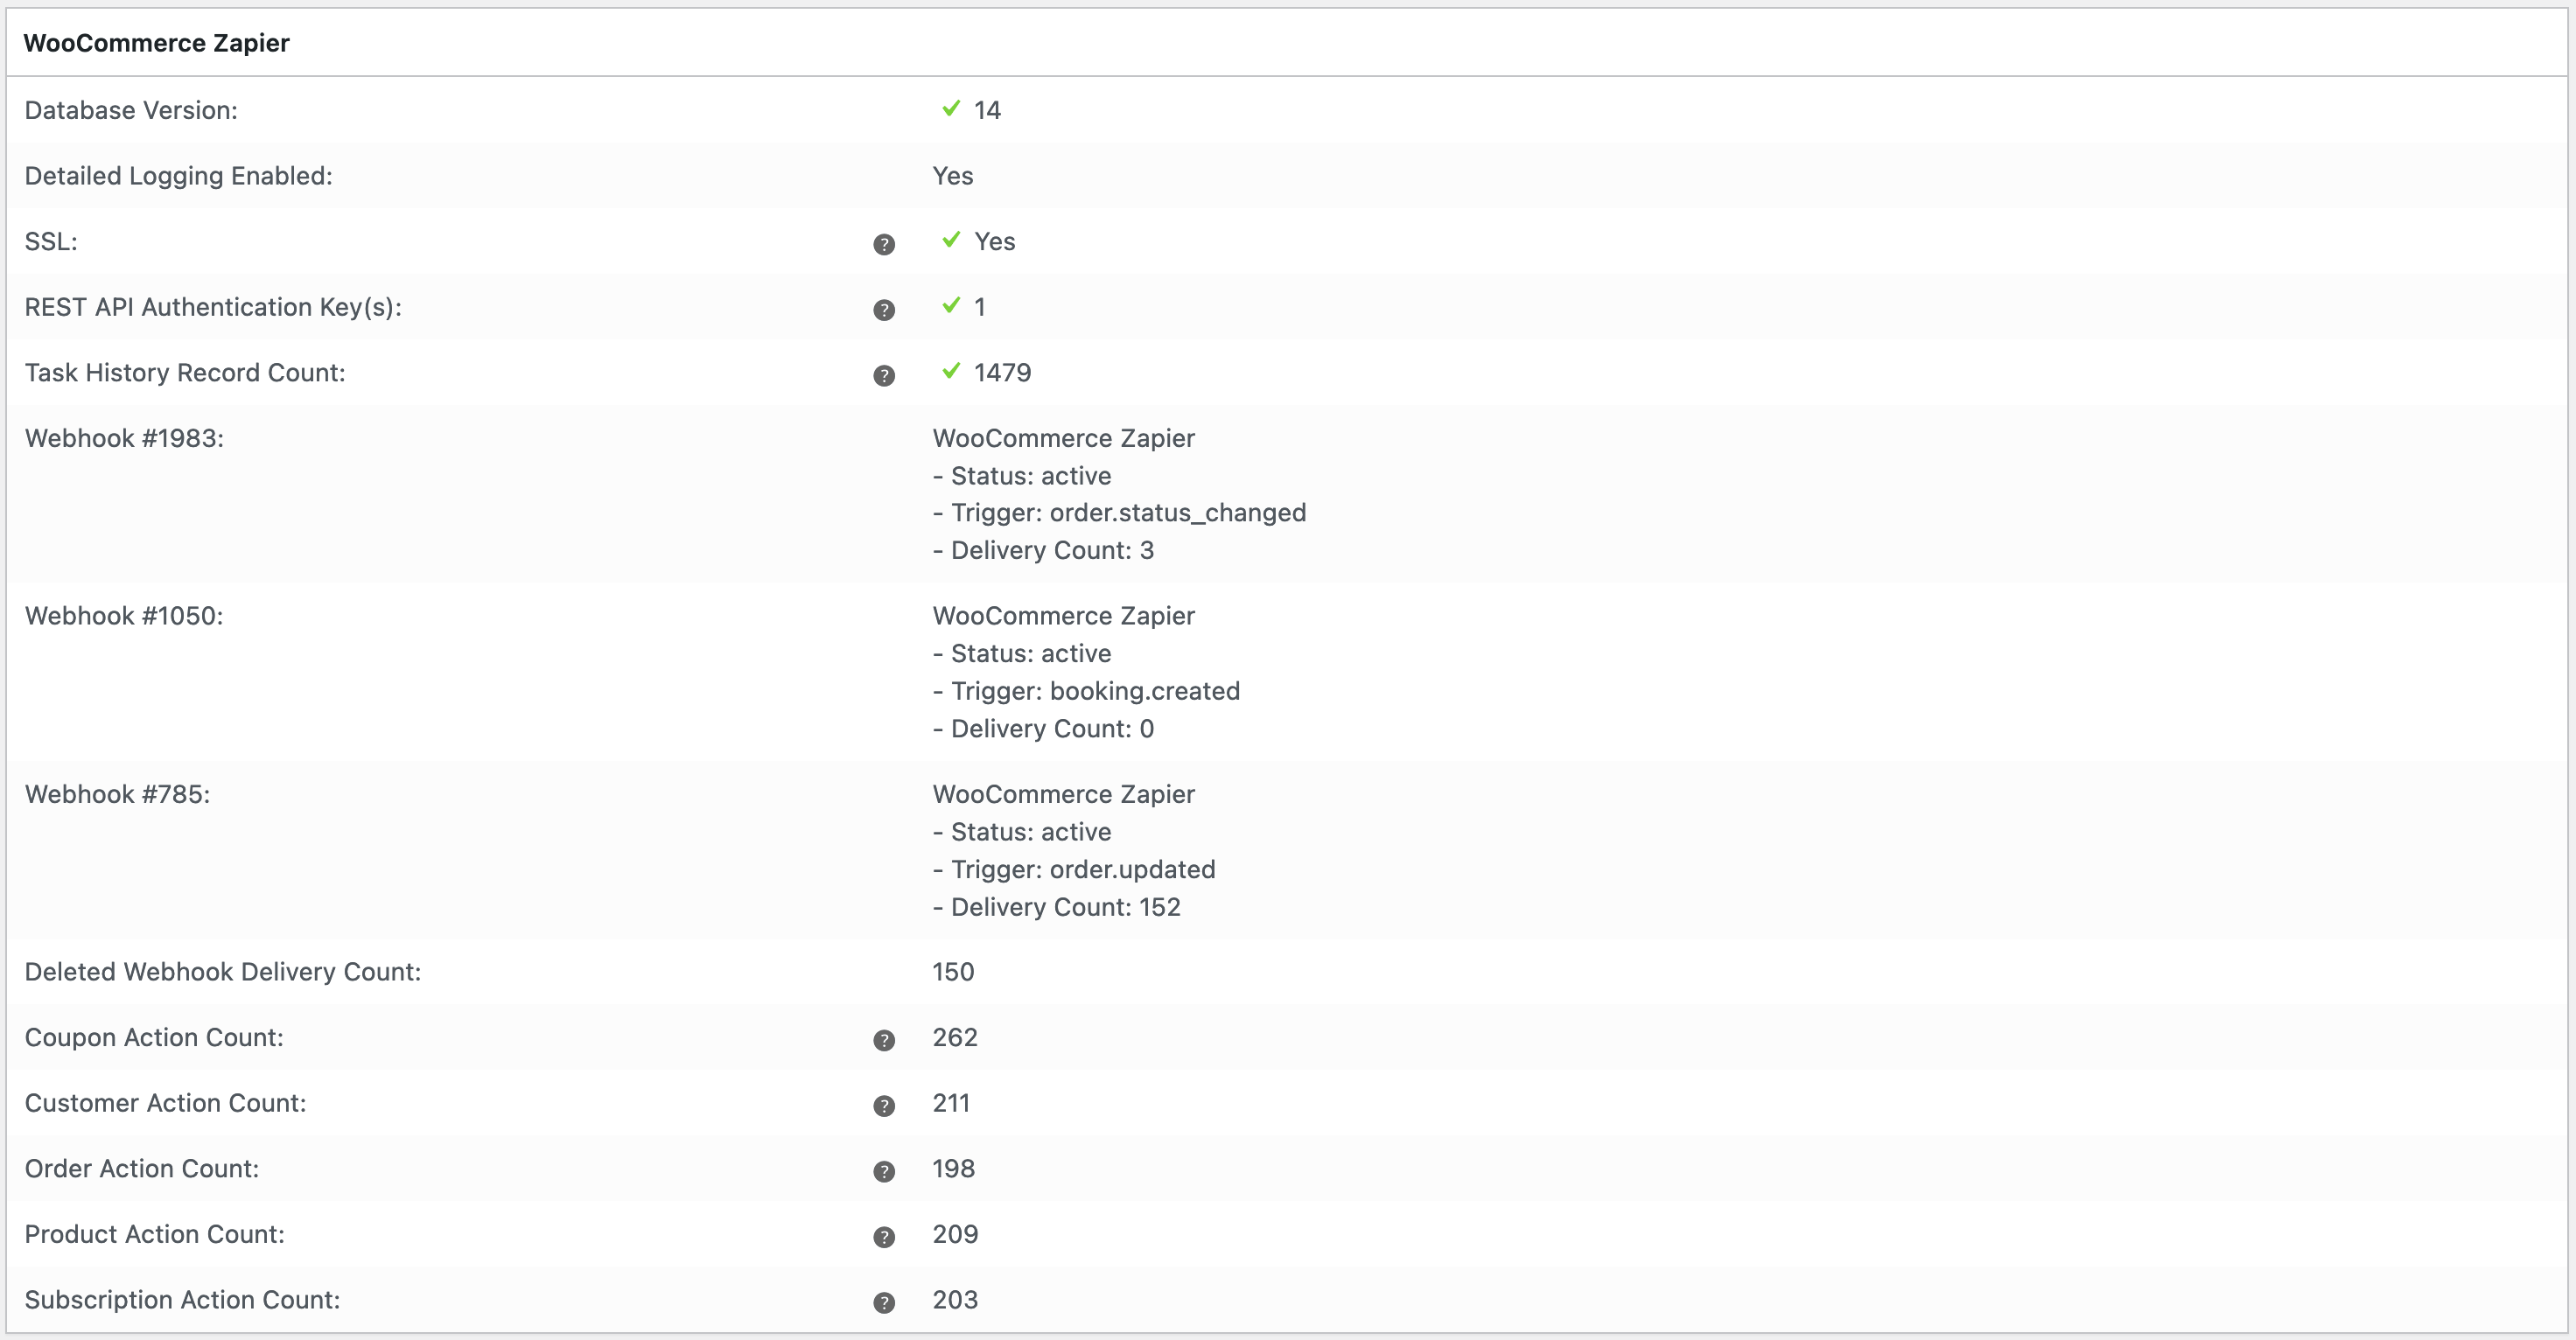
This information is also used by
WooCommerce Zapier Support when you contact us.
Troubleshooting: This is the perfect place to start investigating if you encounter any errors in the plugin. For further reference, please see the Troubleshooting Tips chapter.
To see the Zapier integration logs, go to your
WordPress Dashboard —>
Side Menu —>
WooCommerce —>
Status screen —>
Logs tab and select the newest log whose name starts with
woocommerce-zapier. To view the log, you need to press the
View button.
This plugin uses WooCommerce’s facilities for logging. For more information on that, please see the
Understanding the WooCommerce System Status Report documentation.
The WooCommerce Extension, by default, only logs significant errors that occurred within the plugin. You can enable detailed logging in the
Settings Screen.
Note: The log file may be not exist if the plugin recently installed, or there are no recent errors/logs.
Location:
WordPress Dashboard —>
Side Menu —>
WooCommerce —>
Settings screen —>
Zapier tab.
Currently, the only setting available for the WooCommerce Zapier plugin is to enable or disable the detailed logging.
If you are experiencing a problem with your integration (or technical support asks you to), you can turn on detailed logging with the
Enable Detailed Logging checkbox.
See the
Logs chapter on how to access and view the Zapier Integration logs.
To create a WooCommerce Zapier-specific password, go to the
WordPress Dashboard —>
Side Menu —>
Users —>
Profile screen. Scroll to the
Application Passwords section, which is halfway down the screen. It looks like this:
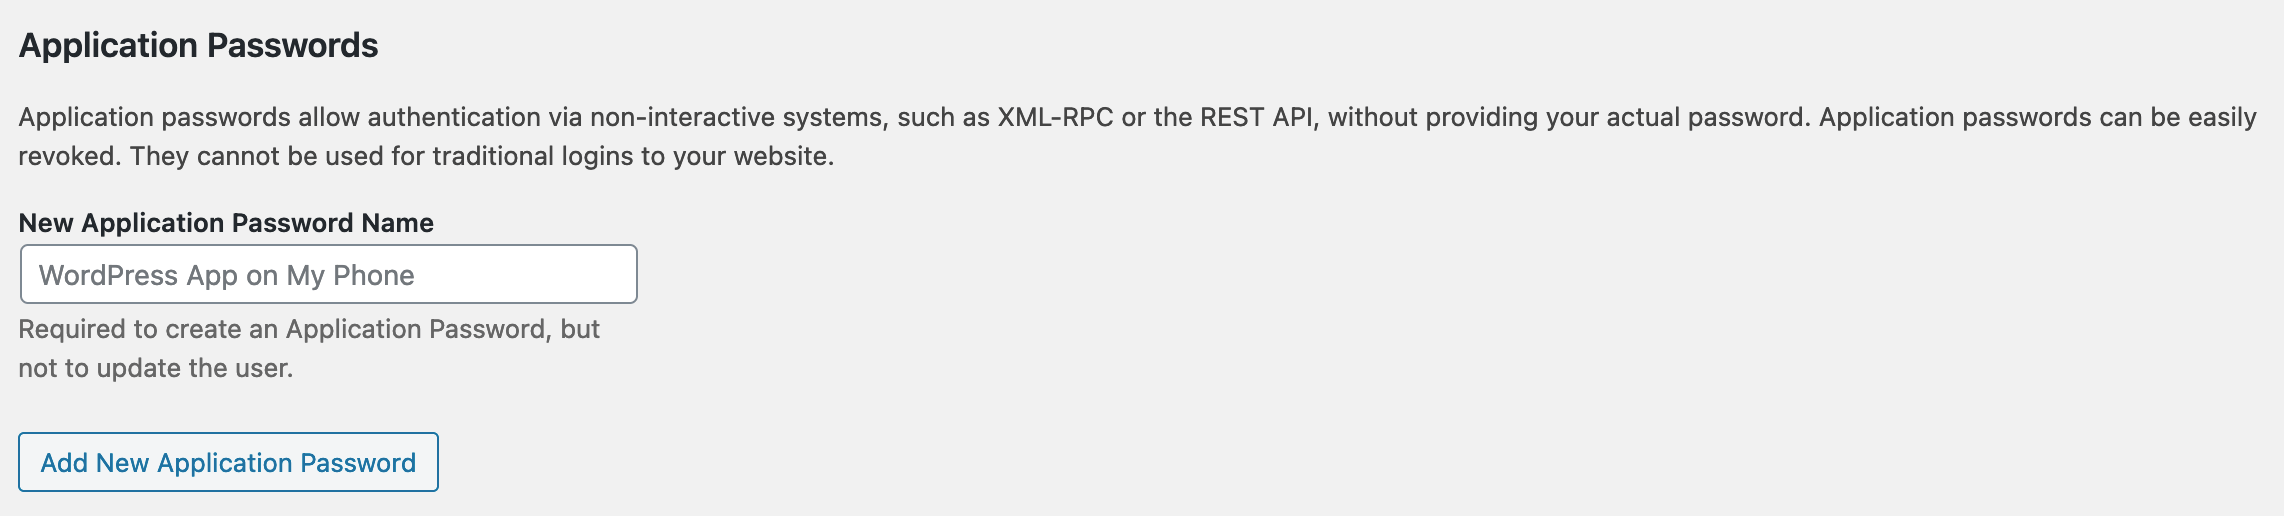
Enter a name into the
New Application Password Name input (for example
WooCommerce Zapier) and press the
Add New Application Password button.
WordPress generates a randomly chosen application password. Make sure that you save it in a safe location, as WordPress will not display it again.
Once you have created one, the screen should look like this:
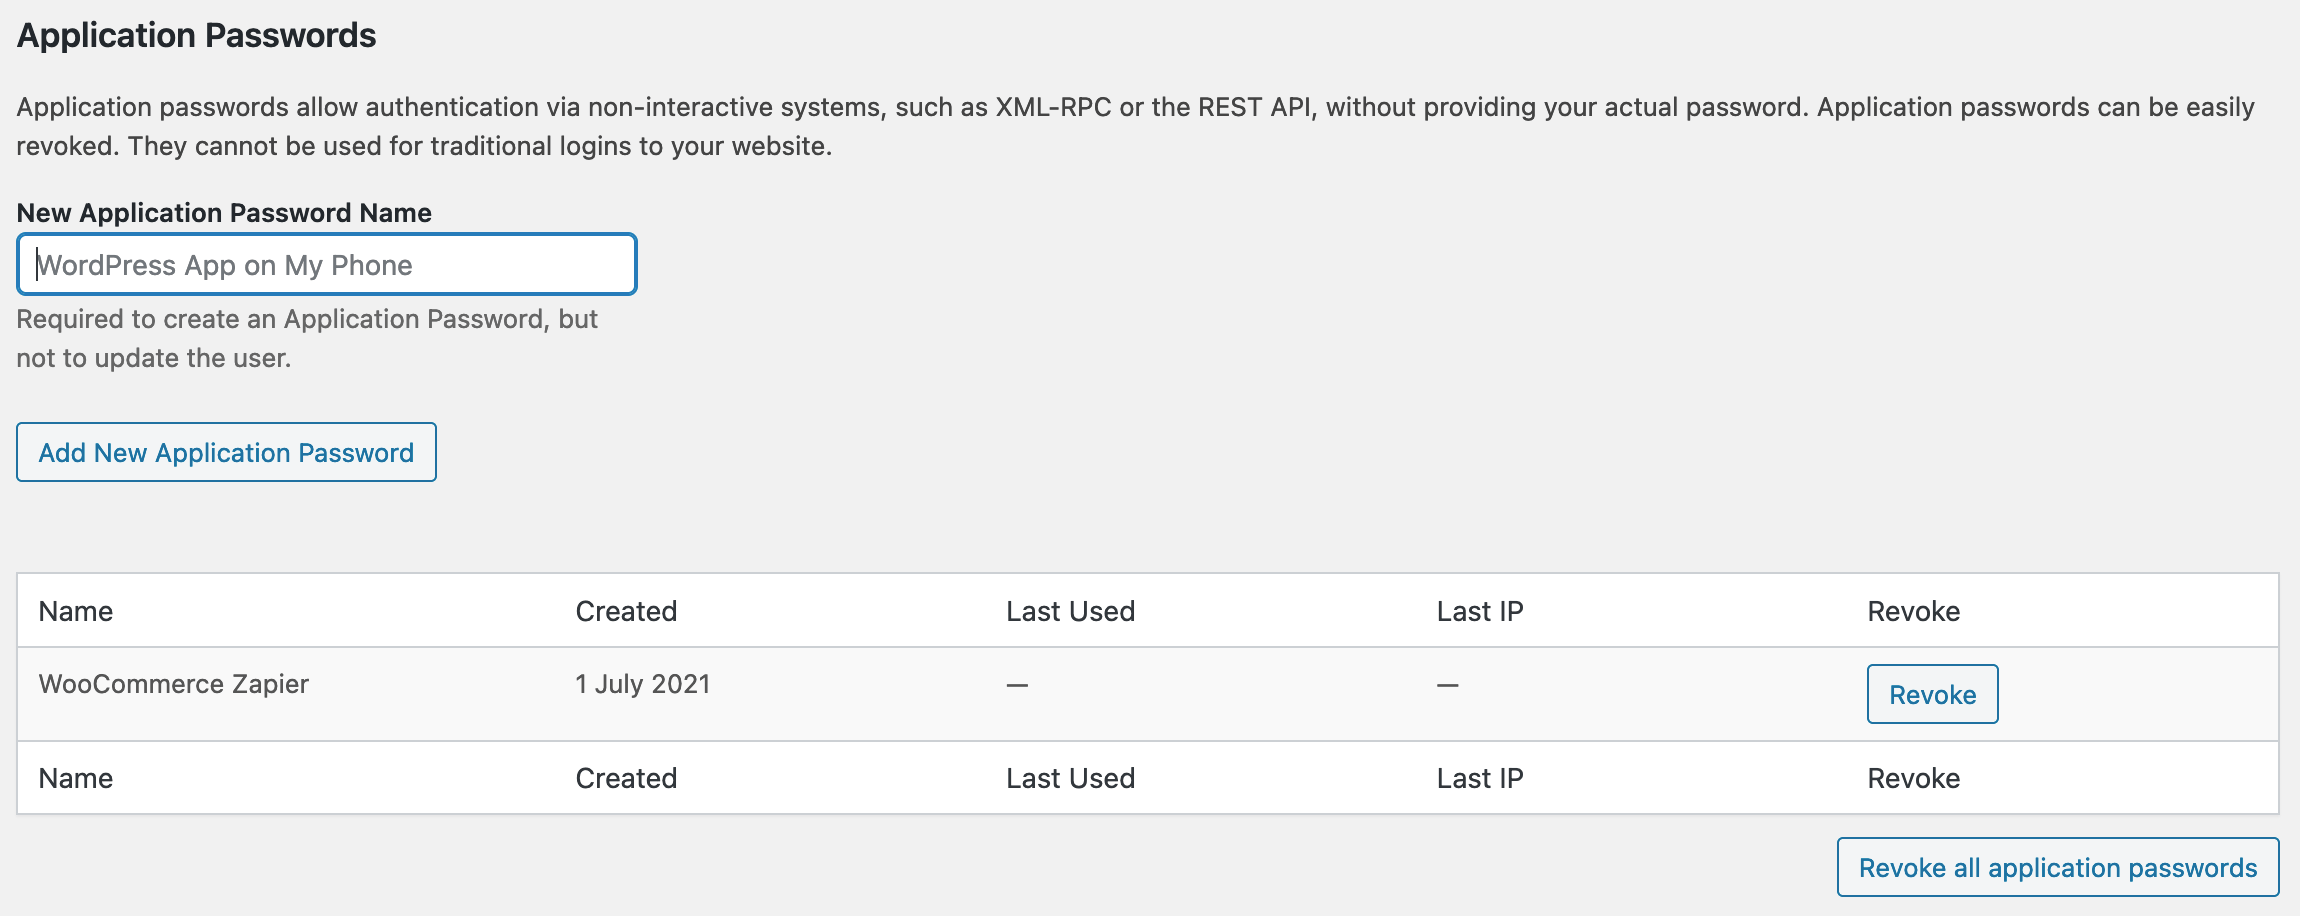
You can generate a new one or delete it later independently from your usual WordPress user account password.
You will use this new Application Password when
Authenticating WooCommerce Zapier.
Can’t see the Application Passwords settings in WordPress?:
- Ensure you are using WordPress version 5.6 or later.
- If you are using any other security plugins, review their settings to ensure they haven’t disabled the Application Passwords feature.
- If you are using the Wordfence Security plugin, ensure application passwords aren’t disabled.
- If you are still unable to create an Application Password, you can use your regular WordPress password.
Changing or Deleting Passwords:
If you delete an application password that you are actively using, your Zapier Integration will stop working.
You will need to provide a valid, active password in Zapier.com, either an Application Password or a WordPress account password.
The following lists consist of various WooCommerce screens, which expose different parts of the inner workings of the WooCommerce Zapier plugin to the admin interface.
The WooCommerce Zapier extension depends on multiple WooCommerce core functionality, including REST API and Action Scheduler.
WooCommerce allows site administrators to inspect and/or modify these, however, in normal use, there should be no need for you to do so because it is managed automatically for you.
Attention: The following information is for reference only. Please be aware, that modifying the WooCommerce Extension behaviour manually is unsupported, and may break the Zapier Integration functionality.
REST API
- WordPress Dashboard —> Side Menu —> WooCommerce —> Settings screen —> Advanced tab —> REST API
- Lists the REST API Keys that allow other applications to authenticate with WooCommerce. You can find the Zapier integration authentication keys here, along with the other manually or automatically generated ones.
- WooCommerce Zapier keys always start with
Zapier - API Read/Write text, followed by the creation date. Upon removing a connection in Zapier’s My Apps page, the REST API keys are automatically removed (revoked) from this list as well.
- The number of used WooCommerce Zapier REST API authentication keys is also displayed on the Status Screen.
Note:
The creation dates on the REST API keys screen and the My Apps page may be different. For example, the plugin automatically monitors and revokes duplicated keys for a user if the key is not used for 30 days.
Webhooks
- WordPress Dashboard —> Side Menu —> WooCommerce —> Settings screen —> Advanced tab —> Webhooks
- For each outgoing connection (Trigger), the plugin creates a webhook in WooCommerce.
- These webhooks have the name of
WooCommerce Zapier. Webhooks are created automatically when you turn “ON” a Zap, and they are deleted when you turn “OFF” a Zap in the Zapier.com interface.
- In normal usage, you should have one active WooCommerce Zapier webhook for each active Zap that has WooCommerce as a trigger.
Danger:
Removing an active webhook stops sending data to Zapier.<br>
Please see the [Webhook Missing or Disabled](#webhook-missing-or-disabled) chapter in troubleshooting how to fix it.

info
When a Zap is disabled, either because of a problem occurring or manually, the corresponding WooCommerce webhook will be removed. Upon turning the Zap "ON" again, the corresponding webhook will be created again.
Action Scheduler
- WordPress Dashboard —> Side Menu —> WooCommerce —> Status screen —> Scheduled Actions tab
- There are two different types of scheduled actions in the WooCommerce Zapier plugin: sending data via webhooks and utility tasks.
- The webhook-related tasks have a Hook name of
woocommerce_deliver_webhook_async and the argument has a related webhook_id. If you notice Pending woocommerce_deliver_webhook_async tasks, this means that data is queued to be sent to Zapier, but hasn’t been sent yet. You can safely click the Run link on each of these to force the data to be sent immediately.
- Utility tasks are the
wc_zapier_history_cleanup and the wc_zapier_key_cleanup. Both should be in the Pending section all the time, and these should be left as-is.
In the Complete section, you can see the previously completed actions.
See the explanation and solution in the
No Data is Being Sent to Zapier chapter.
Yes, you can.
Info: You need to install the WooCommerce Zapier plugin on each of the WooCommerce sites, which typically means purchasing multiple subscriptions for the Zapier Integration so each site can be eligible for updates and support. Each of those sites can be connected to the same Zapier account if you wish.
WooCommerce Zapier does not use WooCommerce’s Legacy REST API, which has been disabled by default for new WooCommerce installations since WooCommerce version 3.4.
Info: WooCommerce announced in October 2023 that the Legacy REST API will be removed starting with version 9.0. Because we have never used that API, we fully expect our plugin to be compatible with version 9.0.
Yes! The Zapier Integration does not distinguish between normal WordPress user passwords and WordPress Application Passwords.
We strongly recommend using a WordPress Application Password, if you are using WordPress 5.6 or later, as this maximises compatibility with security plugins and services.
Alternatively. you can use the
Application Passwords plugin with older WordPress versions, but third-party compatibility is not guaranteed.
See the
Plugin Interface chapter for details on how to set up an application-specific password.
Yes, WordPress multisite is supported!
To connect WooCommerce Zapier to an individual site in a WordPress multisite network, you need to authenticate using a
Super Admin user account. You need a separate authentication for each site in your network.
Why is a Super Admin account necessary?:
In WordPress Multisite, regular administrators of an individual site can’t edit users (and therefore customers) on the site.
You can use the Application Passwords feature to create a unique password for each site in your multisite network.
An individual WooCommerce Zap can’t be used by multiple individual sites in a multisite network. Instead, you will need separate Zaps for each site. To streamline this process, you can duplicate a Zap once you have created it for the first site. When duplicating, you only need to switch the WooCommerce authentication/account to the other site.
We also suggest setting up a
Server Cron Job for each sub-site on your network that uses WooCommerce Zapier.
Tip: You can read about creating and managing a multisite network on WordPress.org in the Create A Network article.
Yes! Please
see here for details.
Yes, variable products and individual variations are fully supported. Please see the
Product Actions and
Variable Products sections for full details.
WooCommerce Zapier Plugin Version 2.6 Required: Please ensure you update the WooCommerce Zapier plugin to version 2.6.0 to use this functionality.
The WooCommerce Zapier plugin includes
line item support since version 1.9.0. This includes having full support for handling arrays (lists) of data (such as multiple order line items).
Multiple line items can be used in supported action. For example, you can create an itemised invoice in Quickbooks or Xero with multiple (separate) line items, provided that both Apps support line items.
Alternatively, you can use the
Line Item in an Order trigger.
The same is true for all the other “array” type fields. For example in an order the
downloadable_files and the
notes fields.
Warning:
Zapier can support line items for specific apps but does not do so by default, so you’ll want to check to see if the action you want to pair with WooCommerce Zapier has line item support. Most often line item support relates to invoicing and financial apps, but some other apps do have support as well.
Please be careful while setting up the Line Item in an Order trigger. Tasks can be stopped and Zap can be disabled if the order doesn’t have a line item. This typically does not happen on a production site but can be common during development.
After changing the URL of your website, please go to
Zapier’s My Apps screen, and locate your existing WooCommerce authentication. Click the
Reconnect button and re-authenticate with your WooCommerce store’s new URL. This tells Zapier to communicate with your new URL rather than the old URL.
After doing so, we recommend then going to
Zapier’s My Zaps screen and editing and reviewing each WooCommerce Zap and testing them to confirm that they are still working as expected.
What Happens if I Did Not Change My Zapier Authentication?:
Change site Domain:
- The site continuously sends data to Zapier.
- When you edit a Zap, Zapier runs to an error (because of the old missing URL), and your site stops sending data.
- Your site could not receive any data, and all of your actions will fail.
Copy the site to a new URL:
- Both the old and the new site send data to Zapier.
- Only your old site receives data.
- When you edit a Zap, Zapier notifies the old site about the change, but your new site stops sending data.
The Subscription resource
doesn’t natively support accessing a subscription’s meta data.
However, there is a workaround. In your Zap, find the associated order for the subscription, as this order is typically for the initial payment, which often contains the required metadata.
For example:
- Step 1. WooCommerce app —> Subscription Resource, and Subscription created Trigger Rule.
- Step 2. WooCommerce app —> Find Order action, where the “Order ID” equals the value from the
parent_id field from the newly created Subscription in Step 1. This finds the original order for the subscription that was just created.
Your subsequent Zap step(s) can then use the data from the Order step (Step 2), rather than the Subscription step (Step 1).
Yes, the Booking resource
supports sending booking data from your store to Zapier. See options in
Trigger Rules.
It does not support creating or updating Bookings via Zaps, because WooCommerce Bookings itself does not natively support creating or updating Bookings via their REST API endpoints.
If you would like us to add Booking actions as a feature, please see the
Can This Extension Do [feature]? section for how to request it.
Yes, the
Membership Plan and the
User Membership resources
support sending membership data from your store to Zapier.
It supports creating or updating User Memberships via Zaps, but not for Membership Plans, as WooCommerce Memberships does not natively support creating or updating Membership Plans via their REST API endpoints.
New features are added to this extension based on customer demand.
We recommend searching for your idea on the
WooCommerce Zapier Feature Requests board.
- If your idea has already been suggested, please add your vote for it.
- If your idea hasn’t already been suggested, post your idea on the Ideas Forum so that others can vote on your idea.
We review WooCommerce Zapier Ideas Forum suggestions regularly and use the votes to understand how many customers are interested in the ideas posted. We then take this into account when planning future releases of WooCommerce Zapier.
By default, the Order Date field is supplied in a universal timestamp format (
ISO 8601 as per Zapier’s specification).
If required, the date/time format can be changed in your Zap by adding a
Formatter action to your Zap. For further reference, see the
Formatter chapter.
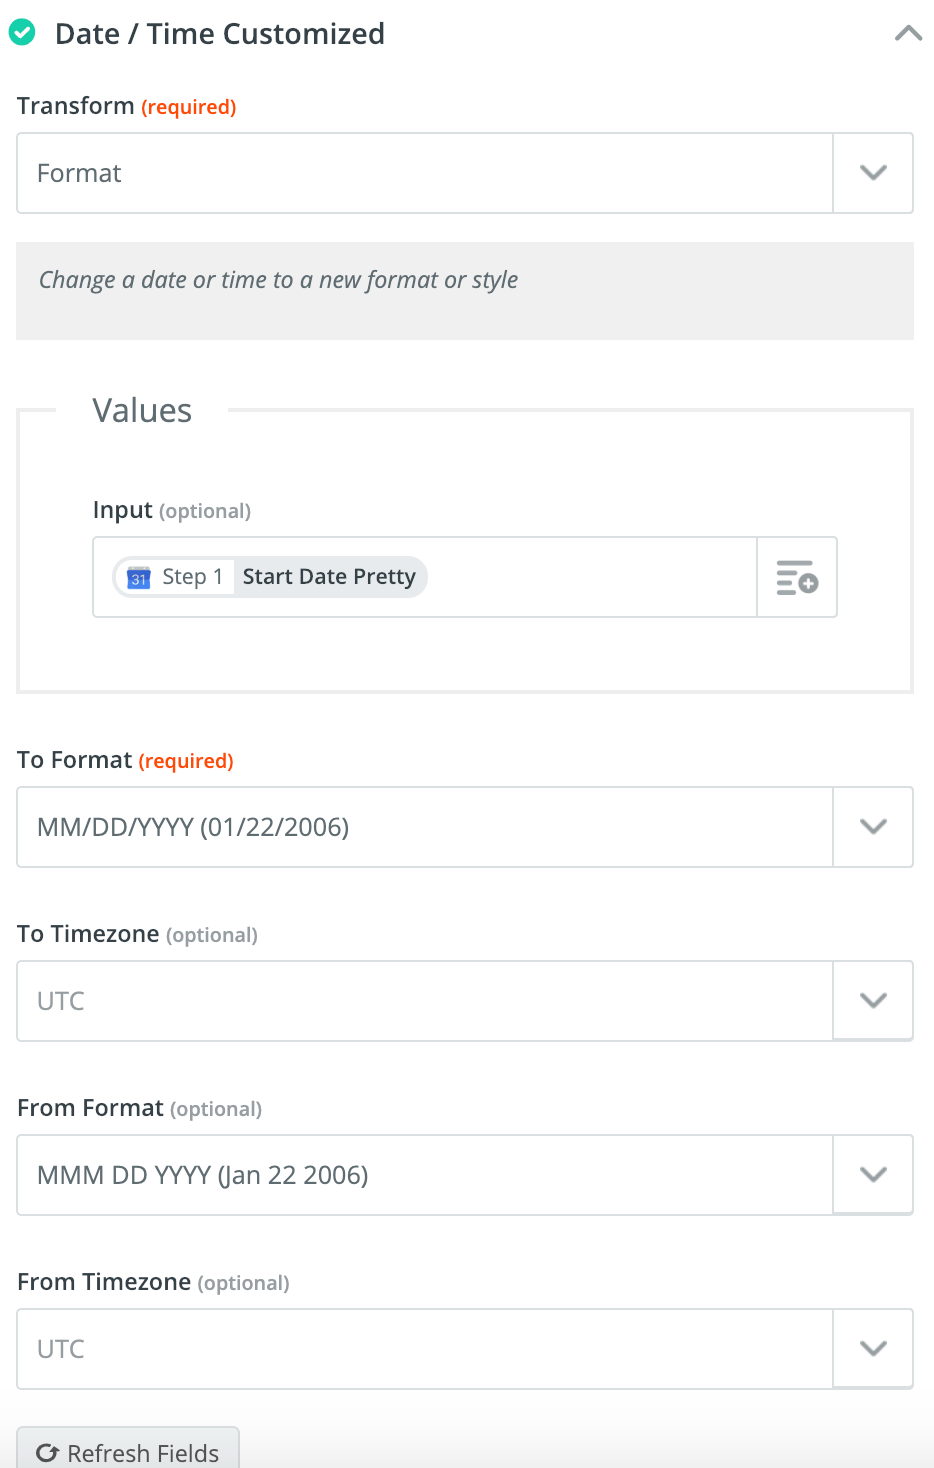
After you install and configure WooCommerce Zapier, your Zap(s) you can
transfer your data missed through an existing Zap.
Please see the
Resources page for full details and Data Field Definitions.
WooCommerce Zapier
always sends and receives your WooCommerce over an
HTTPS encrypted connection, which allows a secure connection between your WooCommerce installation and the Zapier.com service.
Your WooCommerce store requires an SSL certificate for this secure connection to operate. Please see
System Requirements for more details.
We also recommend familiarizing yourself with
Zapier Legal.
Please see the
GDPR Compliance chapter for more information on data privacy.
We, the developers of WooCommerce Zapier do not access, transfer or store any of your customer data whatsoever.
The WooCommerce Extension stores information on all the incoming or outgoing connections. Everything else is transferred as soon as possible from/to Zapier. The data is temporarily stored in memory and/or in a WordPress temporary table.
Please see the
GDPR Compliance chapter for more information on data privacy.
We, the developer of the Zapier Integration (OM4) do not transfer or store any of your customer data whatsoever. In the event of a support request, we request the WooCommerce status information and may request access to your WooCommerce store and Zapier account.
The WooCommerce Extension is designed to collect and send (or receive) supported Resources data to (or from) the Zapier service. You can see all the data in the
Field Definitions tables.
Please see the
GDPR Compliance chapter for more information on data privacy.
The WooCommerce Zapier Extension communicates directly between your WooCommerce store and Zapier. For reference, here are the
Zapier Privacy Policy and
Automattic (WooCommerce) Privacy Policy pages.
Please see the
GDPR Compliance chapter for more information on data privacy.
Always use the latest plugin version: Please ensure that you have updated to the latest version of the WooCommerce Zapier plugin.
Initial Setup
If you have issues during the initial set up of a Zap in Zapier, please refer to the
Authentication Errors chapter below, or Zapier’s
Troubleshooting documentation.
Once You’re Up and Running
Once your initial setup and configuration are completed and your WooCommerce Zapier integration(s) are running, most of the time if a problem occurs, it will be shown in your
Zapier.com Task History screen.
If you experience stopped or halted tasks, please view the task details to decide what to do next. For further information, see the
Task History chapter.
If it is an error, you can usually find the related information in your
WordPress Dashboard’s Task History screen. From there you can navigate to the actual Resource and inspect its
WooCommerce Zapier History box, or you can
review the Logs in your WordPress dashboard.
Issues with Zaps
If you are having other problems with a Zap that you have created, we recommend
contacting Zapier Support. They are usually the best people to help you with any issues that you have within the Zapier dashboard, Zap configuration and/or behaviour.
General WooCommerce Issues
If you encounter errors or issues in WooCommerce, first visit the
WooCommerce Status Screen to identify and troubleshoot errors, or look at the
Logs.
If you need further support, please don’t hesitate to
Contact Us and send a support request.
Enabling Detailed Logging
To help troubleshoot and identify the exact cause of an issue, our support team may ask you to do the following:
- Please go to your WordPress Dashboard —> Side Menu —> WooCommerce —> Settings screen —> Zapier tab, and then tick the Enable Detailed Logging checkbox and Save changes.
This allows our support team to see detailed information about your store, and will usually help us resolve an issue.
Install or Update Issues
If you are having problems installing or updating the WooCommerce Zapier plugin to the latest version:
- Go to your WordPress Dashboard —> Side Menu —> WooCommerce —> Extensions —> My Subscriptions screen and verify that your woocommerce.com account is connected and WooCommerce Zapier license is active.
- On your WordPress Dashboard —> Side Menu —> WooCommerce —> Extensions —> My Subscriptions screen, click the Update button to force a refresh of your account data from Woo.
- Go to your WordPress Dashboard —> Side Menu —> Updates screen, and click the Check Again button to force WordPress to check for updates again.
- The WooCommerce Zapier plugin update should now show on the Updates screen. Select it and click Update Plugins to install the update.
- If you still encounter problems, disconnect and reconnect your Woo account connection. To do this, go back to your WordPress Dashboard —> Side Menu —> WooCommerce —> Extensions —> My Subscriptions screen, and hover over the Connected to woocommerce.com option and click Disconnect. Click Connect and follow the prompts, then retry steps 2-4 above.
- If you still encounter problems, please submit a ticket here and choose the Manage my WooCommerce.com account option so that the Woo support team can assist.
Below are some common errors and issues that can occur when you are Authenticating via the
Zapier.com Zap Editor interface.
Authentication Dialogue
When you create your first WooCommerce Zap, you will be asked to choose your WooCommerce account.
The authentication process involves the Zapier.com service connecting to your WooCommerce store using your WordPress administrator username and password.
Please ensure you complete the authentication dialogue window correctly:
- In the WordPress Site Address (URL) field, enter the URL to your WordPress website’s home (front) page. Be sure the URL starts with
https:// and does not include the trailing slash.
For example: https://example.com
If in doubt, go to the WordPress Dashboard —> Side Menu —> Settings —> General screen and copy the Site Address (URL) field value and paste it into the WordPress Site Address (URL) field in the authentication dialogue window.
- In the WordPress Username field, enter your administrator username or email address that you use when logging into the WordPress dashboard.
- In the WordPress Application Password field, create an Application Password for your WordPress administrator account, and enter it here.
Use a WordPress Application Password:
Using an application password (rather than your regular password) improves compatibility with security-related plugins and services. See details in the [Security Plugins](#security-plugins) chapter.

To set up an Application Password, go to **WordPress Dashboard** --> **Side Menu** --> **Users** --> **Profile** screen and press the "Add New Application Password" button. Please [see here for details](#application-passwords).

Can't see the Application Passwords settings in WordPress? Please [see here for suggestions](#application-passwords).

rnatively, if you are unable to create an Application Password, you can use your regular WordPress password.
Click the
Yes, Continue button to complete the process.
Authentication Errors
If you encounter an error whilst authenticating, please make a note of the red error message that you see in the Zapier Authentication popup window, and click on the error message below for the next steps.
WooCommerce returned “The username and/or password you supplied is incorrect.”. Error code: “woocommerce_rest_cannot_authorize” on https://example.com.:
WooCommerce returned “This user does not have the correct permissions.”. Error code: “woocommerce_rest_cannot_authorize” on https://example.com.:
- Your WordPress username and password was accepted when authenticating, however your user account does not have the necessary permissions. Specifically, you do not have permission to read WooCommerce webhooks. Valid for application-specific passwords as well for account passwords, as the Application Passwords feature does not change user permissions.
- Your website has a security solution or firewall that is blocking authentication attempts. For example, Cloudflare’s Web Application Firewall.
WooCommerce returned “Sorry, you cannot list resources.”. Error code: “woocommerce_rest_cannot_view” on https://example.com:
WooCommerce accepted your username and password, however there is an issue authenticating with the WooCommerce REST API.
“The WooCommerce Zapier plugin is missing or WordPress pretty permalinks may not be configured correctly. File Not Found” response received. HTTP status: “404” on https://example.com.:
A HTTP 404 (File Not Found) error was encountered when authenticating.
- Please ensure you complete the authentication dialogue window correctly.
- Ensure the Site Address (URL) that you entered is correct. It must be the full canonical URL of your WordPress website’s home (front) page, excluding a trailing slash. It should not be the URL to your WooCommerce shop page. If in doubt, go to the WordPress Dashboard —> Side Menu —> Settings —> General screen and copy the Site Address (URL) field value and paste it into the Site Address (URL) field in the authentication dialogue window.
- Make sure you have installed the WooCommerce Zapier plugin.
- Ensure that you have the latest version installed.
- Ensure you have your WordPress permalink settings other than the default (see the requirements the System Requirements chapter).
- Go to your WordPress Dashboard —> Side Menu —> Settings —> Permalinks screen and click Save to flush your permalinks.
Authentication response starts with a BOM character.:
At least one file in your WordPress website has a special byte-order mark (BOM) character in it. This causes every request to your website to contain a mostly invisible BOM character at the beginning of every response.
This invalid character doesn’t usually cause an issue for web browsers, however, it does cause an issue for apps (such as WooCommerce Zapier) that use the WooCommerce REST API for communicating with your website.
In our experience, the most likely cause is that the offending character is at the very beginning (or end) of your wp-config.php file. Or possibly it is at the very beginning and end of a plugin or theme file that you have installed.
This BOM character article has some suggestions on which text editors you can use to help you find this character. It may also be necessary to temporarily switch to a default WordPress theme and deactivate all plugins (except WooCommerce and WooCommerce Zapier), and then reactivate them one-by-one to determine which one is causing the problem.
These general WordPress/WooCommerce configuration issues need to be solved for WooCommerce Zapier (and other REST API based integrations) to work correctly.
You can test your site with the W3C Internationalization Checker.
Authentication response parse failed.:
Your WooCommerce store did not respond with valid JSON when authenticating.
Authentication response is missing required information.:
Your WooCommerce store isn’t responding as with a valid authentication message.
HTTPS (secure) connection required.:
- Make sure you’re communicating to your WooCommerce store via HTTPS, and the URL you enter starts with
https://.
- If your WooCommerce store does not support HTTPS, please contact your website host or web developer.
Sorry, your connection isn’t secure. Please use TLS (HTTPS) to continue.: – Review the SSL Check Failing information to resolve this issue.
“Moved Permanently” response received. HTTP status: “301” on https://example.com.:
A HTTP redirect was encountered when authenticating.
Other redirect error variations:
- “Multiple Choices” response received. HTTP status: “300” on https://example.com
- “Moved Permanently” response received. HTTP status: “301” on https://example.com
- “Found” response received. HTTP status: “302” on https://example.com
- “See Other” response received. HTTP status: “303” on https://example.com
- “Not Modified” response received. HTTP status: “304” on https://example.com
- “Use Proxy” response received. HTTP status: “305” on https://example.com
- “Temporary Redirect” response received. HTTP status: “307” on https://example.com
- “Permanent Redirect” response received. HTTP status: “308” on https://example.com
Solutions:
- Ensure the Site Address (URL) that you entered is correct. It must be the full canonical URL of your WordPress website’s home (front) page, excluding a trailing slash.
- Ensure that you don’t have any plugins or custom code that is enforcing a trailing slash on your website URLs.
- Check for redirection plugins, including the redirects configured in the redirection plugin.
- Check information about security plugins.
- Try to disable any third-party plugins, particularly redirection plugins.
“Bad Request” response received. HTTP status: “400” on https://example.com.:
“Not Acceptable” response received. HTTP status: “406” on https://example.com.:
Your website is hosted with WordPress.com, or it is using Jetpack’s WordPress.com Secure Sign On (SSO) feature.
Please follow these instructions to authenticate successfully.
Request to /wc-zapier-auth/v1/authenticate failed, reason: read ECONNRESET:
There is a network-level communication issue between the Zapier service and your website that is preventing the authentication request from succeeding. Specifically, the TCP connection between zapier.com and your website was unexpectedly closed.
The underlying cause of this problem is typically outside of the control of WooCommerce Zapier, and we, unfortunately, aren’t able to resolve it for you.
- Your web host or web server has some kind of firewall or security appliance that is preventing the authentication request from completing.
- Contact your web hosting provider and point them to our authentication request documentation so that they can ensure their network and server(s) are not blocking WooCommerce Zapier authentication requests.
- Migrate your website to another hosting provider, wait for the DNS changes to propagate, and then try authenticating again.
- An HTTPS/SSL configuration issue exists. Review the SSL Check Failing information to potentially resolve this issue.
- Please contact us if you are unable to resolve this issue.
If you continue to encounter an authentication or communication error, and you are sure your username and password are correct, then it is likely you have a security-related service or plugin on your website that is preventing Zapier from authenticating with your WooCommerce store. See the
Compatibility Issues chapter for more details. If the above suggestions do not resolve your issue, please
contact support for further assistance.
Using Detailed Logging to Determine the Reason for an Authentication Failure
If you still are unable to identify the cause of your authentication issues, please try the following:
- Ensure that you have the latest version of WooCommerce Zapier installed.
You will need to be running version 2.0.2 or newer to complete the following steps.
- Enable detailed logging by going to your WordPress Dashboard —> Side Menu —> WooCommerce —> Settings screen —> Zapier tab, and then tick the Enable Detailed Logging checkbox and Save changes.
- Return the to Zap Editor on Zapier.com, and try and re-authenticate.
- The authentication attempt will likely fail again, however, this time a detailed reason why it failed will be recorded in your WooCommerce logs.
- Go to your WordPress Dashboard —> Side Menu —> WooCommerce —> Status screen —> Logs tab and select the newest log whose name starts with
woocommerce-zapier. Press the View button.
- The log should contain an
Authentication attempt failed or Authentication validation failed message, along with a detailed reason that should help you determine the problem.
If you solved the issue, that’s great!
If you’re not able to solve the issue yourself, please
contact support and be sure to include the red error message from step 3 and the logged error message from step 6.
Tip: Please be sure to disable detailed logging once you have successfully authenticated.
Network-connected devices, configurations or other software can interfere and cause problems with the communication between your store and Zapier.com. Including but not limited are CDNs, Load Balancers, firewalls, or server software or specific configurations.
If you’re using WordPress 5.6 or later, ensure you are utilising the
Application Password feature for maximum compatibility. Please see the
Security Plugins chapter for details on various third-party plugins.
Hosting Providers
Security settings in the following hosting providers are known to cause issues when authenticating.
WordPress.com Secure Sign On
If you are using
Jetpack’s WordPress.com Secure Sign On feature, you will likely be logging in to your website’s dashboard using your WordPress.com email address and password.
To successfully authenticate Zapier with your WooCommerce store, you need to use an
Application Password:
- Log into WordPress.com.
- Switch to your site in the side menu.
- Go to the Side Menu —> Jetpack —> Dashboard, and click the Settings button in the top right corner.
- Inspect the status of the Allow users to log in to this site using WordPress.com accounts toggle.
- If the toggle is
- Off: you can navigate WordPress Dashboard —> Side Menu —> Users —> Profile page.
- On: you need to manually type
https://<YOUR SITE NAME>/wp-admin/profile.php URL in your browser. Use your site URL, not wordpress.com to access your WordPress profile page.
- Note your Username, as you need to use this username when authenticating later.
- Create an Application Password as described here.
- Return to Zapier.com and authenticate again, but instead of using your wordpress.com credentials, you will use:
- Your username from step 6 above.
- Your password from step 7 above.
Congratulations, you have successfully authenticated your WooCommerce store with Zapier.
You will continue to log into your WordPress Dashboard (
wp-admin) using your WordPress.com email address and password, but whenever you authenticate your WooCommerce store with Zapier, you will use your application-specific password or WordPress username/password from the above steps.
Cloudflare Web Application Firewall (WAF)
If you are using Cloudflare’s Web Application Firewall feature, you will likely need to whitelist the WooCommerce Zapier REST API endpoints.
Please see the
WAF documentation and the
WooCommerce Zapier developer documentation.
Security Plugins
See
Plugin Compatibility for supported security plugin information. If you have a plugin installed that prevents the connection between Zapier.com and your site, please try temporarily disabling the security plugin(s), authenticating, and then re-enabling the security feature(s) once you have successfully authenticated.
Two-Factor Authentication
The WooCommerce Zapier Integration is generally compatible with most security plugins that enforce two-factor authentication (2FA), provided that you are using the WordPress
Application Password feature. Please
use an application-specific password if you encounter a problem.
Alternatively, consult the security plugin’s documentation as they may have their own application-specific password feature, and use that when authenticating WooCommerce with Zapier.
Please see the
Security Plugins chapter for a list of known compatibility statuses.
Whitelisting
It isn’t usually feasible or practical to whitelist
Zapier’s IP addresses, because they use Amazon AWS, which means the authentication attempts that come from
IP addresses are regularly changing.
However, you can set it for the plugin
API Endpoints.
Incompatible Plugins
Please review the
list of incompatible plugins in case one of those isn’t causing your authentication issues.
Errored Tasks
Task errors can occur for a wide variety of reasons, but you can always see the exact reason when you open your task history and look at the error message. Here is an example of a task error:

The most common errors related to the WooCommerce Zapier plugin:
| Error message(s) |
Possible Solution(s) |
| Management of Product Prices is not available. Please update the WooCommerce Zapier plugin to version 2.6 or later. |
If you want to use the new Update Product Price action, ensure you are running the latest WooCommerce Zapier plugin (version 2.6.0 or newer). |
| Management of Product Stock Quantities is not available. Please update the WooCommerce Zapier plugin to version 2.5 or later. |
If you want to use the new Update Product Stock Quantity action, ensure you are running the latest WooCommerce Zapier plugin (version 2.5.0 or newer). |
| Bookings are not enabled. Please update the WooCommerce Zapier plugin to version 2.2 or later and ensure the WooCommerce Bookings plugin is installed and configured correctly. |
If you want to use the Bookings Resource, install and activate the WooCommerce Bookings plugin and ensure you are running the latest WooCommerce Zapier plugin (version 2.2.0 or newer). |
| Memberships are not enabled. Please update the WooCommerce Zapier plugin to version 2.10 or later and ensure the WooCommerce Memberships plugin is installed and configured correctly. |
If you want to use the Membership Plan, or User Membership Resources, install and activate the WooCommerce Memberships plugin and ensure you are running the latest WooCommerce Zapier plugin (version 2.10.0 or newer). |
| Coupons are not enabled. Please make sure the feature or plugin is configured correctly on… |
Please enable Coupons in the WooCommerce Settings by following those instructions. |
| Subscriptions are not enabled. Please make sure the feature or plugin is configured correctly on… |
If you want to use the Subscription Resource, install and activate the Woo Subscriptions plugin. |
| Sorry, you cannot view this resource. Error code: woocommerce_rest_cannot_view on https://example.com… |
Your WooCommerce webhook is misconfigured. See here for suggestions. |
| Create Resource response parse failed.
Update Resource response parse failed.
Search Resource response parse failed.
List Resource response parse failed. |
Your WooCommerce store’s WooCommerce REST API isn’t responding with valid JSON, so your task has been halted.
Ensure your website is publicly accessible, including disabling any “Coming Soon” or “Maintenance Mode” plugins.
Enable detailed logging and review the REST API logs to see what unexpected data is being returned.
Check for incompatible plugins.
Review the REST API Issues guide.
Please contact support for further assistance.
Once the issue has been resolved, replay your halted task(s). |
| Hook Resource response parse failed. |
Your WooCommerce store’s webhook mechanism is sending invalid JSON to Zapier, so your task has been errored. |
- [Ensure your website is publicly accessible](#coming-soon-or-maintenance-mode), including disabling any “Coming Soon” or “Maintenance Mode” plugins.
- [Review the WooCommerce Webhook Delivery Logs](https://woocommerce.com/document/webhooks/#webhook-logs).
- Review the [REST API Issues](#rest-api-issues) guide.
- Please [contact support](https://docs.om4.io/woocommerce-zapier/support/) for further assistance.
|
Halted Tasks
Most of the time when a Zapier task is halted, this is the expected behaviour. For example, if you use a
Filter by Zapier step] and the incoming data does not match what your filter criteria.
Another common reason why a task is halted is that WooCommerce cannot perform the specific task on the Resource. Every halted task has a detailed reason that you can refer to on the task details page.
For example for the latter, the task will be halted if you are trying to create a new coupon with a coupon code that already exists:


Info: There are many possible reasons why a Zapier task can’t be completed. The WooCommerce Zapier plugin handles these cases for you to prevent introducing a problem in WooCommerce and always provides a detailed explanation on the task details page.
Resource Sent with Wrong Status
WooCommerce Zapier uses
Action Scheduler, which is a WooCommerce core feature that needs to be working correctly for WooCommerce Zapier to send data to Zapier.
This means that data is not sent immediately to Zapier. Instead, the data is queued to be sent asynchronously in the background.
This helps ensure that your customers don’t experience a slow checkout process. It also allows the extension to send the data if there is an error communicating with Zapier.
A typical delay is between
ten seconds and
one minute, but the delay can be much longer in a staging/testing/development environment or sites with extremely low traffic.
If a Resource status changes during scheduling and sending to Zapier, WooCommerce will send the Resource with the new status information to Zapier. Furthermore, if you are using the
Order status changed (any status) or the
Subscription status changed (any status) trigger rules, in this case, Zapier will receive the same data multiple times.
Info: There is an automatic de-duplication implemented in the Zapier platform, to prevent fire multiple tasks. Please Contact Us if you are experiencing the above problem.
Common causes of data not sending to Zapier:
Webhook Issues
WooCommerce Zapier uses WooCommerce’s built-in webhook mechanism to send data to Zapier.
Webhook Missing or Disabled
If WooCommerce encounters an error when sending data to Zapier, it will automatically disable the webhook, which stops future data from being sent to that Zap.
Please go to the
WooCommerce Webhooks screen, and look for any disabled
WooCommerce Zapier webhooks. If you find any, please edit each one and change them to active so the new data can be sent to Zapier.
If a WooCommerce Zapier webhook is missing or has been accidentally deleted, please
go to Zapier.com and turn your WooCommerce Zap(s) off and on again, which will recreate the webhook in WooCommerce.
Note: WooCommerce can disable a webhook if it continuously fails to deliver. If a webhook was unexpectedly disabled, please search the Webhook ID in the Failed Tasks in the Action Scheduler to determine the reason.
Webhook Payload Issues
WooCommerce’s webhooks are created automatically by WooCommerce Zapier, and they are tied to the WordPress user that created them.
If that WordPress user account is deleted, the webhook(s) assigned to that user will stop working.
Similarly, if the WordPress user is still present but their permissions have changed (for example, being changed from an Administrator to a Contributor), the webhook(s) will also stop working.
Both of these cases will result in:
- Zapier Tasks stopped with the following error message: Sorry, you cannot view this resource. Error code: woocommerce_rest_cannot_view on https://example.com.
- An Unexpected WP_Error payload for Webhook error message being logged in the WooCommerce Zapier Logs.
Follow these steps to resolve the problem:
- Visit the Zapier website to view your WooCommerce app’s connections.
- Click on the 3 dots next to your connection(s), then click Reconnect.
- Follow the prompts to reauthenticate your WooCommerce account. See our Zapier Authentication documentation for more information on how to authenticate.
- Repeat the above steps for each WooCommerce connection that you have listed.
- Once you have re-authenticated, go to the WooCommerce Zaps screen and turn each of your WooCommerce Zap(s) off and on again. This will recreate each webhook in WooCommerce.
- (Optional) You can send any missing data retrospectively. The above error logs will list each Resource ID (such as an Order ID or Product ID) so you know which records to transfer.
If you have a different
ERROR message logged or displaying in your Zapier Task History, please
Contact Us for further assistance, and include a full copy of your WooCommerce Zapier Logs.
Action Scheduler
WooCommerce Zapier uses
Action Scheduler, which is a WooCommerce core feature that needs to be working correctly for WooCommerce Zapier to send data to Zapier.
This means that data is not sent immediately to Zapier. Instead, the data is queued to be sent asynchronously in the background.
This helps ensure that your customers don’t experience a slow checkout process. It also allows the extension to send the data if there is an error communicating with Zapier.
A typical delay is between
ten seconds and
one minute, but the delay can be much longer in a staging/testing/development environment or sites with extremely low traffic.
The WooCommerce Action Scheduler facility uses WordPress’ built-in Cron for scheduling. This means it will only work correctly if your WordPress Cron is working correctly and subsequently WooCommerce Zapier’s ability to send data to Zapier.
Action Scheduler has a dedicated website. Also, you can find further information
in this article on how to troubleshoot the Action Scheduler queue or WordPress Cron execution issues.
Pending Tasks
On the
Action Scheduler screen, you can check the Pending tasks by clicking on the
Pending filter.
Look for tasks with a hook name of
woocommerce_deliver_webhook_async. If you have one or more, it means that queued trigger data hasn’t been sent yet.
You can manually run Pending tasks from that screen, but if tasks remain pending, you will need to identify why the Action Scheduler queue isn’t automatically processing tasks. Usually, the origin of the problem is a malfunction in the
WordPress Cron system. See the
WordPress Cron chapter for more details.
If the problem persists, go to your
Logs screen and look for any errors in the recent logs, it may have information that helps identify the problem.
Failed Tasks
To check for Failed tasks, go to your
Action Scheduler screen, then click on the
Failed filter (if it doesn’t exist, you don’t have failed tasks).
There you can search for your Resource by ID (such as an Order ID or Product ID) to confirm if the Resource was sent to Zapier or not in the first place. Unfortunately, there is no option to resend a failed task. Please see the
Transferring Existing Data Using a Zap chapter if you want to send previously failed data.
If the timeout is the reason, this often occurs when Action Scheduler has too many jobs, and the allowed time limit for PHP is not enough. (The default setting is 30 seconds.) To overcome this limitation, you need to modify the PHP
max_execution_time settings in your hosting environment. If you can, please set it to at least
120 seconds.
You can tweak the Action Scheduler behaviour further with the
Action Scheduler High Volume plugin.
Important: The Action Scheduler High Volume plugin only works correctly if your max_execution_time PHP settings are at least 120 seconds.
If you have failed tasks or the Action Scheduler High Volume plugin can’t solve the issue, please
Contact Us and copy the log column and include it when you send a support request.
WordPress Cron
If your data is being sent to Zapier erratically, or if your data is being sent slowly or in a delayed fashion, you may have a problem with the
WordPress Cron system. If your WordPress installation’s cron system isn’t working correctly, WooCommerce Zapier will not work correctly either.
The
WP Crontrol plugin can help pinpoint cron issues. First, it tests the WordPress Cron spawner on your site and reports the error message if it fails. Also, you can check it manually by going to the
WordPress Dashboard —>
Side Menu —>
Tools —>
Cron Events screen and looking for the “Next Run” columns. If the dates are mostly in the past, especially multiple days or more, your WordPress Cron is not working as expected.
Tip: You can test yourself if the WordPress Cron can run by opening the site WP-Cron endpoint in your browser. For example, https://example.com/wp-cron.php. After that page is loaded, go back and reload the Cron Events screen. If the “Next Run” columns are not changed, your WordPress Installation has a deeper problem. Otherwise, you can use the Server Cron Job or Uptime Services solutions.
Alternate Cron
If your Zaps are receiving an error message such as
rest_api_unavailable or
The Rest API is unavailable. when WooCommerce data is sent to Zapier, you may affect this
known issue with WooCommerce core itself, which causes the
rest_api_unavailable error to occur when delivering data via webhooks. This affects WooCommerce Zapier and any other services that rely on WooCommerce’s webhooks facility.
The problem only occurs when you use WordPress’
ALTERNATE_WP_CRON feature.
Until WooCommerce core fixes the issue in WooCommerce itself, it is necessary to disable
ALTERNATE_WP_CRON on your site.
This WordPress article explains where this constant is defined. Therefore, removing that line from your
wp-config.php file is necessary.
Server Cron Job
Do not configure a cron job for both Action Scheduler and WordPress Cron.:
If your WordPress Cron is working correctly, you only need to configure the cron job for Action Scheduler.
Otherwise, we recommend configuring for WordPress Cron itself.
This is the recommended approach for reliable and timely delivery of your WooCommerce data to Zapier.
If your server has
WP-CLI installed, we suggest setting up a cron job that processes the Action Scheduler/WordPress Cron queue, for example:
cd /path/to/wordpress/ && wp action-scheduler run
cd /path/to/wordpress/ && wp cron event run --due-now
cd /path/to/wordpress/ && php wp-cron.php?doing_wp_cron
(where
/path/to/WordPress/ is the path to your WordPress installation).
If your cron configuration is working as expected, you can disable WordPress’ default WP-Cron behaviour by adding the following line to the
wp-config.php file:
define('DISABLE_WP_CRON', true);
Your web host can usually assist with setting up this cron job.
If you are interested,
see here for more details on Action Scheduler WP-CLI commands.
See here for the WP-CLI cron command.
Using WordPress Multisite:
The above server cron job will execute for your multisite network’s main (primary) site.
To use WooCommerce Zapier on multiple sites within a multisite network, you will need a separate server cron job for each site (with a different --url= parameter for each). For example:
cd /path/to/wordpress/ && wp --url=example.com/au action-scheduler run
cd /path/to/wordpress/ && wp --url=example.com/uk action-scheduler run
cd /path/to/wordpress/ && wp --url=example.com/us action-scheduler run
cd /path/to/wordpress/ && wp --url=example.com/au cron event run --due-now
cd /path/to/wordpress/ && wp --url=example.com/uk cron event run --due-now
cd /path/to/wordpress/ && wp --url=example.com/us cron event run --due-now
(where example.com is the URL of the individual site running WooCommerce Zapier, minus the https:// prefix).
If you aren’t sure which values to use for the --url= parameters, please run a wp site list command on your server and use the URL column to determine the URL for each site.
Test Your Cron Job:
We suggest logging into your server via SSH and running them manually to confirm that you have the correct command(s) for your cron job(s).
A working command should output something such as:
Success: 2 scheduled tasks completed.
Success: Executed a total of 2 cron events.
If you receive another response such as a `command not found, we suggest contacting your web host to confirm that WP-CLI is installed on your server.
Uptime Services
A less technical solution is to create a free
Pingdom or
UptimeRobot account and point it to your site’s WP-Cron endpoint. For example,
https://example.com/wp-cron.php?doing_wp_cron.
This should make WordPress Cron fire regularly (from every 30 seconds using Pingdom to every 5 minutes using UptimeRobot).
Using WordPress Multisite:
If you use WooCommerce Zapier on multiple sites in your multisite network, you will need an uptime check for each wp-cron.php page. For example:
- https://example.com/au/wp-cron.php?doing_wp_cron
- https://example.com/uk/wp-cron.php?doing_wp_cron
- https://example.com/us/wp-cron.php?doing_wp_cron
PayPal Payment Processor
If you are using PayPal payments on your store, please ensure that PayPal Instant Payment Notification (IPN) is properly configured.
Please go to your
WordPress Dashboard —>
Side Menu —>
WooCommerce —>
Settings screen —>
Payments tab and click on
PayPal. Ensure that the
Receiver Email setting is correct and matches your PayPal email address.
Alternatively, you can enable Payment Data Transfer (PDT) in your WooCommerce dashboard. The PayPal Standard documentation has a section about
how to enable PDT.
REST API Issues
The REST API is how Zapier communicates with your WooCommerce store to send and receive data, so your WooCommerce store’s REST API must be operational and working correctly.
We have listed some of the most common error messages that you may encounter when using WooCommerce Zapier with a WooCommerce store with REST API configuration issues:
Authentication response parse failed.Authentication response is missing required information.Create Resource response parse failedUpdate Resource response parse failedSearch Resource response parse failedList Resource response parse failedHook Resource response parse failedWooCommerce returned "..."WooCommerce returned "There has been a critical error on this website. Learn more about troubleshooting WordPress."Webhook Subscribe response parse failed.Webhook Unsubscribe response parse failed.We’re having trouble loading 'Trigger Rule' data (WooCommerce returned "...".)We’re having trouble loading 'Trigger Rule' data (This user does not have the correct permissions.)We’re having trouble loading 'Trigger Rule' data (WooCommerce returned "There has been a critical error on this website. Learn more about troubleshooting WordPress.")Trigger Rule response parse failed.Input Fields response parse failed.
WooCommerce REST API
If your WooCommerce REST API is not working correctly, please consult the
Getting Started with the REST API guide for details on how to verify that your REST API is working correctly.
Info: To connect Zapier, you don’t need to install an extra REST Auth plugin or manage REST API keys or Webhooks in your store. The integration automatically handles those for you.
Coming Soon or Maintenance Mode
The most common cause is a simple one: your WooCommerce store isn’t publicly accessible because you have a “Coming Soon” or “Maintenance Mode” plugin active. Please try deactivating it, and ensure that people can view/visit your website without needing to log in to WordPress.
Invalid or Untrusted SSL Certificates
Your website must also have a valid and trusted SSL certificate installed for Zapier to communicate with your WooCommerce store.
If you encounter an error message such as
certificate verify failed, it usually means that the Zapier service isn’t able to successfully connect to your WooCommerce store because it uses an SSL certificate that was issued from a Certificate Authority that Zapier doesn’t trust.
Please
consult this Zapier guide and
this Zapier guide for further instructions, and if the problem persists please contact Zapier support for assistance.
Debug Output
WordPress or PHP debug output can render REST API responses invalid, so make sure the
WP_DEBUG_DISPLAY constant is set to false in your site’s
wp-config.php file:
define( 'WP_DEBUG_DISPLAY', false );
Please see here for more details.
SSL Check Failing
For the WooCommerce REST API authentication process to work correctly, your website must be configured to use SSL correctly.
If your
status screen shows
SSL as red (No), then you will be unable to authenticate your WooCommerce store with Zapier:

Often this issue results in one of the following error messages when you authenticate your WooCommerce store with Zapier:
- Sorry, your connection isn’t secure. Please use TLS (HTTPS) to continue.
- Sorry, you cannot list resources.
Also, if you
review your WooCommerce Zapier logs, you will likely see the following error message:
CRITICAL: Authentication validation failed via ping. TLS (HTTPS) required.
To resolve this issue, you will need to contact your web host and let them know that WordPress core’s
is_ssl() function is returning
false during WooCommerce REST API requests, and ask them to resolve this for you. Often it is an indication that your website’s SSL/HTTPS configuration isn’t correct.
You can also go
here and perform an SSL Server Test for your website. This test can often identify common SSL misconfigurations that may need to be fixed by your web hosting provider for WooCommerce Zapier to work correctly.
WooCommerce REST API Authentication
If you are still receiving the
Sorry, you cannot list resources. error message after trying the above steps, then this usually means that WooCommerce’s REST API is unable to authenticate using a standard consumer key and secret, which means that WooCommerce Zapier is unable to work as expected.
For WooCommerce Zapier to operate correctly, your website must have a working WooCommerce REST API. This is listed in our
System Requirements.
You can check whether your WooCommerce REST API authentication mechanism is working by following
this documentation which explains how to create a consumer key and secret, and then test if your REST API is working by querying the
https://example.com/wp-json/wc/v3/orders?consumer_key=XXXX&consumer_secret=XXXX endpoint to confirm that it returns an
HTTP 200 OK response and not an
HTTP 401 Unauthorized response.
If the response is
401, then please review our list of
known incompatible and conflicting plugins.
If you are still receiving a
401 response, please use a separate staging/test environment to temporarily switch to a default WordPress theme and deactivate all plugins (except WooCommerce), and then try authenticating to your test environment. If it works, then you can reactivate your plugins one by one to determine which one is causing the authentication problem.
If authentication still isn’t working with only the WooCommerce plugin active, then this indicates that WooCommerce core’s built-in REST API authentication isn’t working as it should. Please
log into your Woo account and submit a support request to the WooCommerce core support team so that they can investigate and identify why WooCommerce core’s REST API query parameter authentication mechanism isn’t working as expected.
Other Resources to Assist With REST API Issues
Here are some other great resources that may also be helpful:
Zapier Service Outages
From time to time, the Zapier.com service may have an outage or a period of downtime. This can cause delays or occasionally skipped or errored tasks. Please be patient, up until the issue is resolved by Zapier and do not attempt to resubmit data.
If all Zapier services are working normally, you can start collecting information on what data missing.
To identify which data you need to resubmit, first look at the
Zapier Task History page, and search for any errors. You can replay a task from this page.
If you still have missing data, because they have not arrived at Zapier at all, you can resend them with specific triggers. For further reference see
transferring data through an existing Zap chapter.
Tip: For the current Zapier service status information, please visit the Zapier Status page.
WooCommerce core contains some experimental and opt-in features that may affect the behaviour of WooCommerce Zapier.
Below is a list of these features and their compatibility with WooCommerce Zapier.
Cart and Checkout Blocks
WooCommerce Zapier version 2.10 or later includes support for the
Cart & Checkout Blocks feature. If you are using WooCommerce Zapier version 2.9 or earlier, you must update to version 2.10 or later before enabling the new block-based Checkout in WooCommerce. After doing so, your WooCommerce Zaps should continue to work.
WooCommerce Memberships does not support Cart and Checkout Blocks: Although WooCommerce Zapier fully supports the new Cart and Checkout Blocks feature in WooCommerce, you cannot use it together with the WooCommerce Memberships plugin, as it is not compatible with that feature.
For the best possible experience, please ensure you are using the latest versions of your WooCommerce plugin and extensions before enabling the new cart/checkout in WooCommerce.
| Plugin |
Minimum Version For Cart/Checkout Blocks |
| WooCommerce Zapier |
Version 2.10 or higher |
| WooCommerce |
Version 7.6 or higher |
Please consult the
Cart & Checkout Blocks documentation for further information.
New Draft Order Status:
WooCommerce’s new Checkout results in orders being created with a Draft (checkout-draft) status.
If you are using Order Triggers or Actions, we recommend reviewing your Zap configuration to ensure that your Zaps continue to work as expected with the new Draft order status.
High-Performance Order Storage (HPOS)
WooCommerce Zapier version 2.7 and later includes support for WooCommerce’s
High-Performance Order Storage (HPOS) feature. If you are using WooCommerce Zapier version 2.6 or earlier, you must update to version 2.7 or later before enabling HPOS in WooCommerce. After doing so, your WooCommerce Zaps should continue to work with or without enabling HPOS.
For the best possible HPOS experience, please ensure you are using the latest versions of your WooCommerce plugin and extensions before enabling HPOS in WooCommerce.
| Plugin |
Minimum Version For HPOS |
| WooCommerce Zapier |
Version 2.7 or higher |
| WooCommerce |
Version 7.8 or higher |
| Woo Subscriptions |
Version 5.3 or higher |
Legacy Feeds are not compatible with HPOS:
If you are using a Legacy Feed (created before version 2.0), it will not be compatible with HPOS.
You must migrate your Legacy Feeds and Zaps before enabling HPOS in WooCommerce.
Order Attribution
WooCommerce 8.5 introduced an
Order Attribution Tracking feature to help store owners understand where their orders are coming from.
This data is included in the Order data sent to Zapier. Please see
Order Data Fields documentation for more information.
With thousands of WooCommerce extensions, addons and plugins available for WooCommerce, and a similar amount of integrations for Zapier, it can be challenging to know if they are compatible with WooCommerce Zapier.
Below is a list of WooCommerce Extensions and plugins that are
supported,
compatible, and
partially compatible with WooCommerce Zapier.
Also listed are
security plugins that may interfere with WooCommerce Zapier, as well as
partially compatible integrations.
Tip: If a WordPress plugin or Zapier Integration that you are using isn’t listed below, it doesn’t necessarily mean it is or isn’t compatible. You can always purchase the WooCommerce Zapier extension and use the 30-day money-back guarantee to try it yourself.
The following WooCommerce extensions are actively supported by WooCommerce Zapier:
WooCommerce Bookings
Compatibility with the
WooCommerce Bookings plugin was added in version 2.2 of WooCommerce Zapier. You must be running at WooCommerce Bookings version 1.15.55 or later.
If you have WooCommerce Bookings installed, you can use Bookings data in your Zaps (Triggers only).
More on how to use Bookings in WooCommerce Zapier.
WooCommerce Memberships
Compatibility with the
WooCommerce Memberships plugin was added in version 2.10 of WooCommerce Zapier. You must be running WooCommerce Memberships version 1.25.0 or later, and PHP version 7.4 or later.
If you have WooCommerce Memberships installed, you can use Membership data in your Zaps, including
Membership Plan and
User Membership.
Woo Subscriptions
Compatibility with the
Woo Subscriptions plugin was added in version 1.6 of WooCommerce Zapier. You must be running at Woo Subscriptions version 4.2.0 or later.
If you have Woo Subscriptions installed, you can use Subscription data in your Zaps (Triggers and Actions).
More on how to use Subscriptions in WooCommerce Zapier.
Checkout Field Editor
Compatibility with the
WooCommerce Checkout Field Editor plugin was added in version 1.1 of WooCommerce Zapier.
Any additional checkout fields added to your store by the WooCommerce Checkout Field Editor plugin will be sent to Zapier, allowing you to use your custom checkout fields in your Zaps that use any
Order trigger events.
You may also wish to view the
Checkout Field Editor documentation.
Below is a list of WooCommerce extensions that are compatible with WooCommerce Zapier.
Sequential Order Numbers Pro
WooCommerce Zapier is compatible with the
WooCommerce Sequential Order Numbers Pro plugin since version 1.1.
If using the WooCommerce Sequential Order Numbers Pro plugin, we recommend using the
number data field (not the
id data field) in your Zap Triggers. See the
Order Data Fields documentation for full details on the
number field.
You may also wish to view the
Sequential Order Numbers Pro documentation.
WooCommerce Order Status Manager
Custom order statuses created with the
Order Status Manager extension are supported in the
Order data Status field when using Order triggers and actions
However, a dedicated Trigger Rule for
Order status changed to … is not available for created custom order statuses.
If you would like to trigger a Zap when an order changes to a custom status, we’d recommend using the
Order status changed (any status) trigger rule, which triggers every time an order changes status (including changing to or from a custom order status).
WooCommerce Pre-Orders
Compatibility with the
WooCommerce Pre-Orders plugin is included.
You typically need to use the
Order status changed (any status) trigger rule, which will fire whenever an order changes status.
You can use this together with a filter to act only when an order changes status to
pre-ordered:
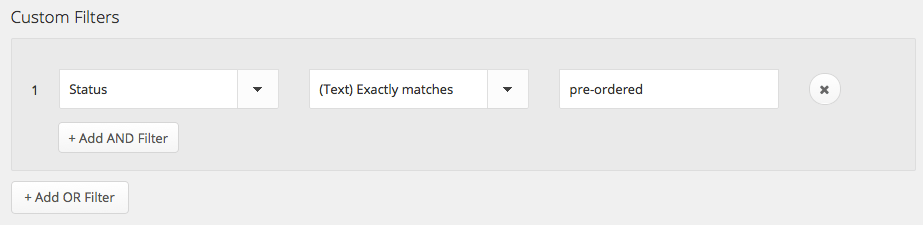
See the documentation on
filters for more information.
You may also wish to view the
WooCommerce Pre-Orders documentation.
Groups for WooCommerce
Whilst we haven’t extensively tested these plugins together, we do know of users who are using them successfully.
If you are encountering memory exhausted errors when using WooCommerce Zapier and
Groups for WooCommerce, please update it to version 1.7.3 which includes a fix that prevents an infinite recursion bug in WooCommerce core.
You may also wish to view the
Groups for WooCommerce documentation.
WooCommerce Gravity Forms Add-Ons
WooCommerce Zapier includes support for the
Gravity Forms Add-Ons extension.
The Gravity Forms Add-Ons data is sent to Zapier as part of the
line_items meta_data field, allowing it to be used in Zap filters.
Note: Please keep in mind that the Zapier Zap editor won’t be aware of your additional Gravity Forms product fields until an order is placed on your WooCommerce store for that product. After that, you can open the Zap Editor and you should see your Gravity Forms fields along with the standard fields.
URL Coupons
WooCommerce Zapier lets you create new Coupons in Zaps (using the
Create Coupon action).
If you are using the
URL Coupons Extension, you can automatically configure the URL Coupons settings (such as
Unique URL and
Page Redirect) for the coupon when it is created via a Zap:
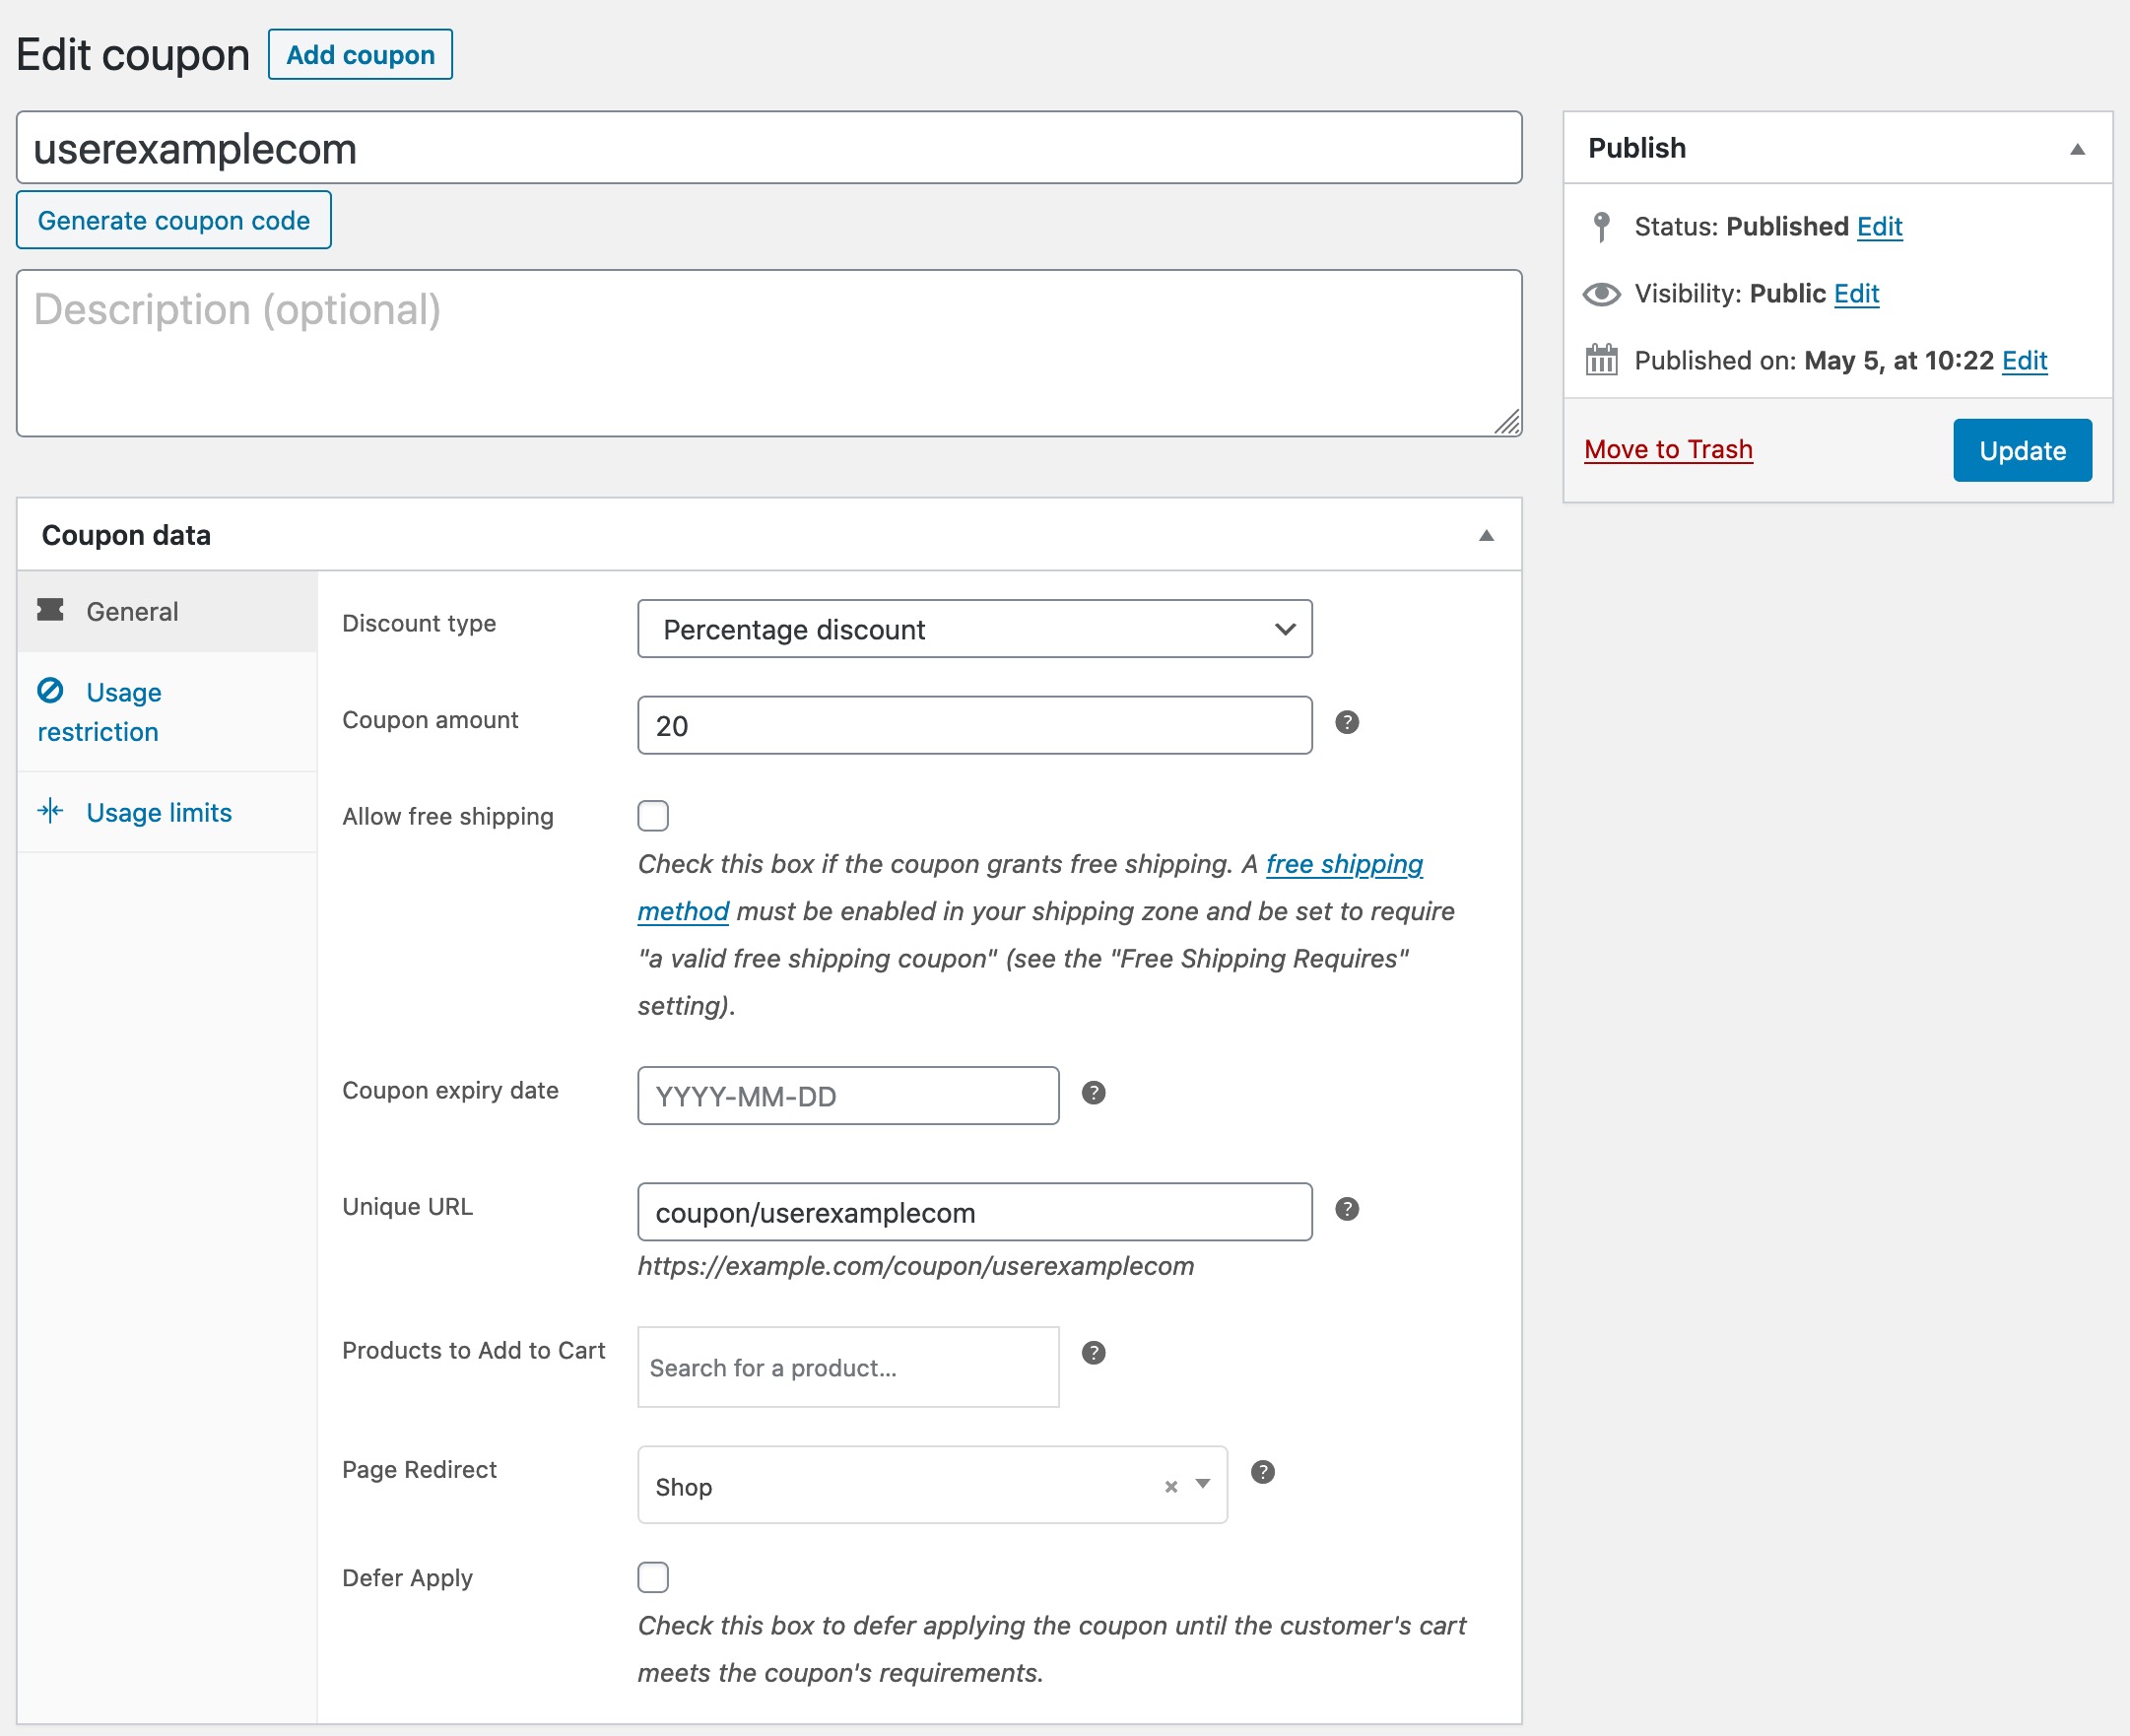
To achieve this, in your Zap’s
Create Coupon action, use the
Meta Data List field to add a new the
_wc_url_coupons_unique_url metadata record. You would typically set the value of this field to the
Slug output from the
suggested Code by Zapier step:

Important: Please be sure to read the URL Coupons documentation which describes important things to consider when setting Coupon URLs.
If you would also like to set the
Page Redirect attribute for the coupon, you can do so by adding two additional meta data records to your create coupon action:
_wc_url_coupons_redirect_page_type set to page._wc_url_coupons_redirect_page set to the page ID of your choice.
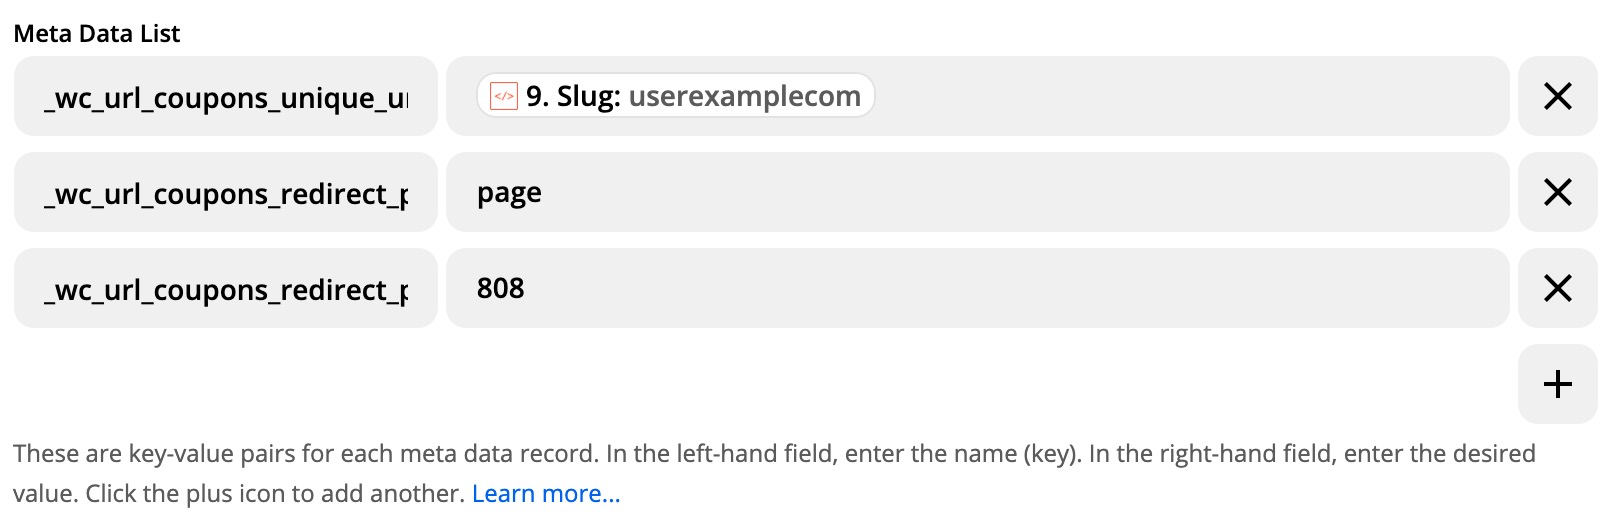
The result is a newly created coupon in WooCommerce with all three URL coupon settings automatically configured:
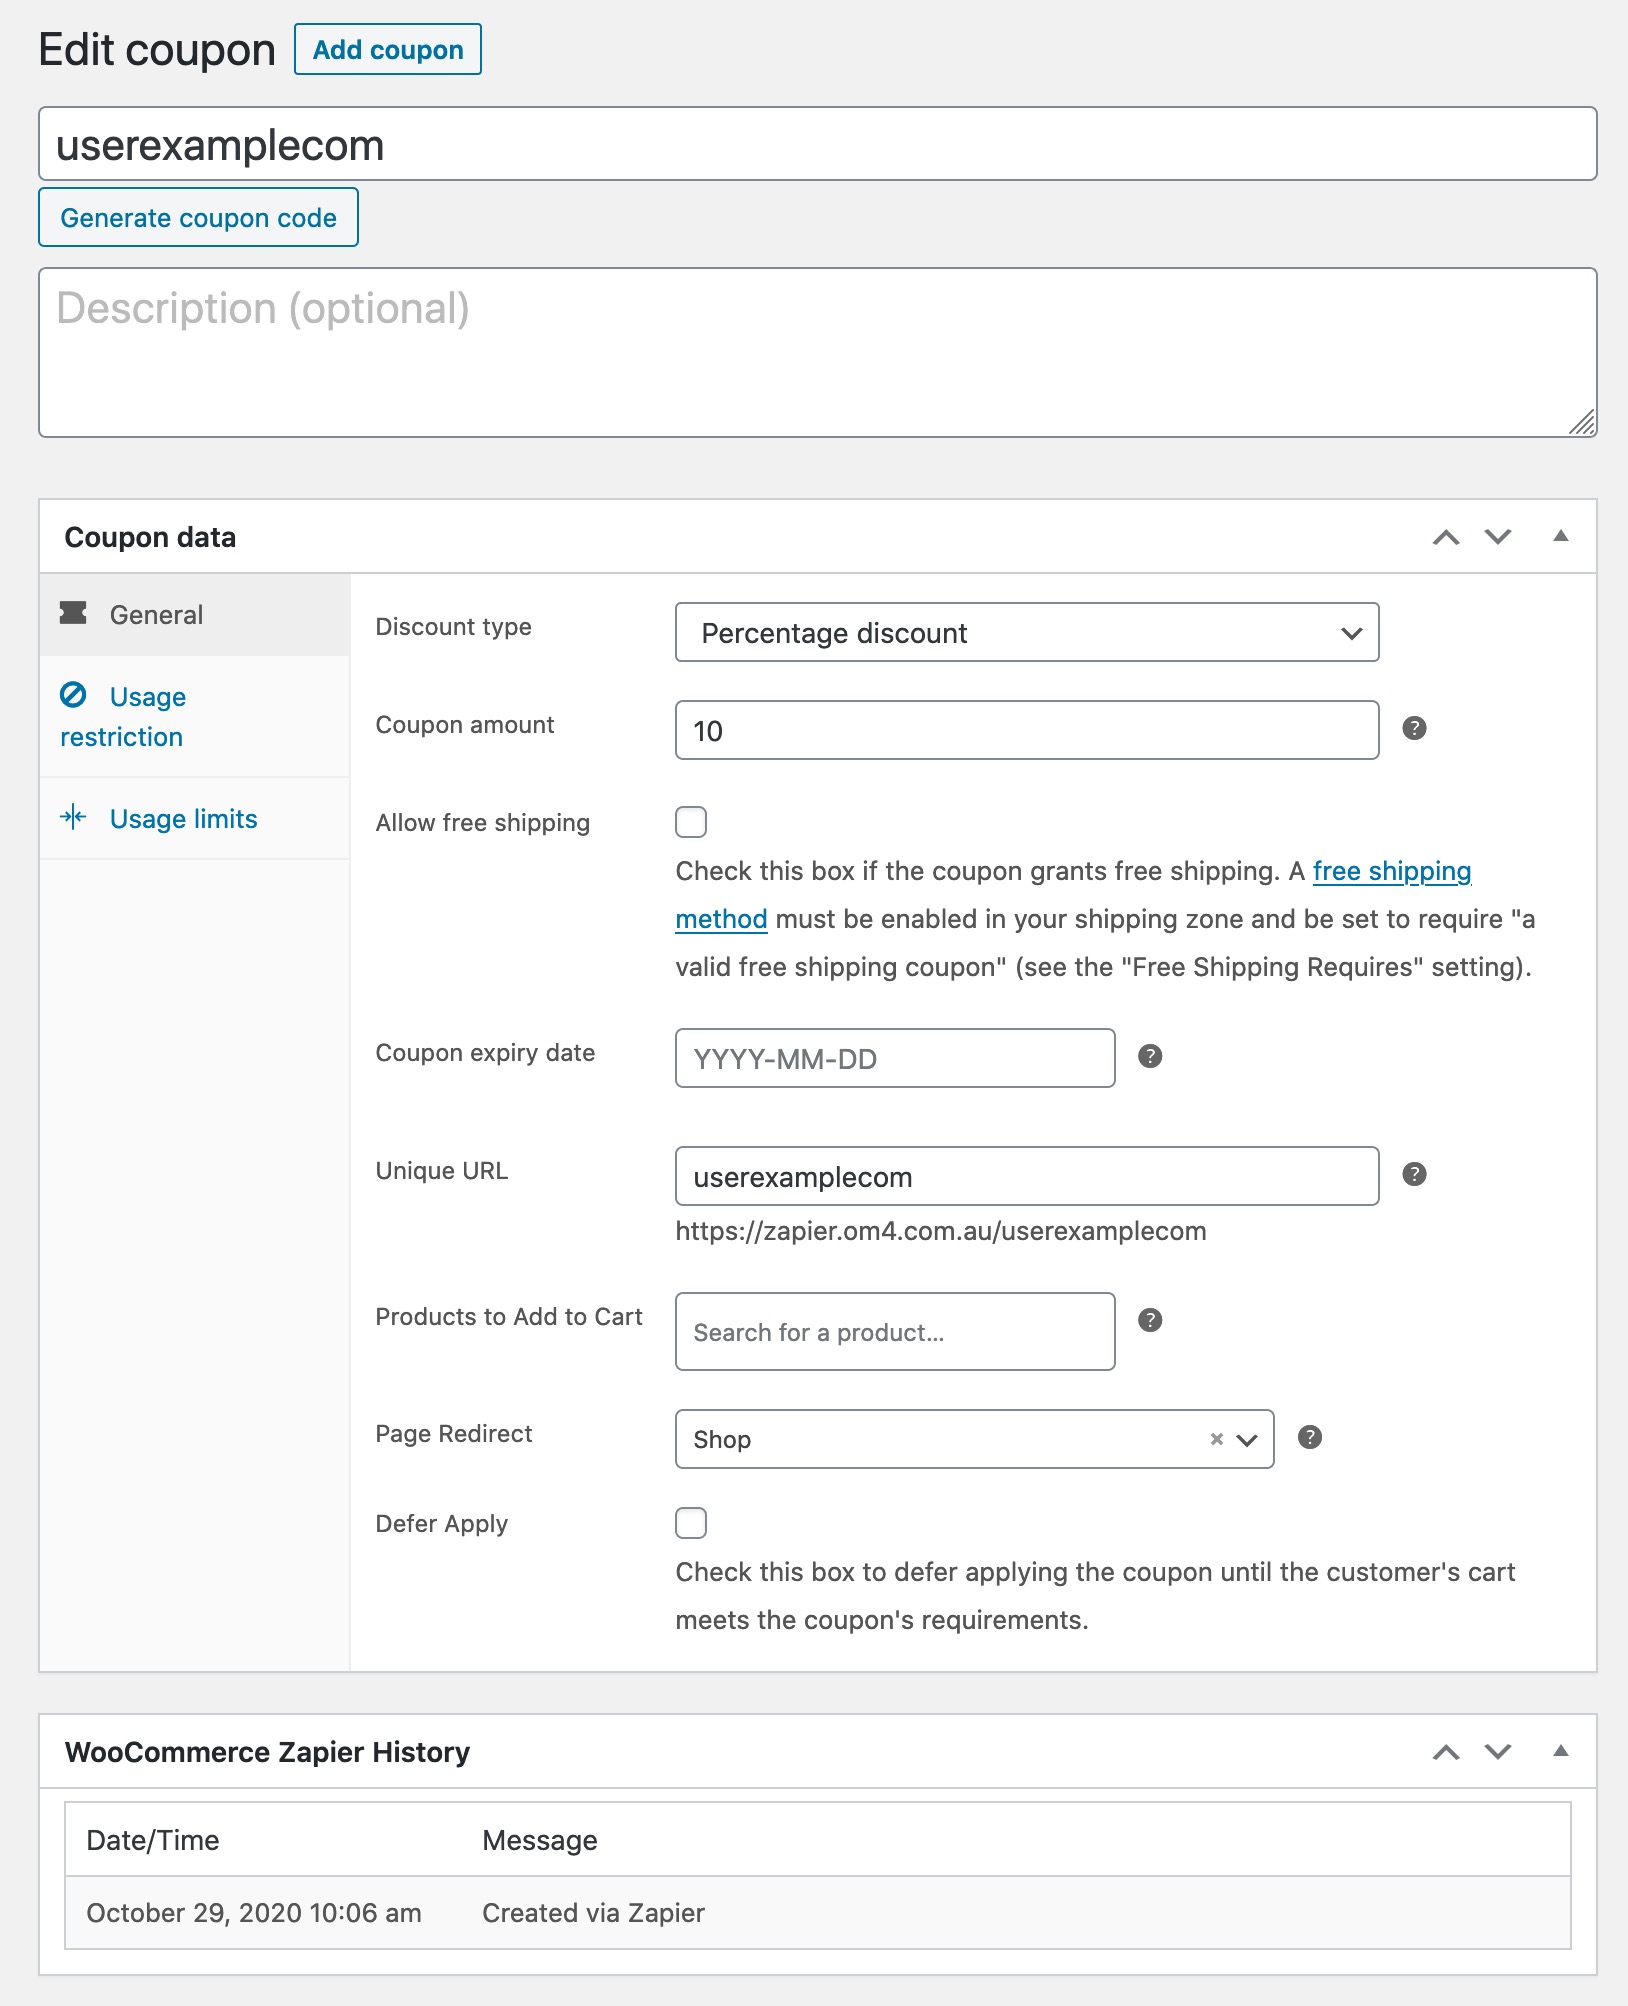
Uncanny Toolkit for LearnDash
Communication with an
application-specific password is not affected by this plugin, but the
Front End Login feature causes issues when authenticating with the normal WordPress account password.
Please deactivate this feature if you are not authenticated with a WordPress Application password.
To avoid interfering with security plugins in general, please ensure that you are using WordPress
Application Passwords to connect your store.
Use Application Passwords: To set up an Application Password, go to WordPress Dashboard —> Side Menu —> Users —> Profile screen and press the “Add New Application Password” button. Please see here for details.
Jetpack
When using Jetpack with WordPress 5.6 or later, the majority of the
Jetpack plugin features are compatible with WooCommerce Zapier, however, there are several areas where you need to be aware of to make the two plugins work together.
If you are using the
Brute Force Attack Protection (formerly Protect) feature, you need to authenticate WooCommerce Zapier using an
application-specific password. Otherwise, please consult the
Jetpack Protect documentation for assistance.
If you are using the
WordPress.com Secure Sign On feature, use a WordPress
Application Password feature when authenticating. Please
see here for details on how to successfully authenticate.
Wordfence Security
Wordfence Security is a very popular security plugin that is commonly used with WooCommerce Zapier.
WooCommerce Zapier Plugin Version 2.3 Required: Please ensure you update the WooCommerce Zapier plugin to version 2.3.0 or later.
WordPress 5.6 Required: Please ensure you’re using WordPress 5.6 or later.
To successfully authenticate with two-factor authentication enabled, you need to use a WordPress
Application Password (not your regular WordPress password) when authenticating.
Please also ensure that the
WordPress Dashboard —>
Side Menu —>
Wordfence —>
All Options —>
Disable WordPress application passwords checkbox is not ticked (i.e., application passwords need to be enabled and not disabled).
You may still experience difficulties authenticating if you are using
Wordfence’s Brute Force Protection.
Moreover, you may need to whitelist the WooCommerce Zapier REST API endpoints. You can find the
list of the plugin endpoints inside our Developer Documentation.
!!! Tip
To see if Wordfence is interfering with the communication, please go to
WordPress Dashboard —>
Side Menu —>
Wordfence —>
Tools —>
Live Traffic and review the live traffic logs to identify the specific reason for the failure.
For busy stores, you may need to use the **Show Advanced Filters** --> `User Agent = Zapier` option to only see Zapier authentication logs.
iThemes Security
iThemes Security does not interfere with WooCommerce Zapier if you are using a WordPress
Application Password.
Alternatively, with older WordPress versions, iThemes Security has its own
application-specific password solution, so when authenticating, please ensure that you use that application-specific password rather than your account password.
WP Rocket
This plugin has a feature that forces trailing slash for any URLs, which is not compatible with the authentication mechanism in WooCommerce Zapier.
To avoid problems with it, please the remove trailing slash functionality or disable it for the
Integration endpoints. Refer to the
WP Rocket Documentation for how to do this.
JWT Auth
The
JWT Auth plugin forces its authentication method to all REST API requests (including WooCommerce Zapier). This interferes with the WooCommerce Zapier’s
Actions functionality. It also prevents Trigger sample data from working.
The solution is to add
WooCommerce Zapier’s endpoints to the
JWT Auth plugin’s whitelist so that JWT authentication is not applied to WooCommerce Zapier’s endpoints.
Whitelist Example:
add_filter( 'jwt_auth_whitelist', function ( $endpoints ) {
    return array(
        '/wc-zapier-auth/*',
        '/wp-json/wc-zapier/*',
    );
} );
Other Security Plugins
The following plugins can cause authentication errors when connecting with a WordPress account password:
Below is a list of plugins that are partially compatible with WooCommerce Zapier.
WooCommerce Product Add-Ons
WooCommerce Zapier includes support for the
Product Add-Ons extension.
The Product Add-Ons data is sent to Zapier as part of the
line_items and
meta_data fields, allowing them to be used in Zap filters.
We don’t recommend using the Product Add-Ons data in Zap templates unless all of your products have the same add-on fields available. This is because a Zap requires a predictable set of data fields coming through for every order line item.
Warning: The Product Add-Ons extension stores addon price information in the meta key field, which can result in a different key value from order to order, making the key name unpredictable and difficult to use in Zap actions.
WooCommerce Deposits
The
WooCommerce Deposits extension can cause problems when retrieving sample order data from WooCommerce when using the Zapier.com Zap editor.
This is because WooCommerce Deposits creates future-dated orders that have a status of
scheduled-payment, so when WooCommerce Zapier loads the most recent orders to display as sample data, the future-dated
scheduled-payment orders are listed first.
This makes it difficult to display useful orders in the Zap editor when setting up your Zap.
The workaround is to temporarily trash these
Scheduled Payment orders, set up your Zap, and then restore the orders:
- Go to the WordPress Dashboard —> Side Menu —> WooCommerce —> Orders screen, then filter by Scheduled.
- Select all the Scheduled orders, then Bulk actions —> Move to Trash.
- Return to the Zapier.com Zap Editor, then in your Trigger step, click Test Trigger, then click the Dropdown list and click the Load More button to retrieve your most recent order data from your store. This sample data should now contain recent valid orders (rather than future-dated scheduled payment orders).
- Select a recent order from the dropdown, then complete the setup of your Zap and turn it on.
- Return to WordPress Dashboard —> Side Menu —> WooCommerce —> Orders, filter by Trashed.
- Select all trashed orders, then Bulk actions —> Restore to reinstate the Scheduled Payment orders.
Fancy Product Designer
Some WooCommerce Zapier users have reported success when using the
Fancy Product Designer plugin, whereas others have encountered issues.
The Fancy Product Designer data is sent to Zapier as part of the
line_items —>
meta_data fields, allowing them to be used in Zaps.
Warning:
This plugin is prone to storing vast amounts of information, which can lead to the data exceeding the current limitation of the Zapier platform (6MB) for Order or Product triggers. When this happens, you may be unable to create a Zap or the corresponding task will fail.
One possible solution for preventing this from happening is filtering out the outgoing data in WooCommerce, as described in the Modifying or Extending Data and Fields chapter.
WooCommerce Composite Products
The
WooCommerce Composite Products extension can cause WooCommerce Zapier
Create Product actions to fail with an
Configuration" (composite_scenarios__configuration) is missing. error message.
To resolve this, please update Composite Products to version 8.1.1 (or newer).
Heads Up: It is not possible to create Composite Products via a Create Product action.
Below is a list of plugins that are not currently compatible with WooCommerce Zapier.
WP-SpamShield
The
WP-SpamShield plugin is known to cause issues when authenticating.
Having this plugin active may cause you to receive either of the following error messages:
Sorry, this user does not have the correct permissions.
ERROR: Sorry, there was an error. Please be sure JavaScript and Cookies are enabled in your browser and try again.
Please deactivate the plugin and try again.
WP Content Copy Protection & No Right Click
This plugin is known to cause issues when authenticating.
Please deactivate the plugin and try again.
WooCommerce Real-time Notifications for new orders
This plugin is known to cause issues when authenticating, with the following error message:
Sorry, you cannot list resources.
Please deactivate the plugin and try again.
Below is a list of Zapier Integrations that are partially compatible with WooCommerce Zapier.
Gmail
Info: The following constraints only apply to consumer Gmail account accounts (emails ending with @gmail.com or @googlemail.com. See details in this help document.
Google is restricting
Gmail Integrations usage. Only the approved apps can receive information. Unfortunately, the WooCOmmerce Zapier is not on the list. If you have a consumer Gmail account and configure Gmail as a trigger and WooCommerce as an action, you will see the following error:
Sending data from WooCommerce to Gmail is not restricted.
You can typically achieve
General Data Protection Regulation (GDPR) compliance whilst using WooCommerce Zapier, and we have provided some information below to help get you started.
Zapier Integration consists of a WooCommerce plugin (installed on your website) and a Zapier App (hosted on Zapier.com), working together to connect WooCommerce to Zapier and Zapier to WooCommerce.
The Zapier Integration is a WordPress plugin, and to operate needs WordPress WooCommerce to be installed.
If you need GDPR compliance, you can usually achieve it with your WordPress installation. For reference see the
Your WordPress.com Site and the GDPR page in wordpress.com, which can be adapted to self-hosted WordPress sites as well.
Here is
WooCommerce’s GDPR Guide for related settings, and you can read the compliance in their
blog post.
Tip: If you are using WordPress version 4.9.6 or newer, we provide a snippet about the integration and Zapier service, that you can include in your privacy policy page. Go to your WordPress Dashboard —> Side Menu —> Settings —> Privacy screen, and follow the Check out our guide link to access it.
You can find out Zapier’s GPR compliance information in their
support documentation.
You will also need to consider the GDPR implications of the third-party services that you use in your Zaps, as these may handle customer data and will need to be evaluated carefully.
The sole purpose of the Zapier Integration is to transfer data between services.
Please note that the above suggestions are not legal advice, and we strongly recommend consulting with a GDPR expert to help ensure that your store and business are GDPR compliant.
Deactivating the WooCommerce Zapier plugin will prevent all existing WooCommerce Zaps from working. Your WooCommerce store will no longer send data to Zapier and will be unable to process incoming connections from your Zaps.
Your existing Zap(s) stay intact, however they will not work anymore. All of your WooCommerce Triggers will not produce any new tasks, and all of your Actions will return an error the next time a Zapier task is performed.
The default behaviour for uninstalling (deactivating and deleting) the plugin is to keep your WooCommerce Zapier data in the WooCommerce store.
If you like, you can delete and reinstall the WooCommerce Extension many times. Your WooCommerce Zapier settings and data will not be lost. This is especially helpful while troubleshooting your WooCommerce store.
If you decide to uninstall the WooCommerce Zapier plugin and you don’t plan to use it anymore, the recommended order of action is to go to Zapier.com and delete all WooCommerce Zaps in Zapier first and then uninstall the plugin. Also, you can permanently remove all WooCommerce Zapier data from WooCommerce too (see
below).
Remove All Data
If you want, you can completely remove all WooCommerce Zapier data during uninstall. This includes settings, Task History, scheduled action(s), WooCommerce Zapier Webhook(s) and REST API Authentication key(s).
To permanently delete all plugin data upon uninstall, you need to add the following line to your
wp-config.php file:
define("WC_ZAPIER_REMOVE_ALL_DATA", true);
After you have done this, go to your
WordPress Dashboard —>
Side Menu —>
Plugins screen and deactivate and delete the WooCommerce Zapier plugin.
Once done, you can remove the
WC_ZAPIER_REMOVE_ALL_DATA line from your
wp-config.php file.
Refer to WordPress’
Editing wp-config.php documentation for further information on how to edit your config.
Note:
If you’re using the Application Passwords feature, you need to manually delete passwords created for Zapier communication. Please see in the Plugin Interface chapter where to find it.
Uninstalling the WooCommerce Extension will not remove your Zaps and data on Zapier, even if you choose to delete all data from WooCommerce.
- Action
- Incoming connection. See Connection Types.
- Application Password
- App-specific password feature built-in to WordPress 5.6 and later.
- Connection
- An actual communication between your WooCommerce store and a Zapier Zap. In this documentation, we are using a couple of related terms of connection.
- Connection Types
- Incoming or Outgoing. Describes the direction of the data flow observed from the WooCommerce store perspective. Incoming connections are referred to as Actions, outgoing connections are referred to as Triggers.
- Resource
- Represents a specific type of WooCommerce data. For example, an Order, a Product, a Customer.
- Trigger
- Outgoing connection. See Connection Types.
- Trigger Rule
- A rule that defines an event (or multiple events) that will cause WooCommerce data to be sent to a Zapier Zap.
- WooCommerce Extension
- Part of the integration that operates inside a WooCommerce store. This is the WooCommerce Zapier plugin that you have installed on your WooCommerce store.
- Zap
- Zapier Zap is a connection configuration between Zapier and other services, including your store. See Connection.
- Zapier App
- Part of the integration that operates inside the zapier.com. This is the interface you see when using the WooCommerce app in a Zap. See Zap.
- Zapier Feed
- A legacy term used to describe a specific connection between Zapier and WooCommerce before version 2.
The
Task History screen on your WooCommerce store shows all Trigger and Action tasks, as well as any errors that may have occurred.
The Task History screen is located at
WordPress Dashboard →
WooCommerce →
Zapier →
Task History.
Errored tasks are shown with a red
Error status:
Hovering over the Error Task will show the error code, and clicking on the
Get Help link will take you to the relevant error documentation.

Each error has a unique error code, which can be used to identify the cause of the error.
WooCommerce Zapier Plugin Version 2.10 Required: Please ensure you update the WooCommerce Zapier plugin to version 2.10.0 to use this functionality.
The most commonly occurring error codes are listed below, along with solutions to resolve them.
action_scheduler_failure
These errors occur when a Trigger in WooCommerce attempts to send data to zapier.com, but the Action Scheduler action encounters an error.
View the Task History record that has the
Error status, and more details about the error will be available in the
Message column.
Click on the relevant error message below for the next steps.
Action Scheduler Failure: action marked as failed after 300 seconds. Unknown error occurred. Check server, PHP and database error logs to diagnose cause.:
Action Scheduler was unable to complete the task within 300 seconds.
Consult the Failed Tasks documentation.
http_request_failed
This occurs when a Trigger in WooCommerce attempts to send data to zapier.com, but the request fails.
View the Task History record that has the
Error status, and more details about the error will be available in the
Message column.
Click on the relevant error message below for the next steps.
Communication error with zapier.com: cURL error 28: Operation timed out after x milliseconds with 0 bytes received:
The network connection between your website and zapier.com timed out.
This can occur if:
- Your website is under heavy load, or if your website is hosted on a slow server.
- Zapier.com is having availability issues.
- Consult the Zapier Service Outages documentation.
rest_missing_callback_param
This occurs when a required field is missing from the data sent to a WooCommerce Create action.
View the Task History record that has the
Error status, and more details about the error will be available in the
Message column.
Edit your Zap’s
Create action step, and ensure that all required fields are populated with valid values.
trigger_error_response
This occurs when a Trigger in WooCommerce attempts to send data to zapier.com, but zapier.com responds with an unexpected error.
Click on the relevant error message below for the next steps.
This can occur if Zapier.com is having availability issues.
View the Task History record that has the
Error status, and more details about the error will be available in the
Message column.
Consult the
Zapier Service Outages documentation.
woocommerce_rest_cannot_view
This occurs when a WooCommerce webhook (Trigger) was created by a WordPress user that no longer exists.
See
Webhook Payload Issues.
woocommerce_rest_invalid_id
This occurs when using the
Create Subscription Note action and the subscription ID provided does not exist.
Ensure the
Subscription Id field is set to the ID of an existing WooCommerce subscription.
woocommerce_rest_order_invalid_id
This occurs when using the
Create Order Note action and the order ID provided does not exist.
Ensure the
Order Id field is set to the ID of an existing WooCommerce order.
woocommerce_rest_product_invalid_id
This occurs when using the
Update Product Price action or
Update Product Stock Quantity action and the
Product Identifier field is set to
ID, and the
Product Value field is set to a product ID that does not exist.
- Ensure the Product Value field is set to the ID of an existing WooCommerce product.
- Alternatively, set the Product Identifier field to SKU and ensure the Product Value field is set to a valid product SKU.
woocommerce_rest_product_stock_management_disabled
This occurs when using the
Update Product Stock Quantity action and the product does not have stock management enabled.
Edit the product in WooCommerce, and ensure the inventory settings have stock management enabled. Please see
here for details.
woocommerce_rest_shop_coupon_invalid_id
This occurs when using the
Update Coupon action and the coupon ID provided does not exist.
Ensure the
Coupon Id field is set to the ID of an existing WooCommerce coupon.
woocommerce_rest_shop_order_invalid_id
This occurs when using the
Update Order action and the order ID provided does not exist.
Ensure the
Order Id field is set to the ID of an existing WooCommerce order.