Bulk Table Editor, a WooCommerce extension for setting up sales and perform bulk updates of products, variations and subscriptions.
Installation
↑ Back to top- Download the .zip file from your WooCommerce account.
- Go to: WordPress Admin > Plugins > Add New to upload the file you downloaded with Choose File.
- Activate the extension.
More information at: Installing and Managing Plugins.
Developers documentation
↑ Back to topThe developers documentation is found here..
Setup and Configuration
↑ Back to topSettings for Bulk Table Editor
To find the settings, go to: WooCommerce > Settings > Bulk Table Editor
Bulk Table Editor has two sections, the first section is for general settings and the other is for setting up integrations with an other plugins. A custom price field is for example a wholesaler price, MSRP or cost of goods.
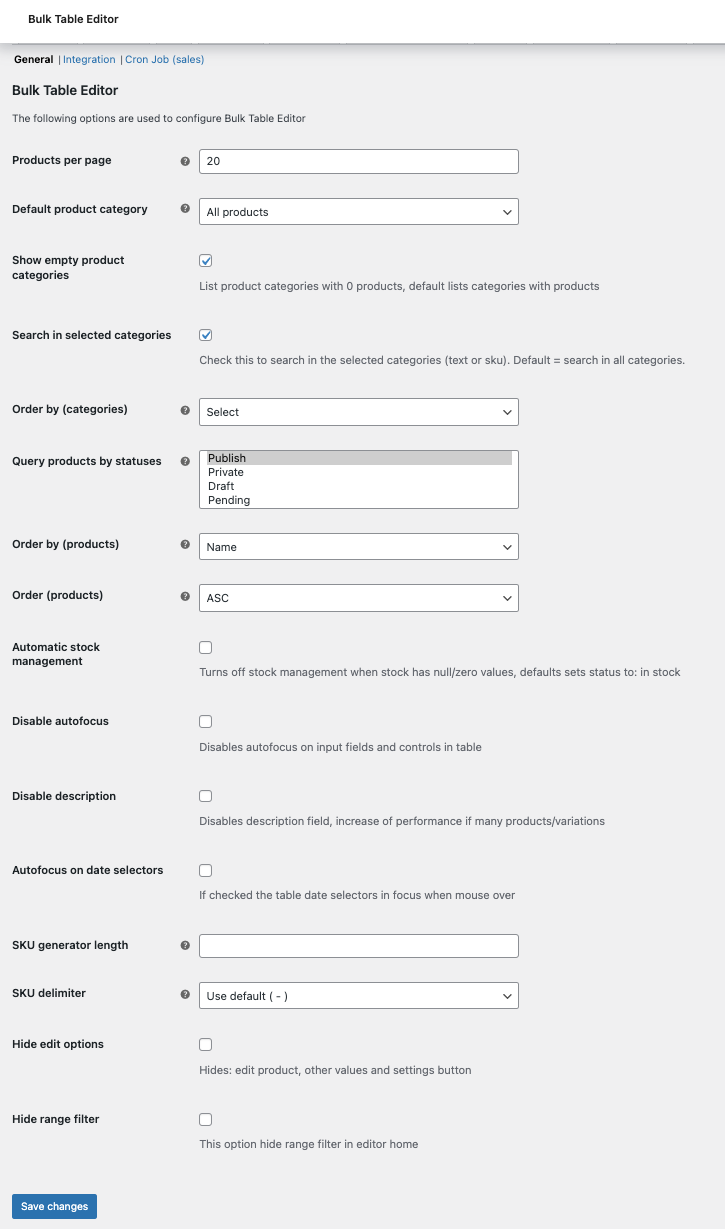
- Products per page: Number of product rows in the table is used in the paging function, default 50 product rows.
- Default product category: Select a category, will show the selected every time you enter plugin page, default is all products.
- Show empty product categories: Check this if you want to show categories with 0 products in the select category in the editor.
- Search in selected categories: Check this to enable the option to search (text and sku) in the categories you have selected (need to do this first). Default (not checked) is to always search in all product categories.
- Order by (categories): If you want a different category ordering in the select than the default (Menu order), select one that fits your store.
- Query products by statuses: Default all statuses will be shown in the extension, if you need to filter out some, select the ones you want to see and save.
- Order by: Set the order by e.g. Name (when query products)
- Order: Set the order e.g. ASC (ascending order) or DESC (descending order)
- Automatic stock management: If you want to turn off stock management i.e you do not use stock for some or all items but still want stock status to be in stock or whatever you have set.
- Disable autofocus: Select this option if you do not want autofocus when the mouse is over an input field i.e search.
- Date selector format: Select the format you want for the date picker in the table. Your WordPress settings for date format will show before and after saving.
- Autofocus on date selectors: If checked you the date selector will appear and the date input field will have focus.
- Filter on sale by Query: If this is checked you will get a list of all your products on sale (no paging is done). This option is not recommended if you have many products. The default will use Javascript to filter this in the table for you.
- SKU generator length: Default the SKU generator use 3 chars like this (product variation): Shirt, blue, large becomes: shi-blu-lar. Use this number option if you want i.e a SKU generated by something else i.e 5 chars(letters) or what you need for your SKUs.
- SKU delimiter: Default SKU is created using – and creates SKUs like this: SHI-BLU-LAR, you can change – to . to make SKUs like this: SHI.BLU.LAR
- Hide edit option: Created to enable you to let users edit prices but not access other product properties.
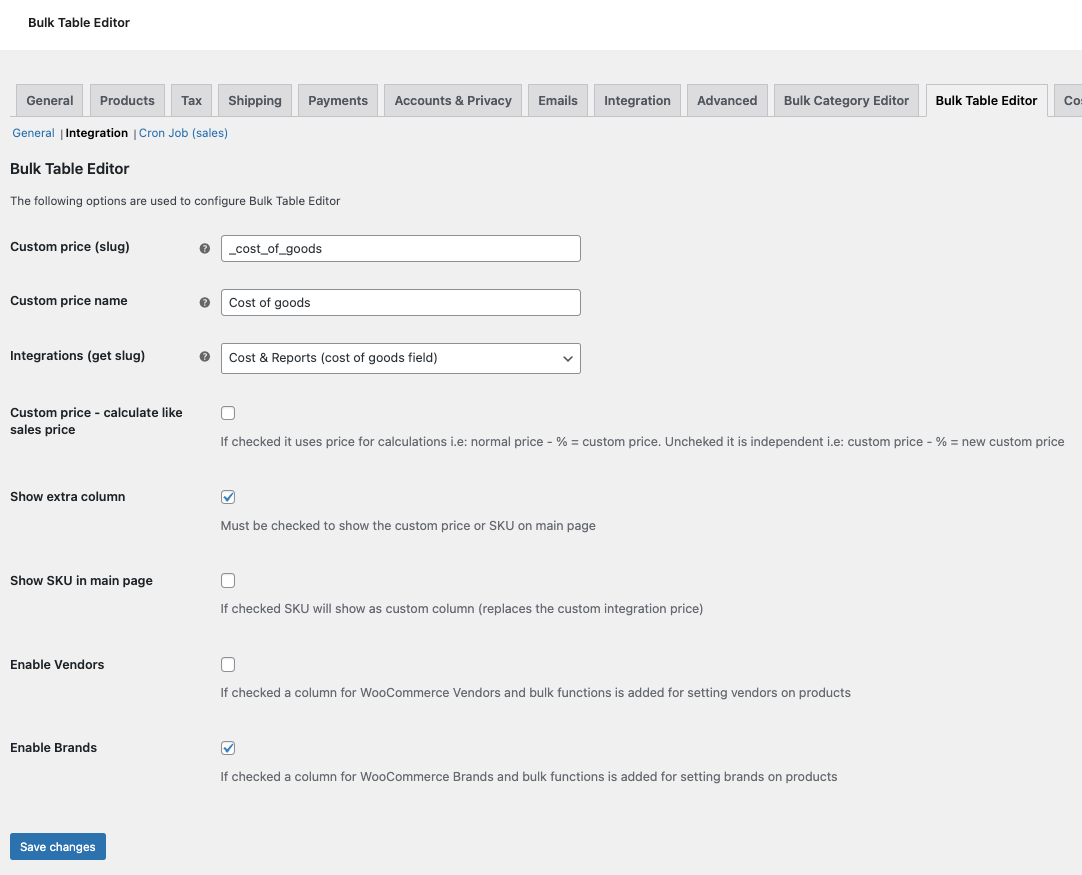
- Custom price (slug): Use the price slug for i.e Cost of goods, Wholesaler, Name your price, MSRP or purchaser price. We recommend that this is a price field when it is treated like a number in the table. See the FAQ section on how to find this slug or use the Integrations (get slug) dropdown box for some know slugs.
- Custom price name: The custom column name in the table, recommended to keep it short as the table has limited size.
- Integrations (get slug): Use this select box to set the slug for Cost of goods (Cost & Reports for WooCommerce), Cost of goods (Cost of goods for WooCommerce) Name your price or other approved integrations. Remember to set a custom name after using this dropdown select box i.e Cost of goods.
- Custom price – calculate like sales price: If checked it calculates using normal price like this example: normal price – 20% = custom price. Default (not checked) it calculates like this example: custom price – 20% = new custom price.
- Show extra column: Check this to see your custom price or SKU in Editor home.
- Show SKU in main page: This option shows SKU with the bulk functions in Editor home and replaces a custom price. Remember to check the option Show extra column if you use this option.
- Enable Vendors: This option can be used if you have Product Vendors by WooCommerce. It adds an extra column in Bulk Table Editor where you can bulk set Vendors per products and variations.
- Enable Brands: If checked and you have WooCommerce Brands installed, you are able to bulk update Brands on your products. You get a new column in Bulk Table Editor (home) – this includes bulk functions like: add, set and remove brands on products in bulk. Option to remove a brand on products, if removing from variables – it automatically removes from the parent product.
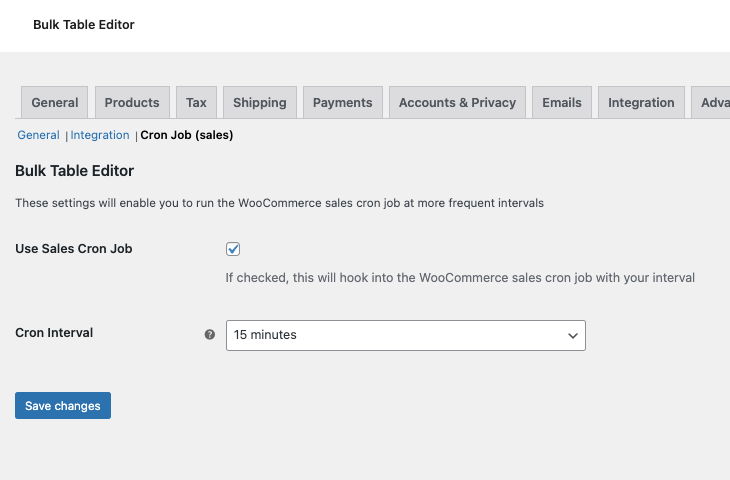
If you like to update your sales more than the default once a day you can now use these settings where we hook into the WooCommerce sales cron job, and enable you to have e.g. hour based sales.
From vs 2.3.20 we use Action Scheduler (if present, default in newer versions of WooCommerce) and if not present Bulk Table Editor uses Cron Job.
- Use sales cron job: Check this to enable the hook into the sales cron job (must be set to make this work)
- Cron interval: Select the interval that fit your store and sales. We have added a 3 minute interval for testing, we recommend to change this after you have tested (e.g. 30 minutes or more – depending on how many products you have / server / CPU and so on)
If you like to check your schedules (if Action Scheduler is used) go to: WooCommerce > Status > Scheduled Actions, search for ‘wbte_start_stop_sales_hook’.
Usage
↑ Back to topYou are now ready to use Bulk Table Editor. To start Bulk Table Editor, in the admin menu find Products > Bulk Table Editor.
Understanding bulk functions
↑ Back to topThe Bulk Editor is optimised to work with stock, prices and sales in your WooCommerce shop. There is also an Other value table that can bulk update SKU, tags, backorders and measures. You will find a couple of bulk functions to the right of select categories and the rest at the top of the table.


Important: Using bulk functions will mark (check) the rows, if you then save the changes will be updated. You can also check the rows (products / variations) you want to update first – then use the bulk functions (and save) if you like to. And if you regret your actions (before you have saved) – just use the Undo changes button to reset back.
Product filters
↑ Back to topThere are several ways to filter products in Bulk Table Editor. The three drop-down menus Select Category, Filter Sales and Filter Tags make it easy to find your products. In addition, you can search for products or filter in the table’s contents (rows). Select Category makes queries to the product database on your selected category, then you can set filters such as on sale or on product tags.
Editor home
↑ Back to topThe default table is the editor home, the grey button shows this. This table have a special focus on prices and setting up sales.
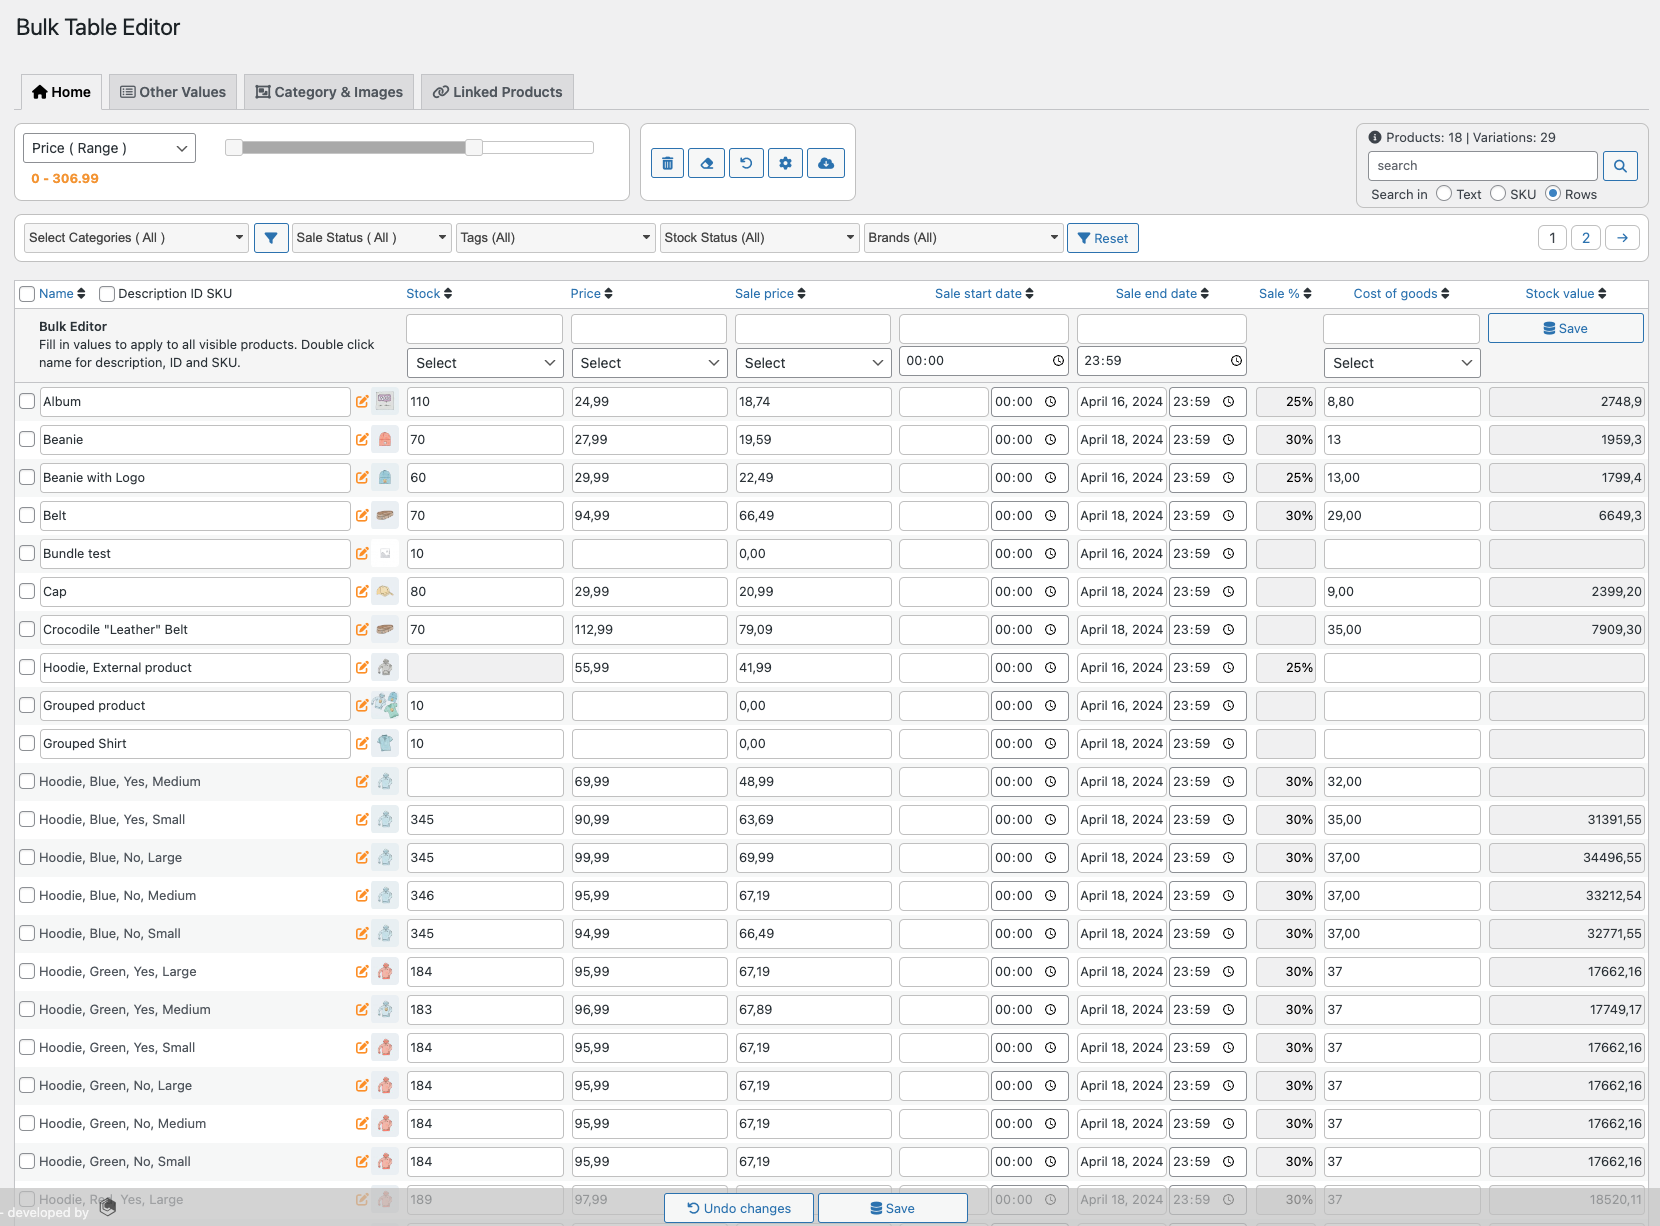
Search
↑ Back to topDefault you search in rows. The row search includes the first three columns in the table including description and SKU (from vs 2.2.7). When searching in rows, while you type the table starts filtering. If you select text or SKU in the radio buttons below the search field you will do a regular database search (all your products). To reset – just click the search button again.
Stock
↑ Back to topTo bulk-update stock, enter an amount in the input field for stock, then find the select option box below.
In the dropdown, select increase or decrease then the amount will be added to all visible products in the table. On the left side in the table you will see that the checkboxes has been checked of, if there is products you do not want to update – just uncheck them.
You can also set a fixed value, set the value and in the dropdown box select set fixed, now all rows has this value. When ready, select the Save all button at the top right off the table.
NOTE: From vs 2.2.5 you can select (check) rows / products first then do bulk updates on the selected items.
Automatic stock management is an option set in settings. This can be used if you do want to automatically turn off stock management on items with null values and default set in stock on these products. If you for some reason decide that a product now needs to use stock, just enter the stock value i.e 10 then stock management automatically is turned on again and set the default in stock status.
Price
↑ Back to top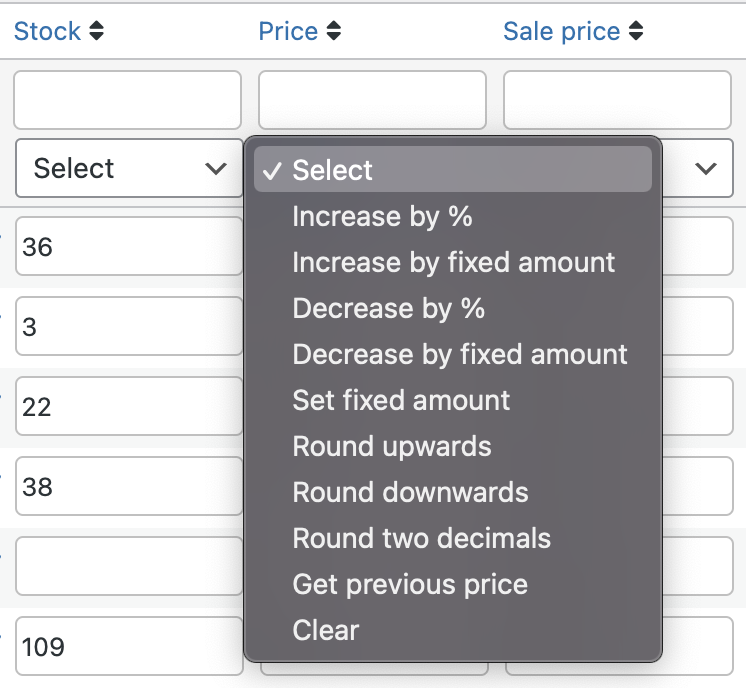
To bulk-update your current prices, enter a value in the input field for price. Then use the select dropdown box below and select one of the options, increase/decrease in percent or increase/decrease fixed amount.
The amount you have will then be calculated and increased/decreased on every row of the table. Then uncheck products you do not want to change and enter the Save all button. (Remember that you can check items first if you just want to bulk update a few)
If the prices are not set or you want to overwrite the current price with a fixed price, add your product price and in the dropdown box select set fixed amount. Now the product rows will be set with your price.
Round upwards function will set the price up from i.e 19.51 to 20.00 and if round downwards from 19.30 to 19.00. Round two decimals does this type of rounding: 19.63 becomes 19.60, it uses the logical round up or down based on the decimals.
Get previous price: every time you save the product price (is was) gets saved. This mainly built so you can clear prices on product variations, they will be hidden with no price. When you need the product variations visible again – just use this function and get the price on the products. (read the hide variations below for how to do this)
Sale price
↑ Back to top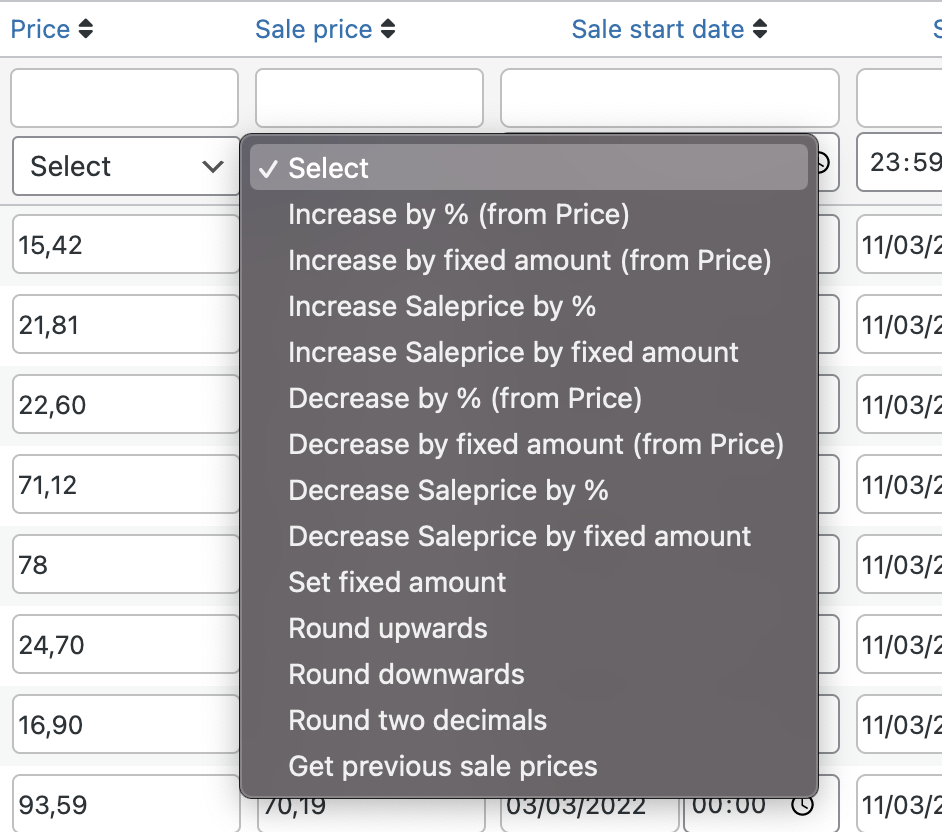
The bulk update function for sale price is the same as for price with the exception that you also have to set a sale start and a sale end date.
NOTE: If you want infinity sales on your products with no start and end dates just set the sales price and save.
There is four option to increase and decrease sale prices:
- Increase
- Increase by % (from Price)
- Uses the current price and calculates i.e 20% and uses this as sale price
- Increase Saleprice by %
- Uses the current sale price and calculates an increase i.e 3% to the existing sale price
- Increase by fixed amount (from Price) – use the current price and adds a fixed amount to this
- Increase Saleprice by fixed amount – uses the current sales price and adds your amount
- Increase by % (from Price)
- Decrease
- Decrease by % (from Price)
- Uses the current price and calculates i.e minus 20% and uses this as sale price
- Decrease Saleprice by %
- Uses the current sale price and calculates an decrease i.e minus 3% to the existing sale price
- Decrease by fixed amount (from Price) – use the current price and removes the fixed amount to this
- Decrease Saleprice by fixed amount – uses the current sales price and removes the amount entered
- Decrease by % (from Price)
Set fixed amount: Sets the amount you entered on every row
Round upwards function will set the price up from i.e 19.51 to 20.00 and if round downwards from 19.30 to 19.00. Round two decimals does this type of rounding: 19.63 becomes 19.60, it uses the logical round up or down based on the decimals.
Get previous sale prices: gets the prices from last sale.
Sale start and sale end dates
↑ Back to top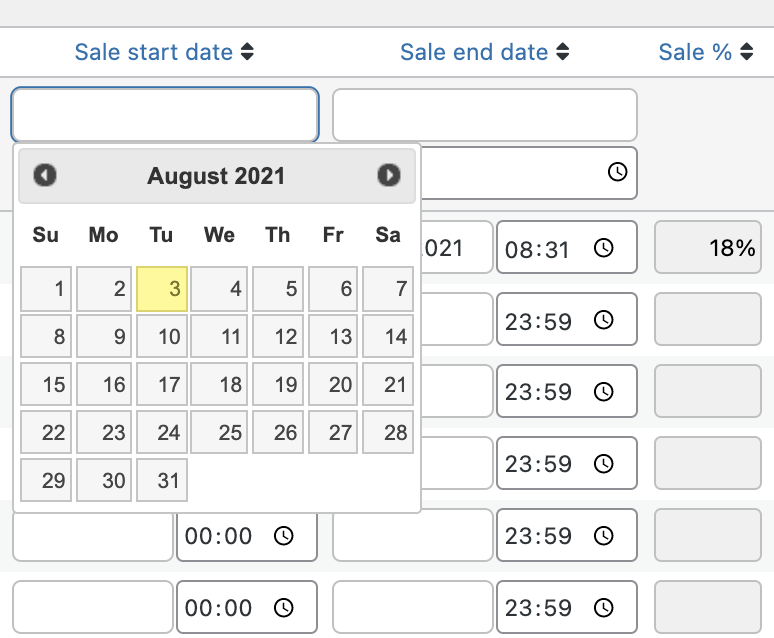
The sale start and sale end date input fields at the top header – right of the table, enter the input field and a dropdown date selector is shown, select the dates of your sale. After selected the dates the table columns will be inserted with the dates you selected. Then just uncheck the ones you do not want to have on your sale and enter the Save all button. Remember you can use i.e only start date, only end date, both or none as long as you have sale price on your product. You can also have a sale just for today – just set todays date in start and end date. A sale end time is at: 23:59:59. From vs 2.1.27 you can also enter sale time start and end, just use the time selectors to set this. When using start / end time be sure to check your WP settings > General for time and timezone. Bulk Table Editor uses 24 hour time (so have this in mind if you use AM/PM)
Sale %
↑ Back to topSale in percent does not have any bulk functions, but will be updated if you change your sales value. The value is rounded to be a whole number and is to get a overview over your current sales in percent. The column can be sorted using the heading.
Custom price
↑ Back to topThe custom price is an option if you have i.e a wholesaler price that you want to calculate and bulk update in Bulk Table Editor. To use a custom price you have to set it up in settings. See FAQ how to set up custom price. Custom price have the option to use the same calculation as sales price or use its own value for calculation. It has also the same bulk functions as price and sales price.
Delete rows
↑ Back to topTo delete products, check products using the left checkbox on every product row. To check all use the checkbox in the table header. Uncheck products you do not want to delete then click the Delete rows link and in the dialog select OK. PS! products will be moved to trash and will be found there if you deleted some products by mistake.
Clear sales
↑ Back to topTo clear an existing sale just click the link Clear sales. Then click the save all button and the sale is removed. You can change your mind and click the Clear sales again and your old values appear, this can only be done before you click the save all button. If you do not want to clear sales on all products just uncheck the checkbox on the products you want to keep before you save.
Integration WooCommerce Brands
↑ Back to top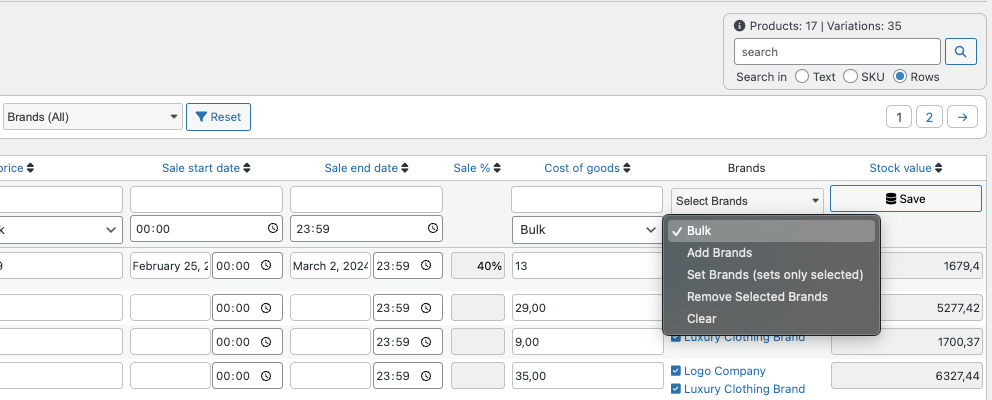
If you have WooCommerce Brands installed, by default the filter by brands is activated. (Multiple select filter)
Add the option to bulk edit brands
Go to WooCommerce > Settings > Bulk Table Editor > Integration, check box to enable brands. If checked this will add a column in Bulk Table Editor home (tab) that enable you to select brands and bulk add, set and remove brands on products.
How does it work?
- Find the column Brands (Editor Home)
- Add brands
- If you like to only adjust a selection of products, filter or search first to get your selection of products. You can also just check (first column) the products you want to change – if you do not do any selections – all visible products will be adjusted when bulk editing them. (Option to uncheck before saving)
- In the select brands > select the brands you want to add to your products
- In the bulk select below, select Add Brands
- This function will add the brands to every visible (or checked) product/variation. A readonly input will show (showing the brands slugs)
- Save (will add the brands on the products on this page)
- Set brands
- Do as in 2.1 (filter)
- In the select brands > select the brands you want set on your products
- In the bulk select below, select Set brands
- This function will set (override current brands) on your products.
- Save (sets just the brands you selected on your products)
- Remove brands
- Do as in 2.1 (filter)
- On products that has brands you can click on the brand to remove (message on hover). If you remove on a variation, the parent product (variable product) will be affected – then after removal you should refresh the page.
- To bulk remove, select brands in the multiple select
- In the bulk select below, select Remove brands
- This function removes the brands if found on a product/variation
- Save (removes the selected brands)
- Clear
- This bulk function removes all brans on the selection
- Save (will reset brands on the products)
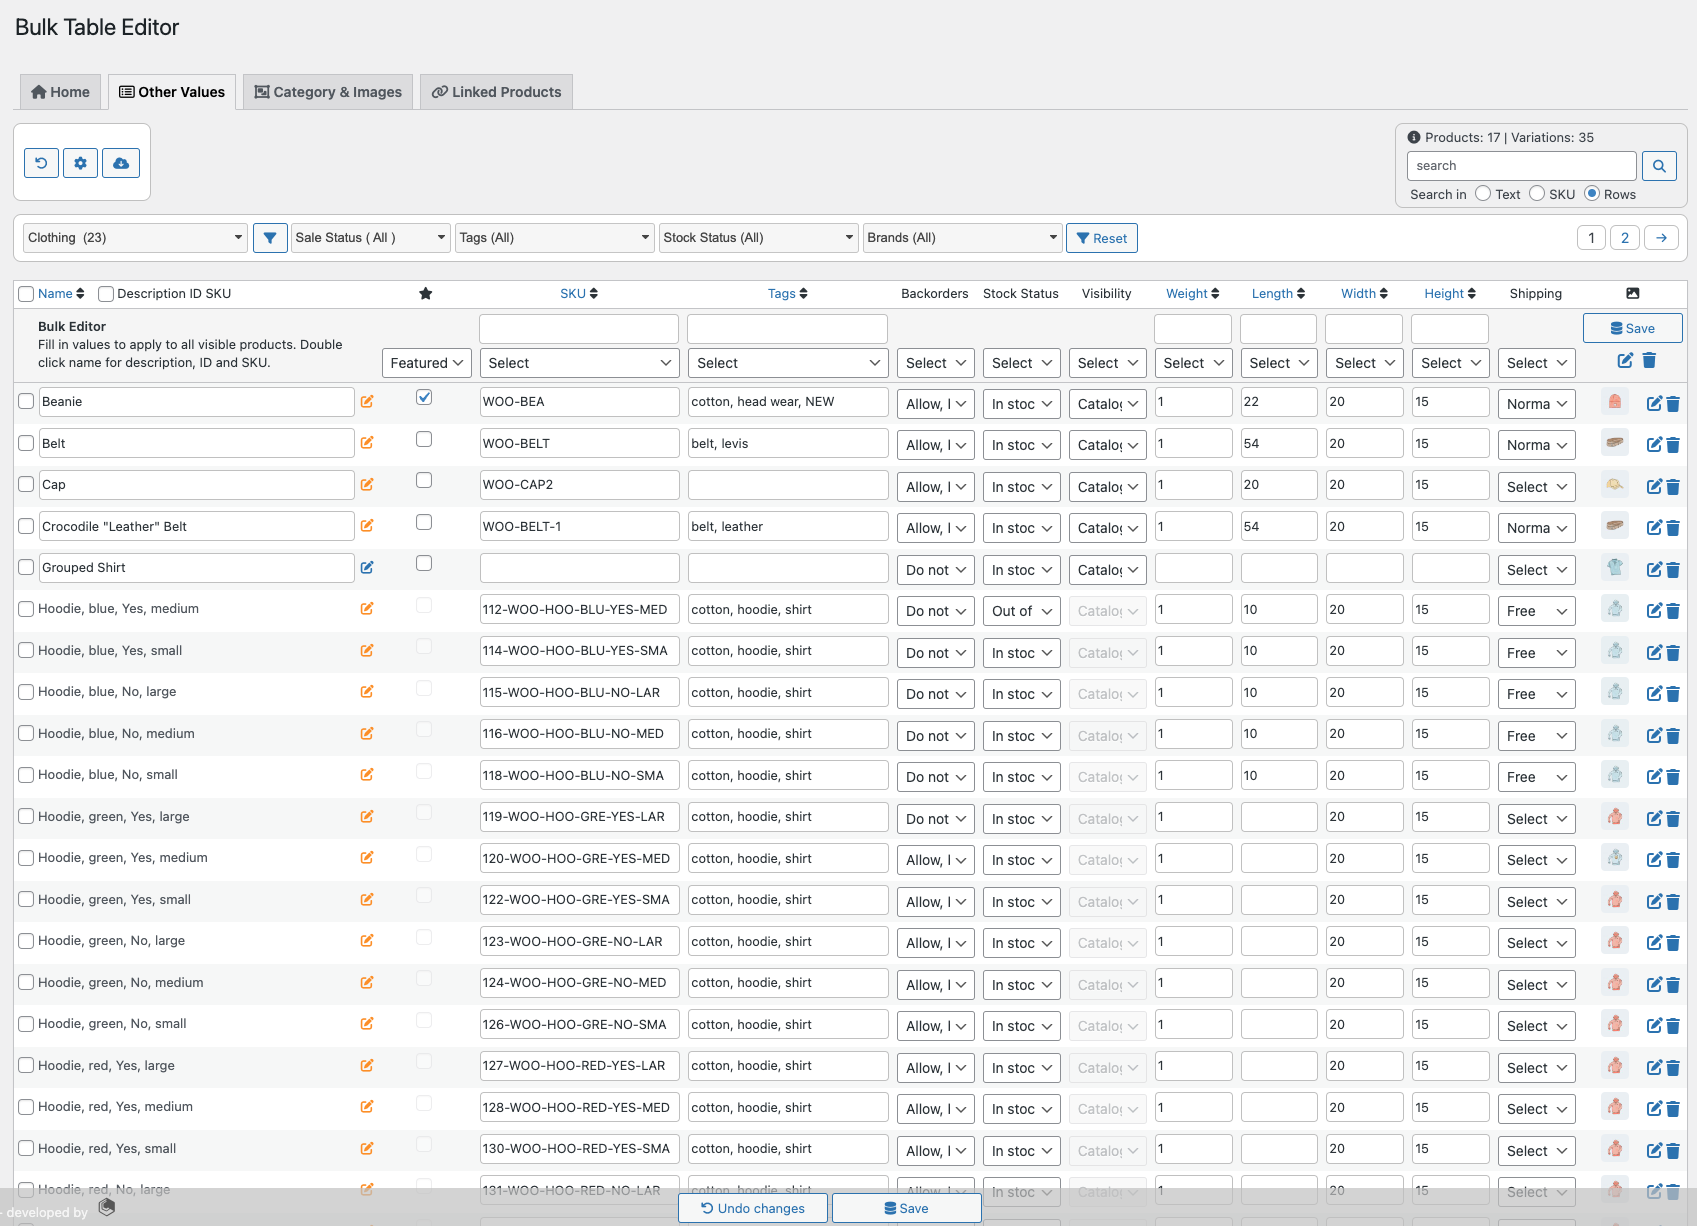
Other values
↑ Back to topThis table enables bulk updates of many of the other values on a product. Some values have rules that will prevent them to be set or other rules that tells what the value is, i.e Backorder and Stock status. All values can be updated in the table or using bulk functions (except Name). When a value has been changed and you leave i.e an input box the checkbox on the left of the row is checked. This indicates that the row will be saved when hitting the Save all button. Easy uncheck rows you do not want to save. If filtering rows, only visible checked rows will be saved.
Name
↑ Back to topCan be updated on single products, variables has a button to enter the parent product.
Featured
↑ Back to topSelect box with options: Yes | No. Example: select yes and all shown rows featured checkbox will be checked, then use save all button to apply this for the products.
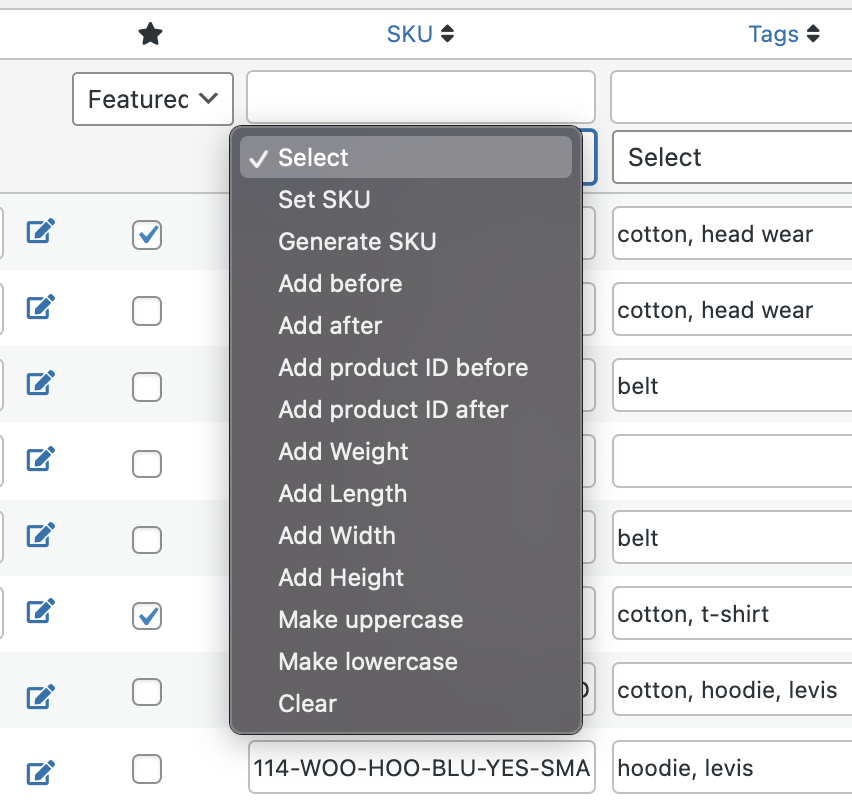
SKU
↑ Back to topSKU has many options, you can add or generate SKUs based on your preferences. Remember that SKU must be unique or else it will not be saved. To make SKU, Bulk Table Editor has several options like set product ID first or after a name, generate SKU is another option that generate SKU like this: Shirt with logo = shi-wit-log. If you have done this, you can add i.e product ID and vendor before: 112-levis and get: 112-levis-shi-wit-log and you have a unique SKU.
Tags
↑ Back to topThink of tags as attributes you can assign to multiple SKUs, this again makes it more easy for customers to find products they look for. The tags has functions like add before and after, or just set a list of tags. If you set a list of tags and add it make sure to use comma to separate your tags.
Backorder
↑ Back to topSelect box with options to tell if one can purchase products if products is not in stock.
Stock status (in stock?)
↑ Back to topThis select box is more a status for your products, you can use the options but it can change automatically if backorder is set and I.e you’re out of stock.
Measures and product image
↑ Back to topWeight: Set the weight
Length: Bulk set length
Width: Bulk set width
Height: Bulk set height
Product image: shows current product image
Category & Images
↑ Back to top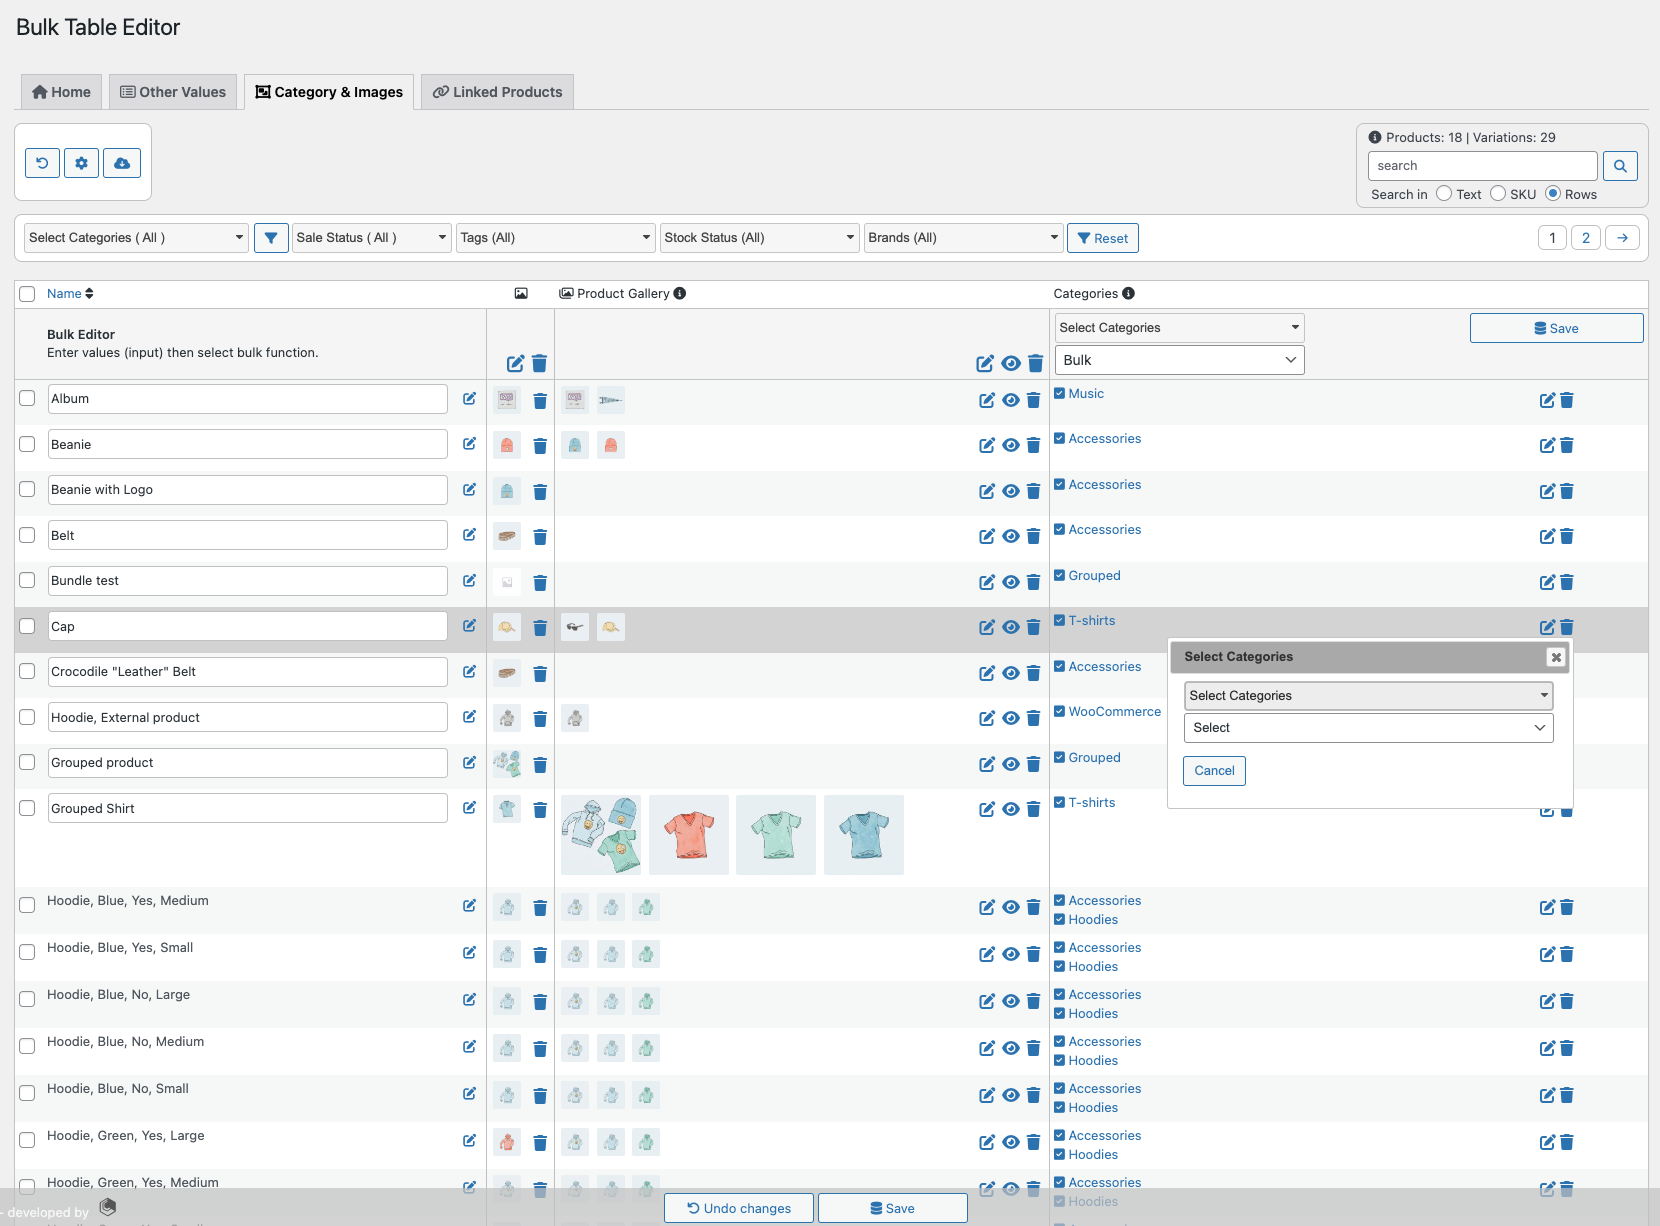
The Bulk Table Editor for WooCommerce enriches your product management experience with the newly added “Category & Images” tab. This innovative feature is designed to streamline the way you manage product visuals and categorizations, enhancing efficiency and control over your WooCommerce store’s inventory.
Empower Your Product Visuals
- Seamless Image Updates: With the “Category & Images” tab, updating featured and gallery images becomes a hassle-free process. Whether you’re looking to adjust a single product or apply changes in bulk, this tab provides the tools you need to keep your product visuals fresh and engaging.
- Zoom for Detail: Each image within the table includes a zoom option, allowing you to enlarge and inspect visuals directly, ensuring every detail is perfect.
Streamlined Category Management
- Bulk Category Updates: Redefine how you organize your products with our multi-select category management tool. This feature not only allows for the bulk updating of categories but also includes a search function, making it easier than ever to find and assign the right categories to your products.
- Flexible Options: Whether you’re adding new categories, setting specific ones, removing unwanted categories, or clearing them altogether, the “Category & Images” tab equips you with the flexibility to tailor your product listings precisely.
Linked Products
↑ Back to topThis guide will walk you through the features and functionalities of this powerful tool, which allows you to create strategic product relationships, manage upsells, and cross-sells with ease.
1. Introduction
↑ Back to topOverview of Linked Products
The Linked Products tab is a feature within Bulk Table Editor for WooCommerce designed to simplify and enhance your product management. It enables you to create and manage upsell and cross-sell relationships between products effortlessly.
Benefits of Using Linked Products
Linked Products help you boost your sales by guiding your customers to discover complementary or higher-value items. By strategically recommending products, you can increase your revenue, enhance the shopping experience, and foster customer loyalty.
2. Getting Started
↑ Back to topAccessing the Linked Products Tab
To access the Linked Products tab and start creating strategic product relationships, follow these simple steps:
- Navigate to Bulk Table Editor: Log in to your WooCommerce admin dashboard and navigate to the Bulk Table Editor plugin.
- Access the Linked Products Tab: In the plugin’s menu, you will find the “Linked Products” tab. Click on it to open the Linked Products interface.
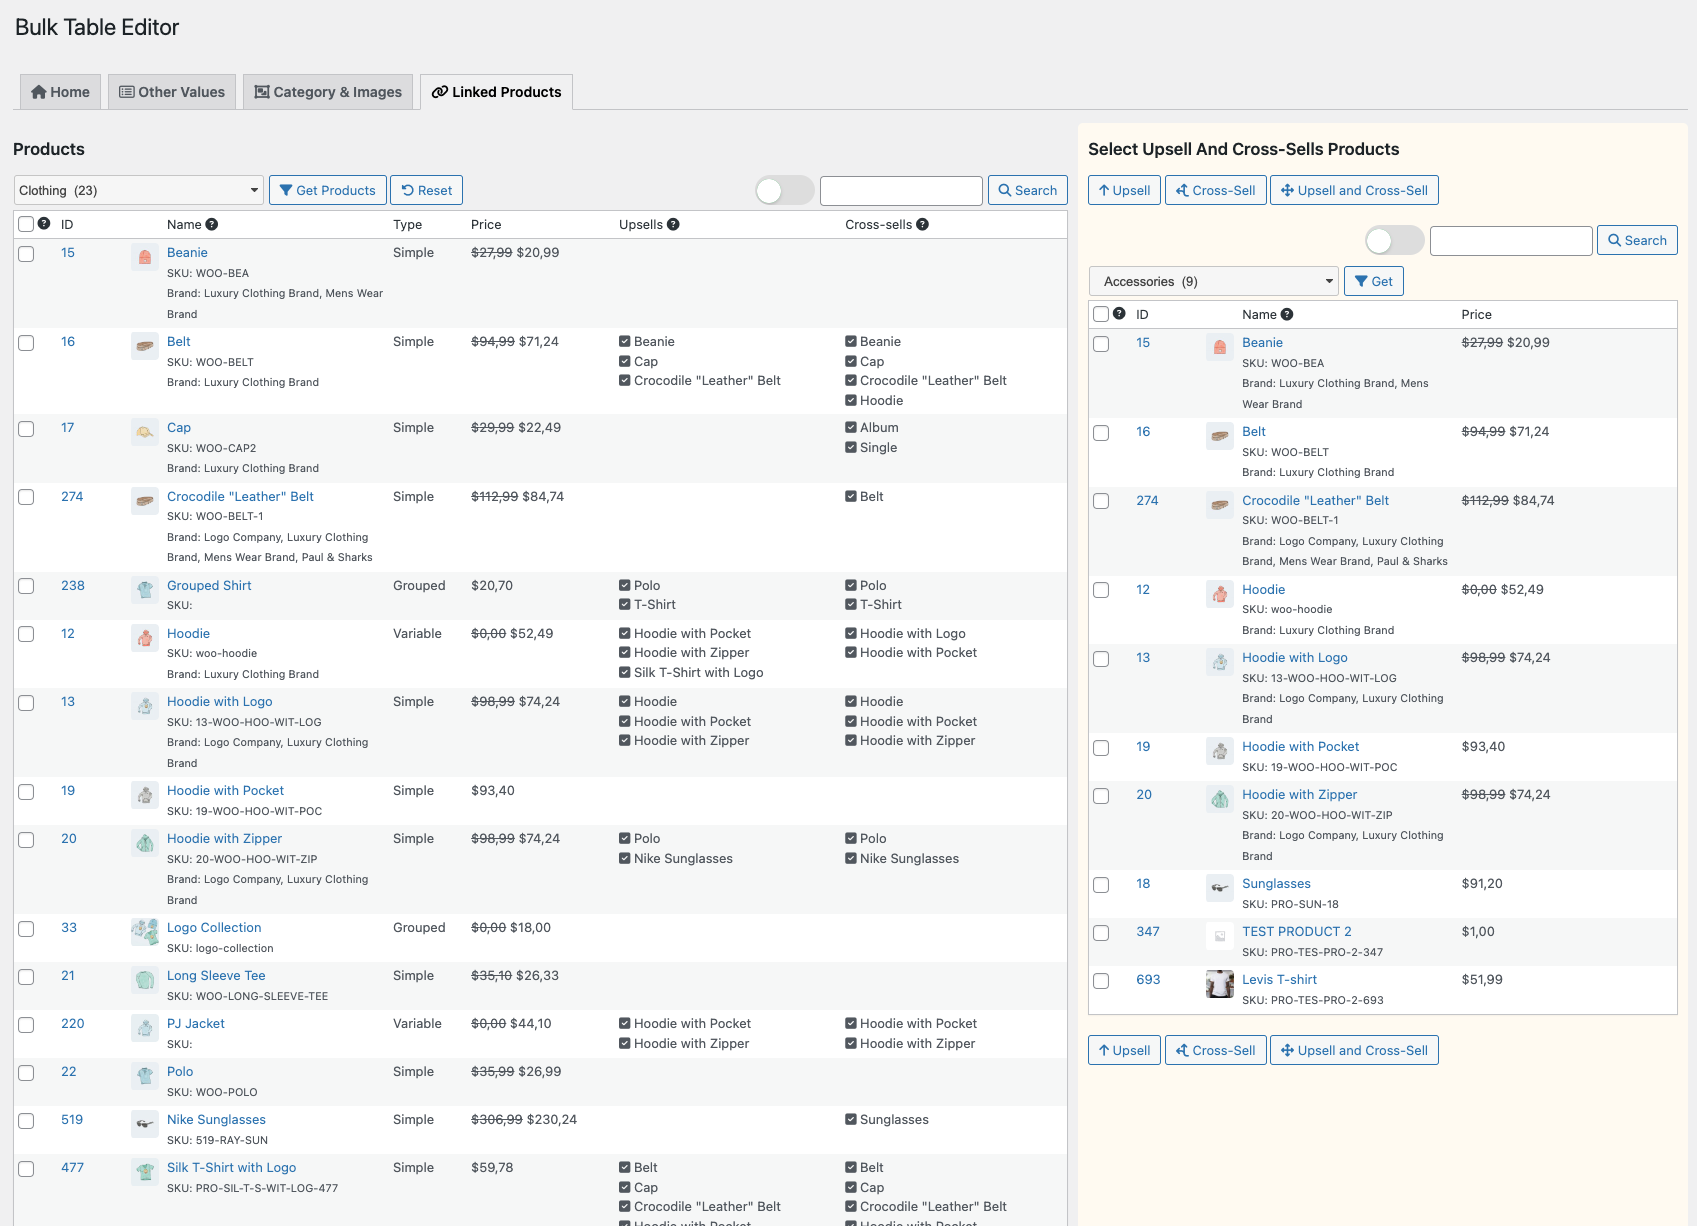
Navigating the Interface
The Linked Products interface consists of two tables: the “Products” table on the left and the “Select Upsell and Cross-Sells” table on the right, indicated by a yellow background.
- Products Table (Left): In this table, you can find and select the products you want to link as upsells or cross-sells. To select a product, simply click on the checkbox next to it, or click on the row itself to check it (the font will become red to indicate selection). To remove a link, click the linked products icon (an Ajax process will remove it in the background).
- Select Upsell and Cross-Sells Table (Right): In this table, you will find a list of products that you can use for upselling or cross-selling. To select a product, mark the checkbox next to it, or click on the row to check it (the font will become red to indicate selection). After selecting the desired products, use one of the three buttons provided: “Upsell,” “Cross-Sell,” or “Upsell and Cross-Sell” to establish the product relationships.
- Search and Filtering: You can use the search functionality to quickly find specific products within both tables. By default, the search function filters within the rows. However, a toggle allows you to switch to a database search, which expands your search capabilities.
3. Managing Upsells
↑ Back to topAdding Upsell Products
To add products as upsells, follow these steps:
- Select Products: In the “Products” table (left), choose the products that you want to promote as upsells by marking their checkboxes or clicking on the rows to check them (the font will become red to indicate selection). To remove a link, click the linked products icon in the Upsells column (an Ajax process will remove it in the background).
- Select Upsell Candidates: In the “Select Upsell and Cross-Sells” table (right), mark the checkboxes next to the products you want to recommend as upsells, or click on the rows to check them (the font will become red to indicate selection).
- Create Upsell Links: Click the “Upsell” button to link the selected products as upsells. This action will establish the product relationships, enhancing your sales strategy.
Removing Upsell Products
If you need to remove products from the list of upsells, follow these steps:
- Access Upsell Products: In the “Products” table (left), locate the product you want to remove as an upsell. Click the linked products icon (checked) in the Upsells column (an Ajax process will remove it in the background).
- Update Upsell Links: Changes are automatically saved when you deselect a product. The product will no longer be linked as an upsell.
4. Managing Cross-Sells
↑ Back to topAdding Cross-Sell Products
To add products as cross-sells, follow these steps:
- Select Products: In the “Products” table (left), choose the products that you want to promote as cross-sells by marking their checkboxes or clicking on the rows to check them (the font will become red to indicate selection). To remove a link, click the linked products icon in the Cross-Sells column (an Ajax process will remove it in the background).
- Select Cross-Sell Candidates: In the “Select Upsell and Cross-Sells” table (right), mark the checkboxes next to the products you want to recommend as cross-sells, or click on the rows to check them (the font will become red to indicate selection).
- Create Cross-Sell Links: Click the “Cross-Sell” button to link the selected products as cross-sells. This action will establish the product relationships, enhancing your sales strategy.
Removing Cross-Sell Products
If you need to remove products from the list of cross-sells, follow these steps:
- Access Cross-Sell Products: In the “Products” table (left), locate the product you want to remove as a cross-sell. Click the linked products icon (checked) in the Cross-Sells column (an Ajax process will remove it in the background).
- Update Cross-Sell Links: Changes are automatically saved when you deselect a product. The product will no longer be linked as a cross-sell.
FAQs
↑ Back to topHow do I change product categories and view all my products again?
↑ Back to topCan I sort and order the table?
↑ Back to topYes, every column that has a up/down arrow is possible to use for sorting. Just click the header link and you will sort the table on that column ascending or descending.
Can I use the table editor to update single products?
↑ Back to topUsing the table to change single values is possible for updating product values. If you have mouse over a field the input is automatically selected. After entering a value and moving to another field, note that the checkbox for that row is checked. When you use the Save all button only rows with checkbox checked is saved. If you change stock or price you will see that the table calculates stock value (right column) and give you a total in the bottom. The totals is based on the products you see in the table.
Can I use the editor on an iPad?
↑ Back to topYes, but you have to enable JavaScript in settings for your iPad browser. Follow this guide: https://www.whatismybrowser.com/guides/how-to-enable-javascript/safari-iphone
Example
↑ Back to top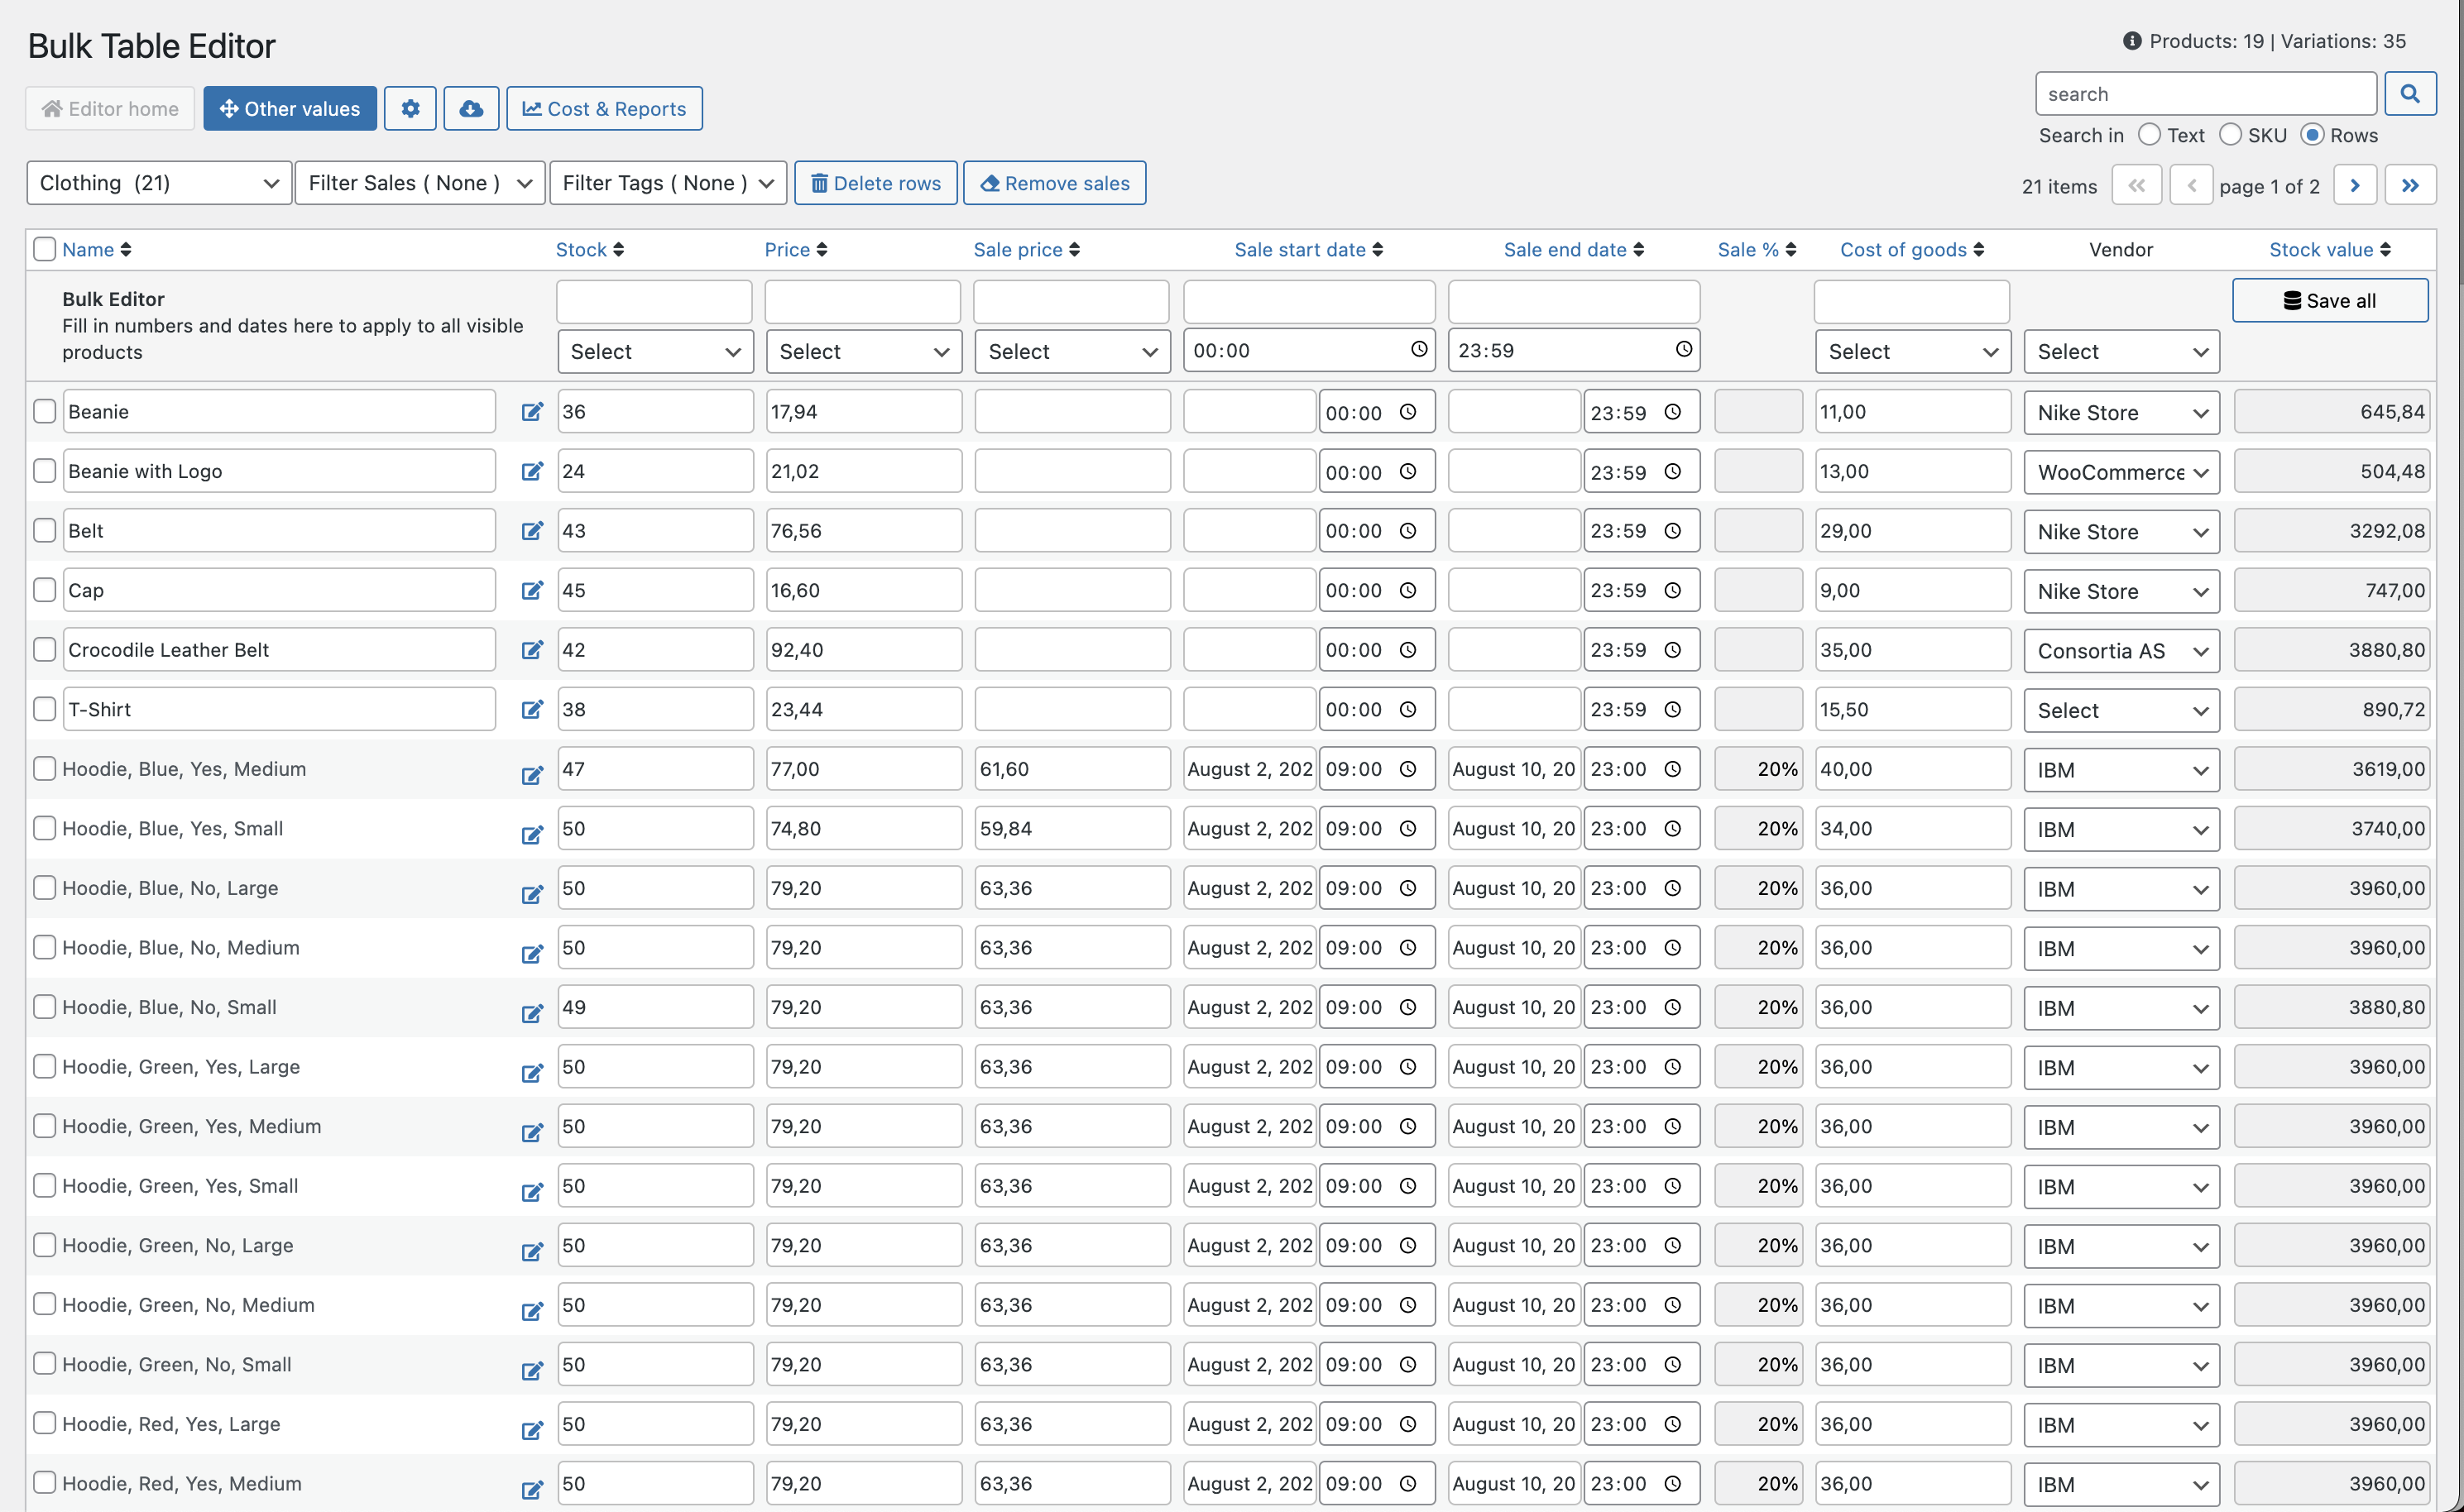
If you sell clothing and want to set up a sale on your category T-Shirts. In Bulk Table Editor this is an easy task. Just select the category i.e T-Shirts and enter a value in the bulk function for sale price i.e 20 and select in the dropdown box – decrease in %. Bulk Table Editor then calculates a 20% sale based on your regular product price and add it to all your products in the category T-Shirts.
After this you just can set a sale start or a sale end date + your start end time if you like. This is done by selecting the dates in the bulk functions for start and end date, Bulk Table Editor then fills the rows for you automatically. Just uncheck products you do not want on sale and click the save all button.
Sales dates
Sales dates is optional. This means that you can i.e use start dates and no end dates. This gives you a sale that starts on a date and runs until you stop it by clearing the sale price (function for this). The same goes for using only the sale end date, means that the sale starts now and ends on the date you selected. If you create a sale with no dates the sale starts now and runs until you remove the sale price.
Sale with no dates (in versions before 2.1.5)
If you just want a sale that goes on until you remove the sale price, then you need to enter Bulk Table Editor’s settings and find a option called: Allow infinity sales price and check this (on) and now you will not need to set dates for you sales.
Compatibility
↑ Back to topThe extension is compatible with:
- WooCommerce Products and variations
- WooCommerce Subscriptions and variations
Languages:
- Default English
- Translation for Spanish
- Translation for Norwegian
- Translation for French
- Includes POT file for translation to other languages
Uninstalling
↑ Back to topIn WordPress > plugins find Bulk Table Editor and deactivate and if you want – delete. If deleting the plugin, the plugin files will be removed from your WordPress installation. If the plugin is deactivated or deleted, your product data will not be affected.