Marketing Automation by Icegram allows you to send welcome emails, newsletter broadcasts, automated follow up sequence mails, maintain product specific audience lists, unsubscribe customers if they refund or cancel and use ready-made high converting email design templates for sending emails.
How to install?
↑ Torna in cima
- Download the .zip file from WooCommerce Account
- Go to WordPress Admin > Plugins > Add New and Upload Plugin with the file you downloaded with Choose file
- Install now & Activate the plugin
- Go through onboarding process to set everything up
Configuration
↑ Torna in cimaSetup & Configuration
↑ Torna in cima
How to use it?
↑ Torna in cima
 Broadcast allows you to design and schedule newsletters on any occasion targeting a group of audience. Be it a product launch or something that you want to share with the audience, broadcast comes in handy when you want to send a customized newsletter on a range of occasions.
Create a broadcast
↑ Torna in cima- Go to your WordPress Dashboard > Email Subscribers > Campaigns
- Click Send Broadcast on the top
- Enter the campaign details and draft the message
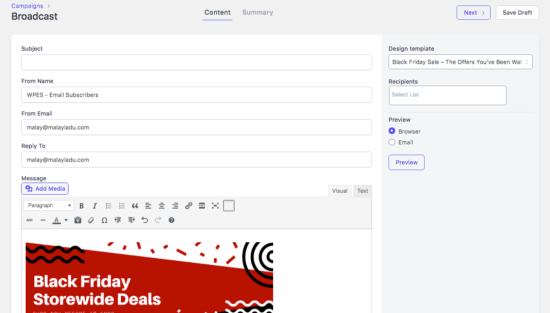
- Subject: Enter the subject of the campaign
- From Name: Enter the name for the recipient to see on their end
- From Email: By default, it is fetched from settings, but you can change it to overwrite the default From Email address.
- Reply To Address: From Email addresses are normally un-monitored emails so you may need to enter a reply-to address in case recipients want to reach out to you
- Message: Actual email content to be sent
- Design Template: Select the template if you have already created it and you can further edit the email message
- Recipients: Choose one or more lists under Recipients to target
- Preview: Preview the email to see how it appears in the browser and the email client
- Select the template from the right
- Click Next to review the summary
- Check the spam score and update the message accordingly
- Enable/disable tracking
- Pick an option to send and click Send/Schedule
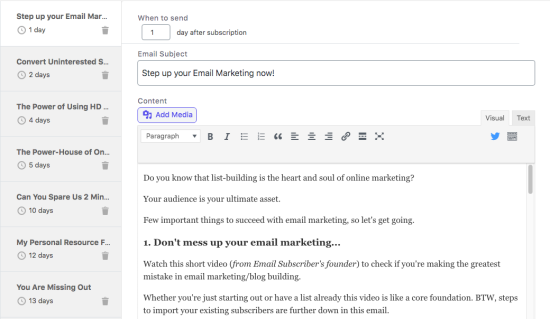
Create an autoresponder sequence
↑ Torna in cima