You can view and adjust filters in the Searchanise control panel > Filters section.
Adding filters
↑ Torna in cimaThe filters are added automatically based on product details and global product attributes after re-indexation. The re-indexation occurs automatically, but you can also trigger it manually by clicking the Force re-indexation button in the Dashboard section.
If you use custom product taxonomies in your store, you can also create filters based on them.
Note
Adding filters based on custom product taxonomies is available for the plugin v.1.0.11 or later.
To set up filters based on custom product taxonomies, follow these steps:
- Go to the Searchanise settings: WordPress admin panel > Settings > Searchanise (v. 1.0.11 or earlier) or WordPress admin panel WooCommerce > Settings > Searchanise (v. 1.0.12 or later).
- Select custom taxonomies based on which you want to create filters in the Custom taxonomies field.
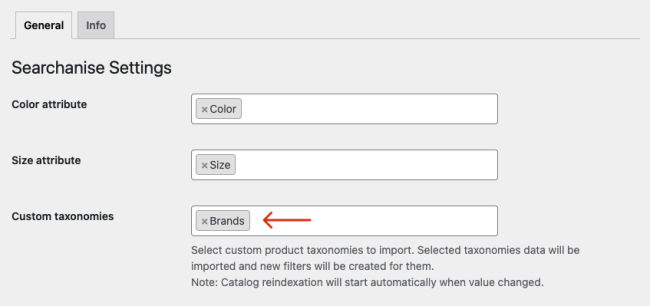
- Save the changes. Catalog indexation will be started automatically.
That’s it. After the indexation is complete, the filters for the selected custom taxonomies will be created. They will appear in the Searchanise control panel > Filters > Filter list. If you would like, you can adjust them there, for example, change the order or titles.
Hiding filters
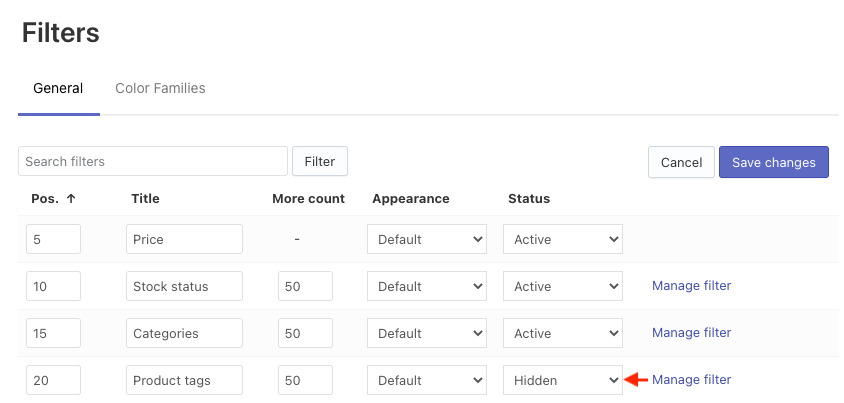
↑ Torna in cimaTo hide filters, follow these steps:
- Go to the Searchanise control panel > Filters > Filter list section.
- Click the Edit filters button in the top-right corner.
- Set statuses of the necessary filters to Hidden.
- Save the changes.
Renaming filters
↑ Torna in cimaYou can find the instructions on how to do that here.
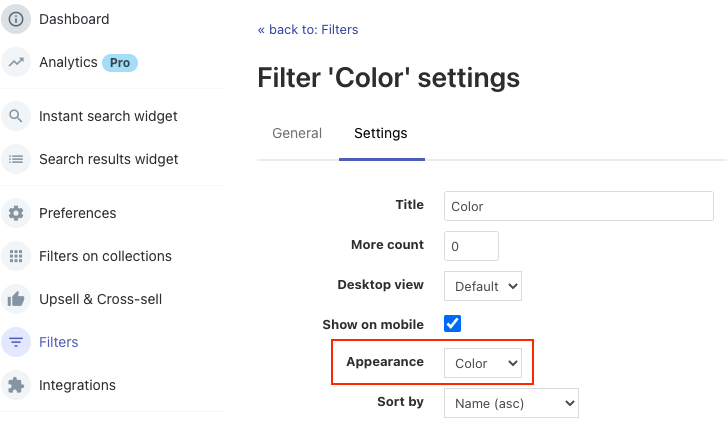
Changing Filters’ Values Appearance
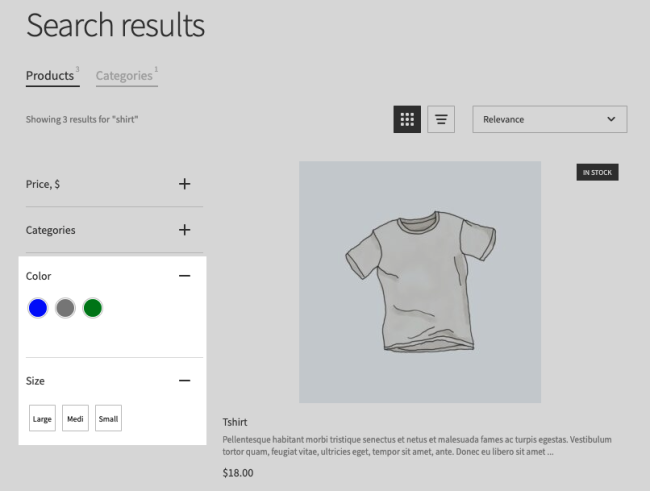
↑ Torna in cimaYou can choose the appearance of filter values in the Appearance option:
- Default – values as text
- Color – color values as color swatches
- Size – size values as text in frames
Important info
To show colors as color swatches, all colors have to be assigned to a Color Family.
There are two ways to change appearance.
Way 1:
- Go to the Searchanise control panel > Filters > Filter list section
- Click the Edit filters button in the top-right corner.
- Select the look for the necessary filters in the Appearance option.
- Save the changes.
Way 2:
- Go to the Searchanise control panel > Filters > Filter list section.
- Click the Manage filter link next to the filter whose look you want to change. The editing page of the filter will be opened.
- Go to the Settings tab, and select the look in the Appearance option.
- Apply the changes.
Sorting Filters
↑ Torna in cimaYou can change the sorting of Filters as well as the sorting of their values.
Change the sorting of Filters
↑ Torna in cimaThe Filters sort according to the adjusted order in the Pos. (Position) column in the Filters > Filter list section.
To change the sorting order, follow these steps:
- Go to the Searchanise control panel > Filters > Filter list section.
- Click the Edit filters button in the top-right corner.
- Set the order of the filters in the Pos. column.
- Save the changes.
That’s it. Your filters will be sorted on the storefront according to the order you’ve just set up.
Change the sorting of filter values
↑ Torna in cimaTo change the sorting of the specific filter values, follow these steps:
- Go to the Searchanise control panel > Filters > Filter list section.
- Click the Manage filter link in the filter row whose values you want to change the sorting.
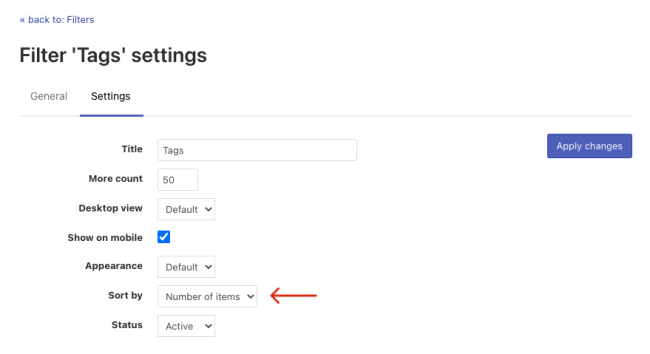
- Go to the Settings tab.
- Select the option in the Sort by setting:
- Default – the default sorting that is set for all filters’ values
- Name (asc) – the sorting by names by ascending (if a display name is set, then it is considered as a name)
- Name (desc) – the sorting by names by descending
- Number of items – the sorting by the number of products by descending
- Manual – the sorting according to the order set in the Position column in the list of filter values. The Position column is shown if the Manual sorting is set.
- If you selected the manual sorting, adjust the order of filter values as you would like in the General tab. See the third step of the instructions here.
- Apply the changes.
That’s it. These filter values will be sorted by the selected way.
Adjust the manual sorting of the filter values
To adjust the manual sorting of the filter values, follow these steps:
- Go to the Searchanise control panel > Filters > Filter list section.
- Click the Manage filter link in the filter row whose values you want to change the sorting.
- Click the Edit values button in the top-right corner.
- Set the order of the filter values in the Position column. Please note that the Position column is shown if the Manual sorting is set for the filter values.
- Save the changes.
That’s it. The filter values will be sorted on the storefront according to the order you’ve just set up.
Bulk editing Filters and Filter Values
↑ Torna in cimaBulk editing of filter and filter values is available in Searchanise.
Bulk editing Filters
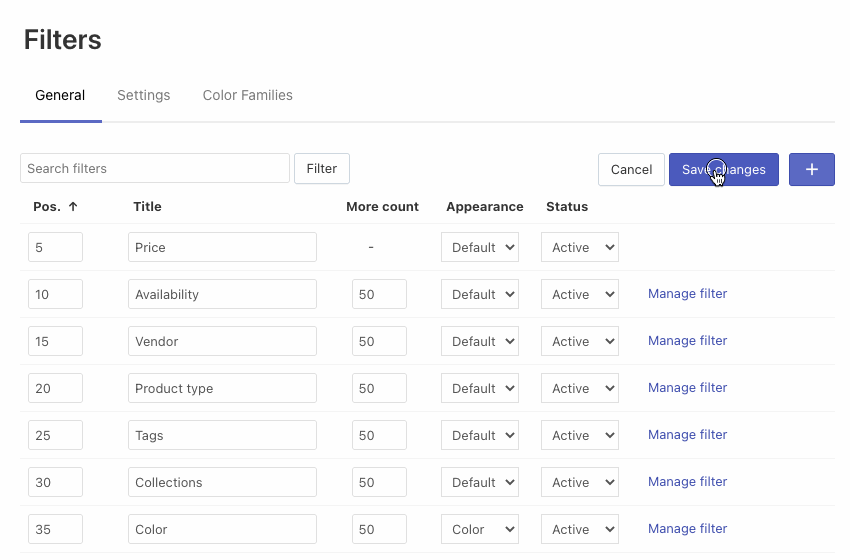
↑ Torna in cimaYou can edit the Status, Desktop view, More count, or Sort by attributes of several Filters at once. To do so, follow these steps:
- Go to the Searchanise control panel > Filters > Filter list section.
- By default, it is shown 20 filters per page. If you want to show and edit more, change the value in the Display drop-down list above the table.
- Select the Select all checkbox in the header of the table or select certain filters.
- Click the appeared Edit selected button.
- Select the values of the fields you want to set for the selected filters and click the Update button.
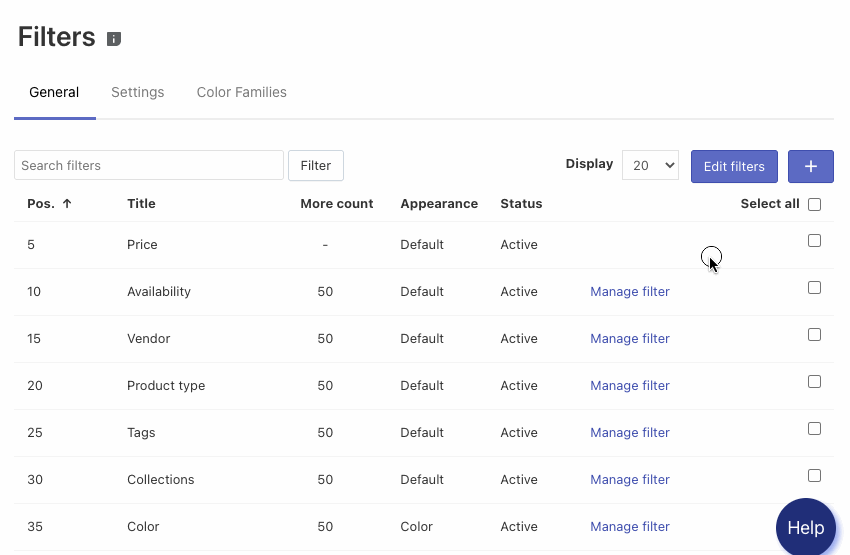
That’s it. The changes are now applied to selected filters.
Bulk editing Filter Values
↑ Torna in cimaYou can edit the Status of several Filter Values at once. To do so, follow these steps:
- Go to the Searchanise control panel > Filters > Filter list section.
- Click the Manage filter link in the filter row whose values you want to change the sorting.
- Select the Select all checkbox in the header of the table or select certain filter values.
- Click the appeared Edit selected button.
- Select the value of the Status field for the selected filter values and click the Update button.
That’s it. The changes are now applied to selected filter values.
Grouping Filter Values
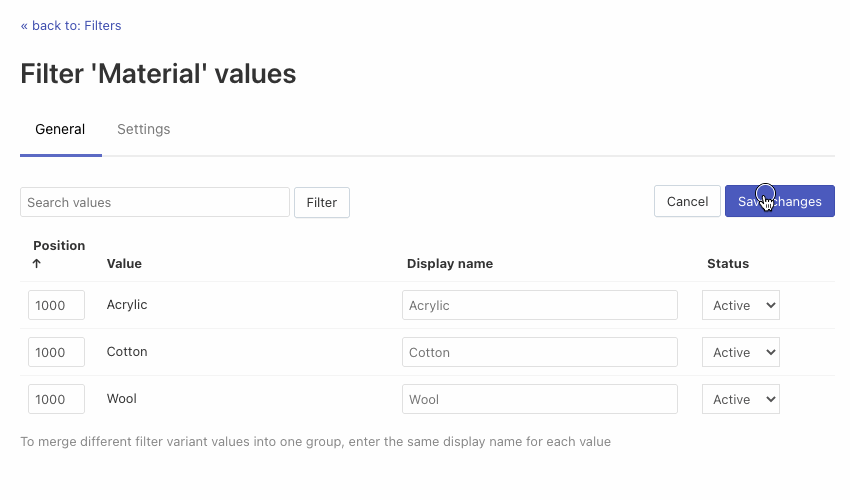
↑ Torna in cimaYou can merge some filter values into one to reduce the number of filter options or to combine similar values. To do so, follow these steps:
- Go to the Searchanise control panel > Filters > Filter list section.
- Click the Manage filter link in the filter row whose values you want to merge.
- Click the Edit values button in the top-right corner.
- Enter the similar names into the Display name column for values you want to merge. The display names are case-sensitive.
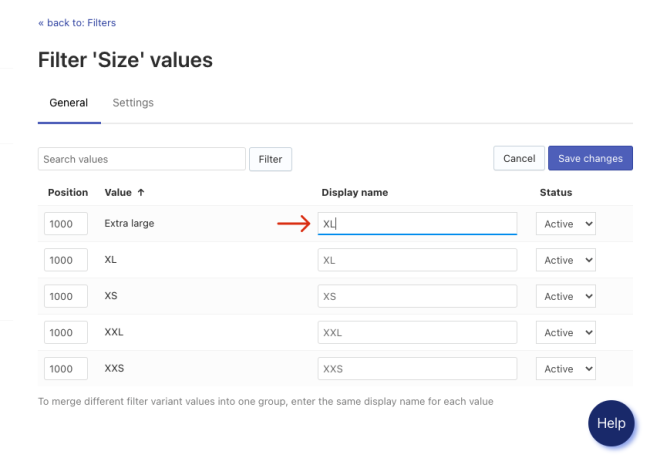
- Save the changes.
That’s it. The filter values with similar display names are now shown as one filter option on the storefront.
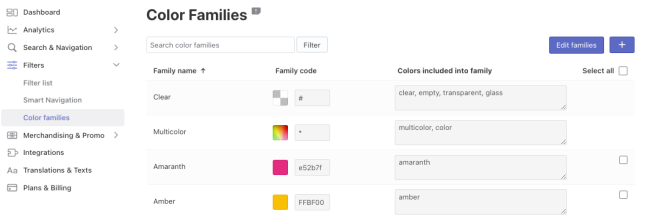
Color Families
↑ Torna in cimaColor Families is a feature that allows you to combine color values with complex names such as fuchsia, natural, sky blue into a standard color palette and display this palette in color swatches.
Important info
When a color value is not assigned to any Color Family, the drop-down list with color text values will be displayed instead of color swatches.
There are two ways of adjusting your Color Families:
- Editing Color Families
- Assigning Color Family to an existing color
Editing Color Families
↑ Torna in cimaYou can add or edit an existing Color Family in the Searchanise control panel > Filters > Color Families section.
Note
The Clear and Multicolor families can’t be deleted or edited.
Adding colors to Color Families
- Go to the Searchanise control panel > Filters > Color Families section.
- If you see an appropriate Color Family, edit it:
- Click the Edit families button in the top-right corner.
- Type new colors separated by commas into the Color includes into family field.
- Save the changes.
- If you don’t see an appropriate Color Family, add a new one:
- Click the + button in the top-right corner.
- Enter Family name.
- Choose Family code by color picker or enter a hex color code into the field.
- Type the colors separated by commas into the Color includes into family field.
- Optionally, add more than one Color Family.
- Save the items.
Deleting colors from a Color Family
- Go to the Searchanise control panel > Filters > Color Families section.
- Click the Edit families button in the top-right corner.
- Remove the color(s) from the Color includes into family field.
- Save the changes.
Deleting a Color Family
- Go to the Searchanise control panel > Filters > Color Families section.
- Select the checkboxes in the Delete column near Color Families you want to remove.
- Click the Delete selected button in the top-right corner.
Assigning a Color Family to an existing color
↑ Torna in cima- Go to the Searchanise control panel > Filters > Filter list section.
- Click the Manage filter link next to the color filter.
- Go to the Settings tab and check that the Color value is selected in the Appearance drop-down list. Select it and apply the changes. As a result, color values will be shown as color swatches in the filter.
- Go to the General tab.
- Click the Edit values button in the top-right corner.
- Assign a Color Family to the color value. Please note that you can select the Show unmapped checkbox at the top to filter color values not assigned to any Color Family.
- Save the changes.