Installation
↑ Back to top- Download the .zip file from your WooCommerce account.
- Go to: WordPress Admin > Plugins > Add New and Upload Plugin. With the file you downloaded, select Choose File.
- Install Now and Activate the extension.
More information at: Install and Activate Plugins/Extensions.
Setup and Configuration
↑ Back to topGlobal Settings Configuration
↑ Back to topGo to: WooCommerce > Webis Multilingual and navigate to the Settings tab.

- Languages
- To add languages, click “Edit languages”, select languages you would like to add and save.
- Language Codes
- Use this section to customize the language code shown in the URL. For example, the default language code for Chinese (simplified) is “zh_CN” and we have modified it to “cn” as shown in the above screenshot.
- Language Switcher
- Use the “Show flags” checkbox to show/hide flags in language switcher.
- Cookie Name
- We use cookies to remember the language selected by the customer. If the site language keeps changing back to the default language, it’s likely that you have your browser cookies disabled or you’re getting the cached page. If the latter, please consult with your developers and add the cookie name to the Cache-Busting Cookies List. In some cases, you may be required to change the cookie name and that is why we have an option to change the name.
String Translation
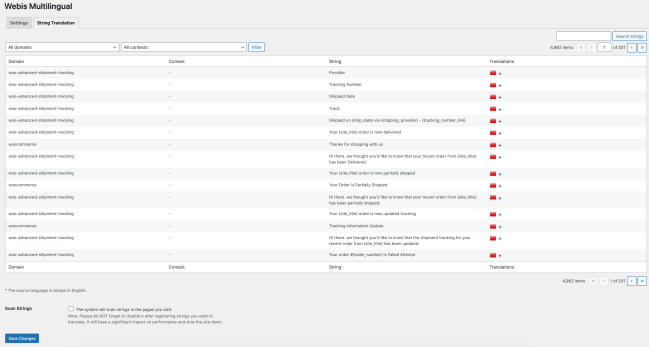
↑ Back to topGo to: WooCommerce > Webis Multilingual and navigate to the String Translation tab.

Use this section to translate the strings in your storefront.
- Enable the “Scan Strings” option on the bottom of the page and press “Save Changes”.
- Visit pages where strings you want to translate get rendered or appear.
- Search for the strings in “String Translation” menu and add translation by clicking “+” button.
IMPORTANT: Please note that you may need to refresh the page a couple of times if the page contains too many strings. And it is very important that you disable the “Scan Strings” option once you are done with scanning as it will have a significant impact on performance and slow the site down.
Translating Contents
↑ Back to topTranslating contents is simple with our plugin. Simply, you will find the fields to add translations below where you’d normally input original contents. For example, to add translations for a product, open up the product edit page and find the Webis Multilingual screen element and add translations. Likewise, to add translations for post, go to the post edit page and find the Webis Multilingual menu.
Here are a couple of examples:

To add translations for products, simply edit the product you wish to translate and add translations to the “Webis Multilingual” section.

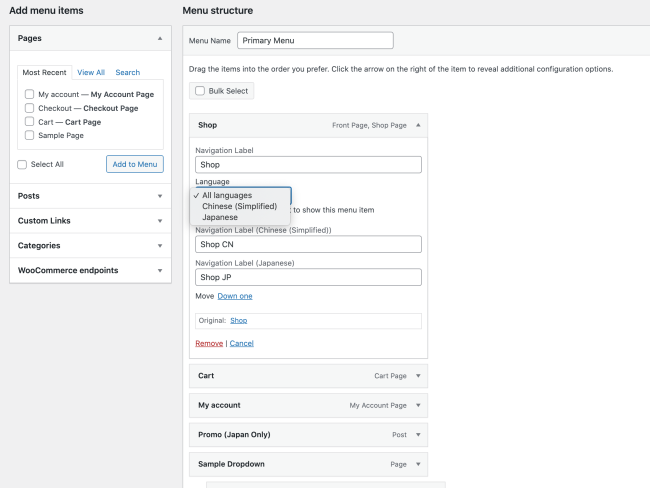
To add translations for menu items, go to: Appearance > Menus. Example: In the above screenshot, we’re adding translations for “Shop” menu item and have three dropdown lists: “All languages”, “Chinese (Simplified)” and “Japanese”. By selecting “All languages”, you are able to add translations for both Chinese and Japanese, and “Shop” menu will show on the storefront for both languages. Please select “Chinese (Simplified)” or “Japanese” if you only want to show the menu item on the storefront for that particular language.
Adding translations is simple with our plugin. Simply go to where you’d normally write your contents and you’ll find “Webis Multilingual” section to add translations. We currently support Product, Category, Attribute, Post, Page and Menu translation.
Video Walkthrough
↑ Back to tophttps://webiswoocommerce.com/plugins/wml/video/walkthrough
FAQ
↑ Back to top1) How can I change language codes in a site URL?
Use the table in the plugin settings page to customize the language codes for each available language. By default, system uses WP default language codes.
2) How can I show the language switcher?
Please use “wmlw_language_switcher” shortcode to show the switcher. It accepts one parameter named “type”.
Example usage:
a) Dropdown: [wmlw_language_switcher type=“dropdown”]
b) List: [wmlw_language_switcher type=“list”]
If you don’t know how to add shortcodes, many theme editor plugins out there allow you to add them easily from the admin dashboard. For example, Elementor has a built-in feature where you enter the shortcode and they add it into php templates for you. Advanced users can manually add the shortcode into theme php templates (ex. header.php).
3) Why does my site language keep changing back to the default language?
We use cookies to remember the language selected by the customer. If the site language keeps changing back to the default language, it’s likely that you have your browser cookies disabled or you’re getting the cached pages. If the latter, please consult with your developers and add the cookie name to the Cache-Busting Cookies List. In some cases, you may be required to change the cookie name and you could do that in the plugin settings page.
4) How can I translate strings other than product info, page contents, etc..?
Please go to the plugin settings page and click the “String Translation” tab. You can search the string you wish to translate and provide translation for each language. If the string you want to translate is not in the list, please go to the bottom of the page and enable the “Scan Strings” feature. This will allow the system to scan the strings in the pages you visit.
Example: If you want to translate a word “Edit” in Cart page and the string is not in the list, you can enable the “Scan Strings” feature, refresh the Cart page and refresh the list to see if it’s properly scanned by the system.
Please note that you may need to refresh the page a couple of times if the page contains too many strings. Also it is very important that you disabled the “Scan Strings” option once you’re done with scanning as it will have a significant impact on performance and slow the site down.