For most online stores and ecommerce sites, your product pages are your sales pages. These are the pages that turn your shoppers from potential customers into actual paying customers.
Great product pages make your items look, sound, and feel like something shoppers want to buy. They make it easier to decide to place an order.
In this article, you’ll get some tips for ecommerce website design, see some great product page design examples, learn how to create the best product pages, and gain a few improvements that can increase your sales and revenue.
The purpose of product pages
Your product pages need to deliver everything necessary to convince shoppers to place an order with you, and not go somewhere else.
Compelling ecommerce product pages do four things. They:
- Inform: Online shoppers need information that answers their questions and shows whether your product will meet their needs or solve their problems.
- Delight: Customers want to be delighted by the promises your product will deliver.
- Reassure: Shoppers want to be reassured that they’re buying something of high quality, from a business that will treat them well.
- Justify: Shoppers need to be able to logically justify their purchase, in their mind or for someone else in their life who may have an opinion.
So, let’s look at how to create product pages and the key elements to delivering a great online shopping experience that results in five-star reviews and repeat customers.
12 key elements of an effective product page design
1. High-quality product images
In a brick-and-mortar store, customers can pick up a product, read the instructions or ingredients, study the label, and compare it to nearby items. In an online store, you need to provide as close as possible to the in-store buying process.
And that begins with high-quality images of your products.
For clothing, it’s best to show people wearing them, with images of different sizes if possible and relevant. For other products, take multiple product photos from a variety of angles, and allow the shopper to click on different views.
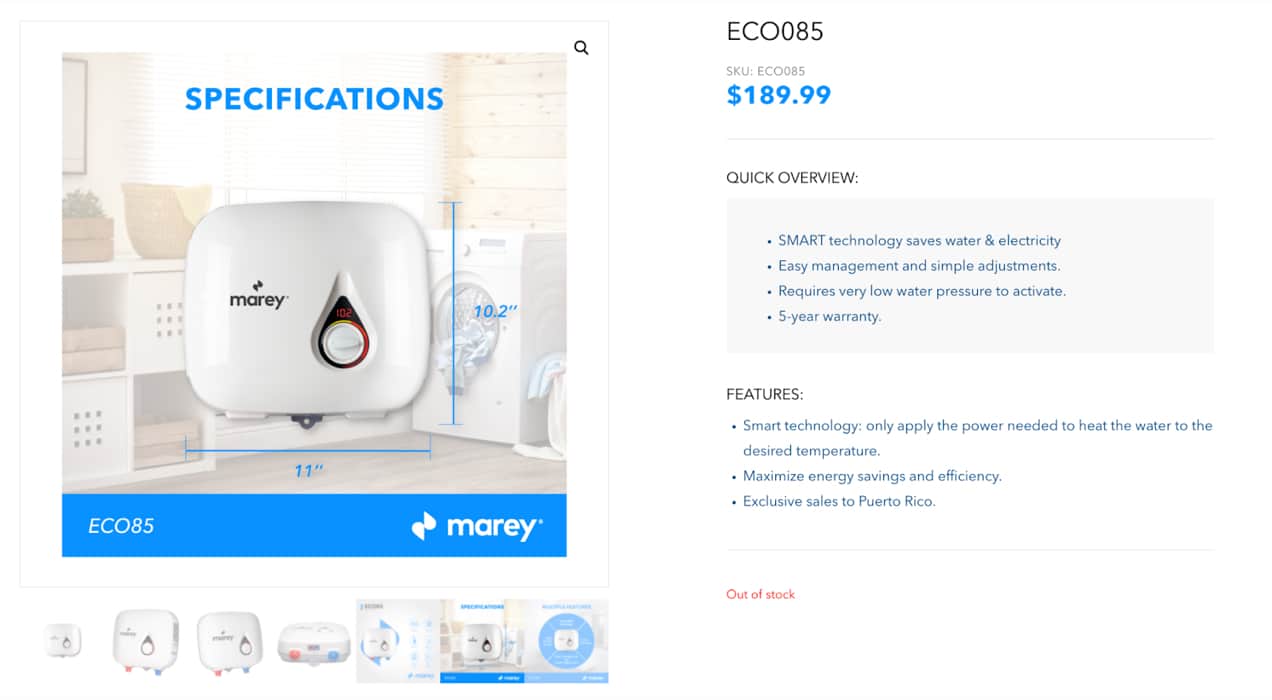
Marey.com is an online store selling various types of water heaters and related technology and equipment. Their product pages allow the potential customer to see each item from several angles, view it up close, and look at features, specifications, and other product details.
Taking great images takes time and dedication. You need good lighting, an appropriate setting, a plan for how you will shoot each product, and a good camera.
Use these tips for taking professional product photos, even if you’re not a photographer.
2. Write compelling product descriptions
The best product descriptions don’t just describe features and specifications about the product. And they don’t just repeat whatever’s on the label.
The most effective descriptions are the ones that enable the shopper to feel and perceive the benefits of owning or consuming a product. How will it make them feel? How will it make their lives easier, simpler, or happier? As the saying goes, you don’t buy a drill because you want a drill. You buy a drill because you want the hole.
Focus on the benefits, not the features alone
So it’s about benefits on your product page, not features. Benefits are about outcomes. What will the outcome be when someone purchases a particular product? In other words, your descriptions should focus on your value proposition.
For example, ‘wrinkle-free’ clothing is a feature. But why should we care?
Because wrinkle-free clothing looks better, so you make a better impression on a date, at a job interview, at social gatherings, or at school. It also eliminates the need for ironing, saving time and hassle, freeing you up to do things you enjoy. Just listing “wrinkle-free” as a feature, but saying nothing more about it, won’t make an impression on most shoppers.
Be specific
As this post about writing high-converting product pages points out, descriptions should also be specific. Don’t make generic claims like “guaranteed to last” or “all natural.” These phrases are so commonplace that they mean next to nothing. How long does it last? Make specific claims and be able to back them up.
Product descriptions can also remove doubts. Remember that these pages need to justify the purchase and reassure the buyer. Doubts come from objections.
What makes your potential customers hesitate to buy an item, other than the price? Your descriptions need to address objections.
Be succinct
Does all of this mean you have to write long product descriptions?
Not necessarily. When you do it well, you can simply rewrite your features as benefits, and you can fit a lot of persuasive information into the same bullet points.
The Roadie 2 is one of the best product page examples. It packs plenty of information on a single page, but the primary benefit is short, sweet, and sits right near the top, “Makes Tuning Easier & Faster.”
Later on the page, it lists technical features, but each is accompanied by more details that explain the benefits of the technology. For example, one feature is, “OLED Screen with Built-In User Interface.”
Directly below that line? “For easy selection of instruments and tunings. Invisible when off, lights up beautifully when you turn Roadie on.”
The page does a brilliant job of listing features and immediately communicating why they matter without wasted space or unnecessary details.

Learn more about writing great product descriptions.
3. Use product videos that bring items to life
In their heyday, infomercials often resulted in millions of dollars in sales because of the power of product demonstration. Seeing that amazing knife cut through tomatoes right after you watched it saw through a T-bone steak – including the bone – was all it took to convince you that you absolutely had to have the knife.
If your products are suited for demonstration, go beyond photos and insert product videos on your pages. It’s not as difficult as you might think, and the payoff is worth it.
The Vimeo for WooCommerce extension makes it even easier to add product videos to your ecommerce website. And videos make shopping more enjoyable and closer to the in-store experience.
4. Include product details shoppers want to know
Every product page needs some factual information to go with it. Which size will fit best? Does the part integrate with the other components I already have? What are the measurements? What are the ingredients?
Whatever the product, be sure to provide all the details people will need to be sure they’re buying the right item. Ultimately, this will lead to fewer questions to sales reps, a lower return rate, and happier customers.
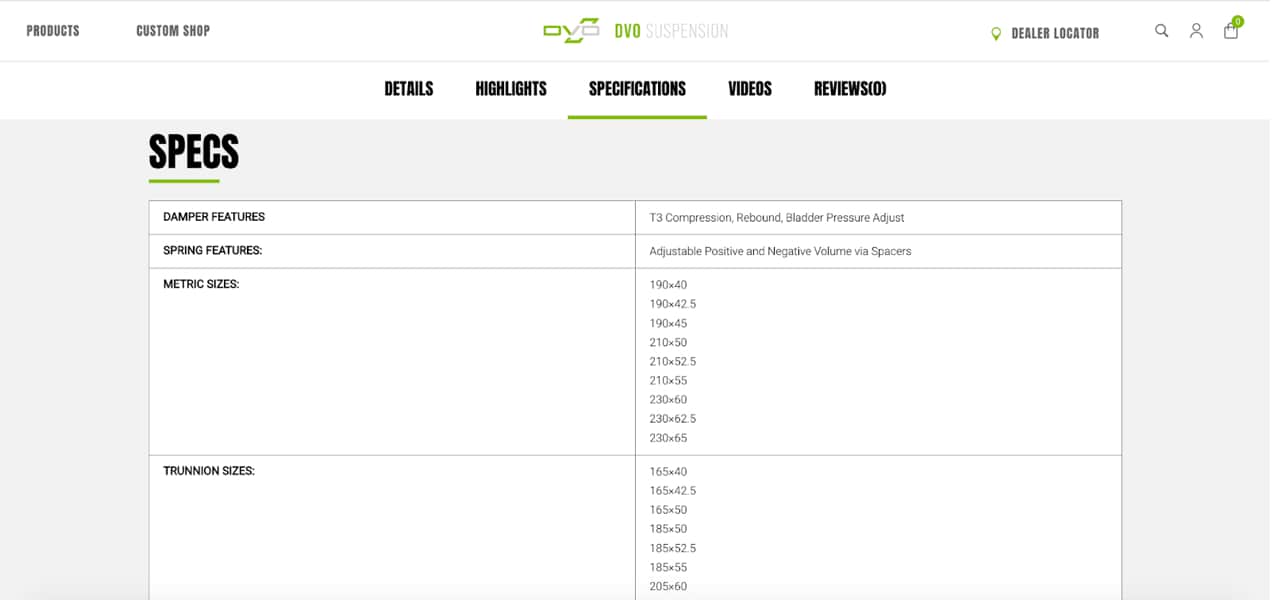
For example, DVO Suspension sells a variety of bicycle shocks and related equipment. This product page includes detailed specifications that bikers would need to know to be sure this product will fit with their bikes. If it doesn’t, the page also recommends other shocks that shoppers can explore.
5. Show product pricing and inventory levels
One of the most frustrating parts about online shopping happens when you have to hunt for the price – and that’s the easiest detail to add to a product page. But with all the other content your site visitors will see, you need to create the page such that the price is impossible to miss.
Large text, different colors, different fonts, and repetition are some of the tools you can use to be sure no one gets confused about the price.
If you’re offering options like product bundles or bulk discounts, be clear about those prices too.
And if your inventory is low or you’re out of an item, you need to include that information on the product page so customers don’t buy something, then find out they have to wait weeks or months for it to be restocked.
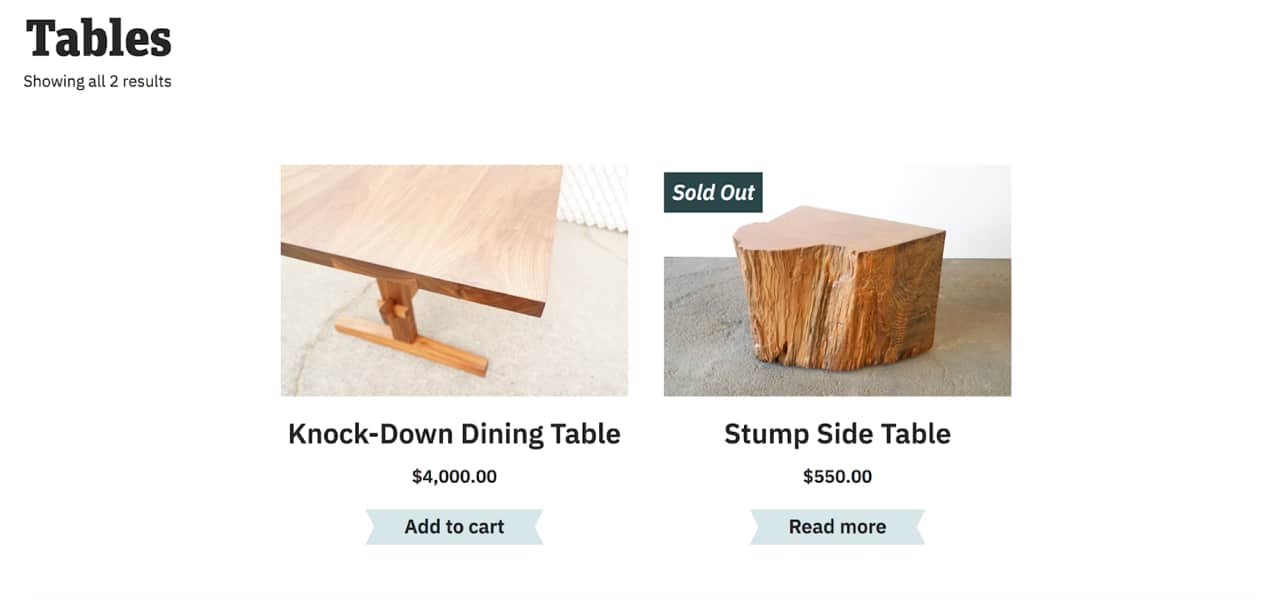
For example, Offerman Woodshop creates custom wood furniture, among other items. This product page features two of their tables, and the prices are right there, impossible to miss. At the time of this writing, one of the tables also had a “sold out” graphic included in the product photo, telling potential customers interested in that table that they’ll have to wait to buy it.
6. Use a product configurator, if applicable
If you sell customized products or product kits that enable the buyer to assemble the parts they want, make this easier by using a product configurator on your product pages.
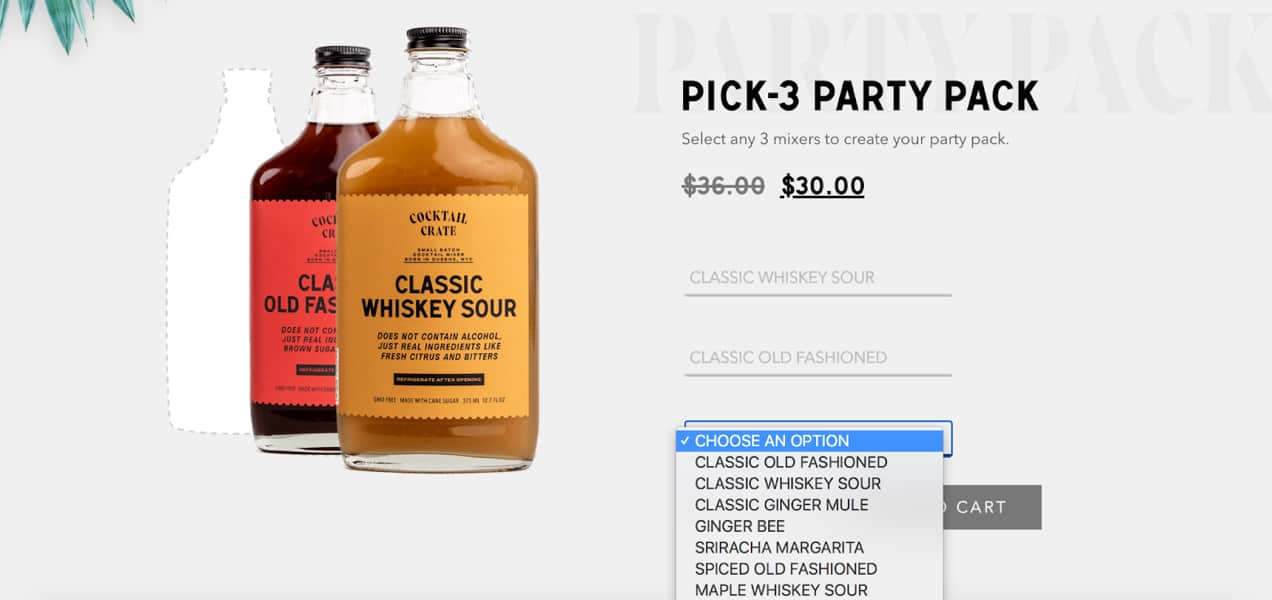
For example, Cocktail Crate lets shoppers choose any three mixers they want to buy as part of a bundle. Their product page walks the customer through choosing each item until they have completed their three-pack.
7. Include social proof
Testimonials and reviews continue to be very effective at meeting the third goal of a product page – reassure the buyer that they’re getting a good deal and working with a reputable brand. This is why social proof is so effective and important.
On a product page, customer testimonials and social proof can take several forms. Video testimonials are especially effective because they eliminate doubt that the review might be created by a bot or an AI tool.
You can also include star reviews on your pages, and other user-generated content from social media, such as screenshots of raving reviews and photos of customers using or displaying your products.
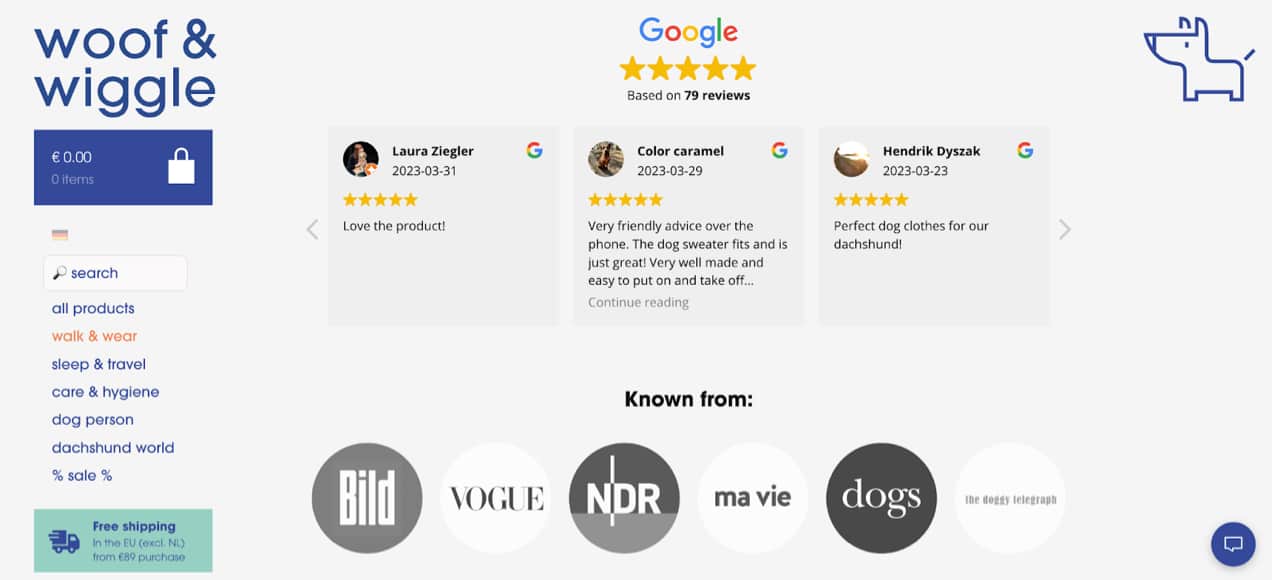
Woof & Wiggle does a brilliant job highlighting real customer reviews with five-star icons and further validation from features in well-known media outlets. It’s a powerful, pungent, proof-building masterpiece.
How can you beat that?
8. Feature incentives to close the sale
Remember – the job of a great product detail page is to sell the product. Descriptions and product details matter, but so does the price. And sometimes shoppers need a little extra incentive to step over the line and decide to place an order.
If you want to use sales incentives such as bundles, free shipping, coupons, first-time customer deals, discounted prices for bulk purchases, buy-one-get-one deals, or any other special offers, be sure to feature them prominently on the product page.
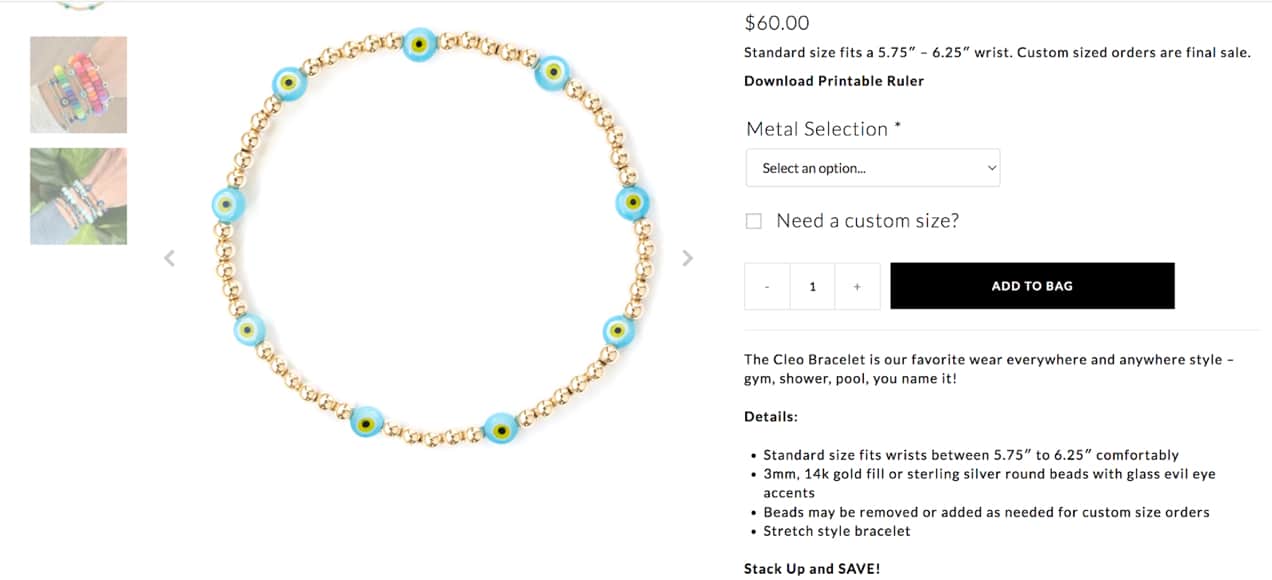
This product page selling bracelets from April Soderstrom includes a message near the end telling customers they can save 15% on purchases over $200, and it includes a coupon code.
This is a smart use of coupons – using the Smart Coupons extension from WooCommerce – because it increases the purchase size, and thus reduces the revenue hit from the coupon.
9. Include product recommendations
Any store can do this using the Product Recommendations extension, which lets you create a variety of rule-based suggestions that will change depending on the shopper and other factors.
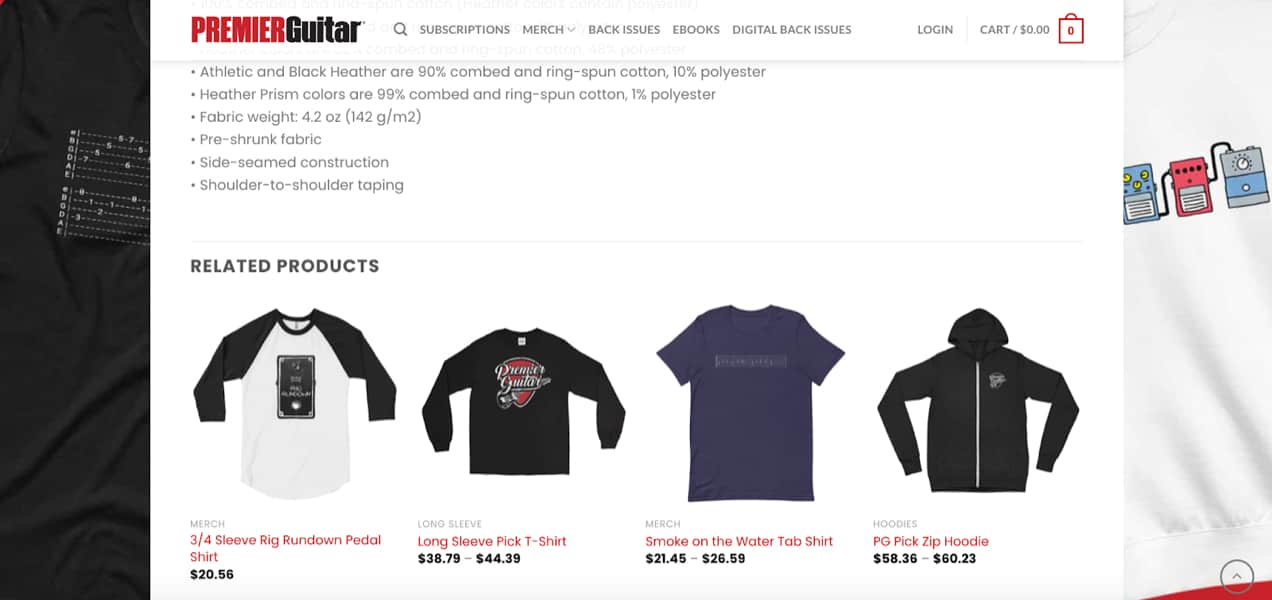
Premier Guitar, for example, presents an array of related products at the bottom of their product pages.
One use of product recommendations is to help shoppers find what they’re looking for if the product they’re currently looking at isn’t meeting their needs.
Another use is to supplement what someone has already purchased with additional or related items that might go well with it, such as a hat with a shirt, or an additional flavor of the same food item.
Product recommendations serve customers with relevant offerings and increase your average order size at the same time.
10. Offer product add-ons such as gift wrapping
Many times, it’s the little extra touches and personalization that seal the purchase decision for your customers, especially when the item is a gift. Giving them the option to write special messages, add gift wrapping, and include other unique features with their purchase makes it more likely that they’ll buy from your online store.
With the Product Add-Ons extension, you can do all that and so much more. For instance, special messages can also go on T-shirts or other items.
You can also enable customers with an option to select colors using an array of product photos, and you can adjust the price accordingly based on their selection.
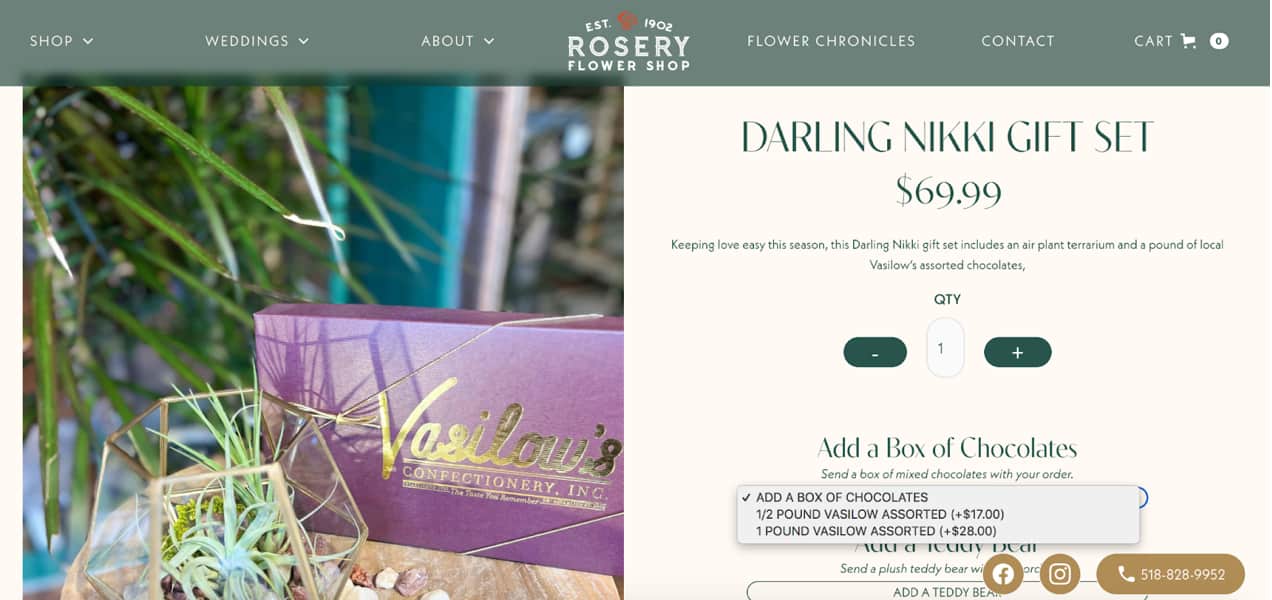
Here’s an example of a product page from Rosery Flower Shop offering add-ons for one of their gift sets. Notice how each add-on item includes a price so there’s no confusion or surprises.
11. Offer customer support such as live chat
Sometimes your customers have quick questions that just need to be answered, right now. Live chat is a fast and simple solution for customers. If your ecommerce website traffic volume is high enough to justify using this, it’s a great addition to a product page and will help you close more sales.
You can also include phone and email support, and that too can be clearly presented right on your product pages.
It’s important to put this information there and not just the checkout page, because if people need a question answered before adding an item to their cart, they won’t reach the checkout page to begin with.
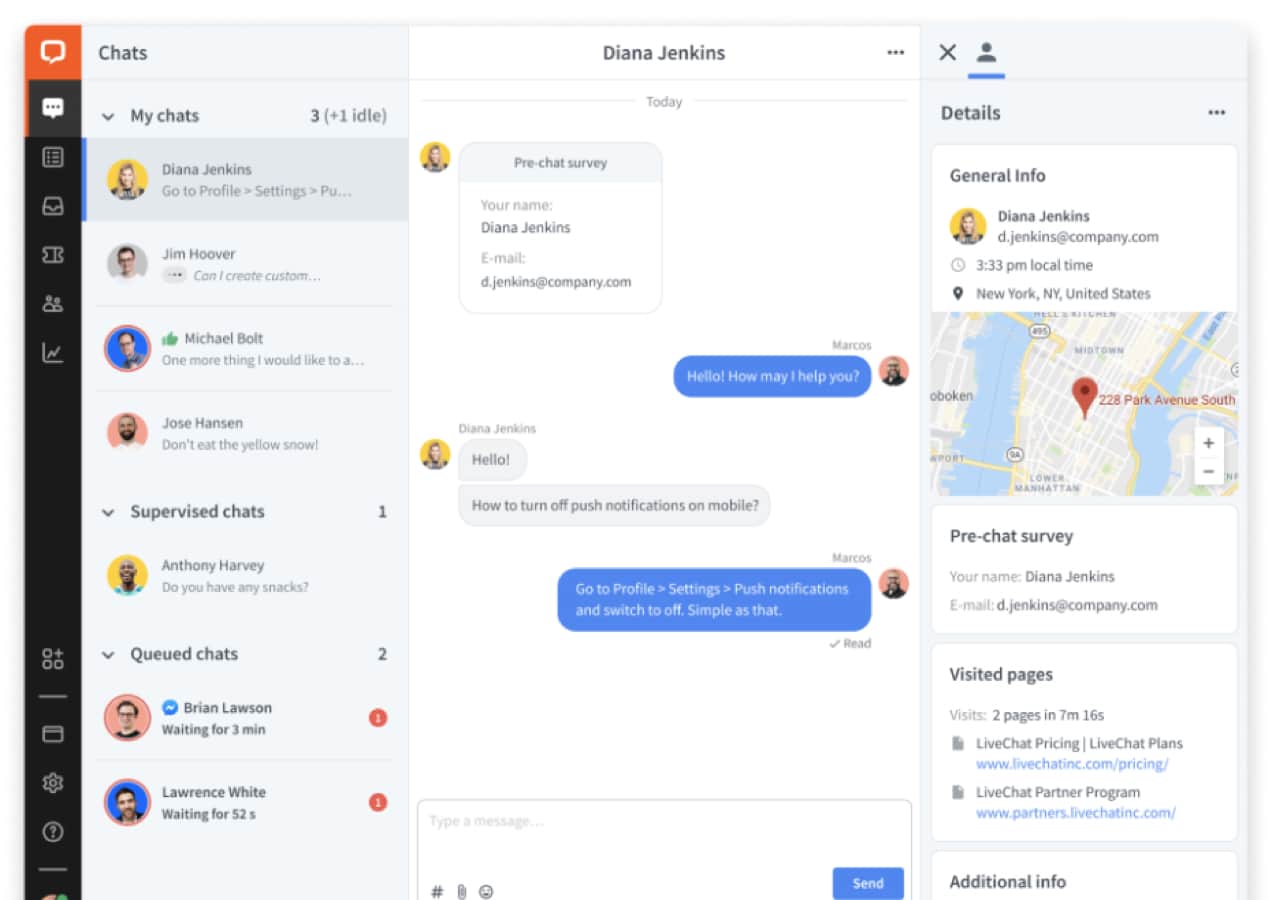
The LiveChat for WooCommerce extension is a great option, even allowing you to provide customer support through external platforms.
12. Include FAQs for more complicated products
If your customer service team keeps getting asked the same questions about a product, it might be a good idea to answer them right on the product page.
An FAQ page isn’t always the best approach for this, because some people won’t think to look for one, and it’s unlikely that questions about specific products would be answered there.
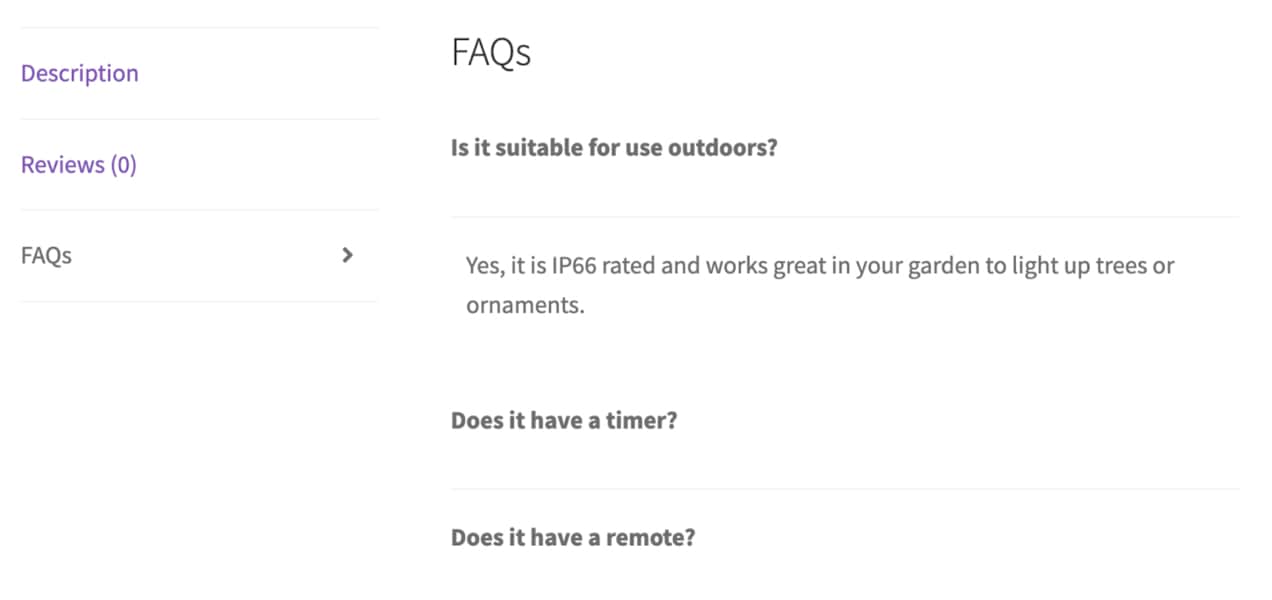
So if appropriate for the product and if it will help your customers, answer common questions about a specific item right on the product page.
How to build product pages with WooCommerce
Now that you know what you should include on your product pages, it’s time to create them with WooCommerce.
1. Add product information in your WordPress dashboard
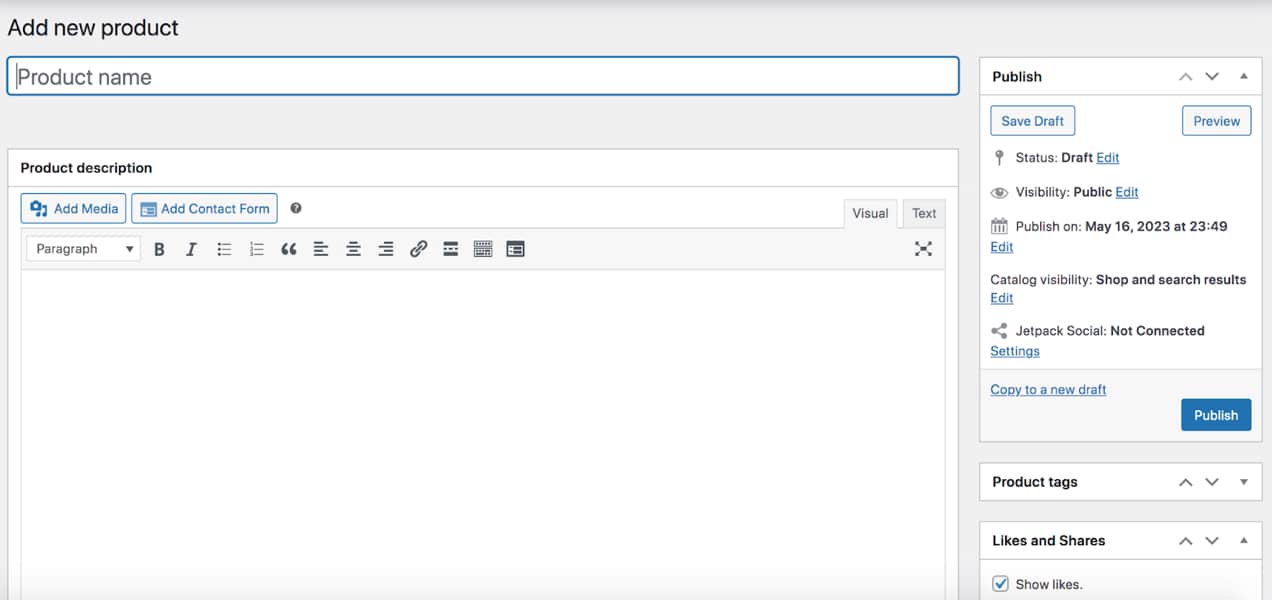
To create a new product, log into your website and go to Products → Add New. This will open up a blank product page, where you can fill in the information for that item. Let’s go through the options here one at a time.
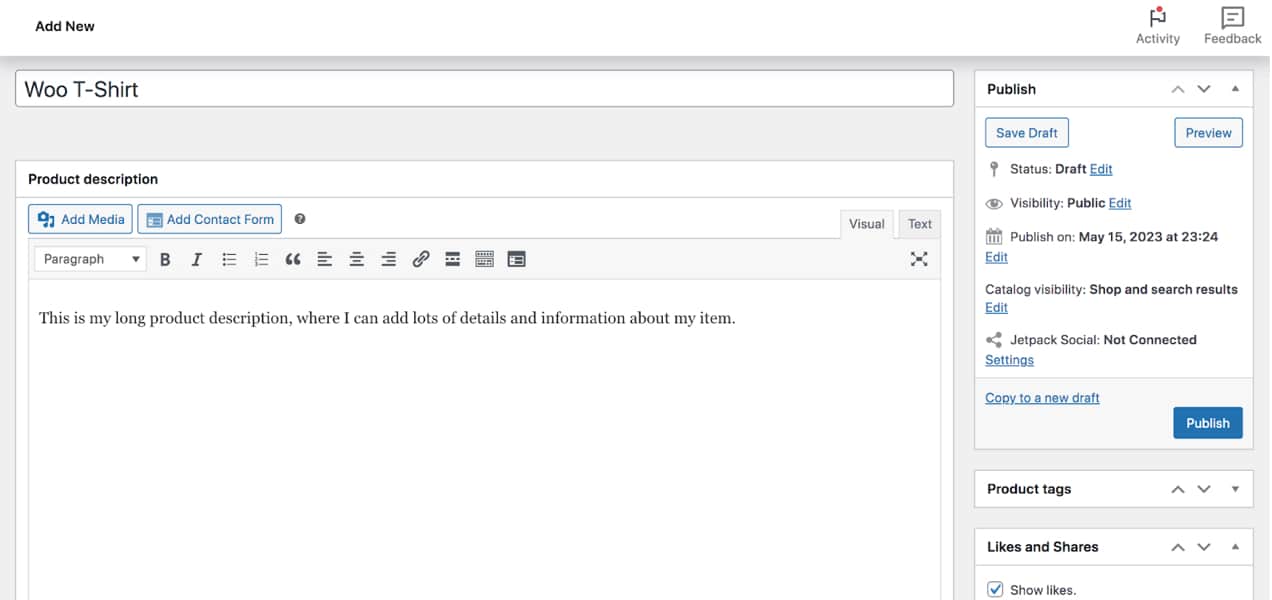
Add your product title and long description
At the top of the page, you’ll see a blank field for your product title. If possible, keep this short and clear.

Below the title, there’s a large, blank text box where you can add lots of details and information. This text will show up below the more pertinent product information, so you’ll want to include all the “extras” here for people who want to learn more from your prooduct page. You can also try breaking up any long bodies of content with bullet points, to make it easier to read.
Choose your product type and set your prices
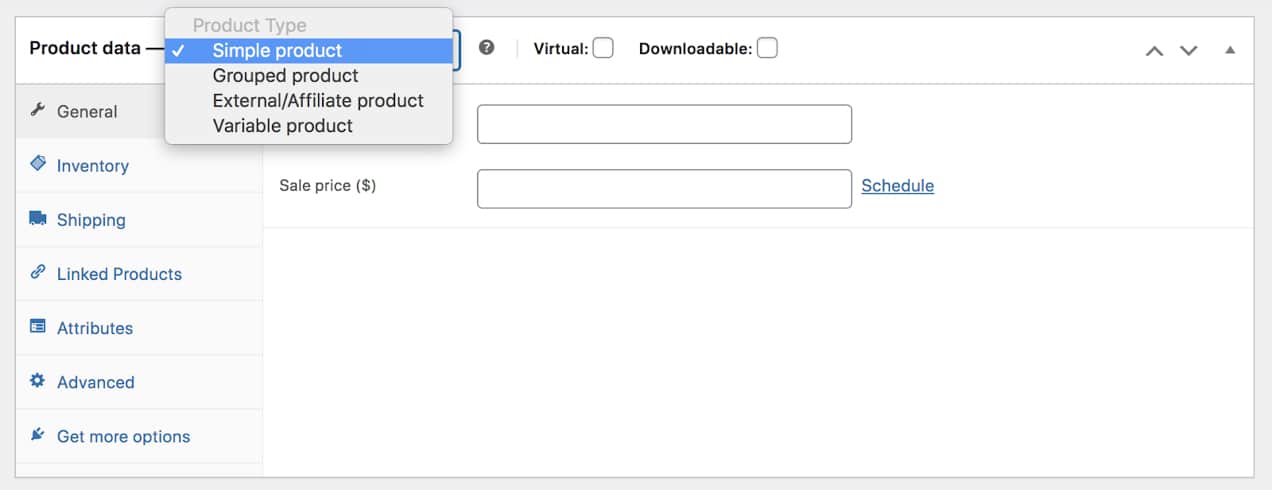
Below the description, you’ll see the Product Data box. At the top of this box, there’s a dropdown for product type.
By default, you can choose between:
- Simple product (an item without choices)
- Grouped product (a product that’s part of a collection)
- External/affiliate product (an item that’s listed on your site but sold elsewhere)
- Variable product (an item with choices, like size or color)
You can also check boxes for Virtual and Downloadable products. Virtual products aren’t shipped to buyers, and include items like services. Downloadable products aren’t shipped, but are delivered via digital download to customers, like PDFs and photos.
In the Regular Price box, set the price of your item. You can also set a Sale price if the product is on sale, and click Schedule to set a start and end time for the sale.
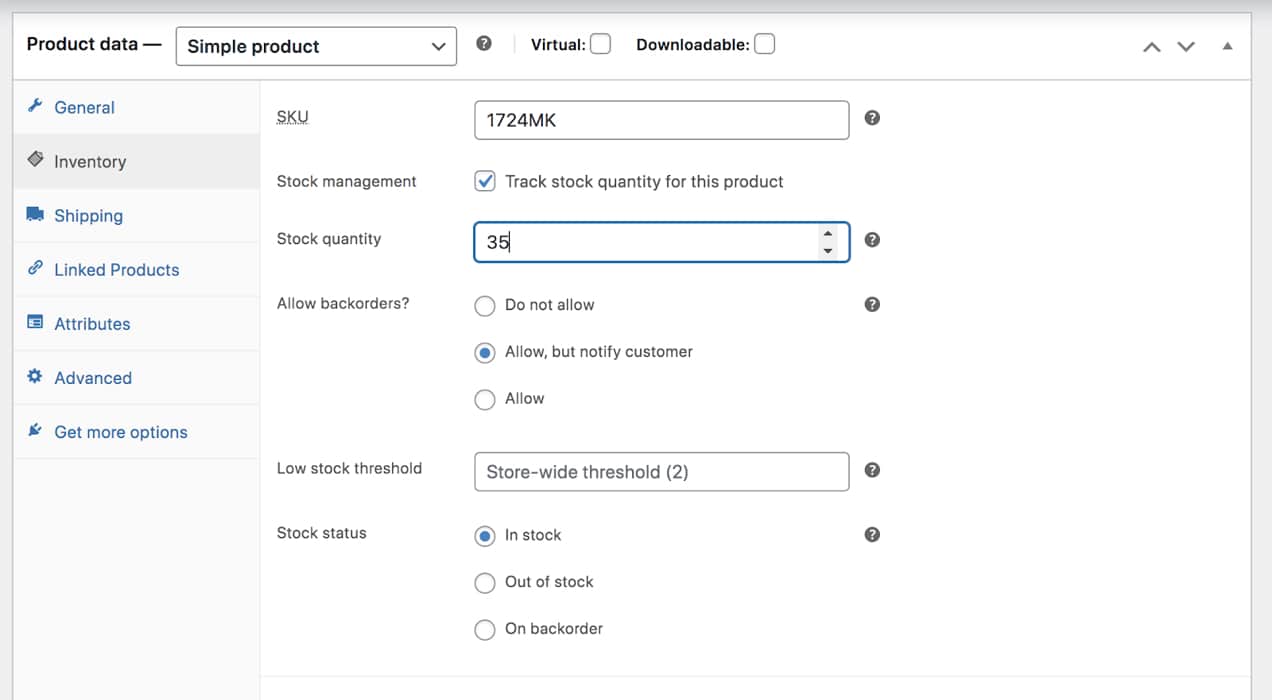
Set your inventory levels and shipping information
Click the Inventory tab on the left. Here, you’ll find settings for the product SKU and inventory levels. You can also set low-stock thresholds, enable backorders, and more.
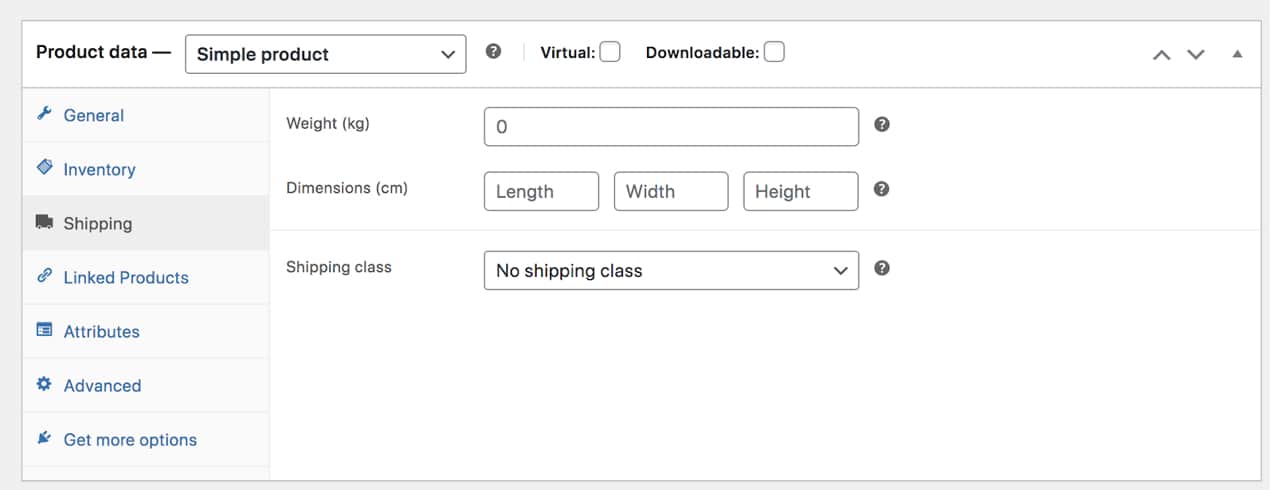
Click the Shipping tab. Depending on how you have shipping set up, you can add the weight, dimensions, and shipping class for the item.
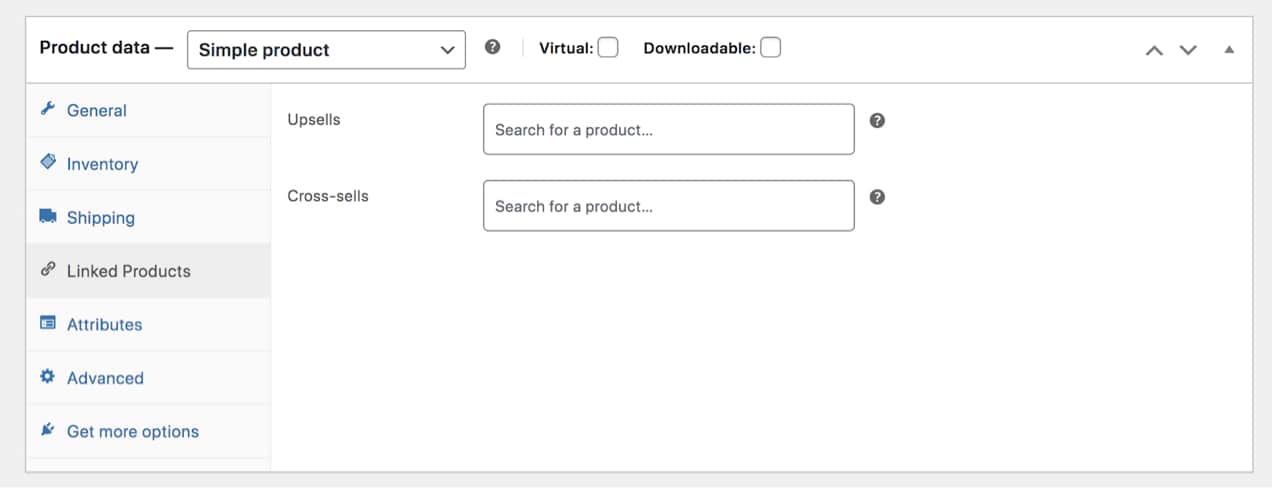
Add upsells and cross-sells
Like we talked about earlier, this is a great way to increase sales from your product page while providing a better user experience for your shoppers. Click on the Linked Products tab to get started.
Then, you can select upsells (items that are an upgrade from the current one) and cross-sells (items that are similar or go with the current item). You can select these on a per-product basis, which gives you full control over what customers are seeing.
In the Product data box, you can also access settings for attributes and variables, if you’d like, along with purchase notes, reviews, and more. Learn more about configuring product settings.
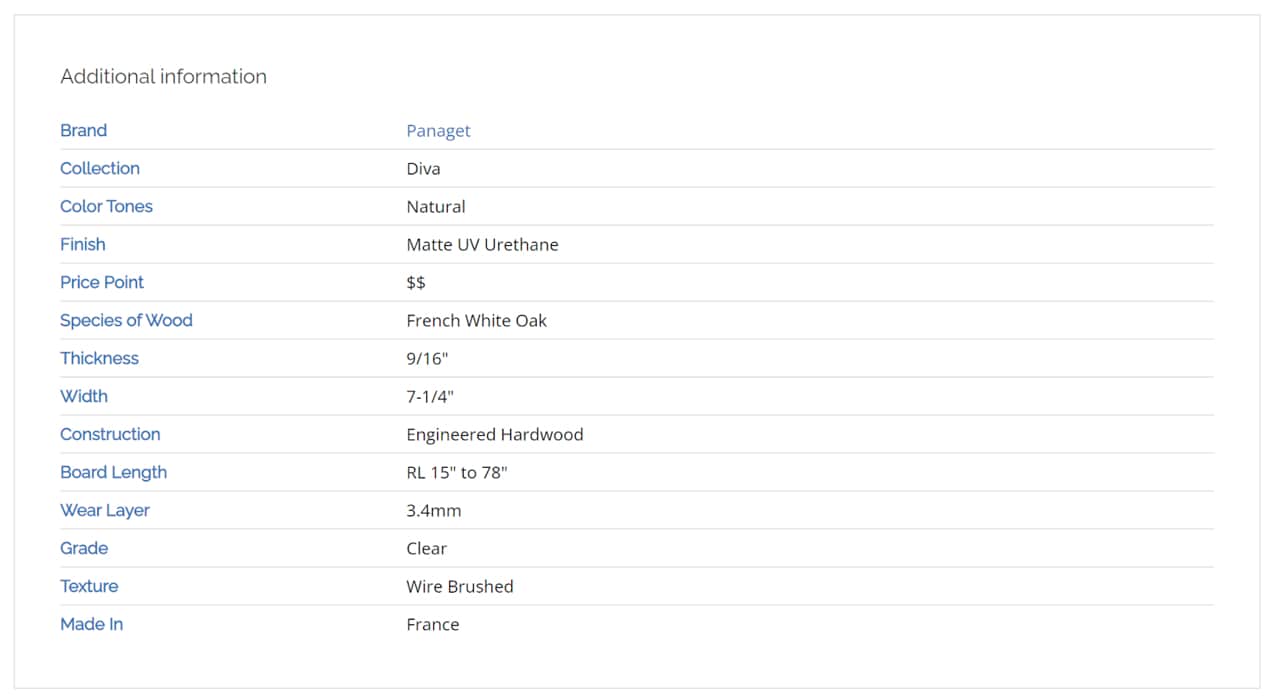
Attributes are a super helpful way to group products and add information about each one, which can improve the online shopping experience.
Lambright Flooring, a wood flooring provider, adds attributes for information like wood color, thickness, width, and more.
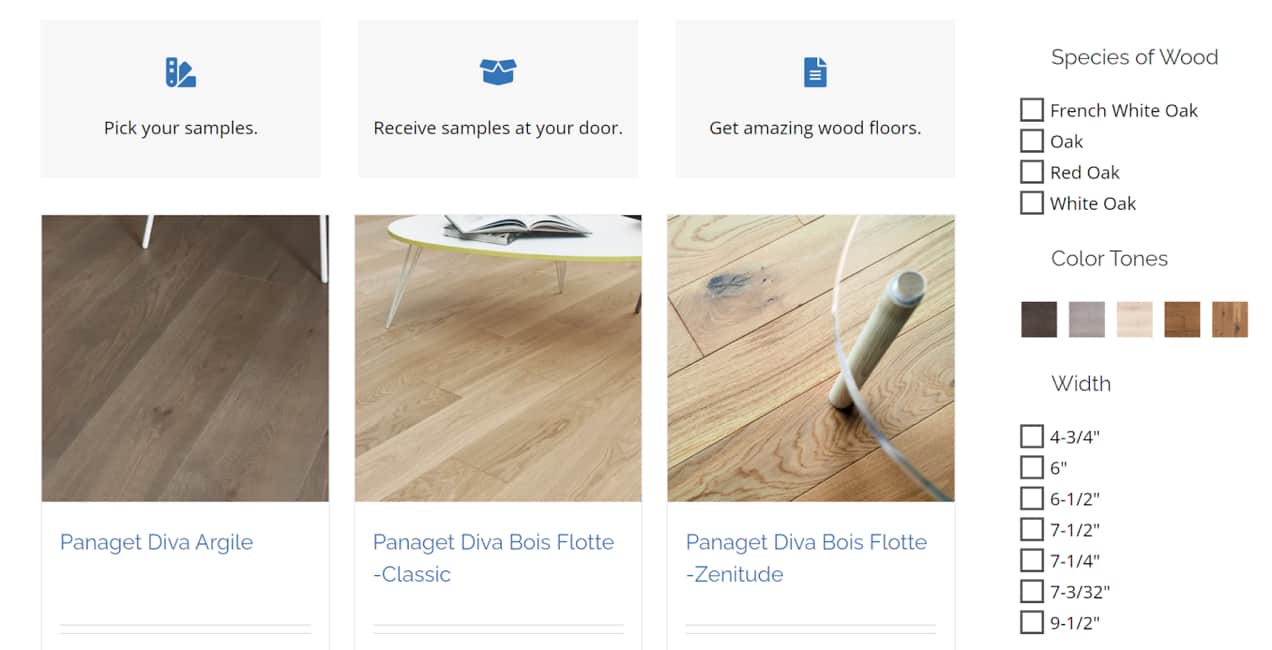
Not only can customers filter by these attributes on archive pages, they can also view all the information at a glance on the product page.
Learn more about using product attributes.
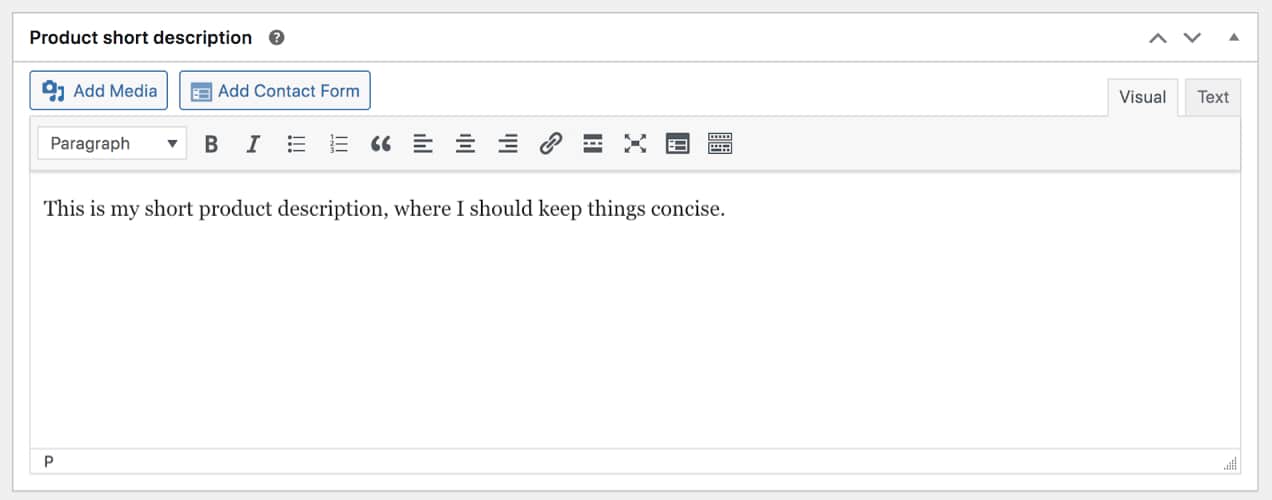
Write a short product description
Scroll down to see the Product short description box. This information sits beside your images and should be concise and to-the-point because you don’t have a lot of room to work with.
Include your most important product information here, keeping in mind the tips we provided earlier. Discuss the primary benefits of the product and include anything that’s critical for shoppers to know to complete the buying process. Then, include more information and data in the long description that falls beneath the item.
Add product images
On the right-hand side of the page, you’ll see an option to Set product image. This is where you’ll set your primary product image that will be the largest one on your product page. This picture will also show up on archive pages for that item, so make sure that it’s representative of the product.
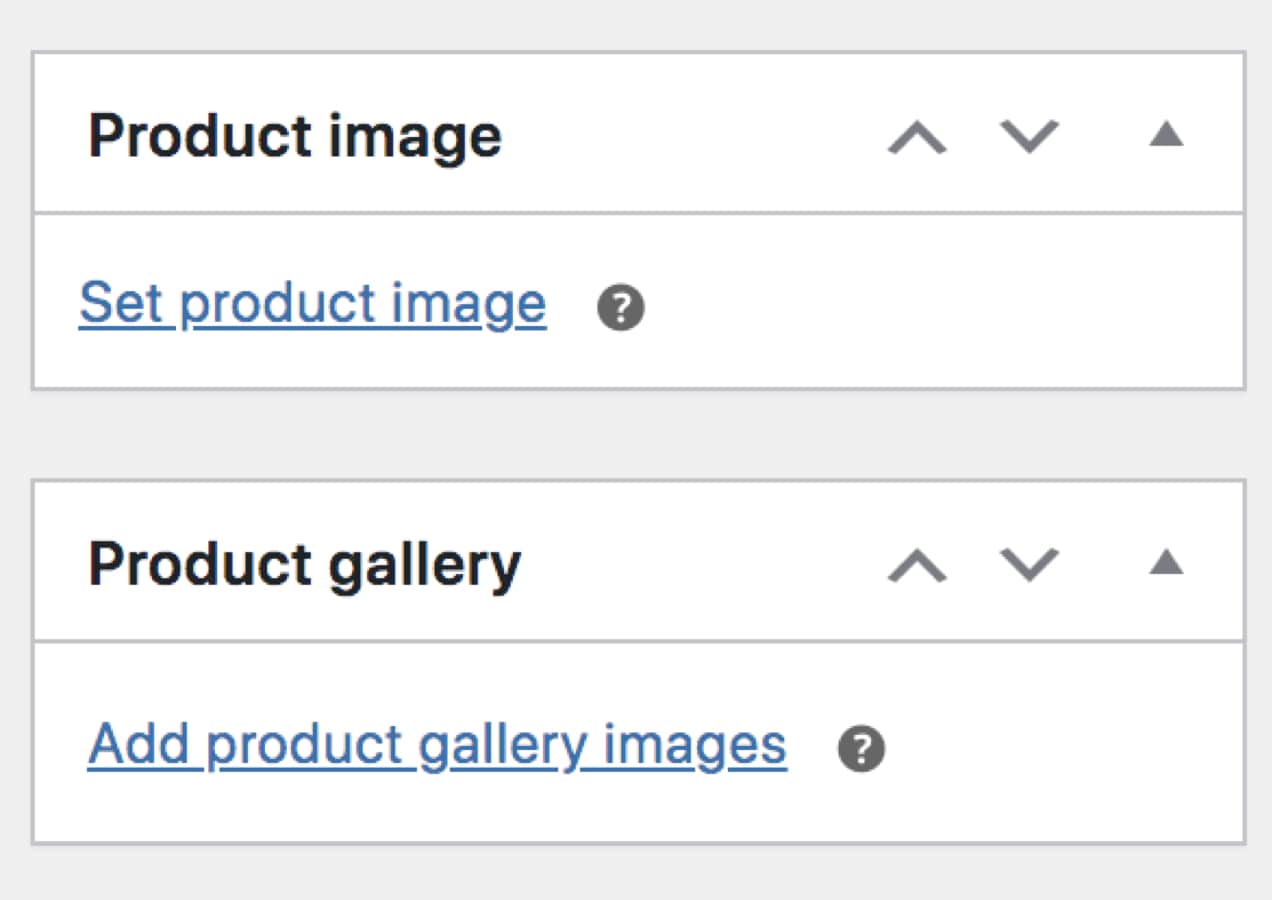
The Product gallery selection is where you’ll add your secondary images that site visitors can scroll through. This is where you can add a variety of sizes, angles, colors, etc. for the item.
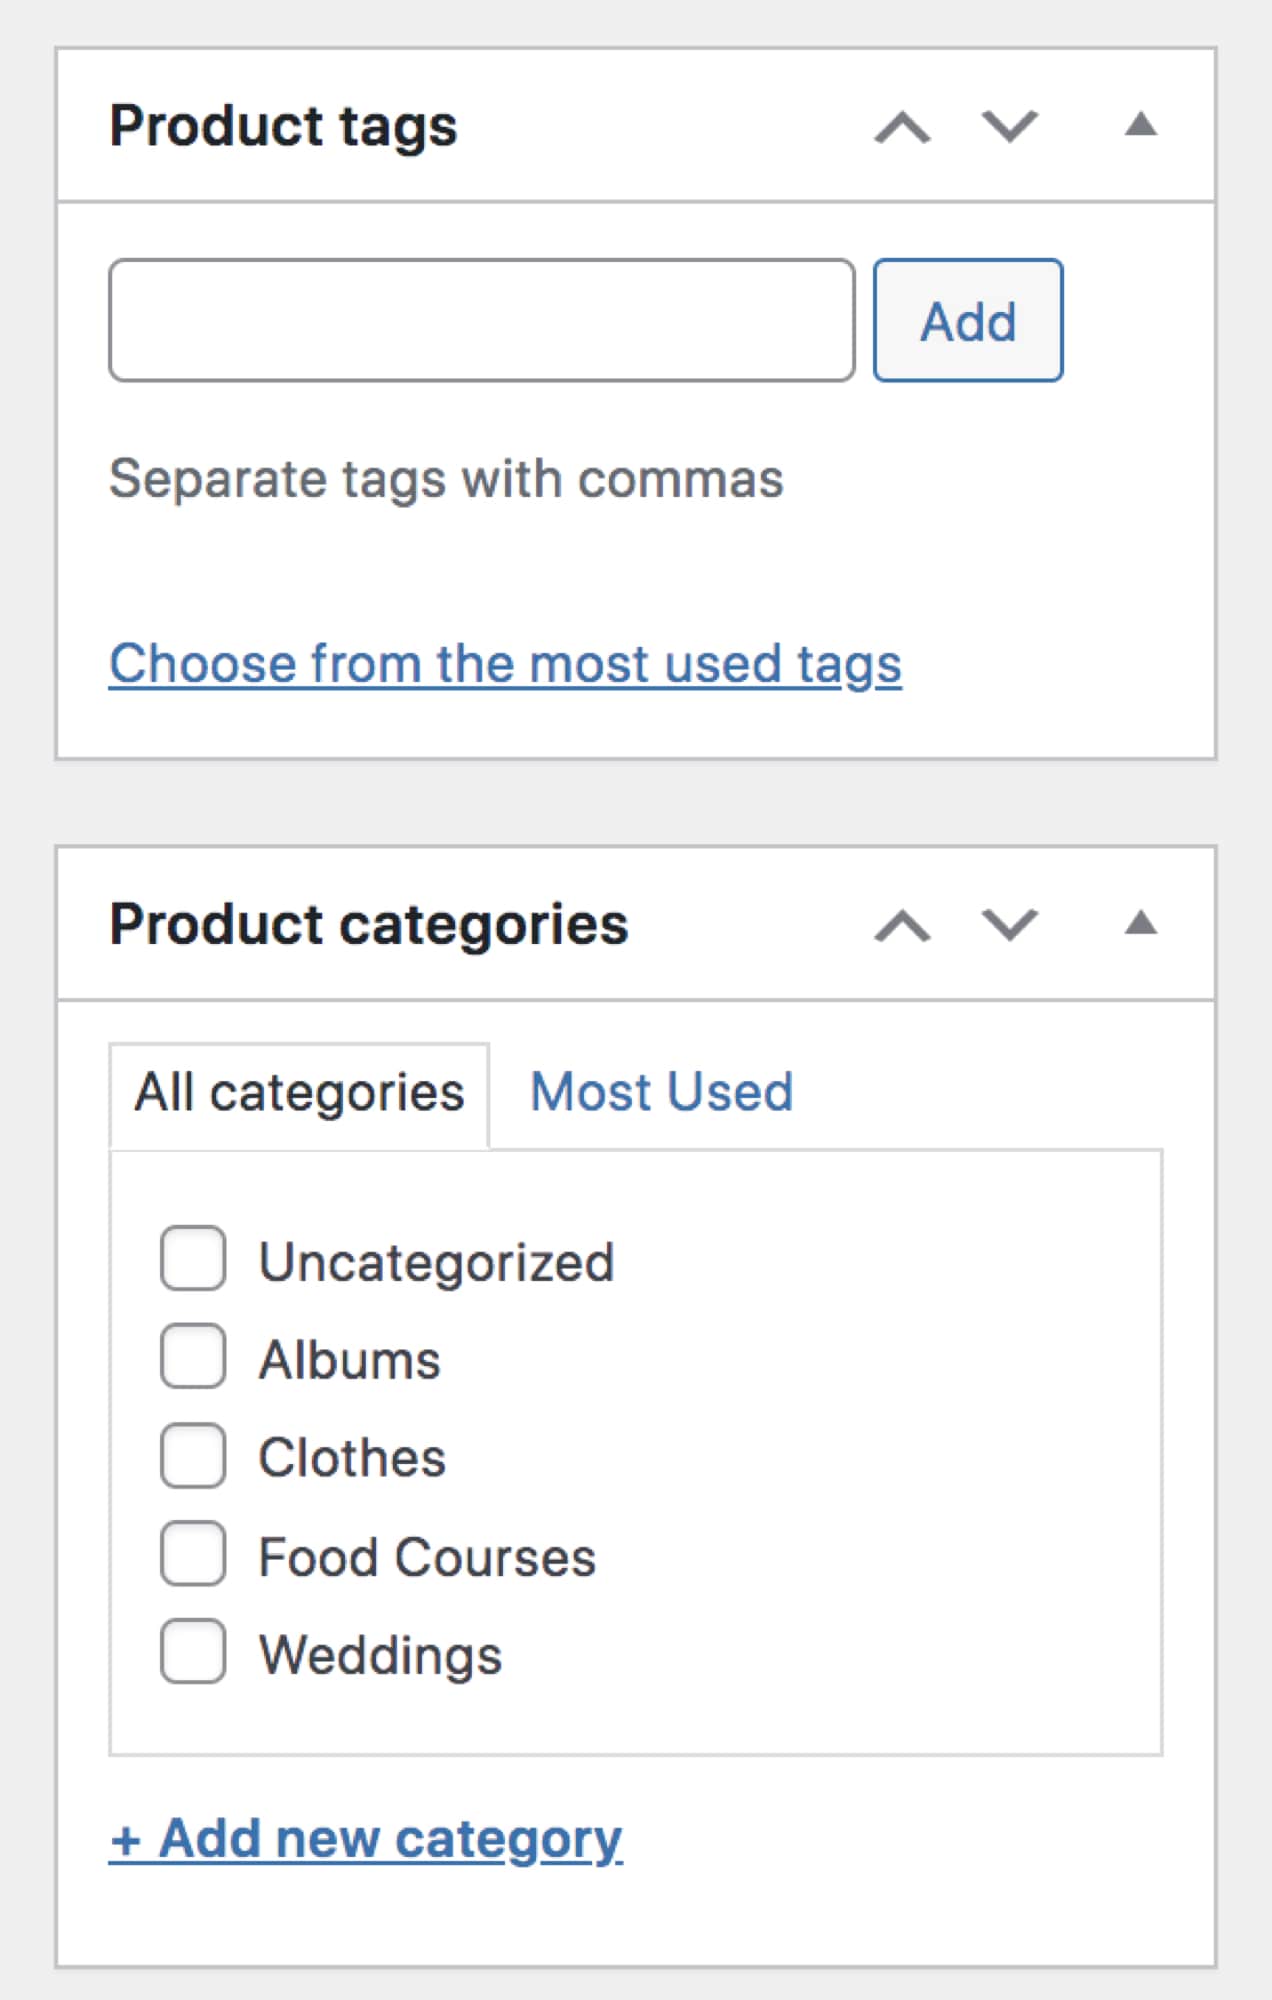
Choose product categories and tags
You can use product categories and tags to organize your items, making things much easier for your customers. Categories and subcategories are the primary way you can organize products.
For example, you might have a T-shirts category, with subcategories for adults, kids, and babies.
You can also use tags for organization, but you don’t have the option to create hierarchies. If you sell graphic tees, you might have tags for “cats,” “superheroes,” and “vintage.”
Once you’re happy with your product, click Publish to add it to your website!
Modify the product page template
If you’re using a block theme, you can also modify the product page template using blocks. This gives you a simple way to make changes to all of your product pages at once without having to edit any code.
In your WordPress dashboard, go to Appearance → Editor, then select Templates. Now, choose the Single Product template.
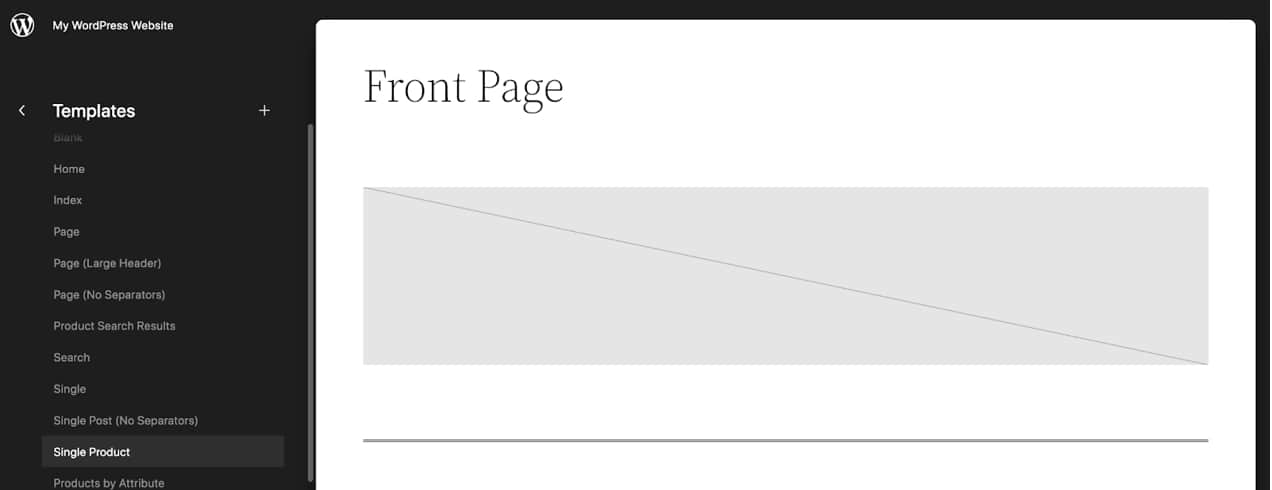
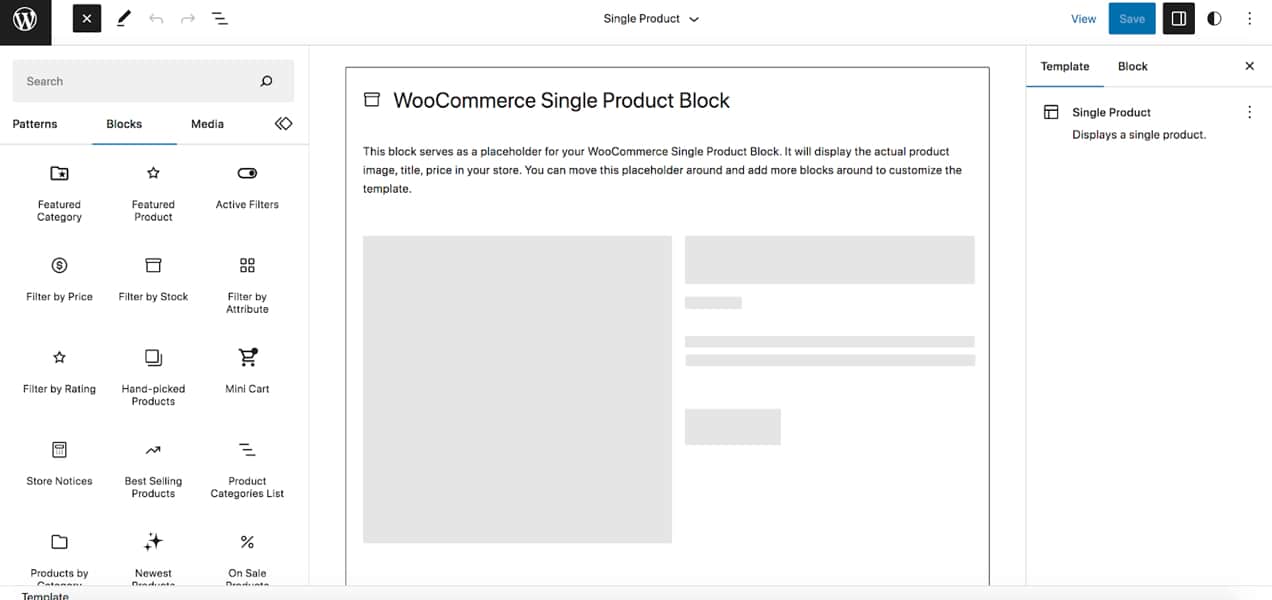
By default, this template has the Single Product block, which shows all the information for the item, including the title, descriptions, images, reviews, related products, etc. But you can add more blocks to the page to create a truly custom, visually appealing product layout.
For example, you might want to add your Instagram feed that works as social proof, showing happy customers using your products. Perhaps you want to include a store notice about shipping policies that you can update store-wide. Or maybe you want to add a grid of your top-selling products at the bottom of each product page.
To do so, click the + icon at the top left to open the Block Inserter. Choose the block you’d like to add and drag it underneath the Single Product block.
In this example, we’ve added a Hand-picked Products block. Select the block and open the Settings panel on the right-hand side. Here, you can edit how the block looks and functions. In this case, you can make changes to the number of products shown, the visible information, the order they display in, and more.
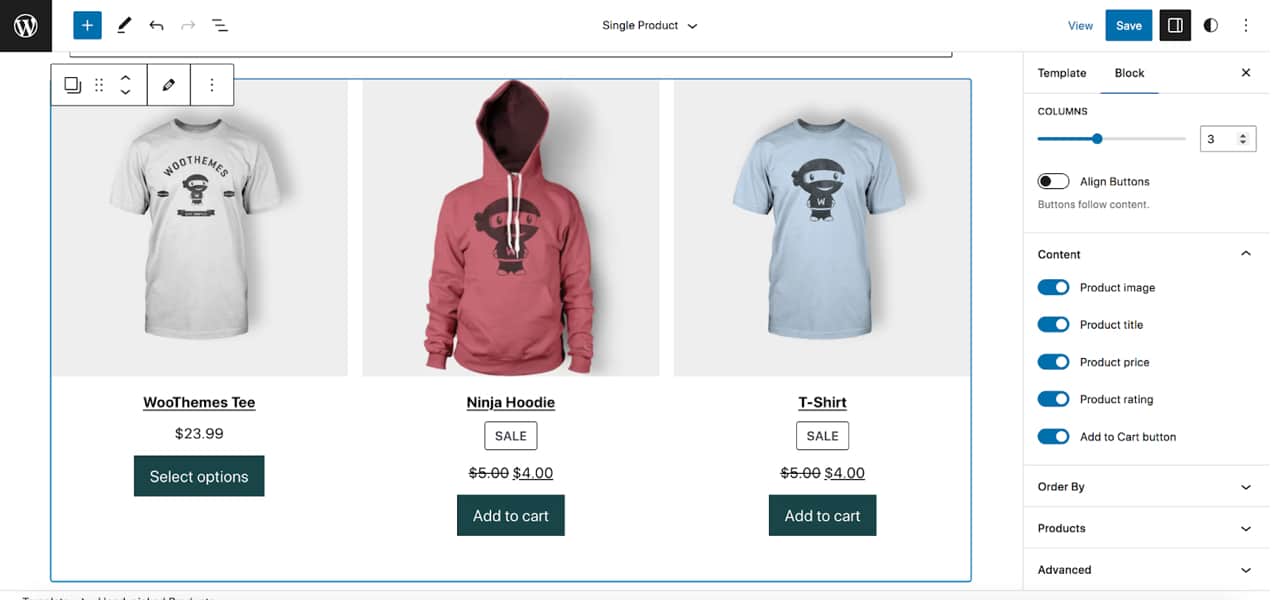
Once you’re finished, click the blue Save button at the top right. Now, you can see your changes reflected across all of your product pages.
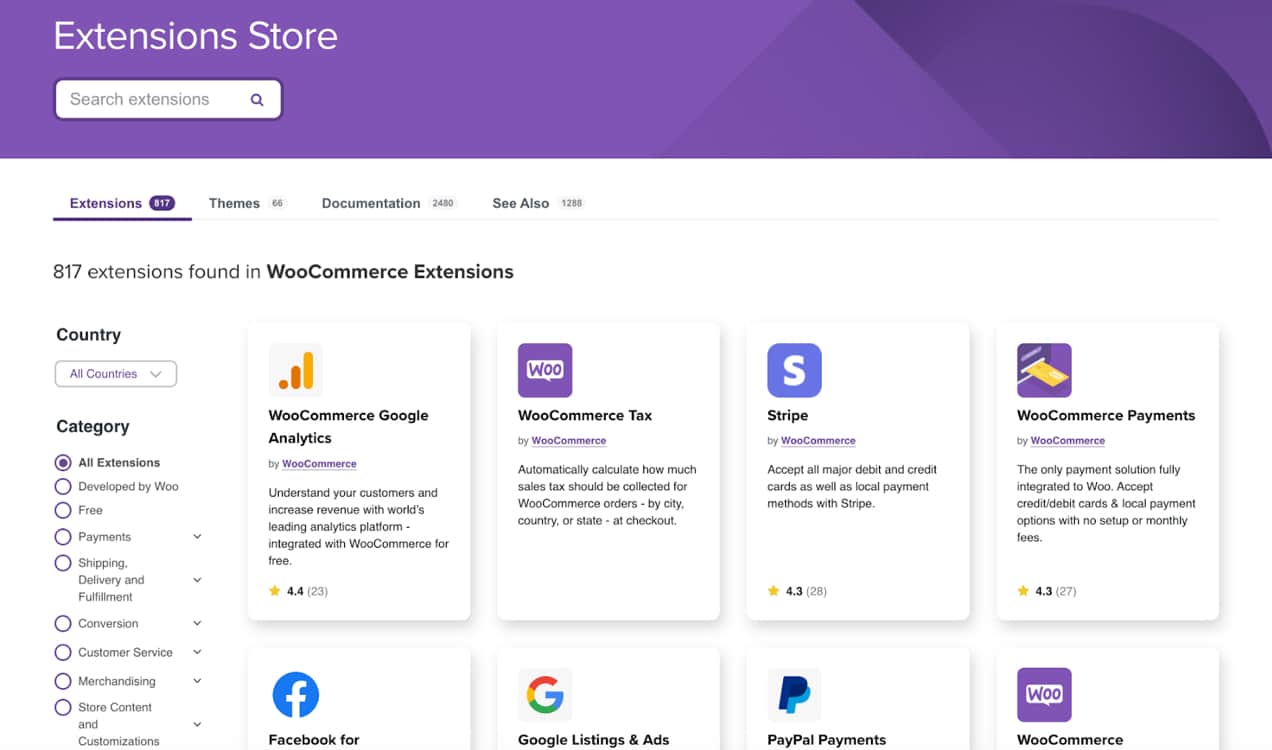
Install and set up any applicable WooCommerce extensions
There are a variety of extensions that you can use to customize your product pages, some of which we’ve already touched on in this post. Here are just a few examples:
- WooCommerce Product Add-ons: Let potential customers add customizations like messages, gift wrapping, and more.
- Product Recommendations: Add more advanced upsells and cross-sells to product pages, increasing average order value and improving the customer experience.
- Product Badges: Add badges to product images to denote holiday items, on-sale products, or any other product type you’d like.
- Product FAQs: Add FAQs that are specific to each individual item.
- Composite Products: Let site visitors build custom product kits.
- Vimeo for WooCommerce: Turn your product images into beautiful, effective videos.
You can view a full list of available extensions here.
All you need to do is download the extension you’d like to use from the WooCommerce Marketplace, then go to Plugins → Add New in your WordPress dashboard. Then, click Upload Plugin at the top and add the extension file that you downloaded. Finally, activate your new tool.
Each extension has documentation available that walks you through how to set up and use it. And if you have any questions, you can reach out to WooCommerce support.
How to get your product pages seen
Getting your product pages seen by your target audience is one goal of search engine optimization (SEO). While much of your ecommerce website traffic may first arrive at your homepage and blog posts, some of your most high-value traffic from your most likely customers should go straight to your product pages.
SEO is a big topic, but we can cover a few of the basic principles here. For more on SEO, see this beginner’s guide to ecommerce SEO. If you already feel like you know the basics, here’s a more advanced SEO guide for ecommerce sites.
Here are the biggest aspects of SEO that you can work on:
- Keywords within your product page copy
- Headlines and subheadings
- Images
- URLs
- Site speed
Let’s touch on each one briefly, and we’ll include additional resources for some of these topics.
Keywords
Keywords are the terms your target audience uses when looking for products you offer. By doing some research into how customers are searching and the terms they’re using, you can learn what kinds of phrases to include on your product pages.
You should target terms with low competition, high search volume, and strong purchase intent. Learn more about keyword research in the article on attracting organic traffic.
Once you’ve determined keywords, you should use these throughout your product page descriptions. This doesn’t mean you should awkwardly force them into every sentence, but you should be mindful of opportunities to demonstrate to search engines that your product page contains information related to that keyword phrase.
Headlines and subheadings
Search engines like Google and Bing zero in on headings and subheadings, because these tend to reflect what the product page is about.
So be mindful of how you structure headings and be sure to naturally include keywords if possible.
You should avoid large blocks of text, as well as too many paragraphs in a row. Break them up with subheadings. You should do this for two reasons. First, it serves your customers, because it makes it easier to read your copy. Second, search engines look for keywords in subheadings.
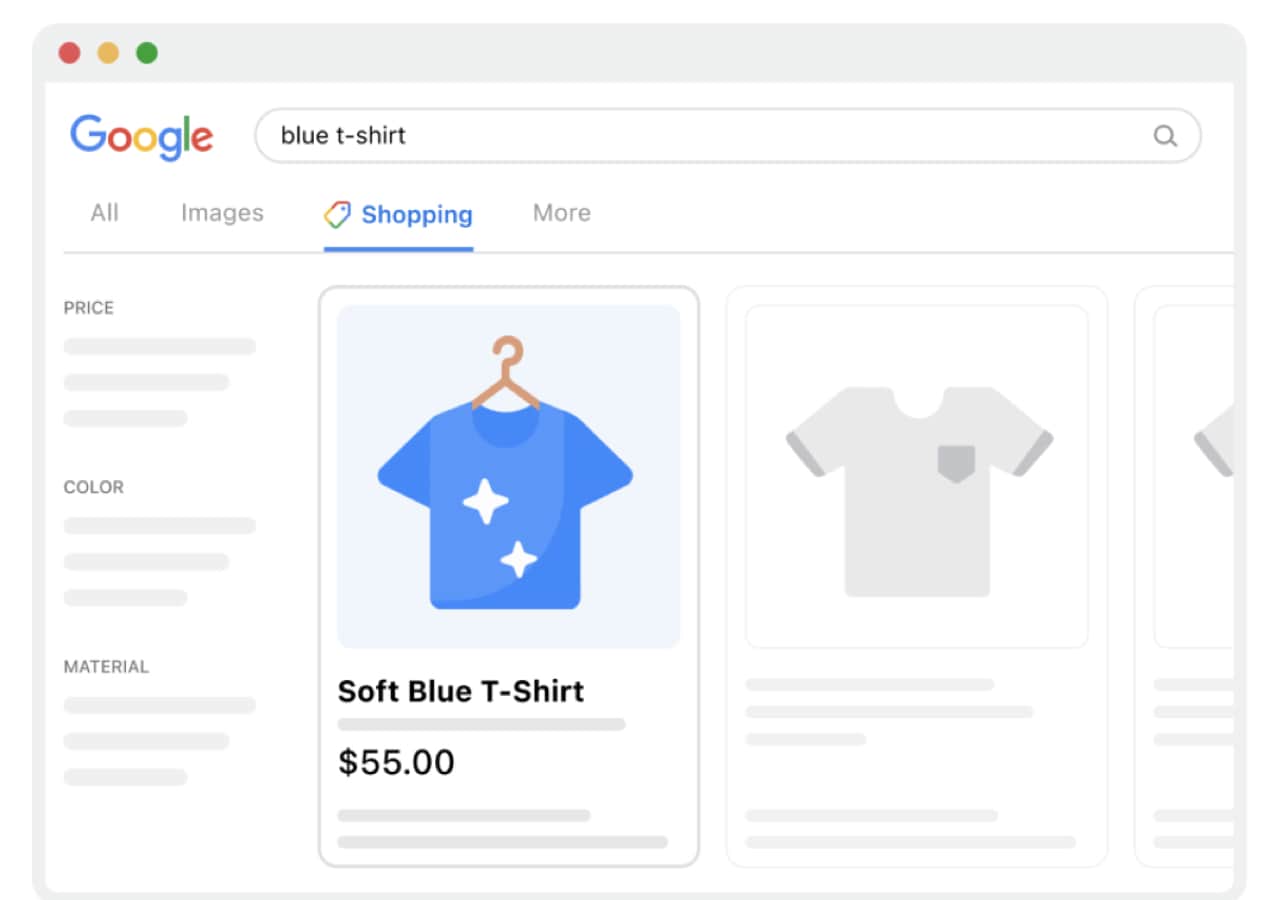
Images
Can product images contribute to search rankings? Absolutely! Images have metadata associated with them. This information is part of what search engines consider when determining the topic and quality of your pages.
Alt text is a text-based description of your images and should primarily be used to help those with vision impairments navigate your page by describing the image. But you can be mindful of how you write alt text to include your keywords, when appropriate.
This may also lead to your images showing up in image results on platforms like Google, which can then generate traffic.
URLs
Like headlines and subheadings, the URLs for your product pages are another very important place to include keywords.
A few tips about writing URLs for product pages:
- Don’t make them too long – focused URLs are better. More than 10-12 words is pushing it.
- Avoid filler words like a, to, and the – stick to words that matter for the product page. URLs are not the place for complete sentences.
- Put your primary keywords first in the URL, if possible.
- Separate all words with dashes.
- Don’t worry about capitalization.
- Be certain not to use URLs you’ve already used, and they shouldn’t be too similar, either.
Site speed
Slow sites get penalized by search engines and tend to show up lower in the search results. Customers tend to get annoyed with slow product landing pages, too. What slows your ecommerce website down? All sorts of things. Again, SEO is a big topic. Item 9 in this article about ecommerce SEO has a number of helpful tips about speeding up your site.
Need technical help for your business? Hire one of our certified WooExpert agencies to help build, manage, and customize your website. Choose an agency from our WooExpert Marketplace, or reach out to our team for a recommendation based on your requirements.
One of the first places to start is with optimizing your images, because bloated images are one of the biggest causes of slow sites. For online stores, this is a big one, because product pages tend to have a lot of images.
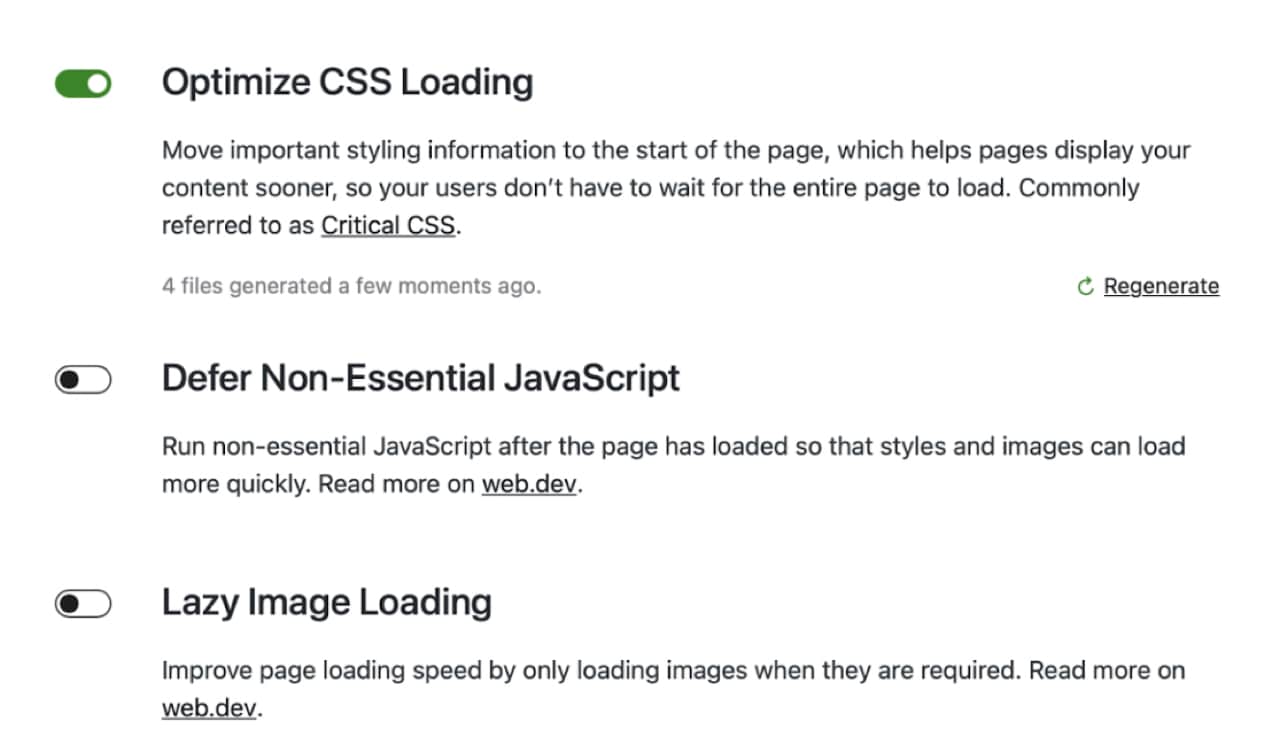
Jetpack offers a variety of powerful performance tools, including a free CDN. The Jetpack Boost plugin handles key speed optimization tasks like lazy loading images, optimizing CSS, and deferring non-essential JavaScript.
Attract traffic using other means
You can attract organic traffic, and you can attract paid traffic. Search engine optimization that leads to higher rankings means you’ll show up naturally for more searches. That, in turn, results in organic traffic. Each click is free, but it takes time and effort to achieve rankings for valuable keywords.
Paid traffic is instant, but every click comes with a fee. So which is better? Let’s take a closer look.
Paid traffic
Paid traffic costs money. So you have to plan ahead and keep track of your expenses when using pay-per-click (PPC) advertising. But if you track your data – where your paying customers are coming from – you can find out if your paid traffic is producing a good profit. If it is, then it’s worth doing. Here’s more on attracting paid online traffic.
It’s also a great way to determine if traffic generated from certain keywords will result in actual sales. If so, you can then justify the expense and long-term effort required to target that term for organic rankings.
If you want to get started with PPC ads, you can use the Google Listings and Ads extension from WooCommerce, which also syncs with Google Merchant Center.
Organic traffic
Organic traffic is “free,” but only in a sense. Organic traffic costs time, and sometimes also money, depending on how you do it. Organic traffic requires someone to do the work to attract the traffic.
This could mean writing blog posts. It could mean using social media, which is a great way to draw traffic to your product pages. But someone has to write and post the articles, and write and post to social media. This takes time for you, or you have to pay someone else to do it.
Social media is powerful and it can be used to nurture and convert a loyal audience. If you have the time to spend on it, you can use it to draw more warm traffic – your target audience – to your online store.
Direct mail
If you serve a local area, you can send out postcards to draw people in that area to your ecommerce store. This approach can be very effective because it avoids all the online distractions fighting for people’s attention.
You may also be able to use coupon mailers, which continue to work well for certain businesses. Just remember, if you’re using anything in the mail, the goal is to get people to visit your website. So your marketing must be very clear about how potential customers can reach you, where to find you, and how to buy from you.
Include your website in any print marketing — and not in tiny print in the bottom corner. Include contact information. Make a specific offer so you can track the effectiveness of the campaign.
FAQs about building product pages
What is a product page?
A product page sells a specific product in an online store. It’s part of your broader website design, naming the product and giving information to help shoppers determine whether or not they want to purchase it. Customers can then add that product to their cart and visit the checkout page to buy it.
What should be included on a product page?
A product page should ideally include the following items:
- A title that includes the name of the product
- A product description that includes the value proposition for that item
- Additional details and specifications that shoppers might need to know
- Product images
- Customer reviews and other social proof for that product
- Recommended related products
- Pricing information
- Contact information or a live chat feature for customer service
- A “purchase” button or similar call to action
- A sense of urgency, when applicable, like “low stock, order soon!”
How do I create a product page design?
There are a number of ways to structure product pages. WooCommerce includes a product template by default, and the theme that you choose also impacts the way that your product pages appear.
To add a new product, simply go to Products → Add New in your WordPress dashboard. There, you can add all of your item information and publish it to your website.
If you’re using a block theme, you can edit the design of the product page layout without having to modify any code. Go to Appearance → Editor in your dashboard, click Templates, then choose the Single Product template. Then, you can add and edit blocks to create completely custom product page designs.
Finally, you can use WooCommerce extensions to modify your product page layout. For example, you can add videos, product-specific FAQs, customization options, and more.
You’ll find instructions for all of these methods earlier in this post. Want some inspiration? See some more product page design examples.
How do you write a website product page?
Begin by studying the product’s features, and use those to determine the benefits it offers to customers. Write your product description around benefits – the desirable outcomes customers experience once they buy your product.
Then, list out all the information related to the product a customer might need to know. Take high-quality images. Consider creating a product video, too. Decide on a price. Write a headline to advertise the product and attract online traffic. Write detailed descriptions. Incorporate your value proposition. Gether social proof like testimonials. Then, build out the page.
What is the purpose of a product page?
The purpose of a product page is to sell the product. Its goals are to:
- Give shoppers the information they need to make a decision.
- Create some emotional desire that speaks to their needs and wants.
- Reassure them they’re working with a good company and that the product is of high quality.
- Help them justify the purchase in their minds with good reasons to buy it.
How can I improve product page SEO?
Improving product page SEO happens over time as you make targeted changes to your content. Begin by identifying a primary keyword and any relevant secondary keywords. Use those in your headings and subheadings, URL, and content, as appropriate. Write alt text for your product images. And expand your written content, because more content generally does a better job attracting traffic from search engines.

To build winning product pages:
1. Focus on user experience and design, ensuring a clear layout and compelling visuals.
2. Craft persuasive product descriptions, highlighting benefits and solving pain points.
3. Add customer reviews and testimonials to build trust.
4. Include clear calls-to-action for easy purchasing.
5. Optimize for mobile responsiveness and fast loading times.
Great points, Oliver, thanks!