If you are looking to automate your shipping process, the Envia Shipping and Fulfillment plugin for WooCommerce can help you quote, create and track thousand of shipments in seconds.
Feature Overview
Envia helps you to improve your logistics process by being able to quote envelopes, boxes and cargo shipments instantly.
- Quote shipping for your orders instantly.
- Advanced and personalized setup of your orders and shipments.
- Assign courier priority for automatic label creation.
- Live checkout rates.
- Split products on packages.
- Create checkout rules to determine shipment pricing.
- Bulk shipments via Excel.
- Operate in 12+ countries, easily start operations in a new market.
- Send inventory to our certified warehouses and use our fulfillment service.
- Hire one of our import and export experts.
- Create your own shipping rules.
- Integrate your own courier accounts.
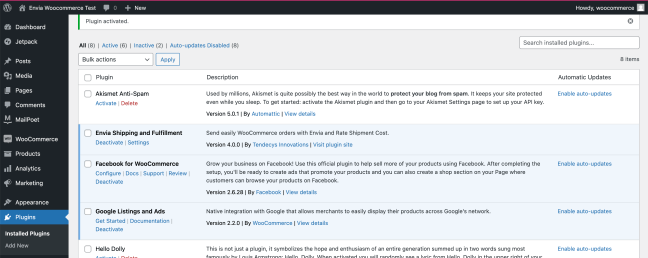
Installation
↑ Volver al principio- Sign up to Envia.com
- Install our plugin to your WooCommerce store.
- Go to Plugins > Add New > Upload and select the ZIP file you just downloaded.
- Click Install Now and then Activate Plugin.
- Read on to learn how to set up and configure the product.
Configuration
↑ Volver al principioConnecting your store with Envia
- Click on Envia Shipping module Settings.
- Next, click on the start with Envia.com button and you will be redirected to our integration process.
- If you don’t have an account, you will need to create one, otherwise type in your username and password to connect your store with your current account.
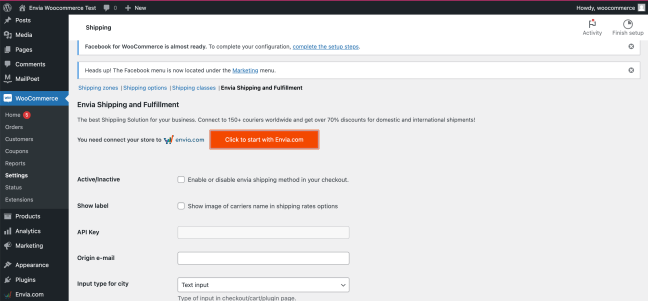
- When the integration flow redirects you to your e-commerce admin panel, close the pop up window and refresh your WooCommerce Admin.
- Once you have completed the steps, your API key will automatically appear in this section.
- Add your origin email, this email will be used to send and receive packages notification updates.
- Determine if the checkout city option will be a select or an input. Input is the default option, the select option is recommended for countries that don’t use Postal Codes. (Like Chile, Colombia, Guatemala)
- Select your default origin address, you can select from one of your currently saved addresses in Envia or you can create a new address.
- Make sure you add the same default origin address in the Envia E-commerce Store Admin Panel.
Creating shipping labels
Envia helps you to easily create shipping labels directly from WooCommerce Orders Section or from Envia E-commerce Pro tool.
To create shipping labels from Envia.com
- Sign in to your account and go the the Envia E-commerce Pro section.
- Make sure your order’s origin, destination and packages are correct.
- Instantly quote with multiple couriers and select the best option for your order.
Setting up your Checkout Shipping methods
There are 2 different types of shipping methods that you can setup in your WooCommerce store. Let’s make sure you have all your shipping setup correctly before you start selling.
- WooCommerce Shipping Zones and Options
- Envia Live Checkout Shipping Rates
If you use option 1, we recommend setting up Shipping Rules in Envia Integrations Settings, so we can help you automatically select which carrier is the best option for the order.
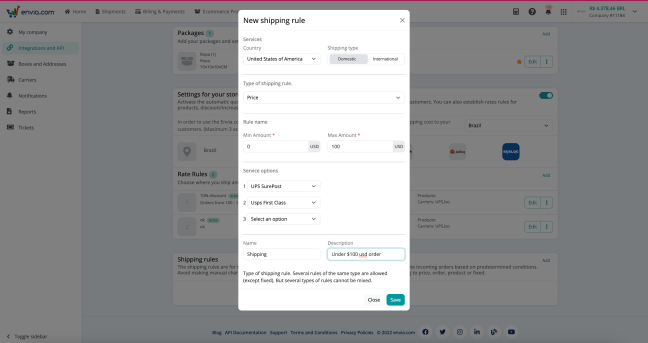
Shipping Rules
Recommended when you don’t have Live Checkout Rates activated and you are using WooCommerce Shipping Zone and Options.
- Go to your store settings in Envia Integration Settings and click on the store you are setting up.
- Activate shipping rules (last option) and add the rules depending on your carrier and service priority.
Here is an example of a Shipping Rule for order with total cost between $0 and $100 usd. The service options priority sets the main carrier service that you want to ship with, if that service is not available, it will proceed to use the next priority option.
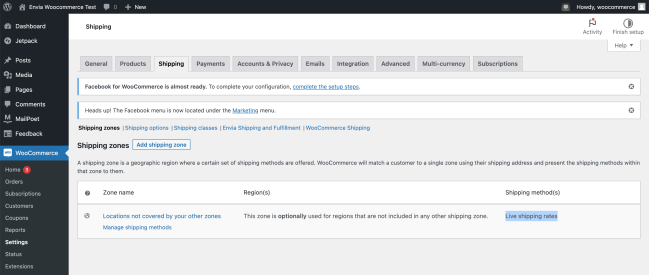
Live Checkout Shipping Rates
In this documentation we will only explain option number 2, which is how to set up Envia Shipping Live Checkout Rates.
- Go to Envia Plugin Settings in your WooCommerce Admin.
- Click on the checkbox to activate Live Checkout Rates and save.
- Go to Shipping Zones in WooCommerce settings and make sure you have Live Checkout Rates active for the zones your are shipping to.
- 5. Now go to your store settings in Envia Integration Settings and click on the store you are setting up.
- 6. Activate the live checkout rates and select the couriers you want to quote with. (Up to 3 carriers)
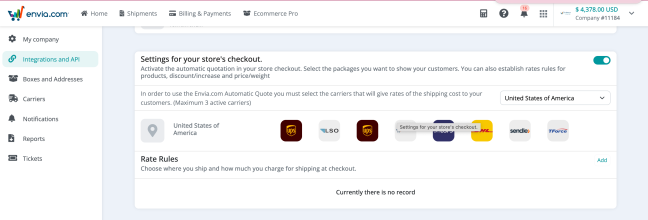
Setting up checkout shipping rules
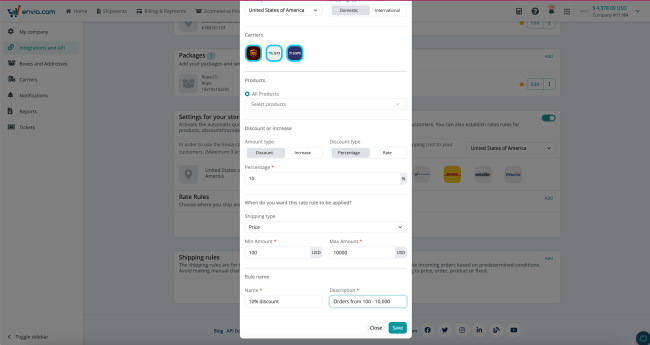
You can add some checkout rules to your Envia Shipping Live Checkout Rates. Select wether you want to give a price discount or increase, depending on the items, weight or total value of the order.
- Select the origin country that you want to apply checkout rules. (Ship from address)
- Determine wether this rule is going to be for domestic or international shipments.
- Select the couriers your want this rule to apply to.
- If you want this rule to only apply to certain products, select the products, else leave it empty and it will apply to all products.
- Complete all the steps depending on your goal, here is an example of giving 10% shipping discount, to orders with a total value over $100 usd.
Live checkout rates examples
There are 2 different ways that shipping prices may appear in your cart and checkout page. The only difference is the image of the courier.
- Without courier images.
- With Courier images.