Introduction
↑ Back to topWS Form is a powerful form development plugin for WordPress.
This extension allows you to customize products in your store with forms. You can use this extension to request additional information about a product before it is added to the cart. Furthermore, it works with popular WooCommerce extensions such as QuickView, Wishlist and Dynamic Pricing.
Use Cases
↑ Back to topExamples uses include:
- Donation or ‘name your price’ products
- Repeatable sections of fields
- Placing ‘Add to Cart’ in a desired location
- Interactive product configurators
- Multi-step product configurators
- Complex price calculations
- File uploads
- Color swatch selectors
… and more! Visit the demo website to see more examples.
Requirements
↑ Back to topThe WS Form PRO Product Add-Ons extension requires:
- WooCommerce
- WS Form PRO (Any edition)
How It Works
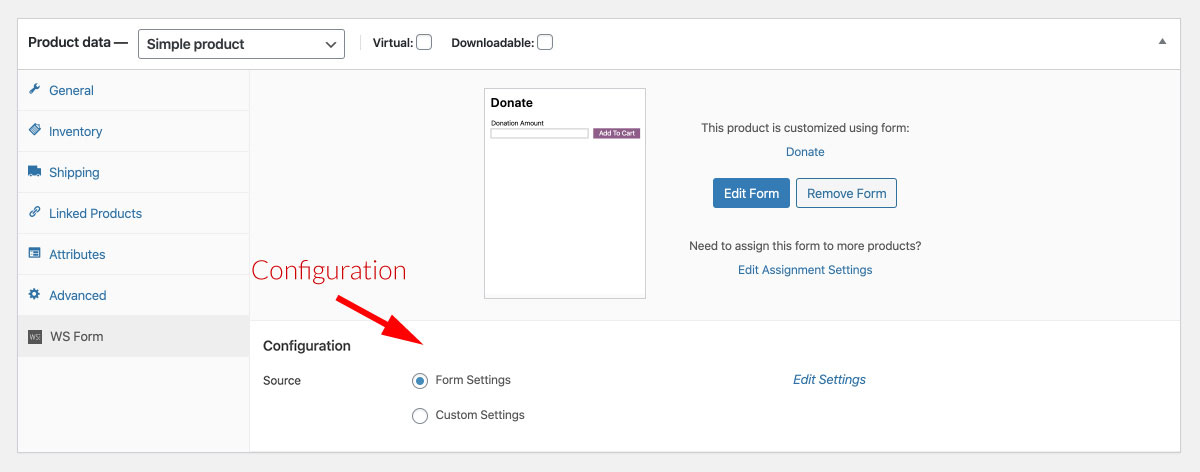
↑ Back to top- Choose or create a form in the ‘WS Form’ tab under ‘Product data’ when editing a WooCommerce product.
- The form is embedded on the product page and allows the customer to customize the product.
- The form fields completed by the customer are added to the cart and order details.
- When the order is placed and the order status is set to ‘Processing’ or ‘Completed’ (i.e. paid), WS Form will run any actions associated with the form. This is useful if you need to email someone about the paid order or even send data to an API endpoint.
Getting Started
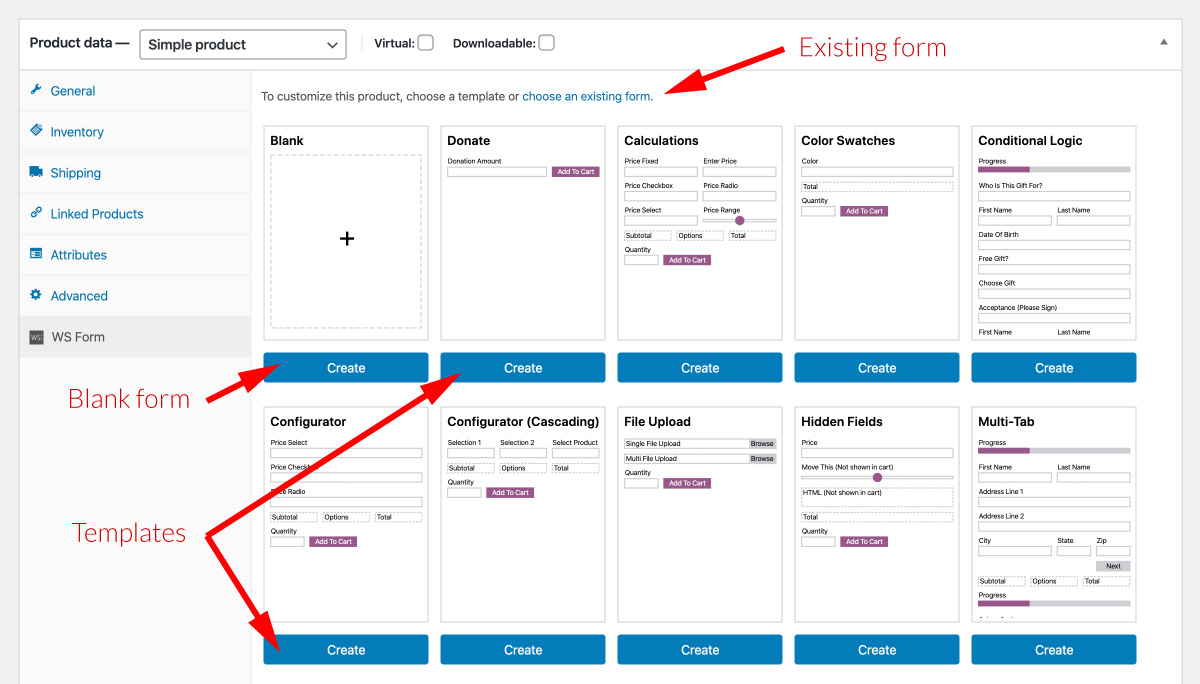
↑ Back to topProduct customizations work by embedding forms created in WS Form into a WooCommerce product page.
To customize a product with a form:
- Add or edit a product.
- Enter a name for the product.
- Click on the ‘WS Form’ tab in the ‘Product Data’ section.
- Choose a template or click to choose an existing form you have already created.
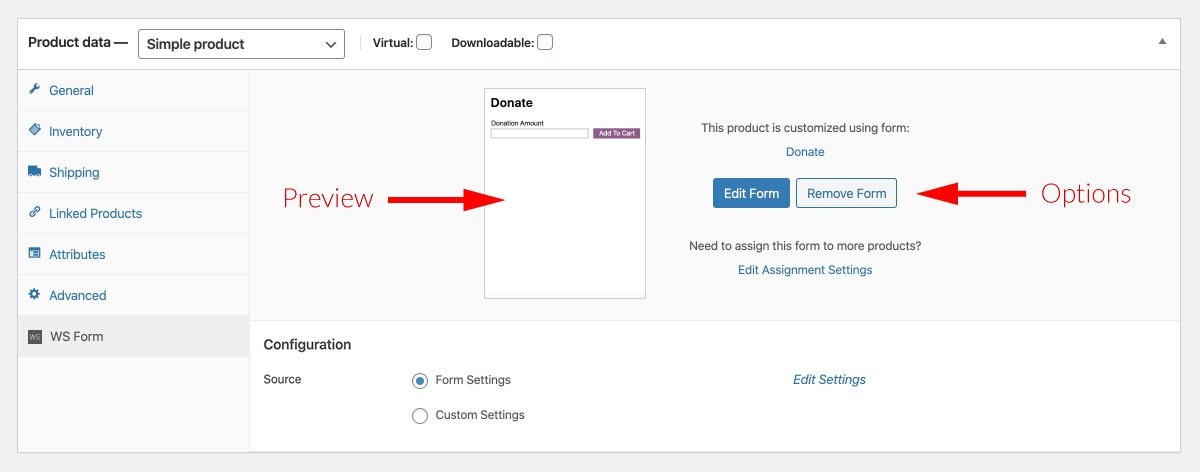
Once the form has been created or selected, a preview of your form will be shown along with options to edit or remove the form.
To test your product customization, click ‘Publish’ (or ‘Update’ for an existing product) to save your changes then click the product URL at the top of the page.
Editing The Form
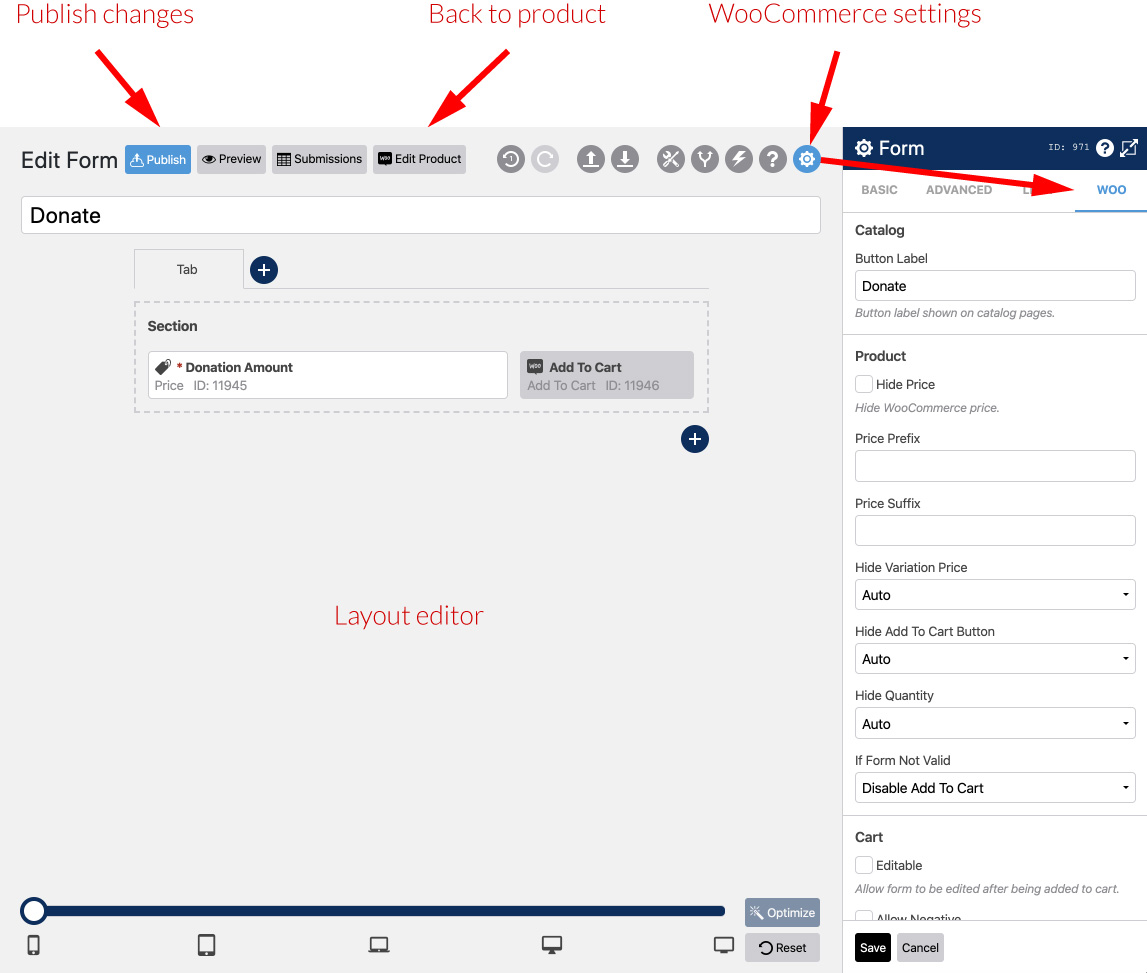
↑ Back to topTo edit the form, click the ‘Edit Form’ button. This will take you to the WS Form layout editor.
For additional help with building a form, please visit our knowledge base.
Any of the WS Form field types can be added to a form to customize a product. You can upload a file or even request a signature. Multi-tab forms are fully supported, allowing you to offer step-by-step product customization to customers. You can also include conditional logic in your form to make product customization interactive for the customer.
If you want your form to adjust the price of the product, you can add any combination of e-commerce fields to your form. The total price of the e-commerce fields in your form will be added to the price of the product set in WooCommerce. The price of the product in WooCommerce can be any amount, including zero. So, for example, to create a donation product, you would set the product price to zero and then simply add a price field to your form.
Publishing The Form
↑ Back to topWhenever you finish editing your form, you need to ensure it has been published. Simply click the ‘Publish’ button at the top of the layout editor to do this. Your changes will then be reflected on the product.
Customizing Product Prices
↑ Back to topIt is possible to add WS Form e-commerce fields to your form to change the price of the product. The sum of the WS Form e-commerce fields will be added to the price of the product.
For example, to create a donation product, you would set the WooCommerce product price to zero, and then add a WS Form price field to your form that would enable someone to enter their donation amount. The amount they enter would then become the price of the product when it is added to the cart.
The WS Form e-commerce fields that can be used to customize a product are:
- Price Enter a price
- Price Select Choose a price from a select pulldown
- Price Checkbox Select prices by clicking checkboxes
- Price Radio Select prices by choosing a radio button
- Price Range Select a price by dragging a range slider
Examples of customizing product prices:
- Donate
- Calculations
- WooCommerce Field Types Example (See below)
To learn more about the WS Form e-commerce fields:
Third Party Extensions
↑ Back to topThis extension is compatible with the Dynamic Pricing extension. Any product price customization in your form will be added to price calculated by the Dynamic Pricing extension.
WooCommerce Field Types
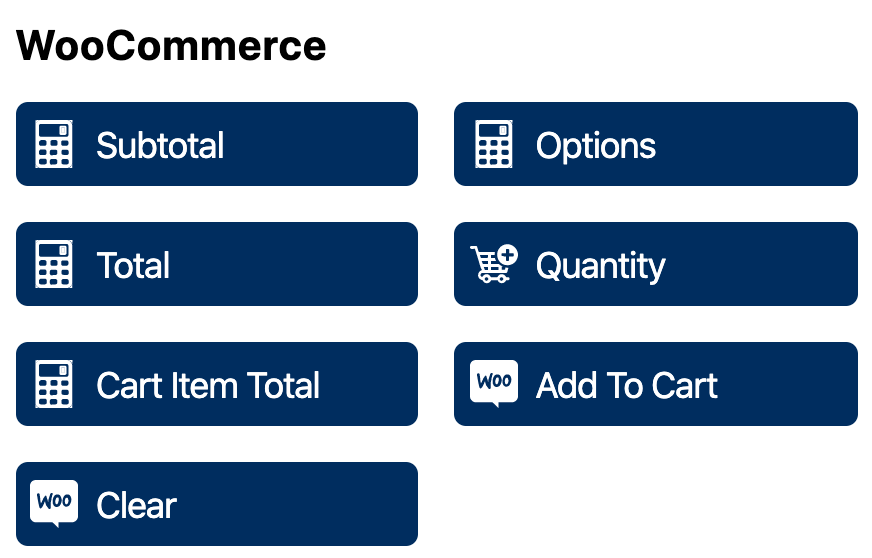
↑ Back to topThe WooCommerce add-on installs some optional field types that you can use on your form. You can place these fields on your form in the same way as any other field type, giving you full control over your form layout.
You’ll find these field types at the bottom of the Toolbox sidebar in the layout editor.
To view a demo of these fields, click here.
The prices are styled to match the normal WooCommerce price, but you can easily edit the format if you are familiar with HTML. To edit the HTML of this field, simply click the settings icon of the field.
The available fields are as follows:
Subtotal (WooCommerce Price)
↑ Back to topThe ‘Subtotal’ field outputs the price of the WooCommerce product before any customizations are applied by WS Form.
Options (WS Form)
↑ Back to topThe ‘Options’ field outputs the calculated price of the WS Form e-commerce fields on your form.
This is the same value as the ‘Cart Total‘ field used in our e-commerce fields, but instead of acting like a cart total, it is the total amount that will be added to the Subtotal (WooCommerce Price).
Total (Subtotal + Options)
↑ Back to topThe ‘Total’ field is the sum of the ‘Sub-total’ (WooCommerce product price) and ‘Options’ (Total of your WS Form e-commerce fields).
This is the single product price that will be used when the product is added to the cart.
Quantity
↑ Back to topThe ‘Quantity’ field allows you to place the WooCommerce quantity field anywhere on your form.
This field acts exactly the same way as the WooCommerce quantity field. If you have set a minimum and/or maximum quantity this field will inherit those properties.
Cart Item Total (Total x Quantity)
↑ Back to topThe ‘Cart Item Total’ field is the product of the ‘Total’ and ‘Quantity’ fields multiplied together.
It allows you to display the total cart item price that will be used when the product is added to the cart.
Add to Cart Button
↑ Back to topThe ‘Add to Cart’ button allows you to add a WooCommerce add to cart button anywhere on your form. This button will only be active when the form is fully validated. If you have any variations on your product, a variant will also need to be selected in order for your form to validate.
This button is useful if you have a multi-tab form and only want the Add to Cart button to appear on the last tab.
The normal WS Form ‘Submit’ button also acts like a WooCommerce ‘Add to Cart’ button.
Clear Button
↑ Back to topThe ‘Clear’ button is used in conjunction with products that have variants. When clicked, it will reset the variations selected. Additionally, this button will also reset your form to its default state. This is not to be confused with the WS Form ‘Clear’ button which clears all form fields. It is named ‘Clear’ here to match the terminology used by WooCommerce.
Choosing Which Fields Appear in Cart and Orders
↑ Back to topThere might be an occasion when you do not want a field on your form to appear in the cart. For example, you might be using a range slider to set a price field and you only want the price field to be included in the cart.
When the WooCommerce add-on is installed it adds a new setting called ‘Exclude from WooCommerce cart and orders’ that enables you to control whether or not a field will be saved to the cart when the ‘Add to Cart’ button is clicked. This setting can be found when you click to edit a field at the bottom of the ‘Basic’ tab.
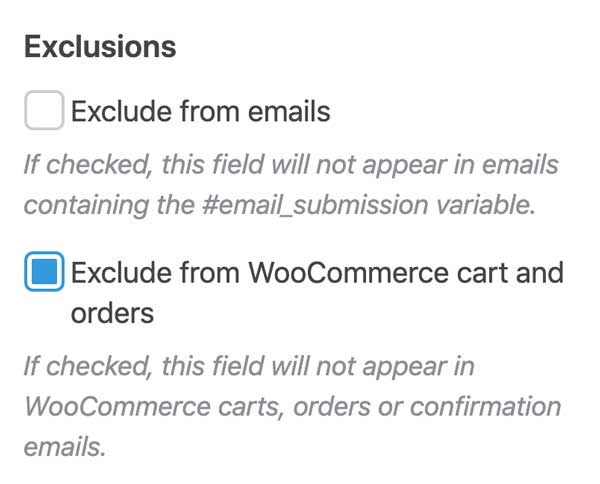
If checked, the field will be excluded from WooCommerce carts, orders or confirmation emails.
Configuration
↑ Back to topWS Form offers various configuration settings that can be changed to control the look of your customized product.
Source
↑ Back to topThe product configuration settings can either be sourced at a form (Form Settings) or product (Custom Settings) level.
The ‘Source’ setting has two options:
- Form Settings – If Form Settings is selected, WS Form will use the settings on the form to configure how the product looks. You can click the ‘Edit Settings’ link next to ‘Form Settings’ to conveniently access the WooCommerce settings of the form.
- Custom Settings – If Custom Settings is selected, WS Form will use the settings shown underneath that option to configure how the product looks. Click ‘Custom Setting’ to see the settings. Make any changes required and then click ‘Update’ on the product page.
The configuration settings are the same for both sources and are as follows:
Catalog – Button Label
↑ Back to topThe default button label shown on products listed in your WooCommerce catalog is set to ‘Select options’. You can change this to anything you wish using the ‘Button label’ setting. For example, you could change this to ‘Donate’ for a donation product.
Product – Hide Price / Price Prefix / Price Suffix
↑ Back to topThe WooCommerce price can be hidden using these settings. You can also add a prefix and suffix to the price. If you want to change the price to something else entirely, simply hide the price and enter some text into the prefix setting.
Use the ‘Subtotal’ WS Form field (see above) if you want to show this price elsewhere.
Product – Hide Variation Price
↑ Back to topThis setting has three options:
- Auto – The WooCommerce variation price will be hidden if you have added a WS Form WooCommerce subtotal field to your form (see above).
- Hide – The WooCommerce variation price will be hidden
- Show – The WooCommerce variation price will be shown
Product – Hide Quantity
↑ Back to topThis setting has three options:
- Auto – The WooCommerce quantity field will be hidden if you have added a WS Form WooCommerce quantity field to your form (see above).
- Hide – The WooCommerce quantity field will be hidden
- Show – The WooCommerce quantity field will be shown
Product – Hide Add To Cart Button
↑ Back to topThis setting has three options:
- Auto – The WooCommerce variation price will be hidden if you have added a WS Form WooCommerce add to cart field to your form (see above).
- Hide – The WooCommerce variation price will be hidden
- Show – The WooCommerce variation price will be shown
Product – If Form Not Valid
↑ Back to topThis setting has two options:
- Disable Add To Cart – The default WooCommerce behavior is to disable the ‘Add To Cart’ button until variations have been selected. When you customize a product with WS Form, the ‘Add To Cart’ button will be disabled until the form validates if you choose this option.
- Show Invalid Feedback – If you want to show normal form validation when ‘Add To Cart’ is clicked, choose this option. This will show normal invalid feedback text on your form fields if they are not validated.
Product – Clear Hidden Fields
↑ Back to topIf this setting is checked, WS Form will not include fields that are hidden in the cart. This option is enabled by default to ensure only fields visible to the customer are included in the cart. You can override this setting at a field level under Basic > Hidden Behavior > Always Include in Actions.
Cart – Editable
↑ Back to topIf you want customers to be able to edit a product in the cart after they have added it, you can enable the ‘Editable’ setting. If enabled, Customers can click the product in their cart, make any necessary adjustments and then click to add the product to their cart again.
Cart – Allow Negatives
↑ Back to topIf checked, the calculated form amount can be negative and subtract from the product price.
WS Form – Run WS Form Actions
↑ Back to topIf checked, WS Form will run actions when the order status changes and matches the order status configured on each action. See below for more information about running actions.
Form Product Assignment
↑ Back to topWhen you choose a template or existing form to assign to a product, WS Form assigns that product to the form automatically for you. You can also assign forms to:
- All products
- One or more specific products
- Product categories
- Product tags
To change which products a form is assigned to:
- Edit the form
- Click on the form settings (gear) icon at the top right of the layout editor
- Click the ‘Woo’ tab
- Edit the ‘Assign To’ settings
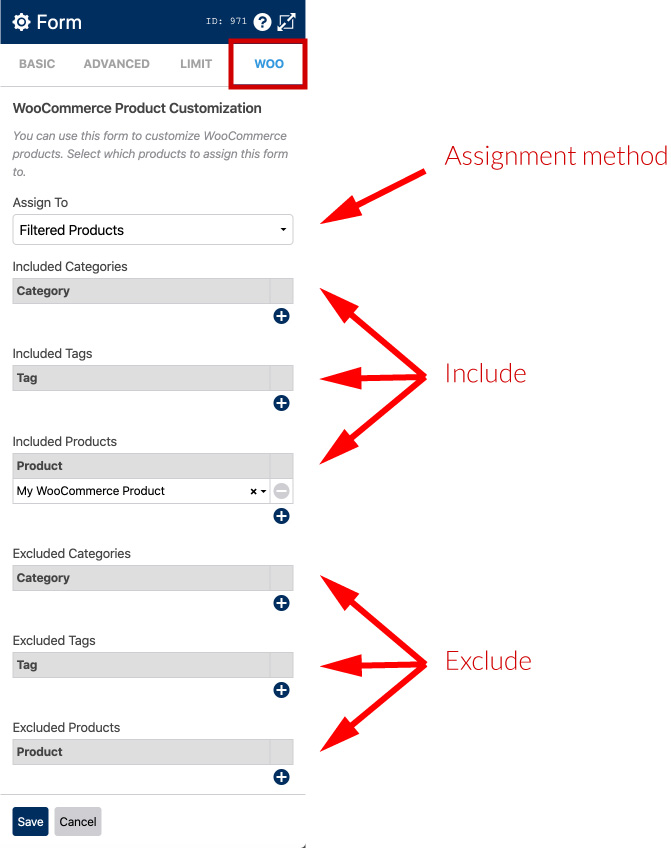
The Woo tab looks as follows:
Assign To
↑ Back to topThe ‘Assign To’ option has three options:
- No Products – The form will not be assigned to any WooCommerce products (This is the default for regular forms on your website that are not used to customize products)
- All Products – The form will be assigned to all of your WooCommerce products
- Filtered Products – The will be assigned to (or excluded from) the categories, tags and specific products you select
Filtered Products
↑ Back to topWhen the filtered products ‘Assign To’ option is selected, six assignment options will appear. Each of these options allows you to add an unlimited number of categories, tags or products to include or exclude. To add an assignment, click the ‘+’ icon and then search for the category, tab or product you with to assign. The assignment options are:
- Included Categories
- Included Tags
- Included Products
- Excluded Categories
- Excluded Tags
- Excluded Products
Handling Multiple Forms Assigned To A Single Product
↑ Back to topEach product can be customized using one form.
If you accidentally assign more than two forms to a single product, WS Form will automatically select one of the forms to customize the product with. Forms that have specific product assignments will get priority.
WS Form will also show the assignments on the product page in the WS Form tab. From there you can edit each form and adjust the product assignments as required.
Data Grid Column Mapping
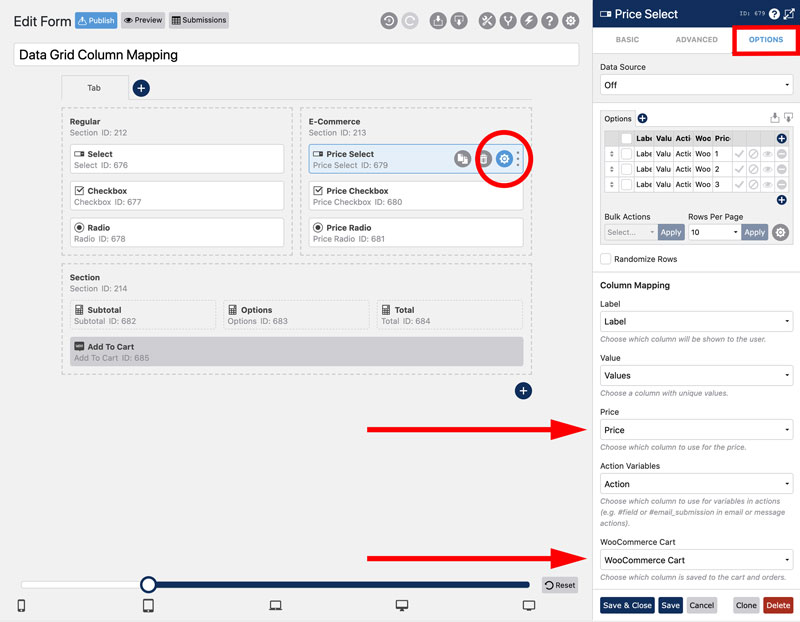
↑ Back to topWhen a user makes a choice with a select, checkbox or radio, WS Form has various data grid column mappings that allow you to customize how choices are displayed on the form and in the cart or orders.
The available column mappings are:
- Label
Text (or image) that is shown on the form itself to your customer. - Value
Value you can use for calculated fields or other conditional logic purposes. - Price
Price that match your stores currency settings (Only available on price select, price checkbox and price radio fields). - Action Variables
Text used in email notifications and other actions or add-ons. - WooCommerce Cart
Text shown in the cart and orders.
To change these settings (example for a select field):
- Edit the form
- Click on the settings (gear) icon on the select, checkbox or radio field
- Click on the options tab to view the data grid
- Scroll down to the ‘Column Mapping’ section and select the data grid column you would like to use as the value that is stored in the cart and orders
- Click ‘Save & Close’
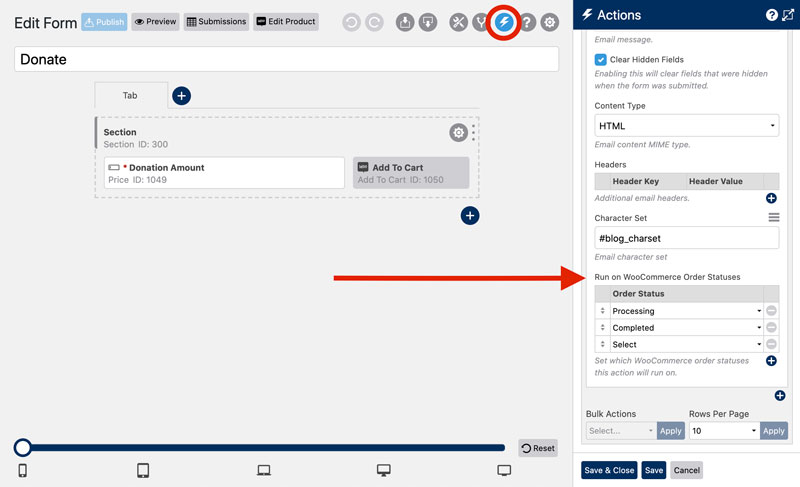
Running Actions
↑ Back to topA great features of this extension is that WS Form server side form actions can be configured to run when an order status changes. This means that you could send an email to a particular department when a product customization has been sold. Or, you could send notifications about a sale to Slack or any of our third party that WS Form integrates with such as Salesforce, Zapier or MailChimp. For developers, you can even run a WordPress hook when a product customization has been sold.
To configure an action to run for a particular order status:
- Click the ‘Actions’ (lightning bolt) icon at the top of the page when editing the form.
- Create or edit an action.
- At the bottom of the actions setting, change the ‘Run on WooCommerce Order Statuses’ setting. Add as many statuses as you wish that will trigger the action to run.
- Click ‘Save & Close’.
If your actions are not running, ensure you have the ‘Run WS Form Actions’ setting enabled in Woo settings.
- Click the ‘Form Settings’ (gear) icon at the top of the page when editing the form.
- Click the ‘Woo’ tab.
- At the bottom of the form settings, enable the ‘Run WS Form Actions’ setting.
- Click ‘Save & Close’.
If you are using ‘Custom Settings’ as your configuration source you should change this setting on your product page.
Form Variables
↑ Back to topThe following WS Form variables can be use in the form that you assign to WooCommerce products.
An example of using these variables might be:
#calc(#ecommerce_cart_woocommerce_price_float * 0.5)This would return the total WooCommerce product price multiplied by 0.5.
These variables can be used in:
- The ‘Default Value’ setting of fields
- Text Editor fields
- HTML fields
- Conditional logic
- Calculated fields
Learn more: Variables, The Variable Cheat Sheet
WooCommerce Product Price
↑ Back to topThe WooCommerce product price excluding the value of any WS Form e-commerce fields.
| Variable | Description |
|---|---|
| #ecommerce_cart_woocommerce_price | Returns as a string (Without currency). |
| #ecommerce_cart_woocommerce_price_currency | Returns as a string (Including currency). |
| #ecommerce_cart_woocommerce_price_float | Returns in a floating point format. |
WooCommerce Regular Product Price
↑ Back to topThe WooCommerce product price (before the sale price) excluding the value of any WS Form e-commerce fields.
| Variable | Description |
|---|---|
| #ecommerce_cart_woocommerce_price_regular | Returns as a string (Without currency). |
| #ecommerce_cart_woocommerce_price_regular_currency | Returns as a string (Including currency). |
| #ecommerce_cart_woocommerce_price_regular_float | Returns in a floating point format. |
WooCommerce Product Price + WS Form Price
↑ Back to topThis is the WooCommerce product price plus the total value of the e-commerce fields on the form.
| Variable | Description |
|---|---|
| #ecommerce_cart_woocommerce_price_total | Returns as a string (Without currency). |
| #ecommerce_cart_woocommerce_price_total_currency | Returns as a string (Including currency). |
| #ecommerce_cart_woocommerce_price_total_float | Returns in a floating point format. |
Cart Item Total
↑ Back to topThis is the WooCommerce product price plus the total value of the e-commerce fields on the form, multiplied by the WooCommerce quantity.
| Variable | Description |
|---|---|
| #ecommerce_cart_woocommerce_price_cart_item_total | Returns as a string (Without currency). |
| #ecommerce_cart_woocommerce_price_cart_item_total_currency | Returns as a string (Including currency). |
| #ecommerce_cart_woocommerce_price_cart_item_total_float | Returns in a floating point format. |
Action Variables
↑ Back to topThe following WS Form variables can be used in actions that relate to WooCommerce orders such as sending emails, redirecting or custom mapping.
Order
↑ Back to top| Variable | Description |
|---|---|
| #woocommerce_order_id | Returns the WooCommerce order ID. |
| #woocommerce_order_number | Returns the WooCommerce order number (For display). |
| #woocommerce_order_status | Returns the WooCommerce order status. |
| #woocommerce_order_sub_total | Returns the WooCommerce order sub total (Without currency). |
| #woocommerce_order_sub_total_price | Returns the WooCommerce order sub total (With currency). |
| #woocommerce_order_discount_total | Returns the WooCommerce order discount total (Without currency). |
| #woocommerce_order_discount_total_price | Returns the WooCommerce order discount total (With currency). |
| #woocommerce_order_shipping_total | Returns the WooCommerce order shipping total (Without currency). |
| #woocommerce_order_shipping_total_price | Returns the WooCommerce order shipping total (With currency). |
| #woocommerce_order_tax_total | Returns the WooCommerce order tax total (Without currency). |
| #woocommerce_order_tax_total_price | Returns the WooCommerce order tax total (With currency). |
| #woocommerce_order_total | Returns the WooCommerce order total (Without currency). |
| #woocommerce_order_total_price | Returns the WooCommerce order total (With currency). |
User
↑ Back to top| Variable | Description |
|---|---|
| #woocommerce_order_user_id | Returns the WooCommerce order user ID. |
| #woocommerce_order_user_first_name | Returns the WooCommerce order user first name. |
| #woocommerce_order_user_last_name | Returns the WooCommerce order user last name. |
| #woocommerce_order_user_email | Returns the WooCommerce order user email. |
Billing
↑ Back to top| Variable | Description |
|---|---|
| #woocommerce_order_billing_first_name | Returns the WooCommerce order billing first name. |
| #woocommerce_order_billing_last_name | Returns the WooCommerce order billing last name. |
| #woocommerce_order_billing_company | Returns the WooCommerce order billing company. |
| #woocommerce_order_billing_address_1 | Returns the WooCommerce order billing address line 1. |
| #woocommerce_order_billing_address_2 | Returns the WooCommerce order billing address line 2. |
| #woocommerce_order_billing_city | Returns the WooCommerce order billing city. |
| #woocommerce_order_billing_state | Returns the WooCommerce order billing state. |
| #woocommerce_order_billing_postcode | Returns the WooCommerce order billing zip. |
| #woocommerce_order_billing_country | Returns the WooCommerce order billing country. |
| #woocommerce_order_billing_email | Returns the WooCommerce order billing email. |
| #woocommerce_order_billing_phone | Returns the WooCommerce order billing phone. |
Shipping
↑ Back to top| Variable | Description |
|---|---|
| #woocommerce_order_shipping_first_name | Returns the WooCommerce order shipping first name. |
| #woocommerce_order_shipping_last_name | Returns the WooCommerce order shipping last name. |
| #woocommerce_order_shipping_company | Returns the WooCommerce order shipping company. |
| #woocommerce_order_shipping_address_1 | Returns the WooCommerce order shipping address line 1. |
| #woocommerce_order_shipping_address_2 | Returns the WooCommerce order shipping address line 2. |
| #woocommerce_order_shipping_city | Returns the WooCommerce order shipping city. |
| #woocommerce_order_shipping_state | Returns the WooCommerce order shipping state. |
| #woocommerce_order_shipping_postcode | Returns the WooCommerce order shipping zip. |
| #woocommerce_order_shipping_country | Returns the WooCommerce order shipping country. |
| #woocommerce_order_shipping_phone | Returns the WooCommerce order shipping phone. |