Customer Upload files for the WooCommerce plugin lets your customer upload files from the product, cart, and checkout page.
Installation
↑ Back to top- Download Customer Upload Files for WooCommerce and have your .zip file
- At the WordPress admin panel, go to the Plugins section, and click ‘Add New’ to upload and install the plugin you just downloaded from WooCommerce.
- Upload the .zip file to proceed with the installation.
- Wait until the plugin installs. After successful installation, activate the plugin, and move on to configuration settings.
Configurations
↑ Back to topAt the admin panel, go to WooCommerce > setting > Upload Files to configure the WooCommerce customer upload file extension. In this tab, you will find two sections Add Rule and Manage Rule.
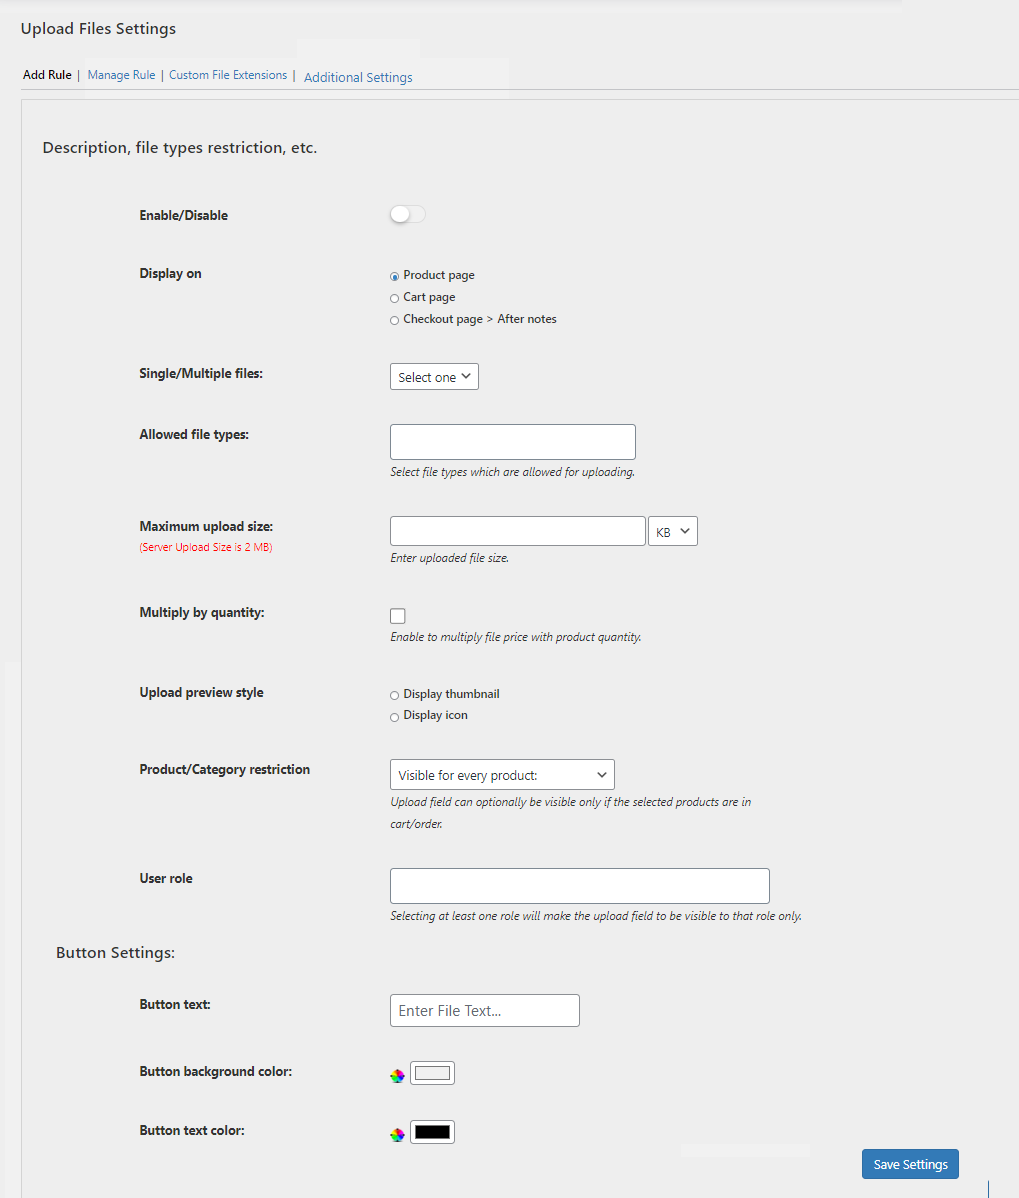
Add Rule
↑ Back to topIn this section, you can add rules to enable upload files option for customers. In each rule you can configure the followings.
- Enable/Disable: Enable or Disable the rule with the toggle switch.
- Display on: Select the location where you want to display the upload files button. You can select from the following pages:
- Product Page
- Cart Page
- Checkout Page > After Notes
- Single/Multiple Files: Select how many files are allowed to upload. You can choose:
- Single file
- Multiple files
- Allowed File Types: Specify the type of file that can be uploaded. These include
- Image Formats (jpg, jpeg, png, gif, ico)
- Video Formats (mp4, m4v, mov, wmv, avi, mpg, ogv, 3gp, 3g2)
- Audio Formats (mp3, m4a, ogg, wav)
- Documents Formats (pdf, doc, docx, ppt, pptx, pps, ppsx, odt, xls, xlsx, psd)
- Custom Extension (You can also add a custom format if required)
- Maximum Upload Size: Enter maximum uploaded file size to upload
- Multiply By Quantity: Enable it to multiply file upload charges with product quantity
- Upload preview style: Select how to preview the upload to your customers. You can select as:
- Display Thumbnail
- Display Icon
- Product/Category Restriction: Select the products or categories for which you want to display the upload button. These include:
- Visible for All Products
- Products (Select the products for which to display the upload button)
- Categories (Upload field can optionally be visible only if the selected categories are in cart/order)
- User Role: Select user role if you to provide this facility to only specific user roles
Button Settings:
↑ Back to top- Button Text (Text for the Upload File Button)
- Button Background Color (Select background color for the Upload File Button)
- Button Text Color (Text color for the button text)
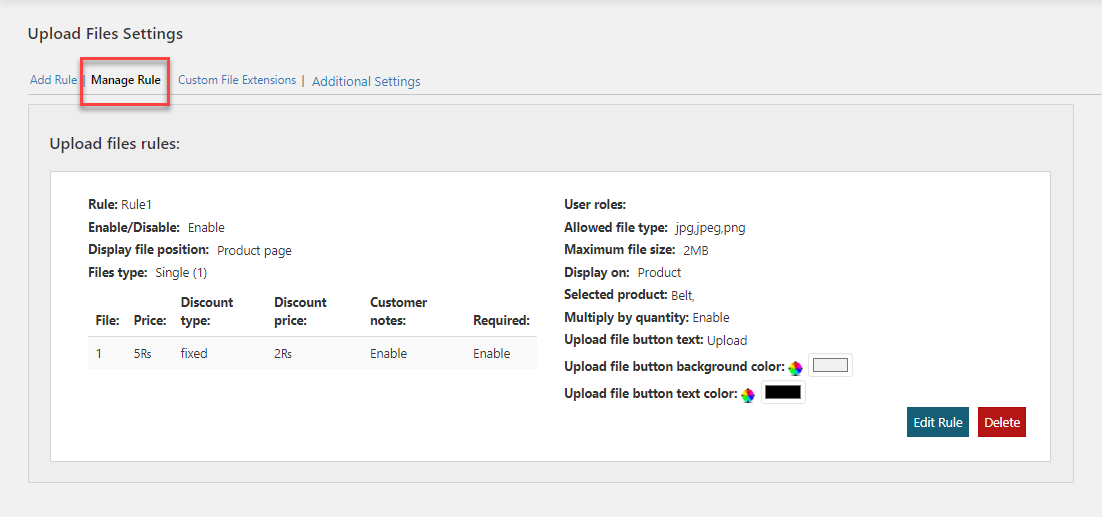
Manage Rule
↑ Back to topIn this section, you can see all the rules created by you with complete information. You can edit and delete the rules from here.
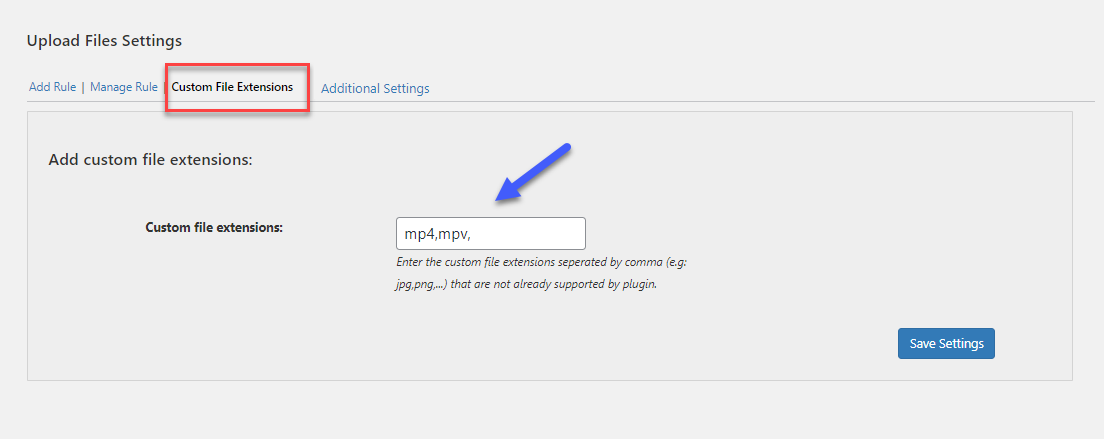
Custom File Extension
↑ Back to topIn this section, the admin can add custom file extensions that are not already supported by the WooCommerce upload files plugin. You can add multiple file extensions separated by a comma.
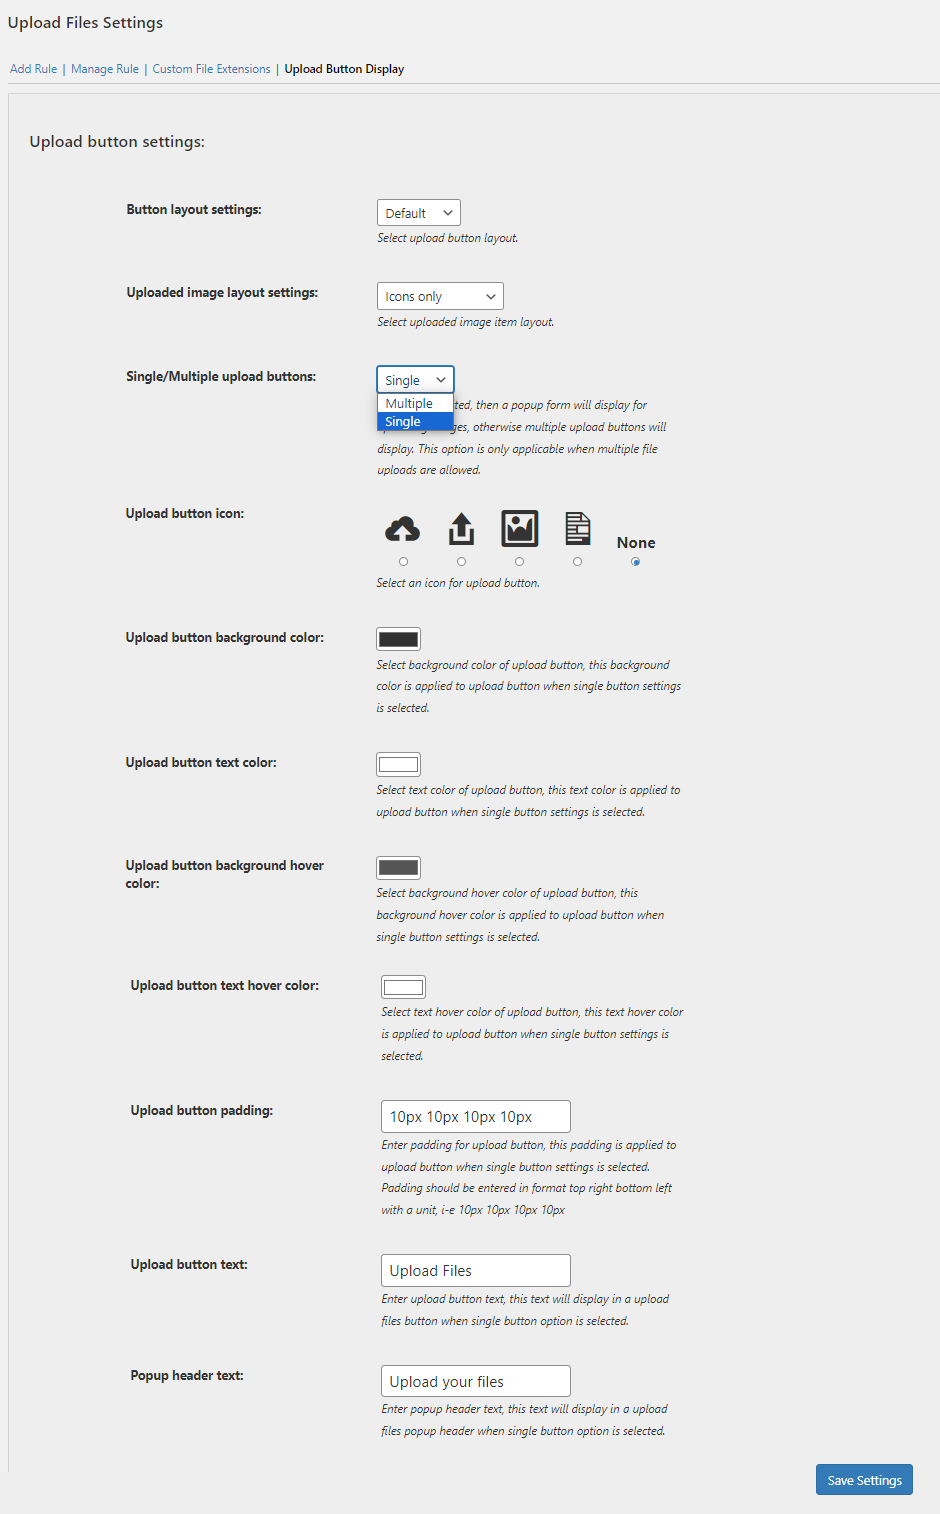
Additional Settings
↑ Back to topIn this section, you can configure the Additional settings for the WooCommerce file upload button. These settings are as follows.
- Button Layout Settings: Select teh layout for the file upload button. You can select:
- Default
- Minimal
- Simplistic
- Uploaded Image Layout Settings: Select teh layout for the uploaded image.
- Default
- Name Only
- Name and Image
- Icons Only
- Single/Multiple Upload Buttons: Select how many upload buttons to display. You can select
- Single (If a single upload button is selected, then a popup form will display for uploading images)
- Multiple (When selected, multiple file upload buttons will be displayed. This option is only applicable when multiple file uploads are allowed)
- Upload Button Icon: Select an icon for teh file upload button
When Single file upload button is selected the following more settings will appear:
- Upload Button Background Color: Select the background color of the file upload button.
- Upload Button Text Color: Select the text color of the upload button.
- Upload Button Background Hover Color: Select the background hover color of the file upload button.
- Upload Button Text Hover Color: Choose the text hover color of teh file upload button.
- Upload Button Padding: Enter padding for teh file upload button.
- Upload Button Text: Enter the upload button text.
- Popup Header Text: Enter text to be displayed on the popup header.
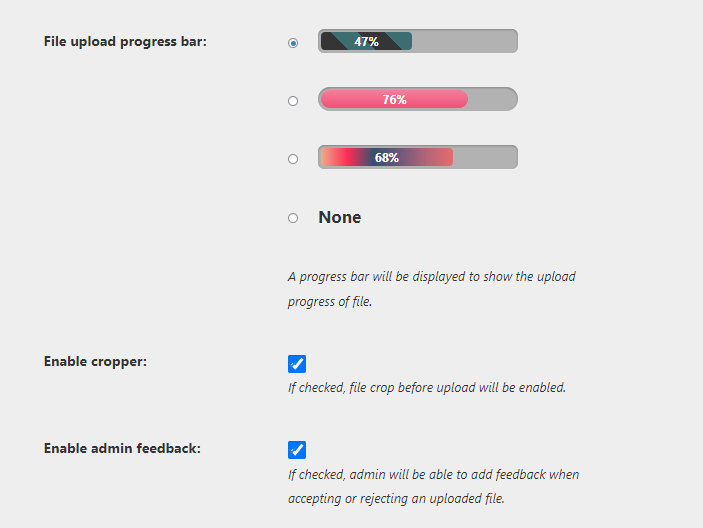
- File Upload Progress Bar: Prgress bar will be displayed to show the upload progress of file.
- Enable Cropper: If checked, file crop before upload will be enabled.
- Enable Admin Feedback: Admin will be able to add feedback when accepting or rejecting on upload files.
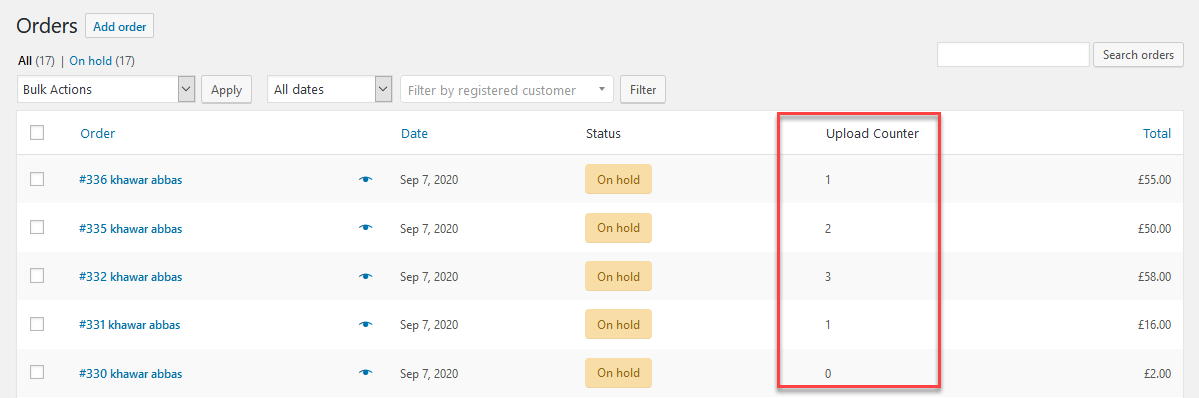
Upload Counter
↑ Back to topGo to WooCommerce > Orders, in the order table, there will be a new column named “Upload Counter”. This column helps you see which customer uploaded the file and the number of files they uploaded.
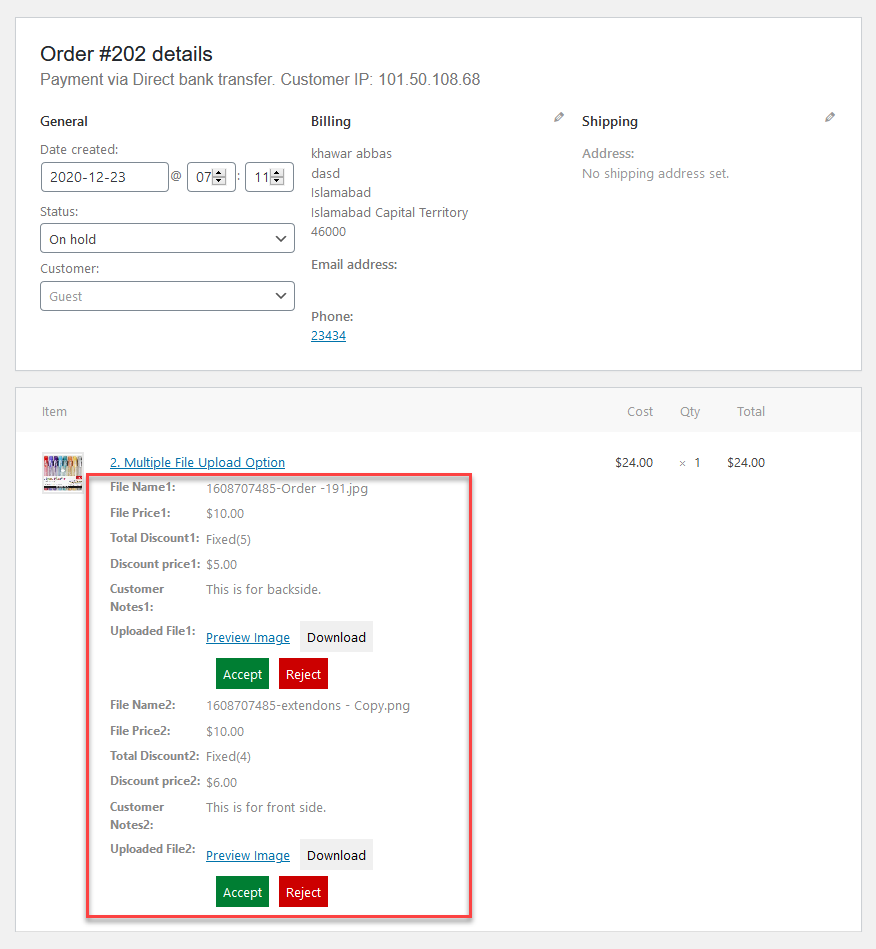
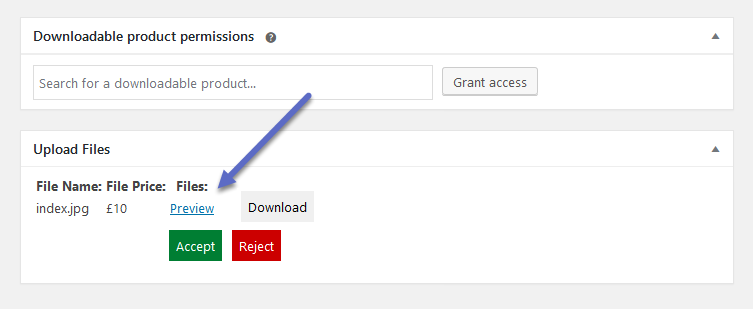
View, Download & Approve/Disapprove Customer Uploaded Files
You can see the customer uploaded files by opening each order and you can approve or disapprove and download the uploaded files.
Note:
Please hit Update Order Button right after approving or rejecting the uploaded files. Once you update the order, an email notification will be sent to the customer.
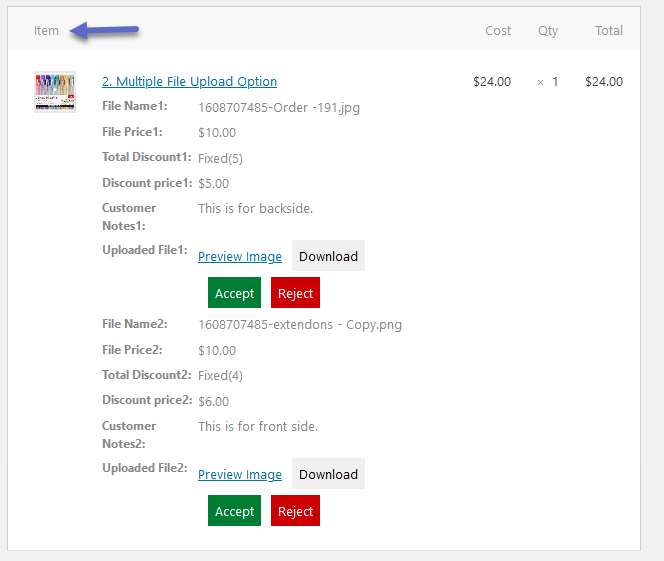
If customers upload the file from the product page, then the uploaded will be displayed in the Item section of the order detail page.
If customers upload the file from the cart or checkout page, then the uploaded file will be displayed at the bottom of each order in the Upload File section.
FAQs
↑ Back to top- Is it possible to restrict the size or type of file the user uploads?
Yes, the upload file checkout WooCommerce plugin allows you to set the minimum and maximum file size for all or selective products and also restricts file types that the user can upload.
- Does the WooCommerce checkout file upload plugin allow multiple file uploads?
Yes, you can easily configure if you want to allow multiple uploads for all or specific products. Create rules to set the number of files that can be uploaded for a single plugin.
- On which pages can you upload the files?
With the checkout files upload for WooCommerce plugin you can enable the file upload button on the product, cart, shop, and checkout page.