TikTok Shop
↑ Back to topThis article will provide step-by-step guidance for onboarding to TikTok Shop via the TikTok for WooCommerce extension.
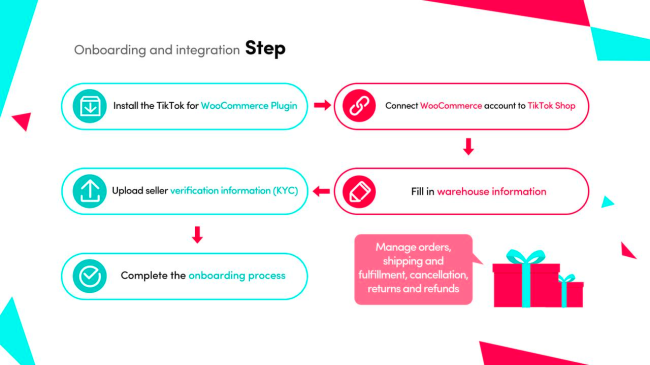
Onboarding and Integration
↑ Back to topStep 1: Download and add TikTok for WooCommerce to your WooCommerce store
1.1 Install the TikTok for WooCommerce extension
You can install the TikTok for WooCommerce extension on your site automatically or manually once you’ve completed checkout. We recommend choosing one of the automatic options:
- Via your order confirmation screen on WooCommerce.com
- Via the My Subscriptions dashboard
Prefer to handle this manually? No problem – download and install the extension on your site via WP Admin by following these steps.
If you’re not seeing TikTok for WooCommerce after installing the extension, you may need to disable the Navigation option in WooCommerce > Settings > Advanced > Features.
Note: Before you begin with the integration set-up, make sure that the “Phone number” field in your store settings/profile is entered.
1.2 Connect and authorize TikTok for WooCommerce
Once you complete the installation of the extension, in your WooCommerce admin select TikTok on the left sidebar menu under “Marketing.”
Select Connect Account to get started with set-up.
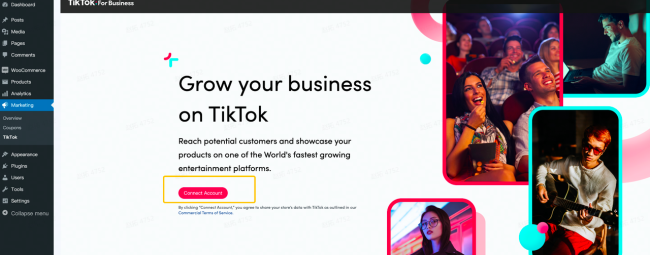
You need to authorize TikTok for WooCommerce to connect to your WooCommerce store:

Step 2: Onboard to TikTok Shop
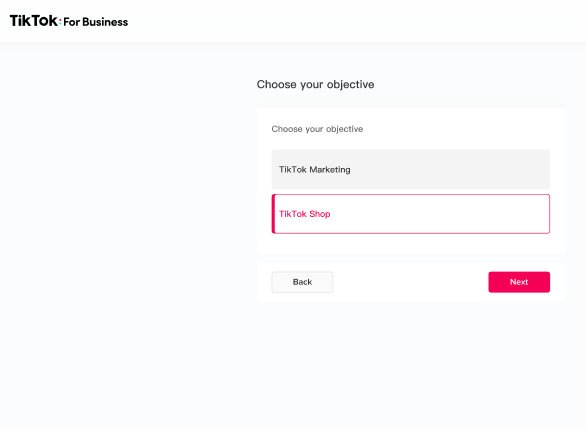
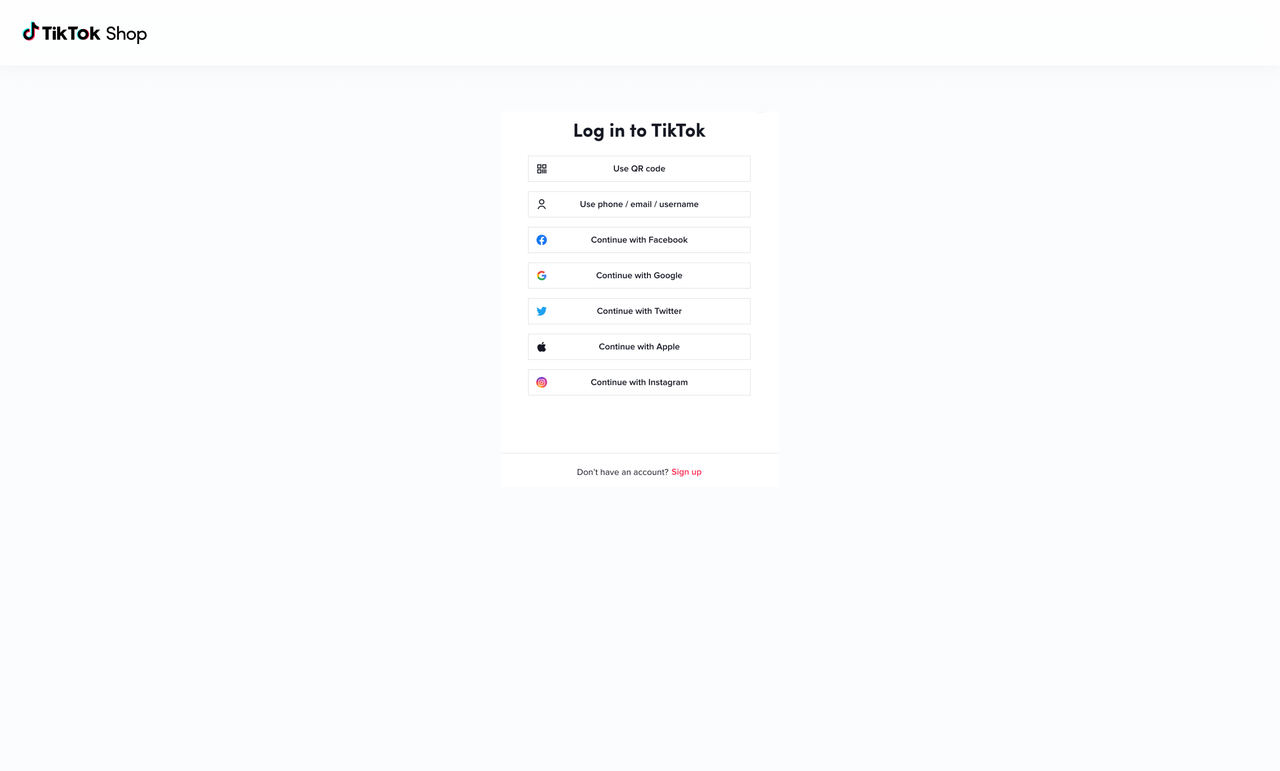
To connect your WooCommerce account to TikTok Shop:
- Select TikTok Shop as the new feature to add
2. Sync a TikTok account to activate your TikTok integration. At this stage, you can either create a new TikTok account or connect to an existing account.
3. Authorize TikTok For Business to access your TikTok account.
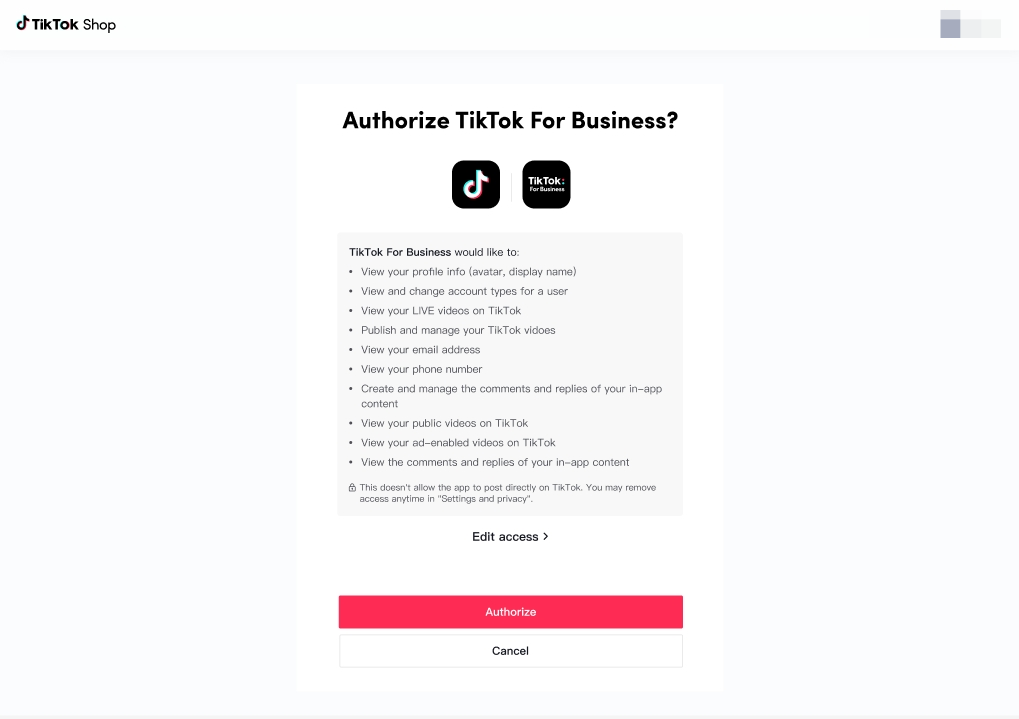
4. Create or connect TikTok for Business Account to TikTok Shop
After authorizing TikTok For Business to access your TikTok account, you need to set up TikTok For Business account.
You can choose to register a new one or use the existing account.You can choose to register a new TikTok For Business account or use the existing account.
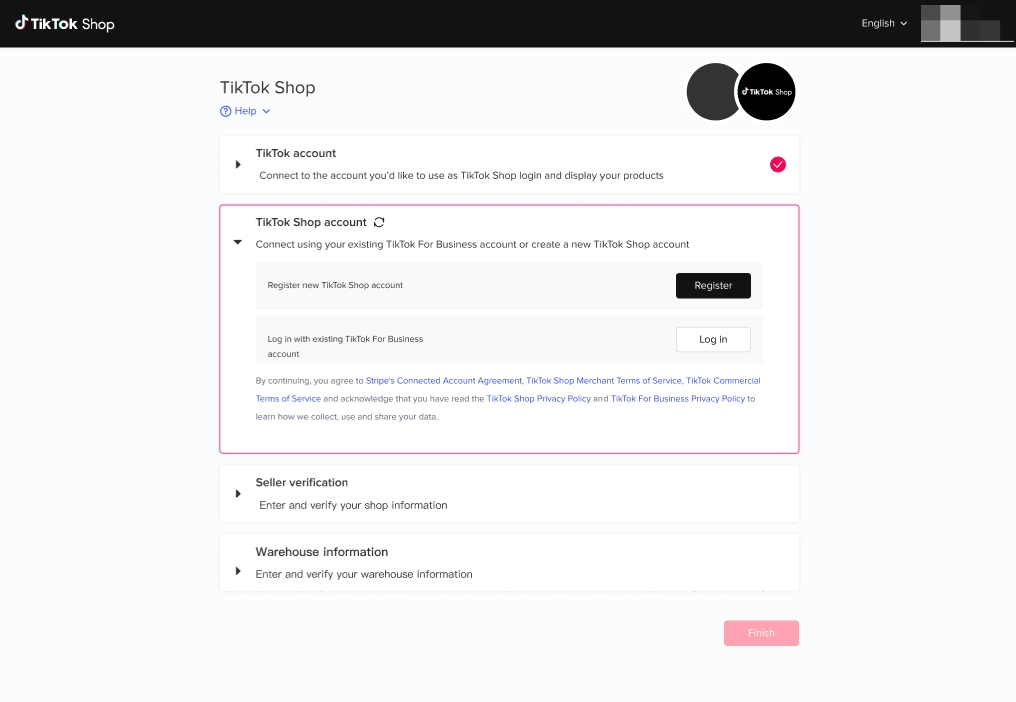
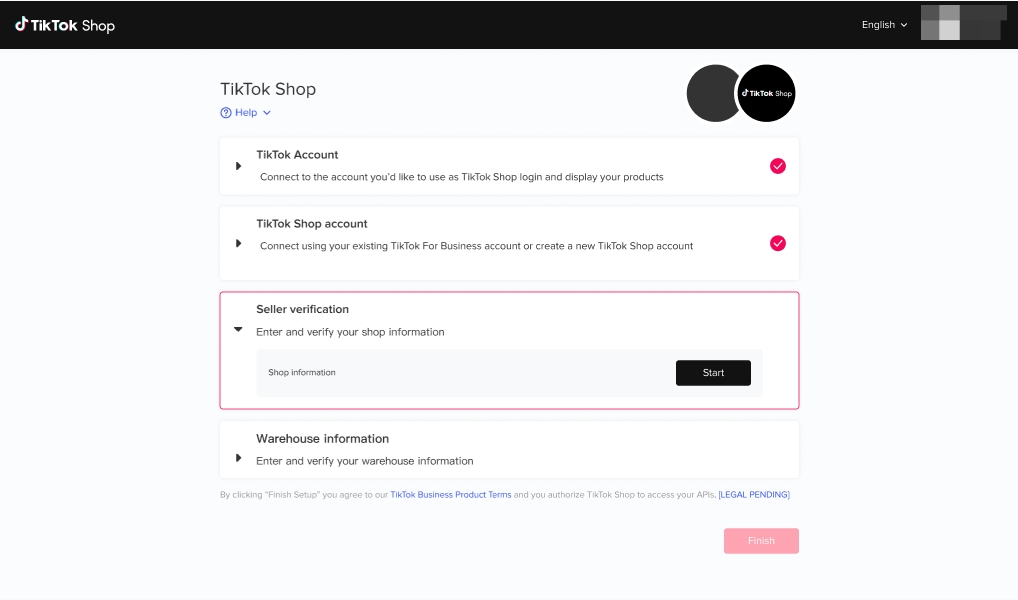
Step 3: Upload seller verification information (KYC)
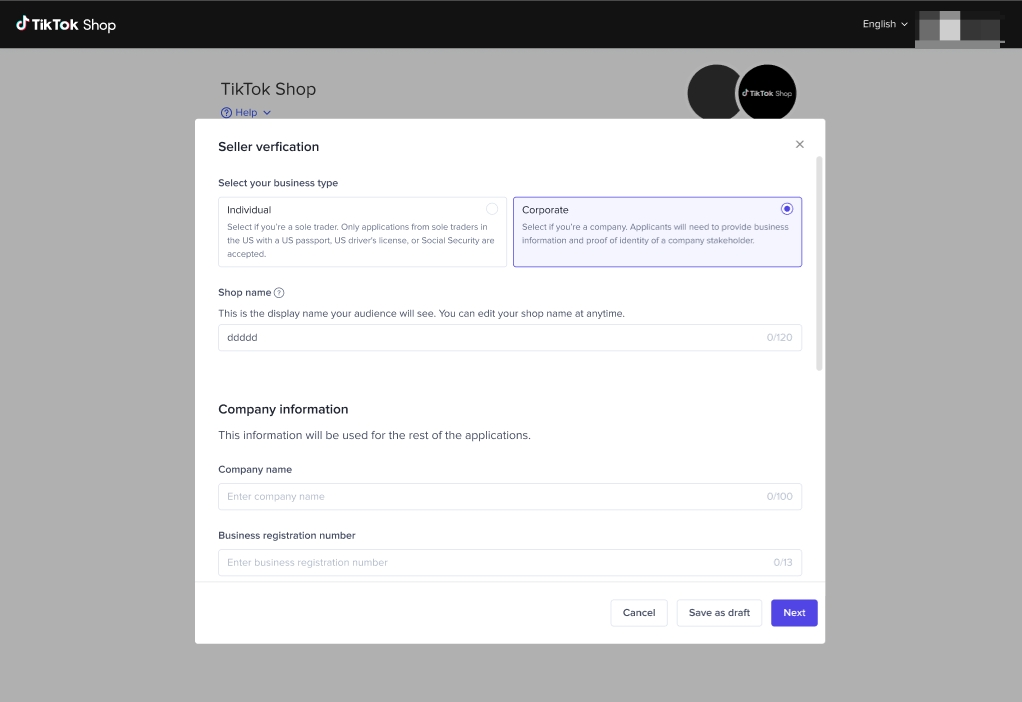
To verify your TikTok Shop, you need to provide information and upload relevant documents.
Click “start” to upload verification documents.
Choose your business type, select the country of registration, and fill in your shop name here.
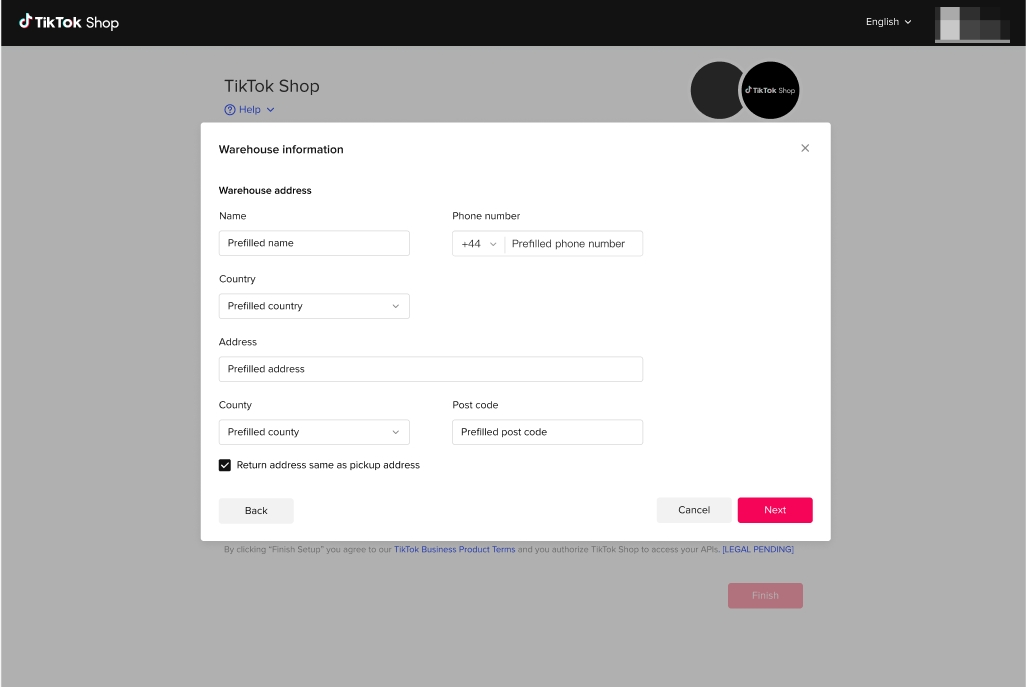
Step 4: Fill in the warehouse information and finish onboarding
You need to provide their warehouse information in order to populate shipping templates.
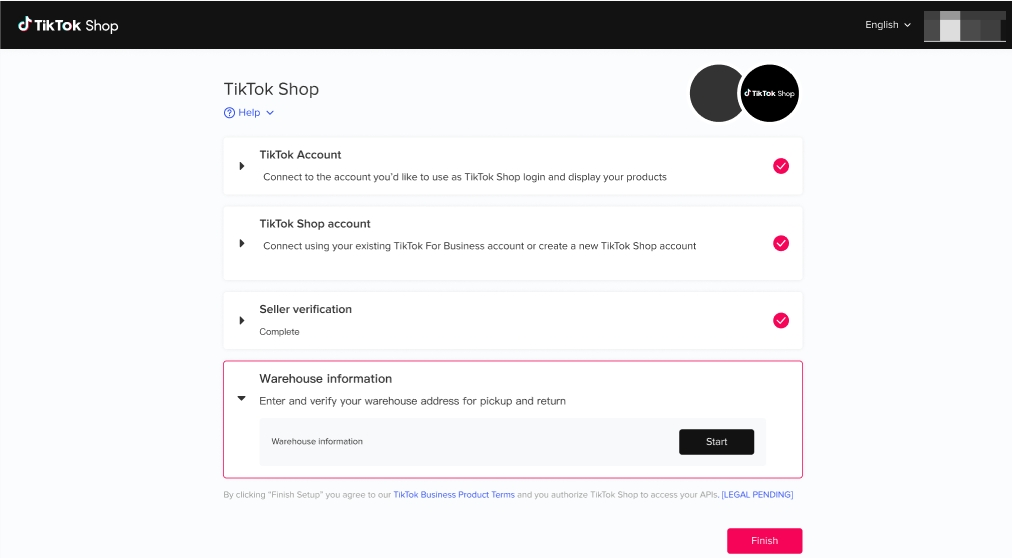
Fill in the Contact Person’s name, phone number, post code and warehouse/ pick-up address here.
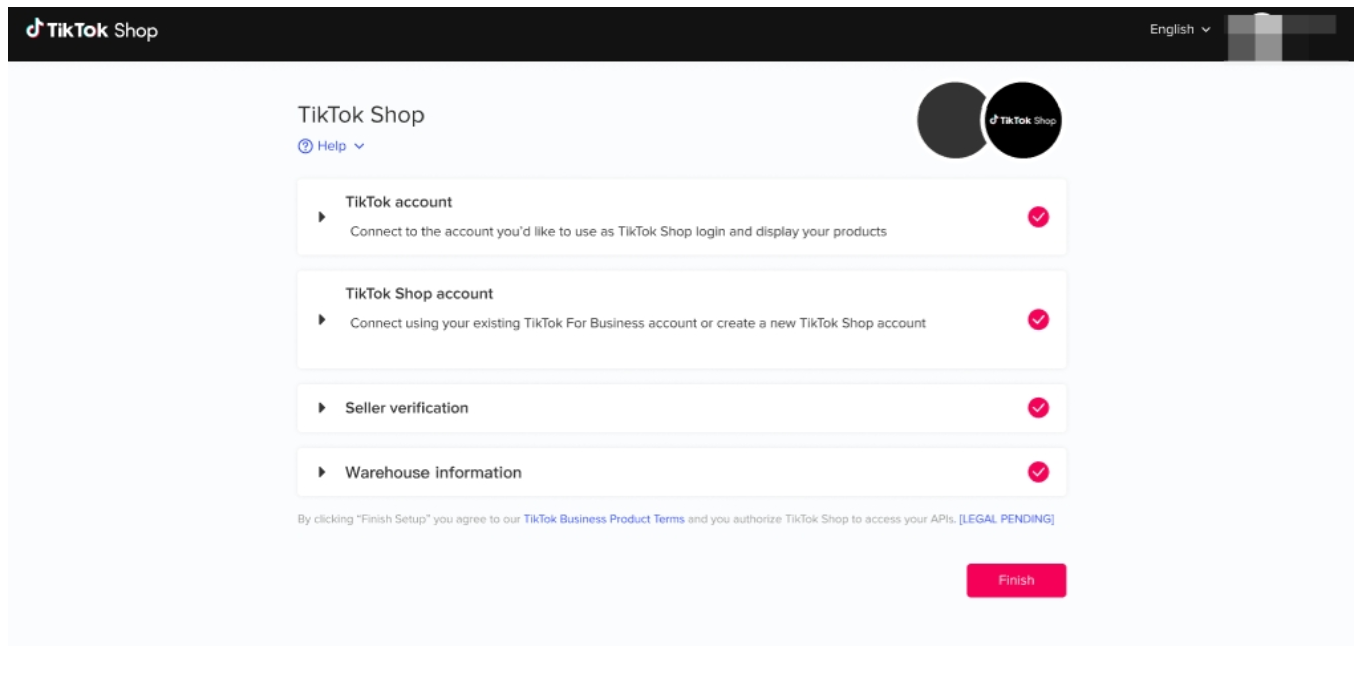
After you click “Finish Setup”, TikTok Shop will review your “Shop (KYC)” and “Warehouse” information. Please wait for approval from TikTok Shop.
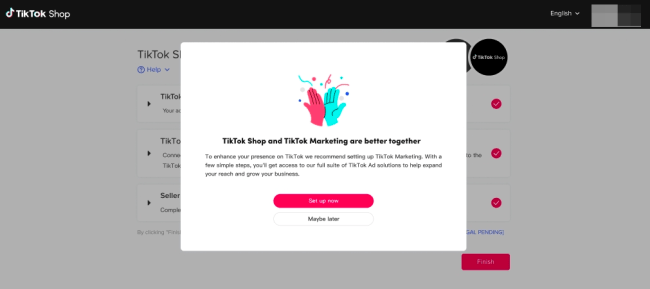
When you see this pop-up, congratulations! it means you’re successfully connected to TikTok For Business.
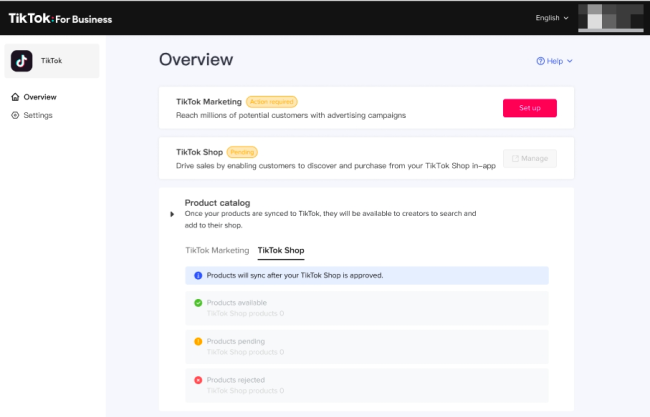
If you are onboarded successfully, the product catalog will be synced from WooCommerce to TikTok Shop automatically. Products that are synced will be reviewed by TikTok Shop, and TikTok Shop may approve or deny them based on related policy.
Note:
- The TikTok Shop/TikTok For Business account you registered/signed in with in step 2 of onboarding is what you use for Seller Center login
- The orders will be shipped out by TikTok’s own shipping solution , and orders need to be fulfilled in Seller Center in the “Orders” tab
Manage orders, shipping and fulfillment, cancellation, returns and refunds
↑ Back to topNow you can start to manage orders, shipping and fulfillment, cancellation, returns and refunds.
Order Management
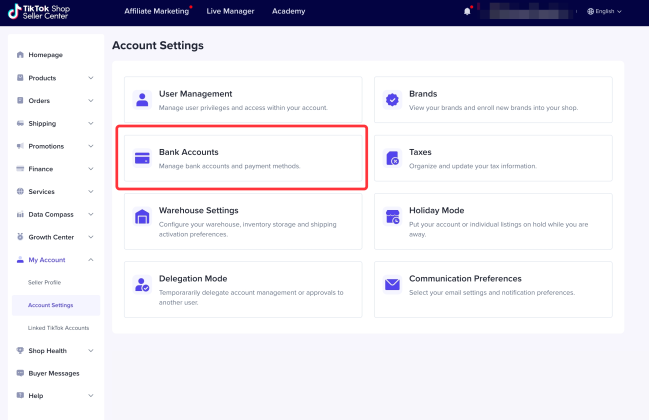
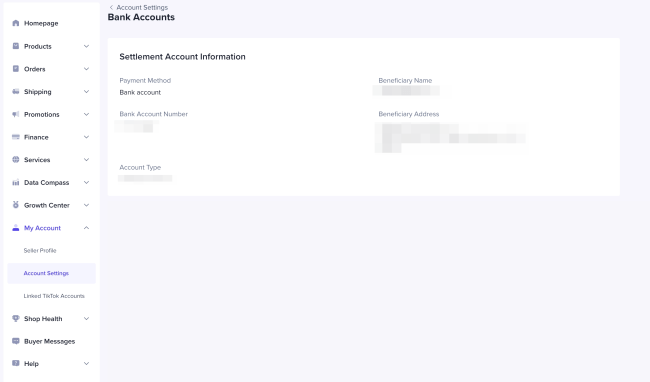
You need to go to Seller Center to bind your bank card for payout.
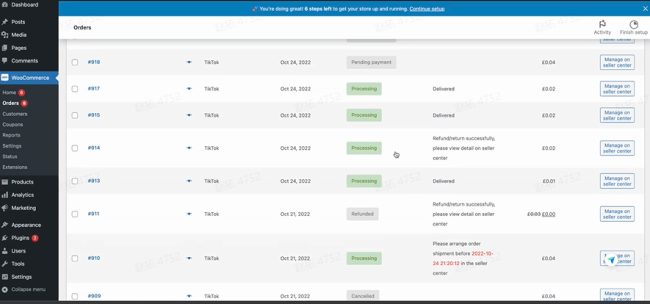
For order management, you can view TikTok Shop orders on WooCommerce Dashboard.
Orders placed by customers on TikTok Shop will be automatically synced to WooCommerce Dashboard (Sellers can view orders on “WooCommerce”–“Orders” sidebar menu).
Sellers can view the status and details of TikTok Shop orders.
Shipping and Fulfillment
When fulfilling orders, you need to go to TikTok Seller Center to conduct.
When viewing orders on WooCommerce Dashboard, if the “Channel” of orders is TikTok, then sellers need to follow the relevant “Action”, and manage orders on TikTok Shop Seller Center.

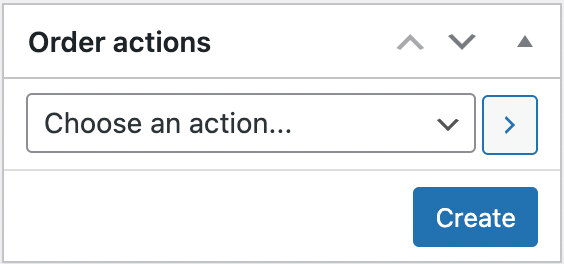
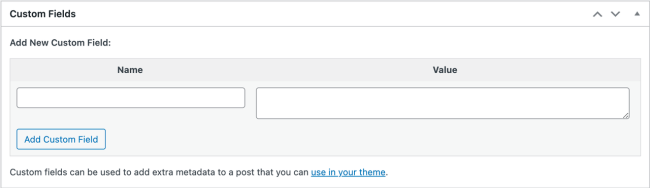
When you access the WooCommerce order Detail page, the following edit features will be disabled:
Order Detail (Read only)
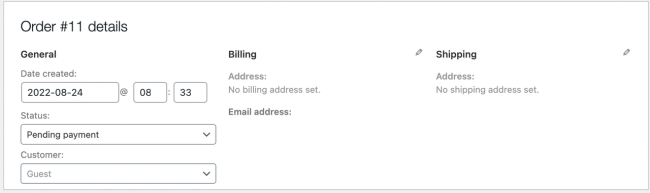
Order Actions (Read only)
Order Item (Read only)

Custom Fields (Read only)
Downloadable Product Permissions (Read only)

Before preparing to ship orders, you may need to do some preparation. You can check pre-shipment guidance here.
Manage Cancellations, Returns and Refunds
You need to manage cancellations, returns and refunds in TikTok Shop seller center.
You can check the guidance here.
Catalog Sync FAQ
↑ Back to topQ: What if my catalog did not synchronize or I am missing products?
Once your Seller verification and Warehouse information is approved, the product catalog will automatically begin to synchronize from WooCommerce to TikTok Shop. Products that are synchronized will be reviewed and either approved or rejected.
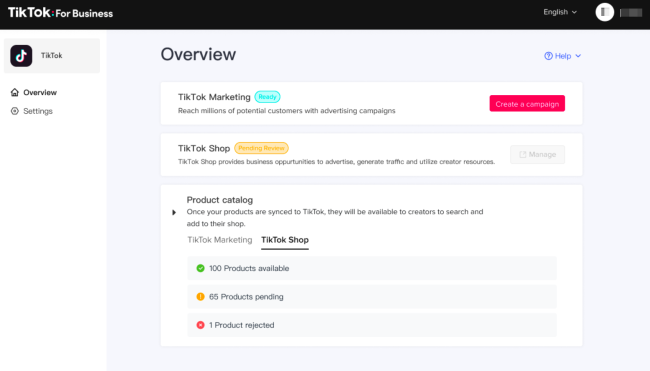
Image 1: Onboarding Page
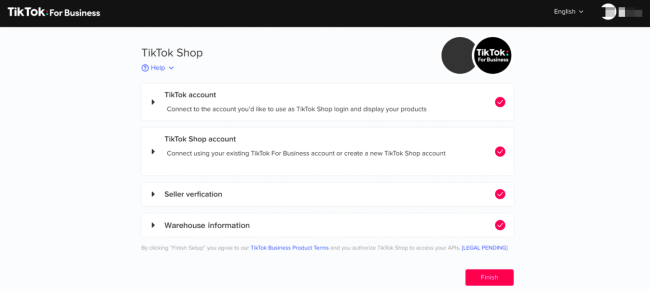
Image 2: Post-Onboarding Overview Page
Q: My product information synchronized but was rejected. How can I fix and resubmit my product?
A: In this scenario, please refer to the product listing guidelines.
If your product is missing from the TikTok Shop catalog after logging into Seller Center, it’s possible the product was unable to synchronize due to information incompatibility or missing information. Try updating your WooCommerce catalog information based on the below requirements to successfully upload missing products. Once you make the edits in WooCommerce, the catalog will automatically retry to upload to TikTok Shop.
Table 1: Product Guidelines
| # | Category | Guideline |
| 1 | Product Name | The product name cannot contain Non-English characters. |
| 2 | Product Name | The product name must have at least 1 character and no more than 255 characters. |
| 3 | Product Image | At least 1 image is required with a maximum of 9 images. |
| 4 | Product Image | Product images require a white background. |
| 5 | Product Image | Picture formats supported are JPG, JPEG, and PNG. |
| 6 | Product Image | Image resolution must be at least 600 x 600 and at most 20,000 x 20,000. |
| 7 | Product Image | The maximum file size of a single image is 5 MB. |
| 8 | Product Image | The recommended aspect ratio for all images is 1:1. |
| 9 | Product Description | A product description is required and limited to 10,000 characters. |
| 10 | Product Dimensions | Make sure your product has appropriate dimensions. The maximum weight allowed is 100 lbs. |
| 11 | Product Grouping | If your products are grouped, as one product is attached to another product, this will cause the synchronization to fail. Please ungroup your products. |
WooCommerce FAQ
↑ Back to topIs the plugin available for any merchants?
Both new and existing TikTok Shop sellers can seamlessly connect to TikTok Shop with the TikTok for WooCommerce integration by creating a new account or logging in with their existing TikTok Shop account.
What documentation is required to register for TikTok Shop?
1) For an individual seller: A US issued passport or driver’s license.
2) For a corporation: Scanned copy of your business registration document and a US issued passport or driver’s license of a stakeholder.
When will my shop become live?After finishing the onboarding steps, TikTok Shop will review your application and documents. Once approved, your products are automatically synced to your TikTok Shop catalog and you may start sales.
How do I log into Seller Center?
There are three ways to login to the Seller Center:
- Using your TikTok for Business credentials
- Using your phone number and an SMS code
- Using your TikTok Account
How do I get paid?
To update your payment information, please login to Seller Center>>My Account>>Account Setting>>Bank Accounts.
How and where do I fulfill orders?
The WooCommerce order page will show full order status, updates, and action needed for all of your TikTok Shop orders.
We offer 2 ways of fulfilling orders. This depends on your shipping option set up in Seller Center
1) TikTok platform shipping: full shipping service provided by TikTok.We have predetermined shipping agreements that will enable you to arrange shipments and generate shipping labels directly in Seller Center. Learn more here.
2) Seller shipping You can ship out directly, using third-party shipping providers (USPS, UPS, Fedex, AmazonLogistics, etc…). There are two ways to trigger third-party fulfillment.
2.1) Fulfill by adding tracking info on Seller Center. Read more here.
2.2) Fulfill by adding your tracking info into the WooCommerce Shipment Tracking plugin. Any tracking info you upload through this plugin will automatically sync to TTS to initiate fulfillment cycle.
How do I cancel , manage returns, or refund orders in WooCommerce?
Order Cancellations, returns, and refunds can only be managed in Seller Center. Please log into your Seller Center account to manage cancellations, returns and refunds.
Why do I see a firewall error?If your Firewall is interfering with our service, whitelist the IP Addresses listed below and whitelisting user agent: tiktok-business-plugin
SG
EU-TTP
TTP
ImageX
How do I get additional help?
Access our in-depth onboarding guide here. You can also create a help ticket to get a response from our Customer Service team on Seller Center here.
What if my catalog did not synchronize or I am missing products?
Once your Seller verification and Warehouse information is approved, your product catalog will automatically begin to synchronize from WooCommerce to TikTok Shop. Products that are synchronized will be reviewed and either approved or rejected.
If your product is missing from the TikTok Shop catalog after logging into Seller Center, it’s possible the product was unable to synchronize due to information incompatibility, or missing information. Try updating your WooCommerce catalog information based on the below requirements to successfully upload missing products. Once you make the edits in WooCommerce, the catalog will automatically retry to upload to TikTik Shop.
You can also refer to the Product Status page. If any of your products require updates or couldn’t be synced, you will be provided with an error description at product level.
| # | Category | Guideline |
| 1 | Product Name | The product name can not contain Non-English characters. |
| 2 | Product Name | The product name must have at least 1 character and no more than 255 characters. |
| 3 | Product Image | At least 1 image is required with a maximum of 9 images. |
| 4 | Product Image | Product images require a white background. |
| 5 | Product Image | Picture formats supported are JPG, JPEG, PNG. |
| 6 | Product Image | Image resolution must be at least 600 x 600 and at most 20,000 x 20,000. |
| 7 | Product Image | The maximum file size of a single image is 5 MB. |
| 8 | Product Image | The recommended aspect ratio for all images is 1:1. |
| 9 | Product Description | A product description is required and limited to 10,000 characters. |
| 10 | Product Dimensions | Make sure your product has appropriate dimensions. The size limit for USPS is 70 lbs and 27 x 18 x 17 inches. The size limit for UPS is 150 lbs and 108 x 108 x 108 inches |
| 11 | Product Grouping | If your products are grouped, as one product is attached to another product, this will cause the synchronization to fail. Please ungroup your products. |
– Individual: You’re selling under your own name, not as a registered business
– Business Entity:
Sole Proprietorship: You own an unincorporated business by yourself
Partnership: You and one or more people come together to run a business
Corporation: Your legal entity is independent from its owners
Non-profit: Your organization is a legal entity organized to do charity, educational, religious or scientific work
Government: Your government entity is established and recognized by US Constitution, treaties, federal or state statutes, or court decision
Public: Your legal entity is regularly traded on an established US securities market
TikTok Marketing
↑ Back to topWhat it does
↑ Back to topTikTok For WooCommerce offers:
- Easy TikTok For Business and TikTok Ad account setup.
- One-click installation of the most advanced TikTok advertising pixel for improved tracking.
- Automatic catalog syncing that makes it easy to create Collection Ads and Dynamic Showcase Ads plus access to new, upcoming organic eCommerce features.
- Access to assisted ad campaign creation within your dashboard.
TikTok Marketing glossary
↑ Back to topTIKTOK FOR BUSINESS
TikTok For Business is the overarching business platform to help brands grow their audience on TikTok and maximize their ROI. It includes pixel installation, ads creation and management tools, and catalog sync. Learn more about TikTok For Business.
TIKTOK (BUSINESS) ACCOUNT
This is your public profile that your audience will see. If you have an existing standard TikTok account, you can switch it to a Business account if you would like.
Once you have a TikTok account, you’ll be able to connect it to your TikTok For Business account and run advertising on your posts. Skip ahead to Create a TikTok (Business) Account to see how to create a standard account and switch it to a Business account.
Learn more about TikTok (Business) accounts.
TIKTOK BUSINESS CENTER
TikTok Business Center is a brand’s “control room” for all its assets on TikTok. It lets you edit your users’ access to advertising tools, catalog, audience, pixel, monitoring logs, and activity. Learn more about TikTok Business Center.
TIKTOK ADS MANAGER
TikTok’s advertising platform offers brands a broad range of ad formats and campaign management tools such as video-generation solutions, real-time result and cost monitoring, smart audience targeting, and more. Learn more about TikTok Ads Manager.
TIKTOK PIXEL
TikTok’s pixel powers its advertising tools and optimizes the results of any campaign. The most recent version is automatically installed when setting up TikTok For WooCommerce. Learn more about TikTok Pixel.
Requirements
↑ Back to topTo create ads using TikTok for WooCommerce:
- You need a TikTok account, Business Center account, and TikTok Ad account. You can create these during setup if needed.
- Your business must be in one of the following countries:
- Inc.: United States its territories and possessions, Canada, and Venezuela
- UK Limited: Austria, Belgium, Bulgaria, Croatia, Czech Republic, Denmark, Estonia, Finland, France, Germany, Greece, Ireland, Italy, Latvia, Lithuania, Netherlands, Poland, Portugal, Romania, Slovakia, Slovenia, Spain, Sweden, the United Kingdom, Switzerland and Norway
- Australia Pty Ltd: Australia and New Zealand
- Pte. Ltd.: Singapore, Malaysia, Philippines, Indonesia, Vietnam, Thailand, South Korea, Israel, Taiwan, Bangladesh, UAE, Morocco, Belarus, Turkey, Serbia, and Saudi Arabia
- Bytedance Brasil Tecnologia Ltd.: Brazil
- Bytedance KK: Japan
- Your TikTok Ad account must be created in the same country as the Store ID
Connecting your store with TikTok For Business
↑ Back to topSet up TikTok For WooCommerce
Go to WordPress and find TikTok under “Plugins” Click “Activate” to get started.

Then, click “Marketing” → “TikTok” on the left hand panel
Click Connect to authorize WooCommerce to access your TikTok account.

Sign up for a new TikTok account or click “Log in” if you already have one.

Authorize TikTok For Business to connect using your TikTok Account

SET UP TIKTOK BUSINESS CENTER AND TIKTOK AD ACCOUNTS
Now that you’ve connected your TikTok For Business account, you’ll be prompted to create or connect your TikTok Business Center account and TikTok Ad account.
To create a new TikTok Business Center account, you can simply click on Create New under the Business Center section. If you have an existing Business Center account associated with your TikTok For Business account, choose the relevant one and click Connect.
Under the TikTok Ad Account section, click Create New to create a TikTok Ad account. If you have an existing TikTok Ad account, click Connect next to the account you want to use.

SET UP TIKTOK PIXEL
If you do not currently have a TikTok pixel, or if you have installed your pixel recently (less than 2 months of use), follow the instructions below.
1. Remove your existing TikTok pixel from your site (if any). Make sure it is not currently being used by any active campaigns.
2. Install a new pixel.
3. Make sure Enable Advanced Matching feature is enabled to improve the match rate between TikTok ad clicks and conversions that happen on your website.

SET UP YOUR CATALOG
Under the Catalog section, click Create New to sync your existing WooCommerce catalog onto your TikTok profile.

FINISH SETUP
Once you’ve completed all setup sections, click Finish Setup.

SET UP BILLING AND PAYMENT INFORMATION
After completing your setup, you can set up your Billing & Payment information by clicking “Create Now” to start designing your ad. Before submission, you will be prompted to add your Billing & Payment information.

OR Navigate to your Integration Dashboard and select “Update account” or select “Add Now” on the notification.

You will be prompted to enter your Business address, select your payment method and click Next.

Then to enter your Credit or Debit information and select submit.

Advertise on TikTok
↑ Back to topOnce you’ve finished setting up TikTok For Business, you can access your account on TikTok Ads Manager and explore TikTok’s extensive range of advertising formats or use the Ad Campaign creation feature right from WooCommerce.
HOW TIKTOK’S AD REVIEW SYSTEM WORKS
- Submit an ad for review through the TikTok Ads Manager platform or directly via the TikTok For WooCommerce integration.
- The ad undergoes review to ensure all creative elements (ad caption, video, audio, etc.) adhere to TikTok policies
- You will receive a notification once your TikTok ads have been approved and published. Most TikTok ads are reviewed within 24 hours, although some may take longer
- If the ad is rejected and there are changes that can be made to help publish it, you will be notified via Ad Group in the TikTok Ads Manager platform.
AD ACCOUNT APPROVAL
Before you can use your synced catalog data in an ad (like a simple campaign using your existing product pictures or Collections and Dynamic Showcase Ads), your Ad Account must be approved.
If you have followed the steps to connect the integration outlined in the Setting up the Integration section, there are NO additional actions needed.
To manually submit your account for review and approval:
1. Go to TikTok Ads Manager, navigate to Ad Account and enter your Website, Billing Address, and Payment Type (Automatic or Manual). Note that you will not be charged until you actually run a campaign.

2. After your information is entered, your account will go into review (typically approved immediately).
3. Once your account is approved, TikTok will automatically add it under the Business Center and enable your synced catalog to be used in ad campaign setup. Catalog sync happens immediately after setup is complete.
Note: There must be at least 6 approved products in the catalog.
Create an Ad Campaign
↑ Back to topYou can create a new ad campaign directly from WooCommerce.
Catalog-Based Ads allow you to easily create product ads using your synced WooCommerce catalog. This ad format has a Conversion Campaign objective. For other objectives (like Awareness or Consideration), you’ll need to use TikTok Ads Manager.
To create a Catalog-Based Ad, click TikTok (under the Marketing Tab) in the WordPress Dashboard

Select “Create a Campaign“

Fill out the information needed to launch your ad campaign.

- Campaign Name – Choose a name for your ad campaign. This is for internal reference only and is not visible to users.
- Promotion Type – Select what you will be promoting (a product from your synced catalog or your store’s homepage URL).
- Ad Creative – Set up your video creative by either uploading your own video or using TikTok’s Smart Video Creation tool.
- Display Name & Profile Image (under Advanced Settings) – Deliver your ads with a custom profile image and display name that will be shown to users.
- Conversion event – Select which event you want to optimize for. See the full list of optimization events enabled for your WooCommerce store here.
- Audience targeting – Choose an audience you would like to target based on your product and experience
- Budget & Schedule – Set your campaign budget and schedule the first date & time for delivery. The system will automatically optimize delivery to keep the best cost-per-action.
Pro tip: Select an upper funnel conversion event (like View Content, Add to Cart, or Purchase) so your pixel can quickly learn high-intent users.
SMART VIDEO TOOL
If you don’t have an existing video, you can use TikTok’s Smart Video Tool to automatically create a video using product photos other images you provide. This is a helpful solution if you don’t have video production capability or experience.
Click Create video under Ad creative to get started.
- Drag and reorder images to finalize the flow of the video ad.
- Optionally add a discount price and product information text.
- Set the video style:
- Dynamic — The video generated is fast paced.
- Peaceful — The video generated is slower paced.

Click Generate Video to preview how your video will look. You’ll be presented with a couple of variations featuring different effects and music. Select one or more that you want to use. When you’re done, click Save.
Once you’ve completed all fields and uploaded or created your video, click Submit.
SETTING UP PAYMENTS
If you’ve already set up a payment method in your TikTok For Business account, your ad will immediately be sent for review, and you’ll receive a notification once your campaign goes live.
If you haven’t set up a payment method, you’ll be prompted to complete this step within the TikTok For WooCommerce integration.
You will first need to add your Business address and then select a Payment method

After you’ve entered your Business addresses, you will be prompted to enter in your Credit or Debit card information then select Submit

Once done, your ad will be reviewed and you’ll be notified when it goes live.
After your campaign has had time to collect data, you can track performance from your TikTok Ads Manager dashboard. Learn more here.
Ad formats available on TikTok Ads Manager
↑ Back to topLEAD GEN ADS
This campaign objective allows you to collect leads using customizable forms. These can be integrated with CRM partners to help qualify and convert leads. Learn more about Lead Gen Ads.
SPARK ADS
This is a native ad format that lets brands use organic TikTok posts as ads. Use your own posts or posts made by TikTok Creators (with their authorization). Learn more about Spark Ads.
COLLECTION ADS*
This ad format combines video ads, product cards, and a full-screen landing page to drive immediate purchases. Learn more about Collection Ads.
To get started with Collection ads:
1. Confirm your WooCommerce catalog is synced with TikTok.
2. Set up the campaign selecting Traffic or Conversions as the objective and selecting your other parameters. Note that under Targeting/Demographics, you should choose the same location as your catalog’s targeting location.
3. Build an Instant Gallery Page using your automatically synced catalog.
4. Finetune your desired graphic selecting where you want the products to appear in the app.
See How to Create Collection Ads for more details.
DYNAMIC SHOWCASE ADS*
This ad format leverages your synced catalog to show relevant products to interested users and is optimized for large catalogs. Learn more about Dynamic Showcase Ads.
To get started with Dynamic Showcase ads:
1. Confirm your WooCommerce catalog is synced with TikTok.
2. Configure your Pixel events (from the Analytics page in the app).
3. Use Dynamic Video Generator to create your video package based on your uploaded catalog.
4. Select Catalog Sales as your campaign objective.
See How to Create Dynamic Showcase Ads for more details.
*Availability may vary, so please reach out to your TikTok representative.
BRAND TAKEOVER, TOP VIEW, HASHTAG CHALLENGE, BRANDED EFFECTS
To access these Reservation-only ad campaign types, reach out to your TikTok representative for details. If you don’t have one, email WooCommerce@tiktok.com.
FAQ
↑ Back to topDo I need to have a TikTok account to use TikTok for WooCommerce?
You don’t need an organic TikTok account to run ads like Collection Ads. However, to use upcoming features or boost posts through Promote, you will need an account with organic presence – check out the instructions on how to open one at the beginning of this guide.
Why should I install this now?
Even if you do not currently run ads, the pixel will begin to collect data which will allow you to then retarget and reach TikTok users who are interested in your products. You’ll also get early access to some of TikTok’s newest marketing tools.
Navigate to WooCommerce > Settings > Advanced > Features, uncheck the “Navigation” option, and save the changes. You should now see “TikTok” under the “Marketing” tab.
TikTok Pixel
What events does the TikTok Pixel support for WooCommerce stores?
The pixel is automatically installed when you set up TikTok For WooCommerce and supports View Content, Start Checkout, Add To Cart, and Purchase events.
What’s Advanced Matching?
Advanced Matching is an upgrade to the TikTok pixel that allows you to send privacy-safe hashed customer information (email addresses and phone numbers) to increase the match rate between TikTok ad clicks, views, and conversions that happen on your website.
Ads Creation from the TikTok integration
How can I create ads on TikTok?
You can create conversion-objective campaign ads right from WooCommerce. For access to all other objectives (such as reach, traffic, app installs, video views, and lead generation), please use TikTok Ads Manager. See how to choose the right objective here.
What is a conversion-objective campaign?
A conversion-objective campaign is designed to drive valuable actions on your website – such as encouraging users to register for an account, opt in for an offer, or make a purchase on your website. See here for more detail.
Are there any prerequisites before ads creation?
You must have your Ad Account in an approved state and have payment methods setup before an ad campaign can start delivery. For more details on account approval, please see here. For more details on accepted payment methods, please see here.
Will ads be paused manually or automatically if the product is out of stock?
You will have to manually pause your ads if a product is out of stock. To pause an ad, please login to TikTok Ads Manager, click Campaign, then select on the Ad tab. Find the ad you wish to pause, and change the On/Off status to Off.
Will I be able to see all campaigns implemented via the TikTok integration on TikTok Ads Manager?
You will be able to see all campaigns created on the TikTok integration on your TikTok Ads Manager account.
Why do I not see my ads running?
You will not be able to publish any ads until you set up your payment method. Please make sure you have finalized your payment information on TikTok Ads Manager. You can add a payment method from your Payment page. From there, click Add a Payment Method and follow the required prompts. For more details on accepted payment methods, please see here.
Where can I view campaign performance?
All campaign performance can be viewed on TikTok Ads Manager. Go into the Campaign page, and select View Data under each campaign, ad group or ad to view the performance data and audience analysis. For more detailed information, please see here.
Ads Manager
How do I start running paid advertising campaigns?
Please access your account on TikTok Ads Manager after adding and setting up TikTok for WooCommerce to access all available ad formats.
What if I already run ads on TikTok via a Business Account?
Using TikTok for WooCommerce will give you early access to TikTok’s newest ad formats. If your account is already managed by a TikTok Account Manager, they will also be informed prior to your onboarding on this test and will continue working with you just as before.
If I have a campaign running with the TikTok Pixel created via the TikTok integration, what will happen if I remove the integration?
Your campaigns using the TikTok pixel created through the TikTok integration will remain active, but the pixel will stop sending back any data to Ads Manager.
Which product categories are allowed for advertising?
Here is a detailed overview of product category restrictions for TikTok advertising.
What if I already advertise on TikTok and my Ad account is managed by an Agency?
Please follow the steps below:
- Create a Business Center and Ad Account via the TikTok integration (or connect to an existing Regular Business Center, NOT the Agency one).
- Give your agency User Access to such Business Center as a Member (via TikTok For Business)
- Give your agency User Access to your Ad Account and Catalog (after you add Business Info and enter into an approved state)
- Request access to your Agency’s Ad Account via such Business Center
For more information about agency managed accounts please visit the help center
Why am I getting an error when trying to access my catalog on TikTok Ads Manager and run catalog-base ads?
This might happen because your newly created Ad account is not verified yet.
How does TikTok review my information?
There are two reviews that will be conducted – product review and content review. This is to ensure that TikTok meets compliance, ensures product relevance in the video, and drives good user experience.
You can find a number of useful articles on our Business Help Center
If you still can’t find the answer to your questions, feel free to file a Customer Support ticket (please use your TikTok For Business credentials to log in and track your tickets)
Our Customer Support agents will get back to you as soon as possible.