Once you’ve connected your Stripe account and configured your webhooks, you can begin accepting payments via the Stripe WooCommerce Extension! However, you may want to adjust some of the plugin settings to change the checkout experience or enable other ways for customers to pay.
This guide will walk you through the Stripe WooCommerce Extension settings. It is broken down into the four main sections at WooCommerce > Settings > Payments > Stripe > Settings:
NOTE: If you would like to adjust the Radar rules of your Stripe account, you can do so from the Stripe dashboard. You can learn more about Stripe Radar here.
General
↑ Back to topThe General section of the Stripe WooCommerce Extension settings controls if and how the Stripe payment option is presented to customers.

In the General section, you can:
- Enable or disable Stripe as a payment option for customers.
- Checking the box will enable the Stripe payment method on checkout.
- Unchecking the box will prevent the Stripe payment method from appearing on checkout.
NOTE: If the new checkout experience is enabled, this option will display differently in the settings, and you will be able to modify the payment method name displayed on your site’s checkout page.
- Enable test mode, which allows those visiting your site to simulate a transaction using test card numbers.
- You can learn more about how to enable test mode here.
Account details
↑ Back to topThe Account details section serves as a place to get an overview of the capabilities of your Stripe account from your WooCommerce dashboard and how well it is communicating with your site and the Stripe WooCommerce Extension.
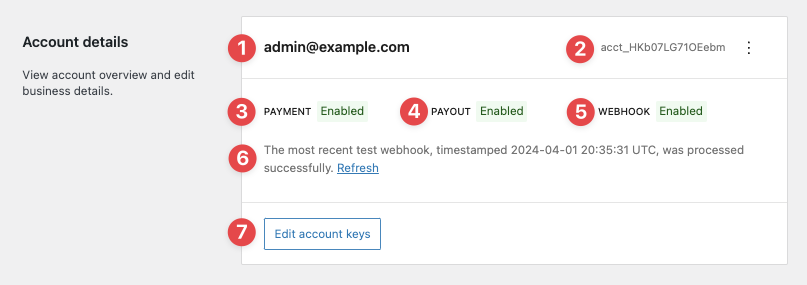
In the Account details section, you can:
- Determine the email address associated with your Stripe account.
- Retrieve the connected Stripe account ID.
- Determine the connected account’s ability to accept payments.
- There may be instances where Stripe will restrict or reject an account’s ability to receive payments.
- Determine the payout eligibility of the connected account.
- There may be instances where Stripe will restrict or reject an account’s ability to process payouts.
- Determine if a webhook secret is saved.
- Determine if webhooks are being actively sent and received by Stripe’s servers.
- Modify the Stripe account keys currently in use on your site.
Payments & transactions
↑ Back to topThe Payments & transactions section allows you to configure optional payment settings and transaction details for the Stripe WooCommerce Extension.
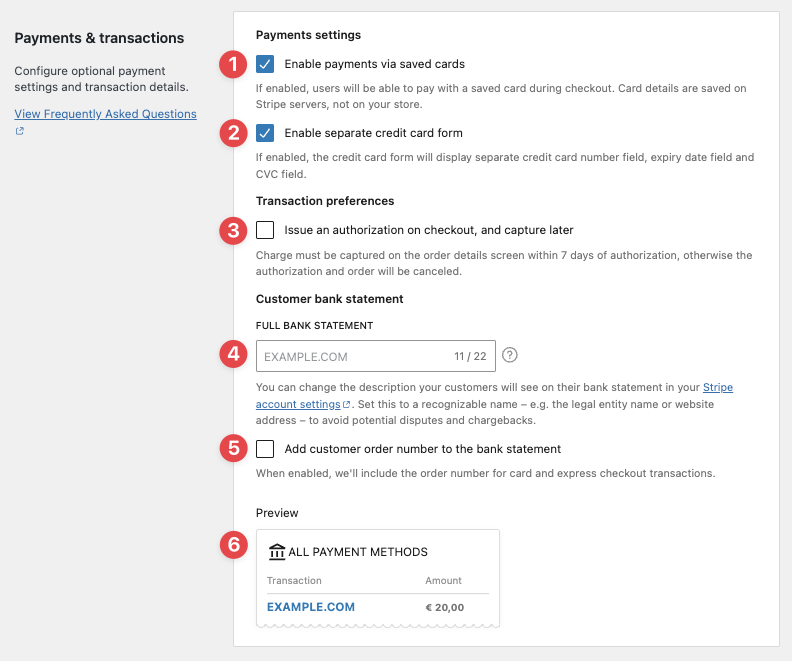
In the Payments & transactions section, you can:
- Allow customers to securely save their payment method to their account either at checkout or via the My Account page.
- The following payment methods can be saved:
- Credit / debit cards
- SEPA Direct Debit
- If the new checkout experience is enabled, the following payment methods can also be saved:
- Bancontact
- iDEAL
- The following payment methods can be saved:
NOTE: The Enable payments via saved cards setting does not need to be enabled to process subscriptions via Woo Subscriptions.
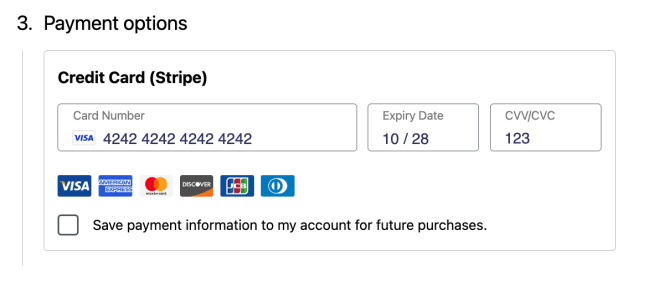
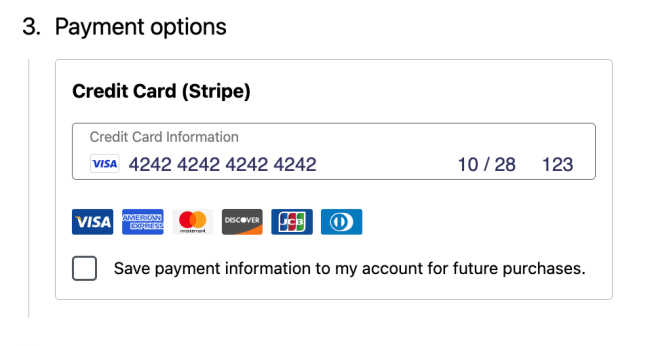
- If the new checkout experience is disabled in the advanced settings section, you can choose to display three separate card forms or a single, continuous card form:
- Choose to authorize a charge immediately so that it can be manually captured later.
- You can read more about this setting in our authorize and capture guide.
- This setting is not compatible with additional payment methods.
WARNING: We suggest leaving the authorize and capture setting disabled unless you have a specific and well-justified use case in mind.
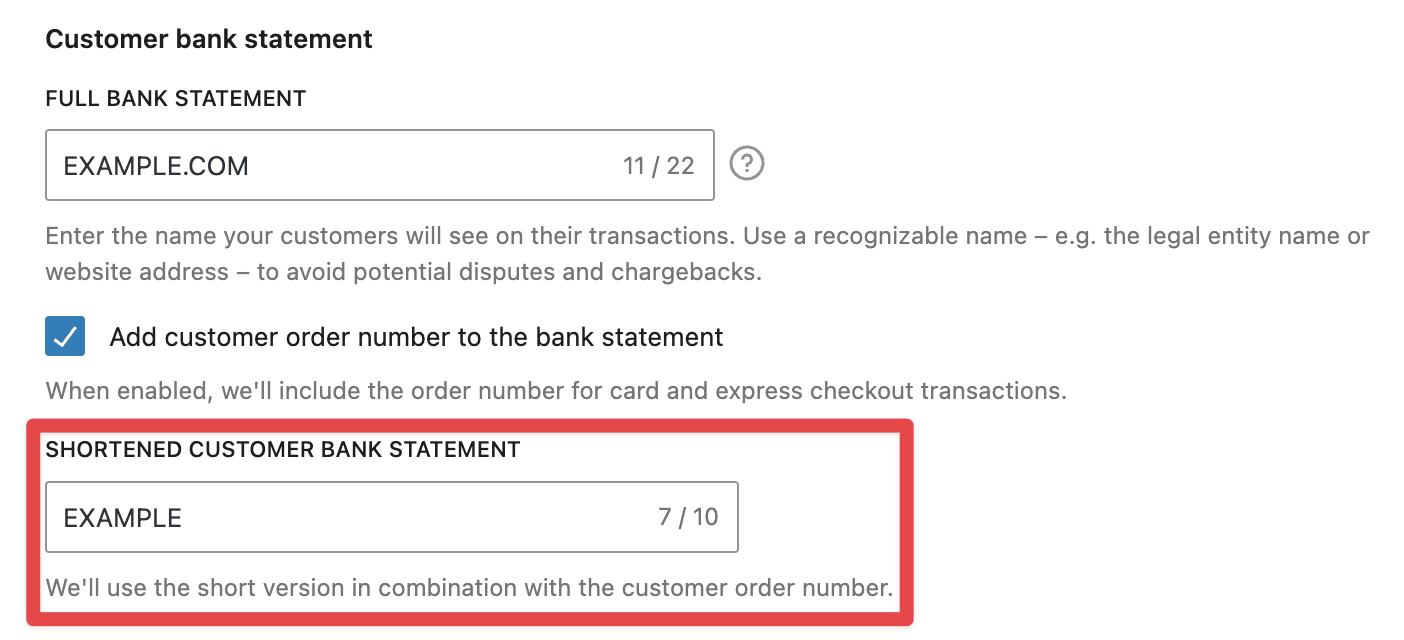
- Determine how purchases on your site will appear on your customers’ bank statements.
- You can adjust your store’s statement descriptor in the Stripe dashboard.
- Include the order number alongside an abbreviated statement descriptor.
- This shortened descriptor is only available for card and express checkout transactions.
- The shortened descriptor can be adjusted in the Stripe dashboard.
- Enabling this option will expand an additional statement descriptor form:
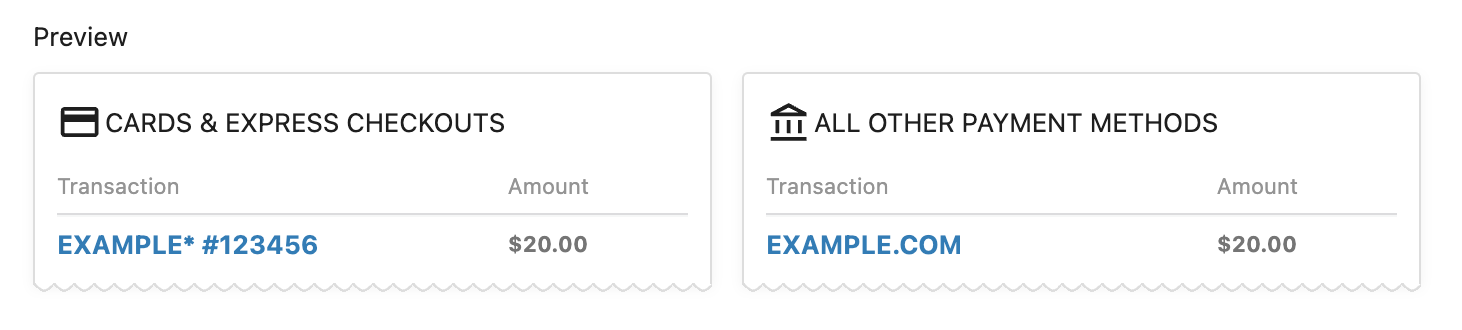
- Preview how your statement descriptor and shortened statement descriptor may appear on customers’ bank statements:
Advanced settings section
↑ Back to topThe Advanced settings section of the Stripe WooCommerce Extension settings will allow you to enable additional, optional settings.
In the Advanced settings section, you can enable:
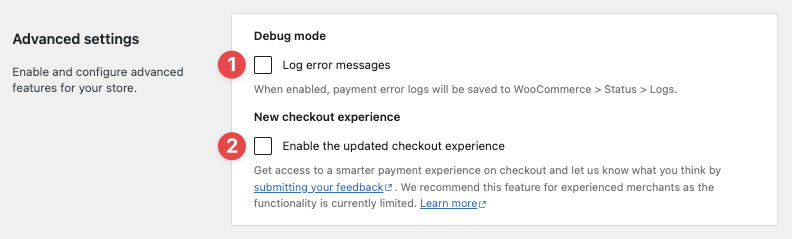
- Logging of error messages and information sent to Stripe’s servers.
- This will save errors to a log file.
- Normally, debugging isn’t necessary to have enabled, but a Happiness Engineer may ask you to enable debug mode.
- You can view the logs by:
- From your site admin, head to WooCommerce > Status > Logs.
- Find the latest source named
woocommerce-gateway-stripe. - Select that source to view any errors from that day.
- By default, logs will be stored for 30 days. Once the debug logs are older than 30 days, they will be automatically deleted.
- The new checkout experience, which will allow customers to choose their preferred payment method via a condensed UI.
- You can find more information about this setting in our new checkout experience guide.