Express checkout methods allow customers to quickly pay for a product or service using pre-filled information from an existing account. The result is that customers can complete purchases via an express checkout method with very little friction, which can lead to increased conversion rates for sites that offer them.
With the Stripe WooCommerce Extension, there are three express checkout methods available:
This guide will cover the requirements for offering express payment methods and how to enable them on your site.
Site requirements for offering express checkouts
↑ Back to topYour site must be configured to be compatible with specific express checkout methods in order to display them properly. While some requirements apply to all express checkout methods, they each have specific requirements that also need to be met.
To properly display express payment methods via the Stripe WooCommerce Extension:
- Your domain must have a valid SSL certificate.
- Your entire site must be served over HTTPS.
Additional Apple Pay requirements
↑ Back to topIn addition to the site requirements here, Apple Pay also requires that:
- Your server has port
443open. - Your server supports the TLS 1.2 protocol or later.
- Your top-level domain or subdomain is added to your Stripe account’s payment method domains page.
NOTE: Apple Pay requires a domain association file to be hosted on your site. The Stripe WooCommerce Extension automatically creates this file for you.
Additional Google Pay requirements
↑ Back to topIn addition to the site requirements here, Google Pay also requires that:
- Your top-level domain or subdomain is added to your Stripe account’s payment method domains page.
Additional Link by Stripe requirements
↑ Back to topIn addition to the site requirements here, Link by Stripe also requires that:
- Your store be able to accept payments in USD.
- Your Stripe account is based in the United States.
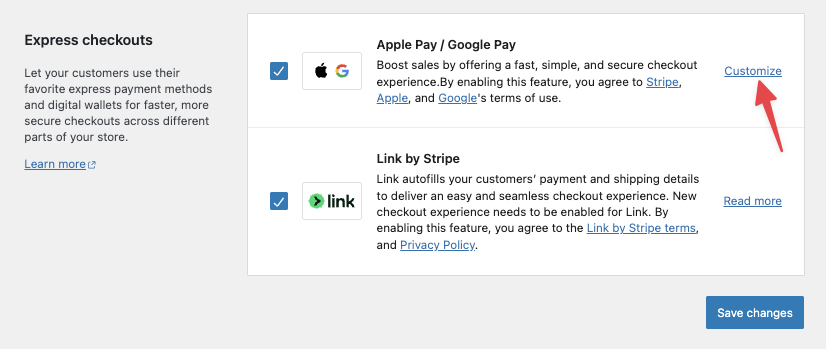
Enabling express checkouts via the Stripe WooCommerce Extension
↑ Back to topTo enable express payment methods in the Stripe WooCommerce Extension:
- Navigate to WooCommerce > Settings > Payments > Stripe > Payment Methods.
- Scroll down to the Express checkouts section.
- Select which of the express payment methods you’d like to enable.
NOTE: Apple Pay and Google Pay share the same toggle, which means they cannot be enabled separately.
- Select the Save changes button when you are finished.
Customizing Apple Pay and Google Pay
↑ Back to topAfter saving your payment method settings, you can customize how Apple Pay and Google Pay buttons appear on your site by selecting the Customize button.
When customizing Apple Pay and Google Pay, you can change:
- Which of the following pages these buttons will appear on:
- The checkout page.
- Individual product pages.
- The cart page.
- The label of the Apple Pay and Google Pay buttons.
- The size of the Apple Pay and Google Pay buttons.
- The color theme of the Apple Pay and Google Pay buttons.
A preview is also available so that you can see how these customizations will appear before saving your changes.