In this guide, we’ll walk you through the steps to schedule vacation time for your online store. Discover how to close your store during specific periods, providing your customers a smooth shopping experience. When your shop is in vacation mode, it won’t accept new orders, and the checkout process will be temporarily disabled.
Installation
↑ Back to top- Download the .zip file from your WooCommerce account.
- Log in to your WordPress dashboard.
- Navigate to Plugins > Add New.
- Click the Upload Plugin button next to the page title.
- Select the plugin file you downloaded from your computer by clicking the Choose file button.
- After selecting the plugin file, click on Install Now. WordPress will handle the file upload and installation process.
- Once the installation is complete, you’ll receive a success message.
- Click the Activate Plugin link to begin utilizing the plugin.
Schedule Vacations
↑ Back to topYou can schedule unlimited vacation date times, and your online shop will automatically close whenever any of these schedules match your site’s date and time settings. Here’s how to set up a vacation schedule for temporarily closing your shop:
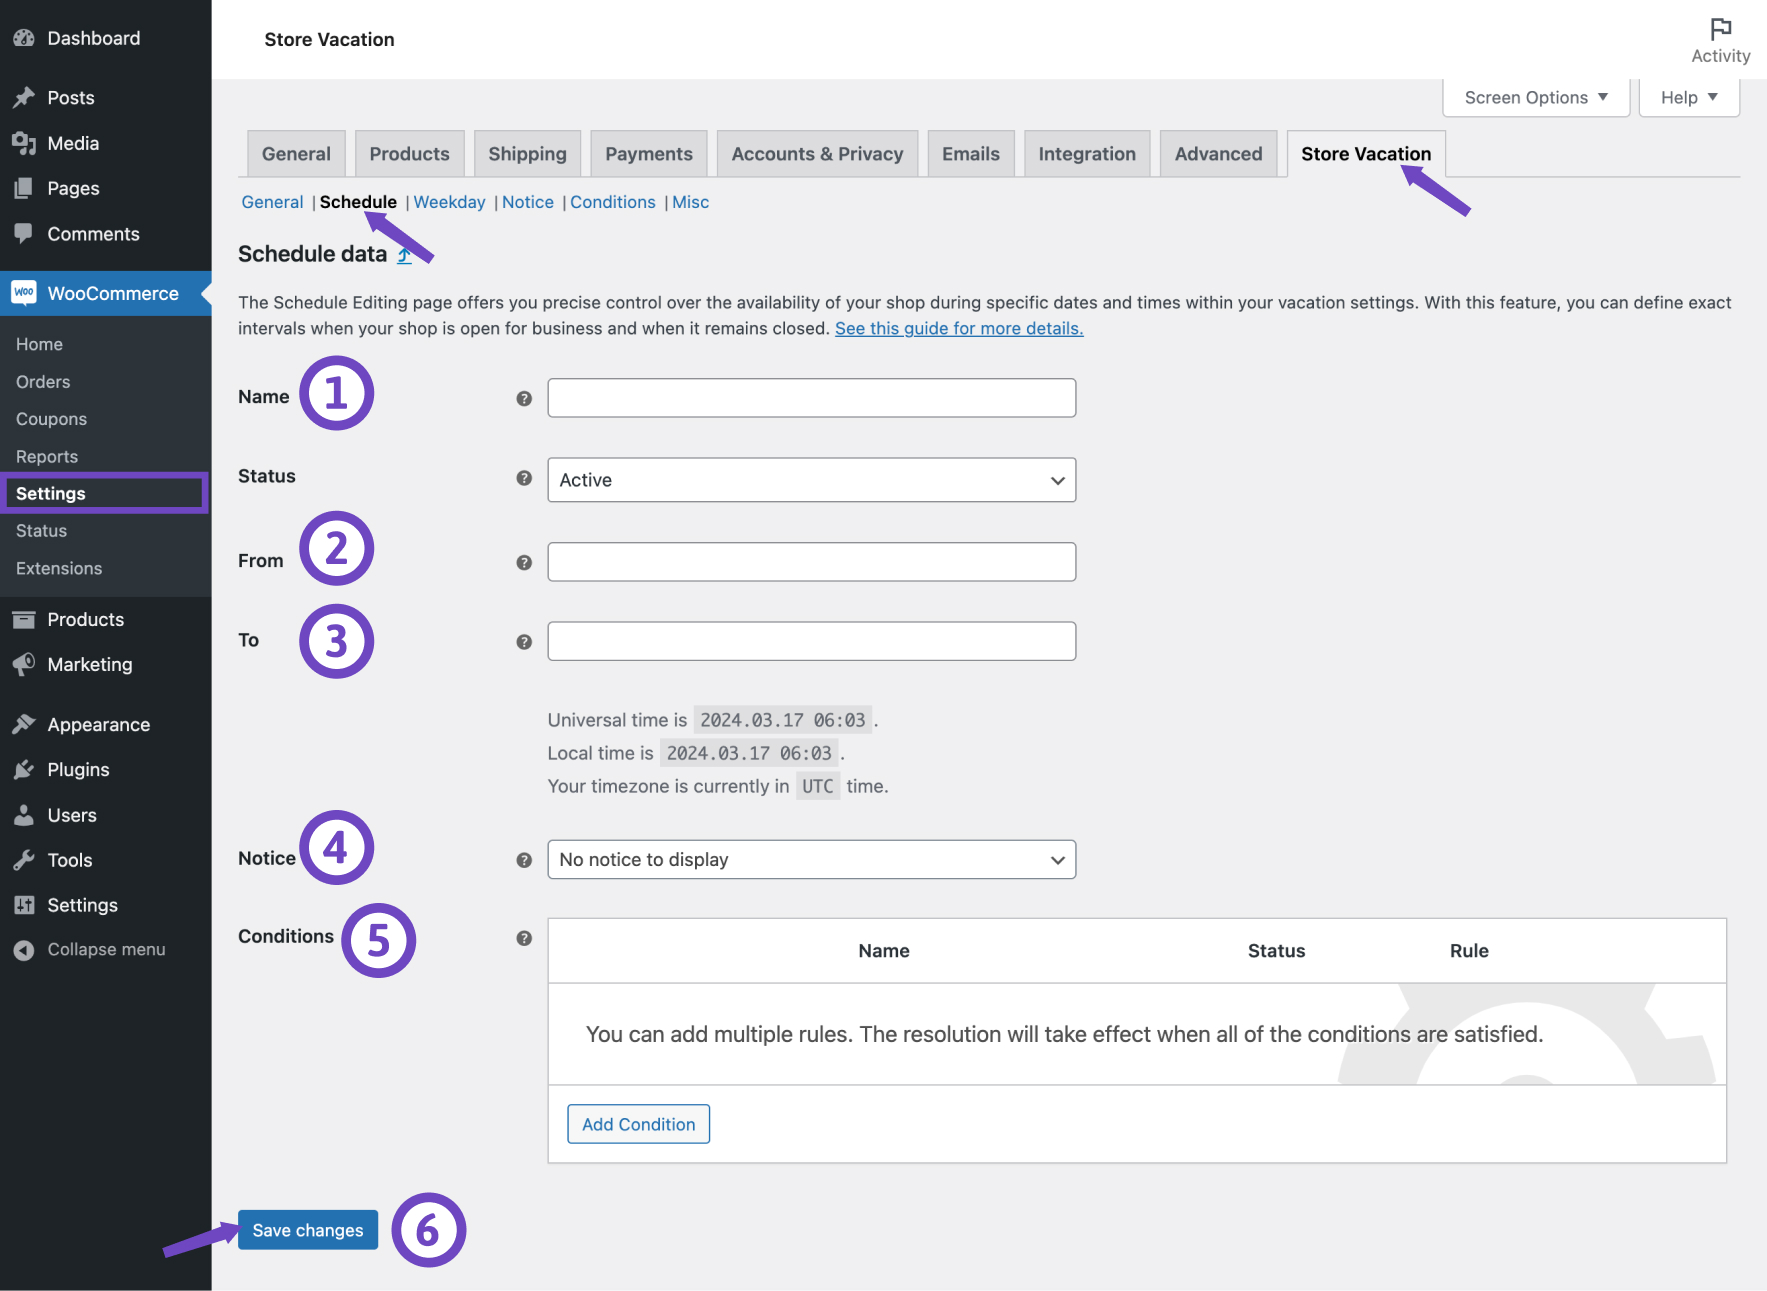
- Go to WooCommerce > Settings > Store Vacation.
- In the current tab, find the Schedule section.
- Click on the Add new button.
- Provide a friendly Name for your schedule plan.
- Use the From field to select the date and time you want the vacation mode to start. Your shop will close at this selected date and time.
- In the To field, select the date and time you want the vacation mode to end, and your shop to reopen.
- The No Notice to Display option is selected for the Notice field by default. If you wish to display a custom announcement during the vacation mode, select a notice (learn more about vacation notices here).
- By including Conditions and rules, you can selectively exempt specific products from vacation mode, enabling customers to purchase even when your shop is temporarily closed for vacation.
- Click on the Save changes button.
Store Vacation will use your current timezone setting for scheduling. If needed, you can adjust your timezone in your WordPress settings.
Schedule table
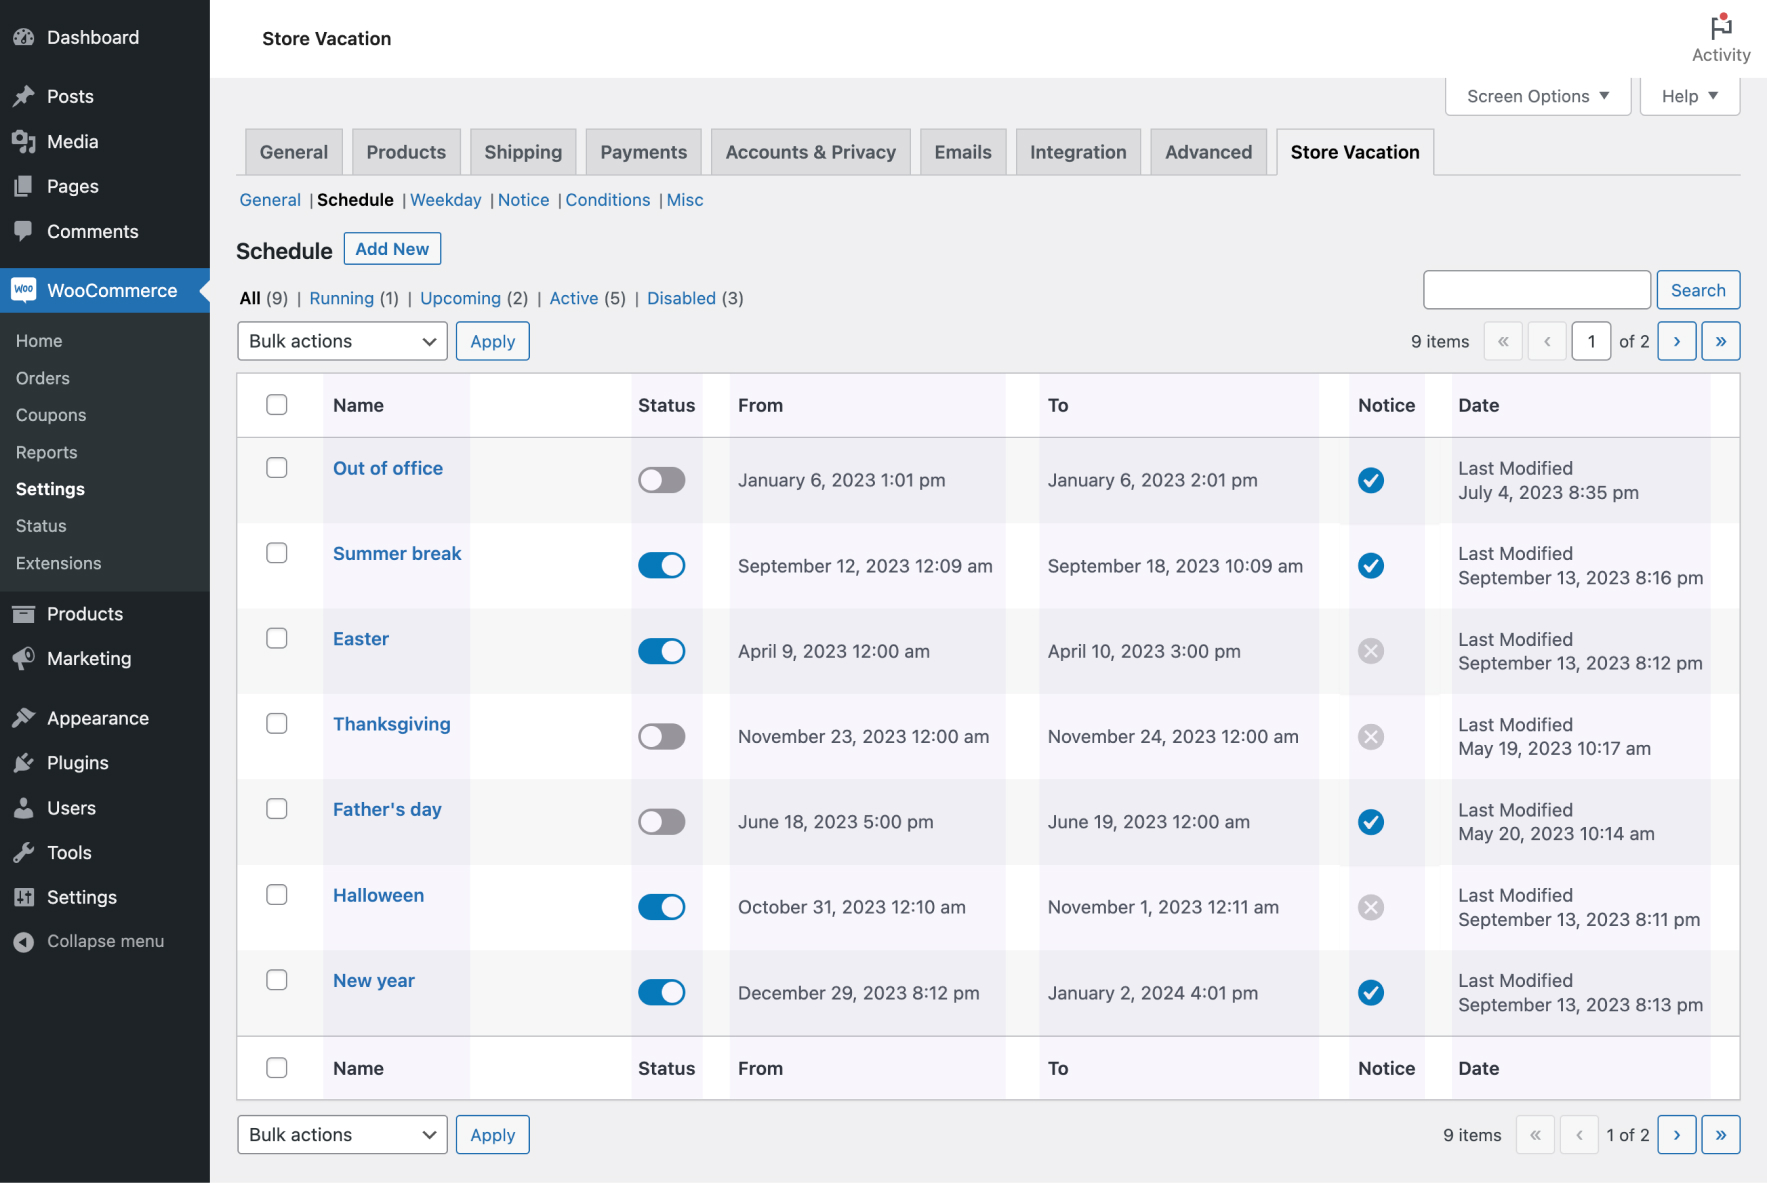
↑ Back to topOnce you’ve added a new schedule, your schedule table will populate with valuable information. On the schedule page, you can review the list of your planned vacations through this table. Here’s what you can find in the schedule table:
- Name: This column displays the name of your schedule. If you didn’t specify a name when creating the schedule, the creation date uses as the schedule name.
- Status: This column conveniently shows the status of your vacation schedule. Activating or disabling the schedule is easy—simply click the toggle switch to make your desired adjustments.
- From: This column shows the start date and time of your vacation. Your shop will close at the time indicated here.
- To: In this column, you’ll see your vacation’s end date and time. Your shop will reopen at the time specified here.
- Notice: This column informs whether you’ve assigned a notice to announce your vacation to your visitors. A checkmark icon indicates that you’ve selected a notice to display during the vacation, while a cross icon signifies that you’ve not chosen any notice to display.
- Date: This column displays the last date the schedule was modified.
Weekday Schedule
↑ Back to topTo manage your shop’s operating hours, you can create weekday schedules to close your shop during non-business hours and weekends. Follow these steps to create a weekday schedule:
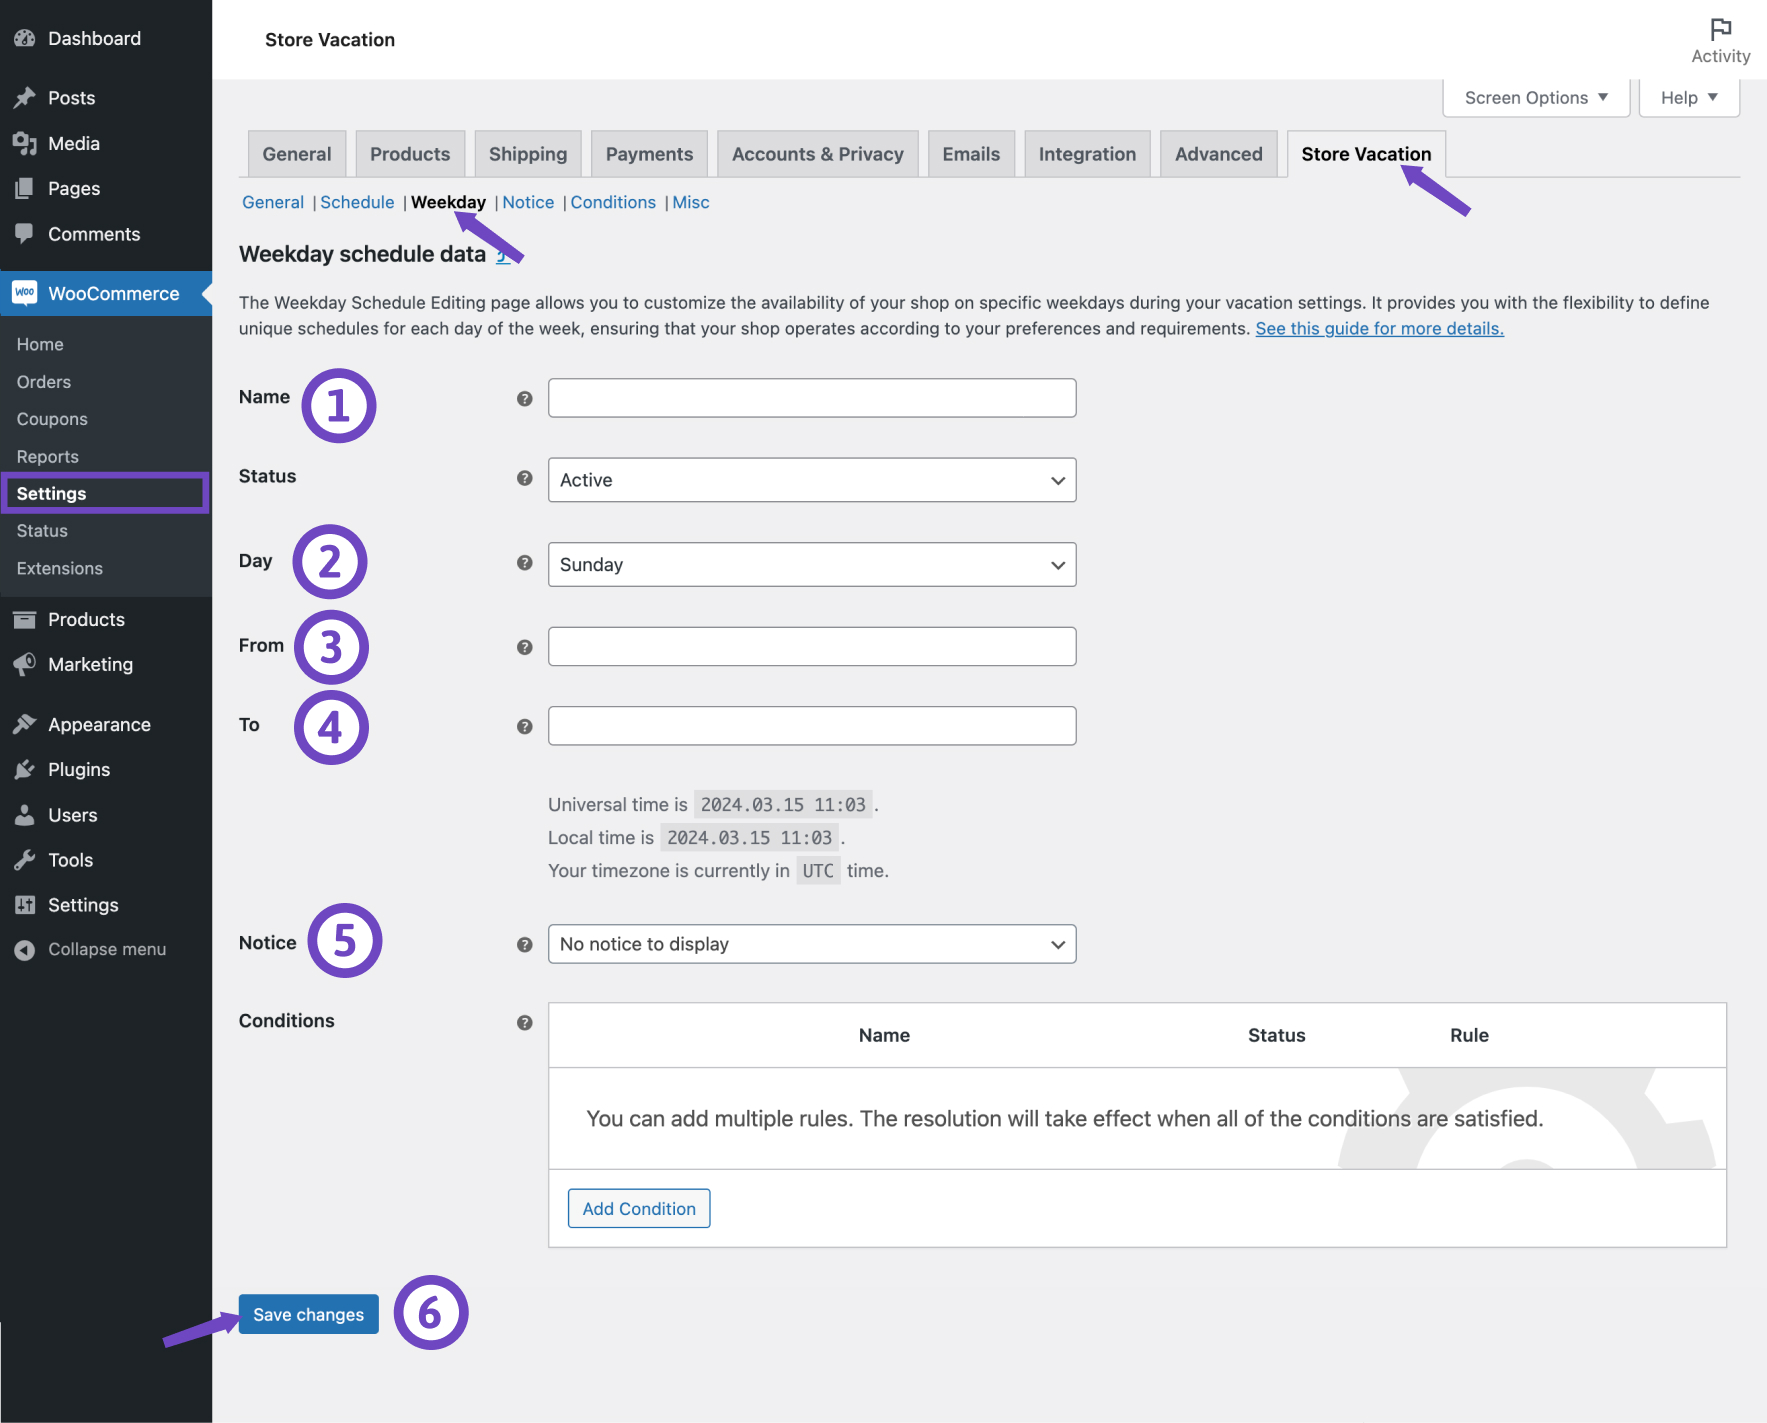
- Navigate to WooCommerce > Settings > Store Vacation.
- In the current tab, find the Weekday section.
- Click on the Add new button.
- Enter a friendly Name for your weekday schedule.
- Select the Day of the week you want to define its closing time.
- Define the start time using the From field. Your store will close weekly at the time you specify here.
- Define the end time using the To field. Your store will reopen on the selected day at the specified time in this field.
- By default, the Notice field is set to No notice to display. If you want to display a notification during the closing time in your store, select a notice (learn more about vacation notices here).
- By applying Conditions, you can selectively exclude specific products from vacation mode, ensuring they remain purchasable even when your shop is closed during a weekly closing time.
- Click on the Save changes button.
Weekday table
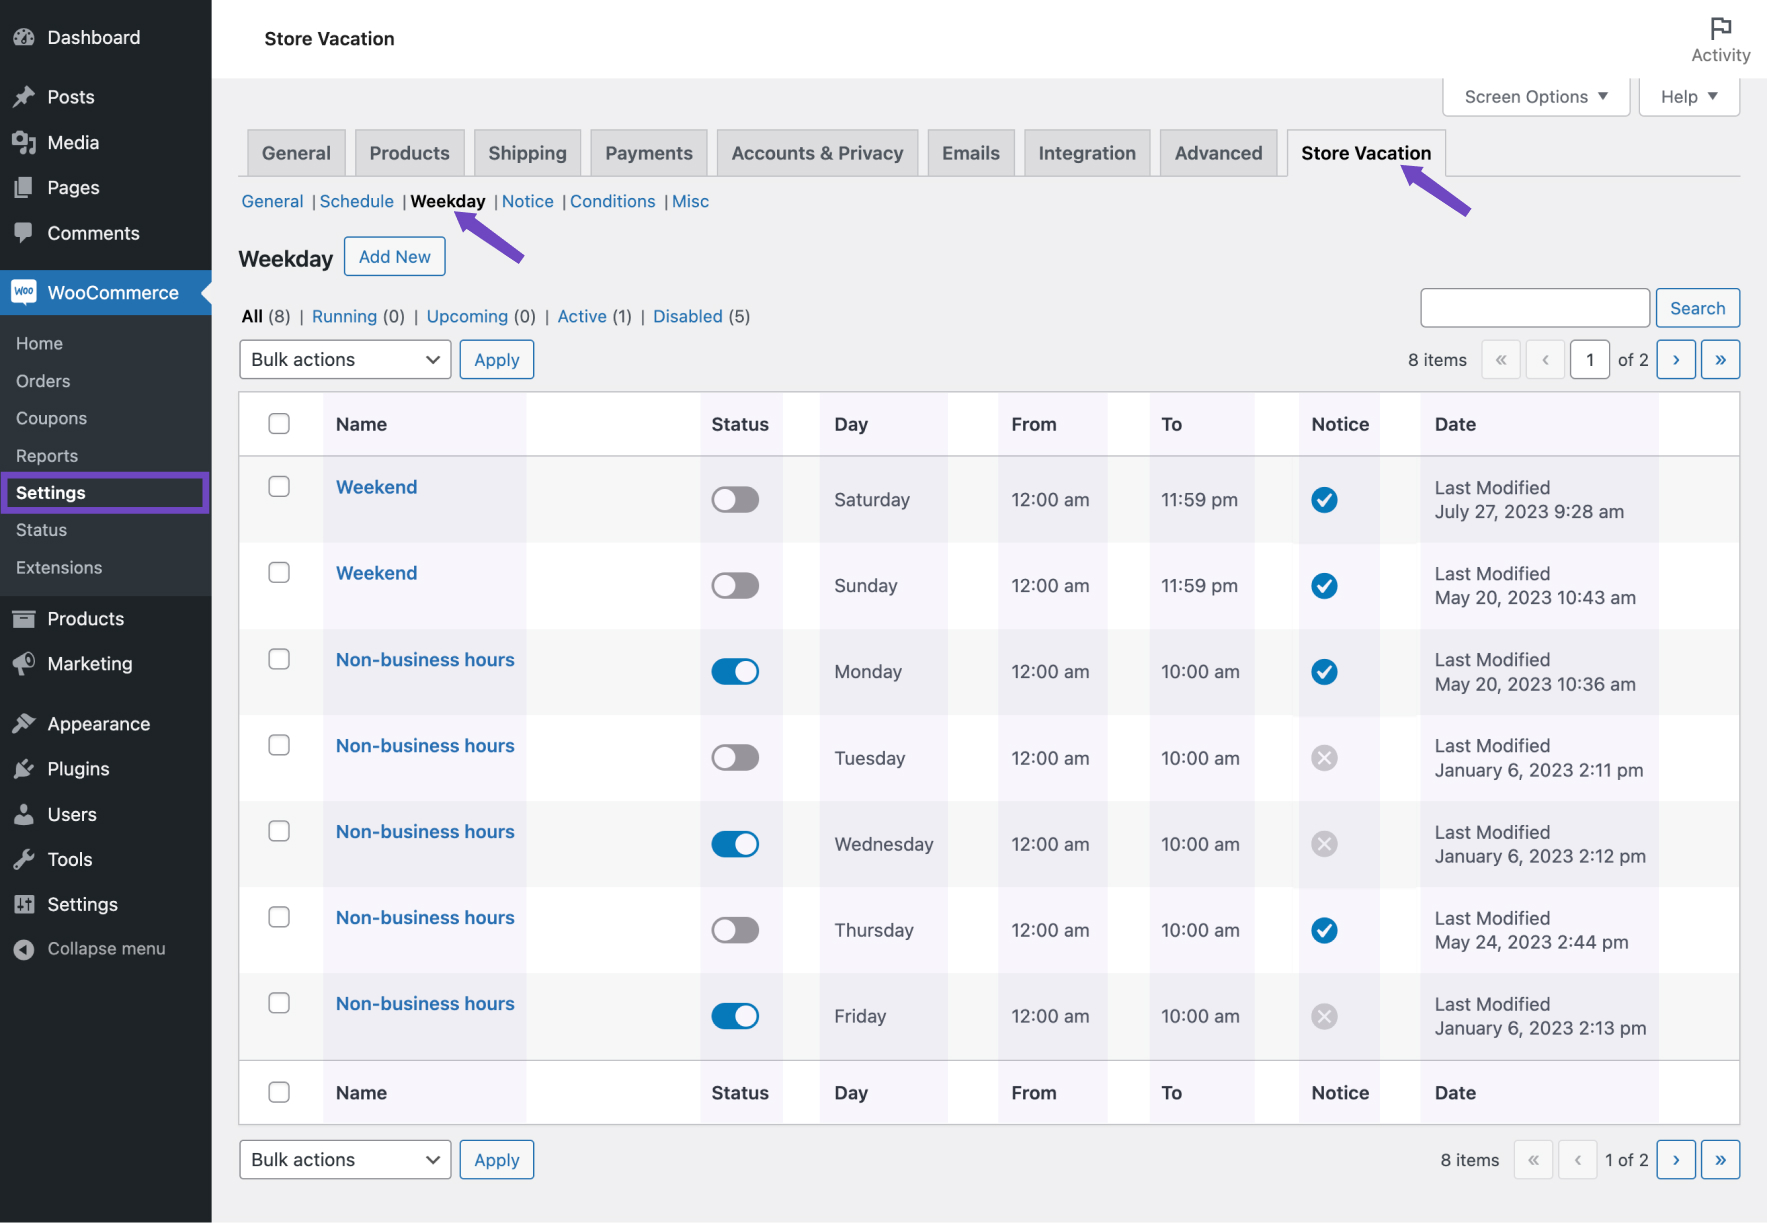
↑ Back to topAfter you add a new weekday, your weekday table will fill up. You can overview the list of your defined weekly closing times in a table on the weekday page.
The weekday table displays some information about your shop closing times based on the schedules defined.
- Name: Displays the name of your weekday schedule. If you haven’t entered a custom name when creating the schedule, the timestamp when you created the entry will be used as a placeholder for naming.
- Day: Displays the day you configured your non-working hours.
- From: Displays the start time of shop closing.
- To: Displays the end time of shop closing. Your shop reopens to accept orders at this time.
- Notice: This column lets you know whether you have assigned a notice to announce your closing time to your visitors. A checkmark icon indicates that you’ve selected a notice to display during the vacation, while a cross icon signifies that you’ve not chosen any notice to display during the vacation.
- Date: Displays the last date that the weekday is modified.
Vacation Notices
↑ Back to topYou have the flexibility to create customized notices, each with a unique announcement that can be assigned to specific vacation schedules or weekday closings. Here’s how to do it:
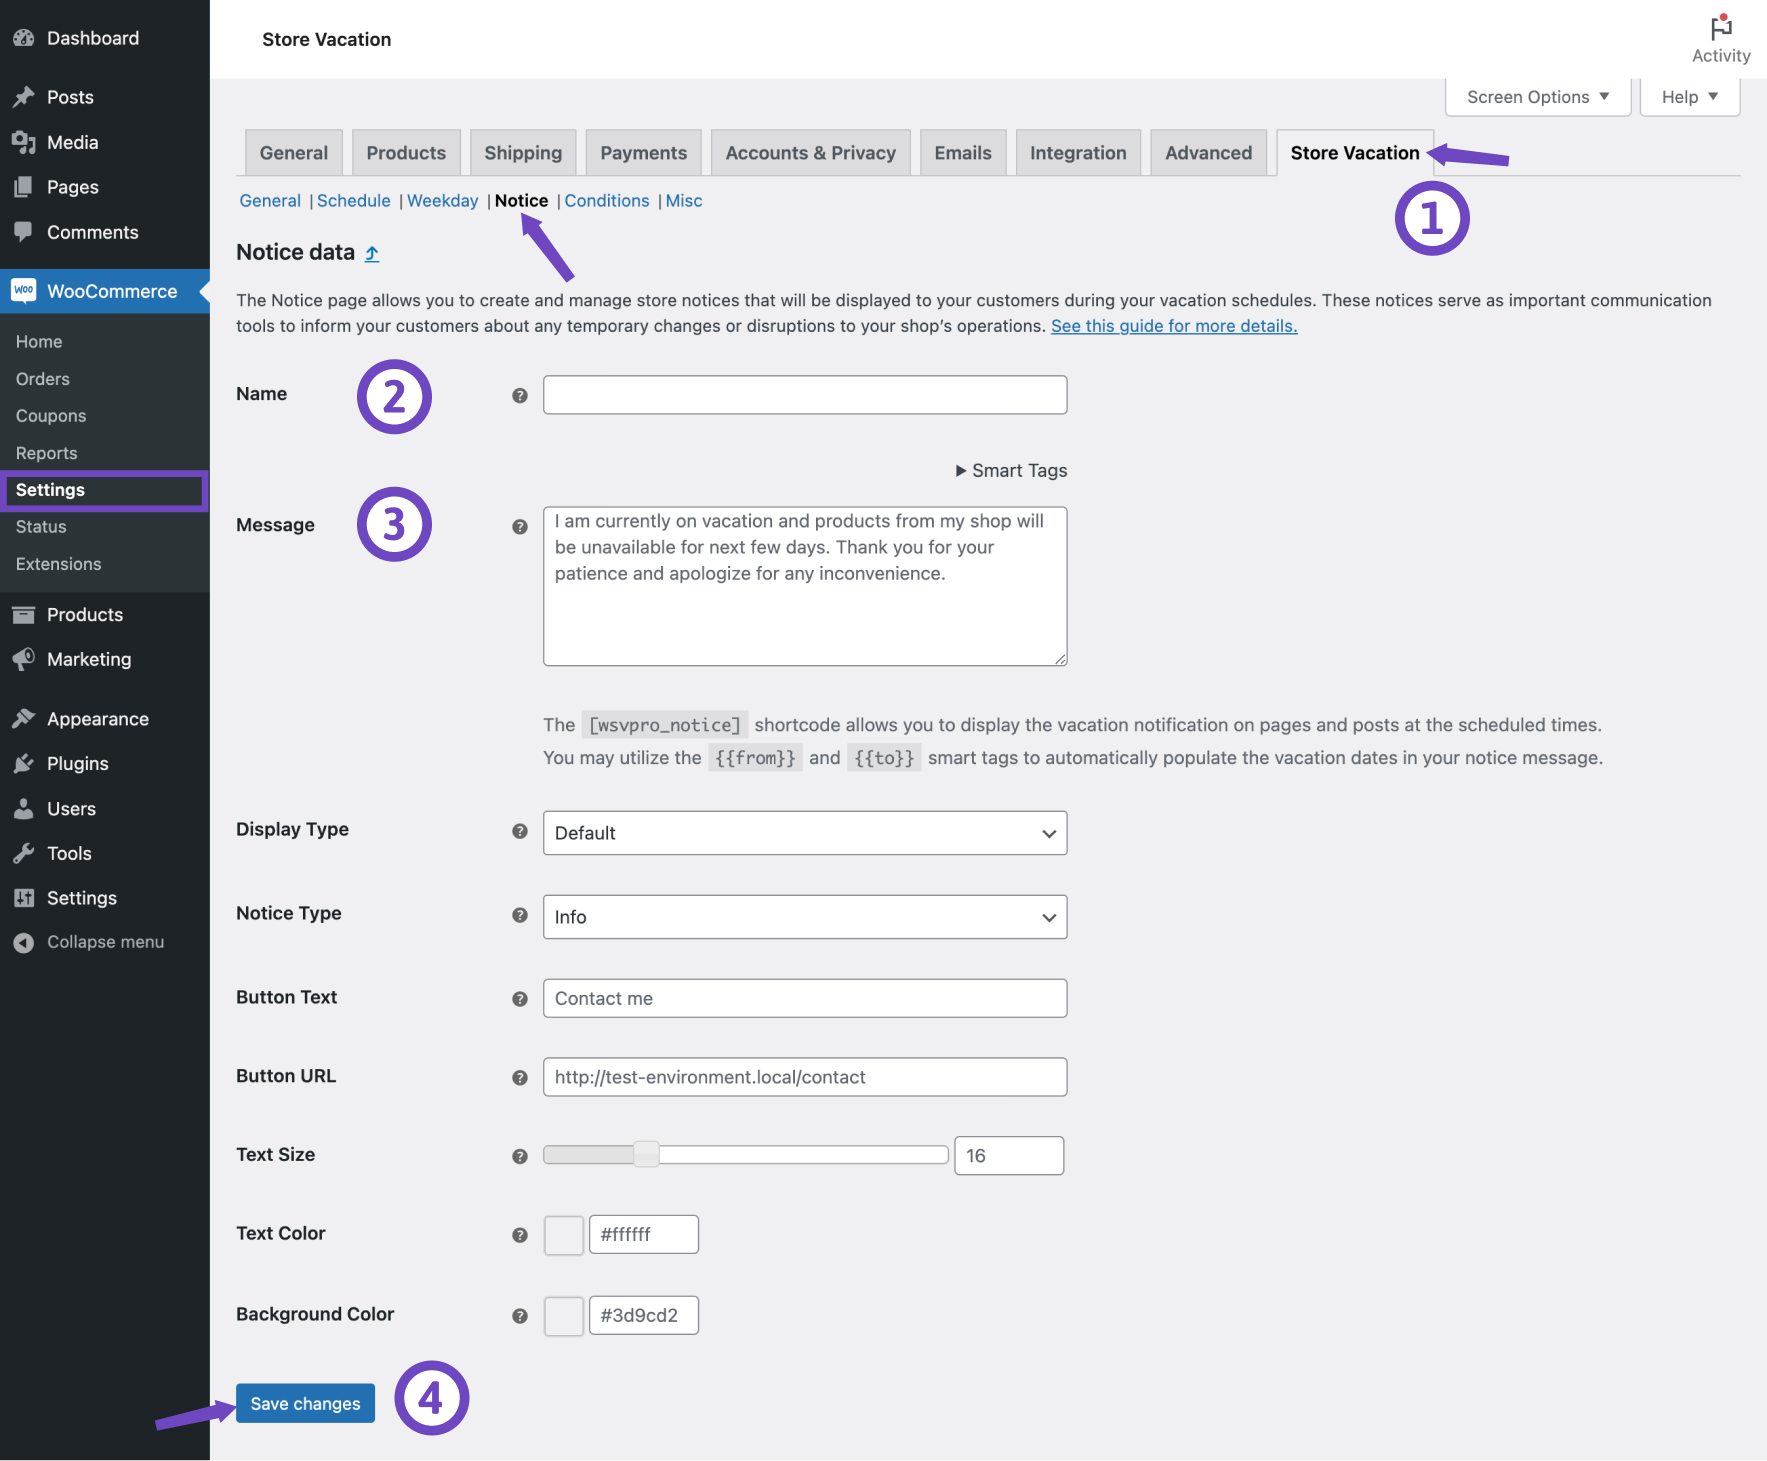
- Navigate to WooCommerce > Settings > Store Vacation.
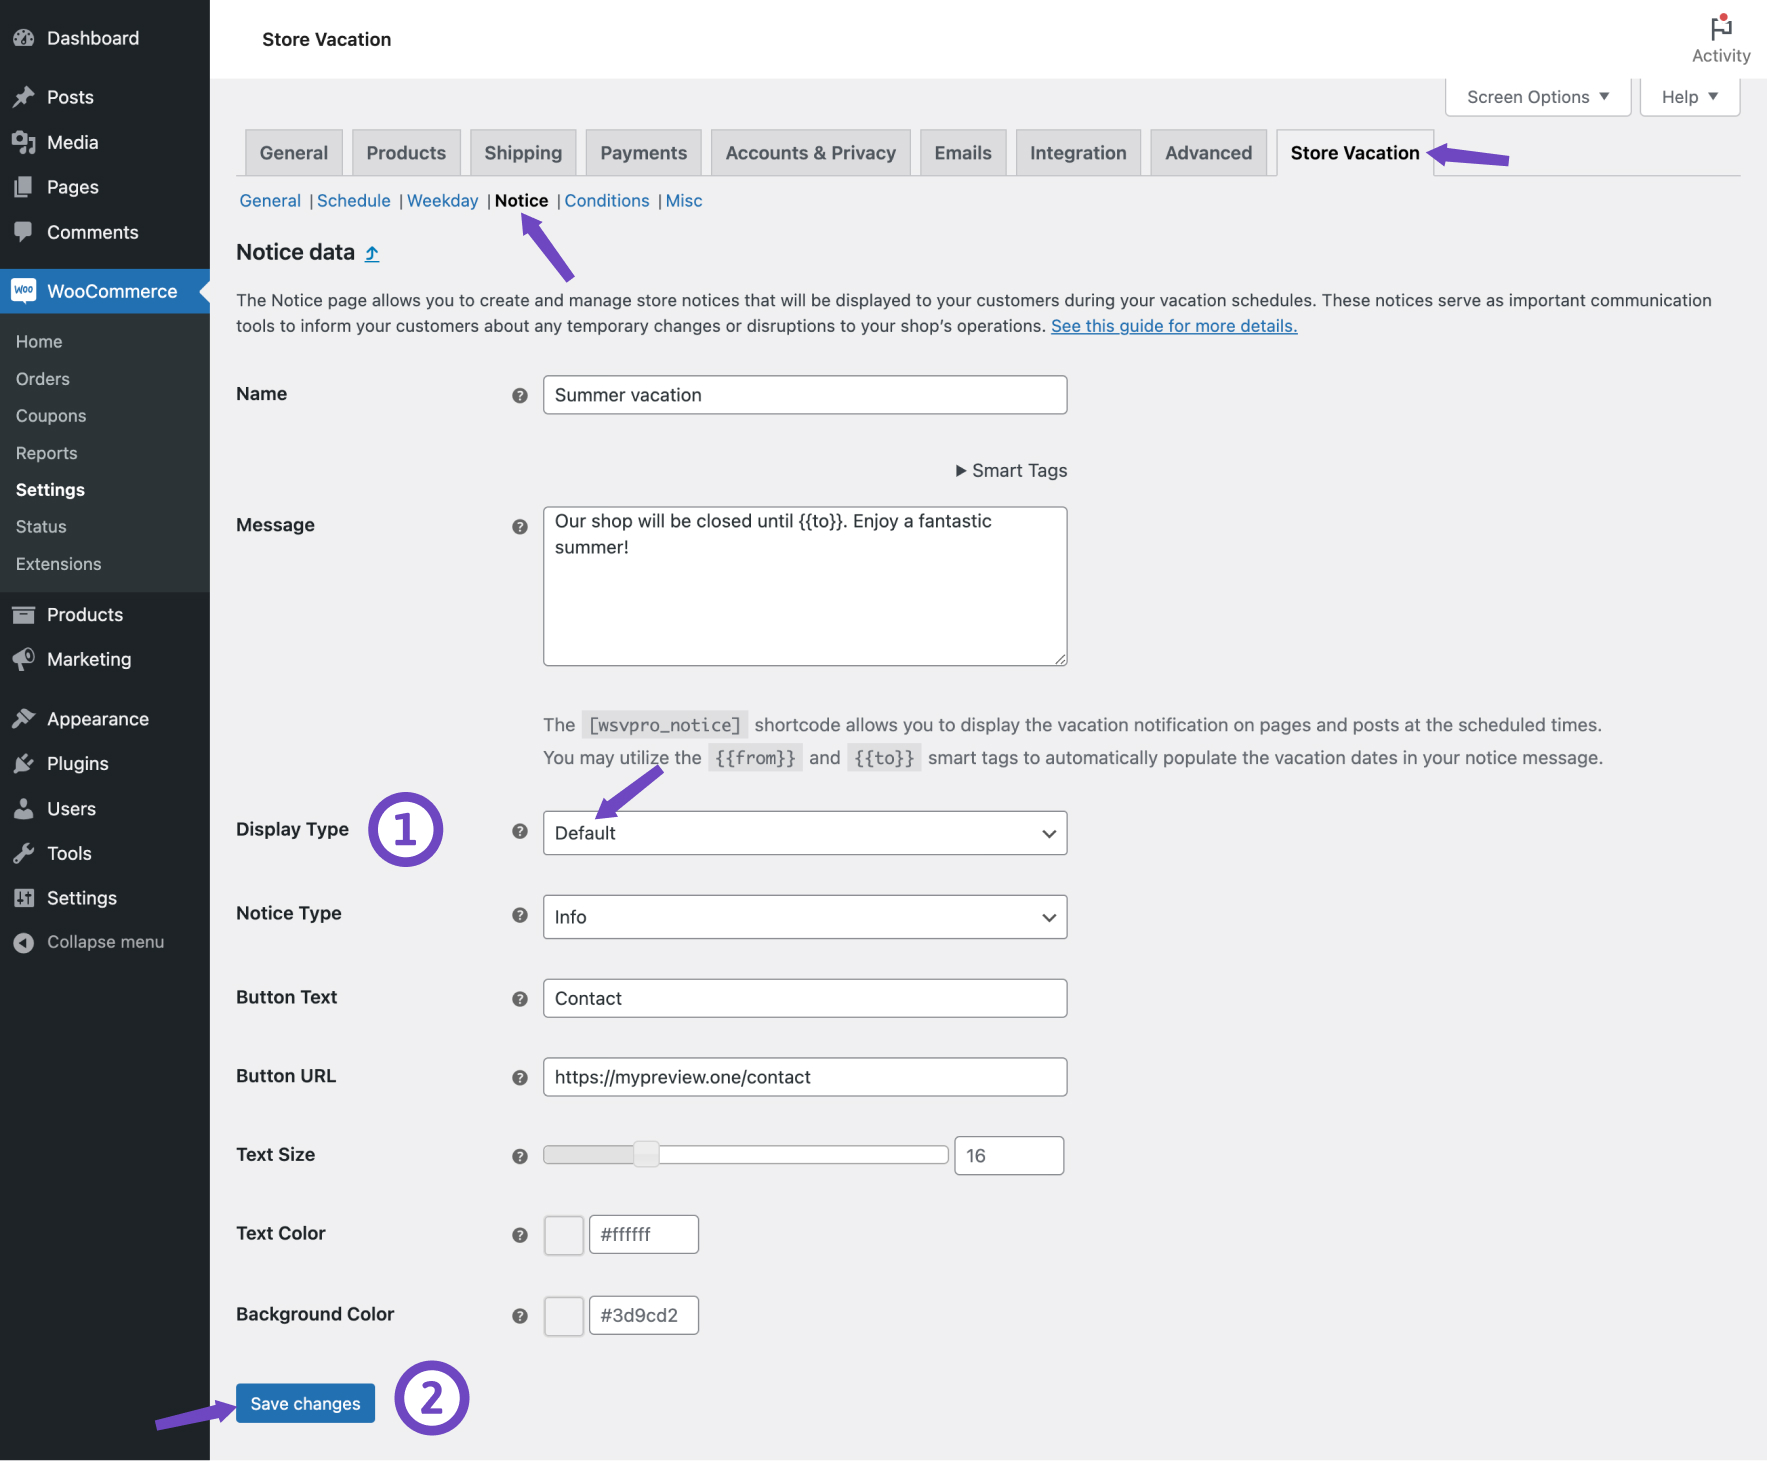
- In the current tab, find the Notice section.
- Click on the Add new button.
- Enter a Name for your notice to identify it.
- Enter your Message, which will be displayed to your customers during the specified period.
- Click on the Save changes button.
Notice table
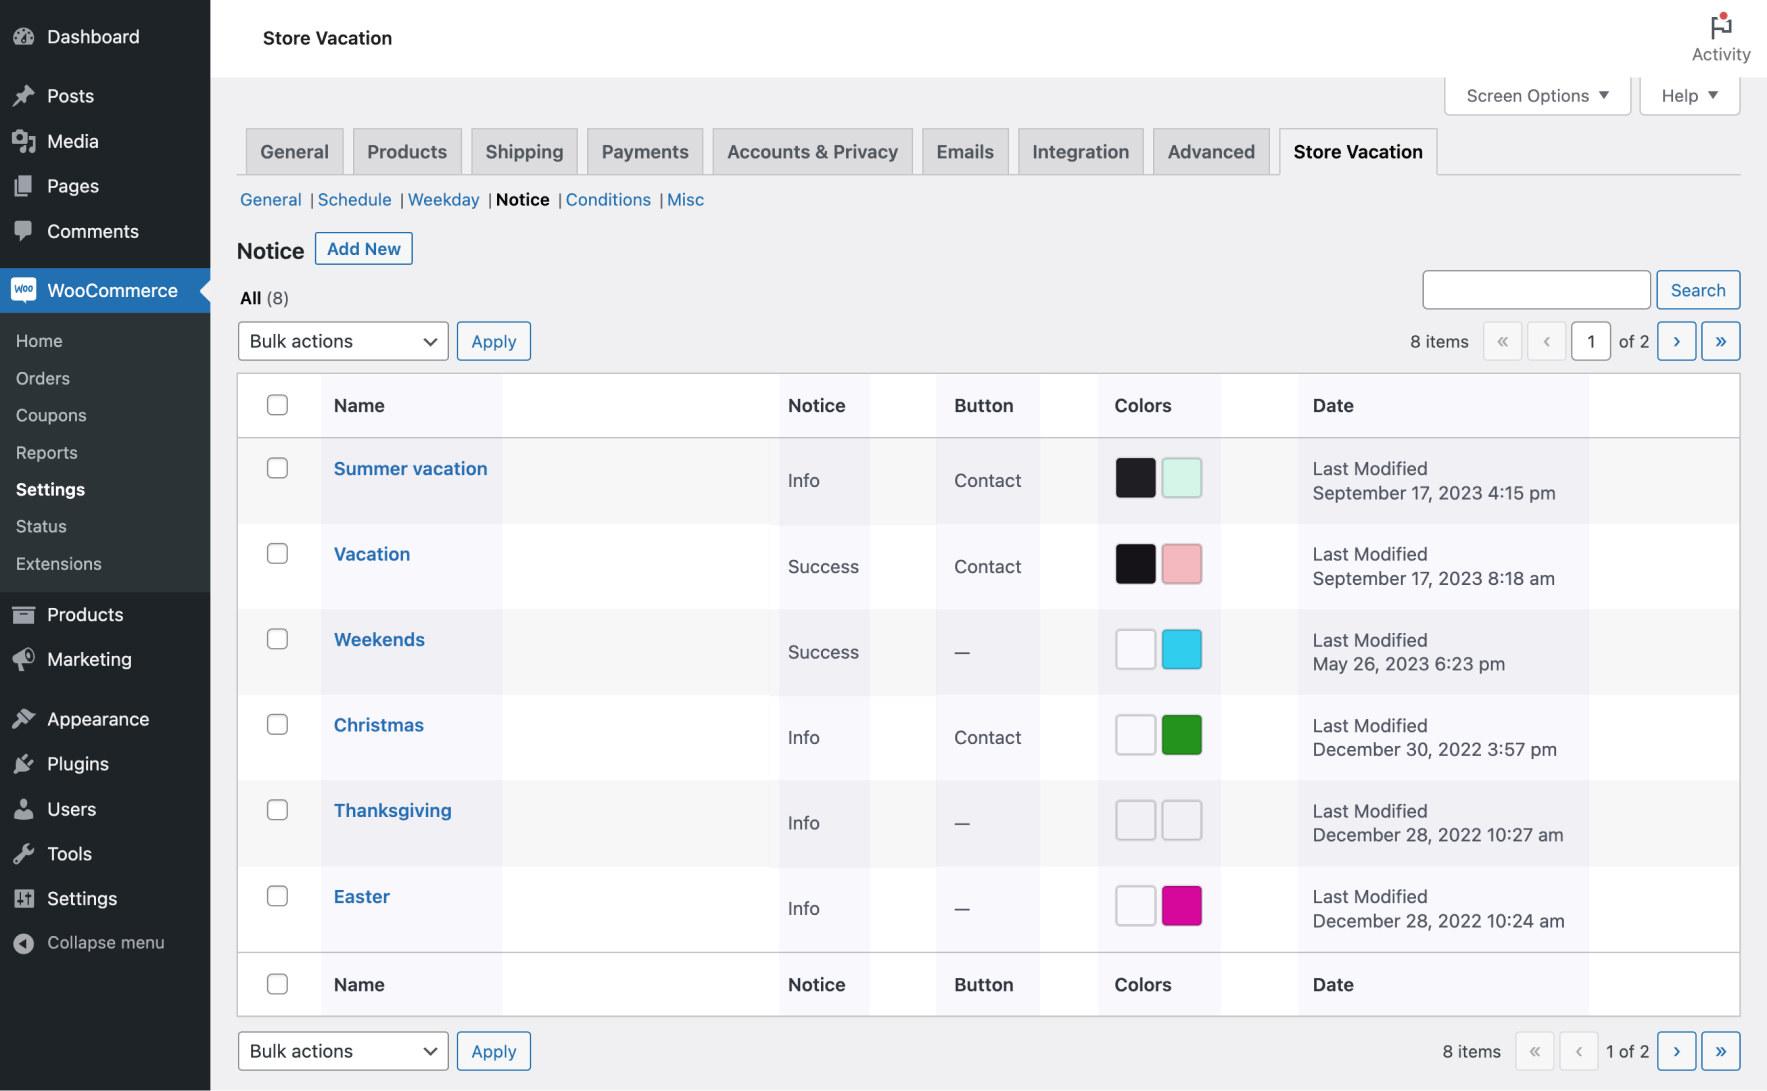
↑ Back to topThe notice table allows you to review some essential information quickly. Here’s what details you can find in the notice table:
- Name: This column displays the name of your notice. If you didn’t specify a name when creating the notice, the creation date will be used as the notice name.
- Notice: In this column, you can see the type of notice assigned to each vacation notice.
- Button: This column shows the Button Text. A horizontal line (—) will be shown as a placeholder if you didn’t enter any button text.
- Colors: In this column, you’ll find the Text and Background colors you have selected for each notice, helping you identify their visual styling.
- Date: This column displays the last date the notice was modified, allowing you to track when changes were made to your notices.
Using smart tags
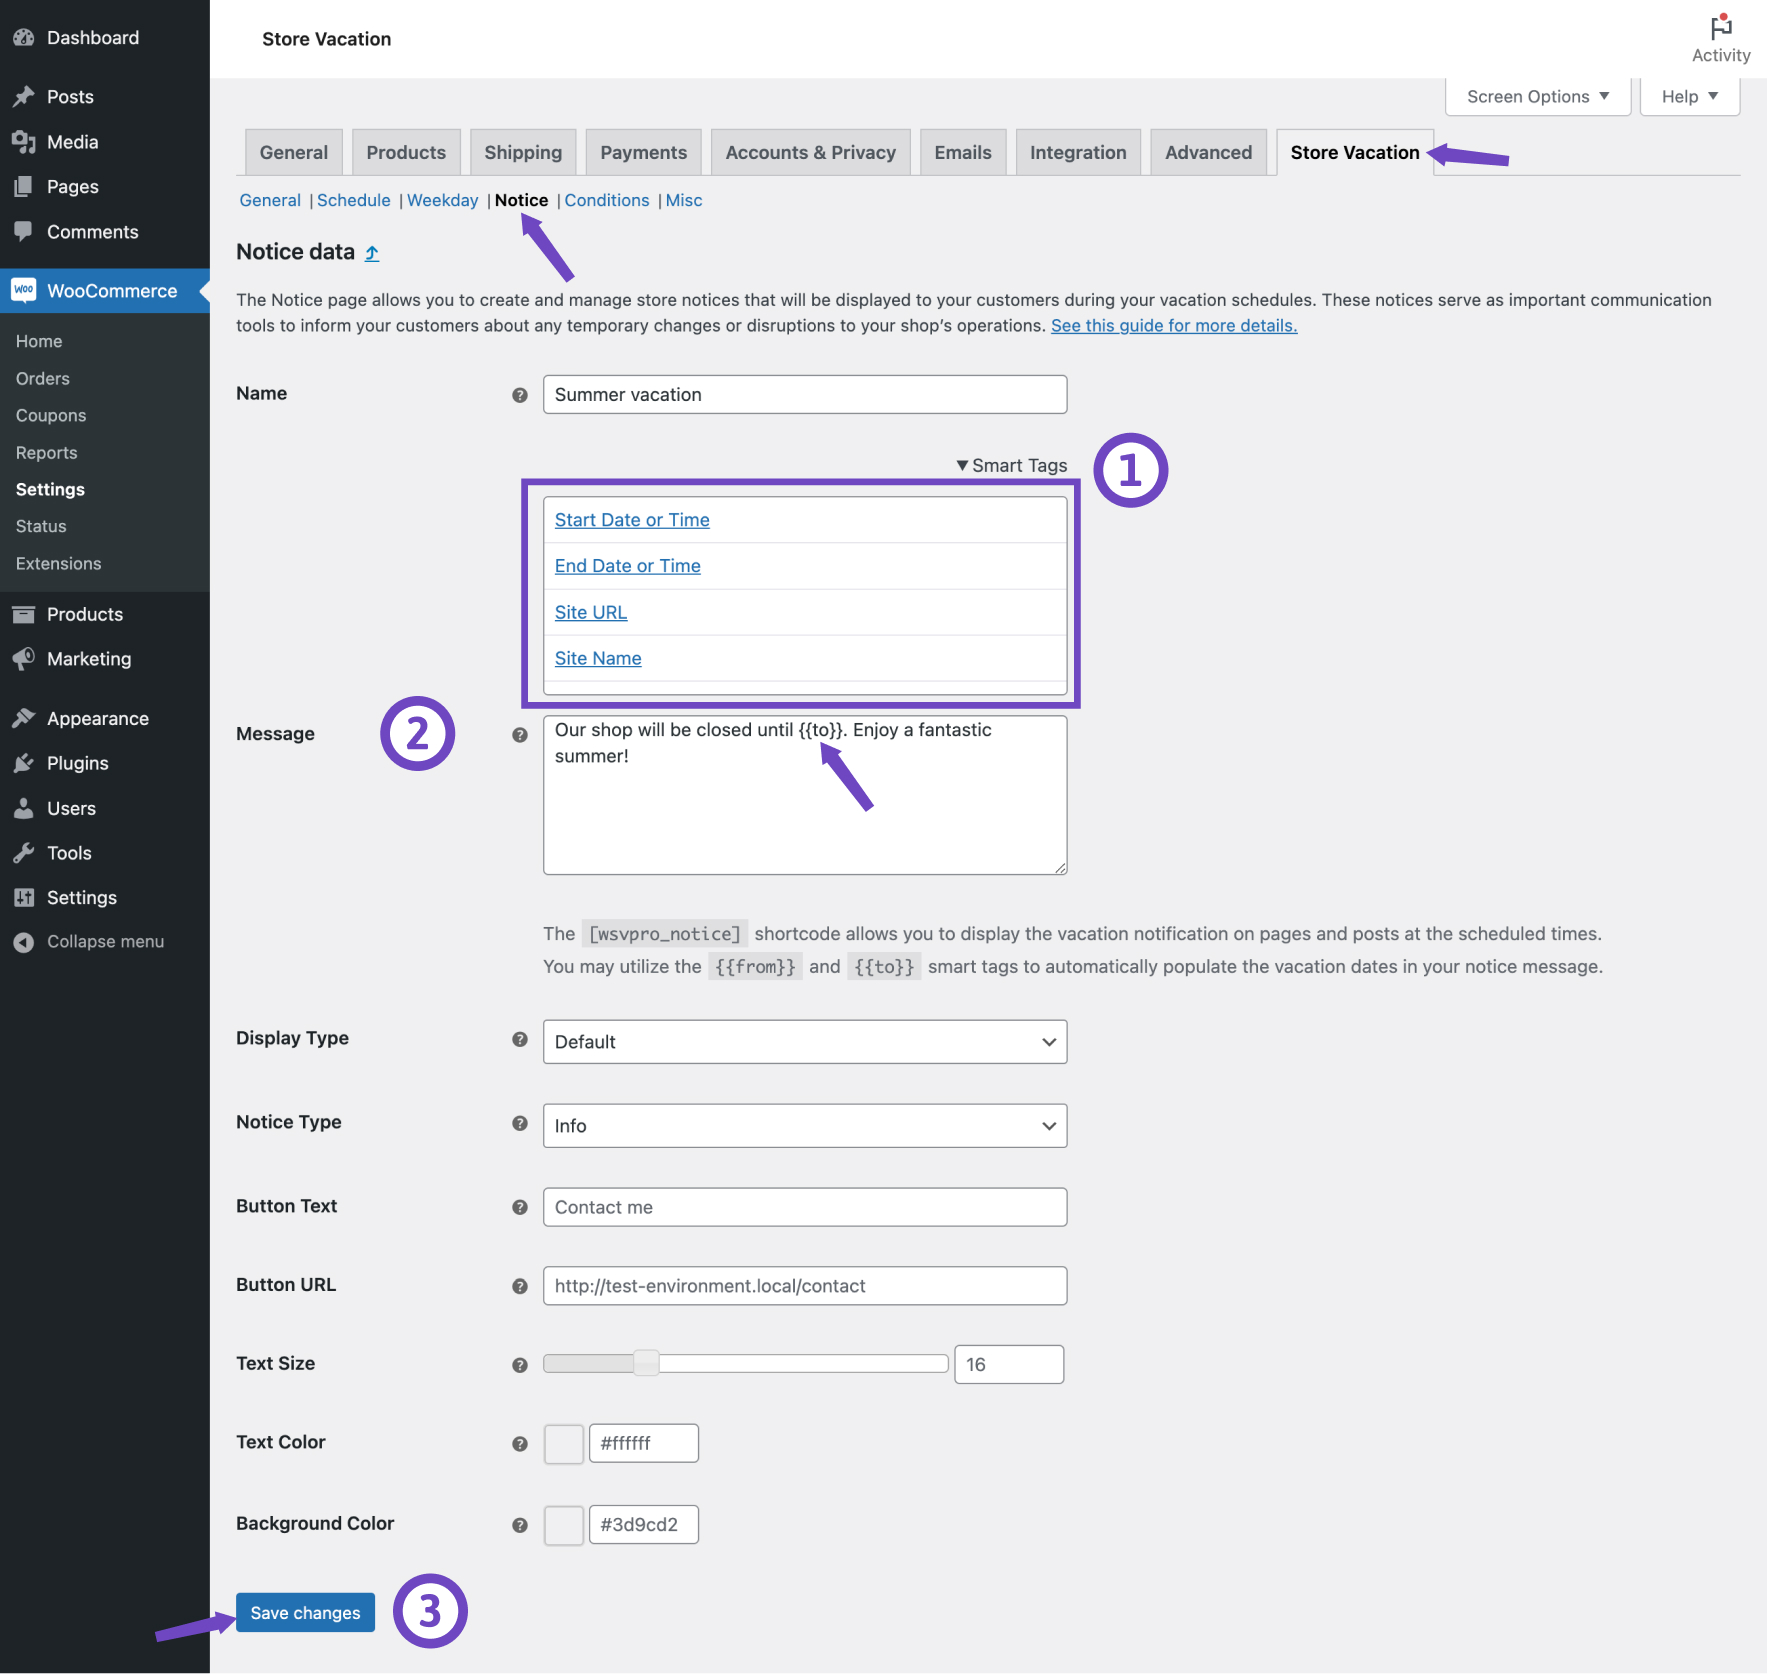
↑ Back to topUtilize smart tags to incorporate dynamic information into your vacation notice. Here’s how you can do it:
- Click on the Smart Tags located above the Message field.
- Choose the options you want to include in your message.
- Start Date or Time: This smart tag allows you to insert the date your shop will temporarily close automatically.
- End Date or Time: Use this smart tag to include the date your shop will reopen.
- Site URL: Use this smart tag to include your site’s URL.
- Site Name: Include your site’s title or name in this smart tag.
- Admin Email: Using this smart tag, you can include the site admin’s email address in your notice.
- The smart tags will be automatically inserted at the end of your message. You can reposition them within your notice message as needed.
- Click on the Save changes button.
Adding a button to your notice
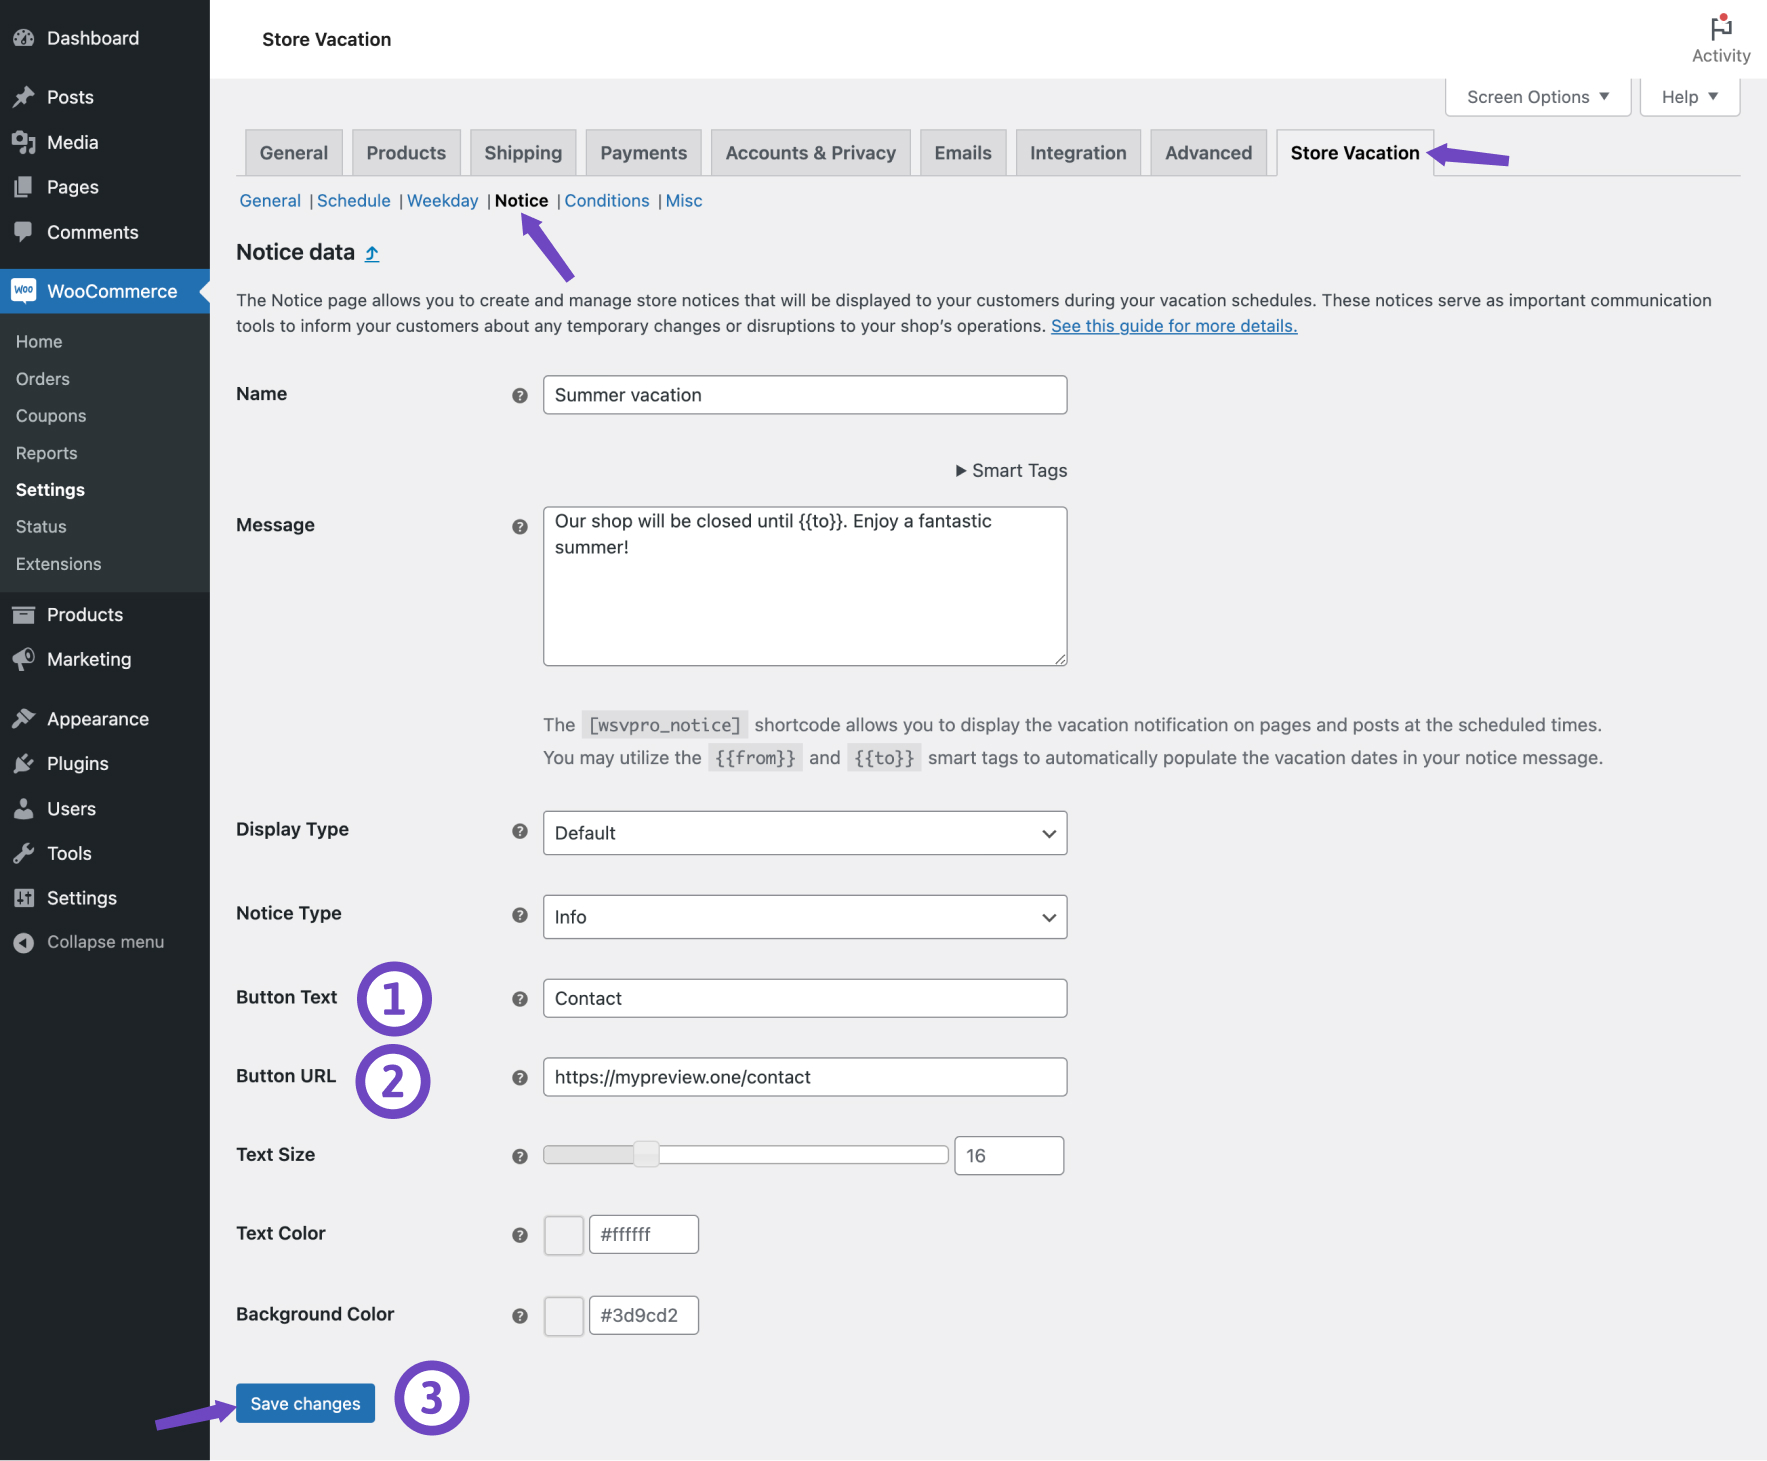
↑ Back to topEnhance your vacation notice with a clear call to action button, guiding your customers to take specific actions, such as visiting your contact page. Here’s how to do it:
- Enter the text you want to display on the button in the Button text field.
- Specify the URL to which the button should direct your customers in the Button URL field.
- Click on the Save changes button.

Customize Notice
↑ Back to topIn most cases, themes will apply their own unique styles to WooCommerce notice variations to ensure they align with their visual design. Here, we’ll explore the customization options available within the plugin to tailor your vacation notices to your liking.
Display type
↑ Back to topYou can change the appearance of your vacation notice by adjusting the Display Type option. Here’s how:
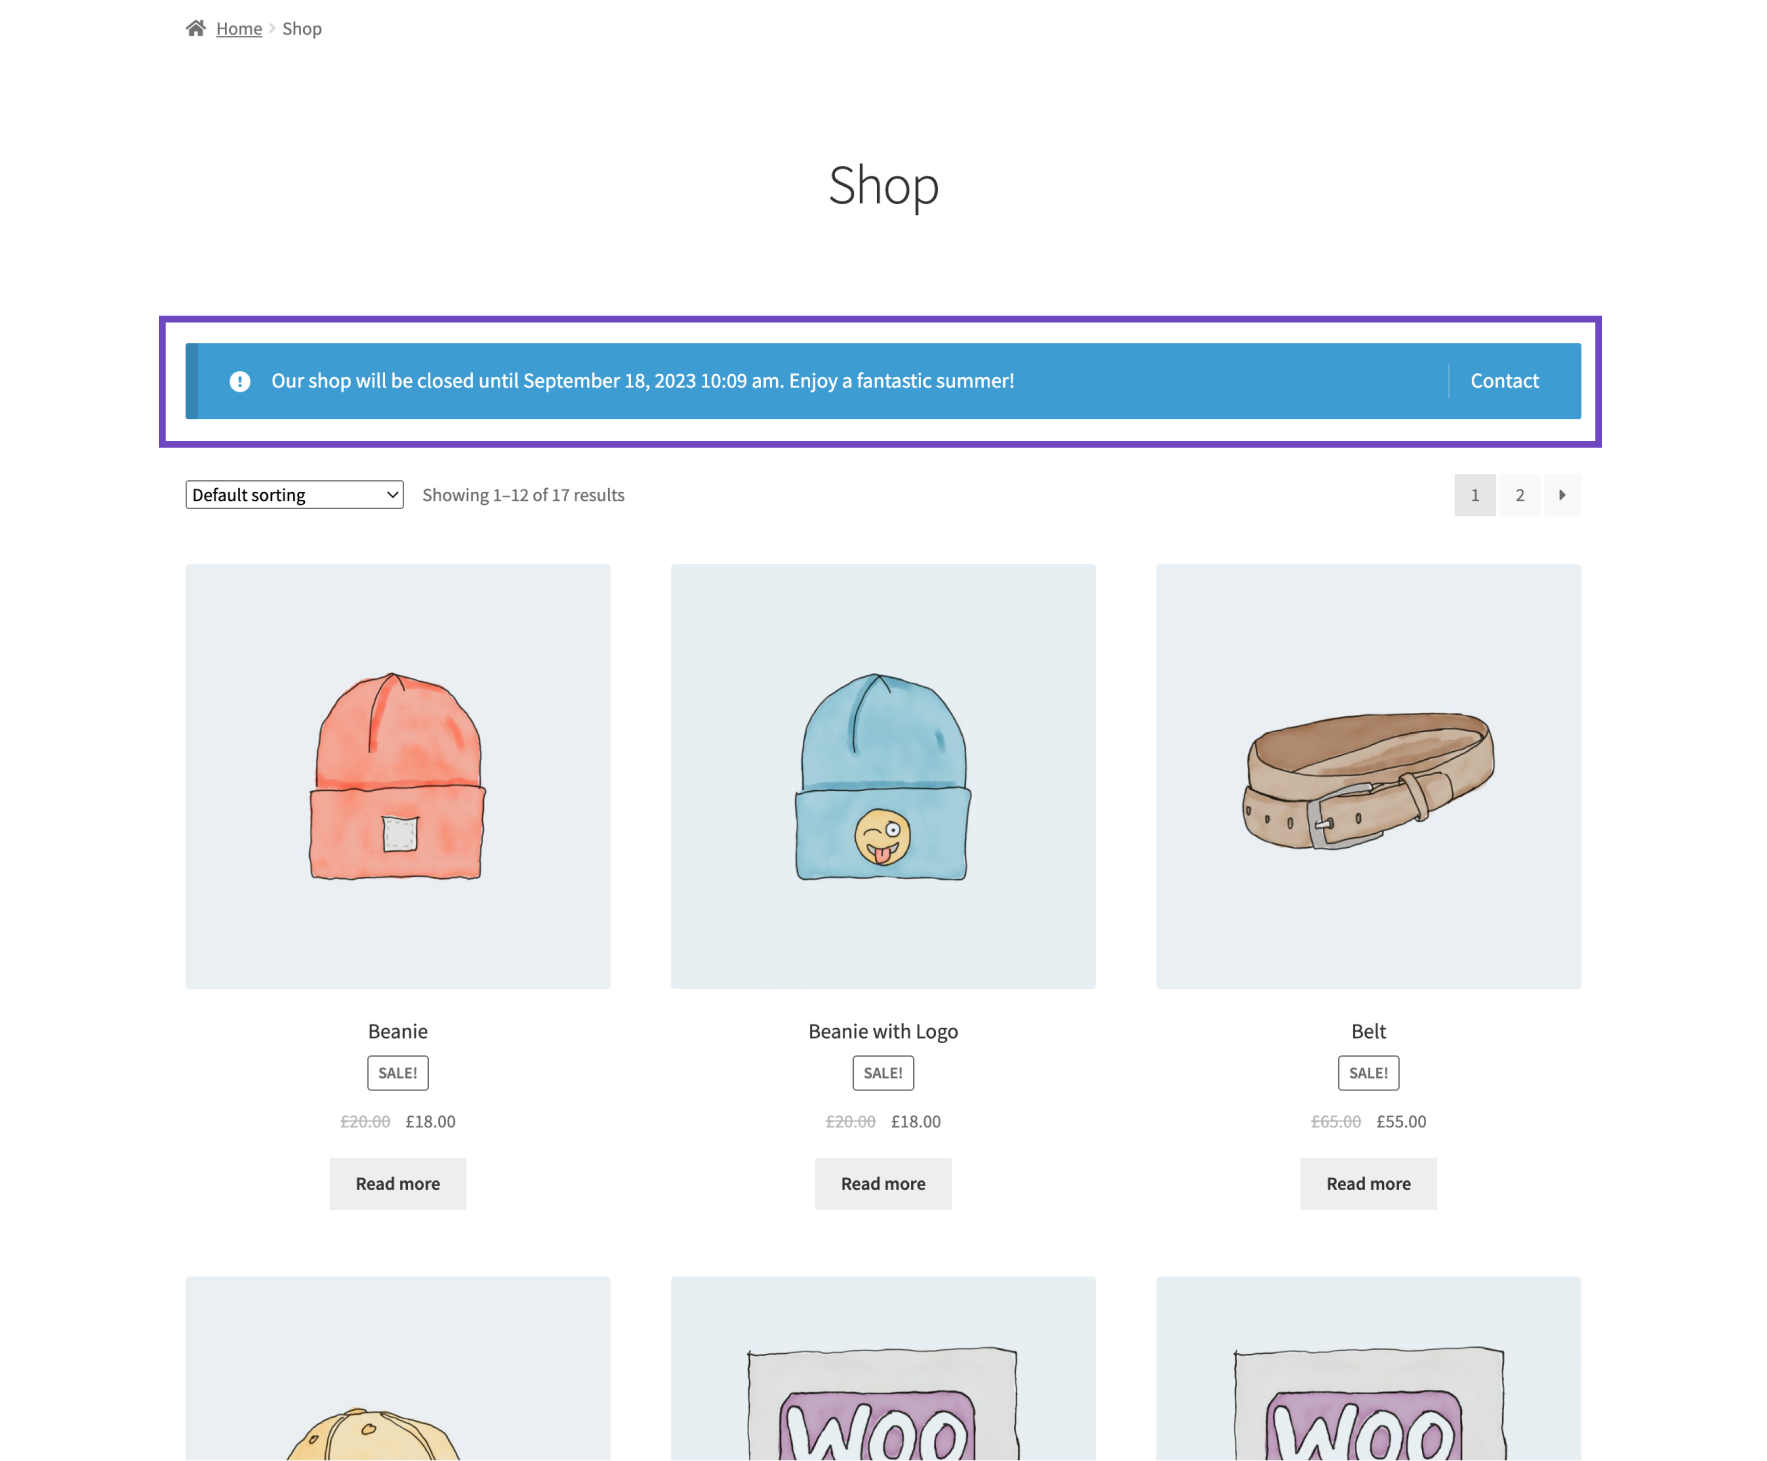
1- Default display:
This is the default option, already selected for the Display Type field. It inherits the notice’s appearance from the WooCommerce notice, presenting it in a boxed view block.
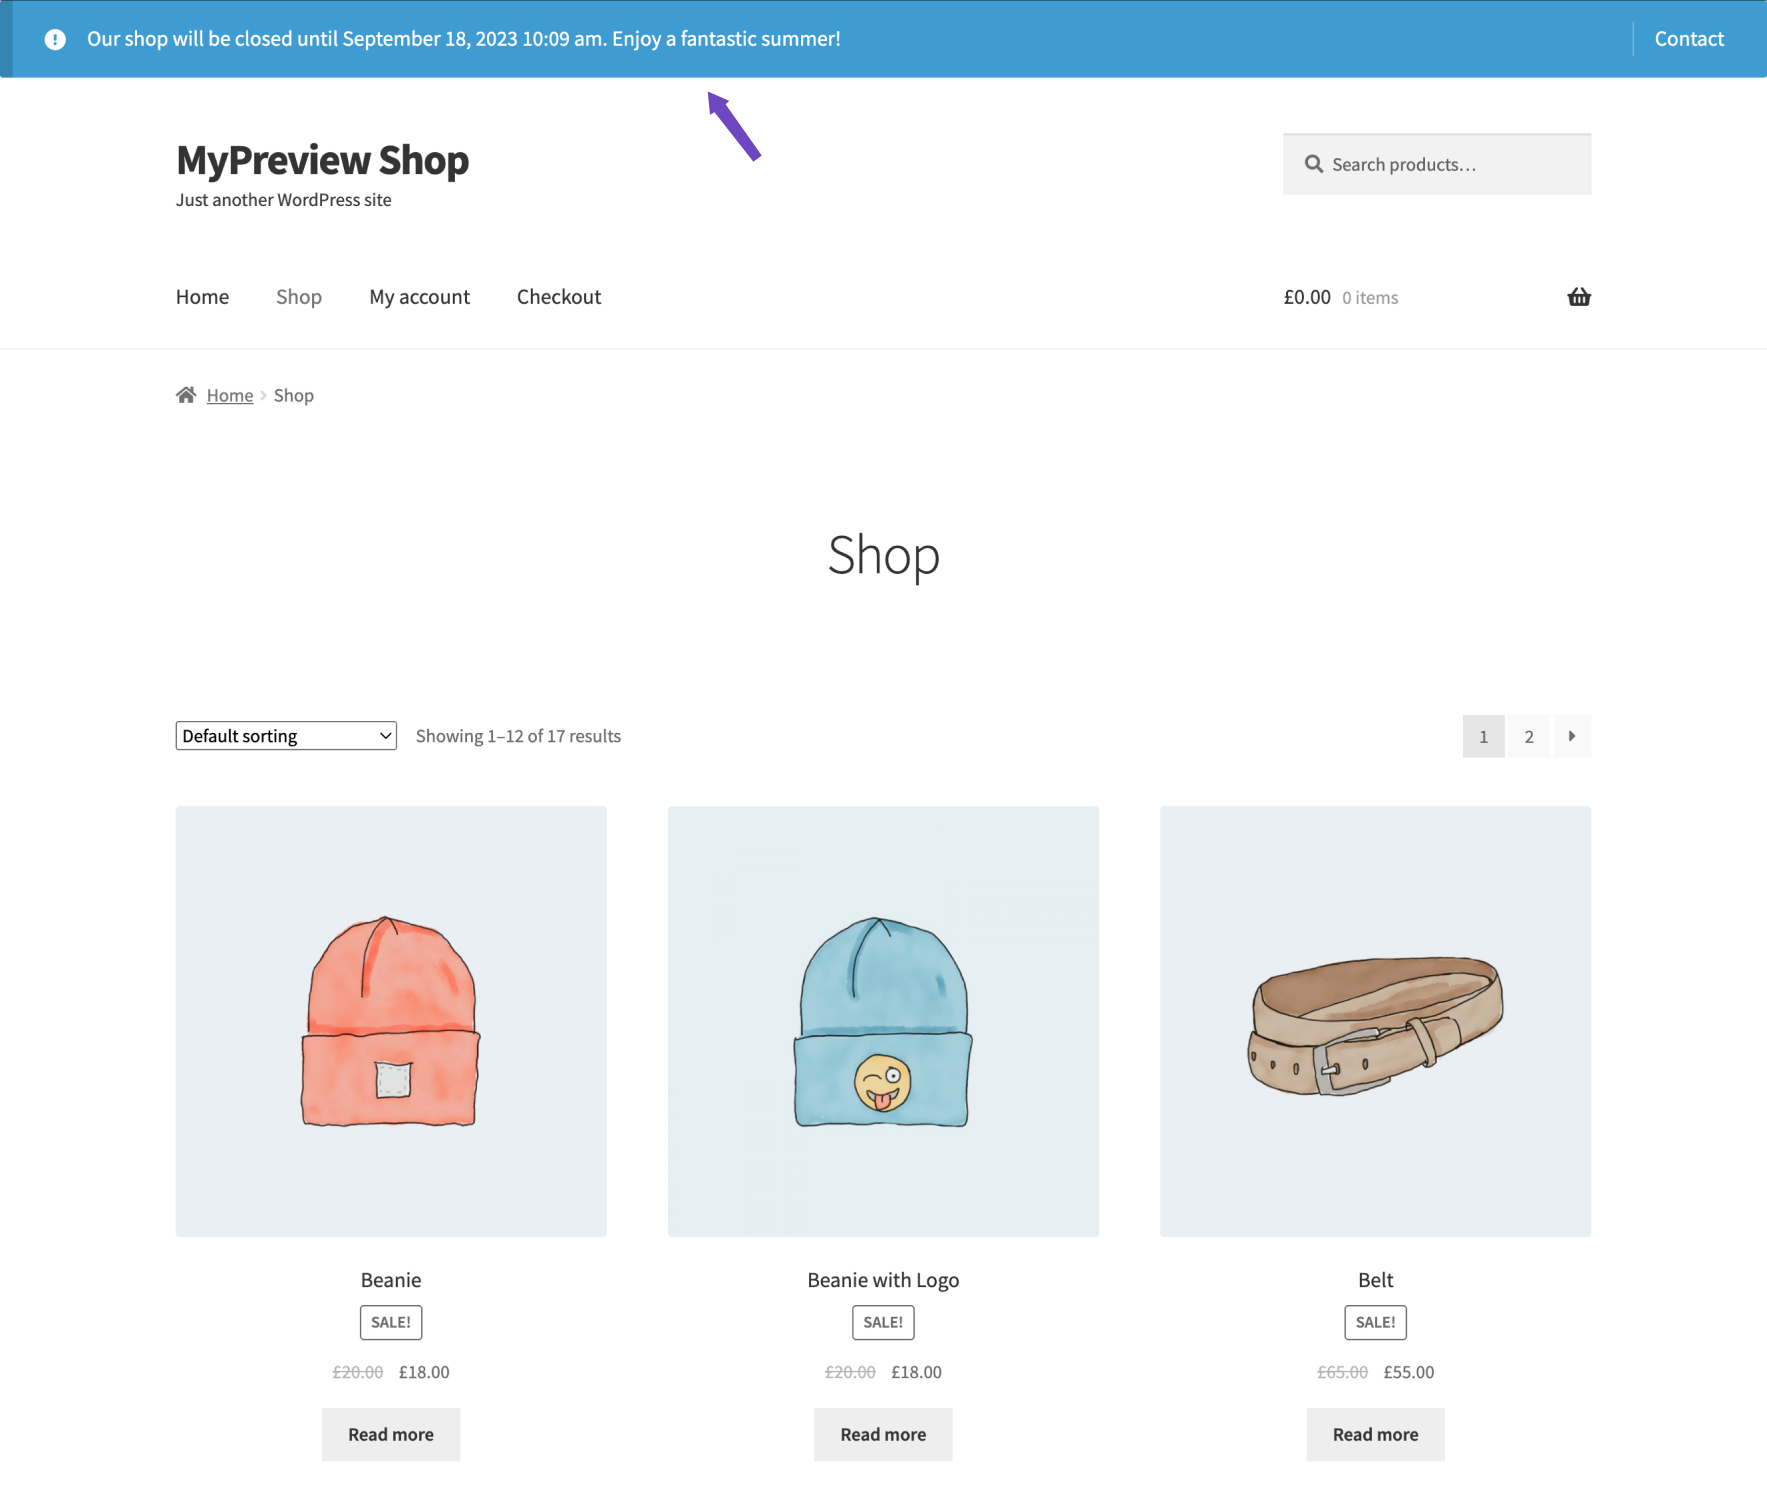
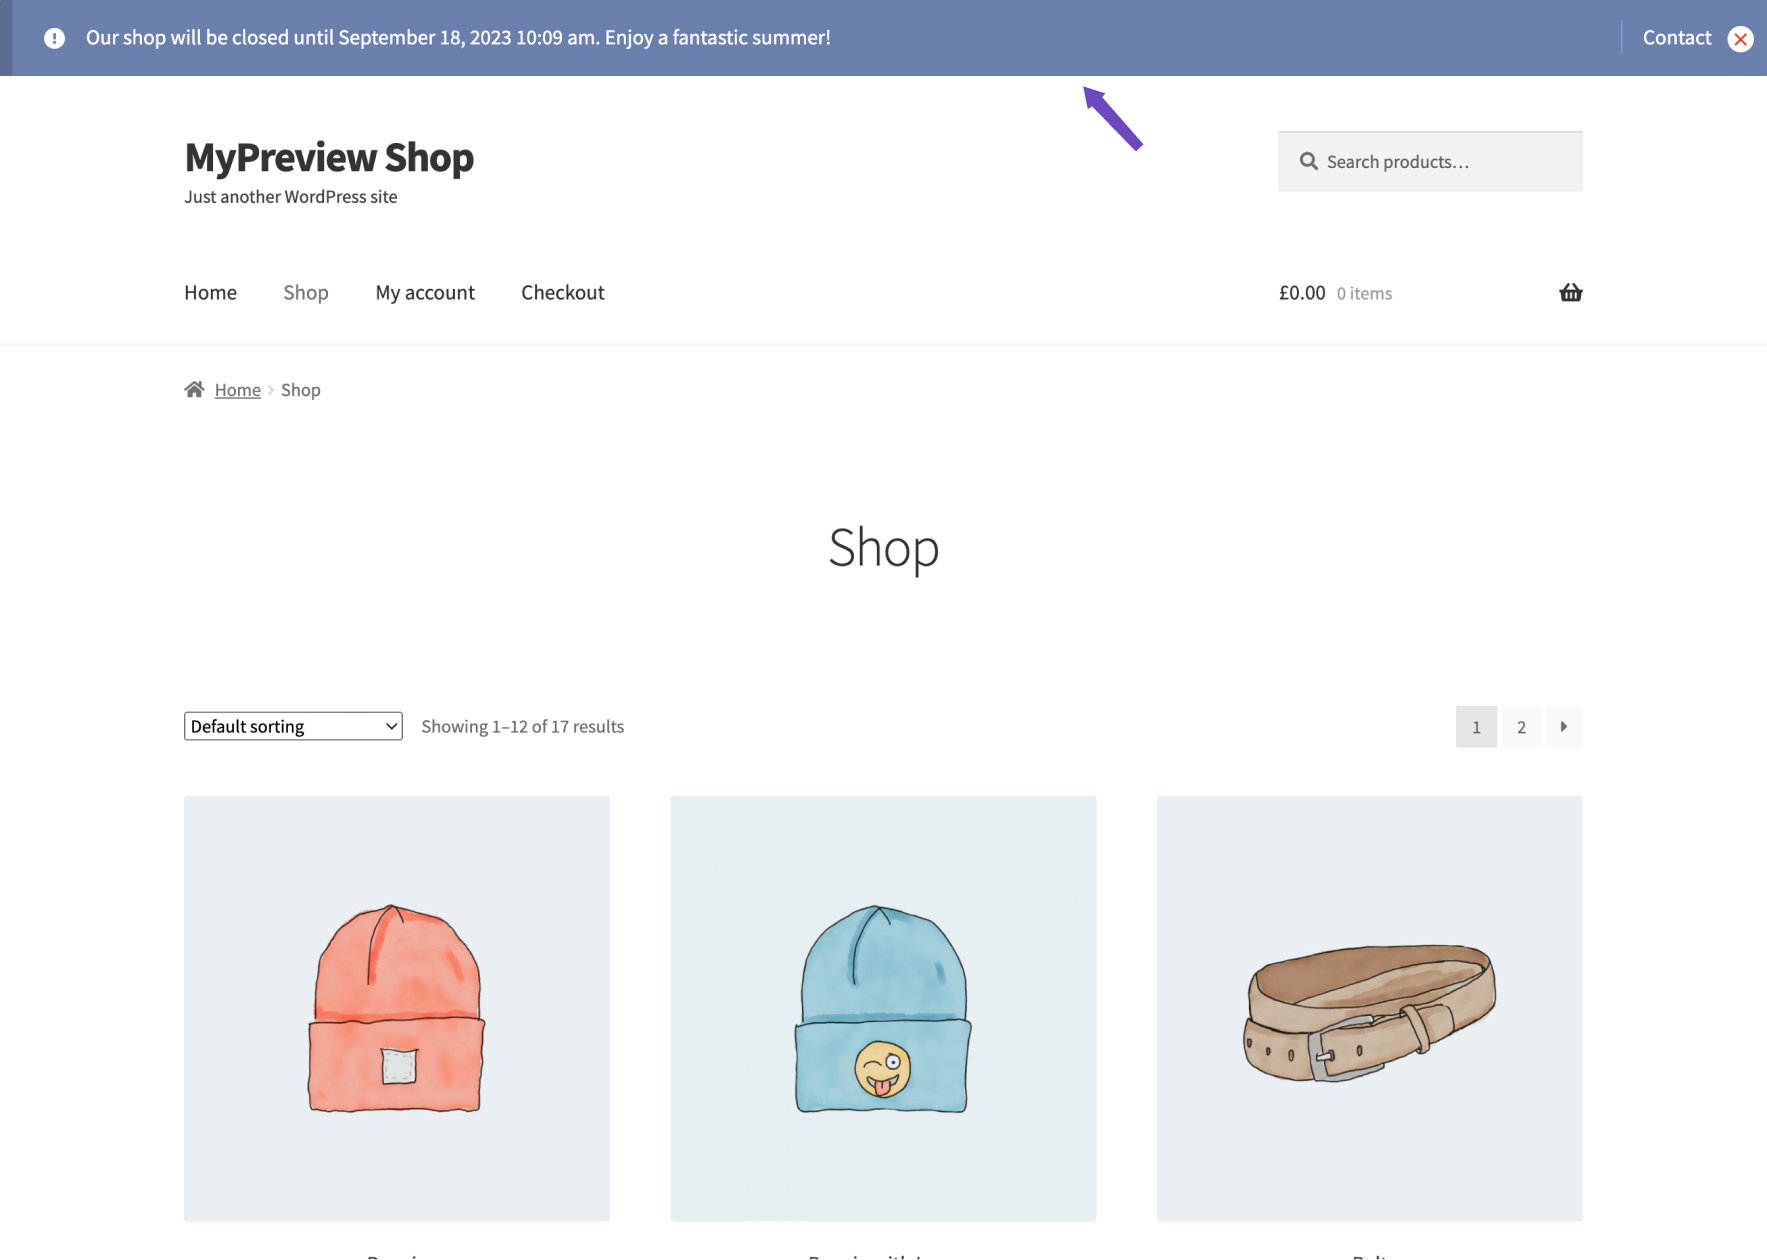
2- Announcement bar:
Alternatively, you have the option to showcase your vacation notice in an Announcement bar. To use the announcement bar:
- Choose the Announcement bar option for Display Type.
- Click on the Save changes button.
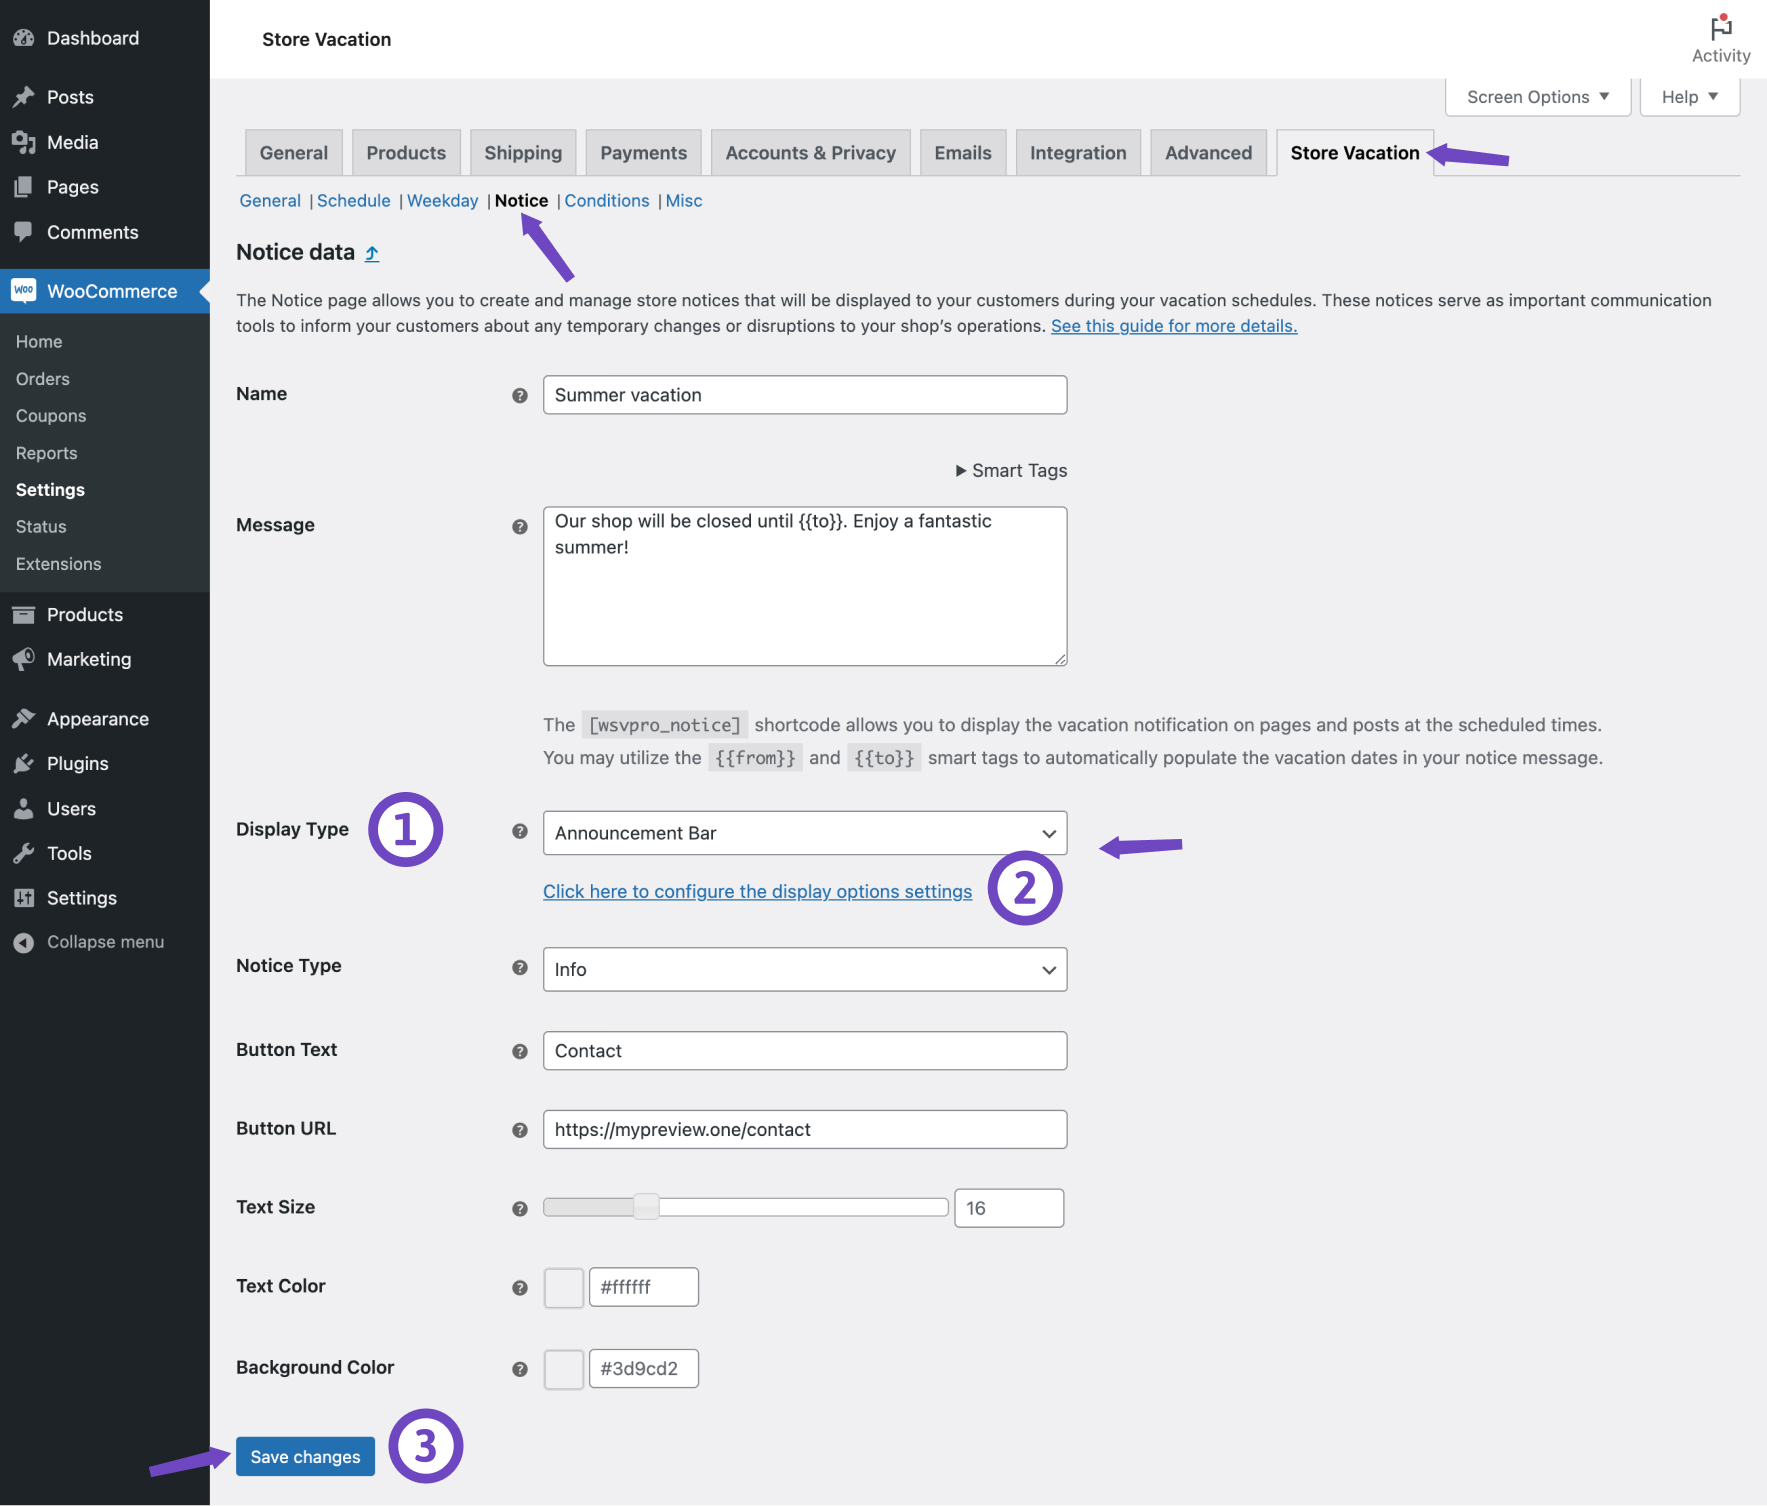
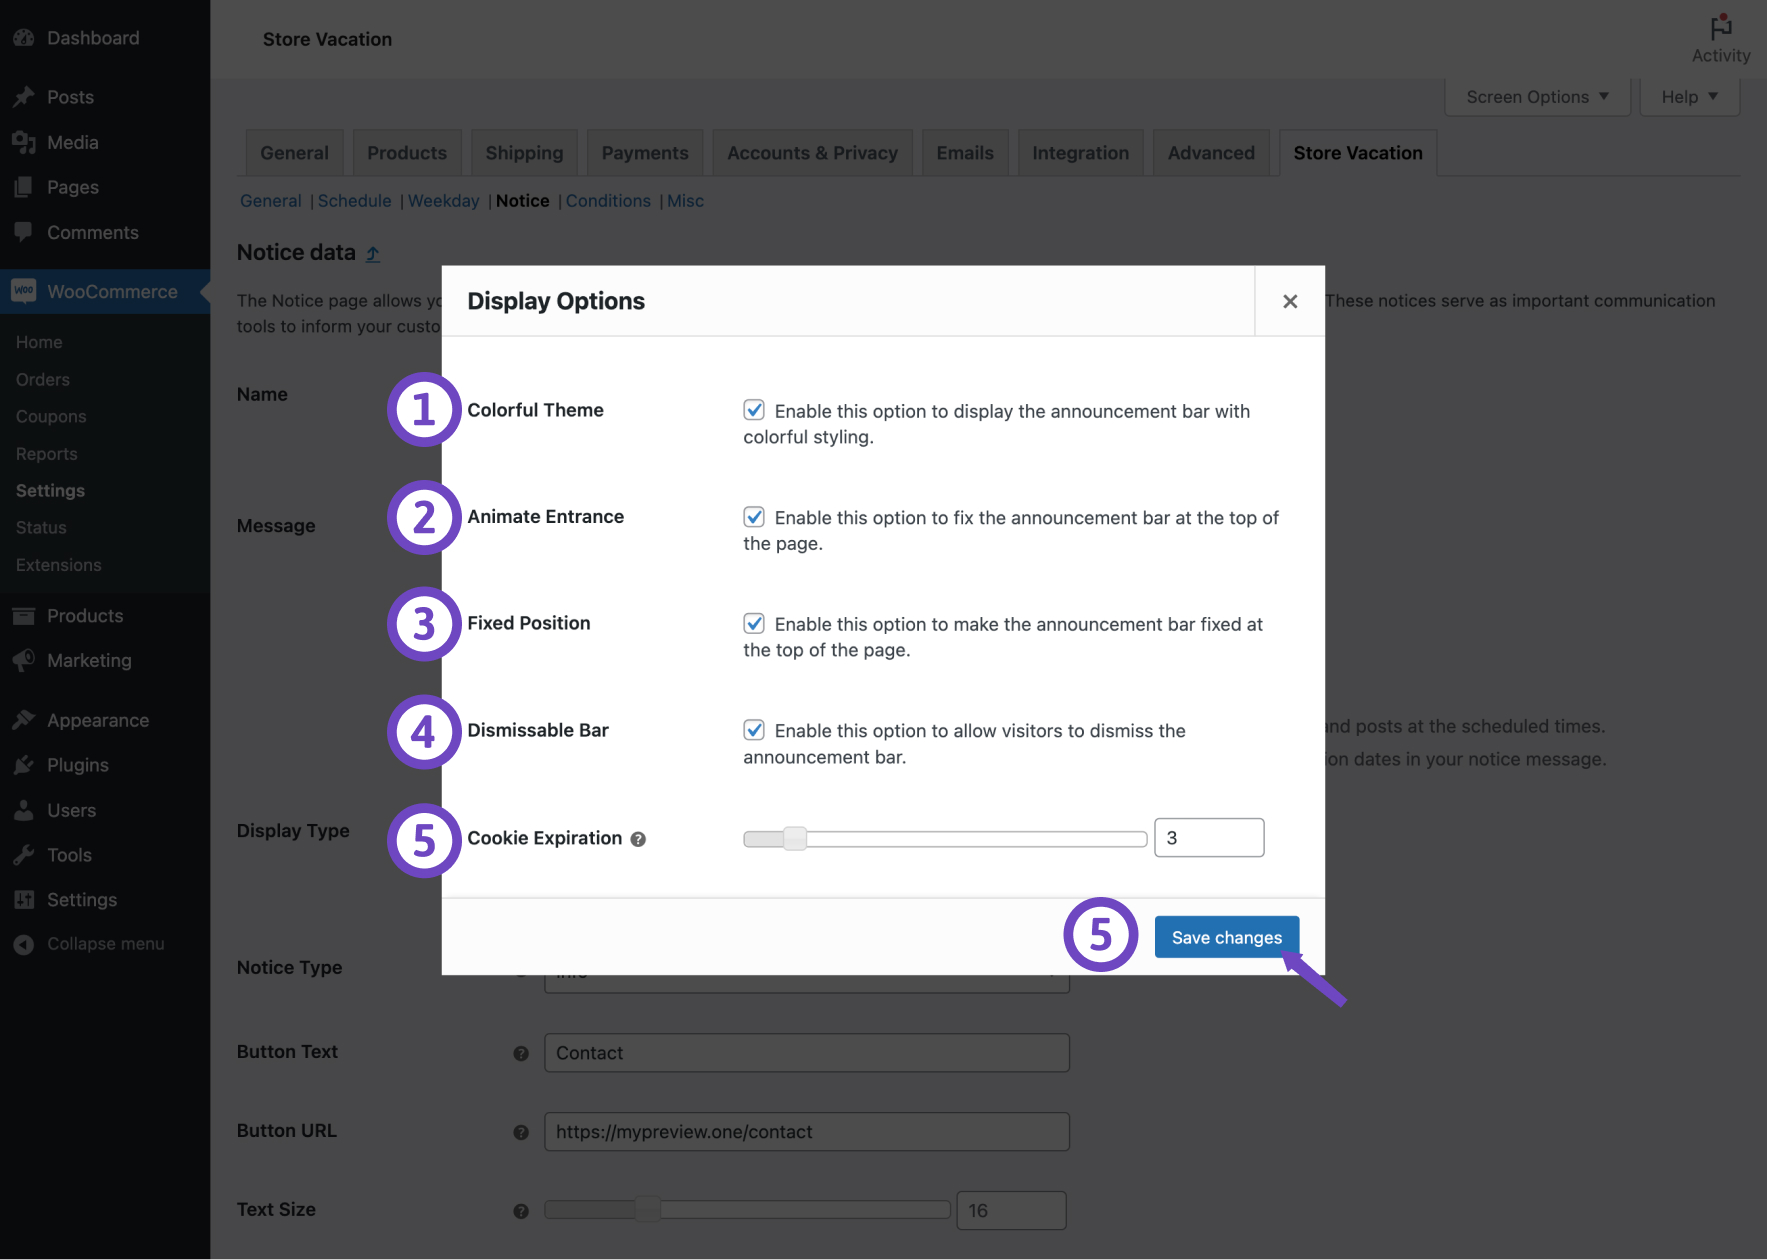
Now, here are some customization options for your Announcement Bar:
- Colorful Theme: Opting for this setting will introduce an eye-catching background animation with a variety of colors to your announcement bar, enhancing its visual appeal.
- Animate Entrance: When activated, this option will include a lively bounce animation as your notice bar appears upon page load, adding an engaging touch to your website.
- Fixed Position: Selecting this feature will affix the announcement bar firmly to the top of your webpage, ensuring it remains in view even as visitors scroll down, providing consistent visibility.
- Dismissable Bar: This option adds a close (x) button to the notice bar, allowing visitors to dismiss it. You can adjust how long the notice remains hidden for a user who clicks the close button using the Cookie Expiration field. However, without setting the Cookie Expiration, the message will reappear if the user refreshes the page.
- Cookie Expiration: This range slider permits you to set a cookie for the announcement bar, measured in hours. For instance, if you select a duration of 3 hours for this option while also enabling the Dismissable Bar checkbox, the bar will remain hidden for the respective user for a period of 3 hours after they click on the close (x) button.
Notice type
↑ Back to topYou can update the notice type within WooCommerce’s built-in notice types. To choose the suitable notice type, it’s helpful to understand the definitions of each type in WooCommerce:
- Info: This is a general notice type commonly used for informational purposes, such as announcements or user guides.
- Success: This notice type commonly indicates a successful action. For example, it is used in WooCommerce when adding an item to the cart or receiving a shipping quote.
- Error: An error notice is triggered when something goes wrong. This message will typically appear on shop pages due to user error or code issues.
To update the notice type:
- Select a Notice Type from the options provided.
- Click on the Save changes button.
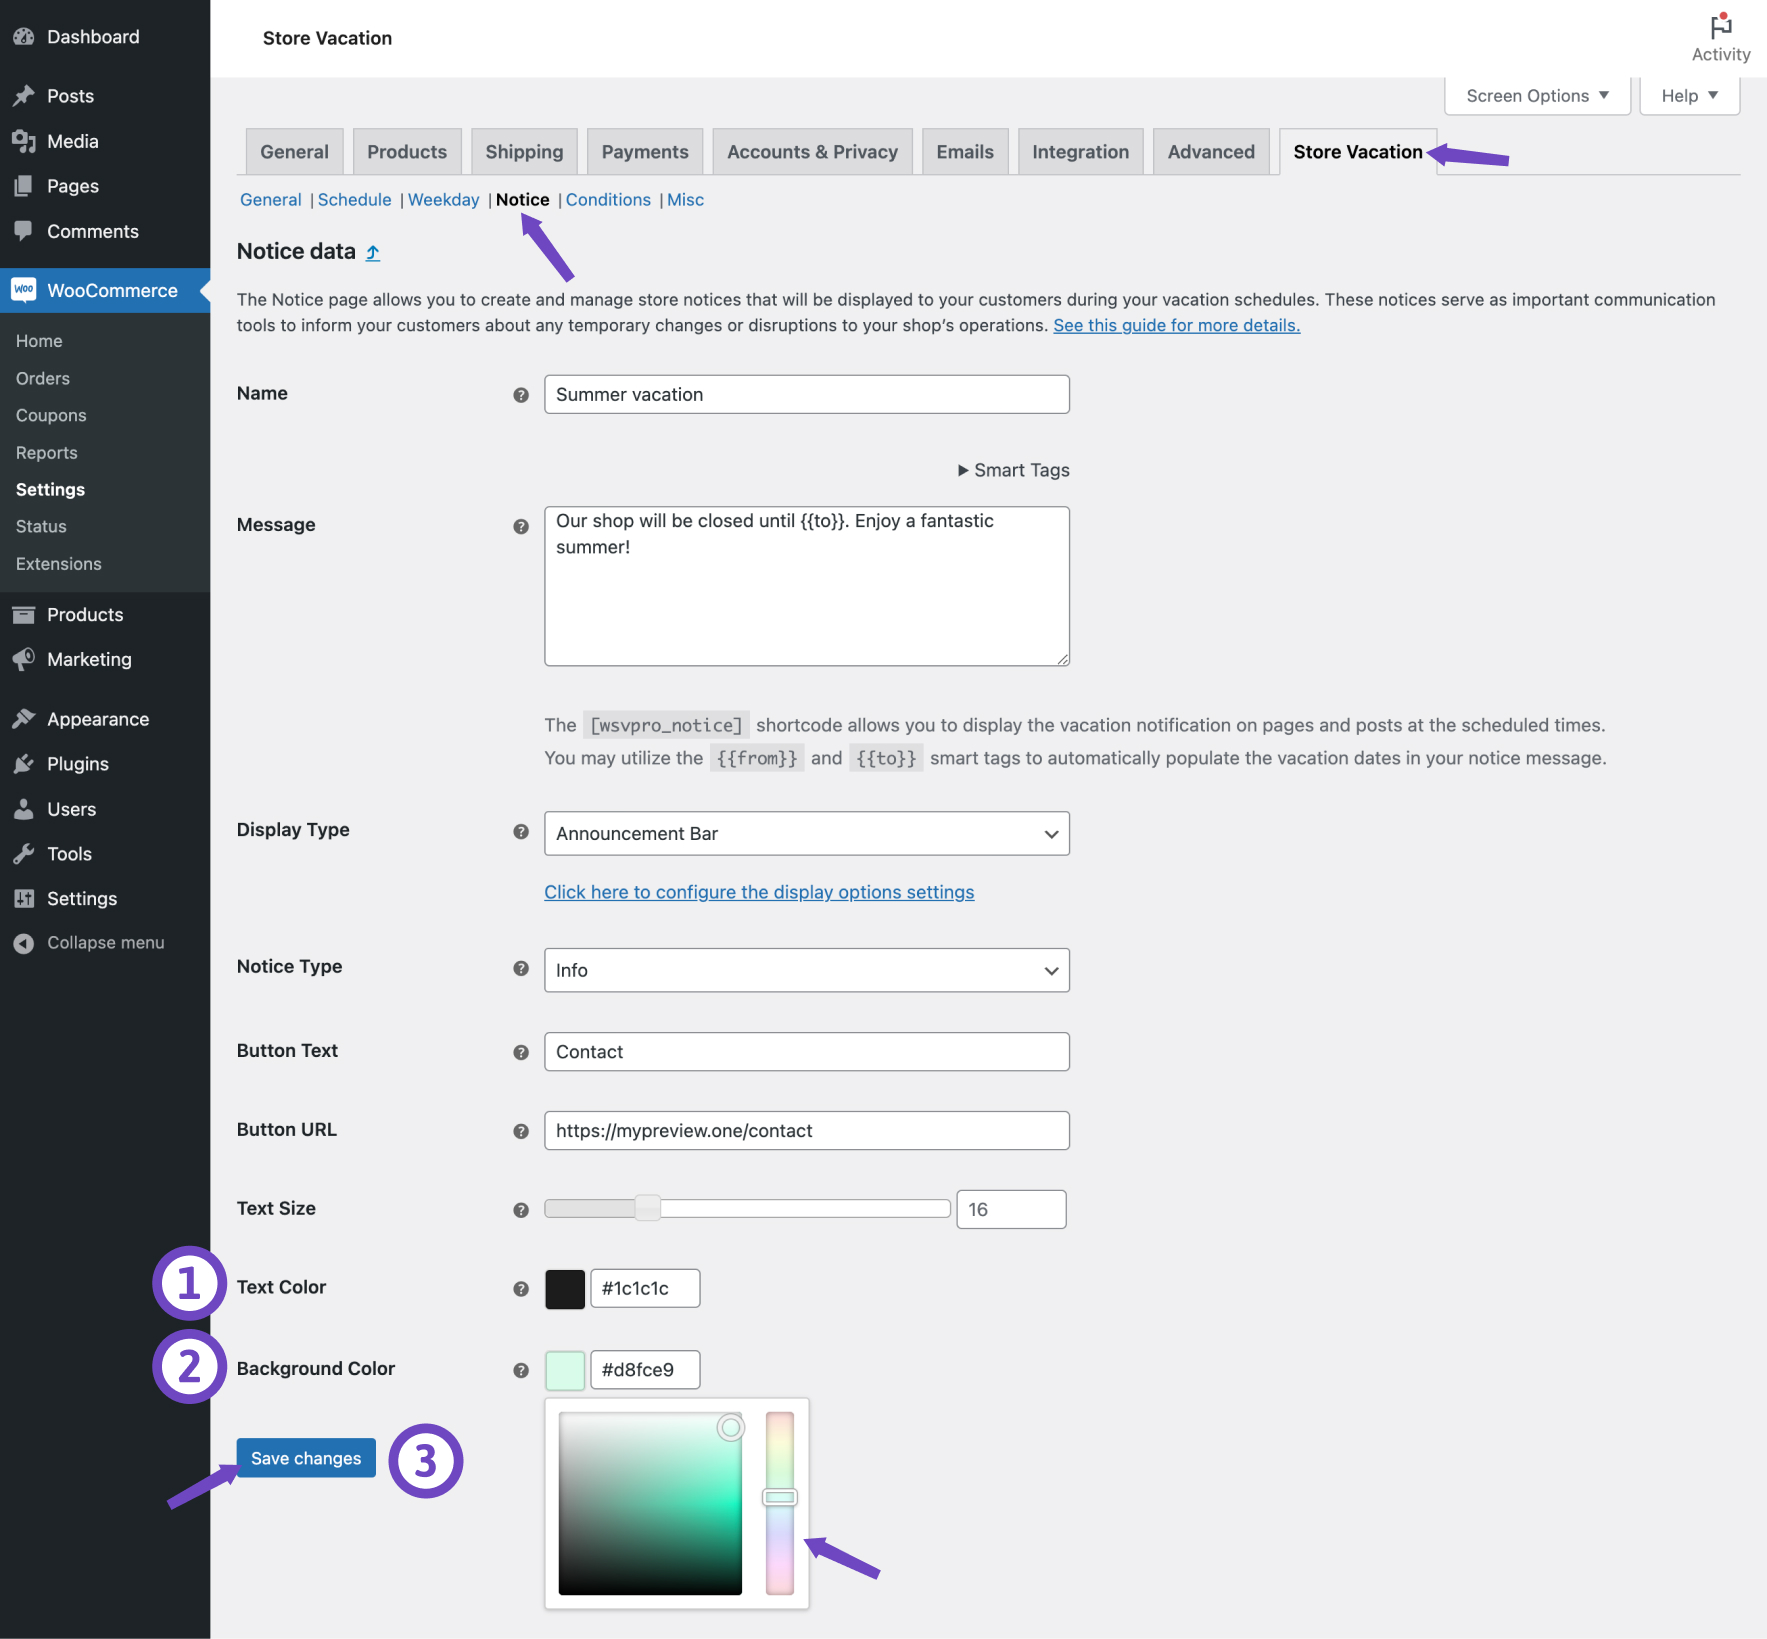
Notice color
↑ Back to topYou can override the color scheme of your vacation notices using the color picker controls provided by the plugin. This allows you to ensure that the notice’s color matches your store’s branding.
- Define a Text color using the color picker.
- Define a Background color using the color picker.
- Click on the Save changes button.
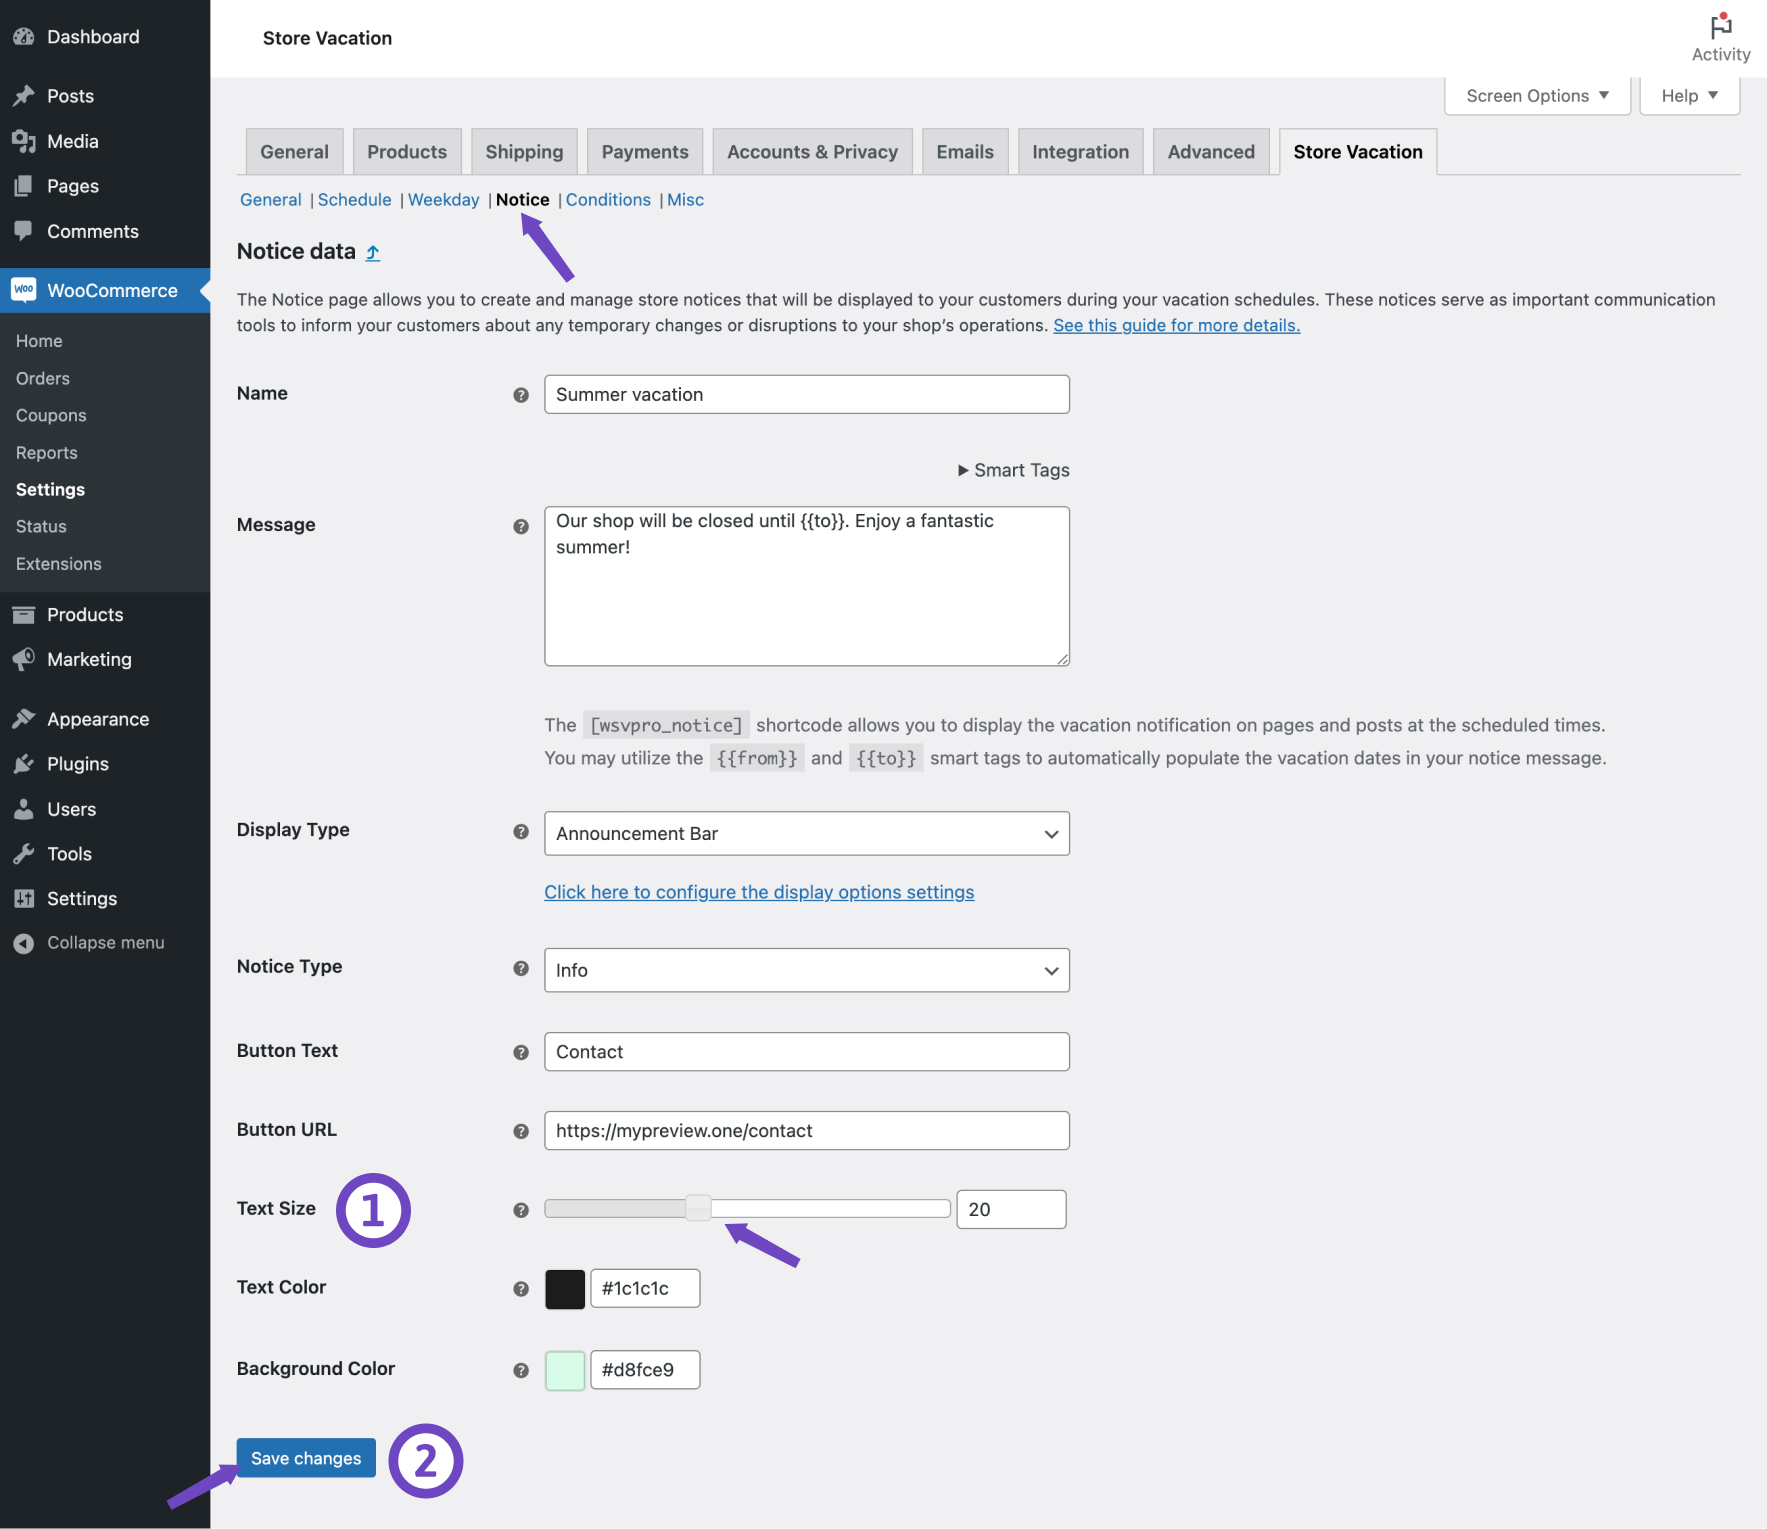
Notice text size
↑ Back to topAdjusting the font size of your vacation notices is also possible using the range slider controls provided by the plugin. This way, you can ensure that the notice text is readable and aligns with your overall design.
- Use the range slider to adjust the Text Size as desired.
- Click on the Save changes button.
Vacation Notice Display
↑ Back to topThe vacation notice that the plugin generates is meant to be displayed on WooCommerce pages, such as the shop and product pages, during the period of your vacation. However, we understand that you may want to extend the visibility of your message to other pages on your website.
You can opt to add your message to other pages through the Store Vacation Notice block, Elementor widget, or the shortcode.
Notice block
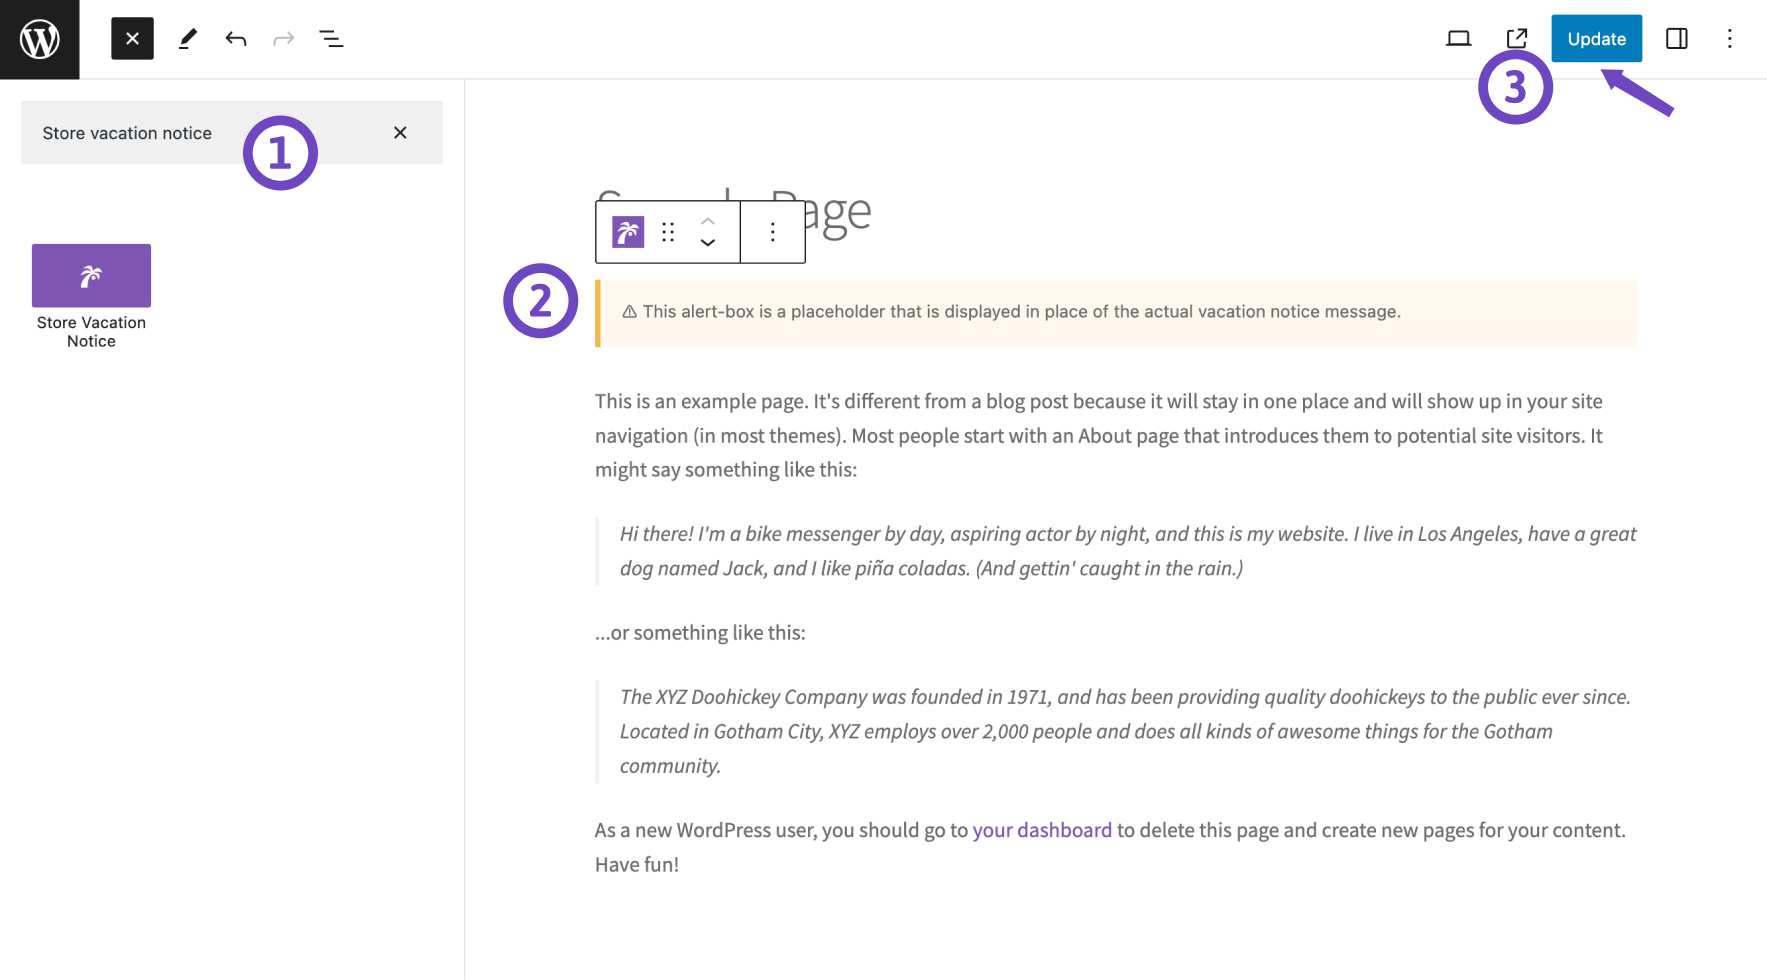
↑ Back to topIf you have pages on your website where you want to display your vacation notice, you can use the Store Vacation Notice block to achieve this. In addition to the default WooCommerce pages, you can add this block to the editor of your desired page. Follow these simple steps to display your vacation notice on a specific page:
- Edit the page or post where you want to add the vacation notice block.
- Click on the (+) button to add a new block in the editor.
- Search for the Store Vacation Notice block and select it from the available block options.
- Click on the Update button to make the changes live on your page.
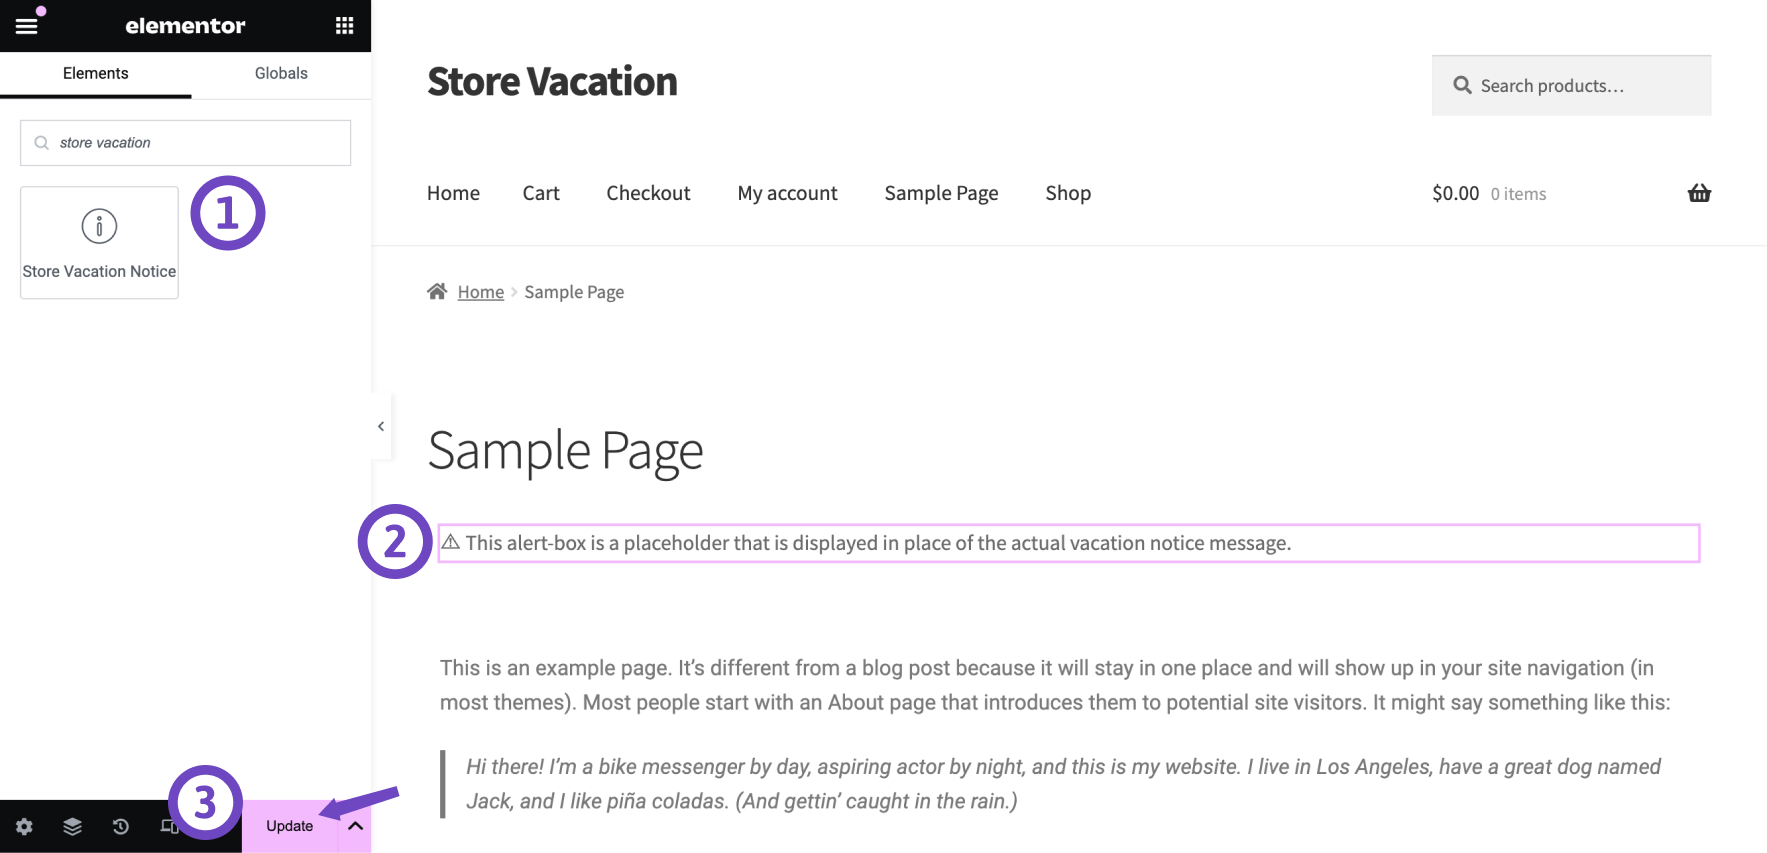
Elementor widget
↑ Back to topIf you use the Elementor page builder to design your website, you can integrate the Store Vacation Notice widget into your pages. To add the vacation notice widget to your page or post, follow these steps:
- Edit the page or post where you want to add the vacation notice block.
- In the Elementor editor, search for the Store Vacation Notice widget.
- Drag and drop the widget into the desired section of your page.
- Click on the Update button to make the changes live on your page.
Shortcode
↑ Back to topIf you are using a page builder plugin without specific integrations for Store Vacation plugin, you can add the vacation notice to your pages with [wsvpro_notice] shortcode.
General Settings
↑ Back to topOn the General page, you can access the Force Close and User Role options.
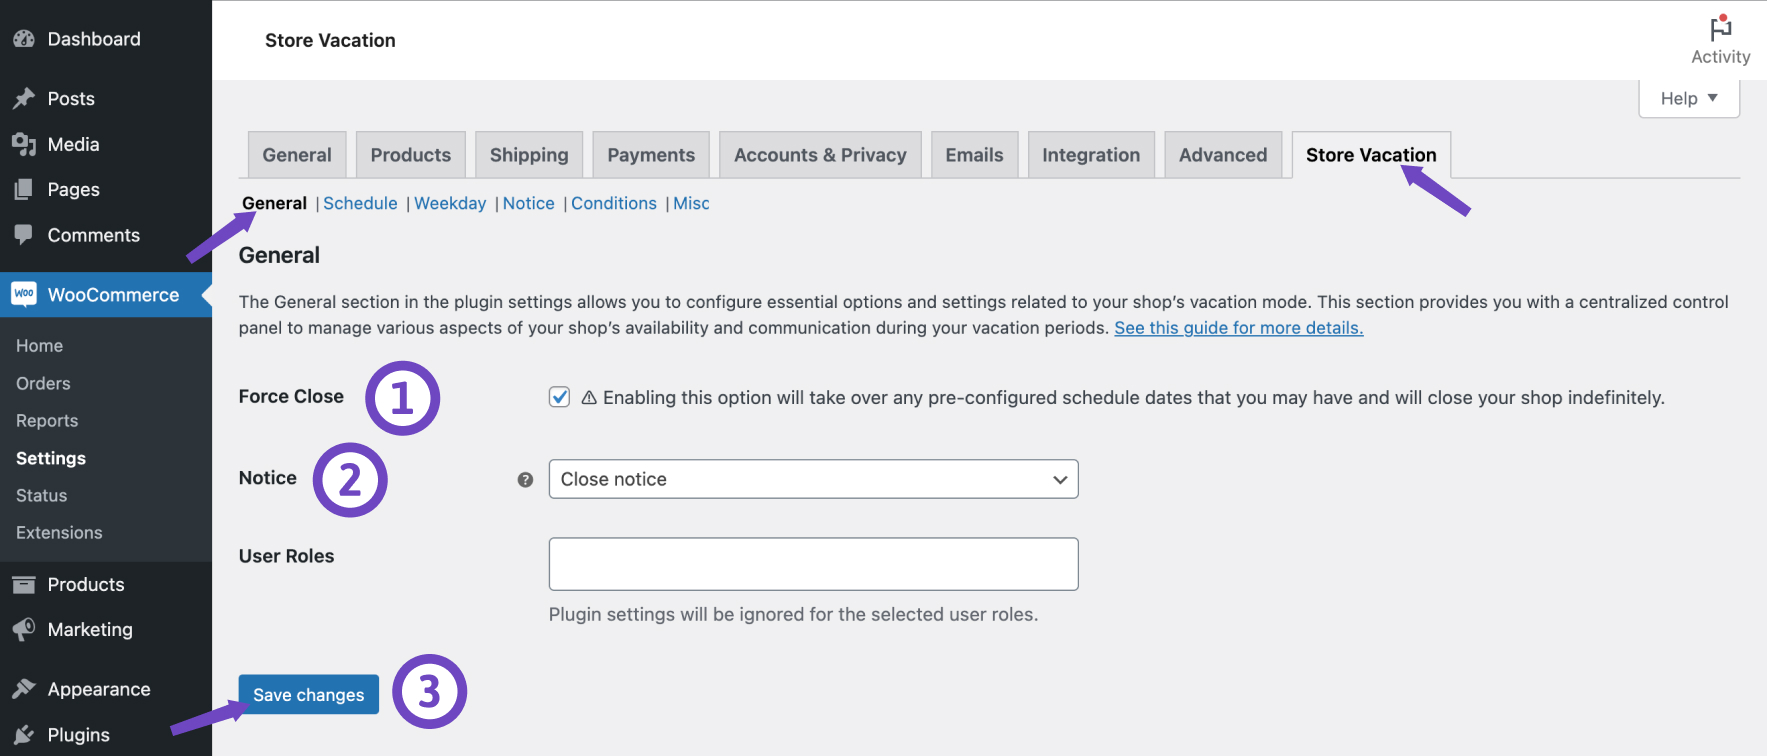
Force close
↑ Back to topThis option allows you to activate vacation mode without a predefined schedule or end time. During this time, your shop won’t accept any new orders until you disable the Force Close manually. Here’s how you can activate the Force Close option:
- Go to WooCommerce > Settings > Store Vacation > General.
- Choose whether to activate Force Close.
- Select the Notice you want to display during the vacation mode. You can learn how to create and manage vacation notices here.
- Click on the Save changes button.
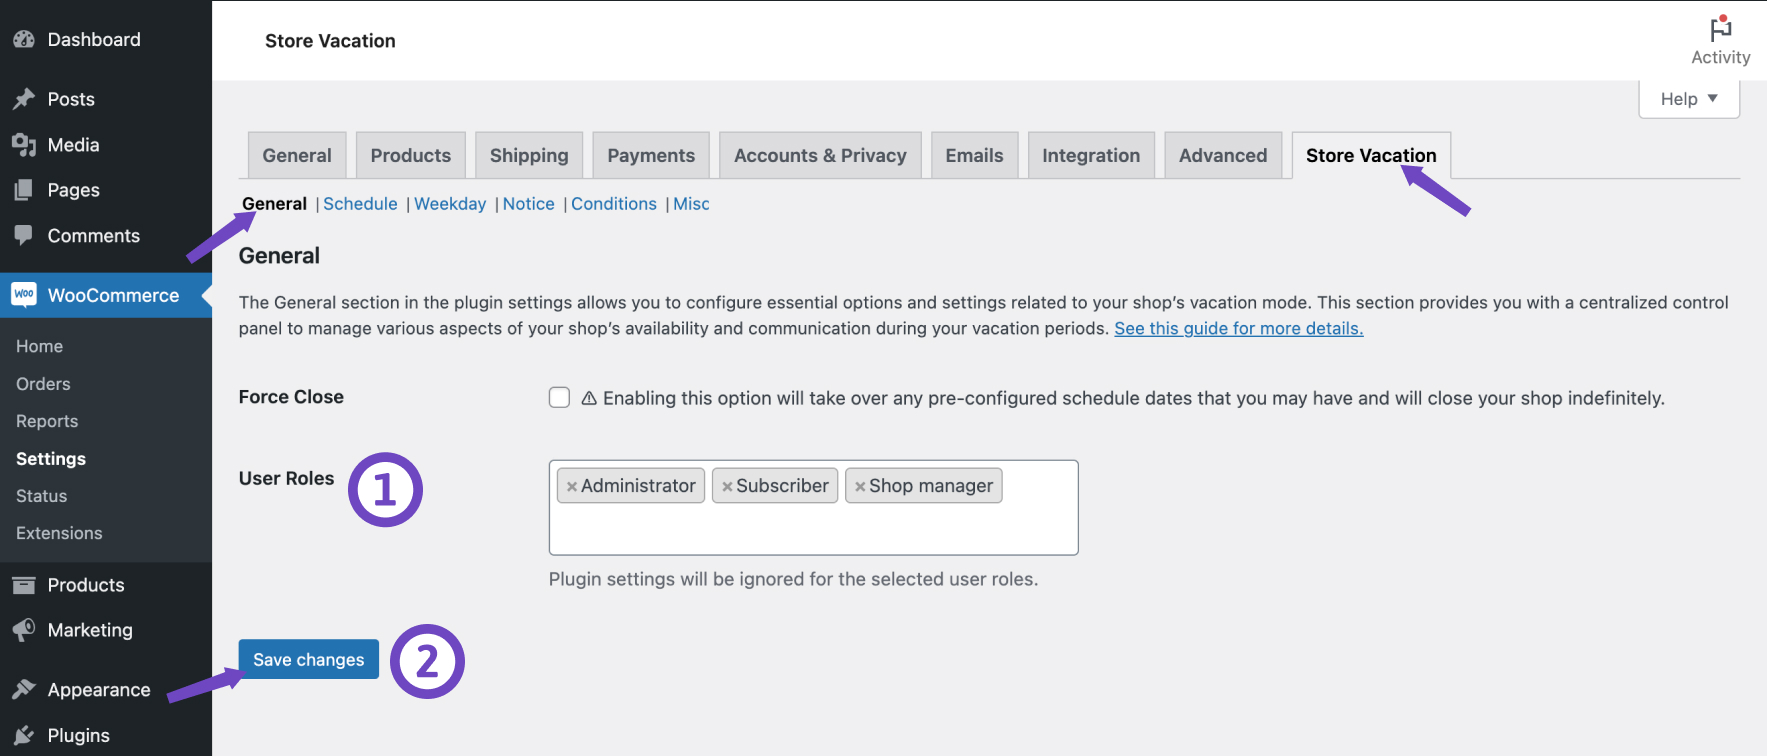
User roles
↑ Back to topYou can exclude specific user roles, like administrators or shop managers, from the vacation mode. This means that your shop will remain open for these user roles even during vacation mode. Here’s how you can do this:
- Go to WooCommerce > Settings > Store Vacation > General.
- Choose User Roles to ignore from vacation mode.
- Click on the Save changes button.
Misc Settings
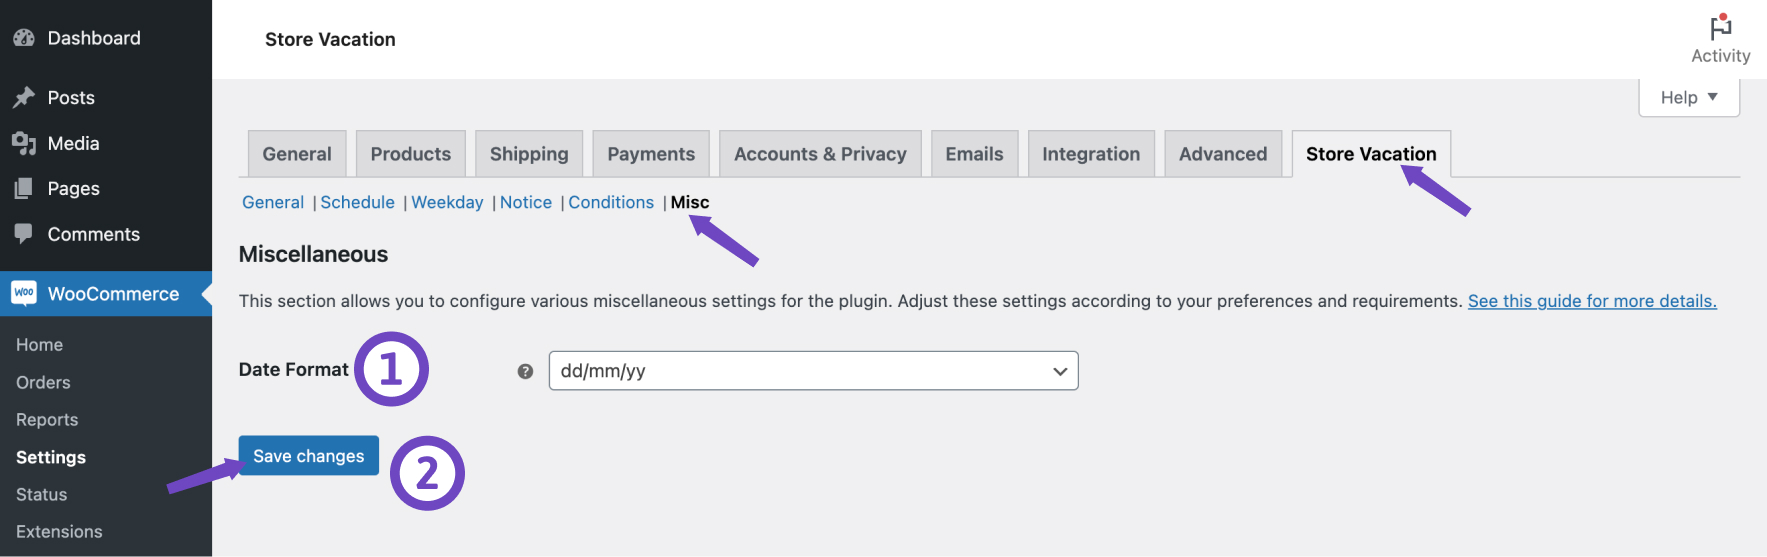
↑ Back to topIn the Miscellaneous settings section, you have the option to customize the date format used across various date fields within the setting pages. This feature allows you to select a format that aligns with the standard date conventions of your country, promoting consistency and clarity throughout your store vacation management process. To adjust the date format:
- Go to WooCommerce > Settings > Store Vacation > Misc.
- Select the Date Format that best corresponds to your preferred standard or regional convention.
- Click on the Save changes button.
Conditional Logic
↑ Back to topConditional Logic provides you the ability to establish dynamic rules for product availability when your store is in vacation mode. By customizing which products can be purchased, you can maintain control over your shop’s operations even when you’re away.
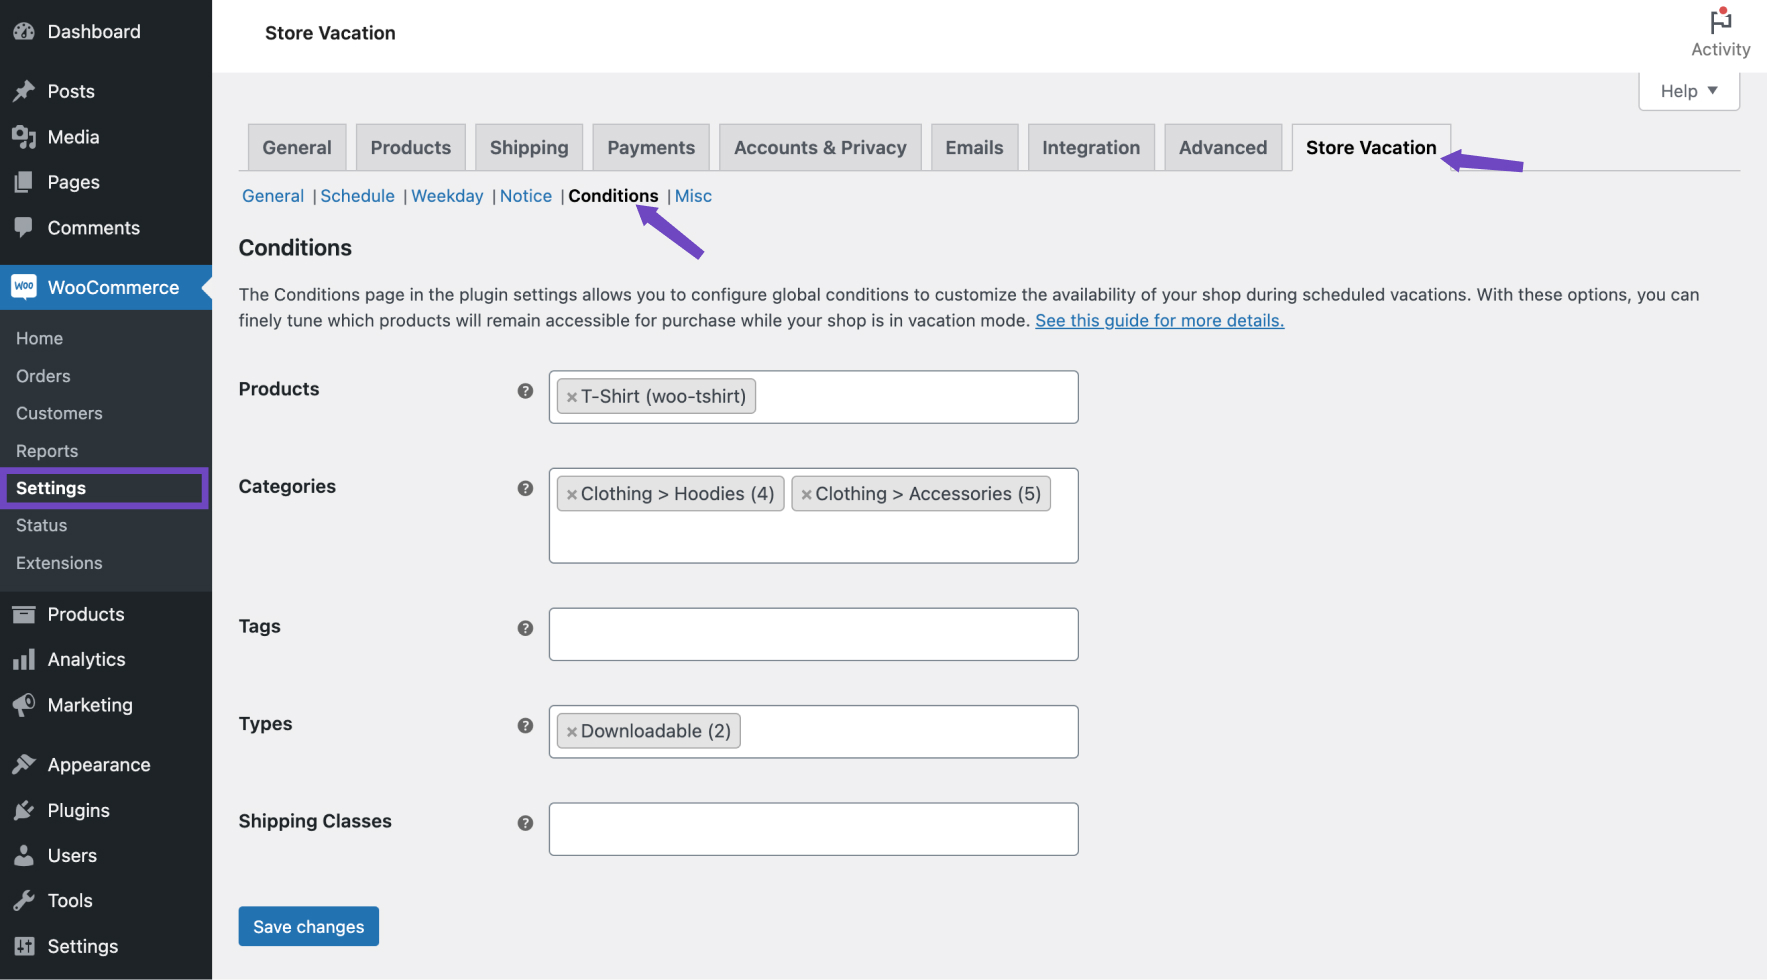
Setting global conditions
↑ Back to topGlobal rules apply universally to all schedules and weekdays. Here’s how to define them:
- Go to WooCommerce > Settings > Store Vacation.
- In the current tab, find the Conditions section.
- Choose the products you want to exclude from vacation mode. Customers can purchase these selected products during vacation mode.
- Click on the Save changes button.
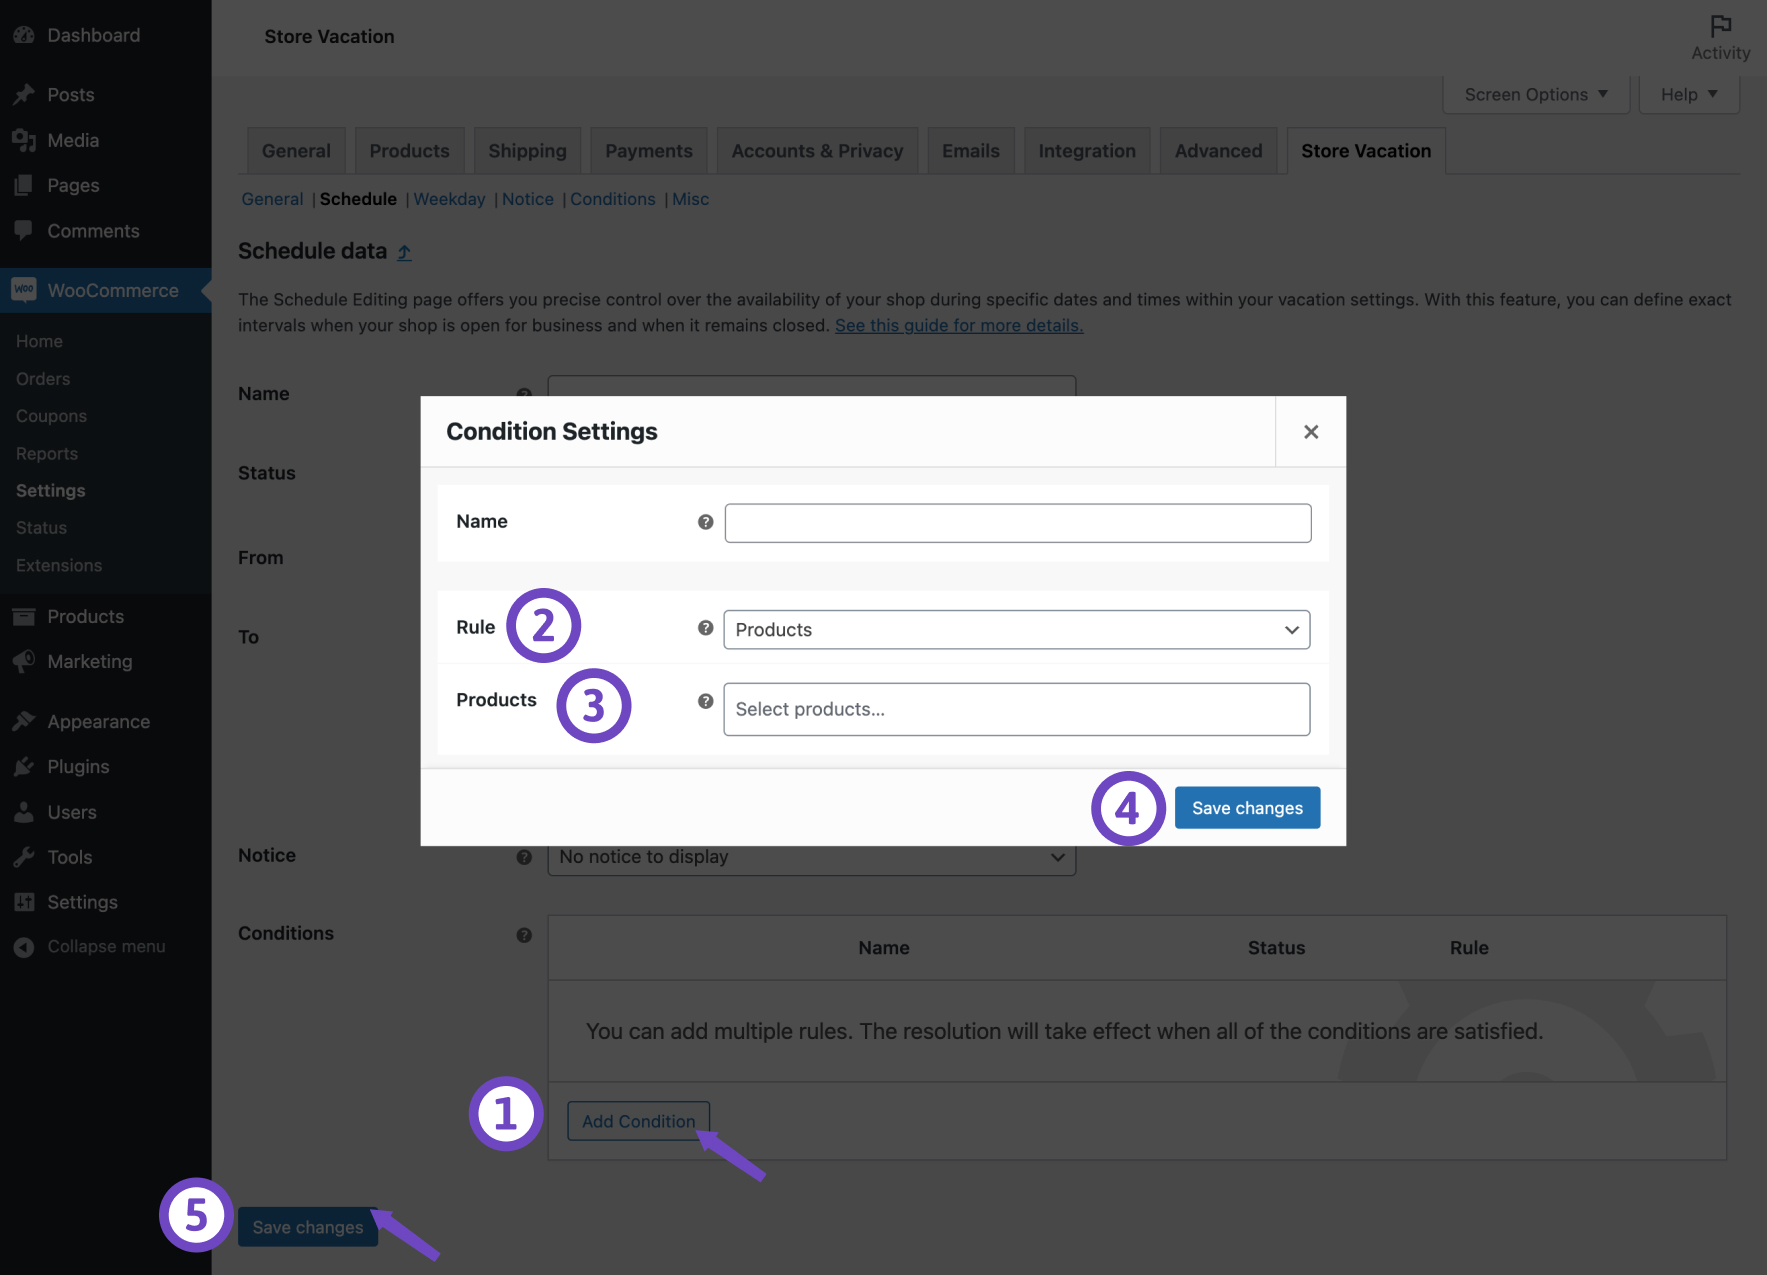
Setting individual conditions
↑ Back to topIn addition to global settings, you can apply conditions for each schedule or weekday separately.
- Edit the desired Schedule or Weekday plan.
- Within the Conditions table, click on Add Condition button.
- Optionally, provide a descriptive Name for the condition.
- Use the drop-down field to specify a Rule for your vacation mode
- Depending on the selected rule, choose from the available options.
- Click on the Save changes button.
Examples of rules
↑ Back to topHere are some common scenarios where you might apply conditional logic:
- Products: Select individual products to keep available during vacation mode.
- Categories: Allow the purchase of items within certain categories.
- Tags: Allow the purchase of products that are tagged with specific labels.
- Types: Set rules to make certain types of products available during closing times.
- Shipping Classes: Allow products assigned to particular shipping classes to be purchasable.
- Brands: If you’re utilizing WooCommerce Brands, you have the option to permit the purchase of products from specific brands.
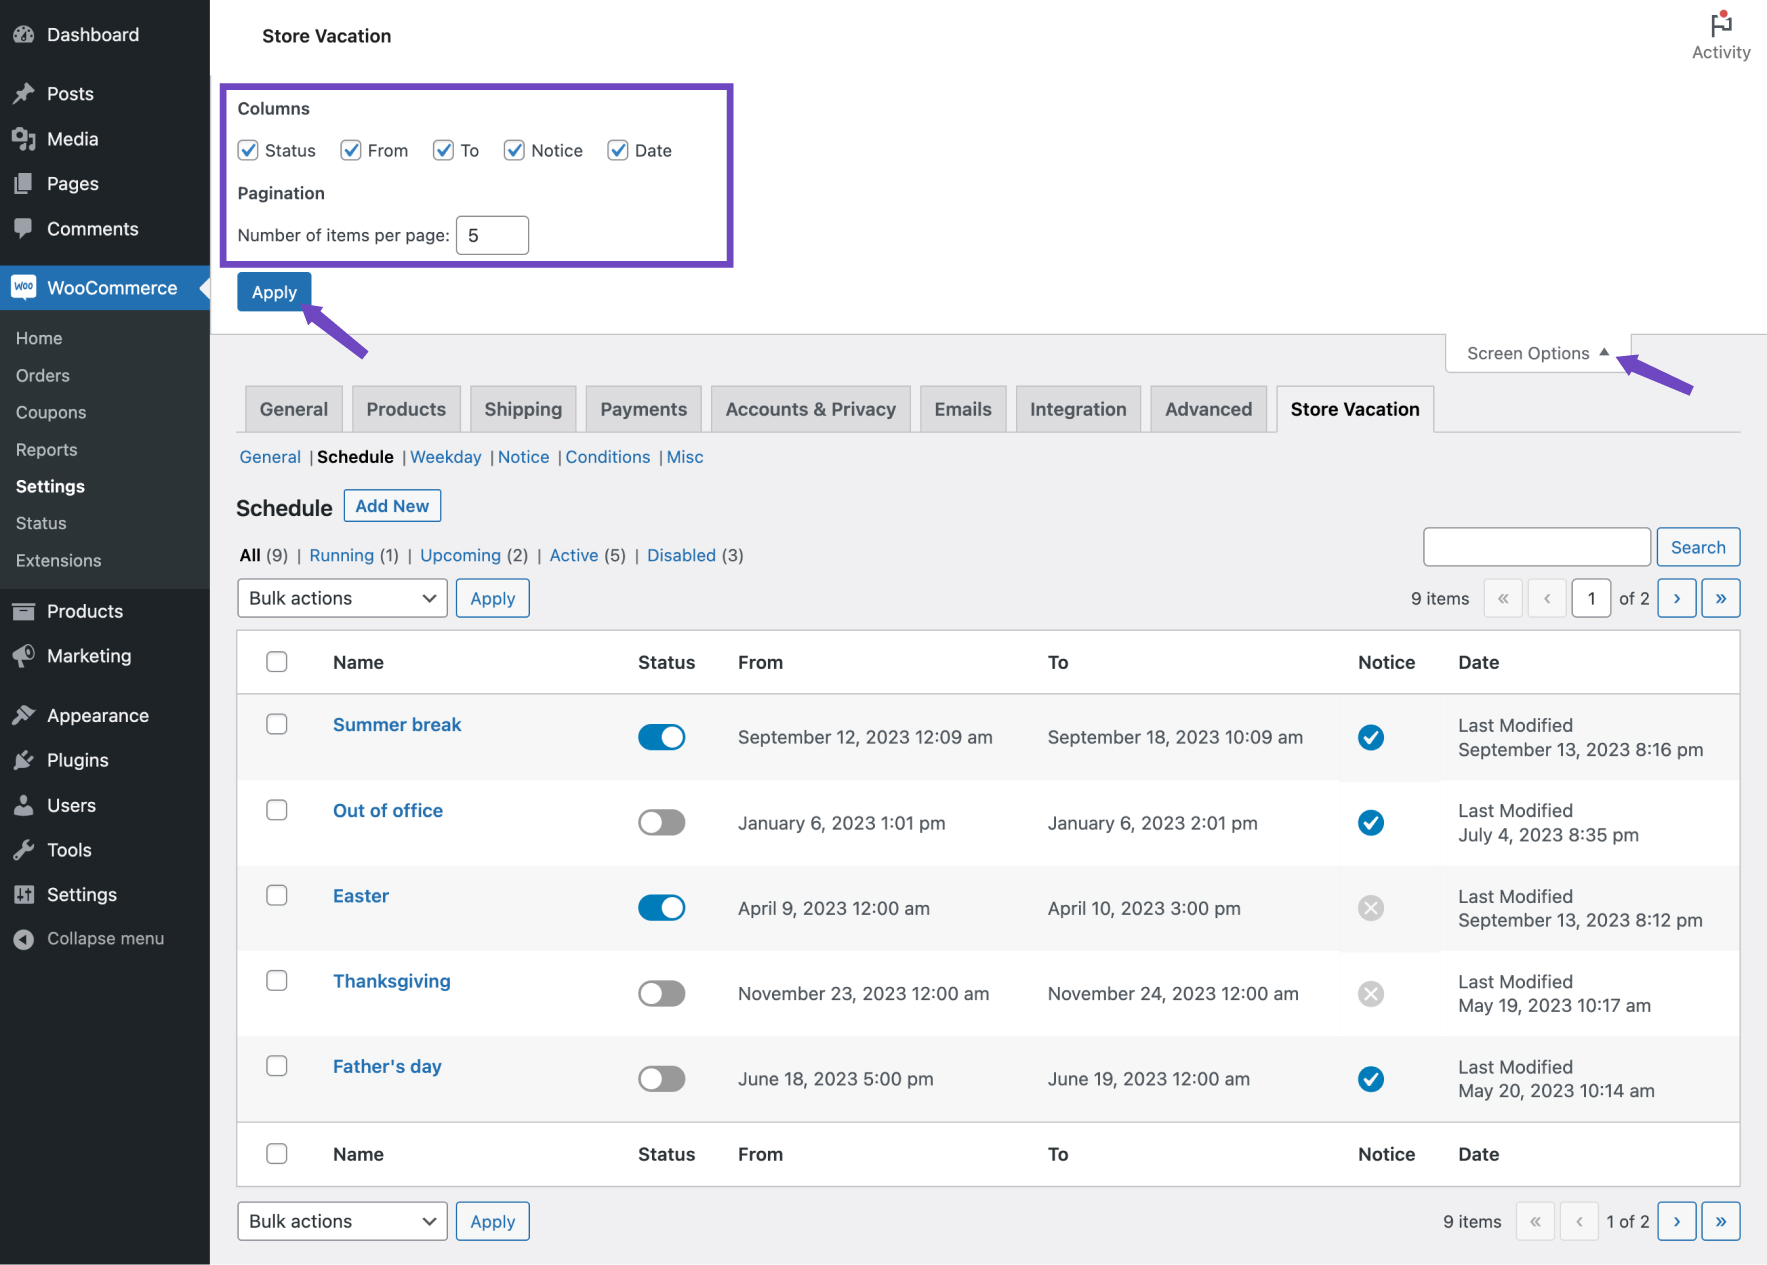
Customize Overview Tables
↑ Back to topYou can customize the overview table to fit your unique needs and preferences. Here’s how you can personalize your schedule, weekday, or notice tables:
- Click on the Screen Options located at the top right corner of your screen.
- Inside this menu, you can toggle the visibility of columns and change the Number of items displayed per page.
Updating Your Timezone
↑ Back to topIf you need to adjust your site’s time and date settings to align with a different timezone, follow these steps:
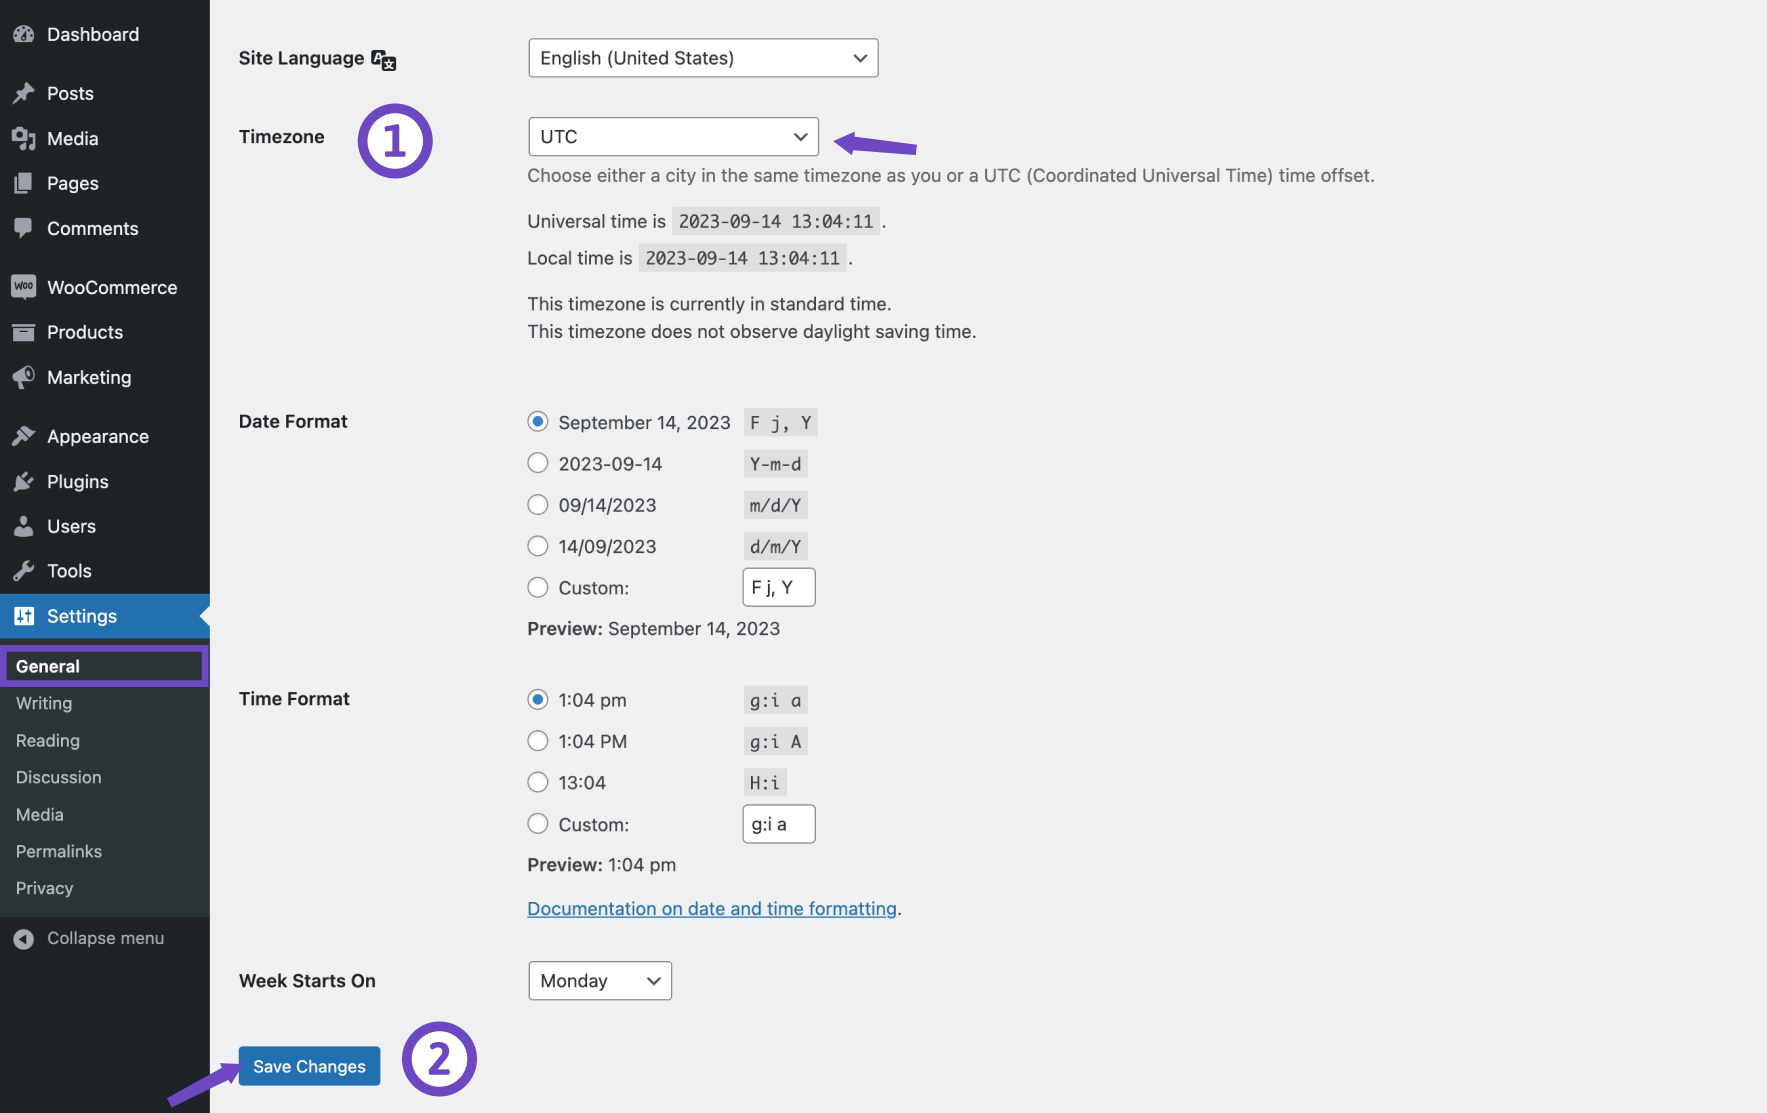
- Navigate to Settings > General.
- Choose your desired Timezone from the available options.
- Click on the Save changes button.
Import and Export
↑ Back to topImport and export features enable you to transfer your plugin settings to a different website. Your data will be stored in a JSON file, which can be imported into another WooCommerce store. Since shop managers have the ability to delete notices or schedules, we suggest regularly exporting your data manually as a backup.
Export
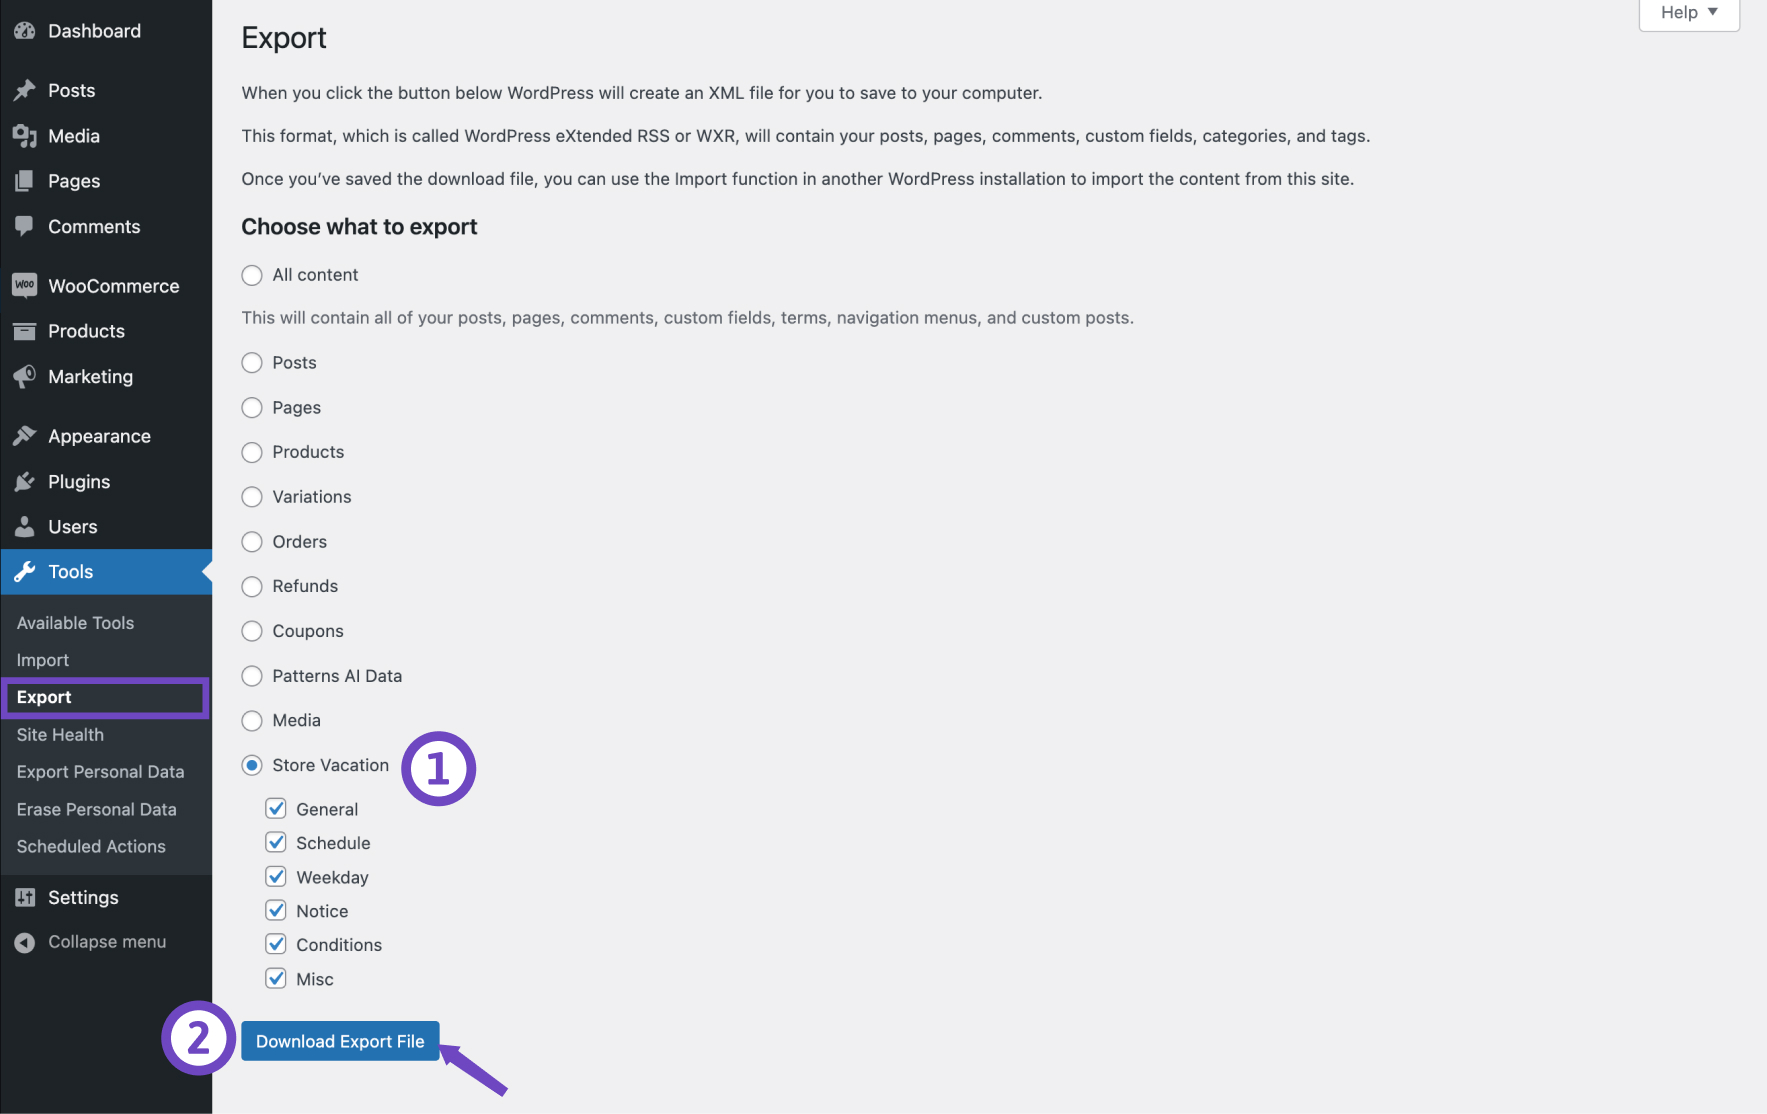
↑ Back to topBefore exporting your content, make sure your website is accessible to the public and not under maintenance or password protected. It’s also a good idea to tidy things up by removing unnecessary schedules and deleting unused notices to keep the export file small.
- Go to Tools > Export.
- Choose Store Vacation.
- Select the settings you want to export by ticking the checkboxes.
- Click on the Download Export File button.
- Wait for WordPress to process the export. Once done, you’ll get a JSON file to save on your computer.
Only settings from the General and Conditions tabs will be overwritten during import. If you already have schedules on your store, they’ll stay as they are, and the plugin will match new notices to the appropriate schedules automatically.
Import
↑ Back to topBefore importing, make sure the exported file isn’t too big for your server to handle, as this might cause memory issues. If you encounter an error like Fatal error: Allowed memory size of 8388608 bytes exhausted, you may need to increase your server’s memory limit or split the settings into smaller files.
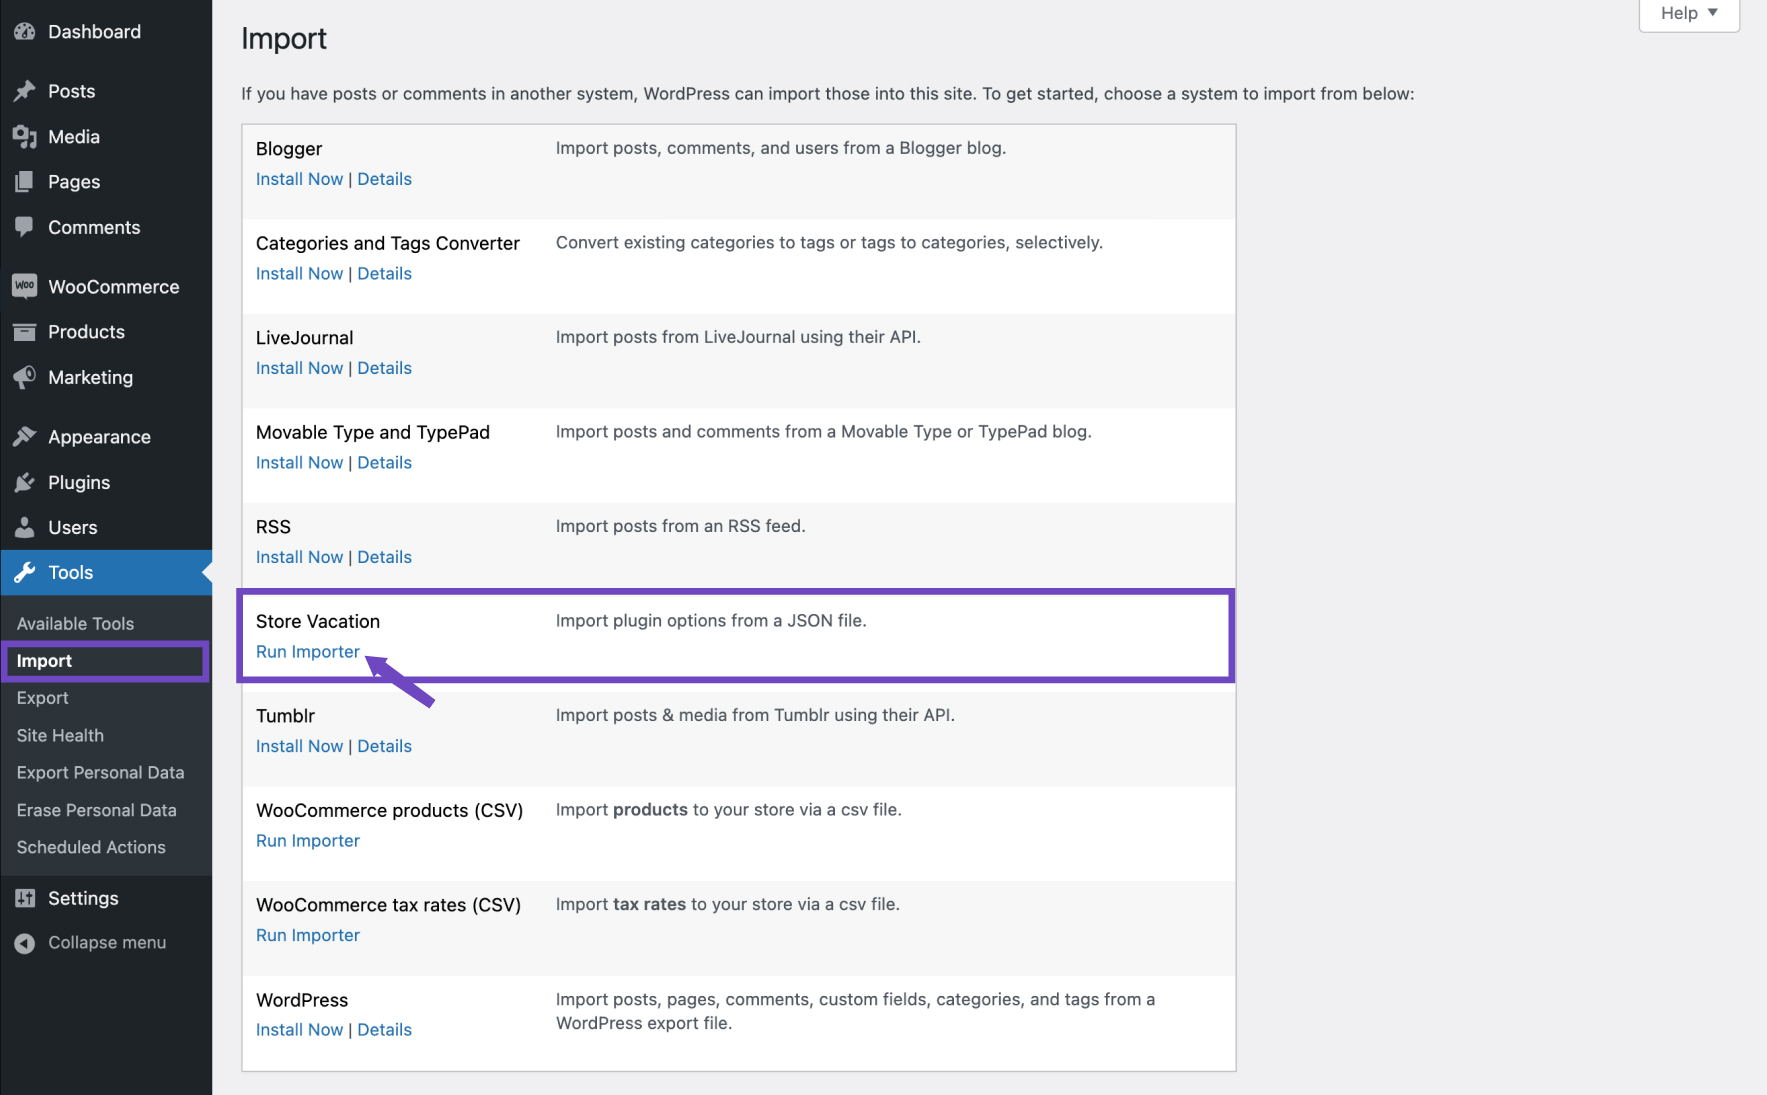
- Go to Tools > Import.
- Choose Store Vacation and click on Run Importer.
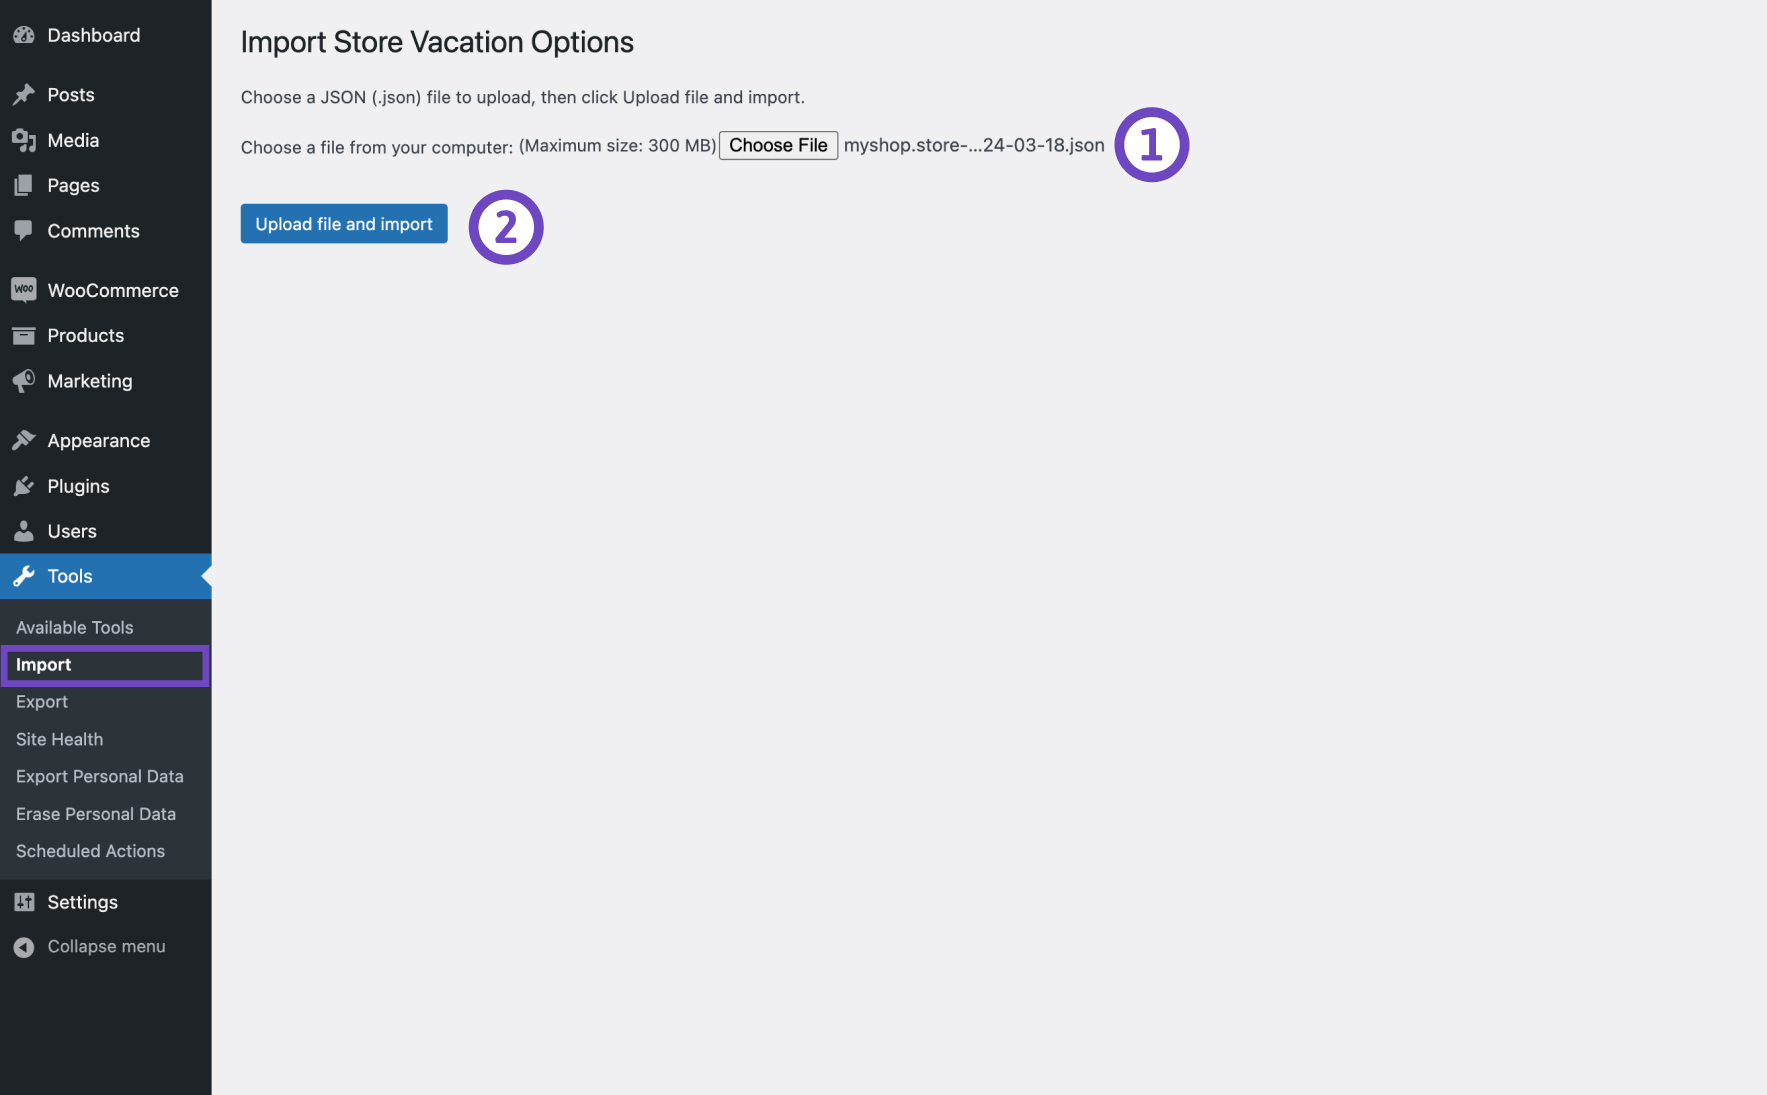
- Select the settings you want to import by ticking the checkboxes.
- Click on the Choose File and select the JSON file you exported before.
- Click on the Upload file and import button.
- Once the import is finished, you’ll see a success message.
If the import fails, it might still create some content. Be careful of duplicate data if you try importing again after fixing the error. Check the plugin’s Settings page to remove any extra records if needed.