Store Owner’s Guide
↑ Back to topInstallation
↑ Back to top- Download the Smart Product Bundle plugin.
- Go to your WordPress Admin Dashboard.
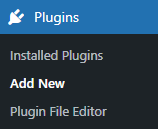
- Navigate to the WordPress Admin Dashboard → Plugins → Add New.
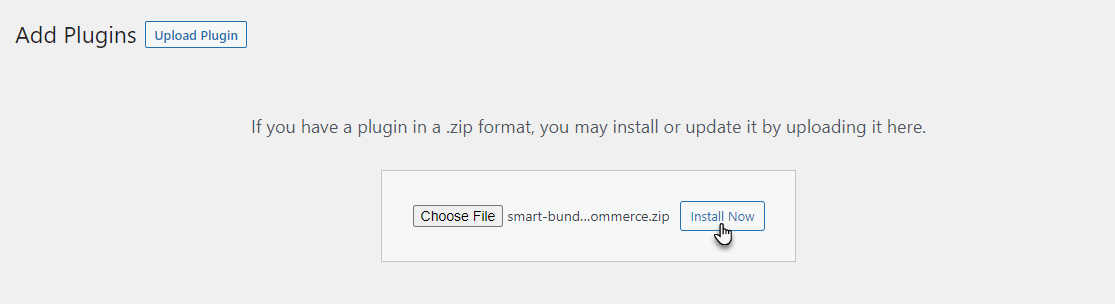
- In Add Plugins, click on the Upload Plugin button on the top left corner of your screen.
- Next, click the Choose file button in the below box.
- Select the zip file that you have downloaded and upload it.
- Click on the Install Now button.
- After the plugin is installed, click on the Activate Plugin button to activate it.
Create a Smart Bundle Product
↑ Back to topSettings Tab
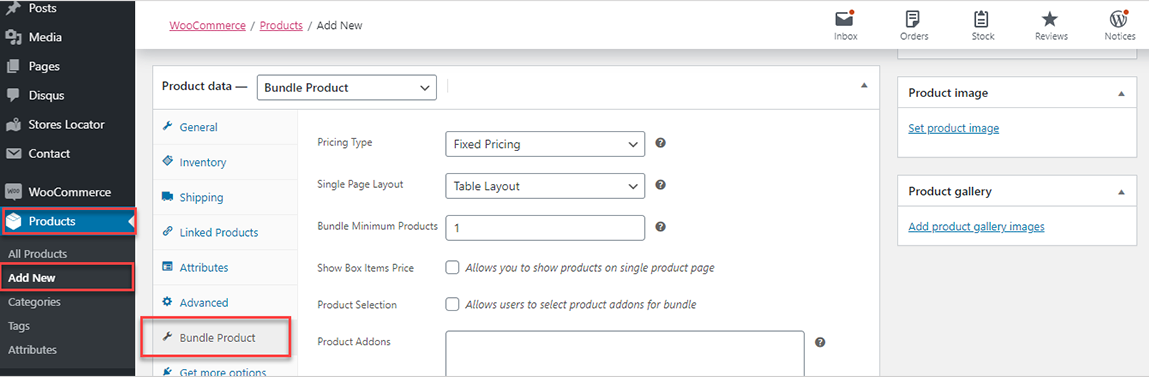
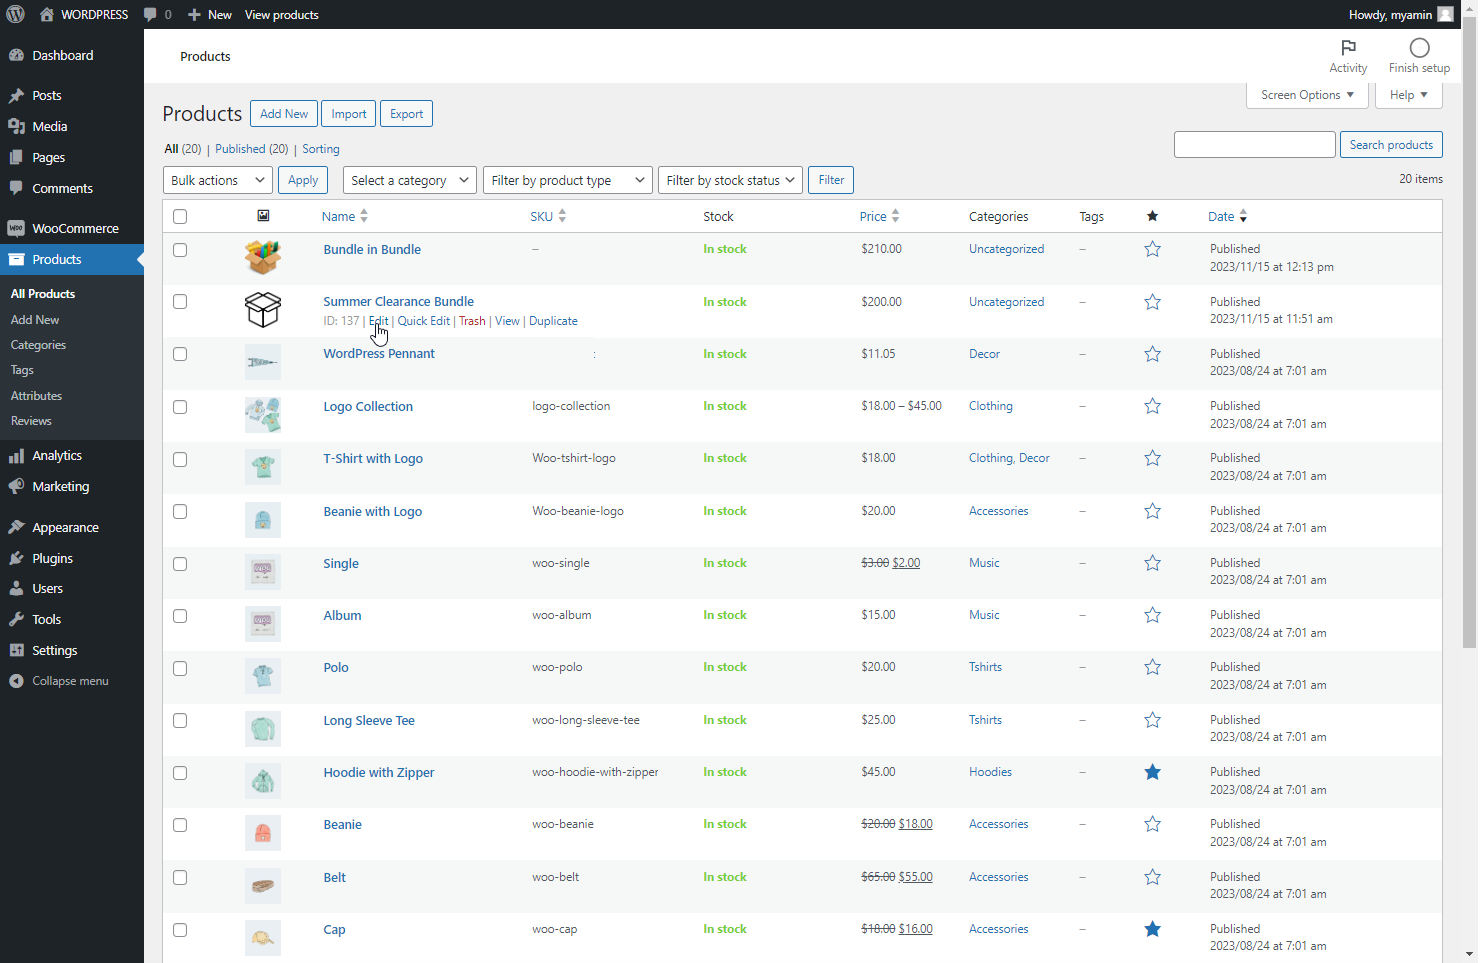
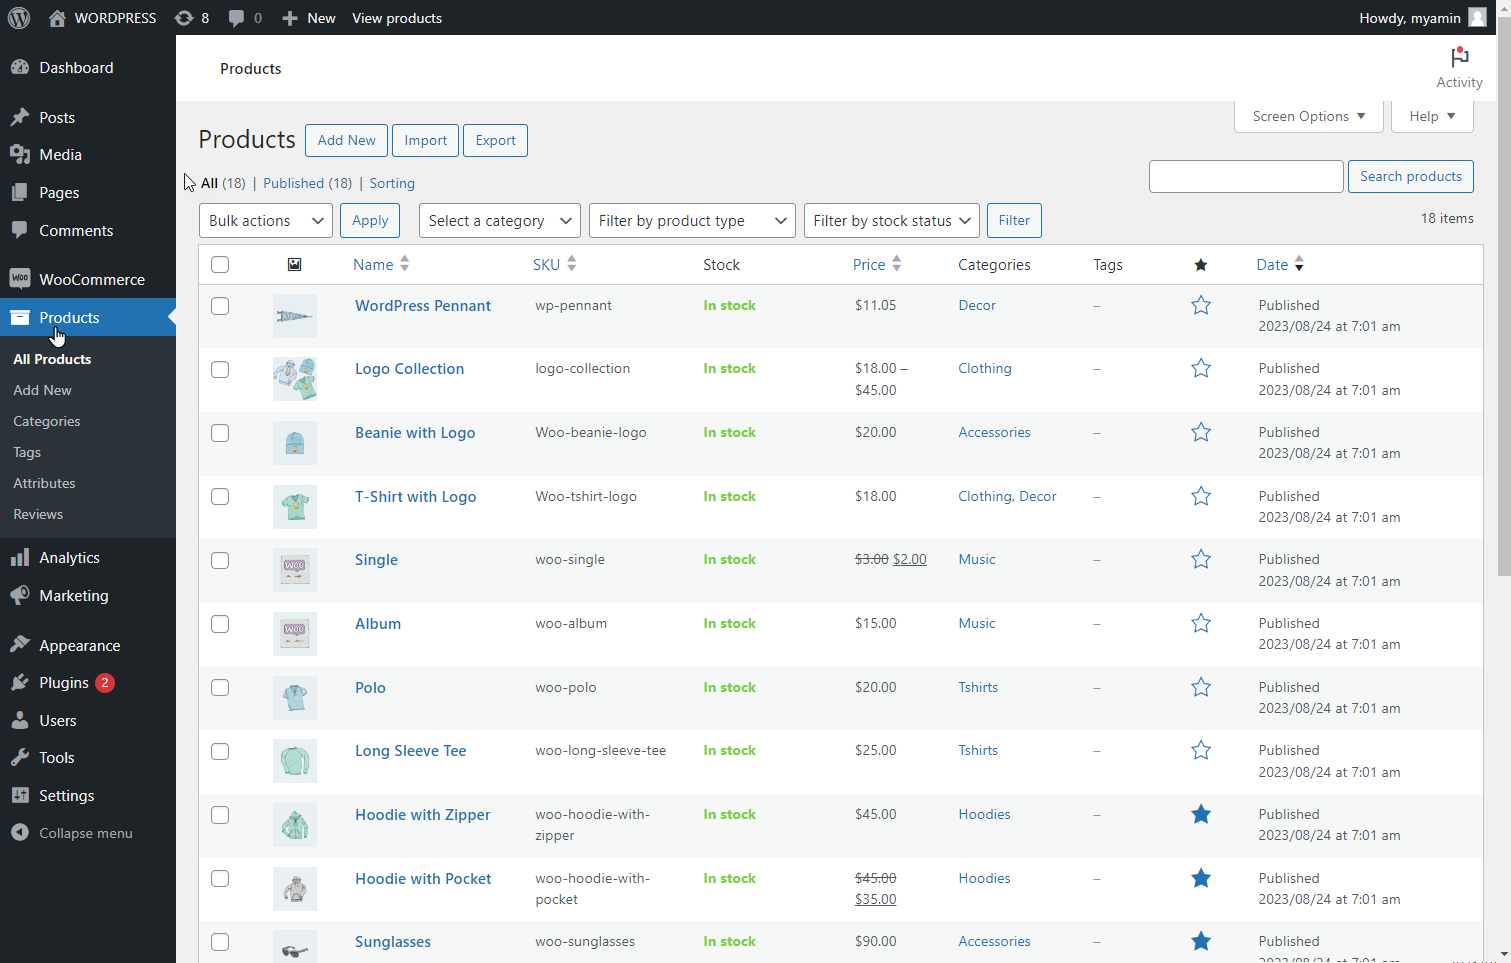
↑ Back to top- Go to → Products
- Click on → Add new
- Enter name and description of the product.
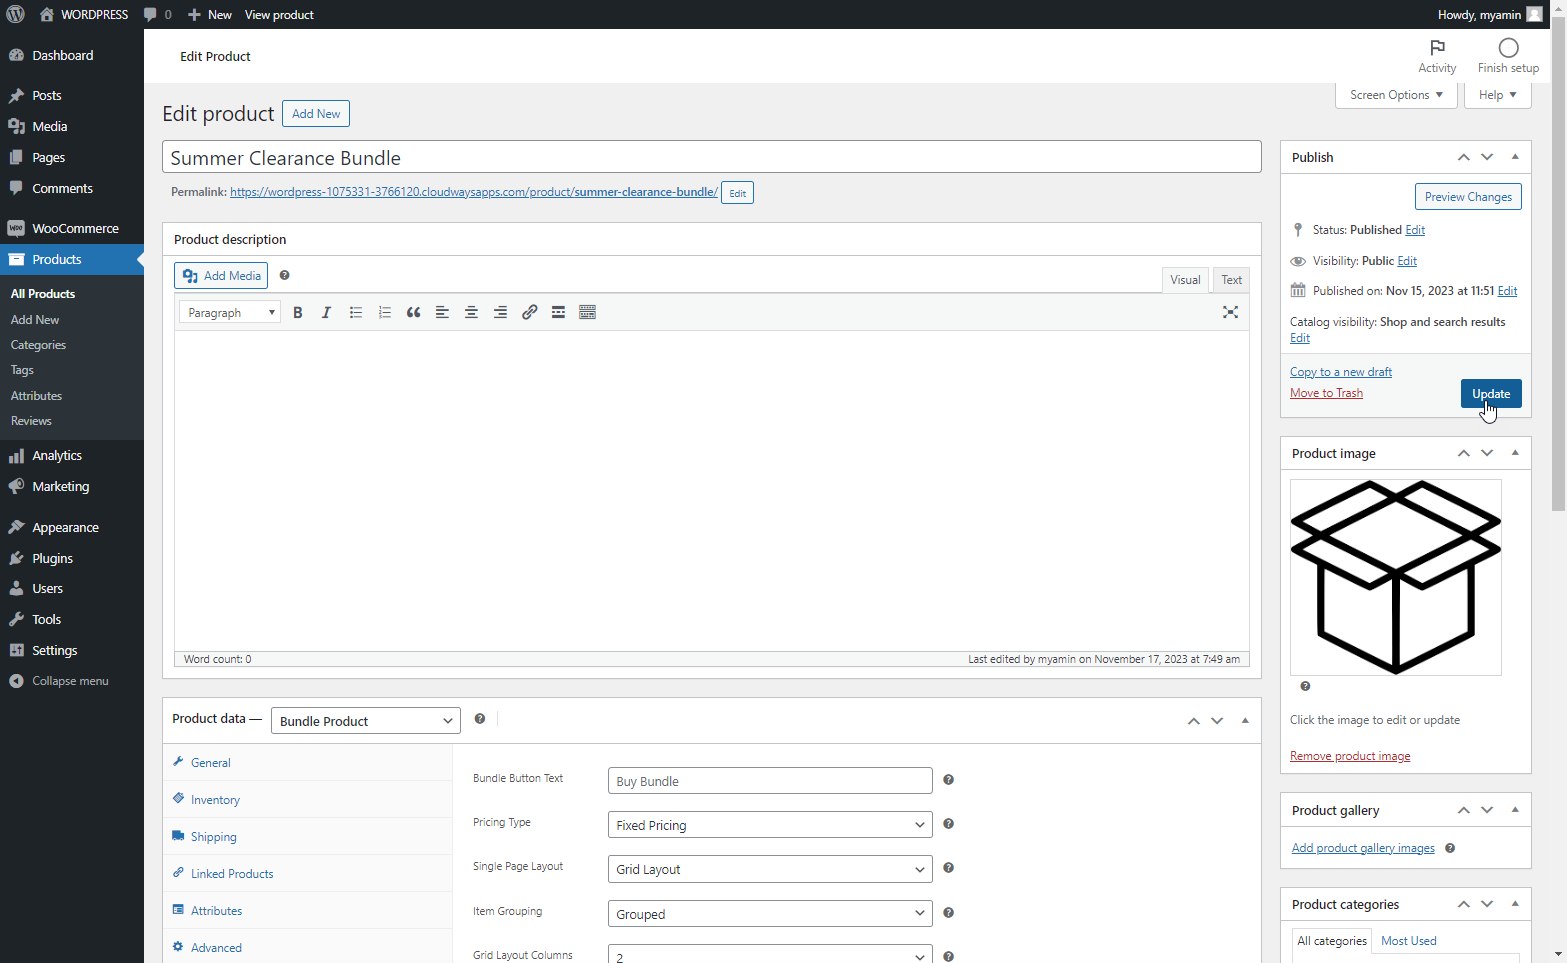
- Choose product type → Select Bundle Product from Product data list.
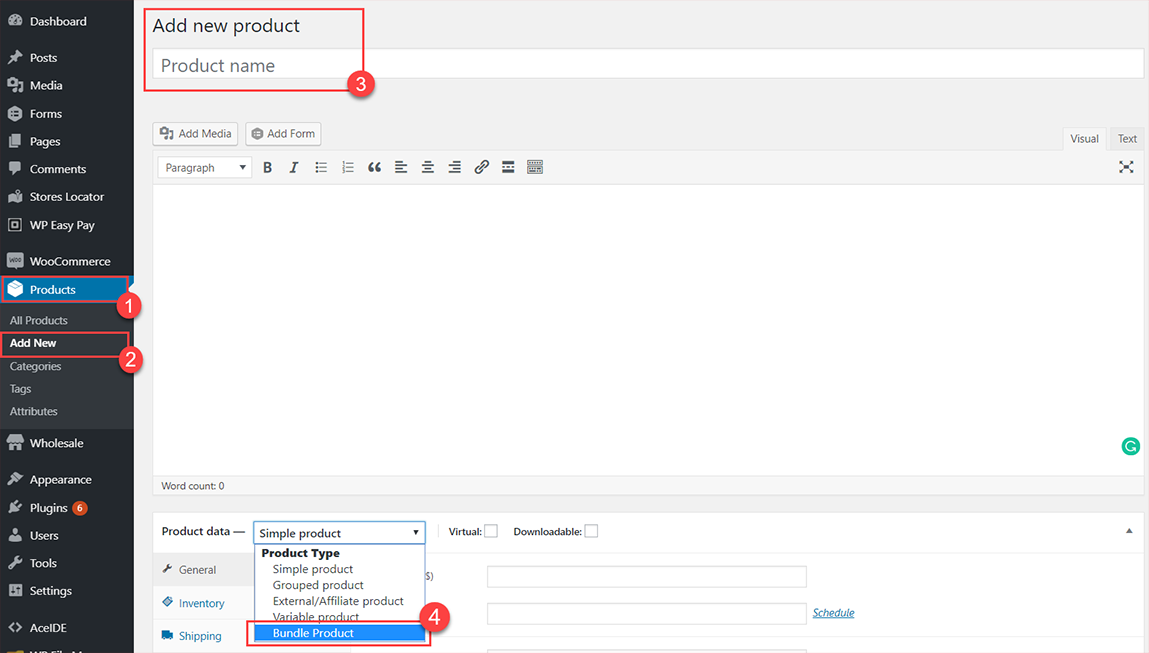
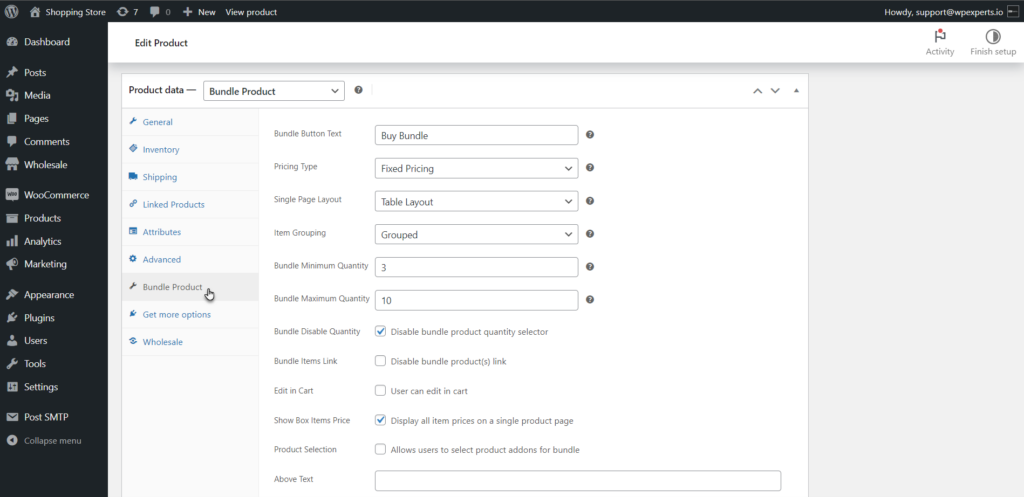
- Click on bundle product to edit the settings.
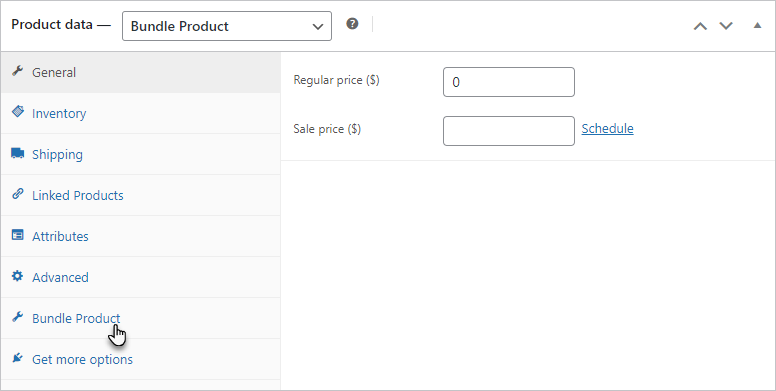
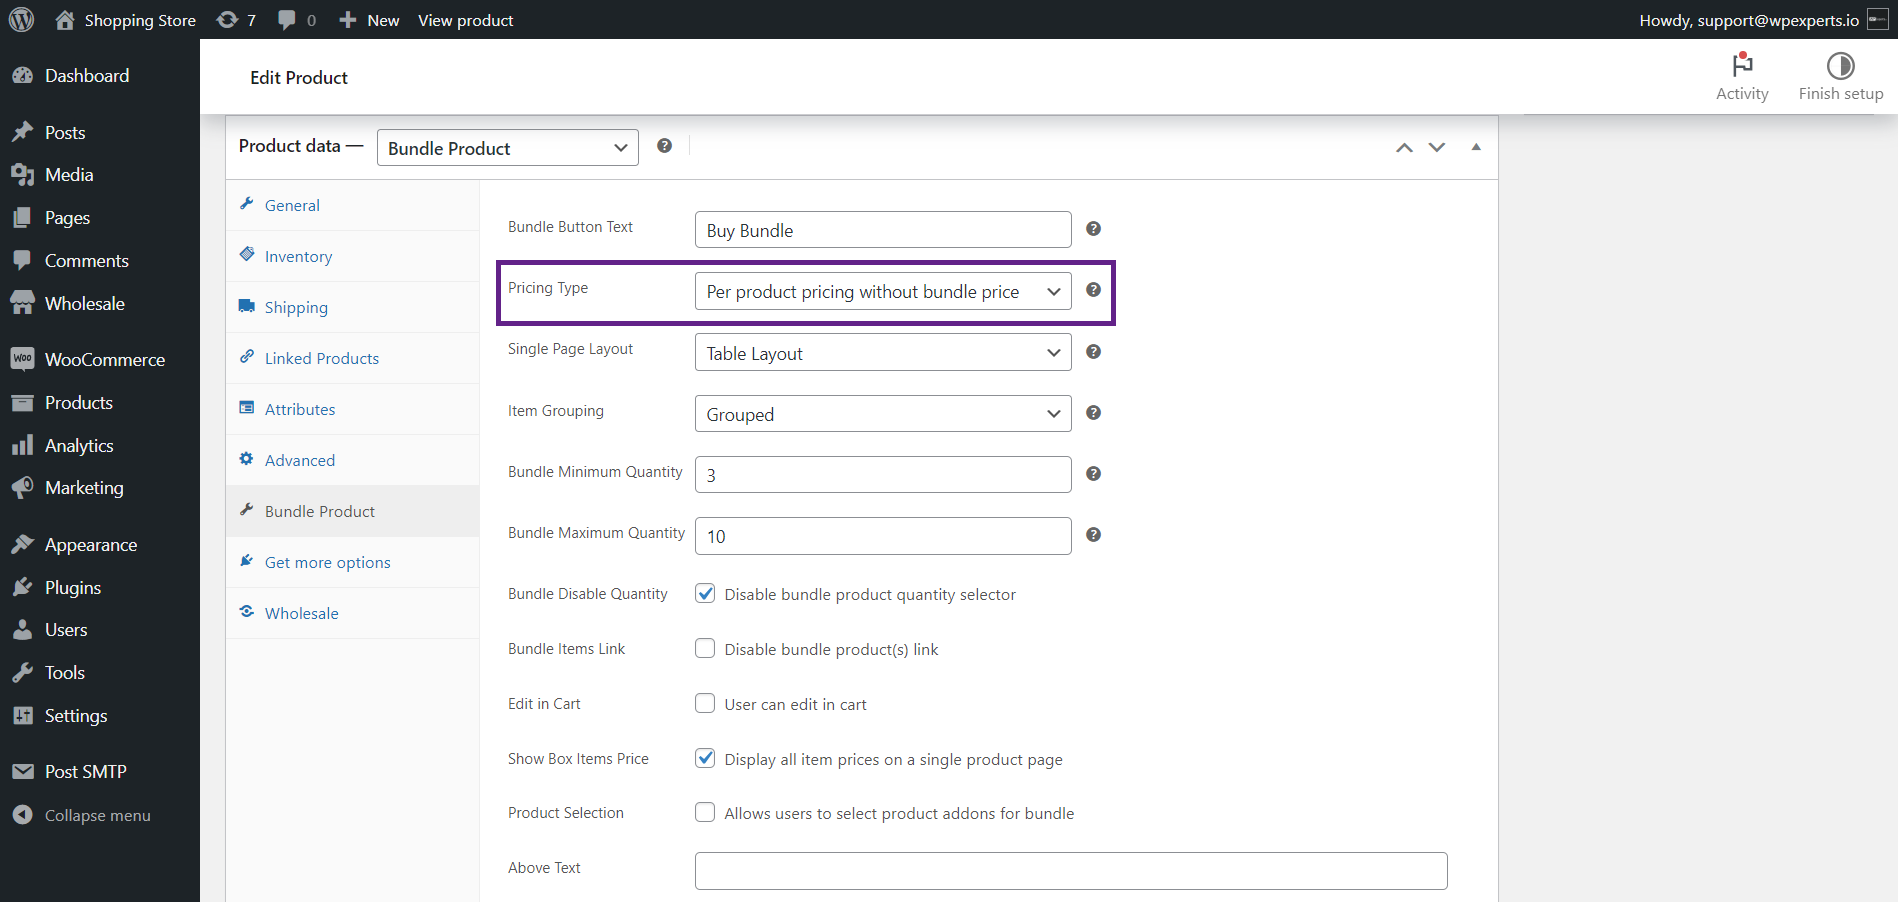
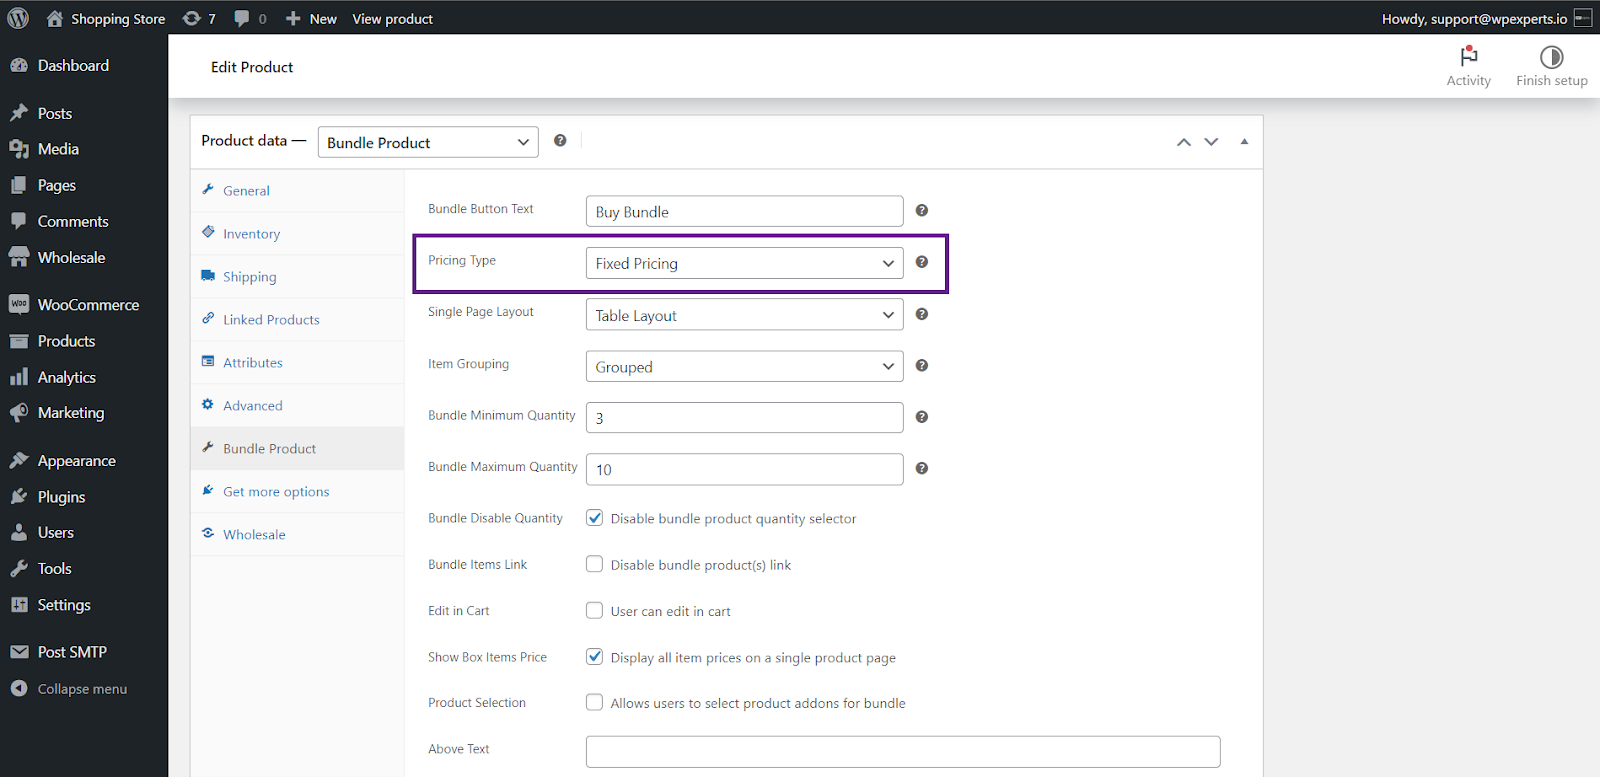
Pricing Tab
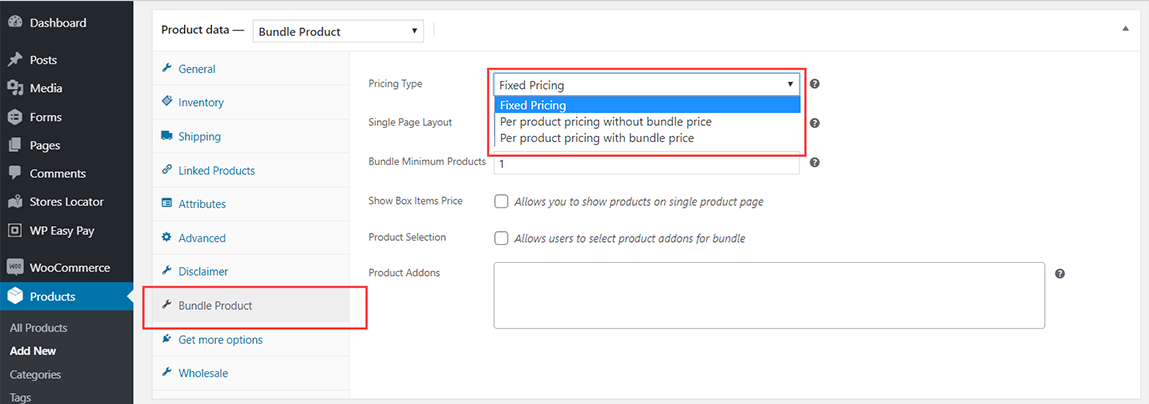
↑ Back to top- There are three types of pricing options available for admin:
- Fixed Pricing: Define the price from the General Tab in the Regular Price option; otherwise, Smart Bundle Product will not work.
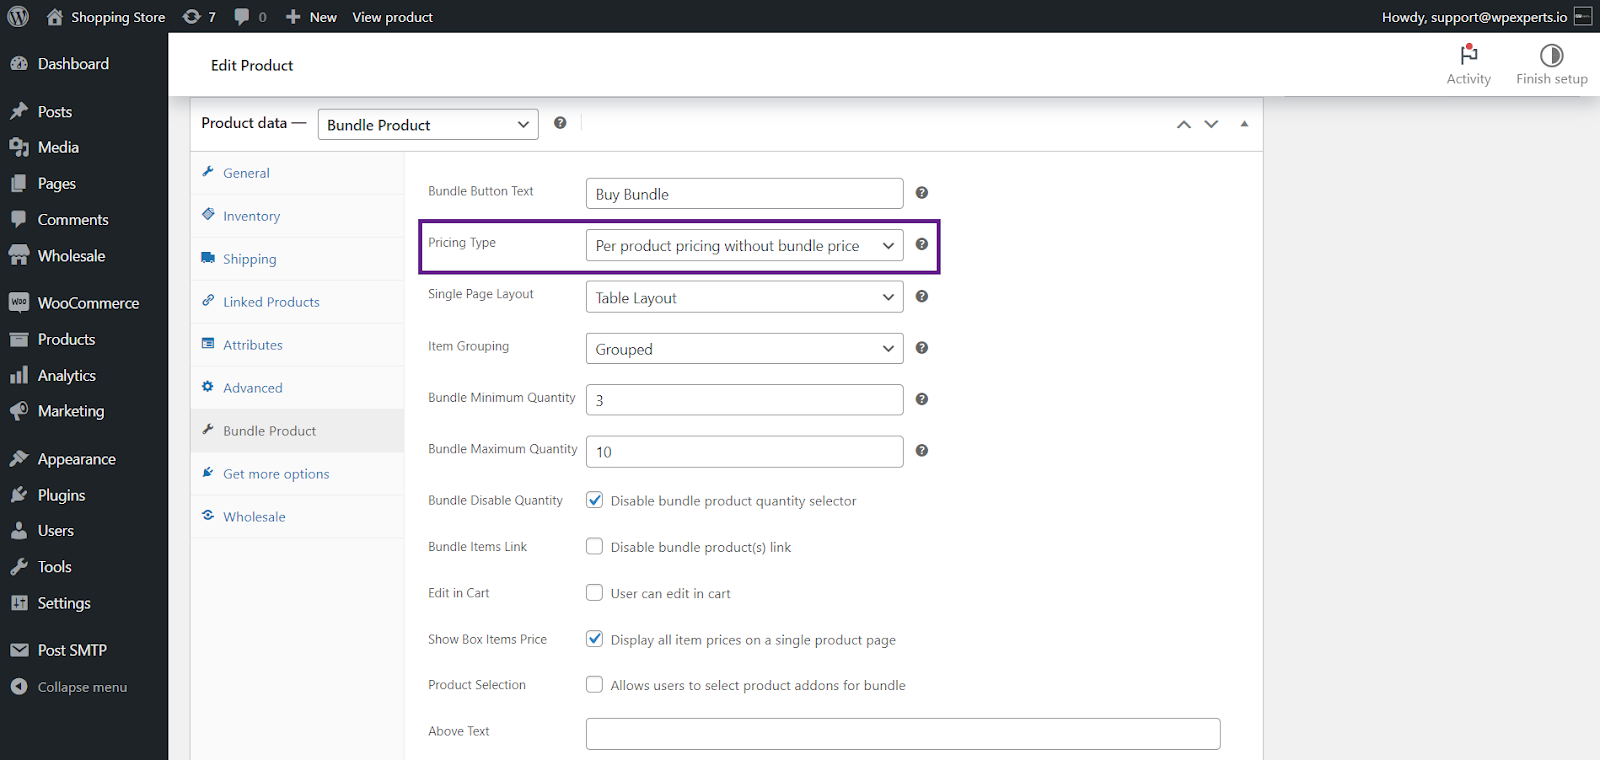
- Per Product Pricing Without Bundle Price: Charge the price per product in the bundle without the bundle price being included in the final price.
- Per Product Pricing With Bundle Price: Charge the price per product in the bundle, with the bundle price being included in the final price.
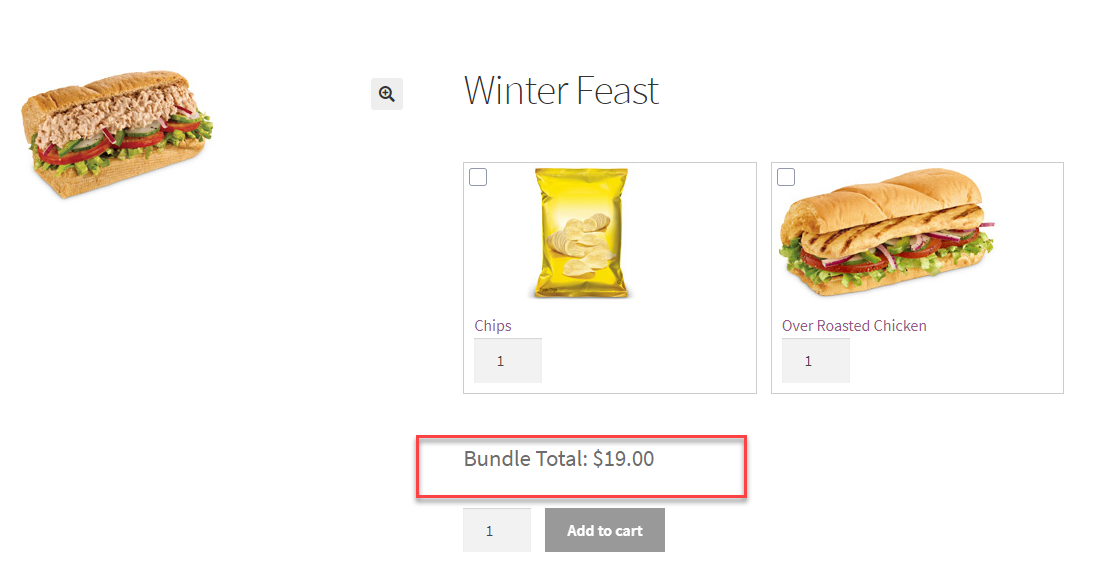
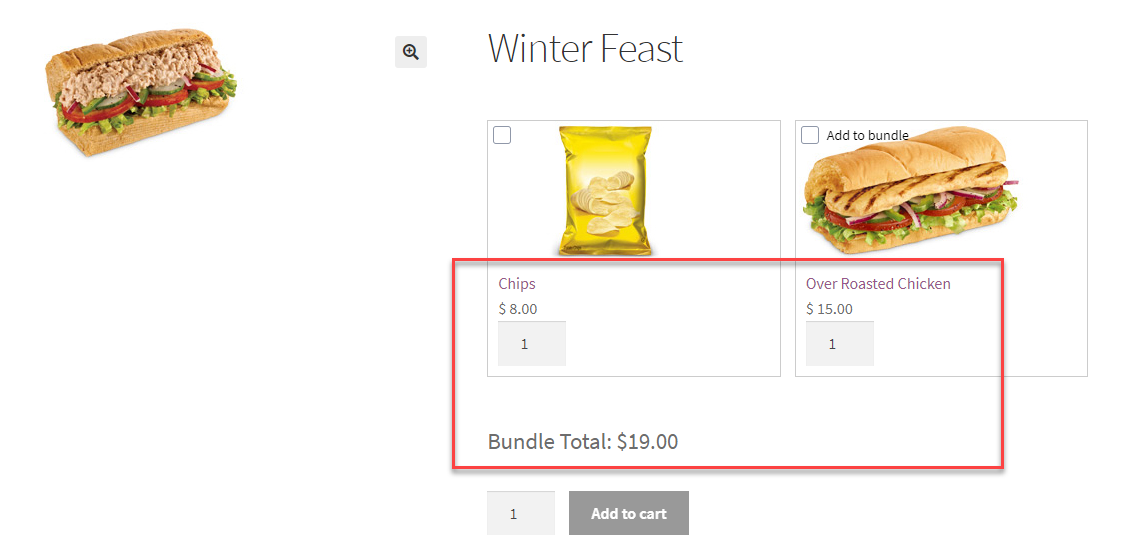
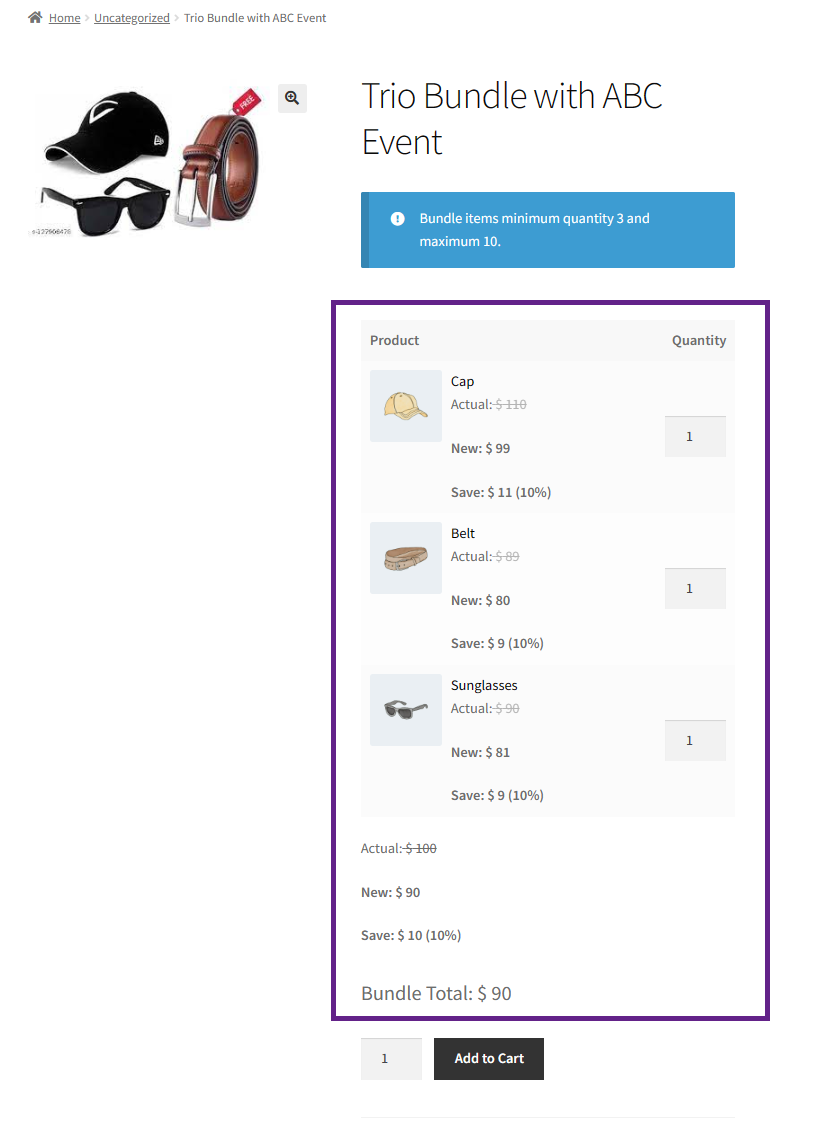
Frontend Impact of Fixed Pricing
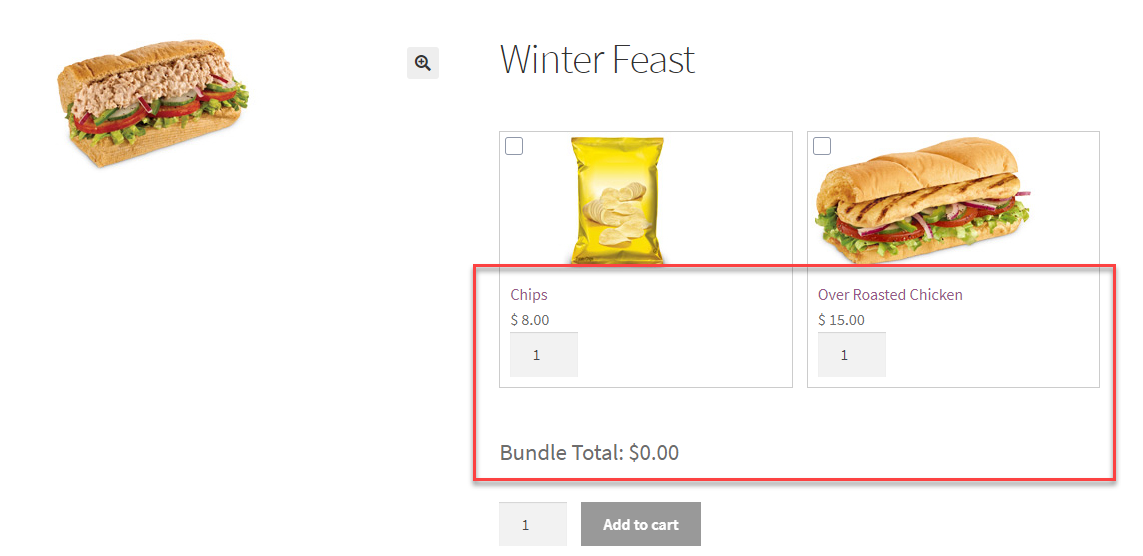
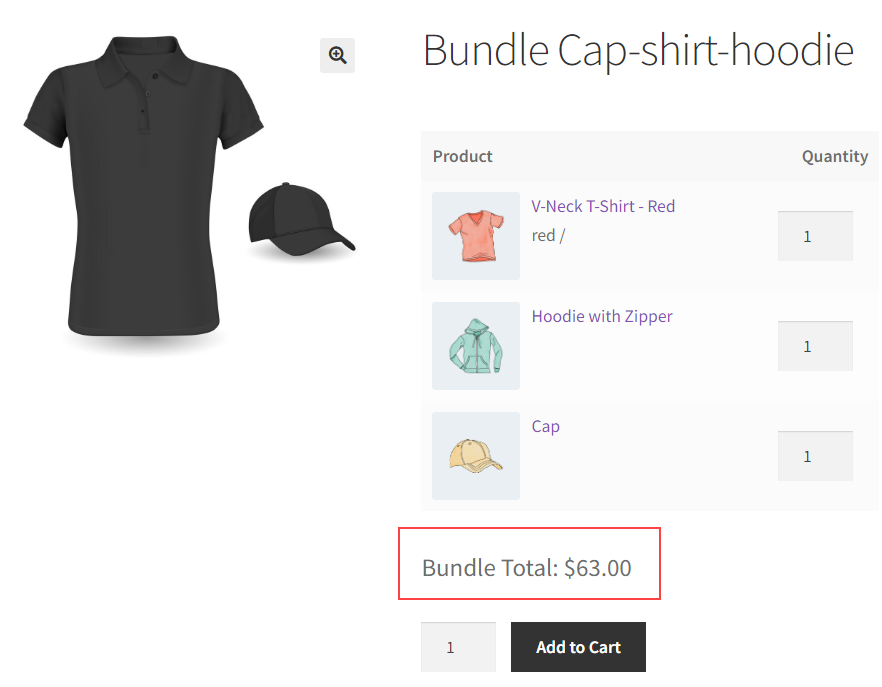
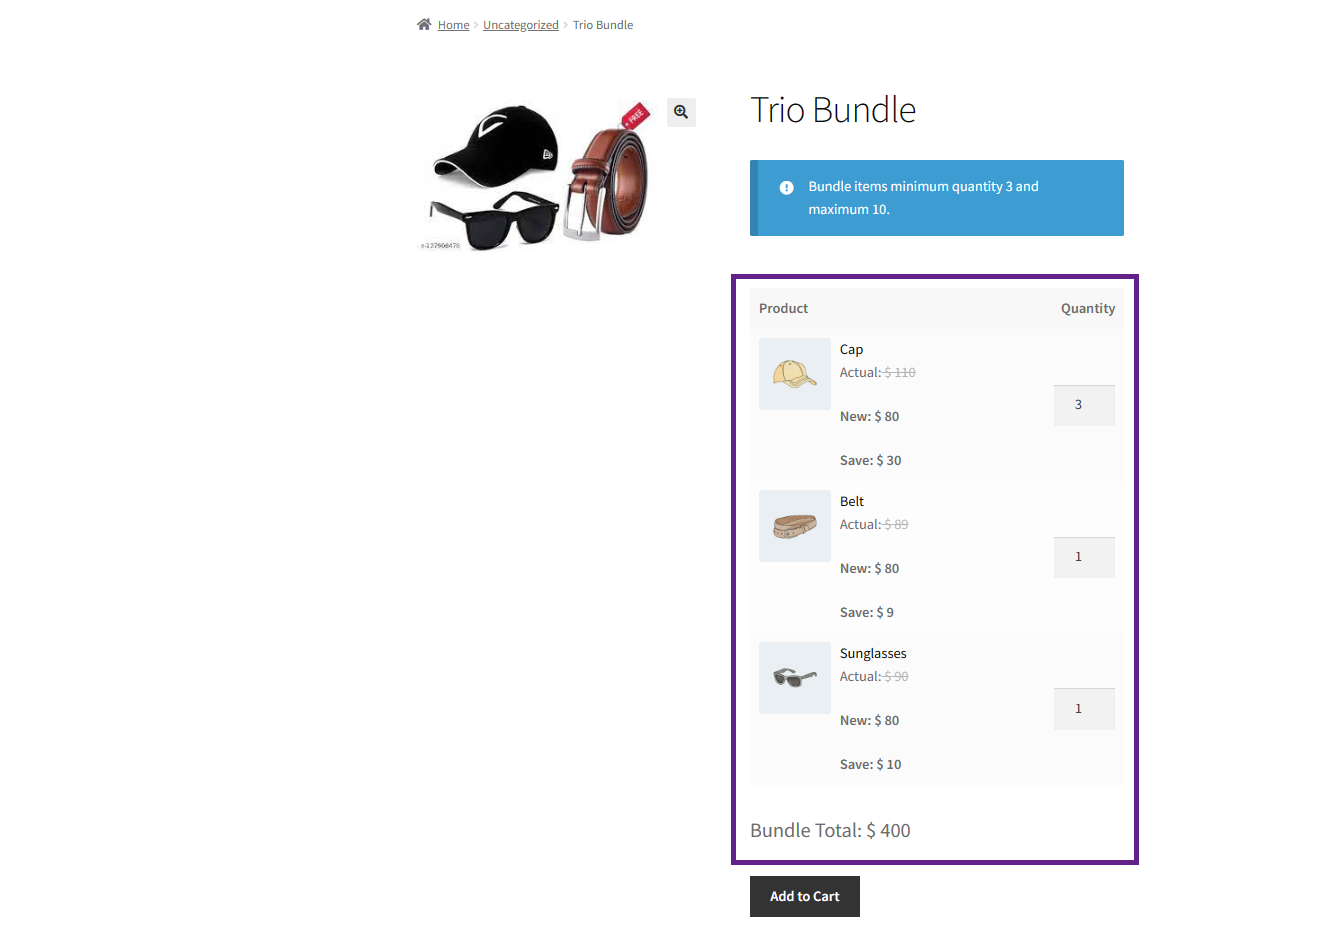
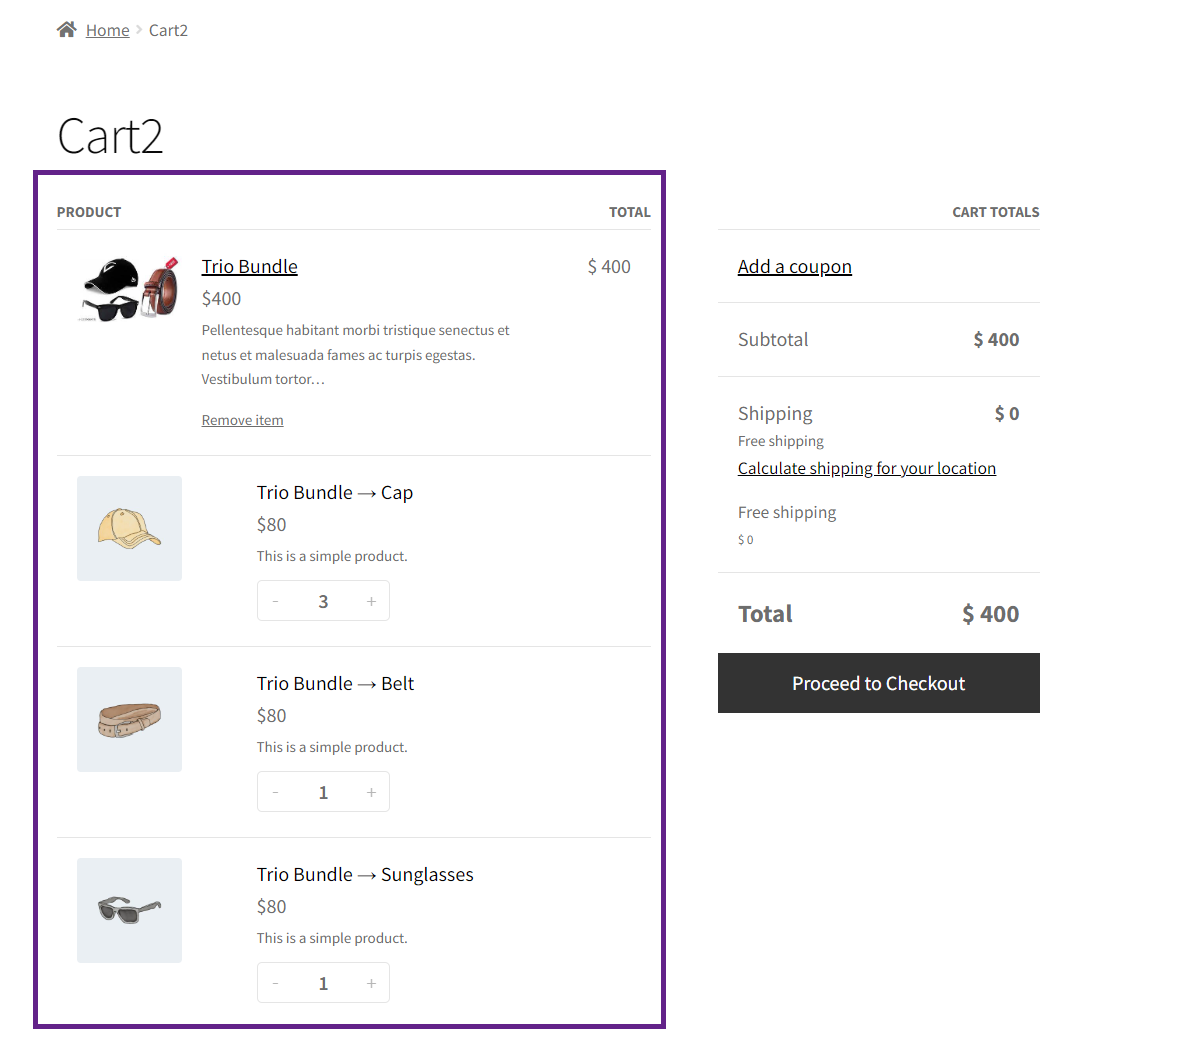
Frontend Impact Per Product Pricing without Bundle Price
The second option is ‘Per Product Pricing without Bundle Price,’ which will calculate the price from each product and will accommodate the total bundle price
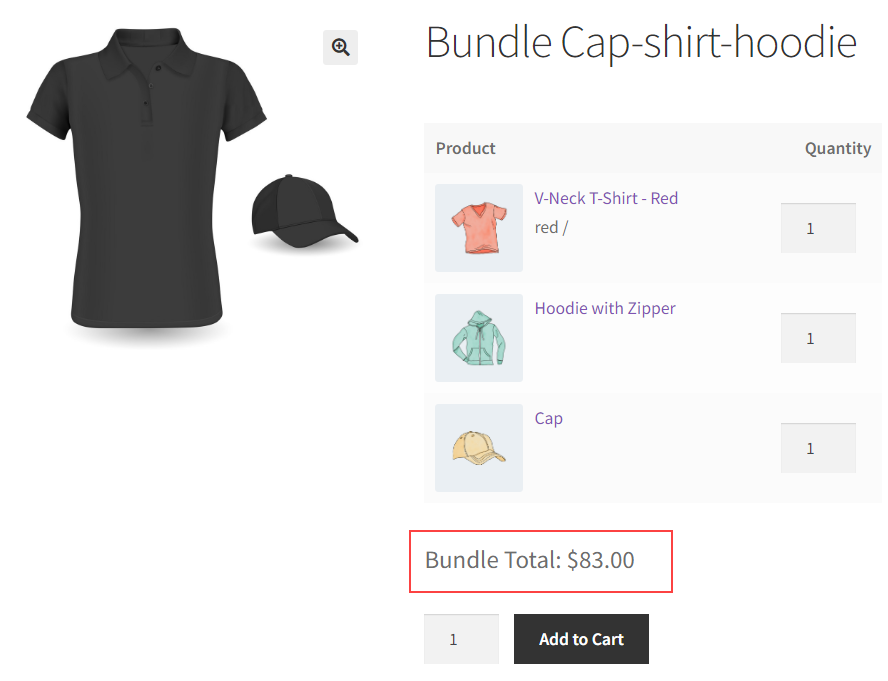
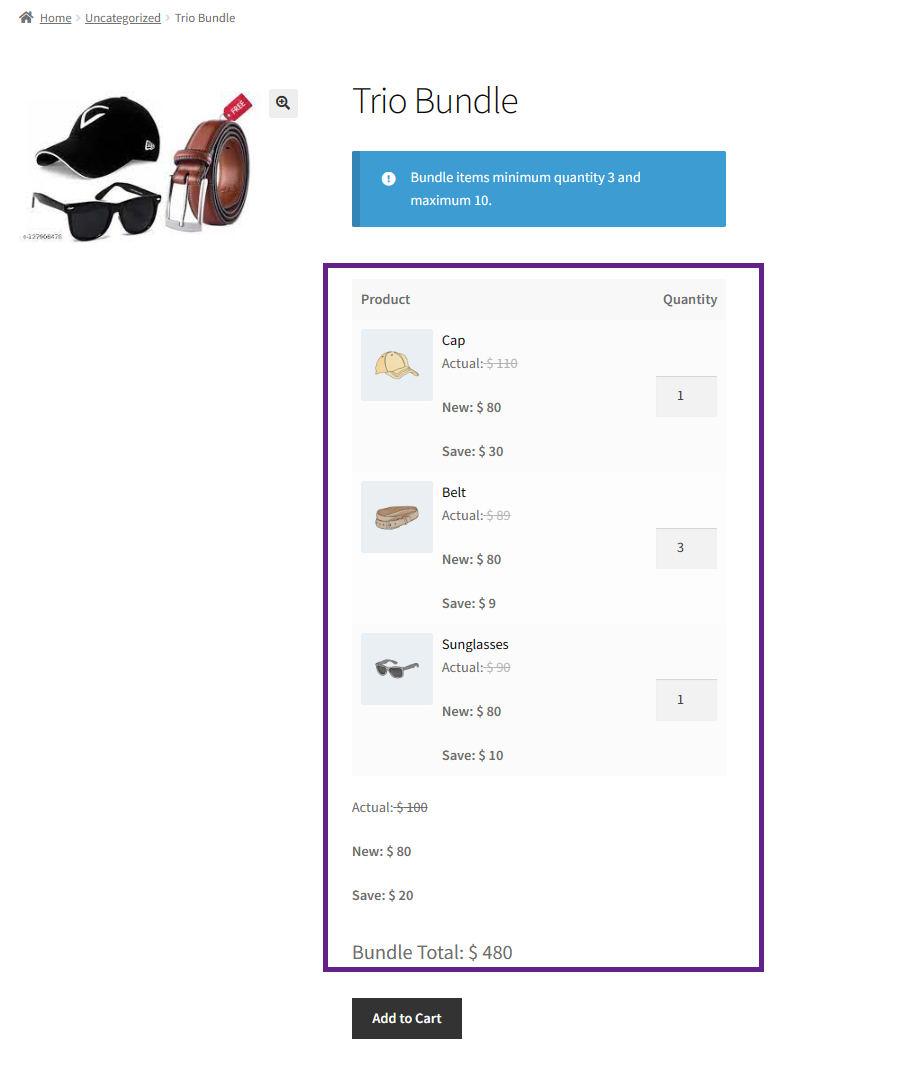
Frontend Impact Per product pricing with Bundle Price
The third option is ‘Per product pricing with Bundle Price,’ which will include the amount of each product as well as the amount of the bundle.
Single Page Layout
↑ Back to top- Select the page layout to display the product accordingly.
- Products in the bundle can be viewed in Table, Grid, and Full-Width Grid Layout.
- Enter the number of columns in Grid Layout and Full-Width Grid Layout.
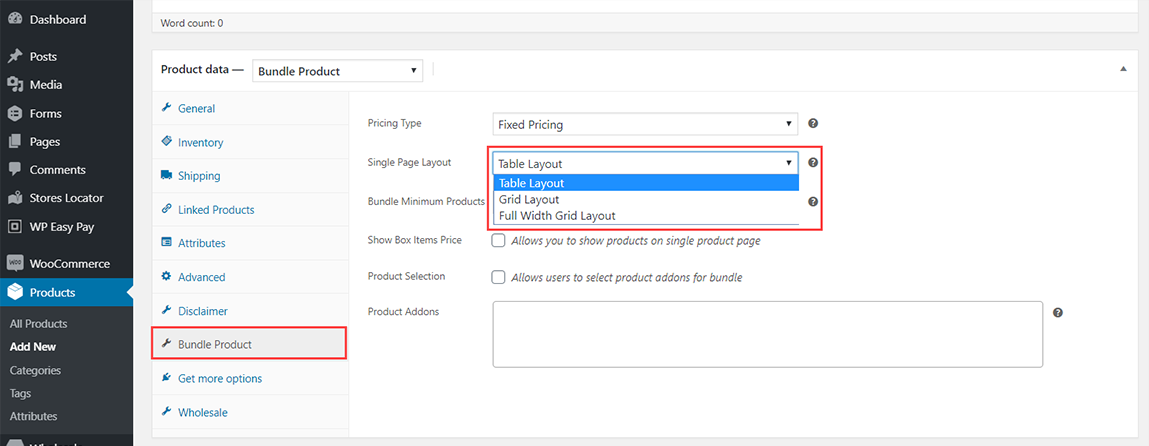
Table Layout Frontend Impact

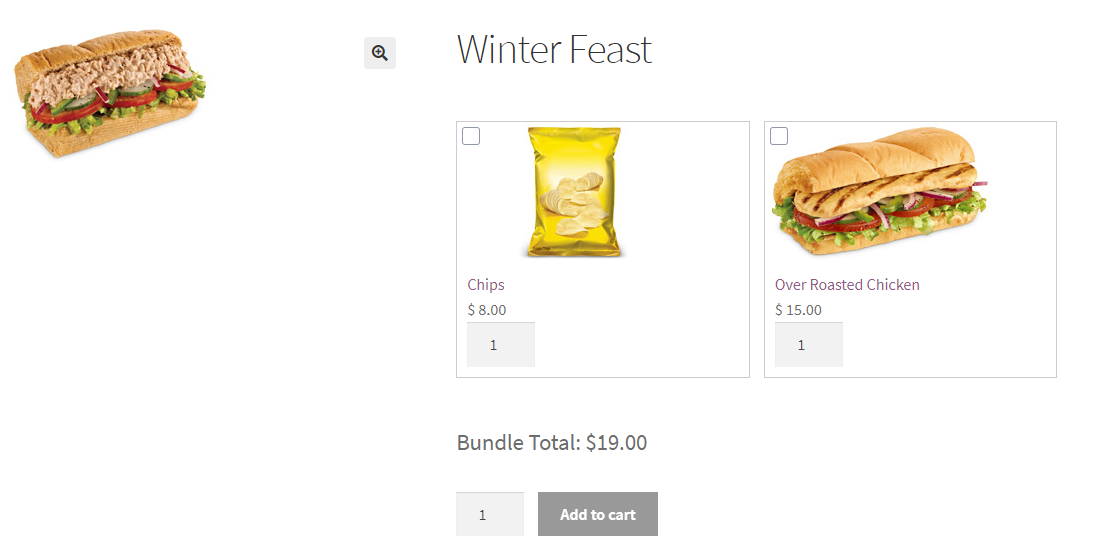
Grid Layout Frontend Impact
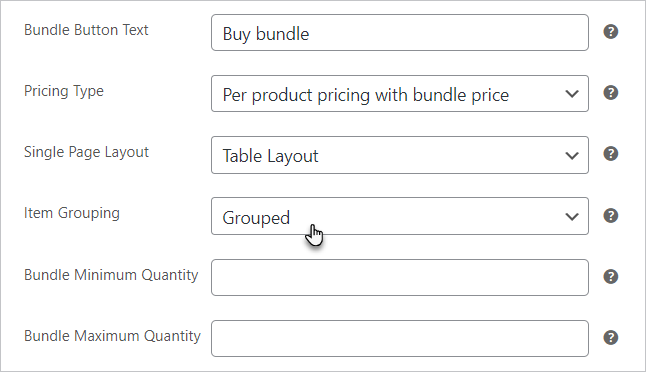
Item Grouping
↑ Back to top- Item Grouping allows the user to control the line spacing of the bundled items in the cart and order.
- Navigate to the WordPress Admin Dashboard → Products → All Products.

- Add new or select your bundle product and go to Edit.
- In Edit Product, go to the Product Data section.
- Select the Bundle Product from the right side.
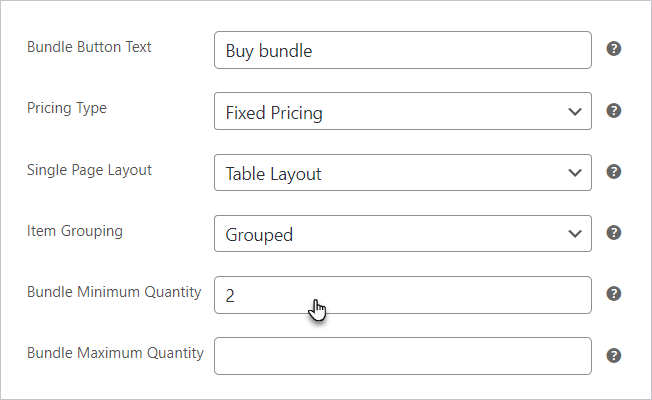
- In the Bundle Product settings, go to the Item Grouping select box.
- Click on the Item Grouping.
- There will be two options:
- Grouped.
- Flat.
- Select the desired option from the drop-down menu.
- Click on the Update button to save the settings.
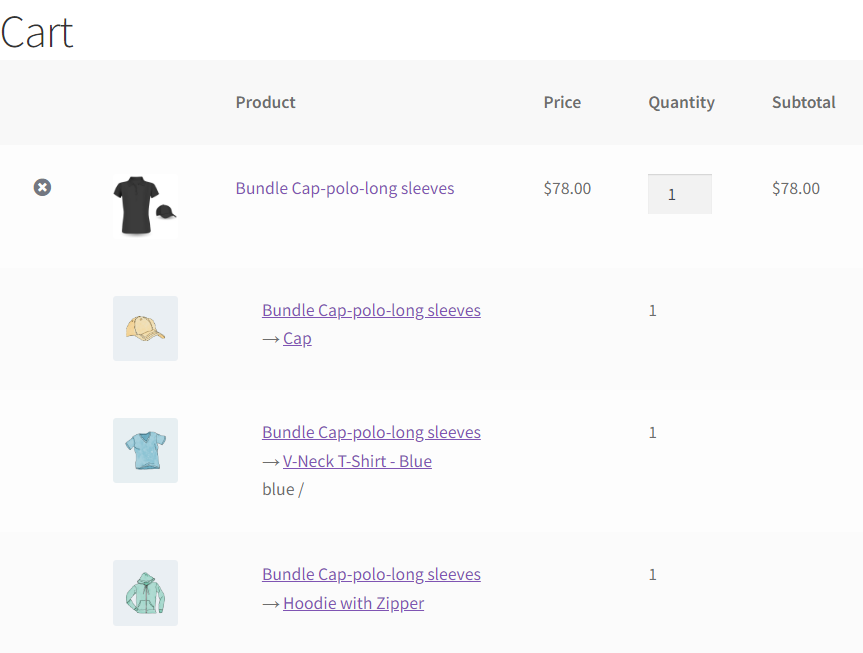
Grouped
- This option will group the bundle items under a parent item.
- Select Grouped from the Item Grouping.
- Click on the Update button to save the settings.
Front-End Impact
- Go to the Shop.
- Select a bundle product.
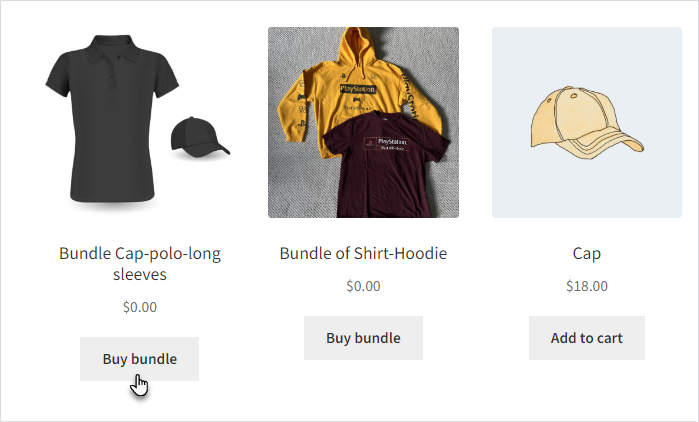
- Click on Add to Cart.
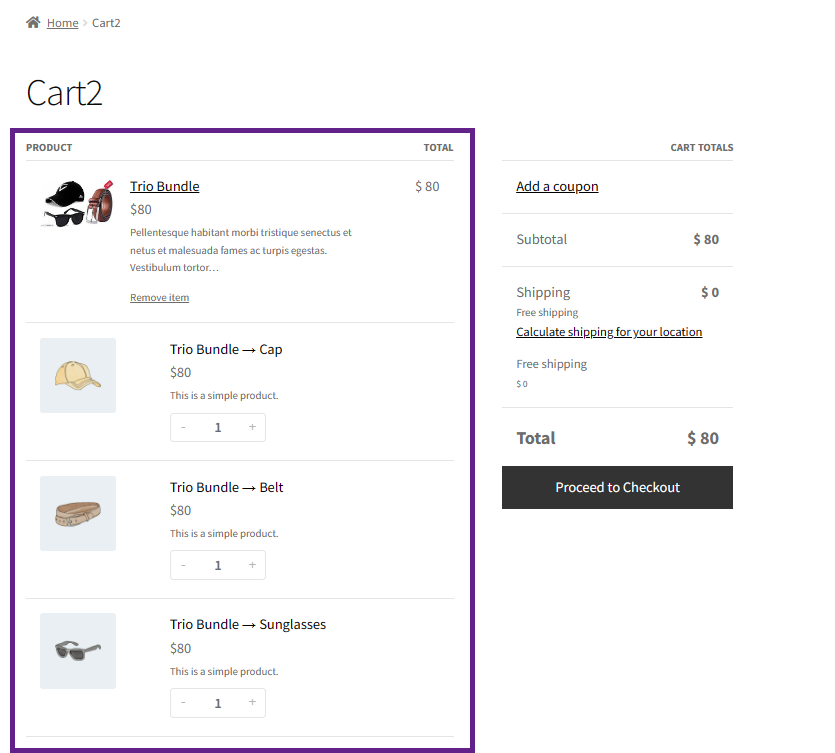
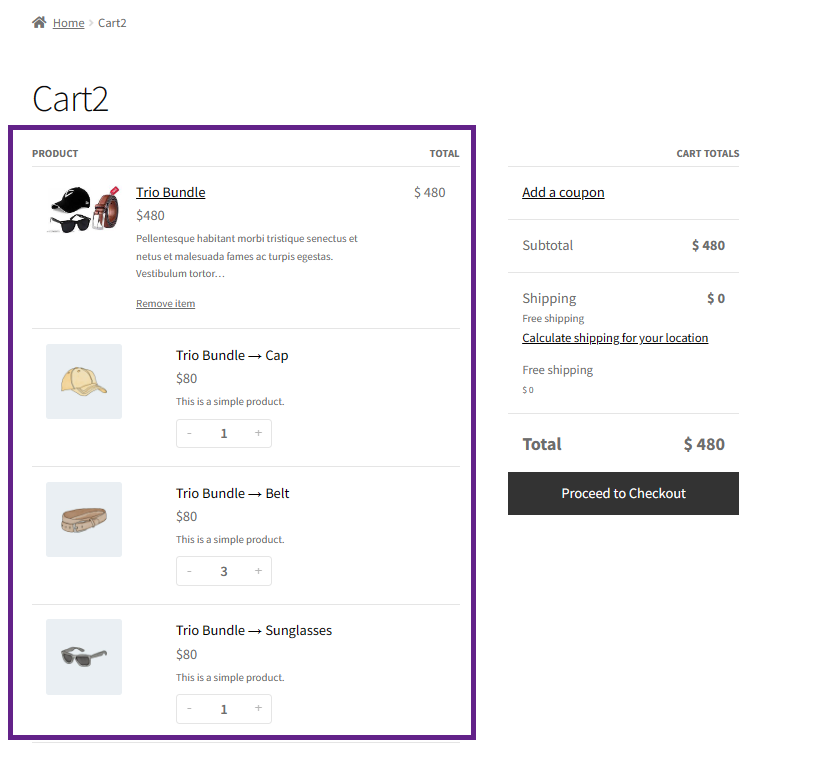
- Go to the Cart page.
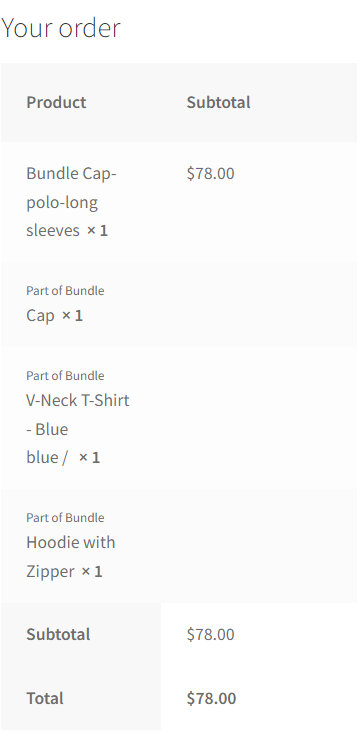
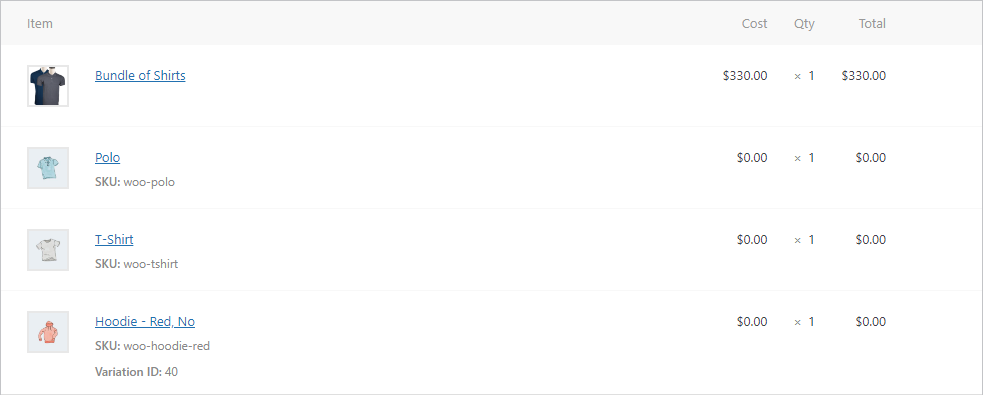
- The bundle items are displayed as grouped under the parent bundle.
- Click on Proceed to Checkout.
- The bundle items are displayed as grouped under the parent bundle on the checkout page.
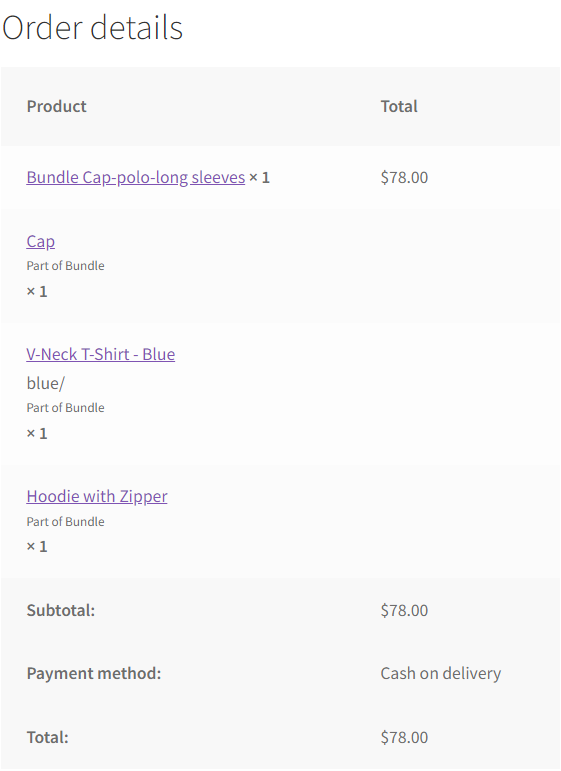
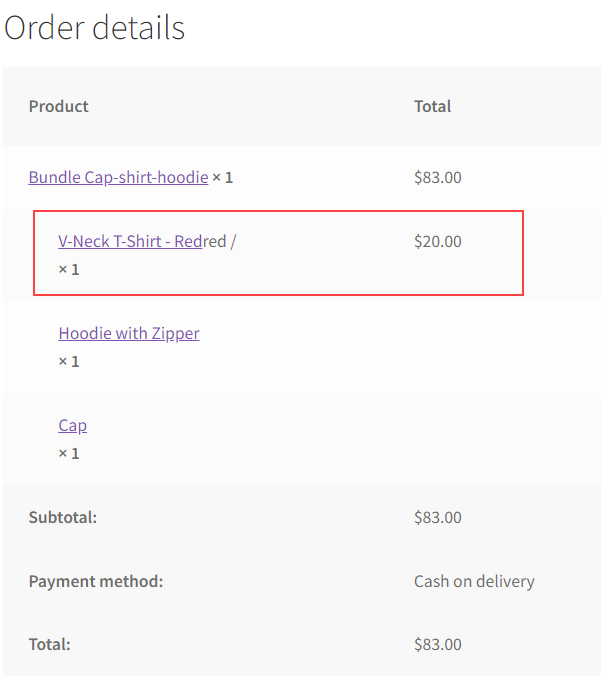
- After placing your order, grouped items are displaced in the Order details.
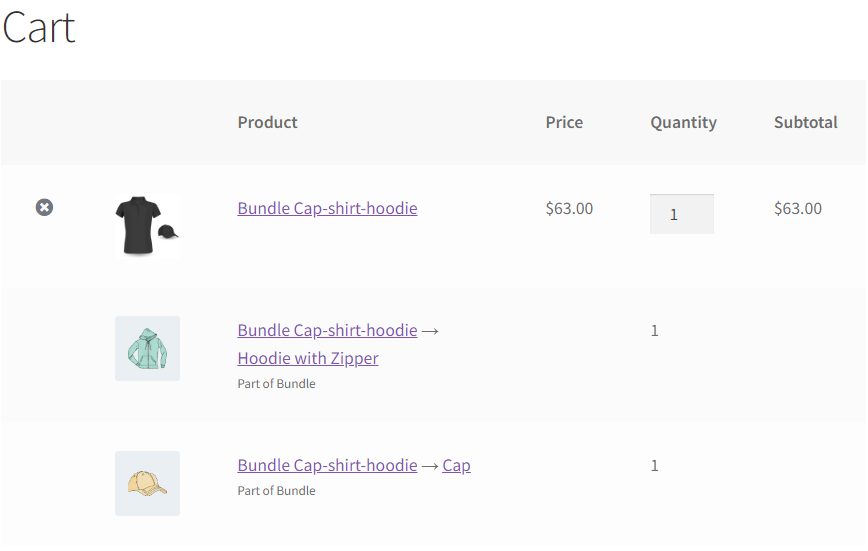
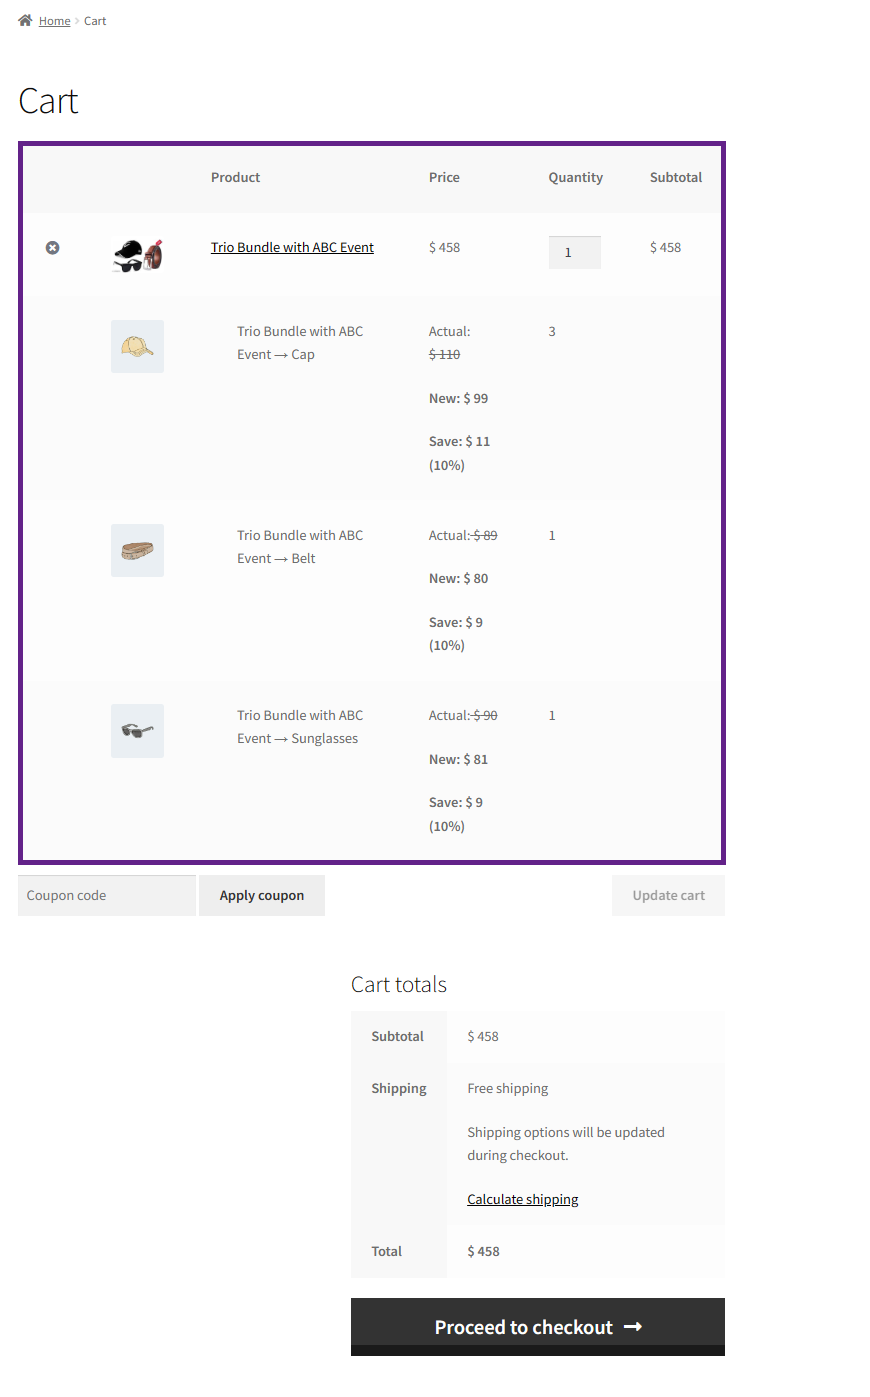
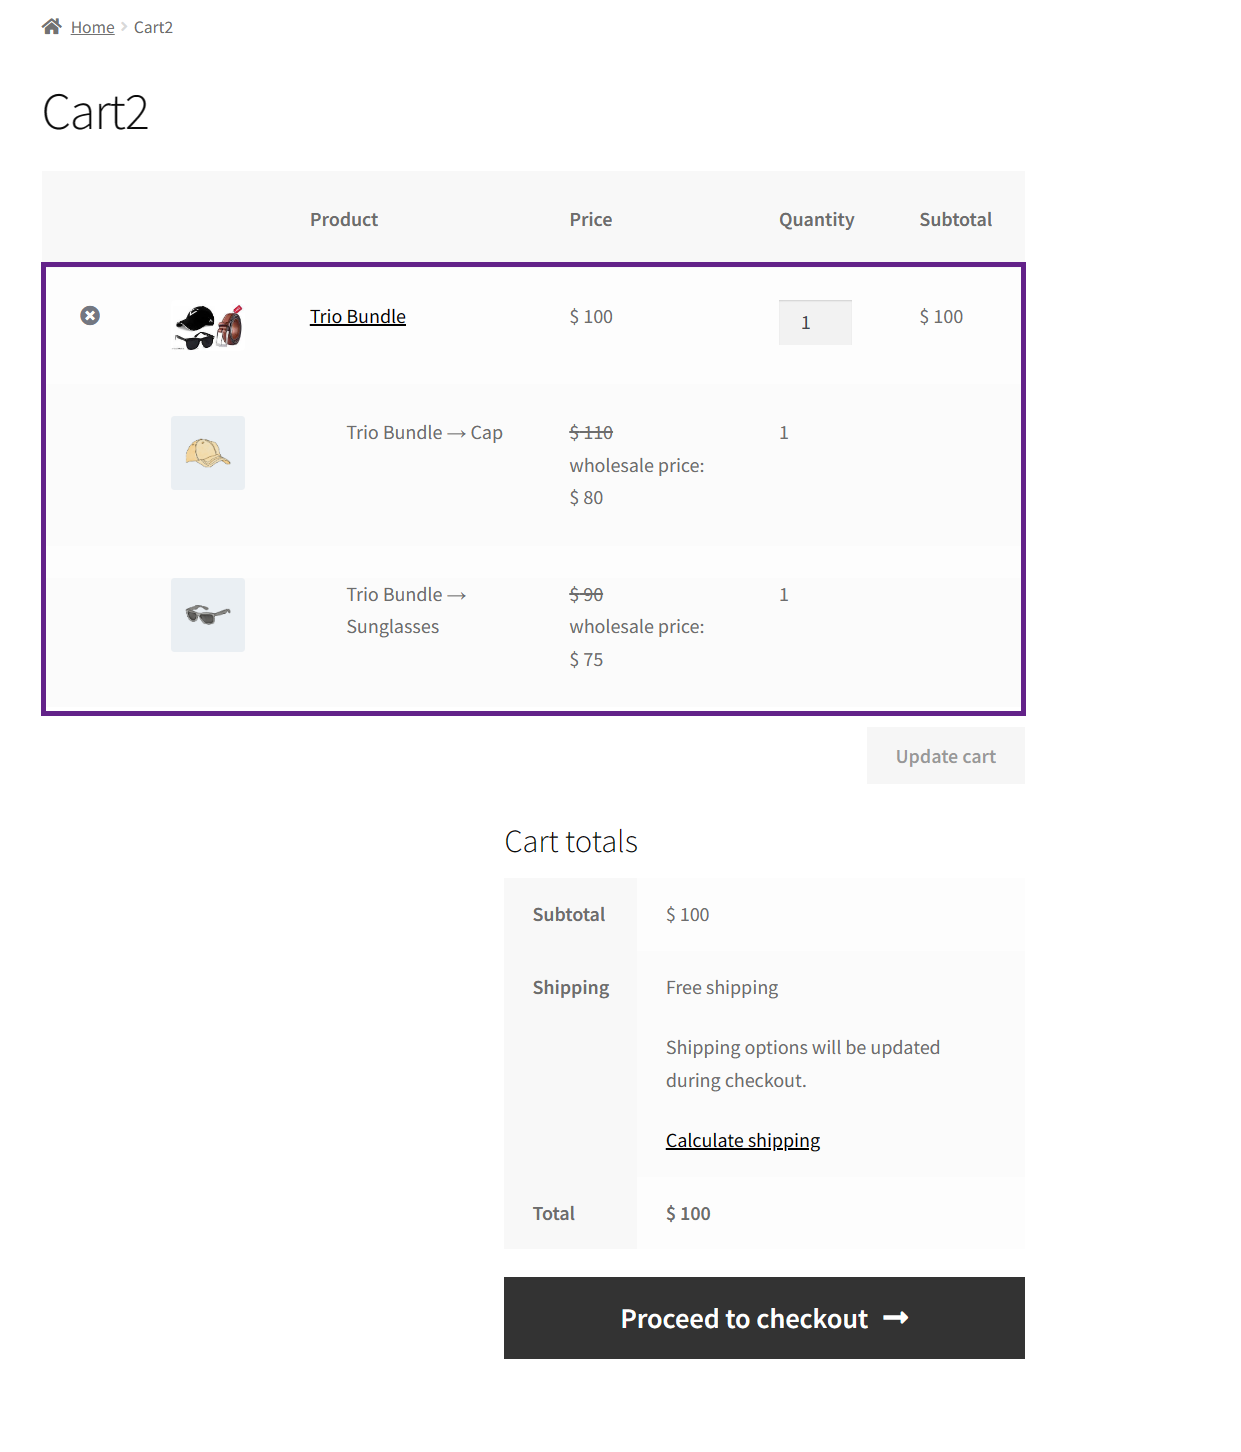
Flat
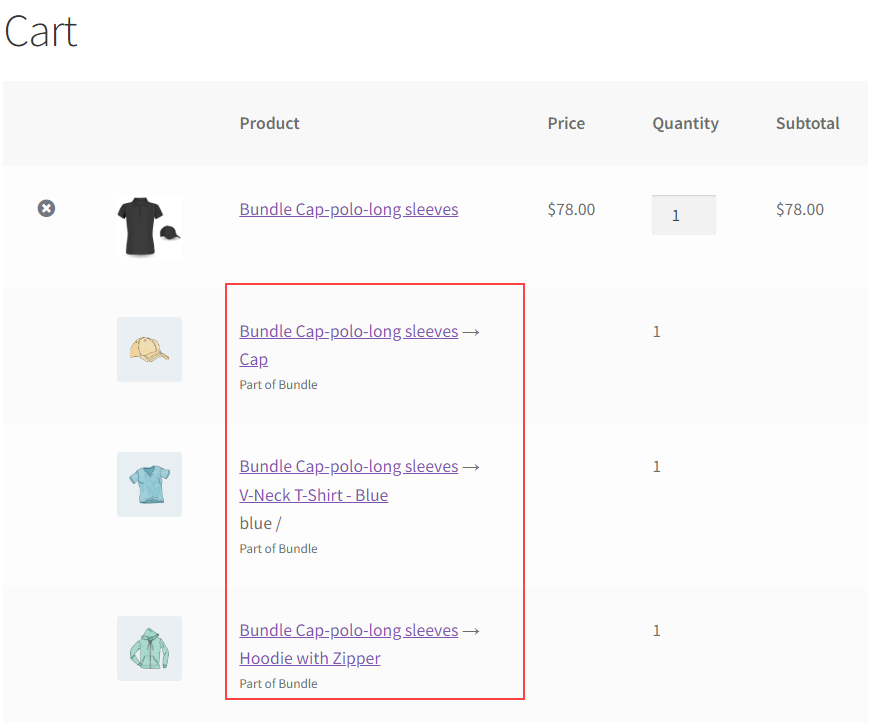
- This option will allow the bundle items in the cart to display the reference to the bundle.
- Select Flat from the Item Grouping.
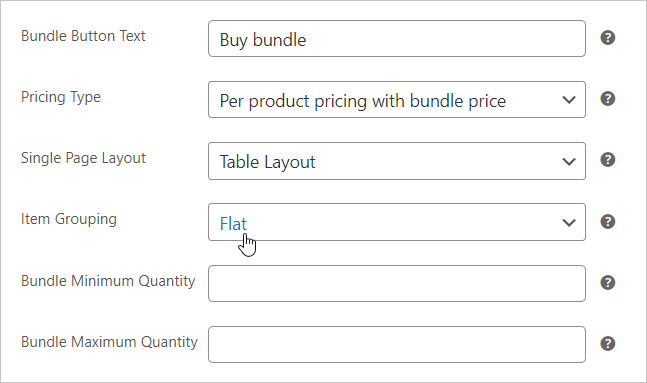
- Click on the Update button to save the settings.
Front-End Impact
- Go to the Shop.
- Select a bundle product.

- Click on Add to Cart.
- Go to the Cart page.
- The bundle items will display the reference of the bundle.
- Click on Proceed to Checkout.
- In the checkout page, the bundle items will display the reference of the bundle.
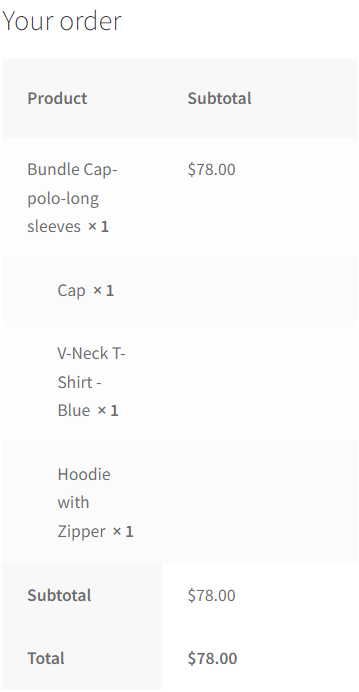
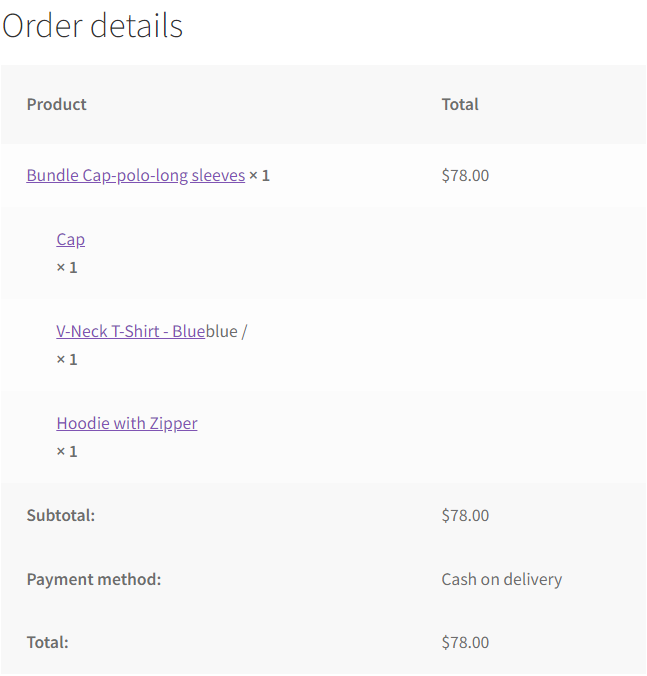
- Now after placing your order, bundle items are displaced in the Order details.
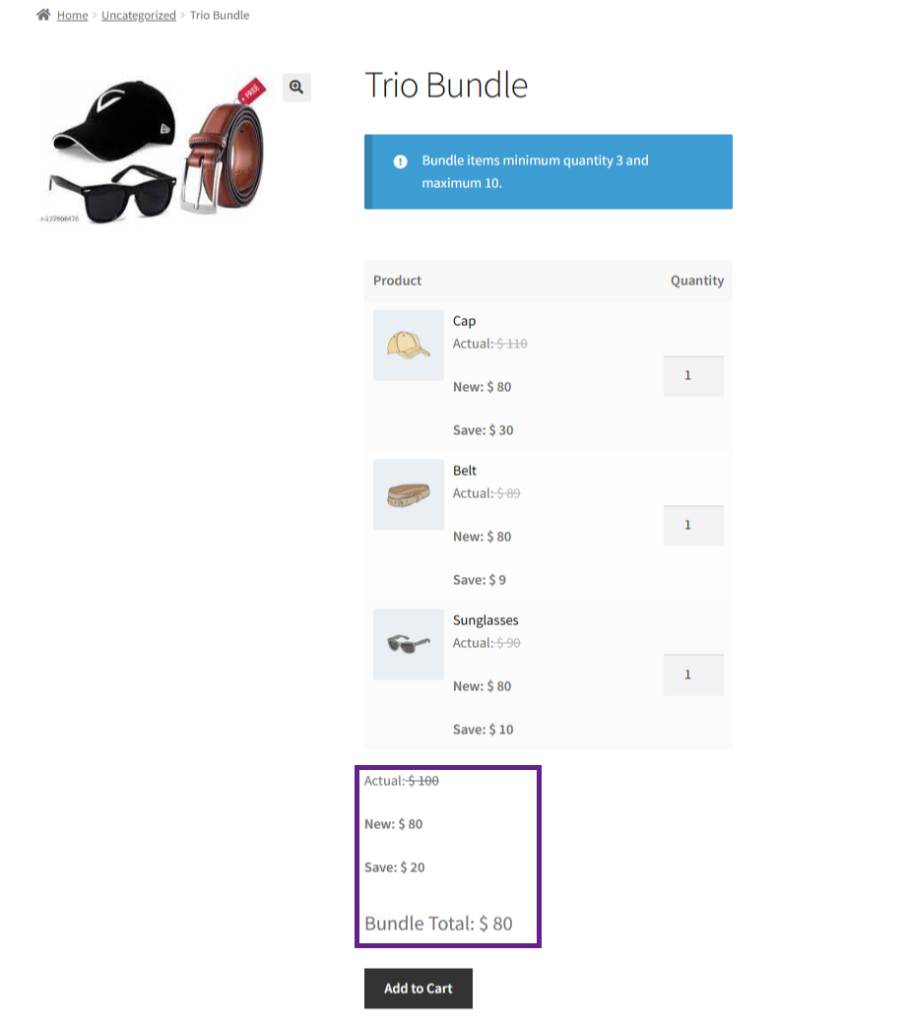
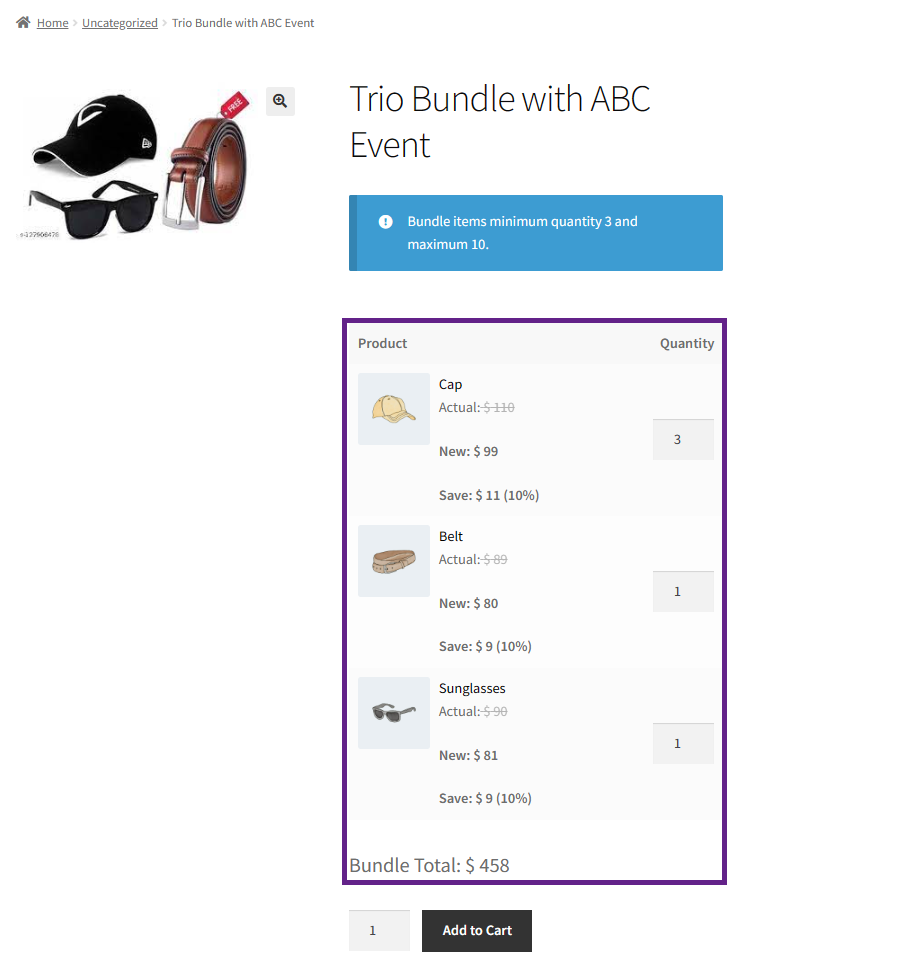
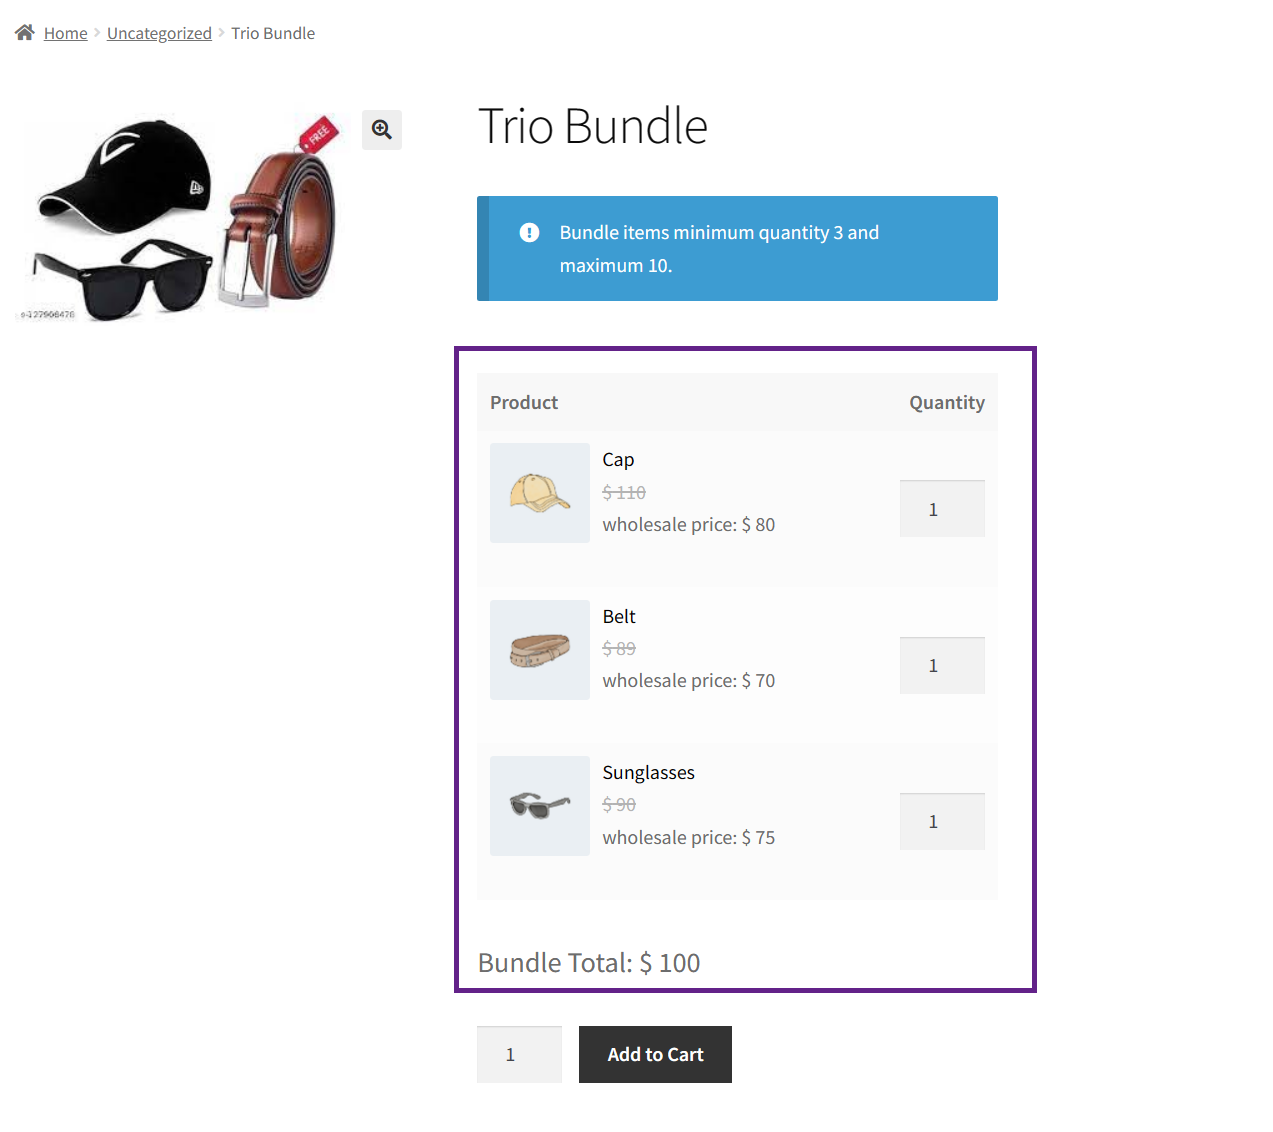
Bundle Minimum And Maximum Quantity
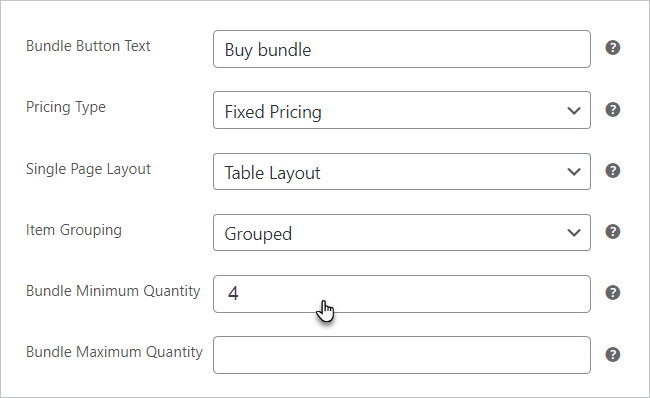
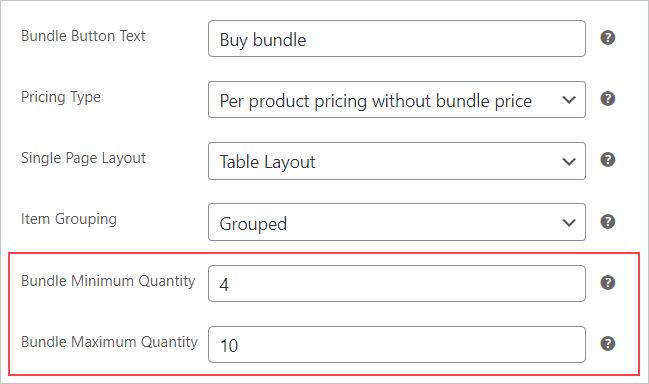
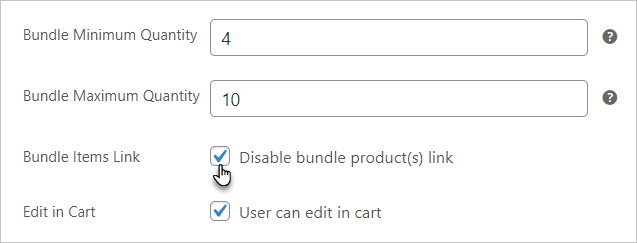
↑ Back to top- Bundle Minimum allows the admin to set the minimum quantity of the items in the whole bundle that needs to be selected to buy that bundle.
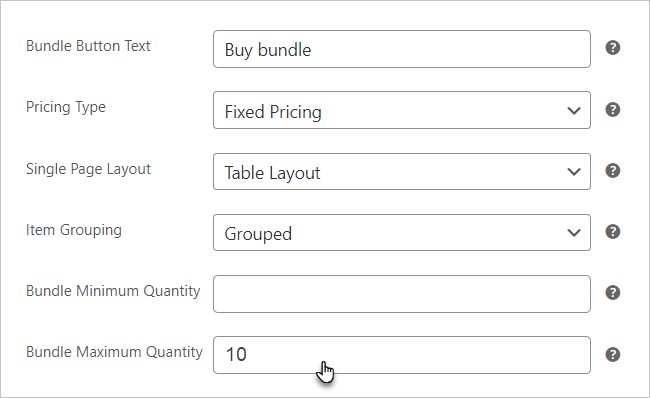
- Bundle Maximum allows the admin to set the maximum quantity of the items in the whole bundle. The user would not be able to buy the bundle if the maximum quantity is exceeded.
- Navigate to the WordPress Admin Dashboard → Products → All Products.
- Add new or select your bundle product and go to Edit.
- In Edit Product, go to the Product data section.
- Select the Bundle Product from the right side.

- In the Bundle Product settings, go to the Bundle Minimum Quantity
- Set the minimum quantity of the products in the bundle.
- To set the maximum quantity of the products, go to the Bundle Maximum Quantity.
- Enter the quantity in the Bundle Maximum Quantity.

- Click on the Update button to save the settings.
Front-End Impact
Only Bundle Minimum Quantity
- Only Bundle Minimum Quantity is set.
- Go to the Shop.
- Select a bundle product.

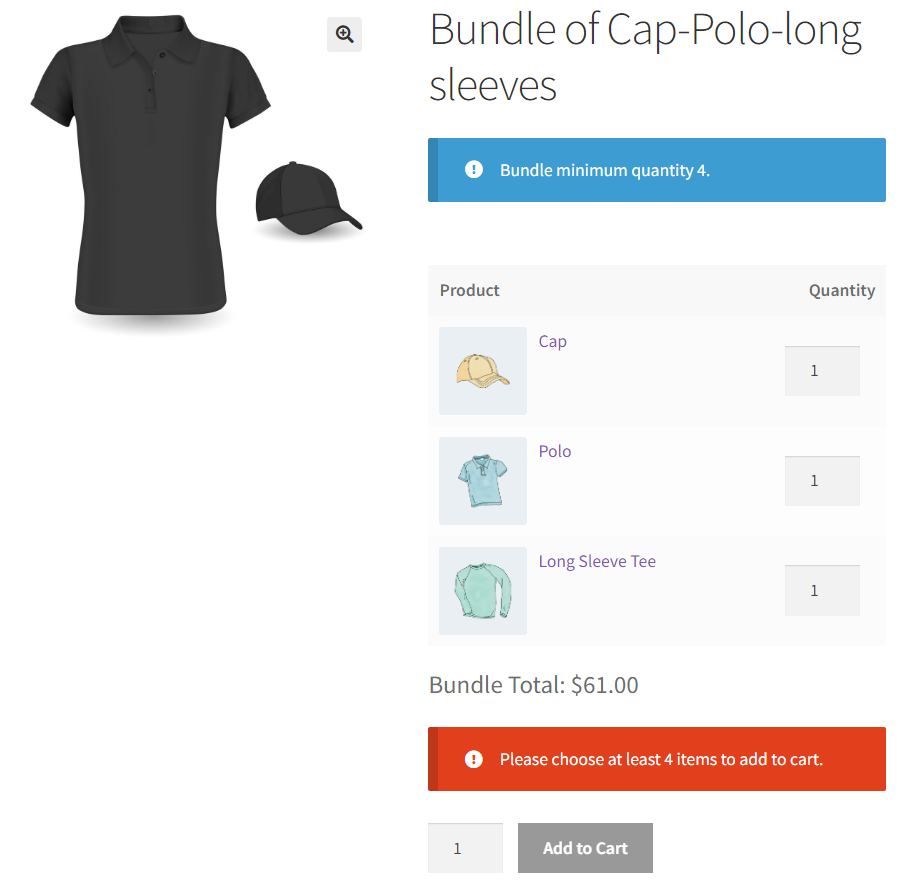
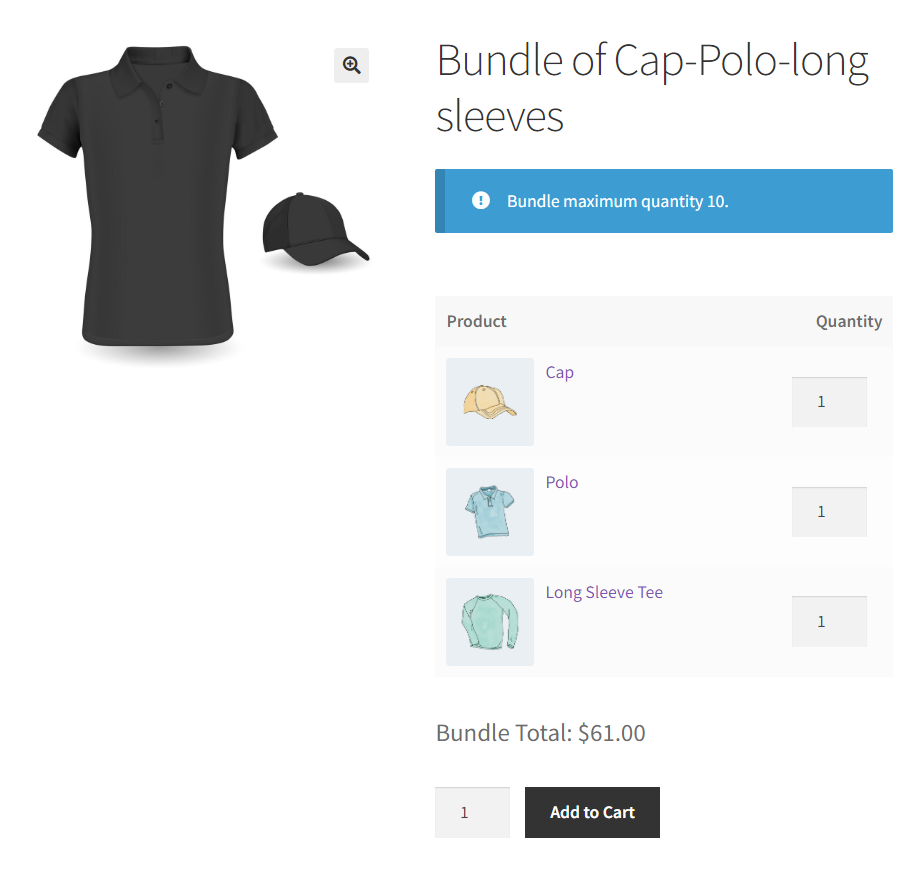
- Minimum bundle quantity message will be displayed under the product name.
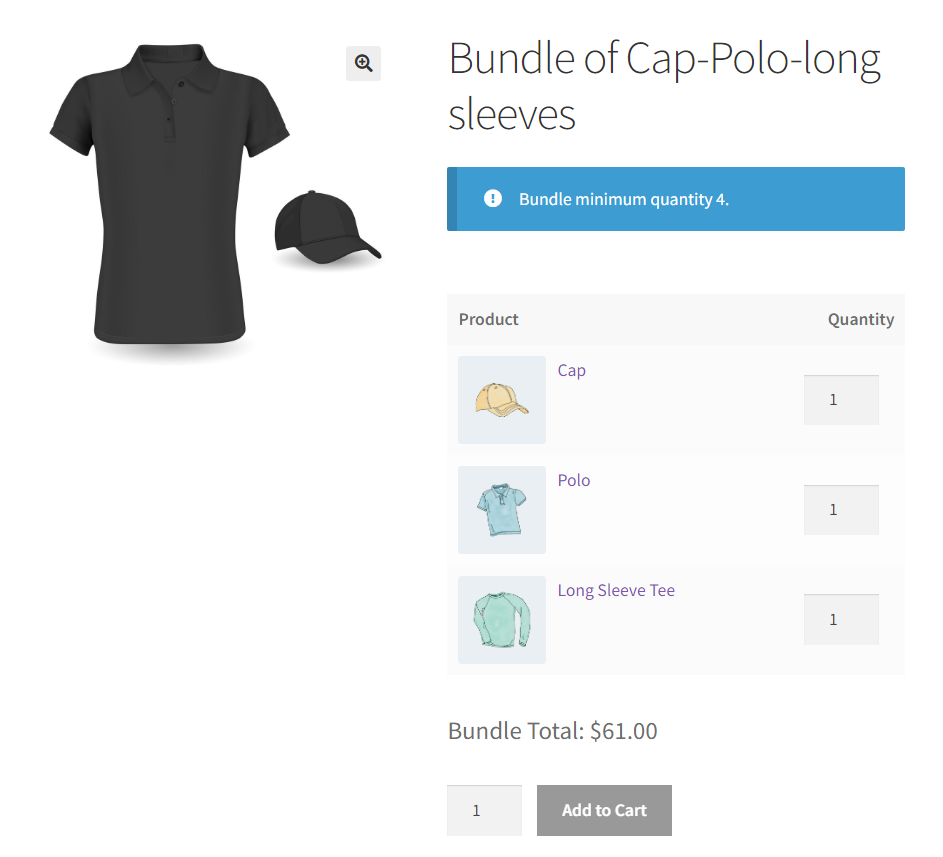
Note: Add to cart button will be disabled until the minimum bundle quantity is not selected.
Only Bundle Maximum Quantity
- Only Bundle Maximum Quantity is set.
- Go to the Shop.
- Select a bundle product.

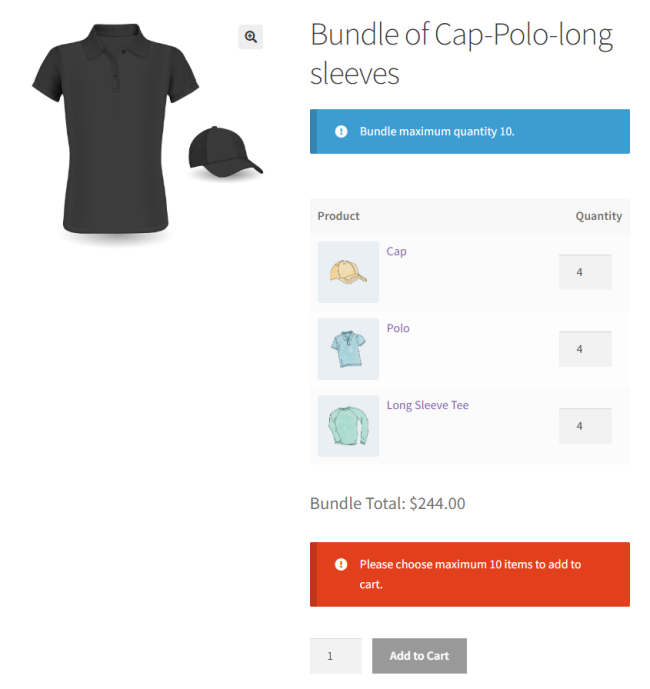
- Maximum bundle quantity message will be displayed under the product name.
Note: Add to cart button will be disabled when the maximum bundle quantity limit is exceeded.
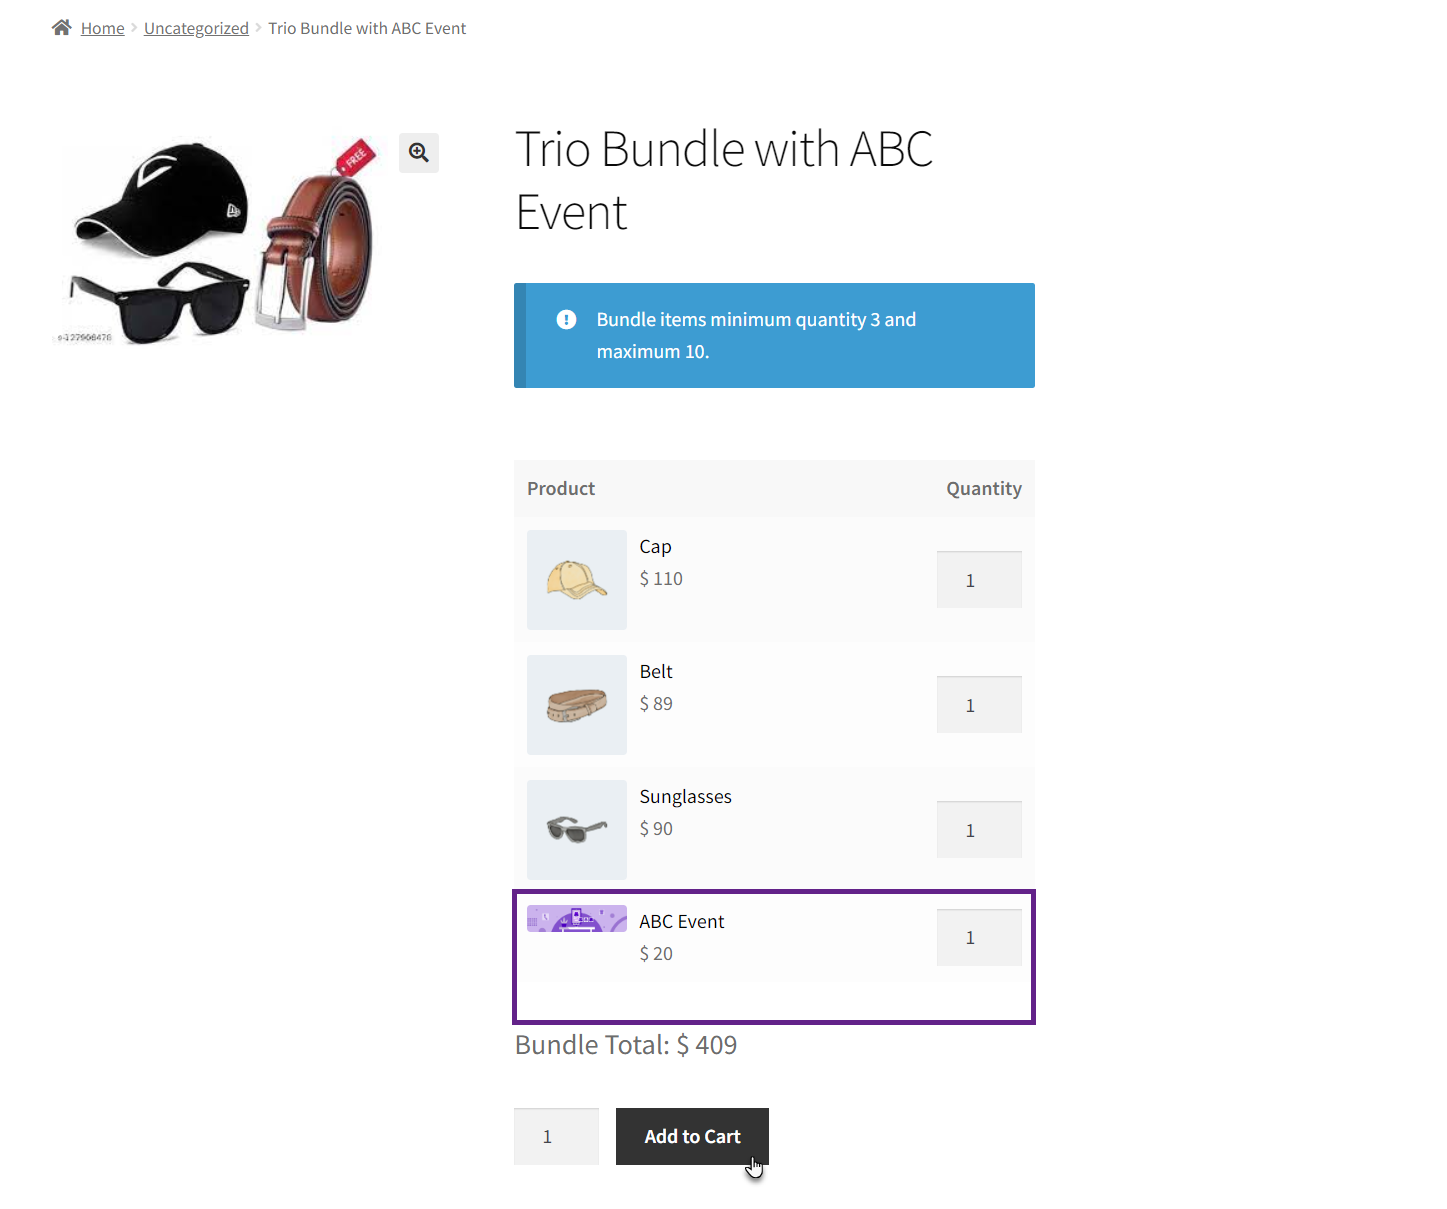
Both Maximum and Minimum Bundle Quantity
- When both Maximum and Minimum bundle quantity is set then the user has to select the quantity of the bundle products between the minimum and maximum quantity.
- Go to the Shop.
- Select a bundle product.

- Minimum and Maximum bundle quantity message will be displayed under the product name.

Note: Add to cart button will be disabled until the quantity is not selected between minimum and maximum quantity.
Edit In Cart
↑ Back to top- This option will allow the user to edit the item quantity of the bundle in Cart page.
- Navigate to the Edit in Cart in Bundle Products.
- Click on the checkbox to enable the option.
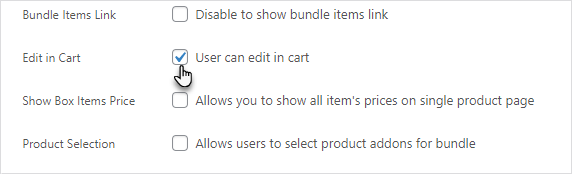
- Click on the Update button to save the settings.
Front-End Impact
- Go to the Shop.
- Select a bundle product.

- Click on Add to Cart.
- Go to the Cart page.
- Edit button will be displayed under the bundle name in the cart page.
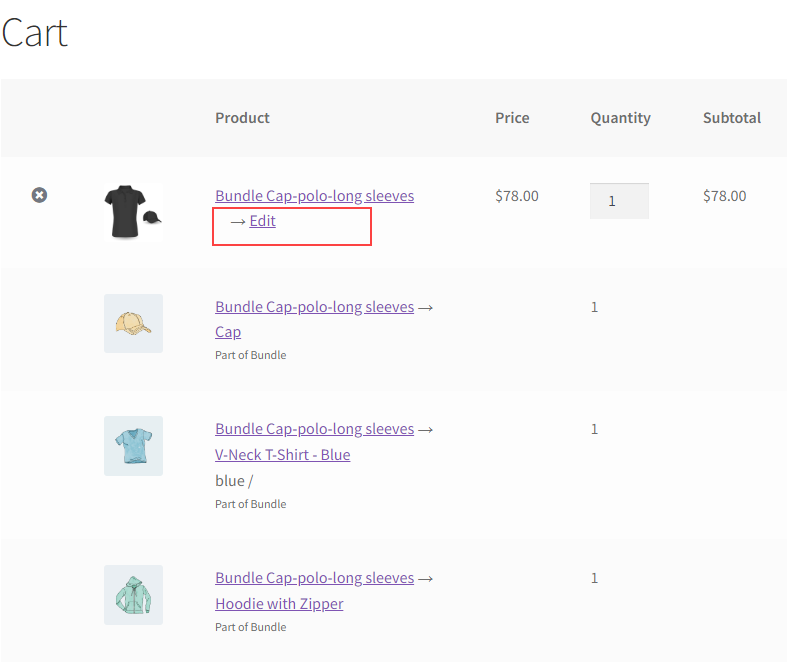
- Click on the Edit button to edit the bundle item quantity.
- This wll take you to the bundle edit page.
- Change the quantity of the items.
- When finished, click on the Update Bundle.
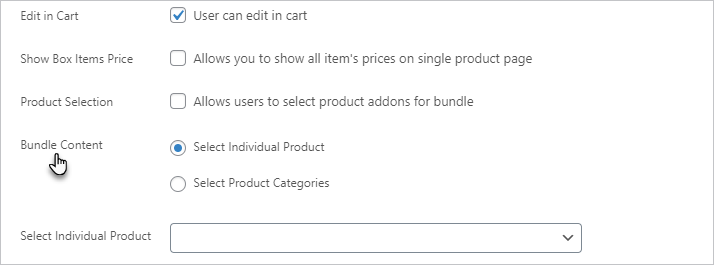
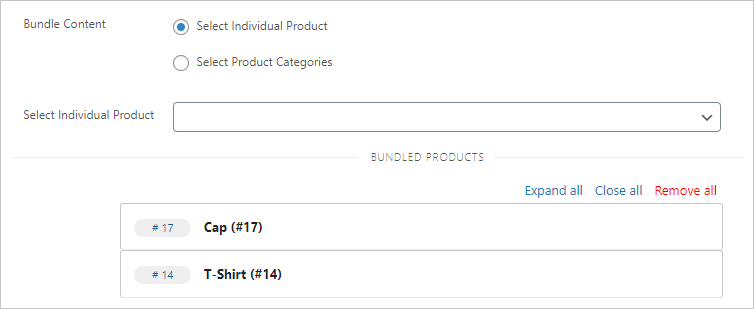
Bundle Content
↑ Back to top- Bundle content will allow the users to select which items they would like to add in the bundle.
- Navigate to the Bundle Content in Bundle Products.
- There will be two options:
- Select Individual Product.
- Select Product Category.
Individual Product
- This will allow the user to add individual products in the bundle.
- Click on the Select Individual Product in Bundle Content.
- Now select the products from the Select Individual Product select box.
- Click on the Update button to save the settings.
Front-End Impact
- Go to the Shop.
- Select a bundle product.
- Bundle contains the individual products.
Category Product
- This will allow the user to add categories in the bundle.
- Click on the Select Product Categories in the Bundle Content.
- Now select the categories from the Select Product Categories select box.
- Click on the Update button to save the settings.
Front-End Impact
- Go to the Shop.
- Select a bundle product.
- Bundle contains all the products of the category.
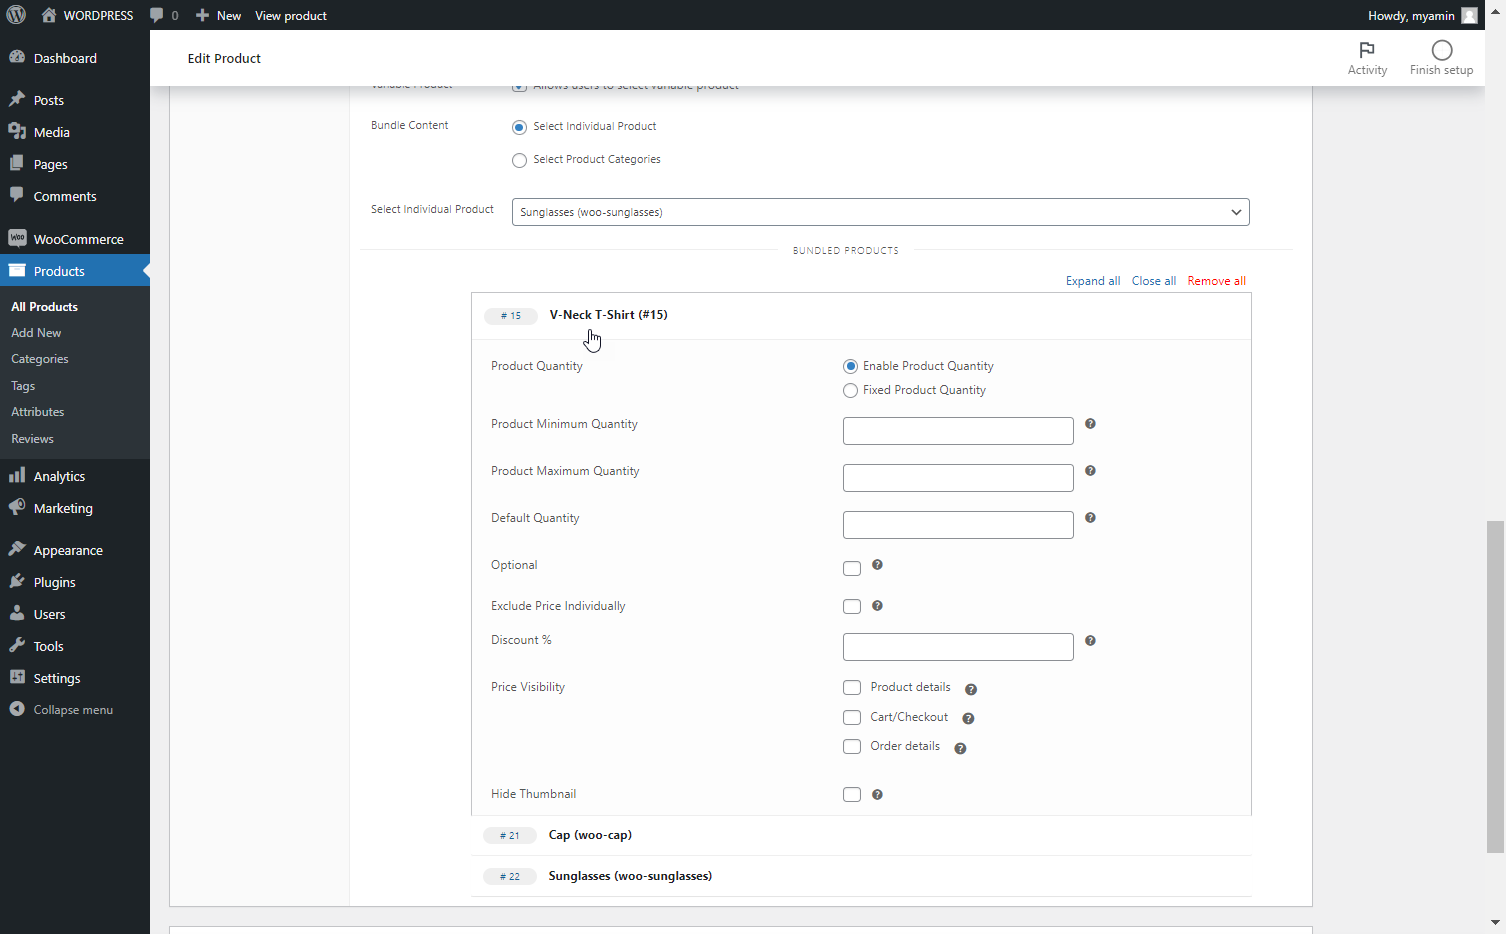
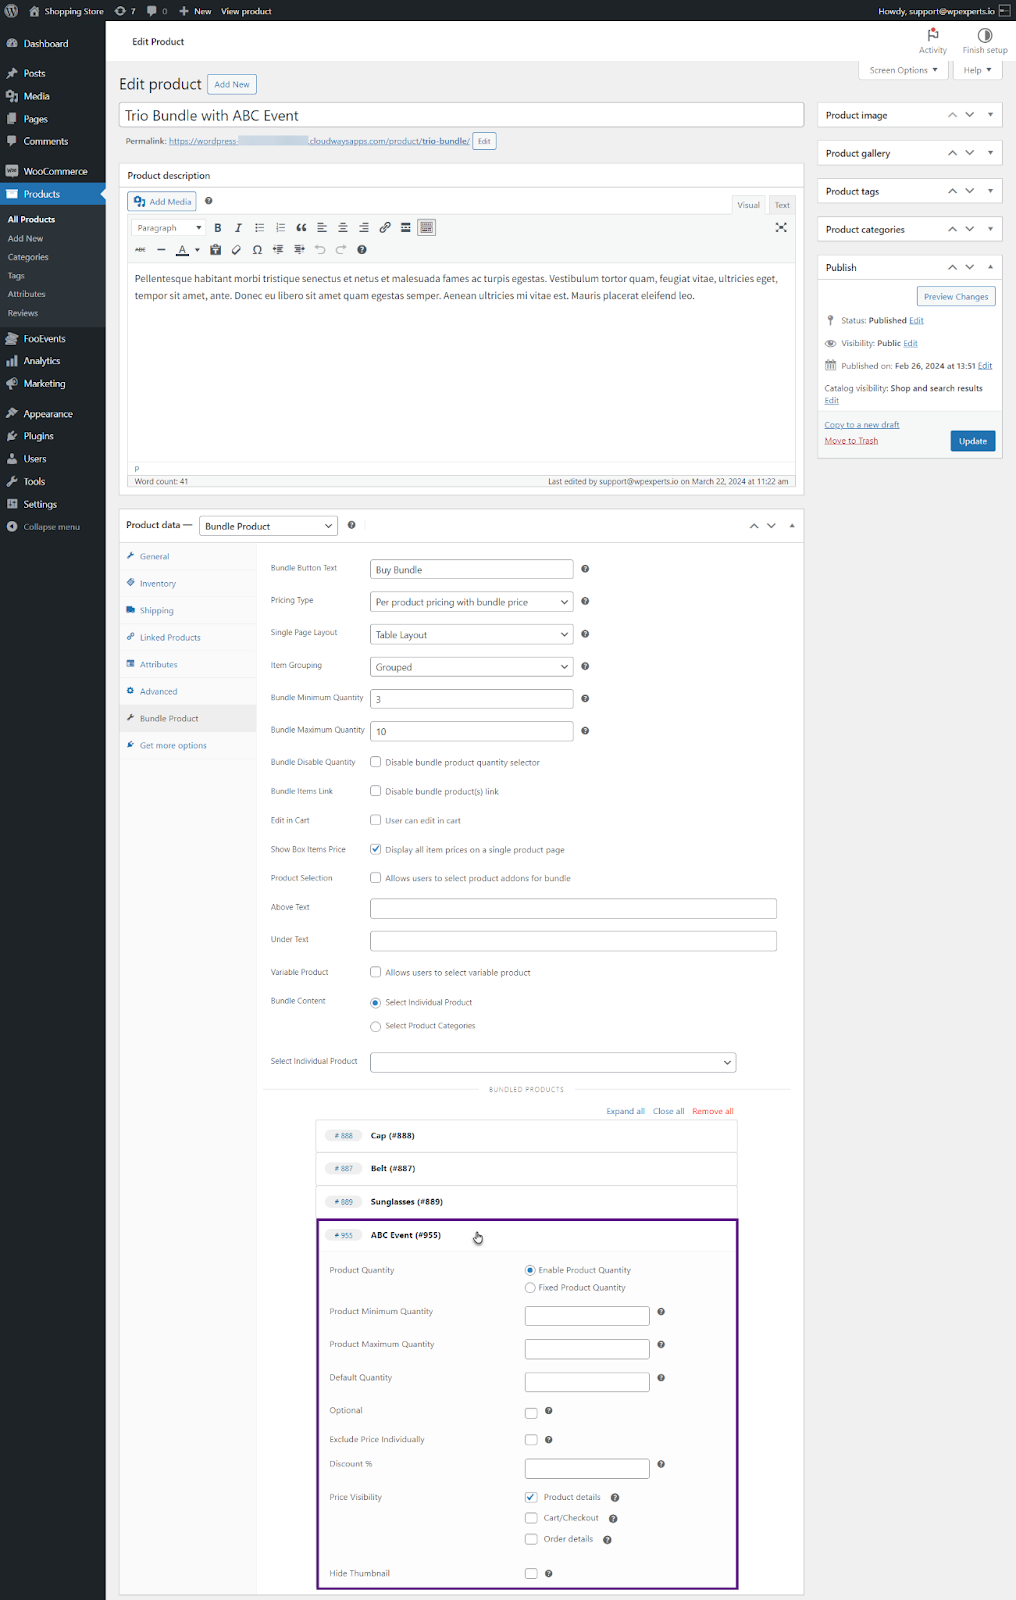
Bundled Product Settings
↑ Back to top- When Bundle Content is set as Select Individual Product, it allows the user to set different settings for the individual product of the bundle.
- Navigate to a product under Bundled Product.
- Click on a product to expand the product settings.
- Expand all button is used to expand the settings of all the products.
- The close all button is used to close the expanded settings of all the products.
- Remove all button will remove all the products from the bundle.
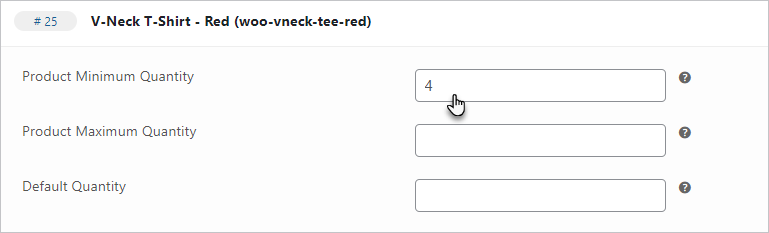
Min Quantity
- This allows the Admin to set the minimum quantity for an individual product, when a minimum quantity is set then the user would not be able to add the product in the cart until the minimum quantity is not selected on the front-end.
- By default it will set this minimum quantity for the product in the quantity selector.
- Set a quantity in the Min Quantity selector box.
- Click on the Update button to save the settings.
Front-End Impact
- Go to the Shop.
- Select a bundle product.
- Minimum product quantity will be displayed as default quantity.
- If the product is less than the minimum quantity then it will not let the user to add the bundle in the cart.
Max Quantity
- This allows the Admin to set the maximum quantity for an individual product, when a maximum quantity is set then the user would not be able to add the product in the cart if the quantity exceeds the maximum quantity limit.
- Set a quantity in the Max Quantity selector box.
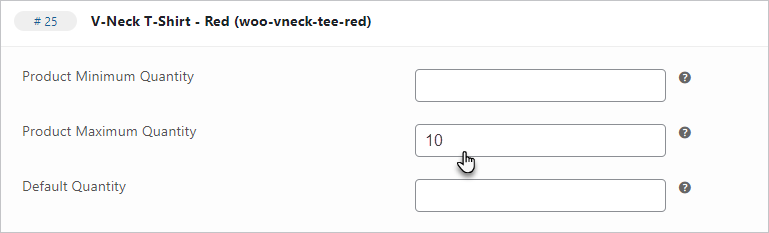
- Click on the Update button to save the settings.
Front-End Impact
- Go to the Shop.
- Select a bundle product.

- The quantity selector will not let the user exceed the maximum limit.
- If the user enters the quantity more than the maximum quantity then it will not allow the user to add the bundle to the cart.
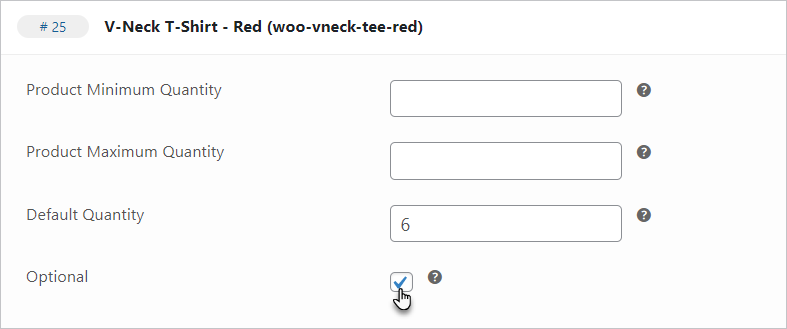
Default Quantity
- This allows the Admin to set the default quantity for an individual product of the bundle in the product screen.
- This default quantity will not be less than the minimum quantity if set in Min Quantity.
- Set a quantity in the Default Quantity selector box.
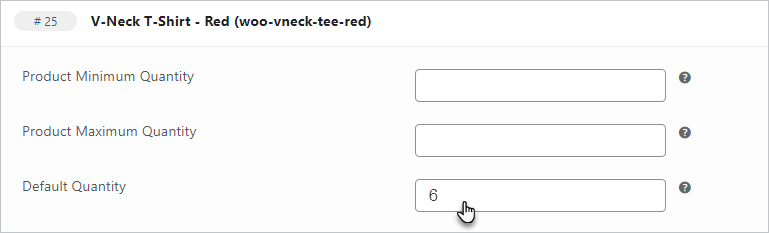
- Click on the Update button to save the settings.
Front-End Impact
- Go to the Shop.
- Select a bundle product.

- Default product quantity will be displayed.
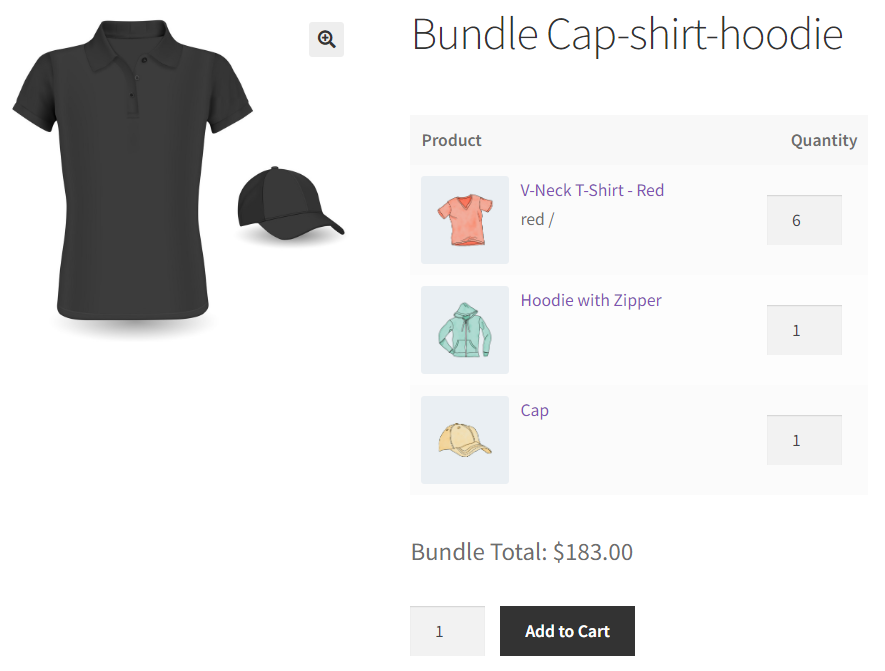
Optional
↑ Back to top- The admin can set an individual product as optional, this option allows the user to exclude the product from the bundle.
- Click on the Optional checkbox button to mark a product as optional.
Note: Admin has to uncheck Product Selection for this option to work properly.
- Click on the Update button to save the settings.
Front-End Impact
- Go to the Shop.
- Select a bundle product.

- A checkbox will be displayed on the product thumbnail.
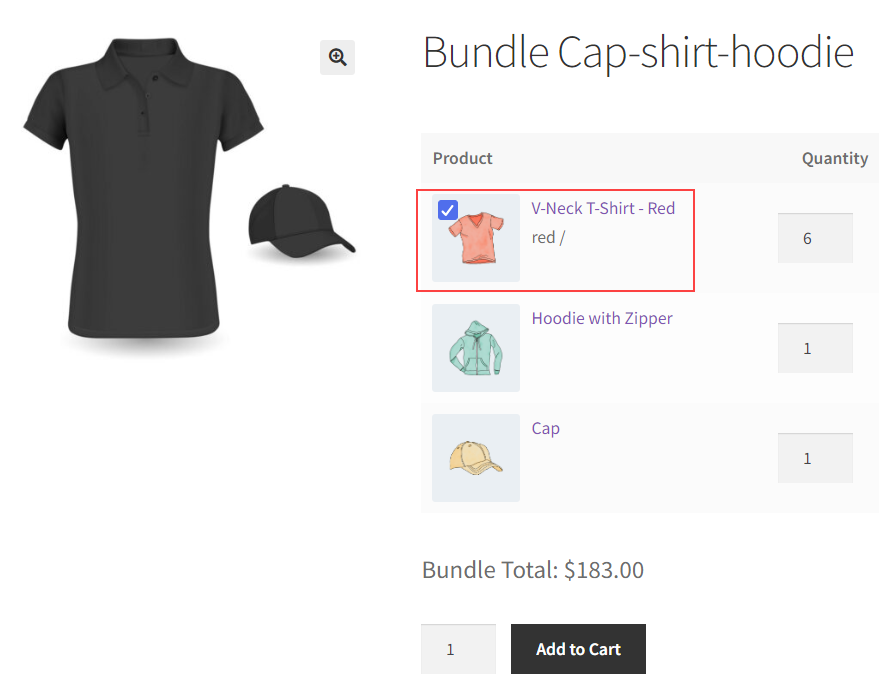
- Click on the check box to uncheck and exclude the product.
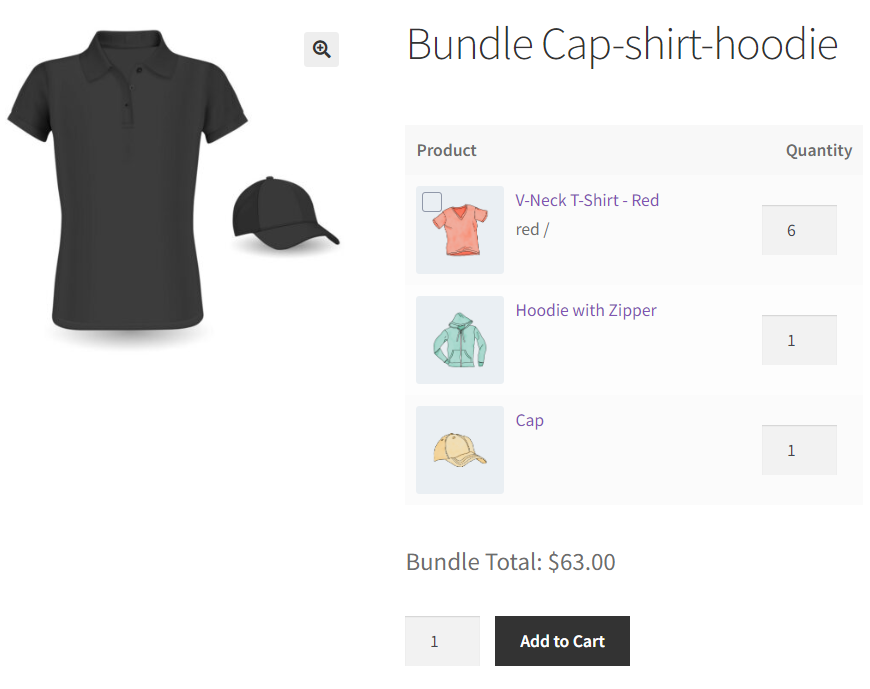
- Click on the Add to Cart button.
- The product and the price will be excluded and the remaining product of the bundle will be added in the cart.
Exclude Price Individually
↑ Back to top- This option will exclude the price of the item and this price will not be added to the bundle price.
Note: This option only works when Pricing Type is set as “Per Product Pricing Without Bundle Price” or “Per Product Pricing With Bundle Price”.
- To exclude the price of an item, click on the Exclude price individually checkbox.
- This will also disable the Discount % for this item.
- Click on the Update button to save the settings.
Front-End Impact
- Go to the Shop.
- Select a bundle product.

- Prices before excluding.
- Prices after excluding.
- Complete the process and proceed to check out.
- Place the order.
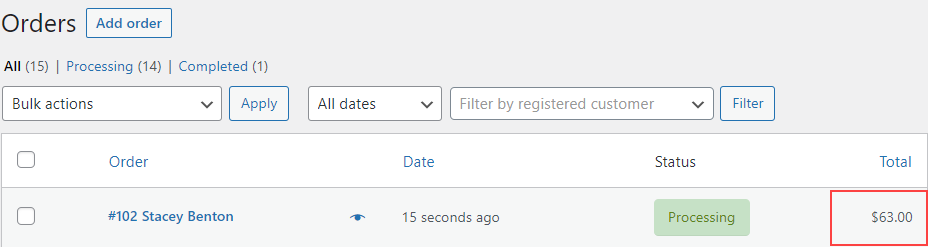
- The price excluding the item price will be charged.
Discount %
↑ Back to top- This option will add a discount percentage on the individual item of the bundle.
Note: This option only works when “Exclude Price Individually” is unchecked.
- Add the discount in the Discount %.
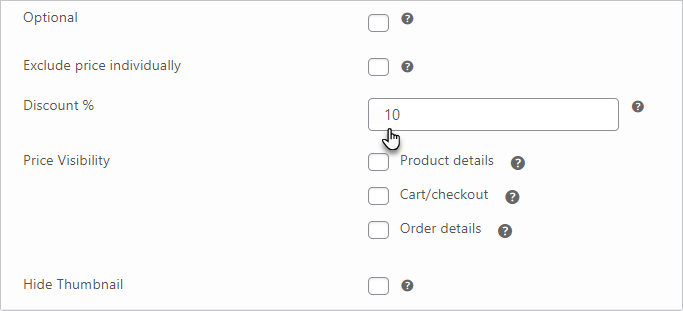
- Click on the Update button to save the settings.
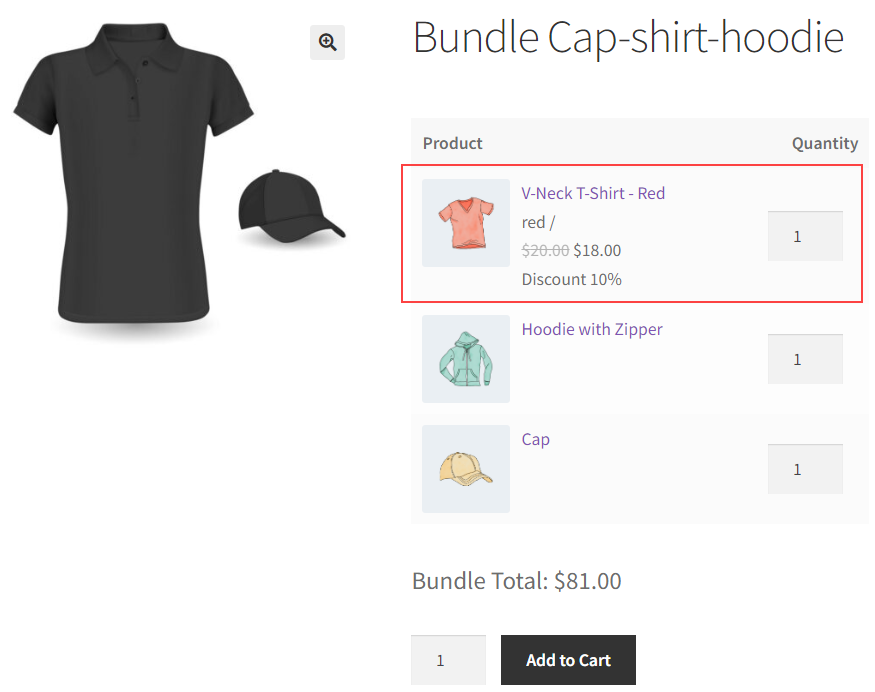
Front-End Impact
- Go to the Shop.
- Select a bundle product.

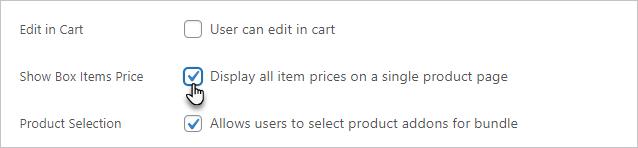
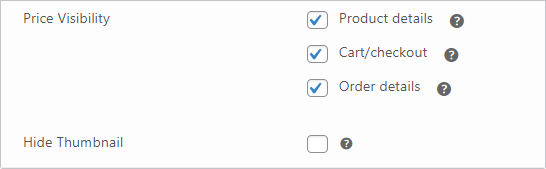
Price Visibility
↑ Back to top- This option will display the price of the item.
- First check the Show Box Item Price checkbox.
- Now, navigate to the product in the Bundled Products.
- Expand the product.
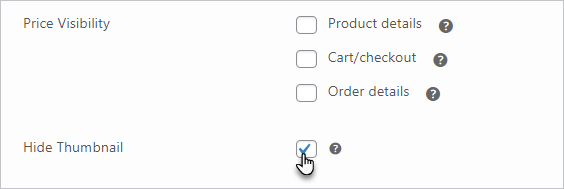
- Click on the Product details checkbox to display the item price on the product page.
- Click on the Cart/Checkout checkbox to display the item price on the Cart and Checkout page.
- Click on the Order details checkbox to display the item price on the Order page.
- Click on the Update button to save the settings.
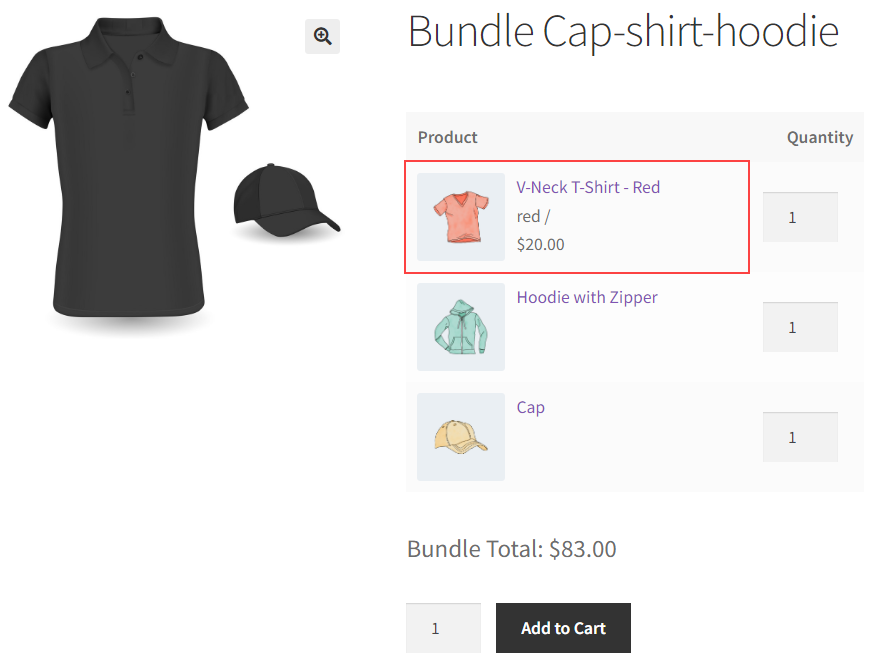
Front-End Impact
- Go to the Shop.
- Select a bundle product.

- The item price will be displayed in the product page.
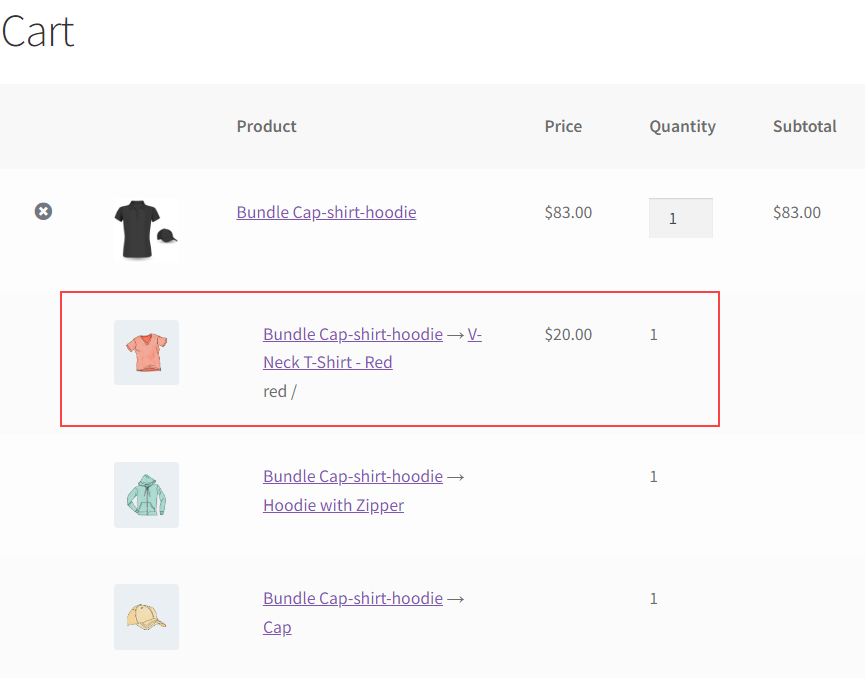
- The item price will be displayed in the Cart page.
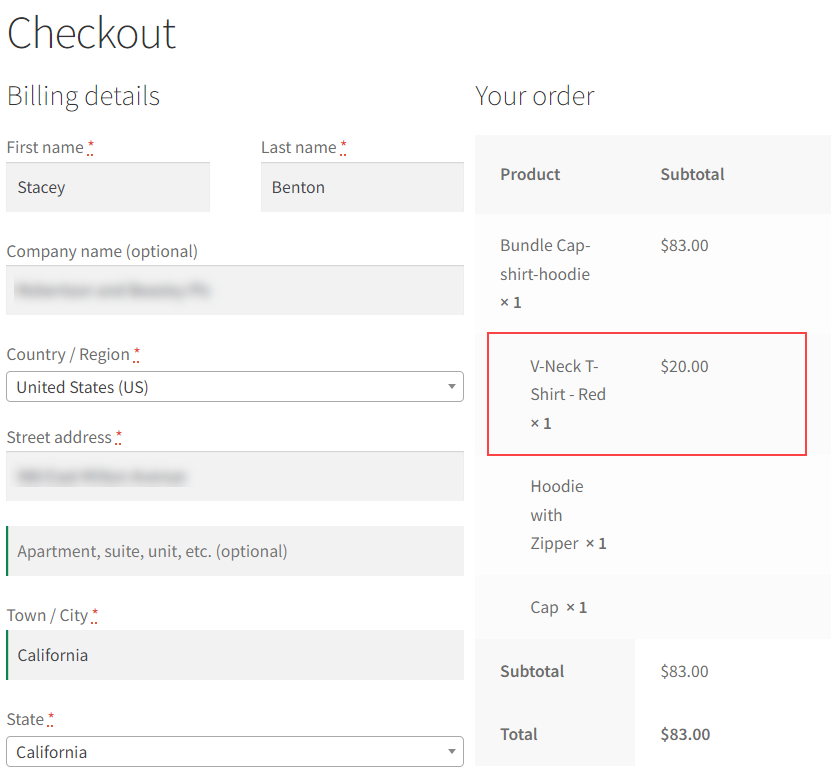
- The item price will be displayed in the Checkout page.
- The item price will be displayed in the Order details page.
Hide Thumbnail
↑ Back to top- This option will hide the thumbnail image of the item in the product detail page, cart and checkout page.
- Click on the Hide Thumbnail checkbox.
- Click on the Update button to save the settings.
Front-End Impact
- Go to the Shop.
- Select a bundle product.

- The item thumbnail before.

- The item thumbnail after.

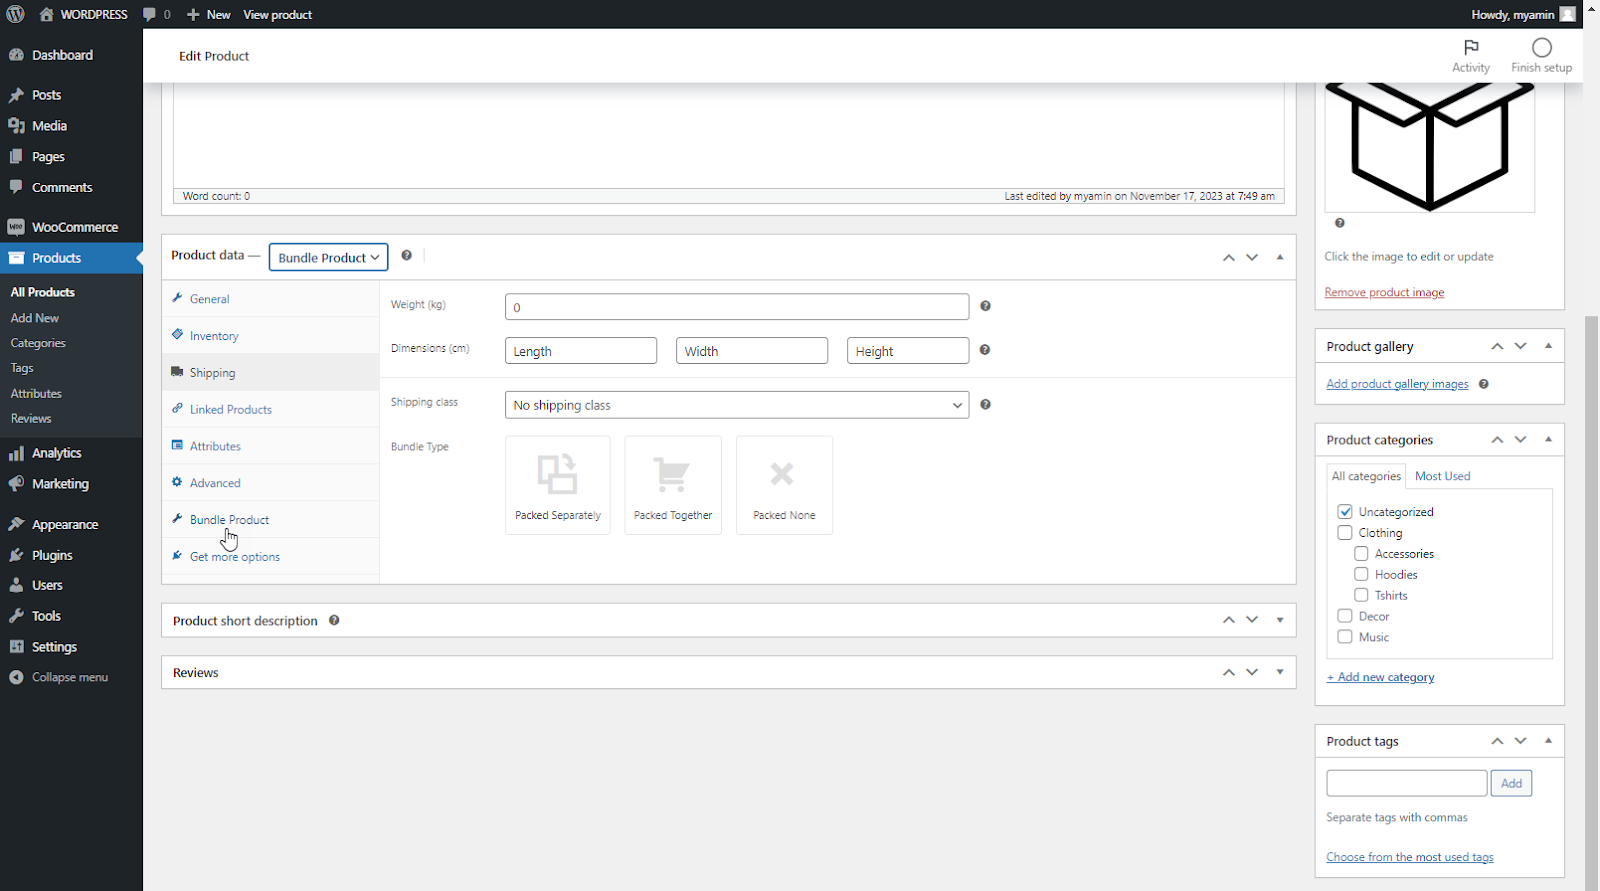
Bundle Type (Shipping Settings)
↑ Back to top- This option shows how the bundle items will be packed and shipped.
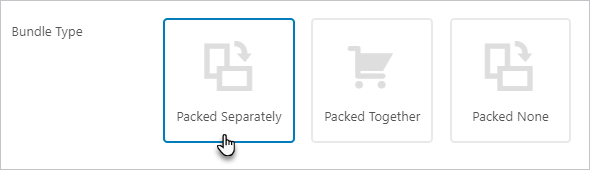
- Navigate to the WooCommerce Products → Product Data → Shipping → Bundle Type.

- In Packed Separately, all selected items are shipped individually in their original packaging and the shipping properties of all packaged items are retained.
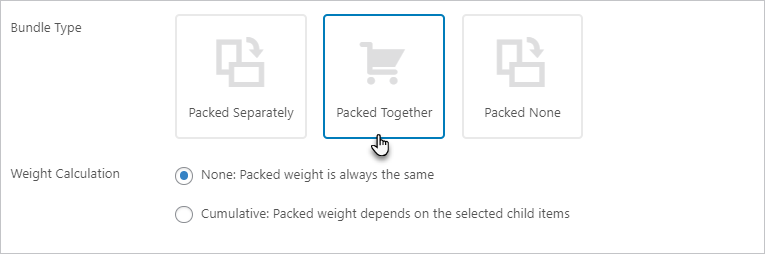
- In Packed Together, all selected items are assembled or packaged together and shipped as a single unit.
- This will open Weight Calculation where there will be two radio buttons.
- None: Packed weight is always the same.
- Cumulative: Packed weight depends on the selected child items.
- Admin can define physical properties of dimensions and weights.
- Select a Bundle Type.
- Click on the Update button to save the settings.
Front-End Impact
- Go to the Shop.
- Purchase a bundle product.
- Complete the purchase process and complete the payment.
- Navigate to the WooCommerce → Orders → Order Edit.
- Order Packed Separately.
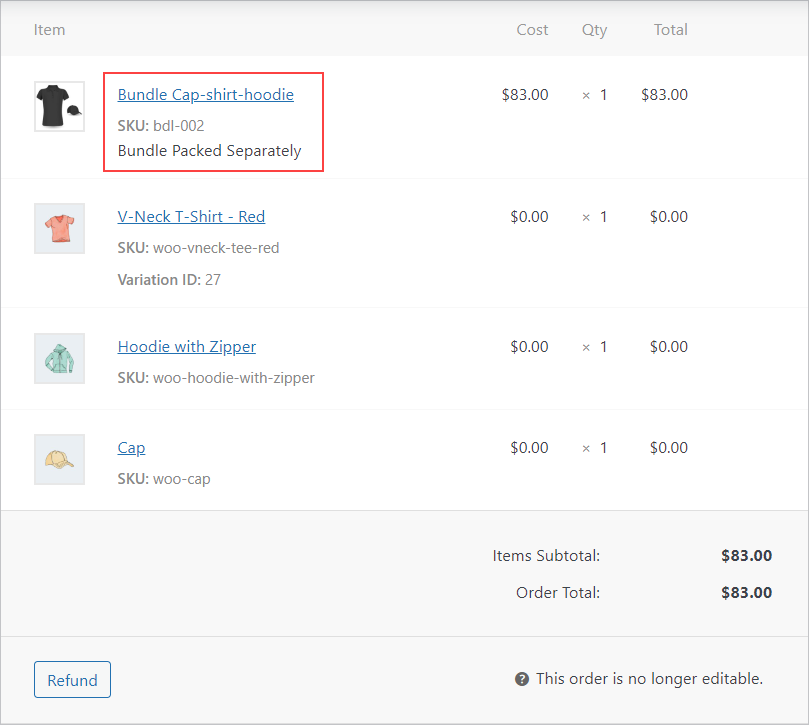
- Order Packed Together (None).

- Order Packed Together (Cumulative).

Subscription Settings
↑ Back to top- The admin can make a subscription bundle product.
- This setting requires WooCommerce Subscription plugin.
- Install and activate the WooCommerce Subscription plugin first.
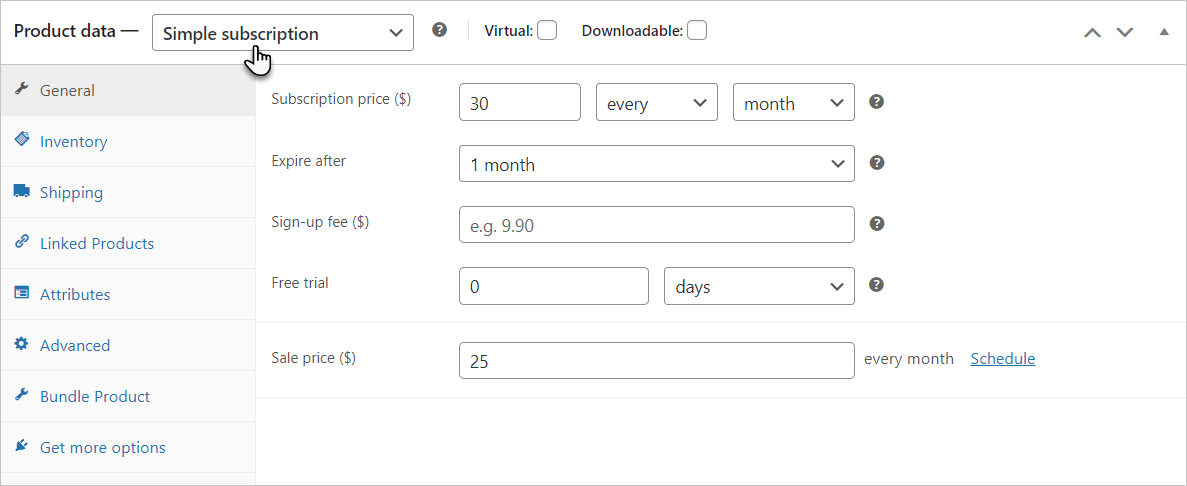
- Now add a new product, navigate to the WordPress Admin Dashboard→ Products → Add new.
- Select product type as Simple Subscription in the Product Data.
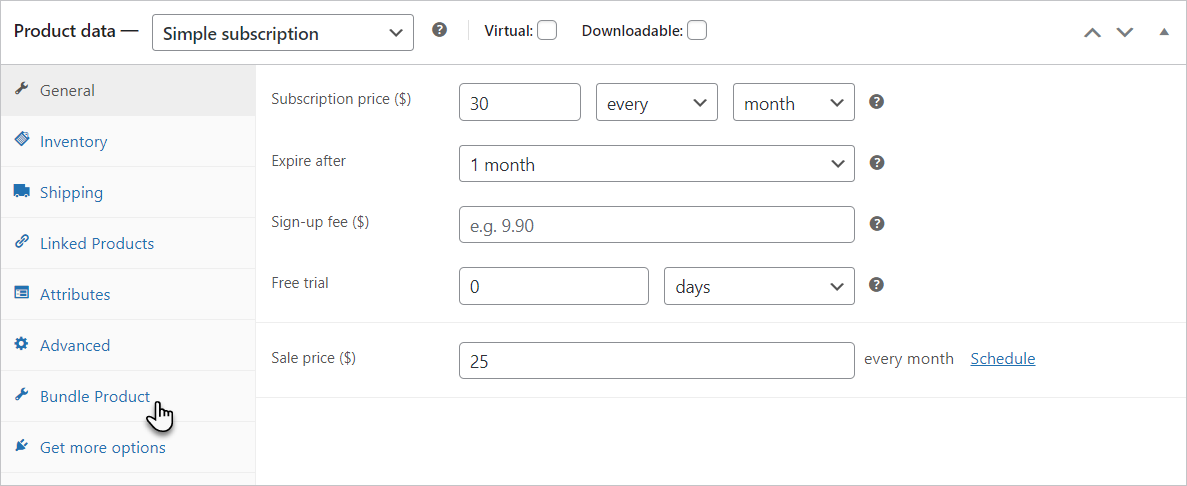
- Select the Bundle Product from the right side.
- Add your bundle product settings.
- Add products in your bundle.
- Click on the Publish/Update button to save the changes.
Front-End Impact
- Go to the Shop.
- Purchase the subpscrption product bundle.
- Add products in your bundle.

- Add the product in cart.
- Proceed to Checkout.
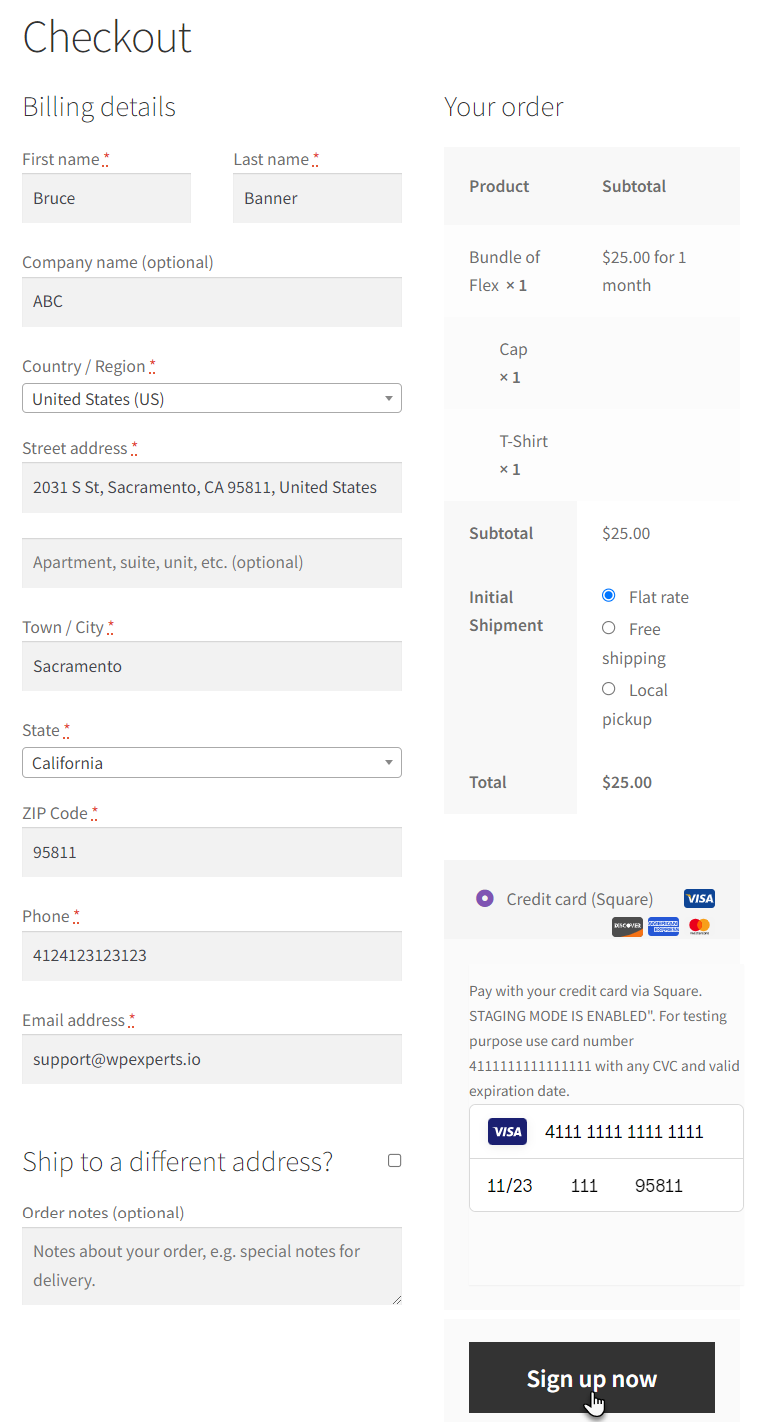
- Click on the Sign up Now to subscribe to the subscription product bundle.
- Once your order is successful your order details will be shown.
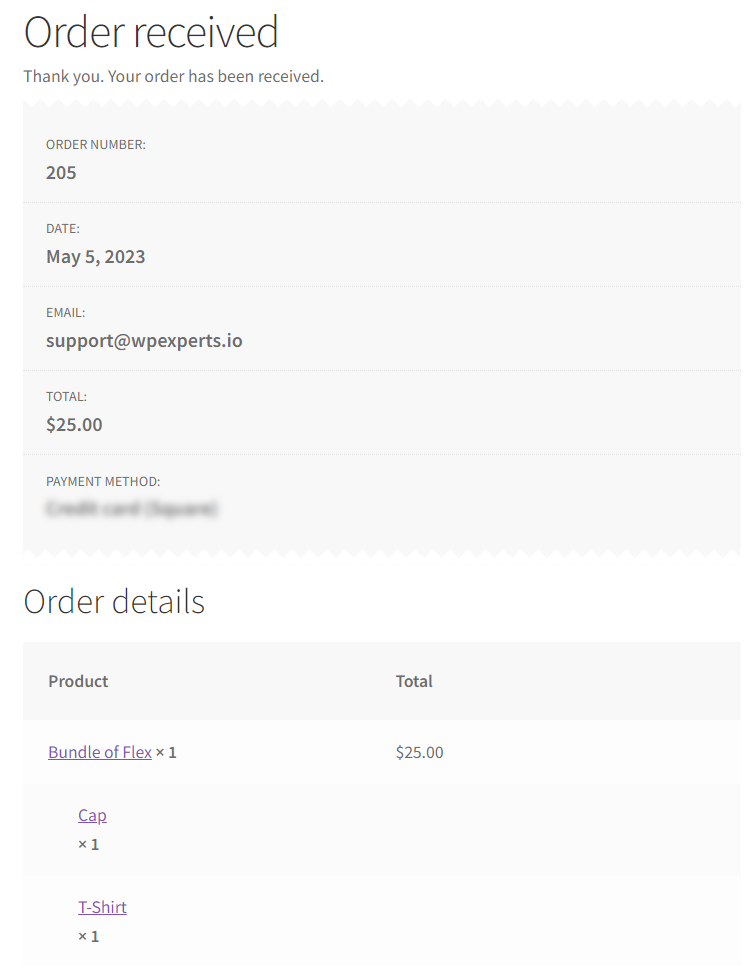
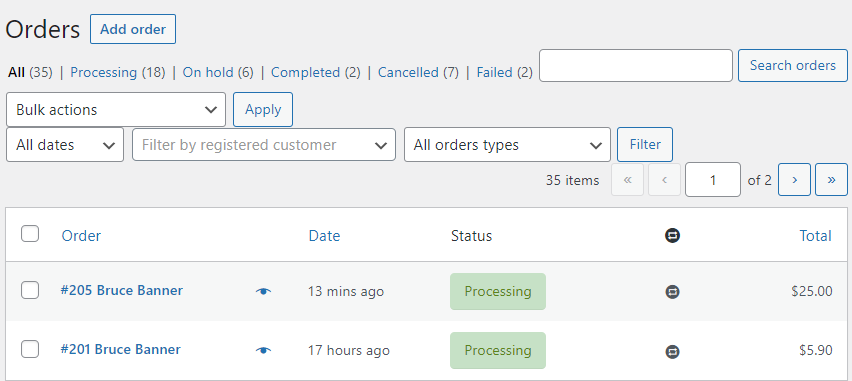
- Navigate to the WordPress Admin Dashboard → WooCommerce→ Orders.
- Check your subscription product bundle order details.
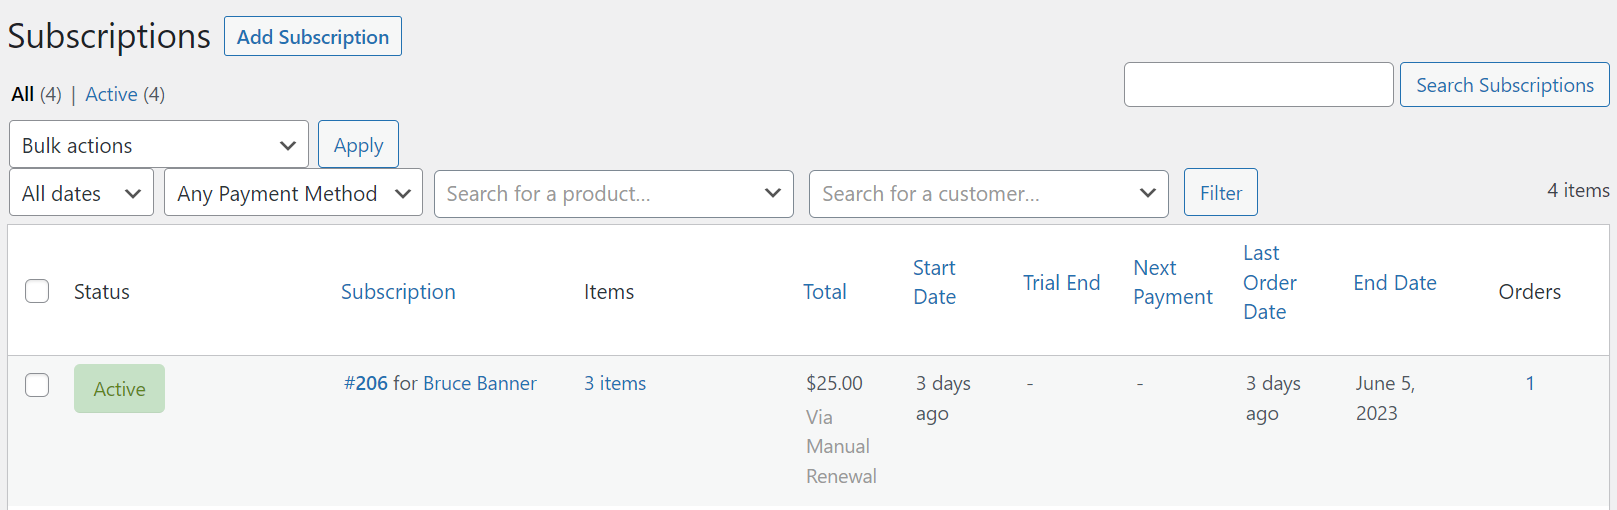
- Navigate to the WordPress Admin Dashboard → WooCommerce→ Subscriptions.
- Check your subscription.
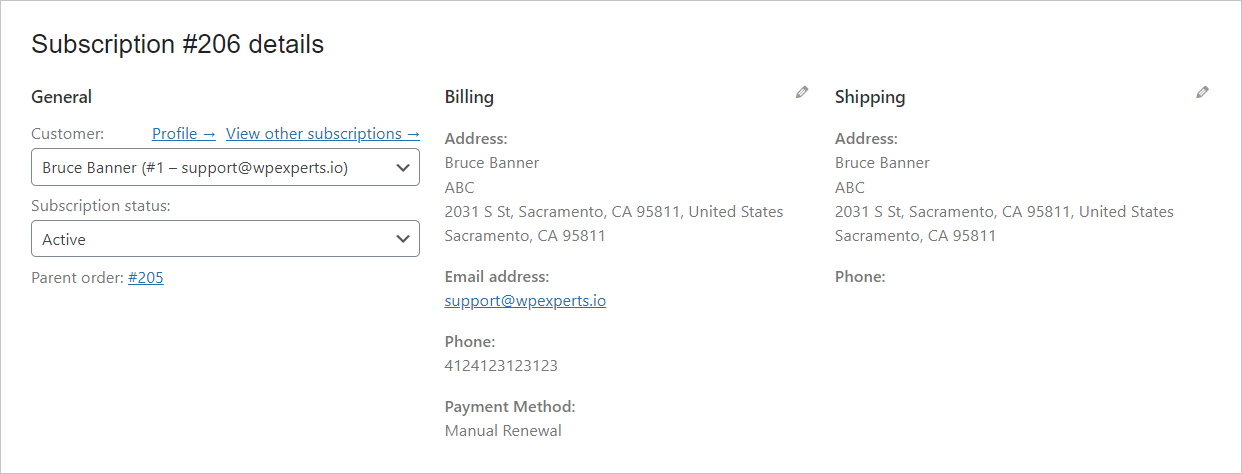
- Click on the subscription to check subscription details.
Bundle Items Link
↑ Back to top- The admin can disable the product link from the bundle.
- This will not allow the user to redirect to the product page from the bundle page when the product is clicked.
- Go to the Bundle Items Link.
- Click on the check box.
- Click on the Update button to save the changes.
Front-End Impact
- Go to the Shop.
- Go to the bundle product.
- Before Disabling Product Link.
- After Disabling Product Link it will not redirect to the product page.
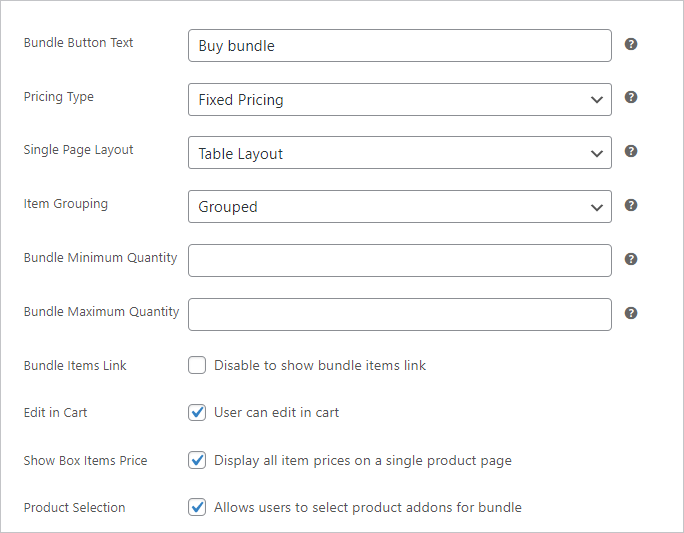
Product Selection
↑ Back to top- The admin can allow the user to select products to be added in bundle.
- Go to the Product Selection.
- Click on the check box to enable it.
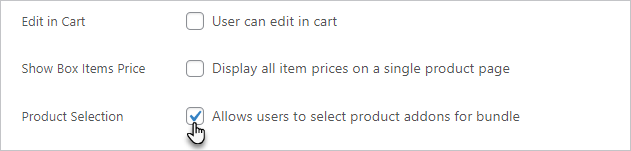
- Click on the Update button to save the changes.
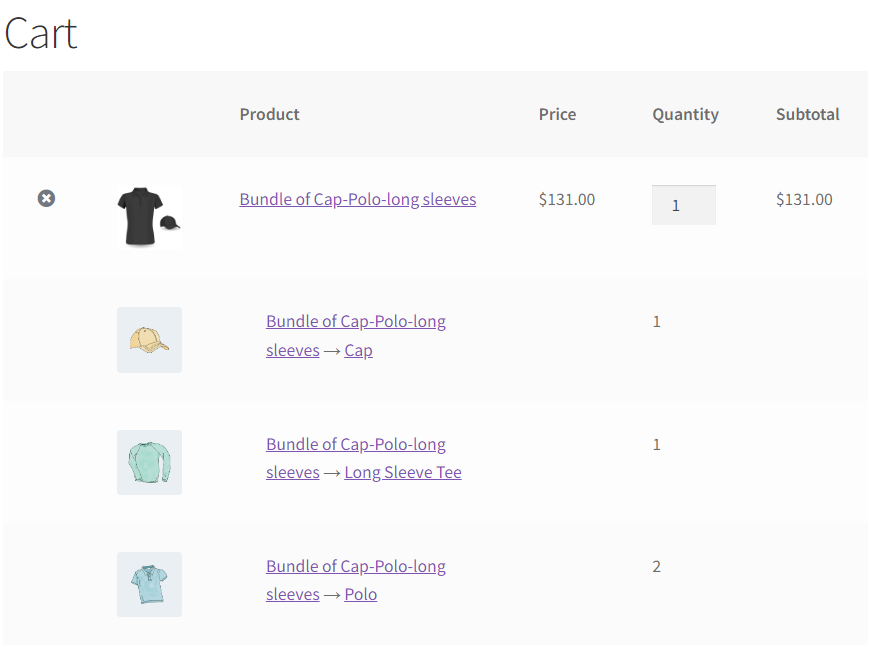
Front-End Impact
- Go to the Shop.
- Go to the bundle product.
- Now the user can select the products they want to add in the bundle.
- Add the product in the cart.
- Only selected products will be added in the bundle.
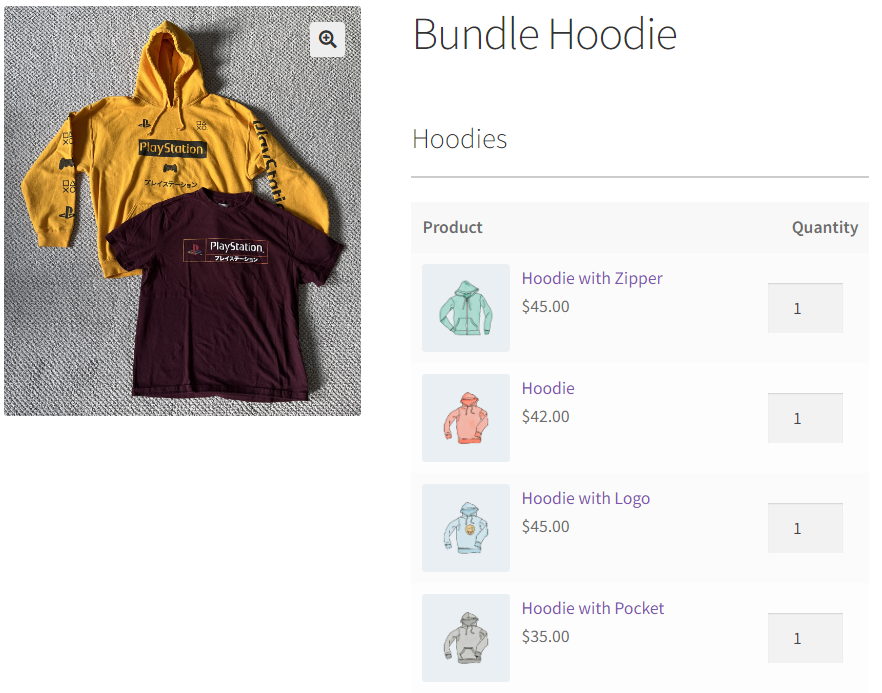
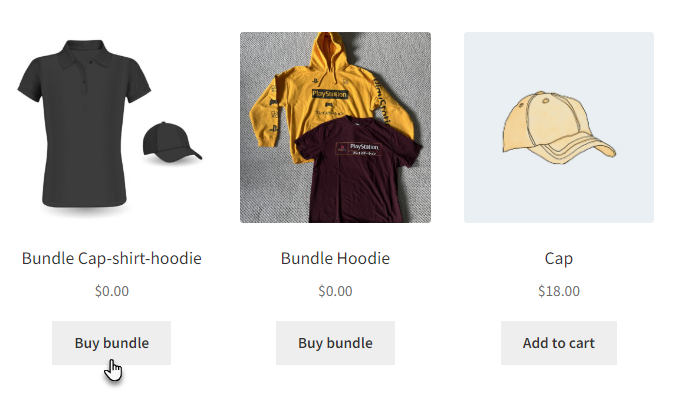
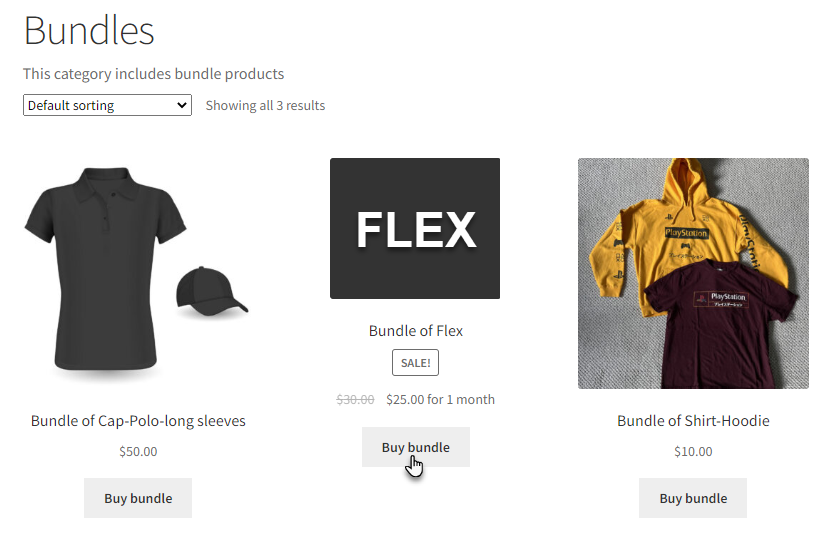
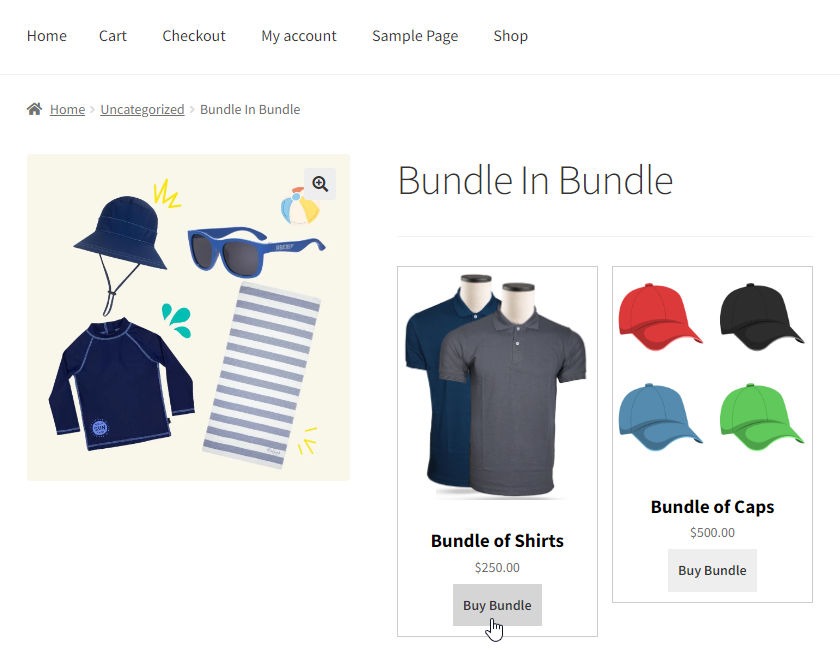
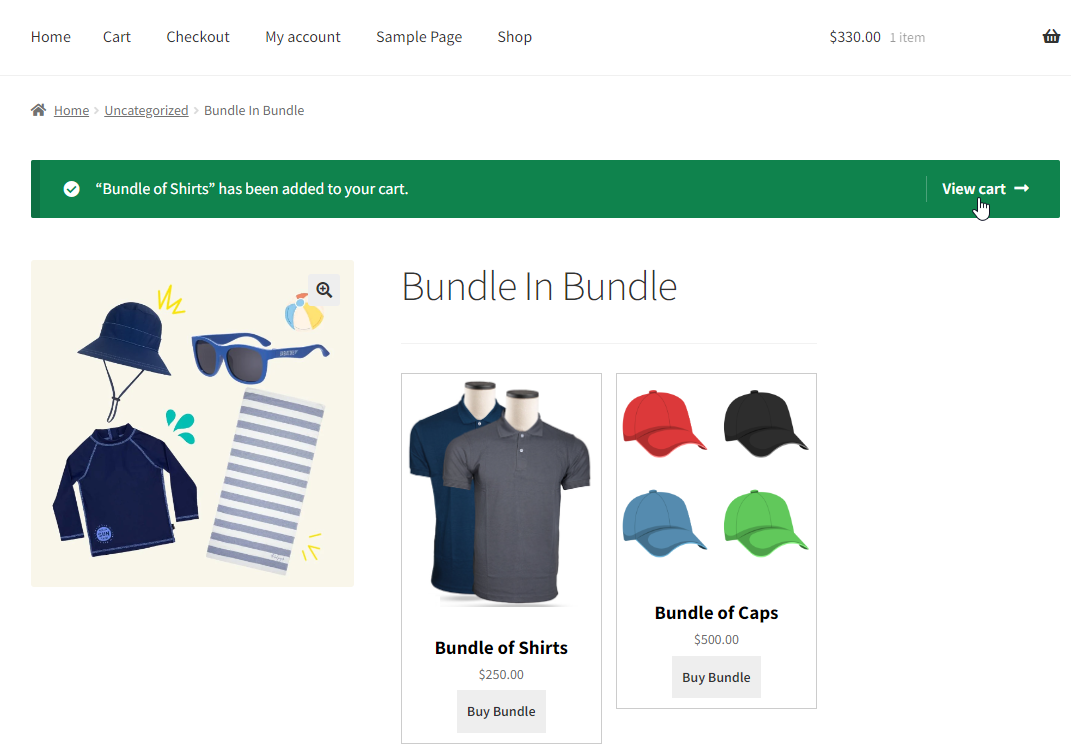
Bundle In Bundle
↑ Back to top- The bundle in bundles will just contain and show the bundles of products in one place, and users can buy individual bundles from it.
- The admin can now add Bundle in Bundle in the Smart Bundle Product.
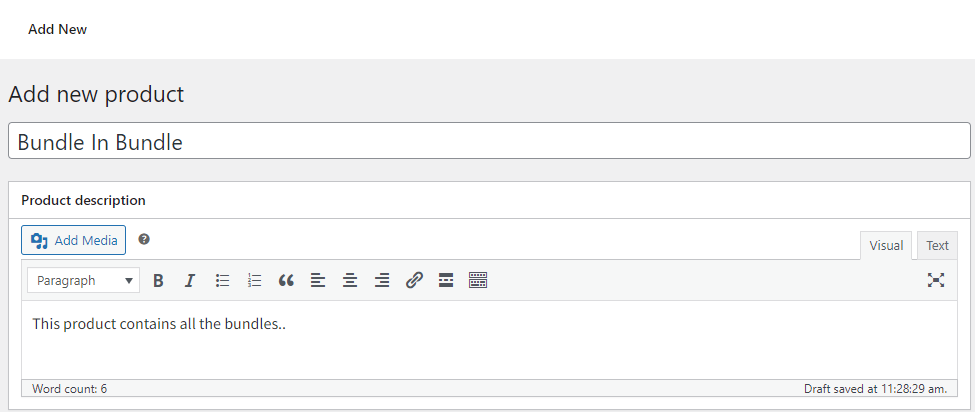
- Navigate to the WordPress Admin Dashboard => Products => Add New.
- Add Product Name and Product Description.
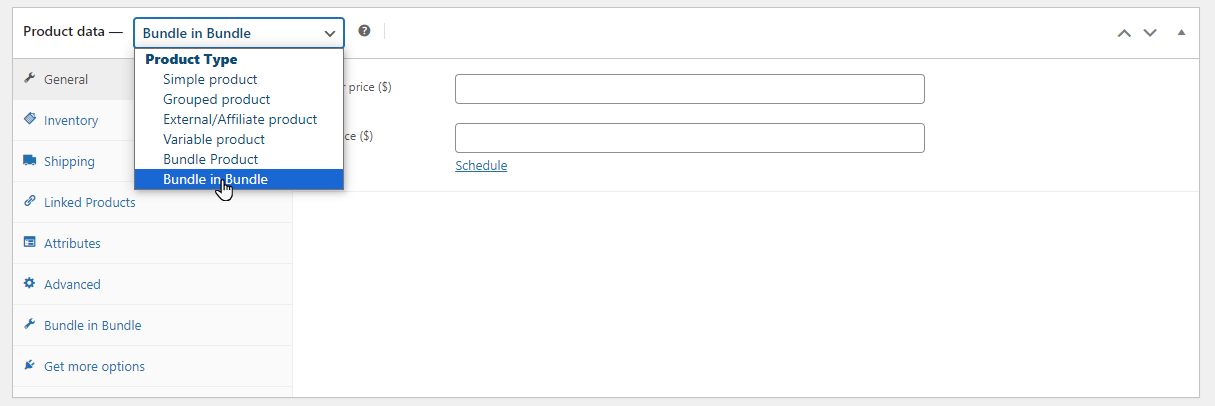
- Navigate to the Product Data Section.
- Select Bundle in Bundle from the Product Data drop-down.
- Navigate and select Bundle in Bundle from the side menu.
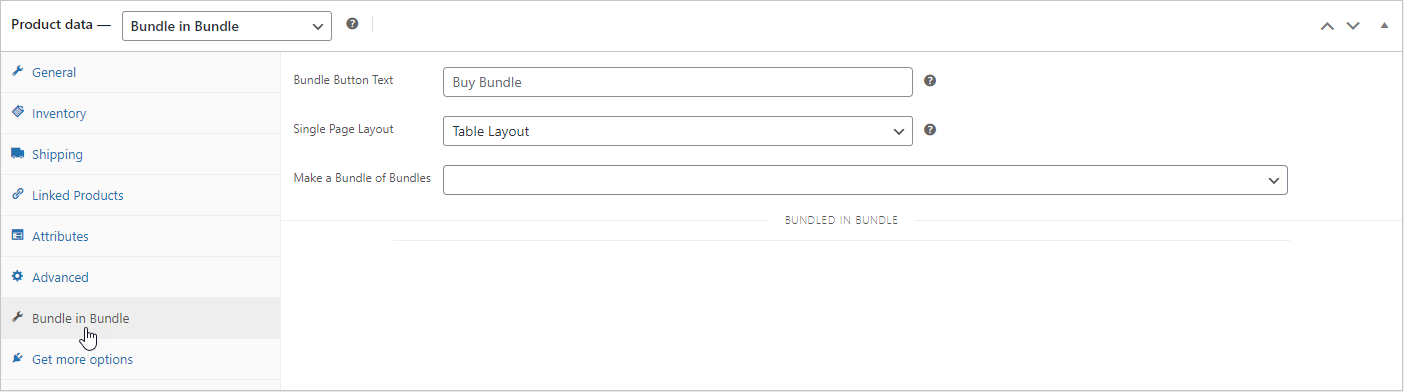
- Add a button label in the Bundle Button Text input box or leave it as the default setting with Buy Bundle.
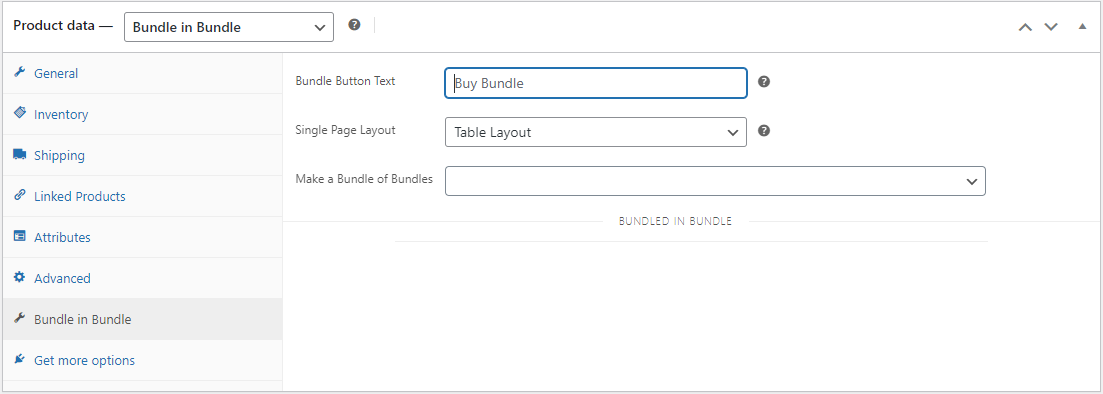
- From the Single Page Layout, select the option from the drop-down menu.
Types of Layout
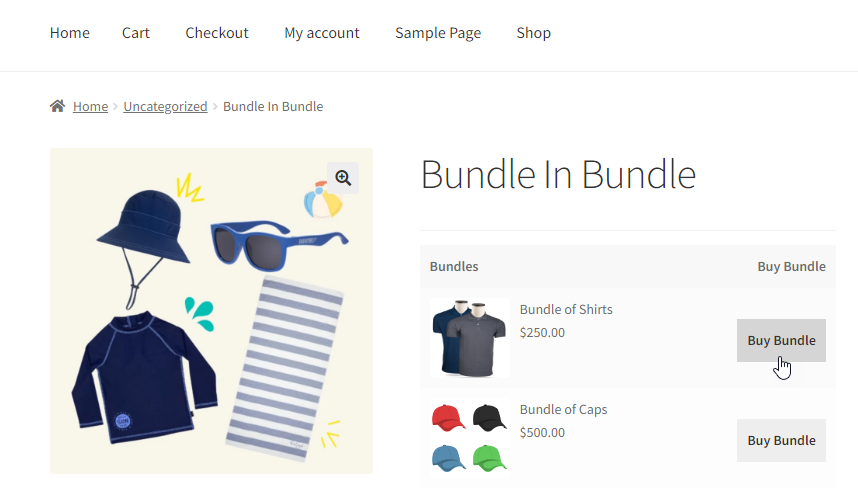
↑ Back to top- Table Layout:
If a user wants to display bundles in list form, then select Table Layout.

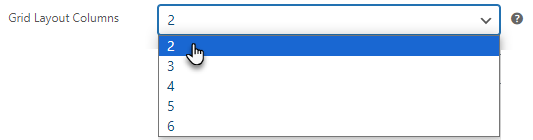
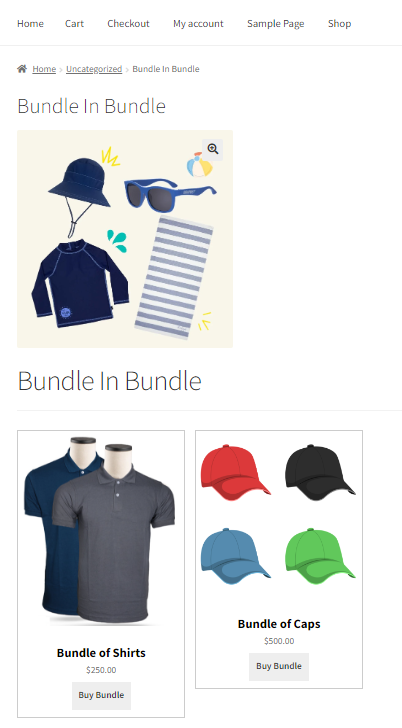
- Grid Layout
If a user wants to display bundles in grid form, then select Grid Layout.

- After selecting Grid Layout, the admin can set the number of Grid Layout Columns from the drop-down menu.
- Full Width Grid Layout:

- After selecting Full Width Grid Layout, the admin can set the number of Grid Layout Columns from the drop-down menu.

Note: In full Width Grid Layout, the column can be set from 3 to 6 for products in a bundle.
- Add bundle products in Make a Bundle of Bundle.
Note: The user can only add Bundle Products, no Single Products nor Variable Products can be added.
Note: If the bundle in bundle product type is selected, then the regular price will not affect the bundle in bundle product price.
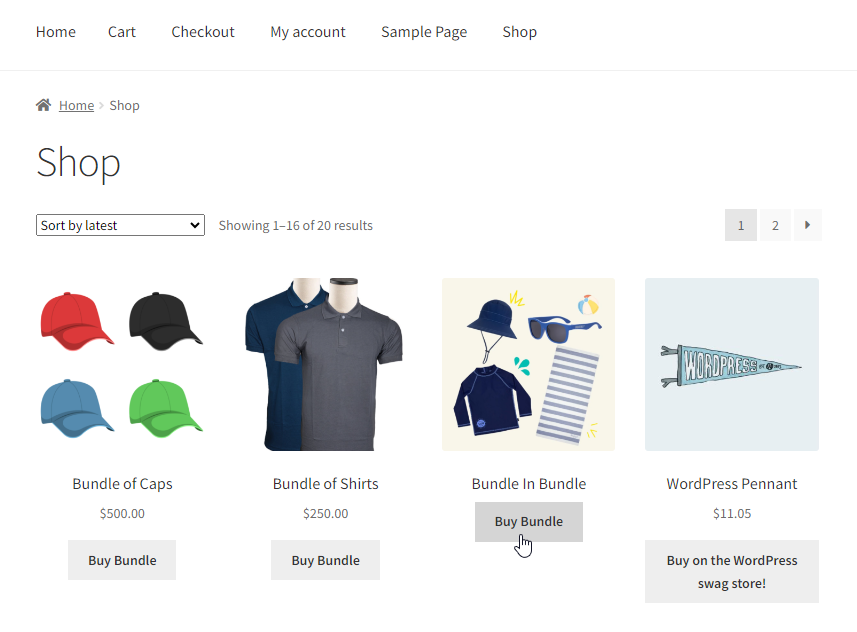
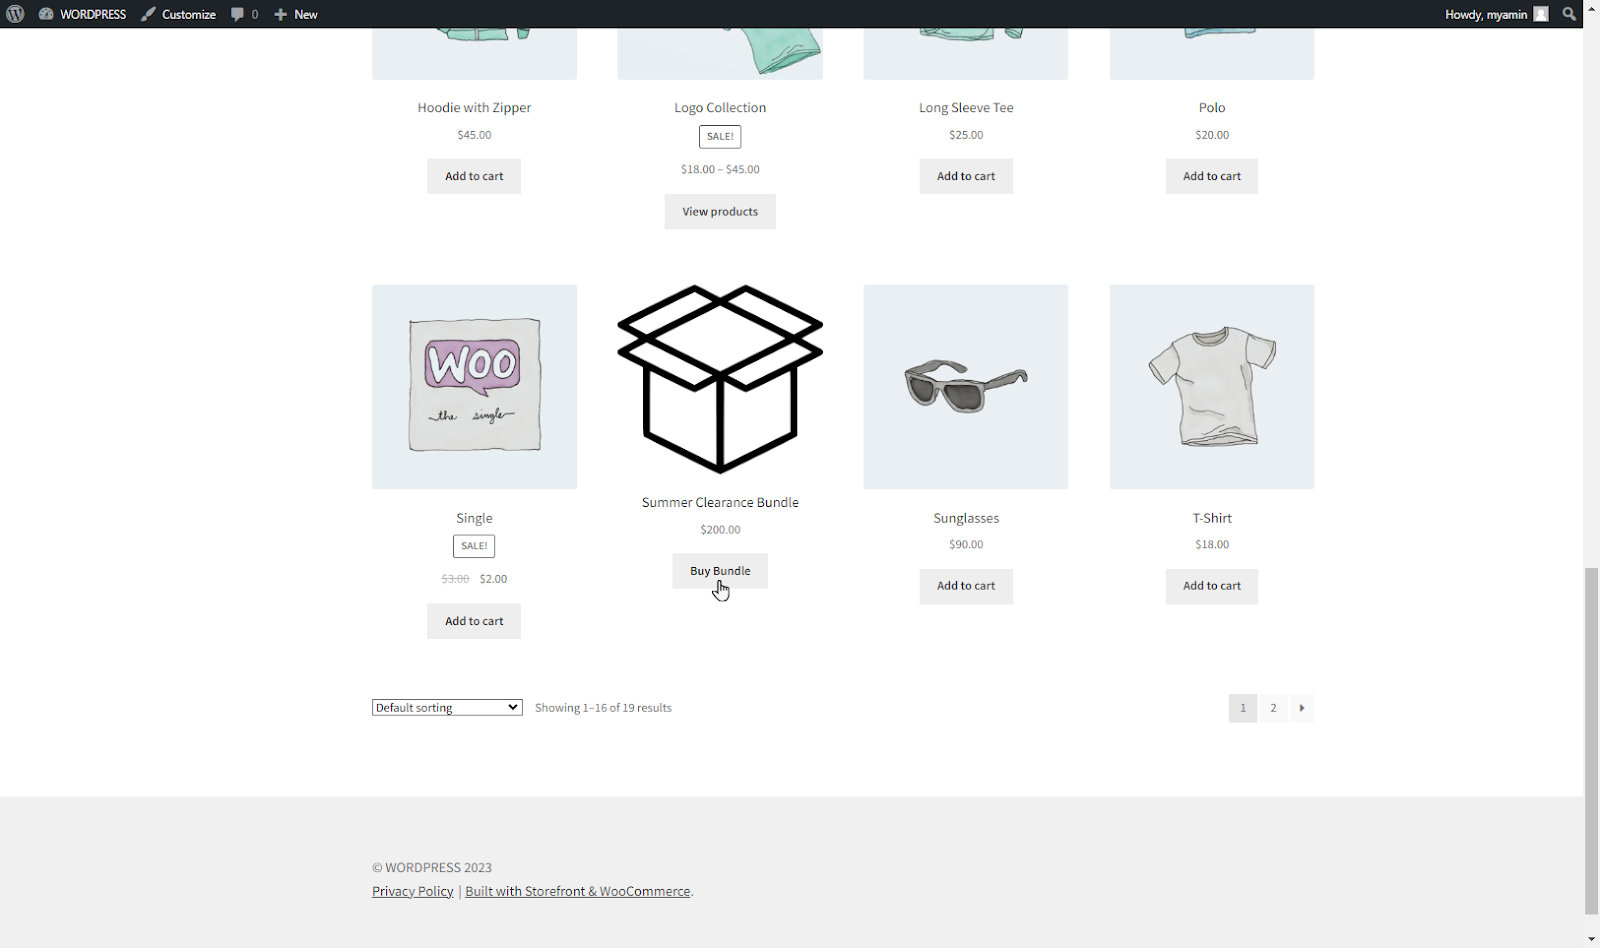
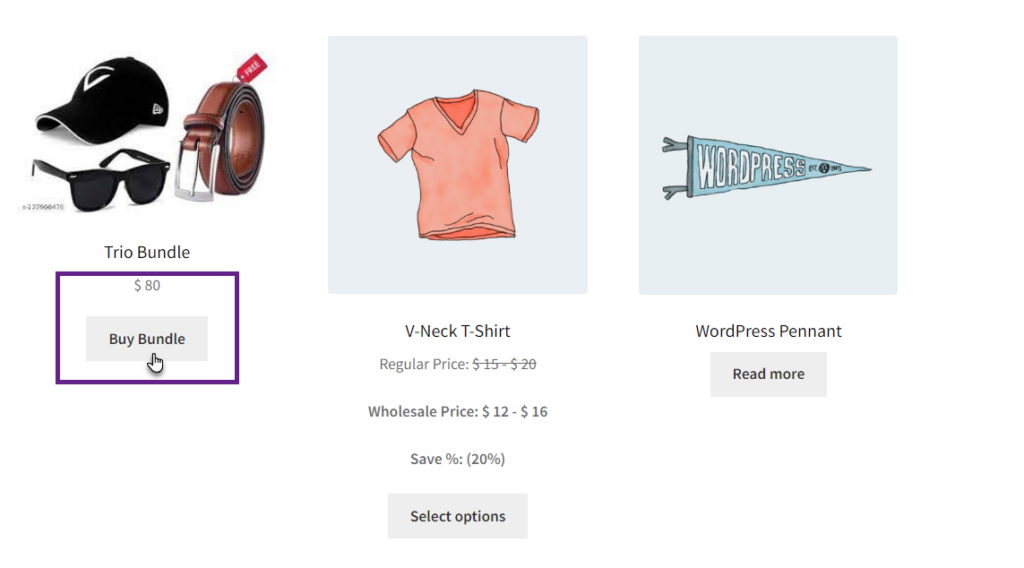
Front-End Impact:
- Select the Bundle in Bundle Product from Shop.
- Front-End Impact (Grid Layout):
- Front-End Impact (Table Layout):
- Front-End Impact (Full Width Grid Layout):
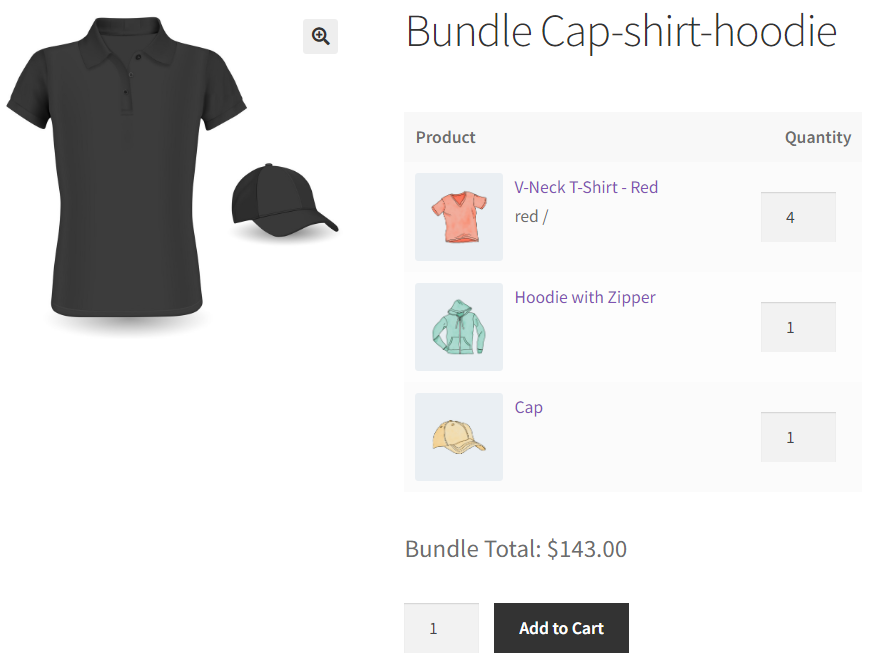
- After selecting Bundle in Bundle Product, click on Buy Bundle to buy a particular bundle from Bundle in Bundle Product, and a pop-up window will open.
- Click on the Add to Cart button to add the bundle to the cart.
- Navigate and click on the View Cart button.
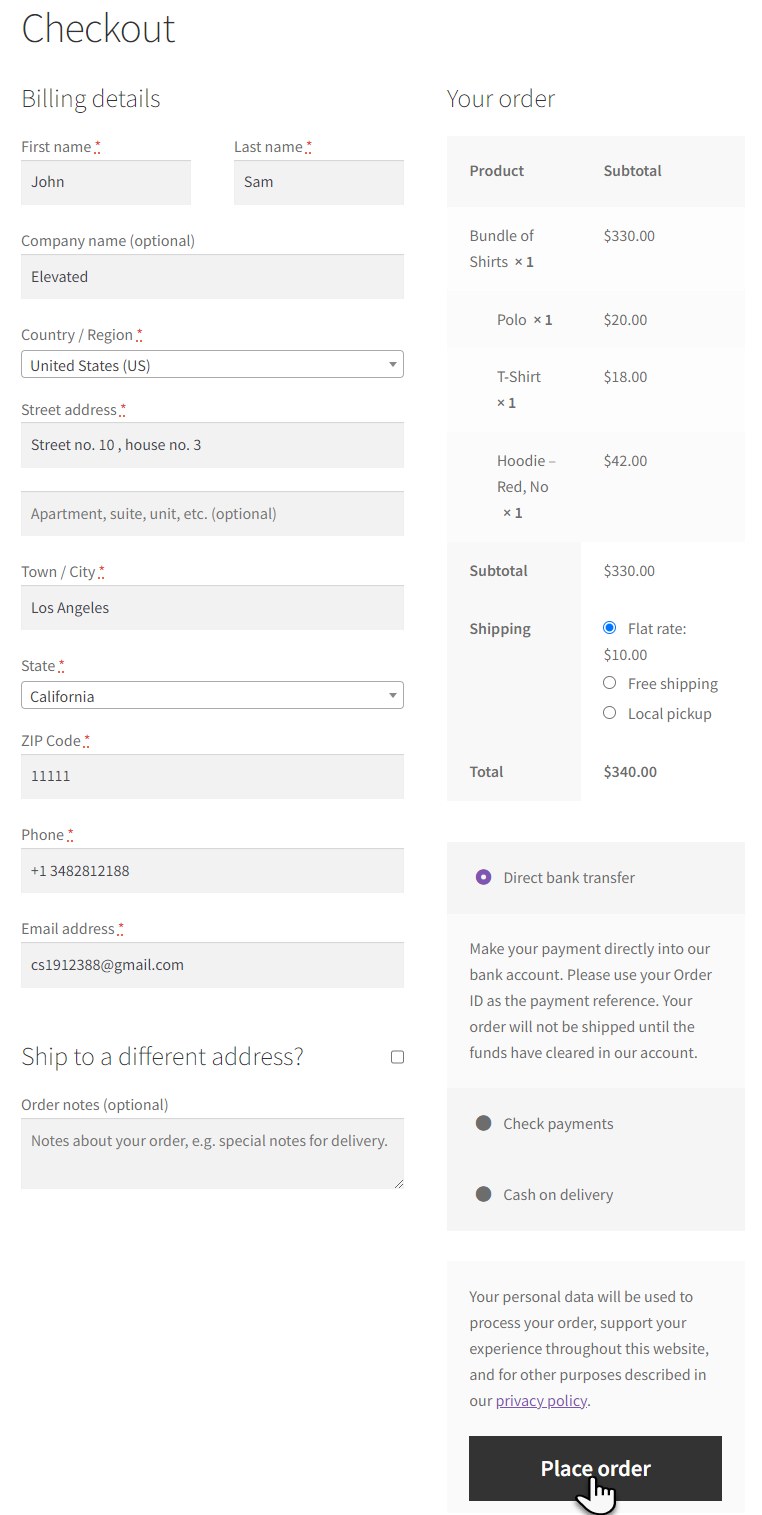
- Click on Proceed to checkout.

- Click on Place order after filling in the required description.
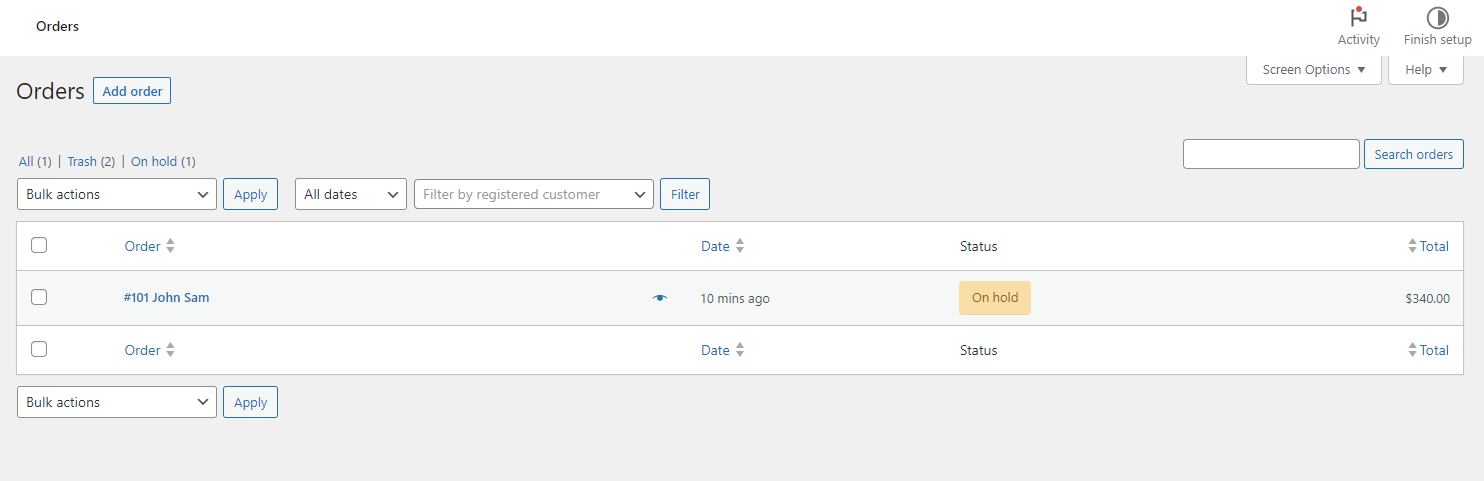
- After a successful transaction, the following order is received, and order details will appear regarding the product.
- Admin can check the Order in WooCommerce => Orders.
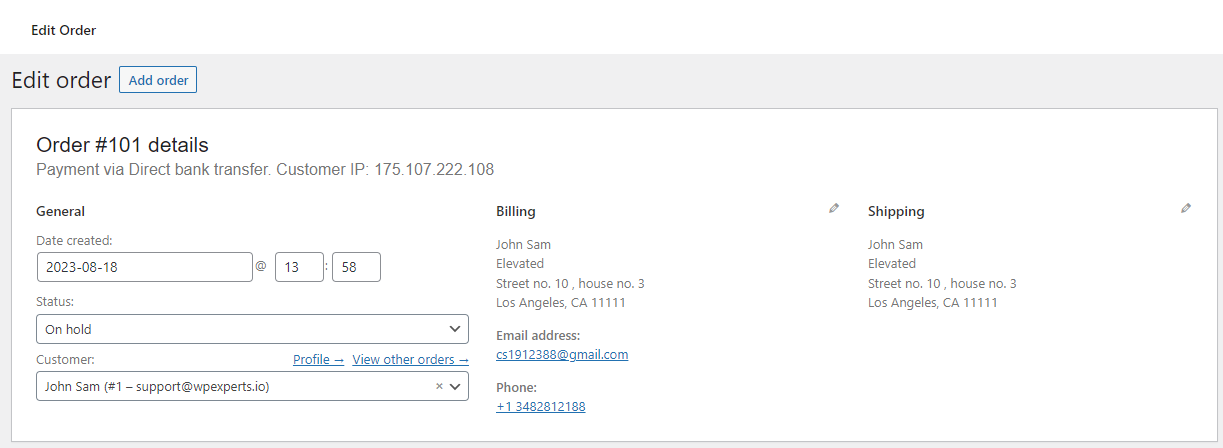
- Click on the order to view more details.
Notes for Product in a Page
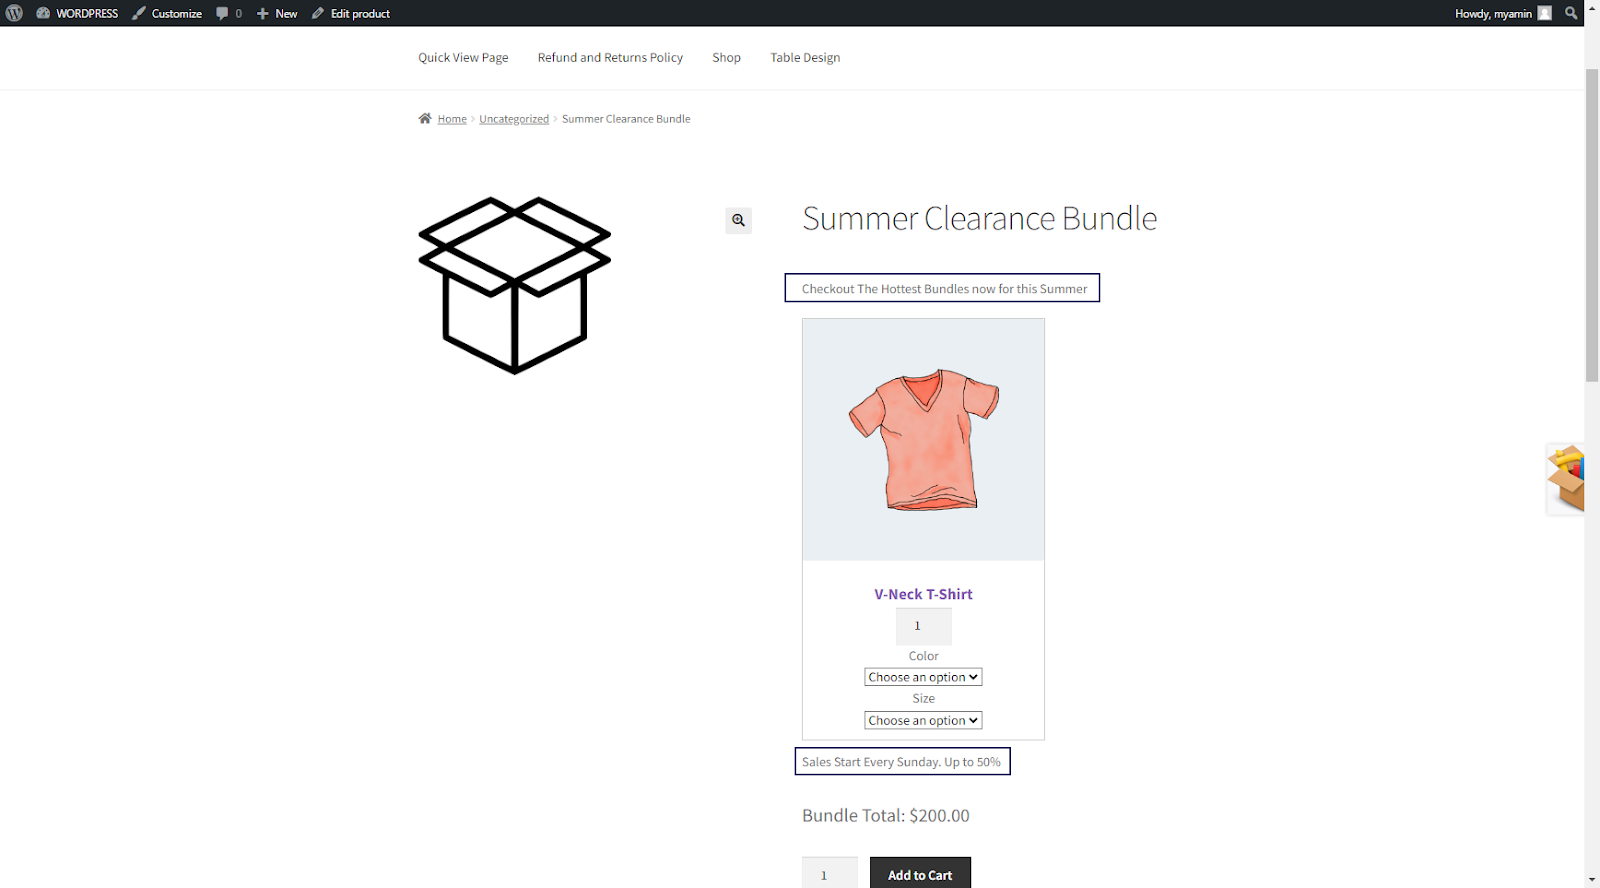
↑ Back to top(Above & Lower Text in Product Page)
- The admin can now add texts above and below the bundle. These texts will be displayed on the bundle product page.
- In order to add texts in a bundle, navigate to the WooCommerce > Products.

- Select the specific product under the Products.
- Under the Product data section, select the Bundle Product.
- Click the Bundle Product under the Product Data tab.

- There will be options, i.e., Above Text and Under Text
- Enter the desired text to appear Above and below the Product.
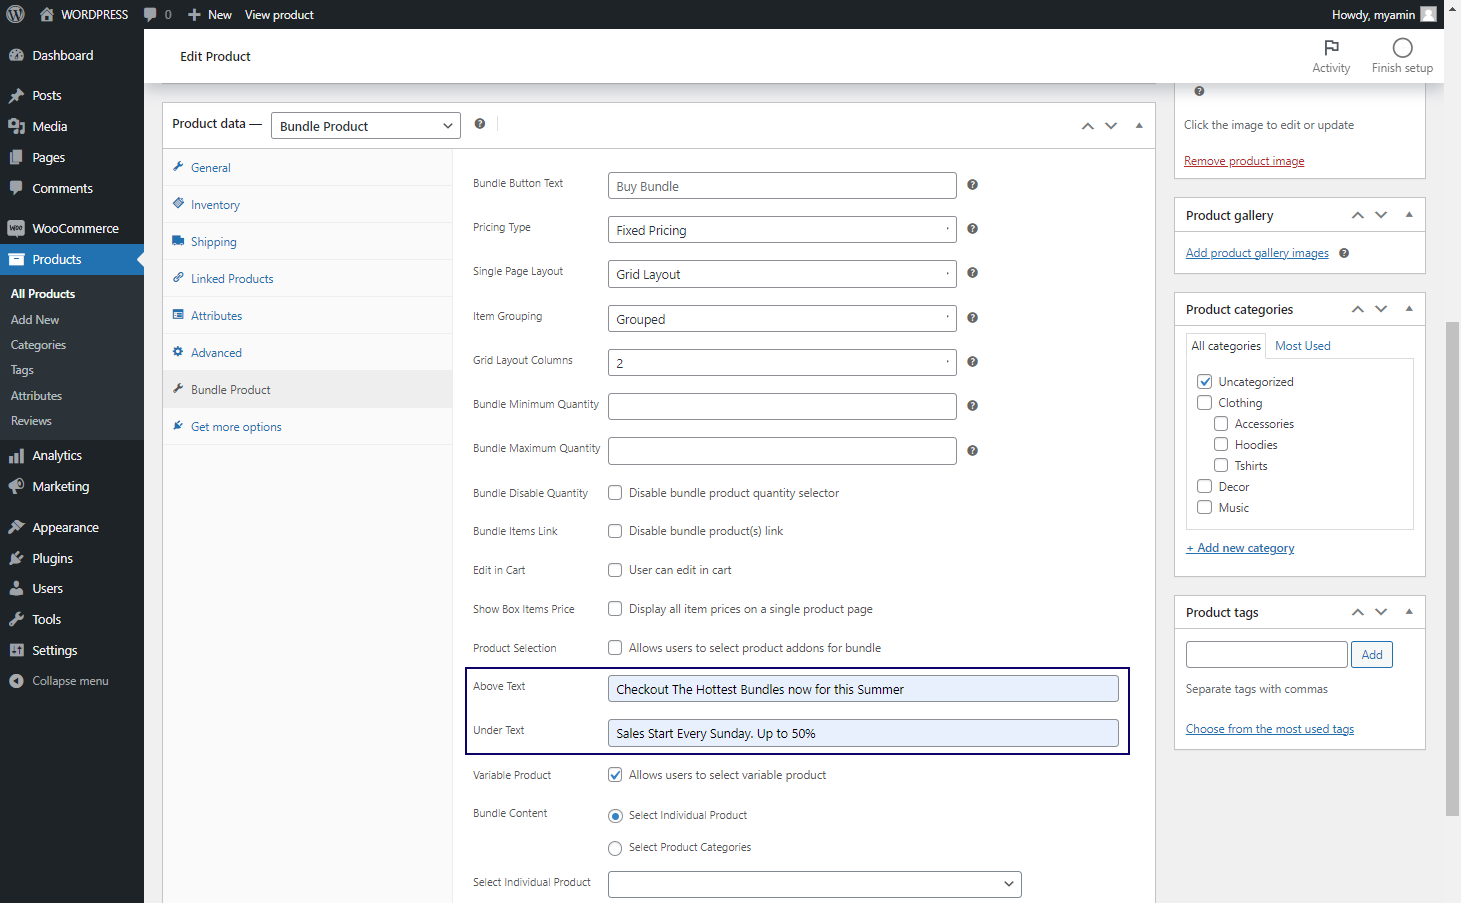
- Once done click Update.
Frontend Impact
↑ Back to topBefore
After
- The texts appear above and below the bundle items.
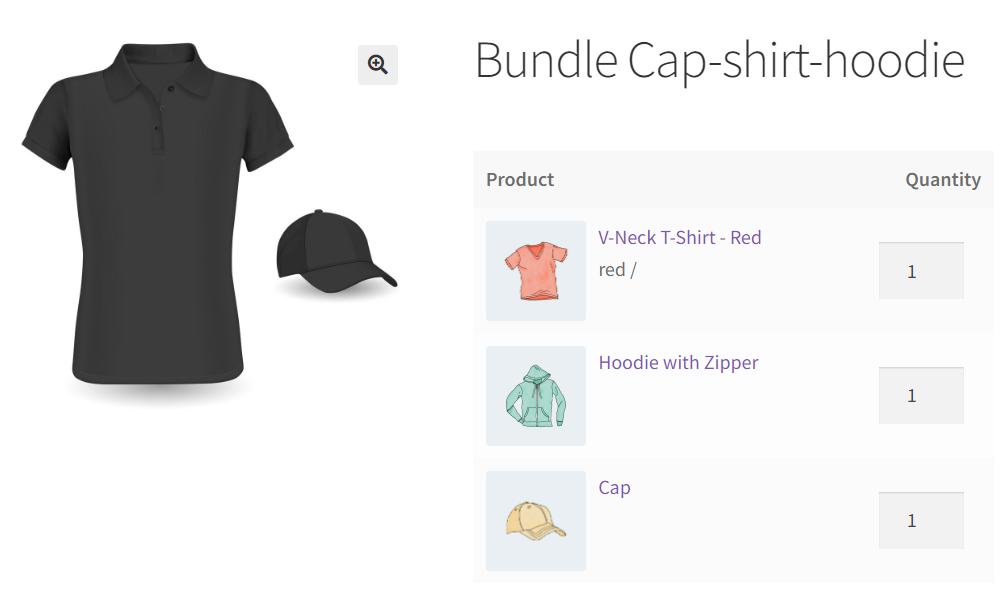
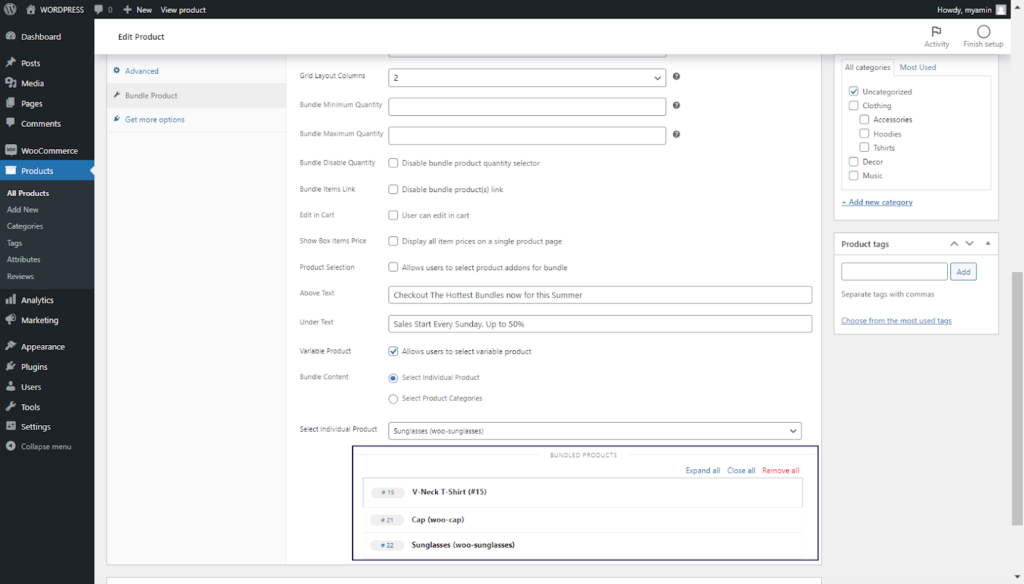
Variable Product in Bundle Products
↑ Back to top- The admin can add a whole variable product in the bundle instead of adding separate variations of a variable product.
- In order to add a variable product, edit the desired bundle product.

- Click the Bundle Product under the Product Data tab.

- In the Bundle Product tab, enable the Variable Product checkbox. This will allow the admin to select a variable product as a bundle item.

- Select the Individual Product radio button under the Bundle Content
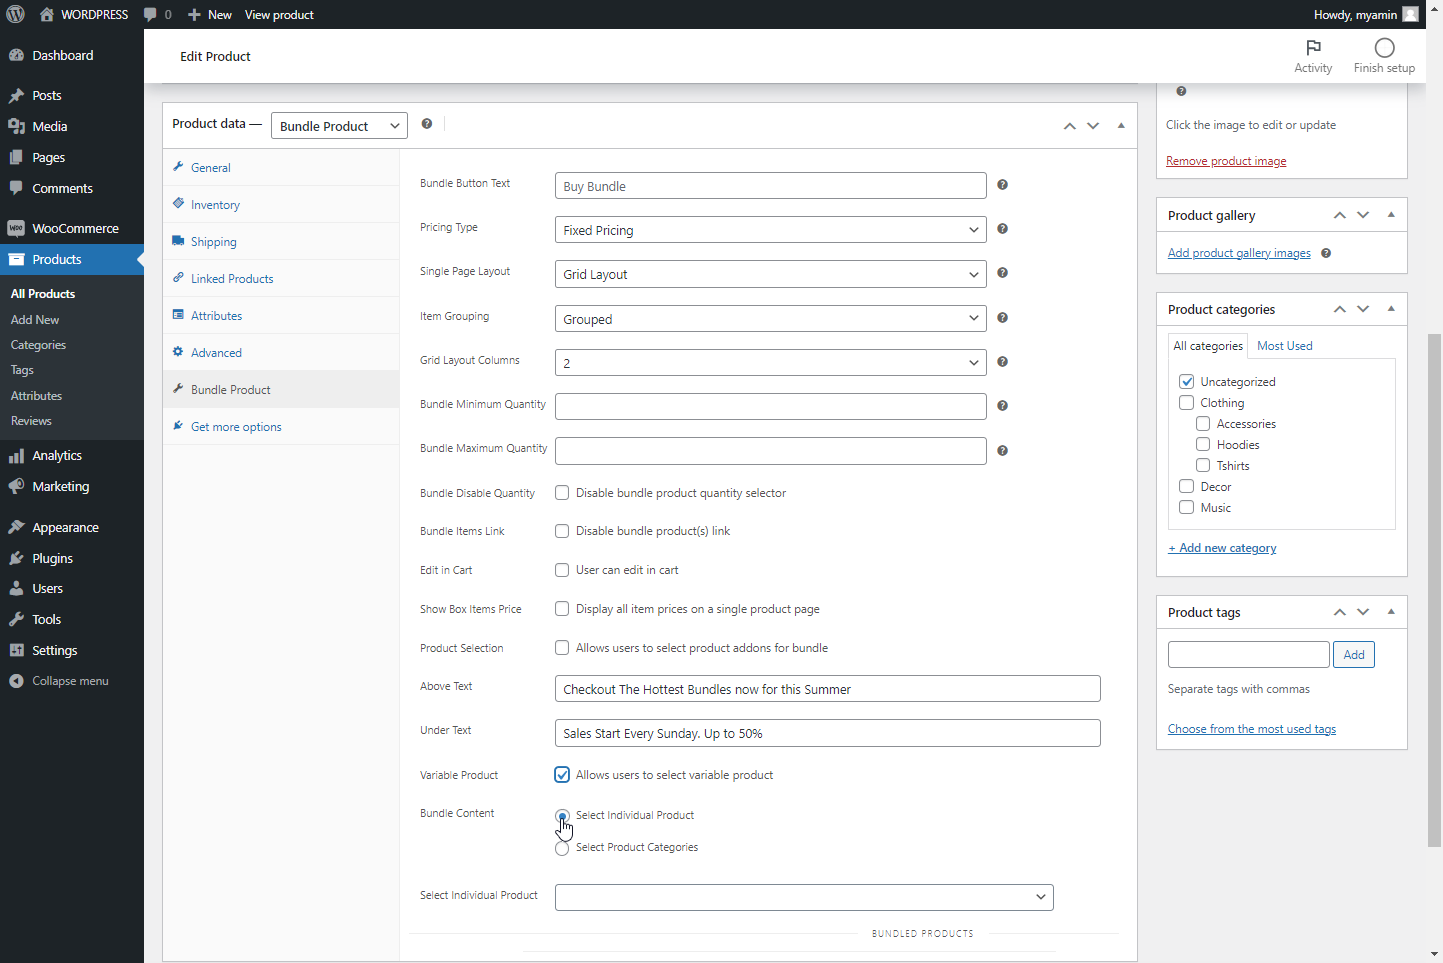
- Now select the variable product as an individual product, in our case V-neck T-shirt.
- Once done, click Update.

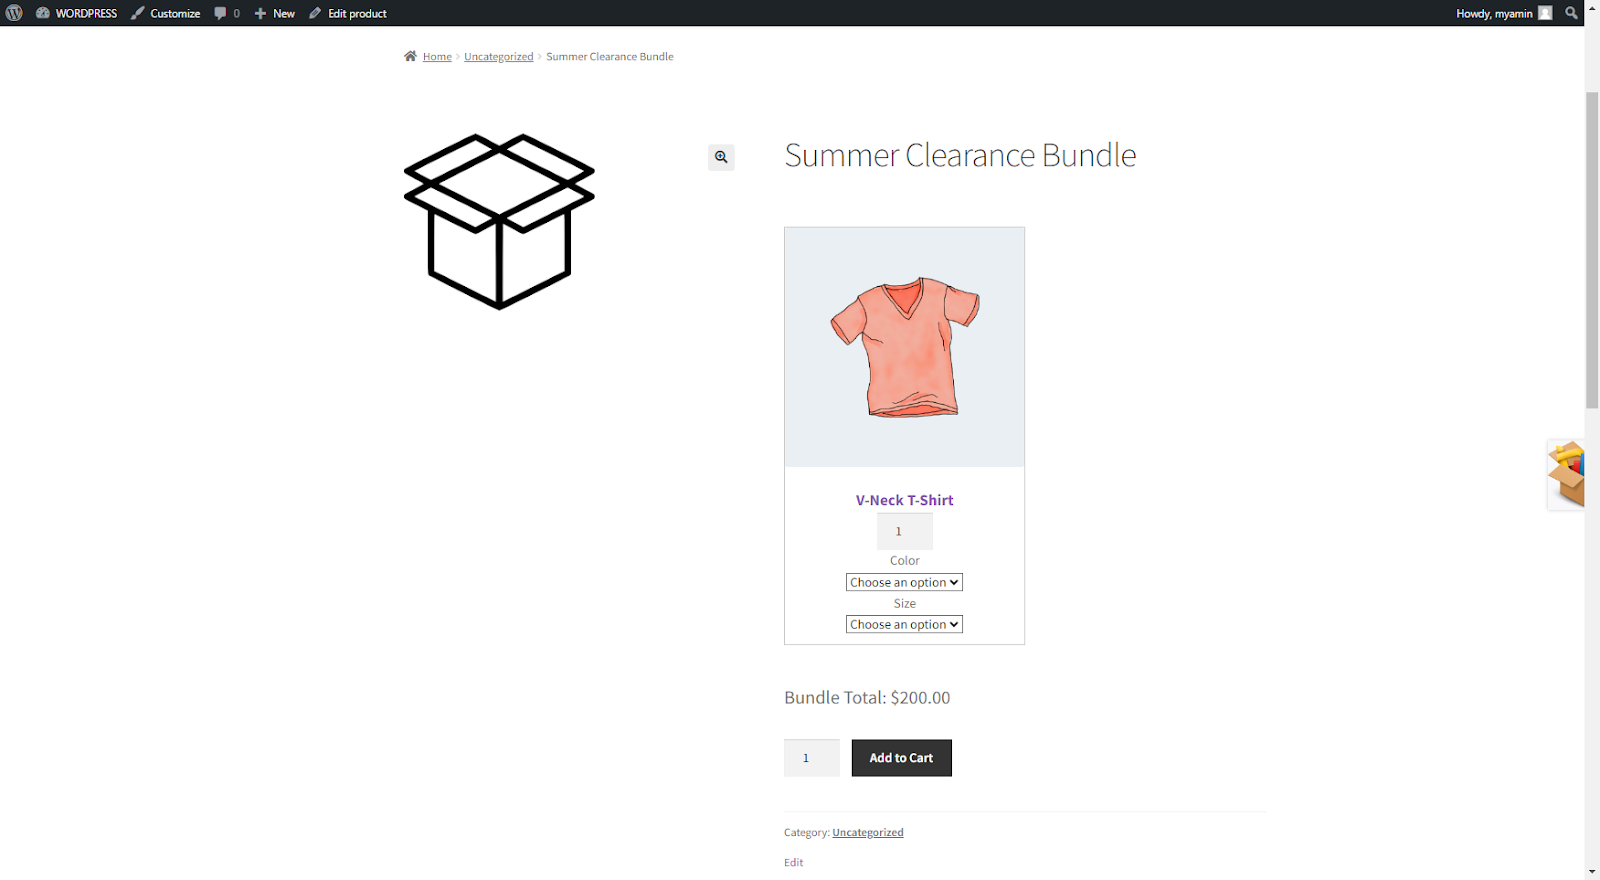
Frontend Impact
↑ Back to top- Click the Buy Bundle button.
- Once in the bundle, the user can buy the variable product. i.e., V-Neck T-shirt
- Users can select the variations from the front-end.
Coupon Restrictions
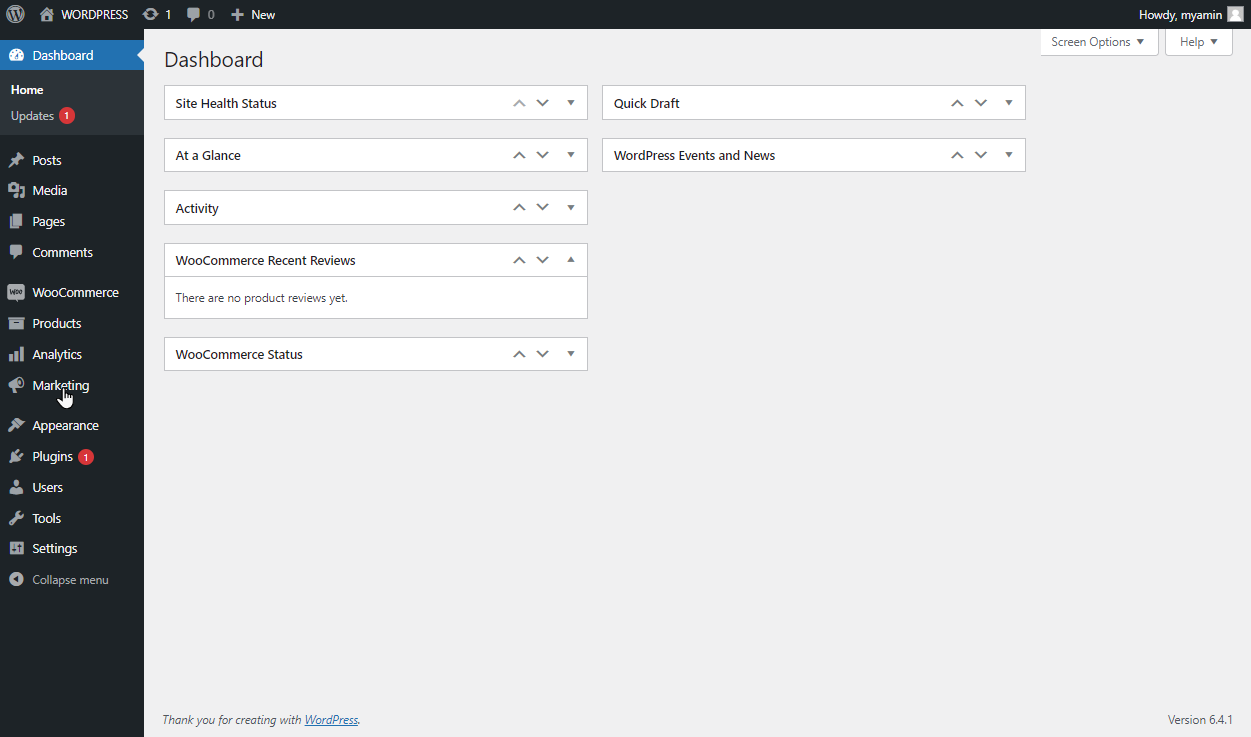
↑ Back to top- Navigate to Marketing under the WooCommerce tab.
- Click Coupons under the coupon section. Add a coupon or edit the desired coupon.
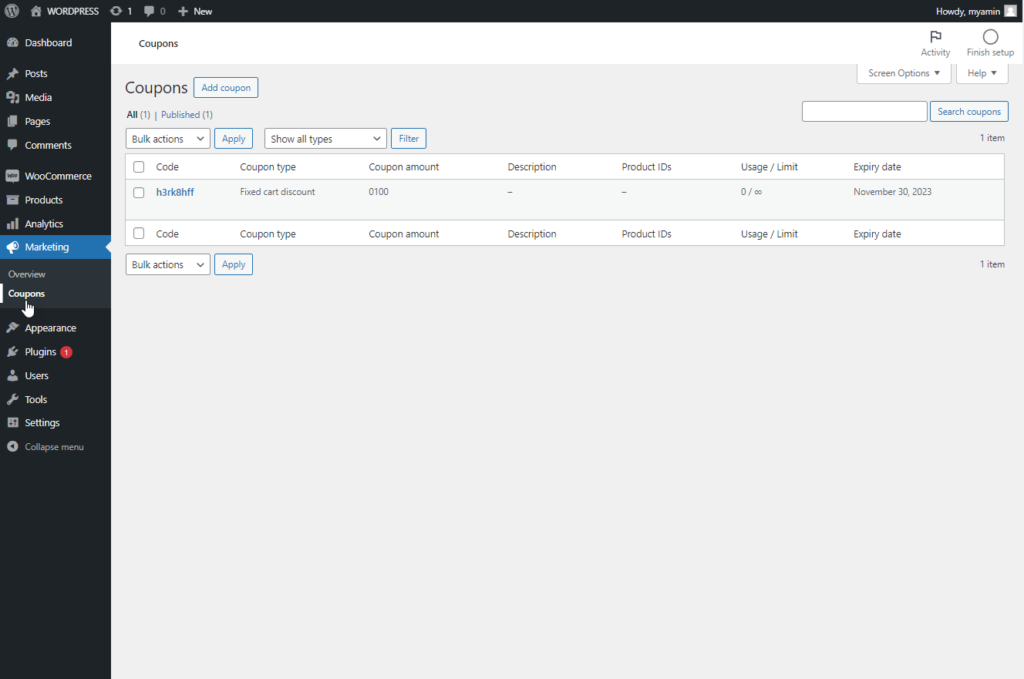
- Under the Coupons tab, select the Smart Bundle Product.
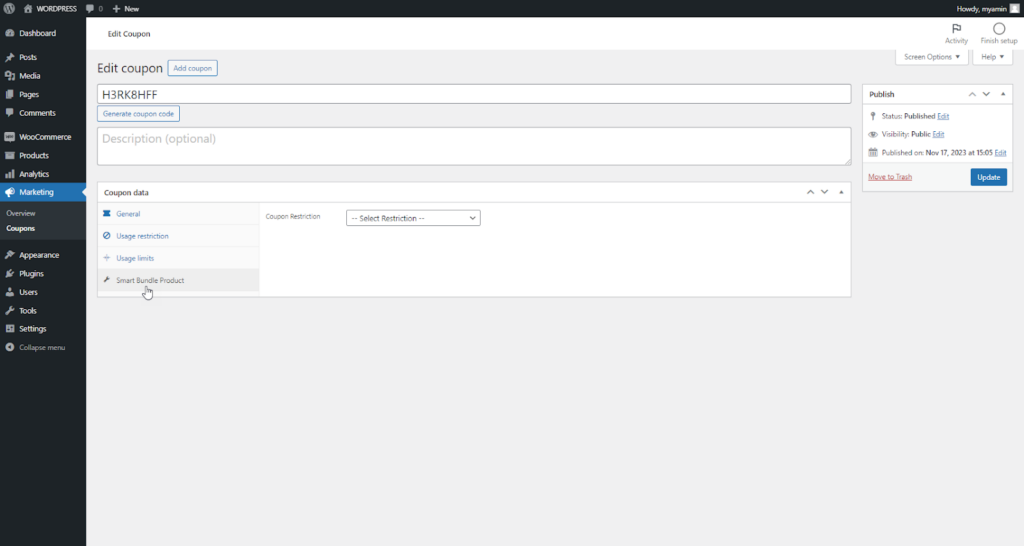
- Here, the Admin can select Coupon Restrictions from the dropdown menu.
Note: Each restriction has its functionality,
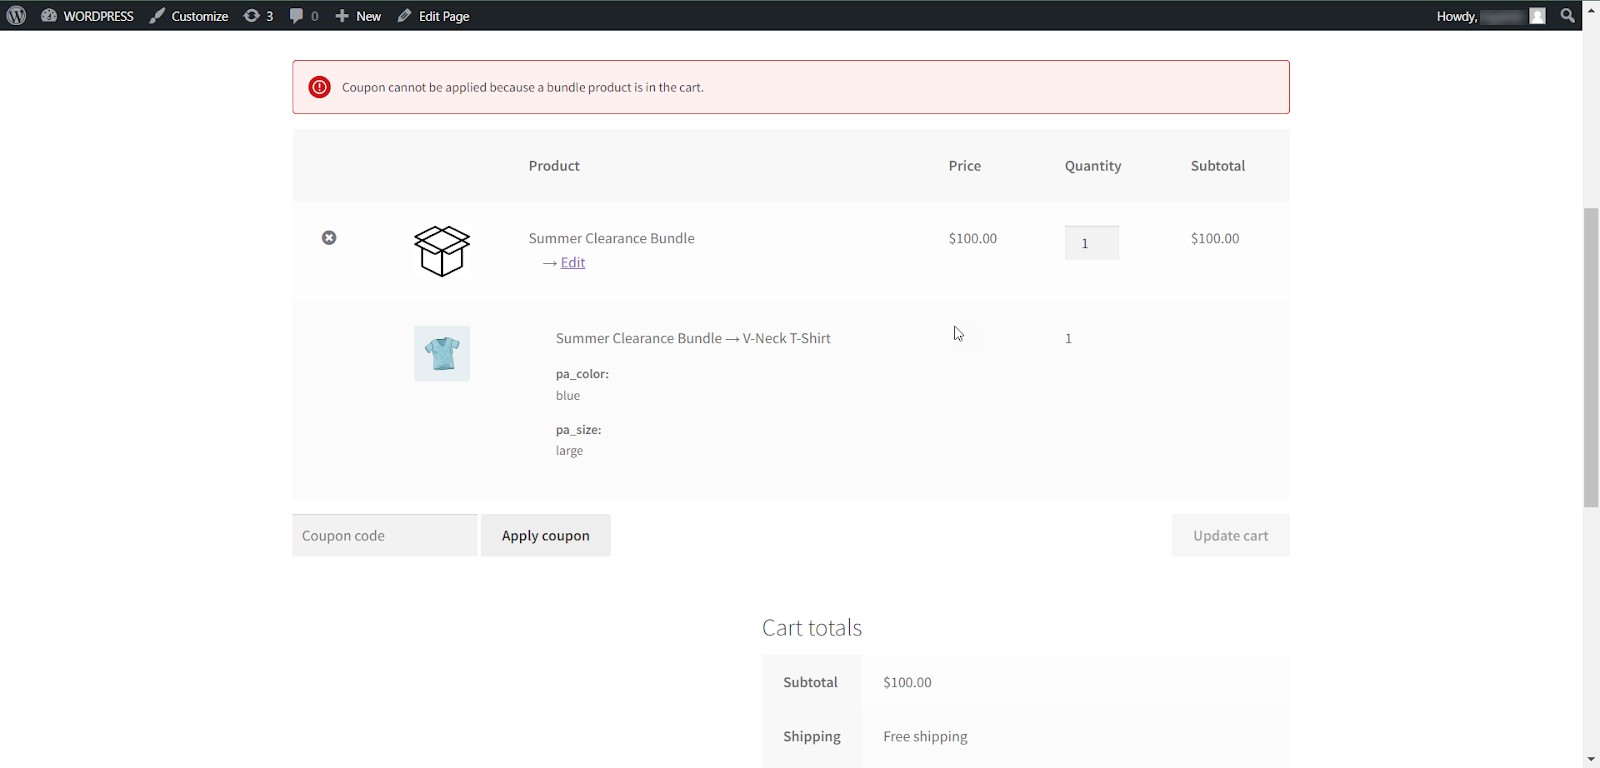
- Exclude bundle Products: This Coupon Restriction disables coupons on the bundle Products only
- Exclude bundle in bundle coupons: This Coupon Restriction disables coupons on the bundle in bundle Products only.
- Exclude All Bundle Products: This Coupon Restriction disables coupons on all the bundle Products including bundle in bundle and bundle products.
- In our case, we have Excluded All bundle Products.
Frontend Impact
↑ Back to topBefore

After
Bundle Disable Quantity
↑ Back to top- The admin can now disable the quantity selector for the bundle product. When the quantity selector is disabled, by default, only one bundle can be added to the cart.
- Navigate to the WooCommerce > Products.
- Select the Bundle Product under the Products.

- Click the Bundle Product under the Product Data tab.

- There will be a checkbox, i.e., Bundle Disable Quantity
- Enable the Bundle Disable Quantity checkbox and click update
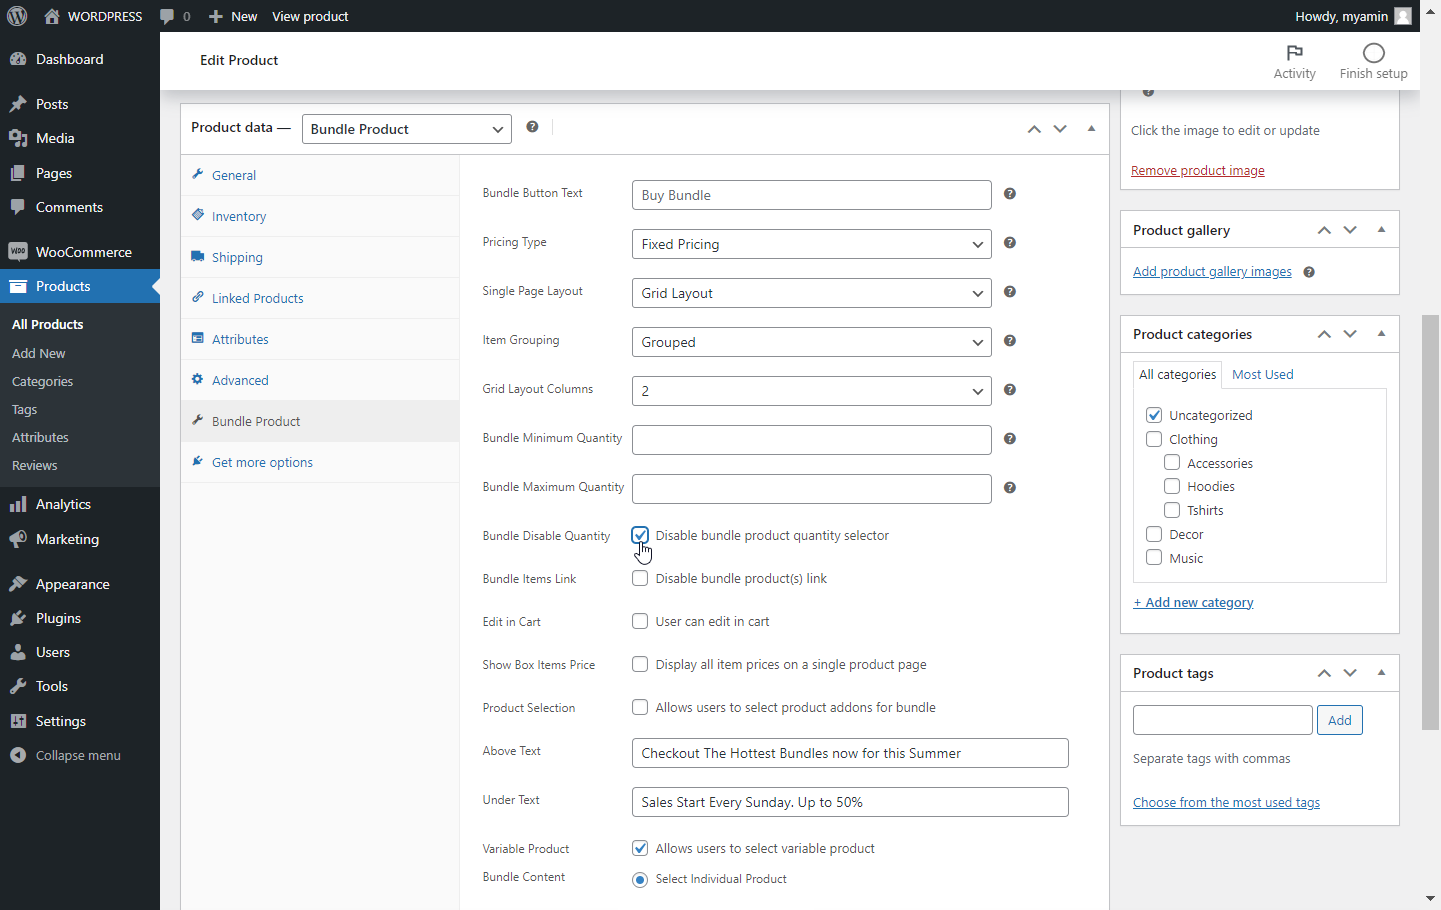
Note: The specific bundle quantity will be fixed, and the user will be unable to add more than one to the cart.
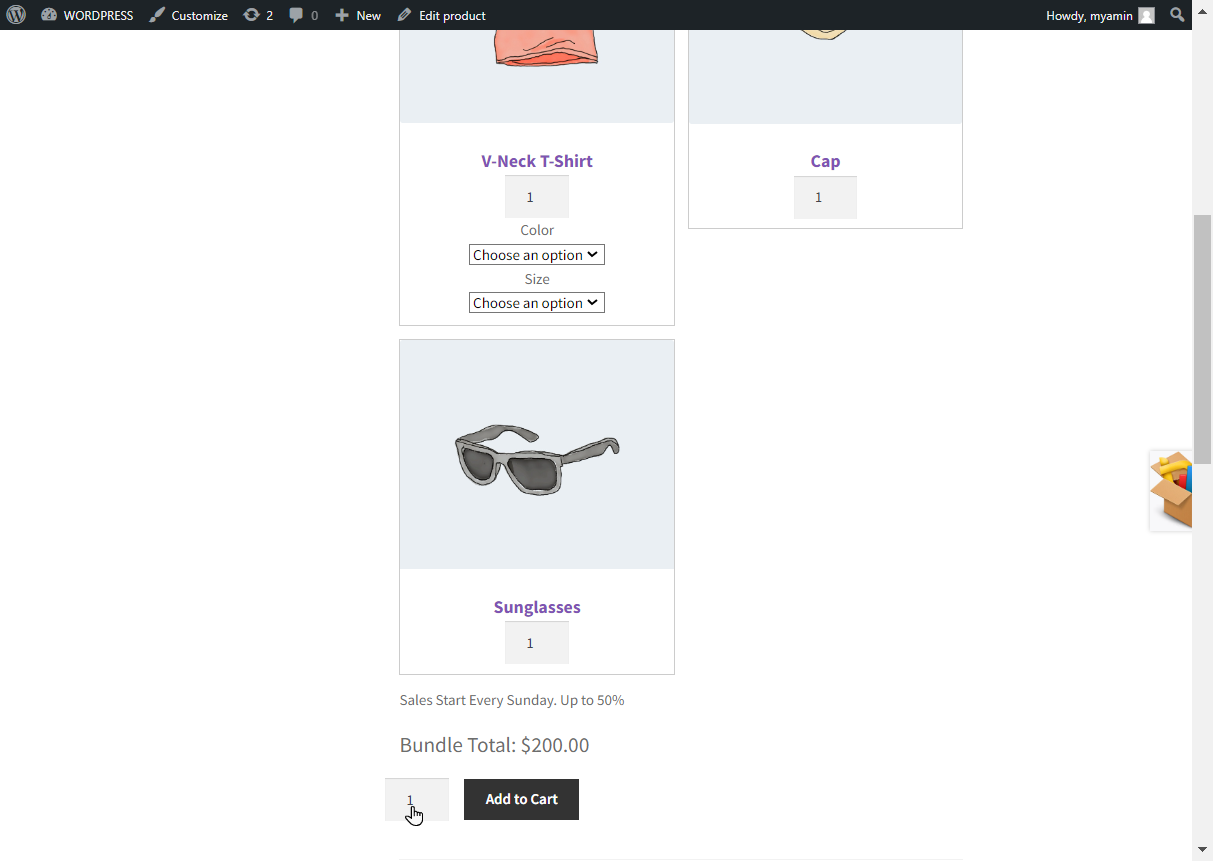
Frontend Impact
↑ Back to topBefore
After
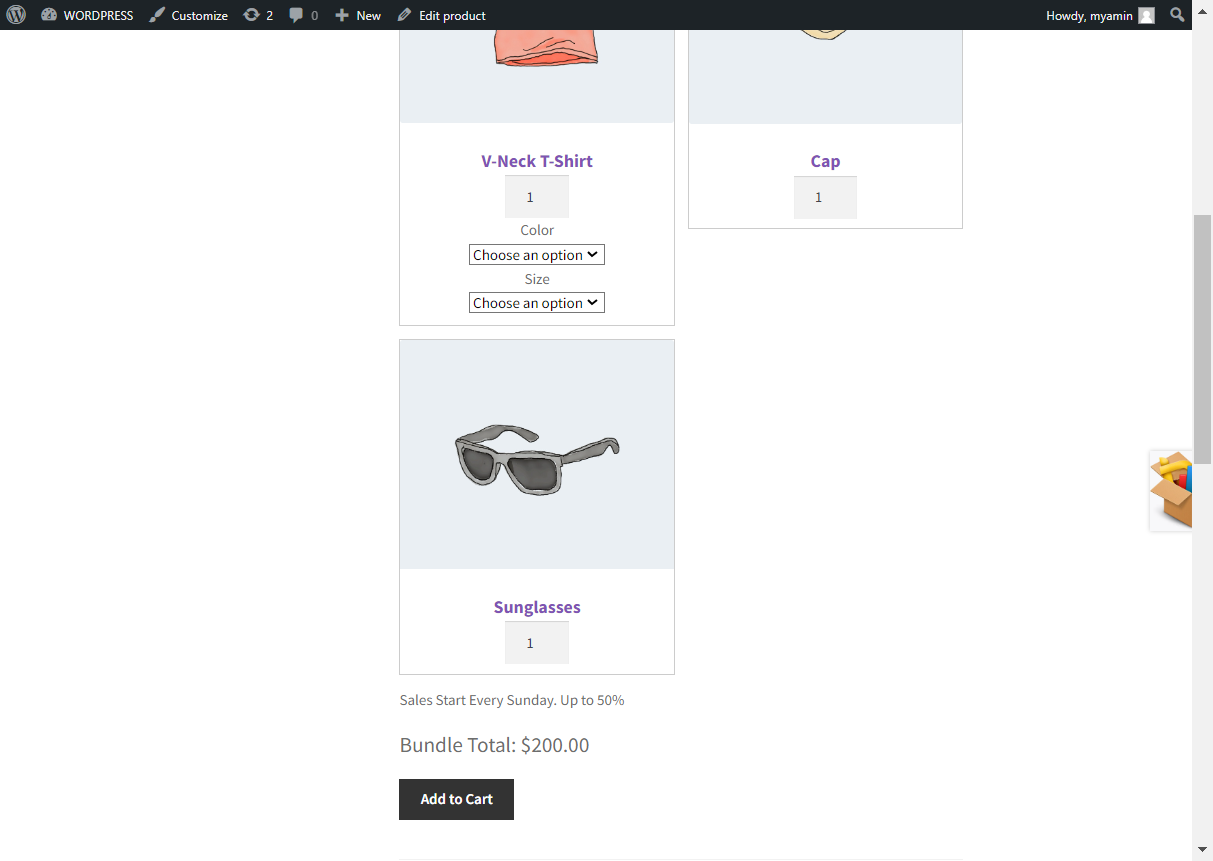
NOTE: The Quantity selector will also be disabled from the cart page.
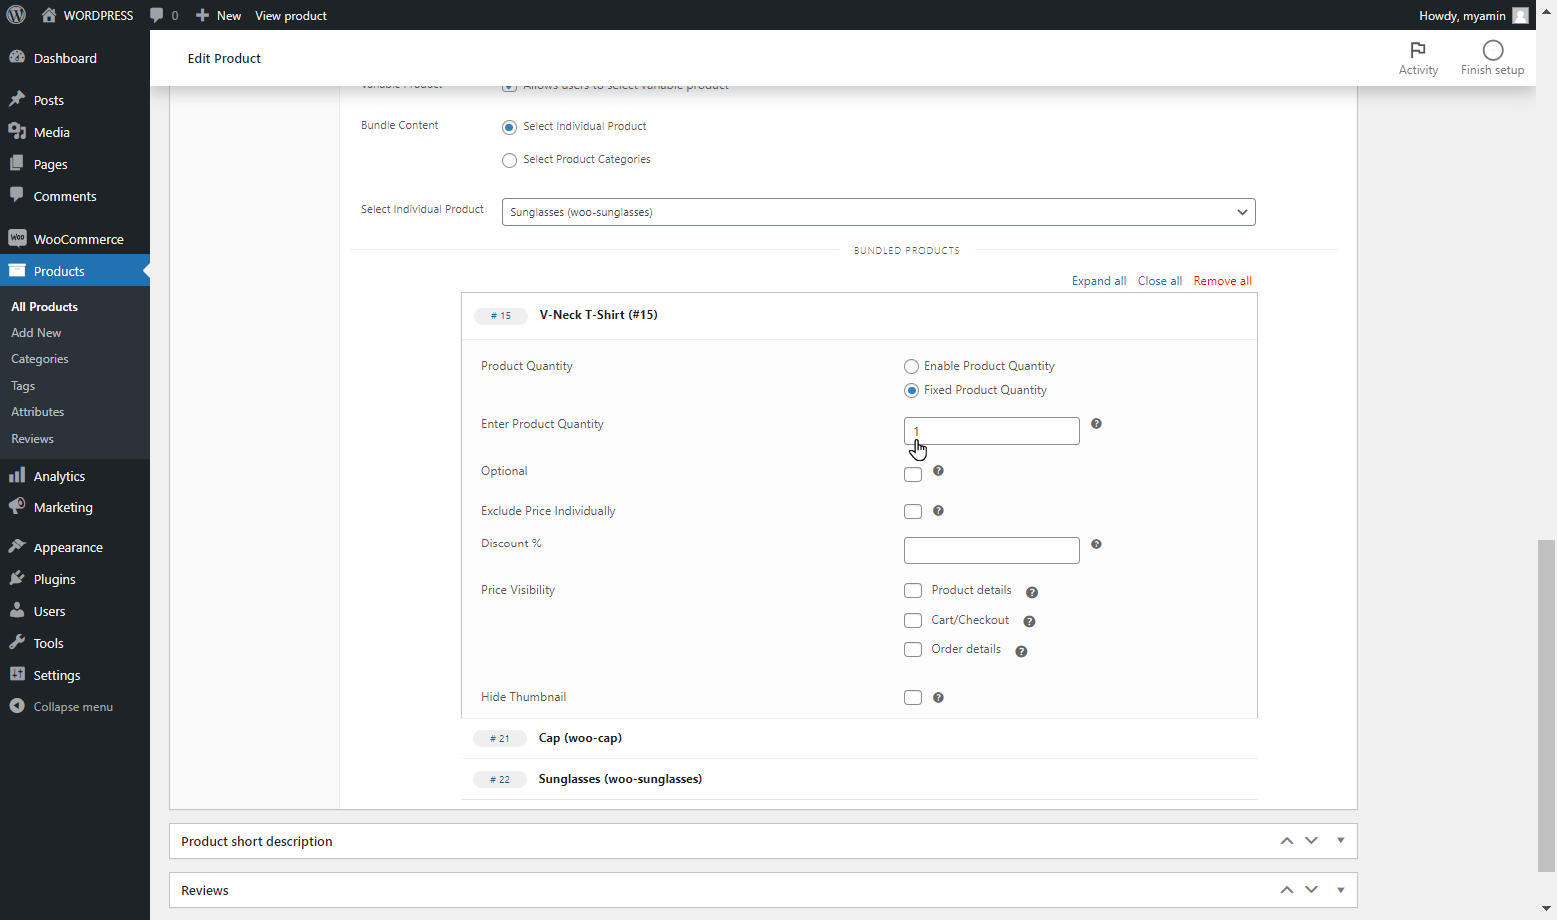
Fixed Bundle Item Quantity
↑ Back to top- The admin can now specify the quantities of individual items of the bundle. When a fixed quantity for the item is specified by the admin, the customer cannot change the quantity of the item in the cart.
- Navigate to the WooCommerce > Products.

- Select the Bundle Product under the Products.

- Click the Bundle Product under the Product Data tab.
- Under the BUNDLE PRODUCTS header, the admin can see the Specified Products.
- Click the Specified Products.
Note: Each product has its settings and should be specified individually.
- Under the Product setting, select the Fixed Product Quantity checkbox beside the Product Quantity label.
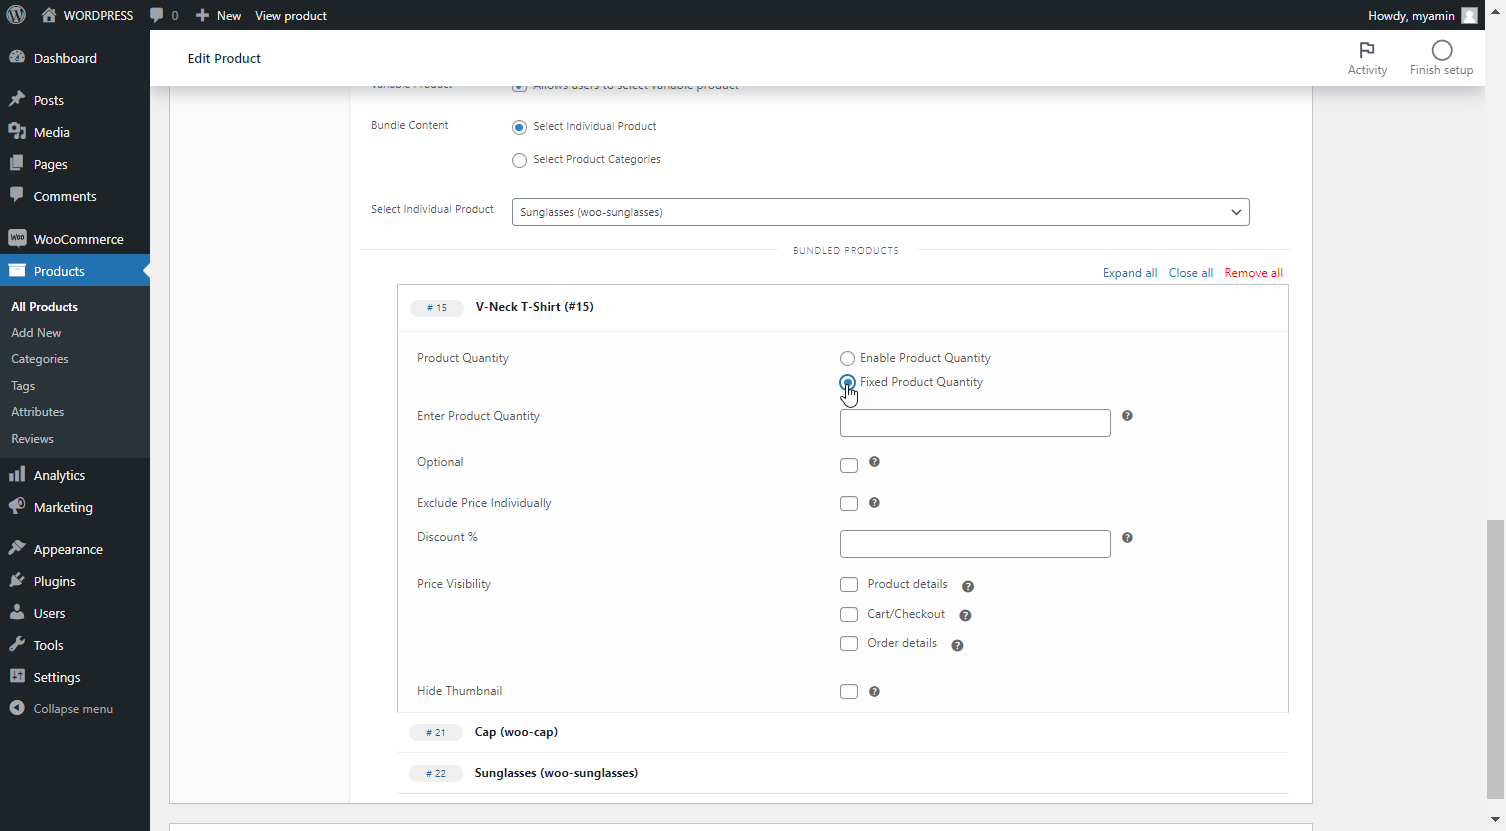
- Specify the Product Quantity in Enter Product Quantity and click Update.
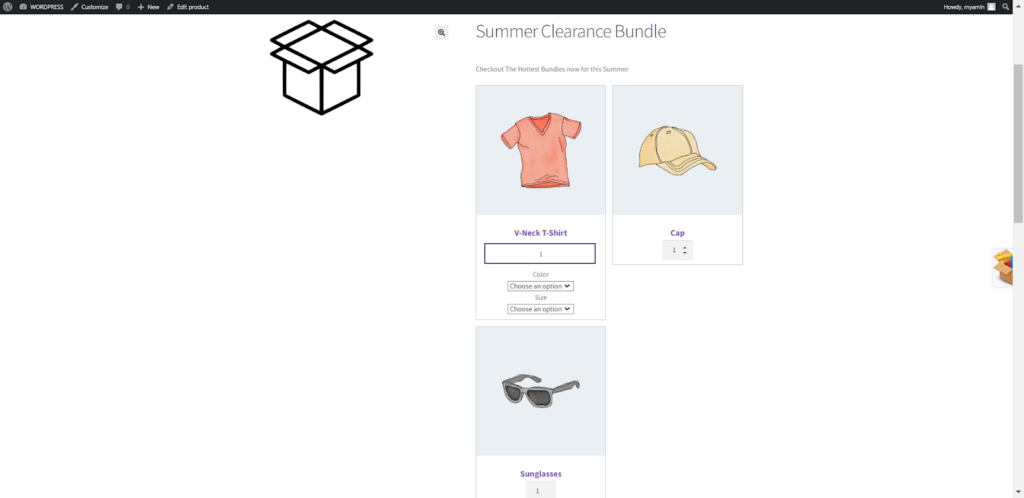
Frontend Impact
↑ Back to topBefore
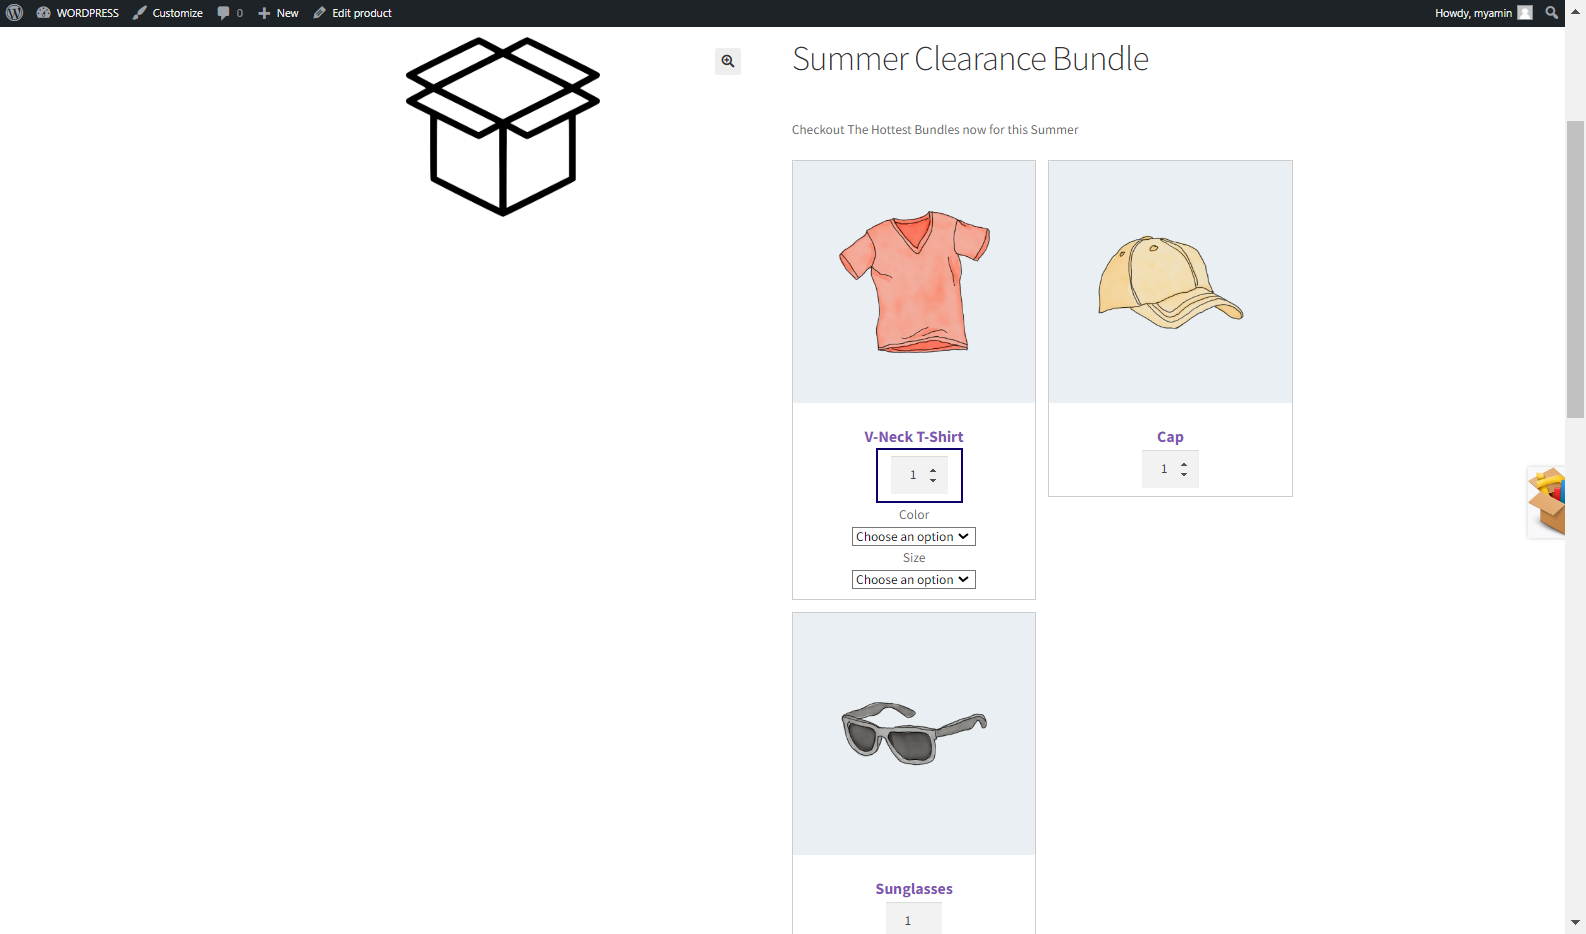
After
- The user is now restricted to select the quantity of the specific product.
NOTE: The Product’s Quantity selector will be disabled from the cart page.
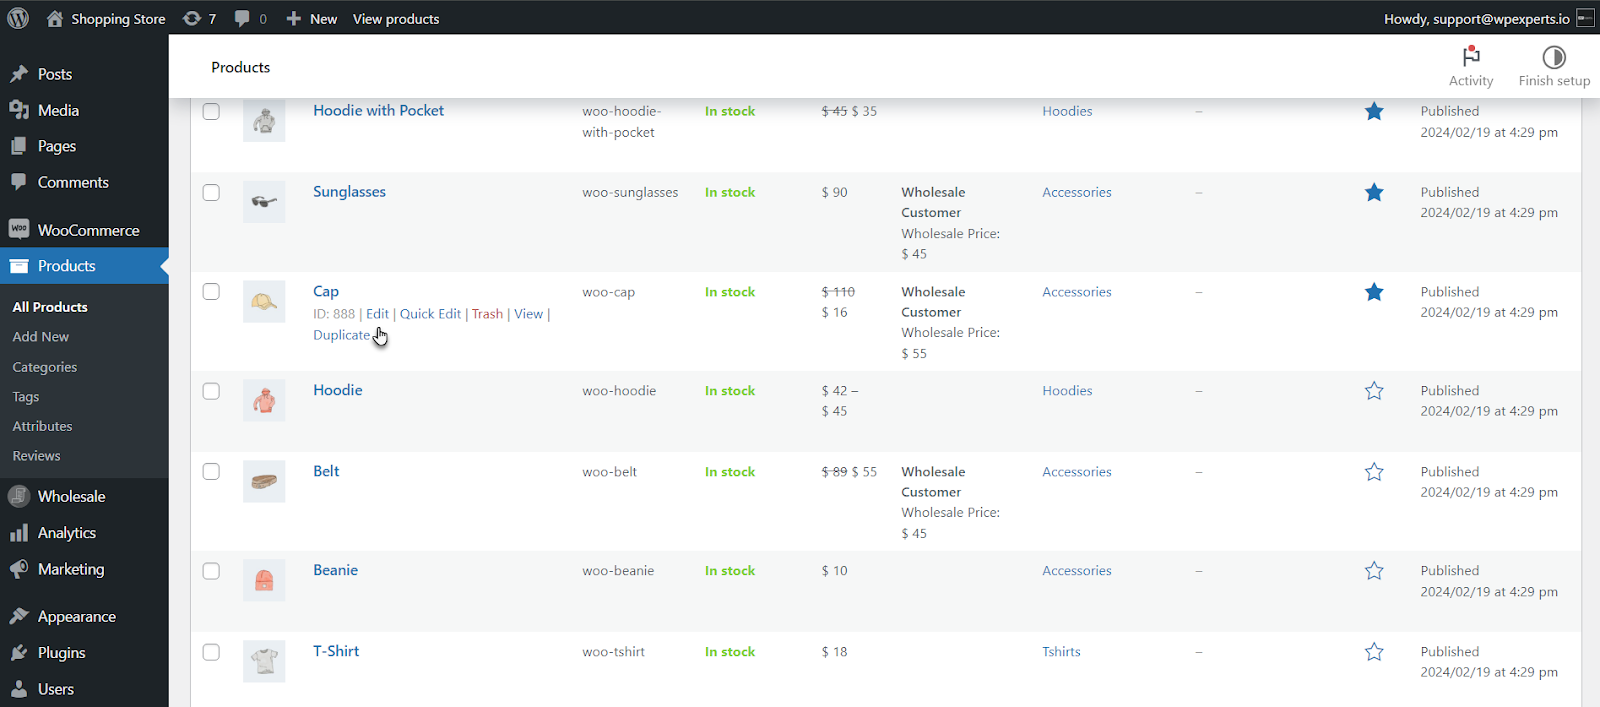
Compatibility and Integrations
↑ Back to topCompatibility of Wholesale with Smart Product Bundles (Pro Version)
↑ Back to top- Download the Wholesale for WooCommerce plugin by clicking here.
- Install the plugin and activate it.
- For further plugin settings and information, please visit the Wholesale for WooCommerce documentation.
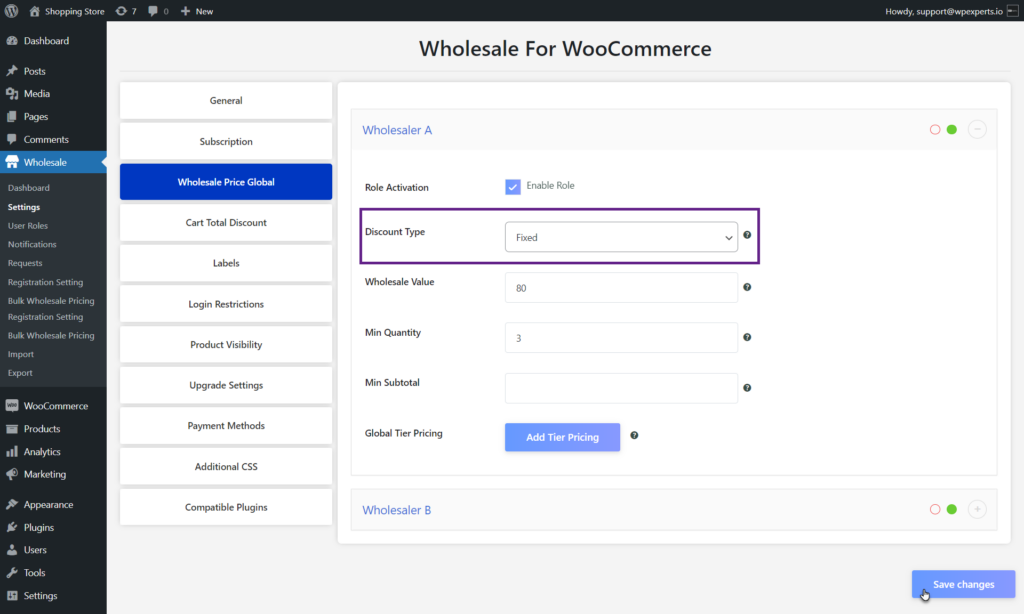
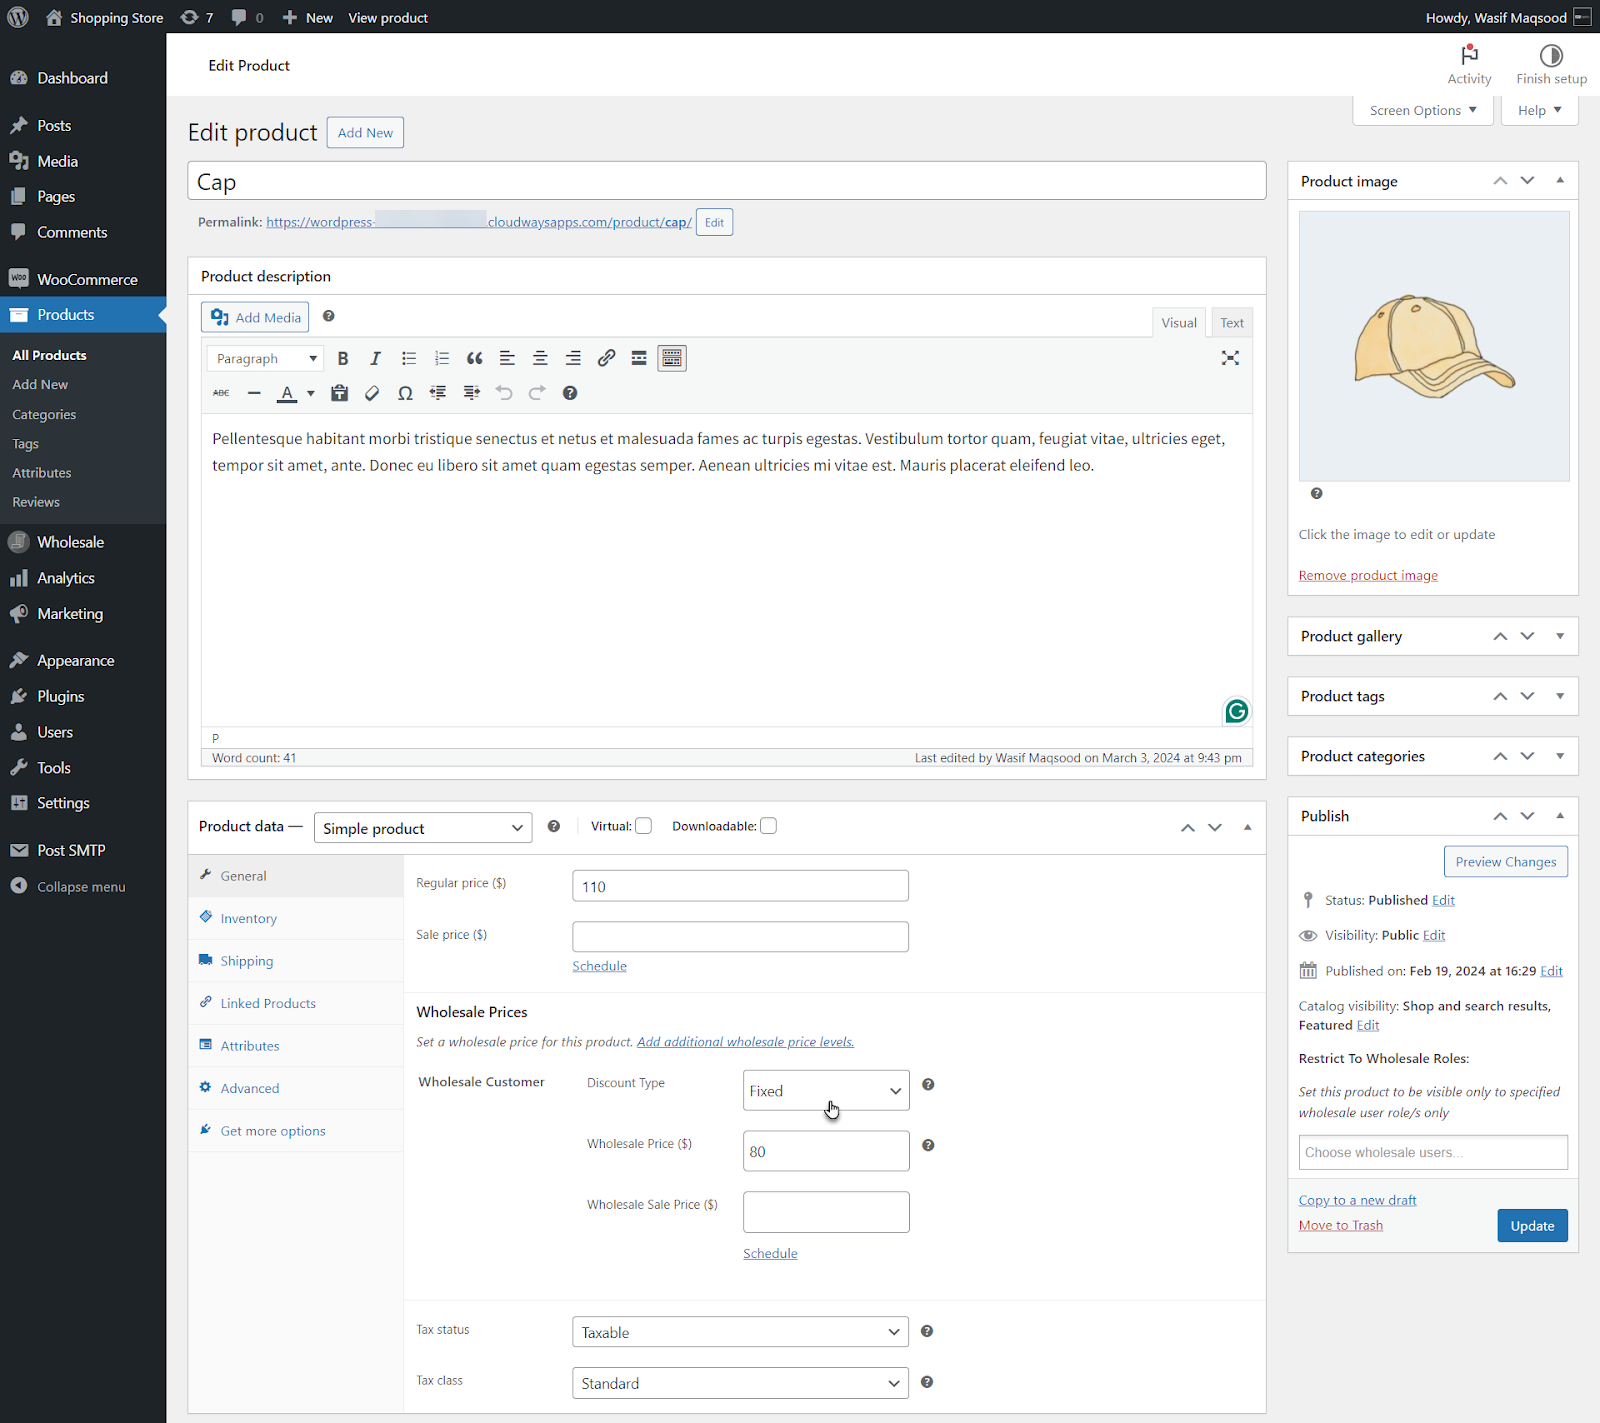
Discount Type (Fixed)
- When the admin configures a “Fixed” Discount Type along with a Wholesale Value in the back-end settings after creating a Wholesale Role, customers with the same Wholesale Role can purchase bundle products at discounted rates specified by the admin on the front end.
Back-End Settings
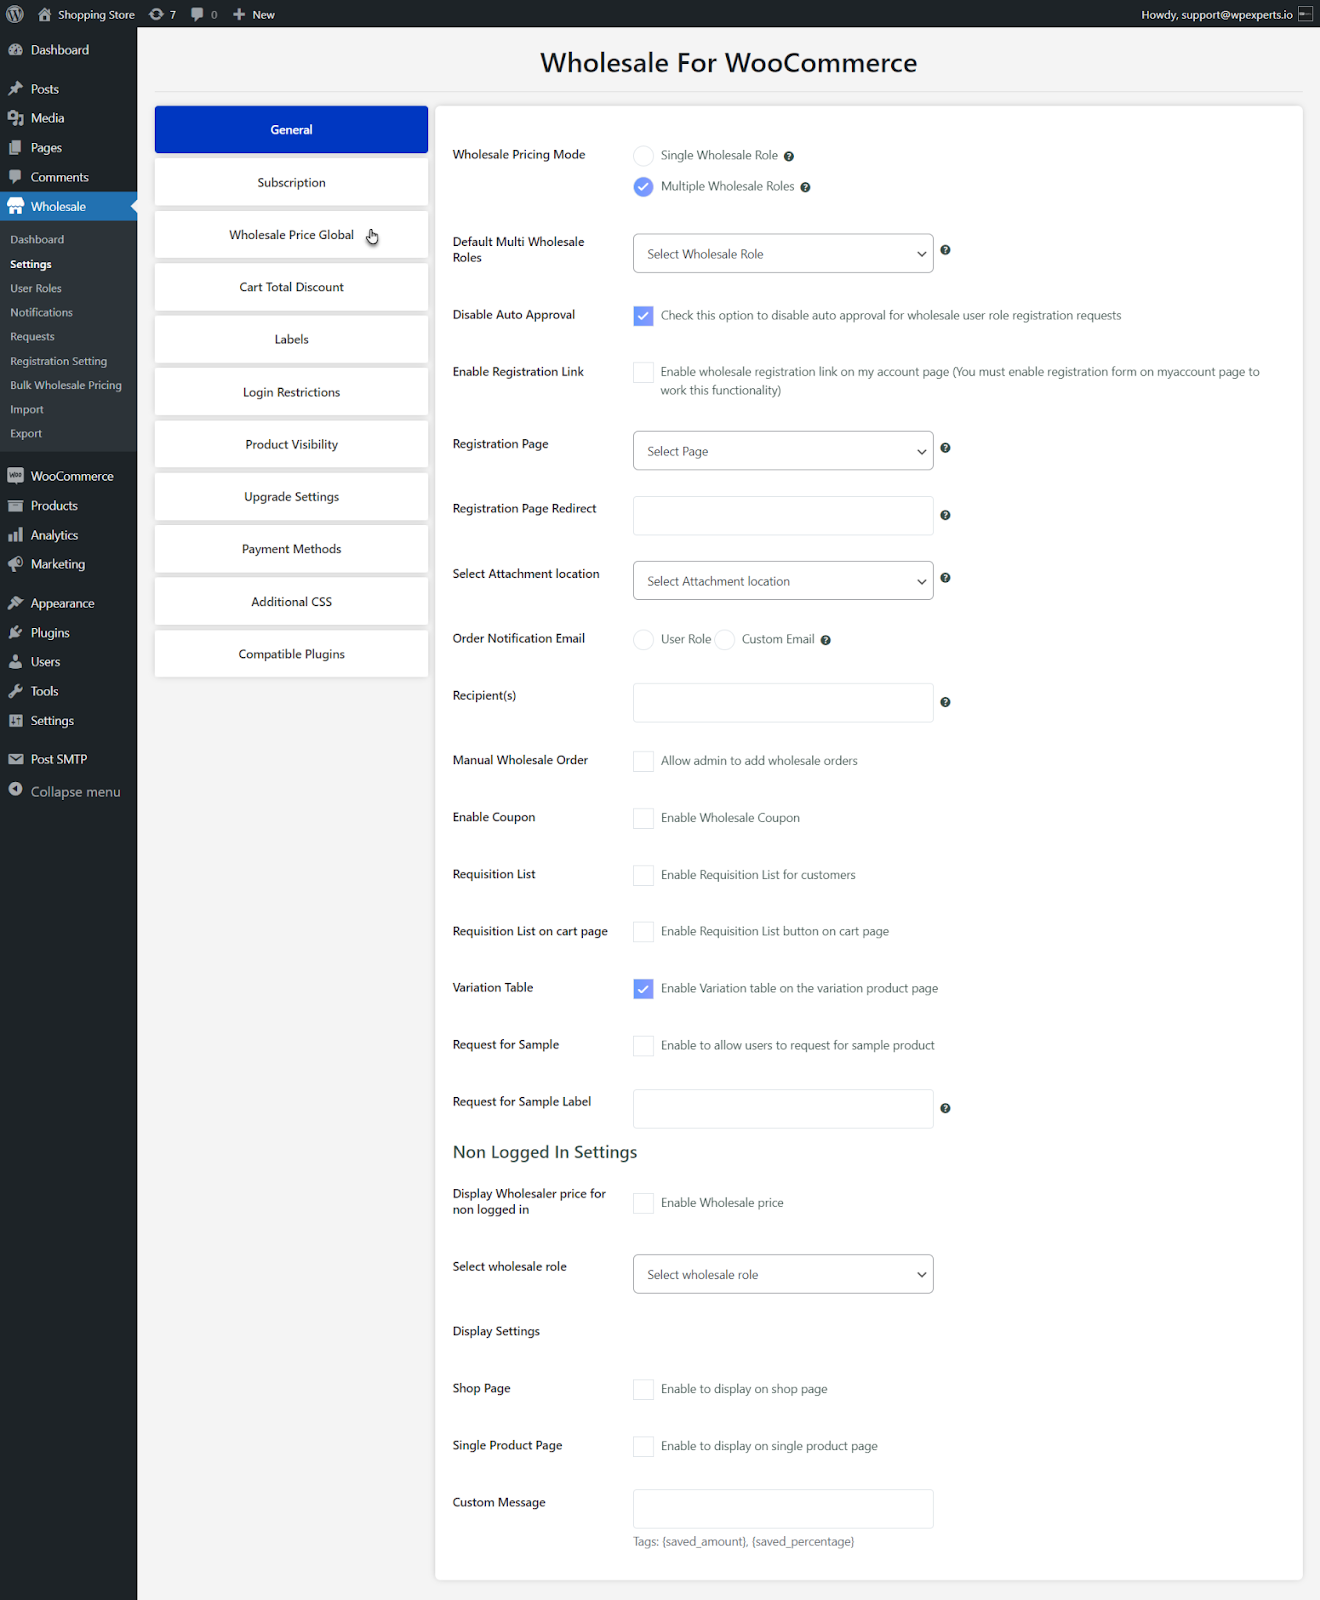
- Go to: Admin Dashboard > Wholesale > Settings.
- Navigate to the Wholesale Price Global tab.

- Adjust the settings according to your needs.
- Select Fixed discount from the Discount Type dropdown.
- Enter the discount value in the Wholesale Value input box.
- Once done, click the Save Changes button
Front-End Impact
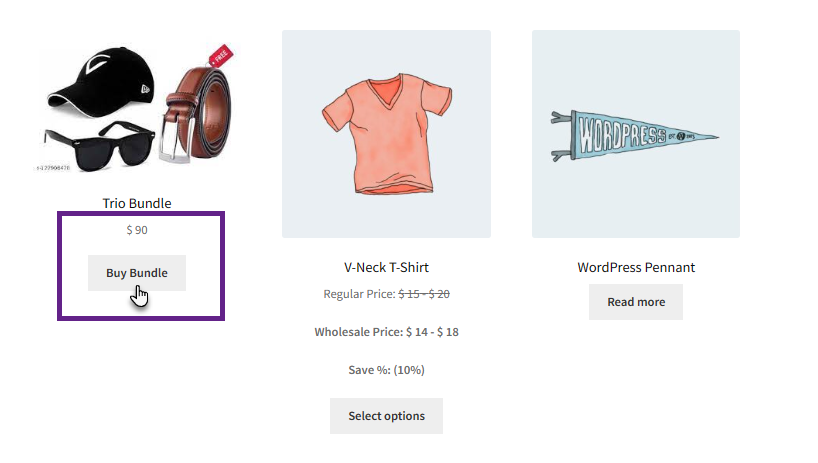
- Navigate to your shop.
- Navigate to the bundle from your shop.
- As you can see, the price of the bundle is now fixed
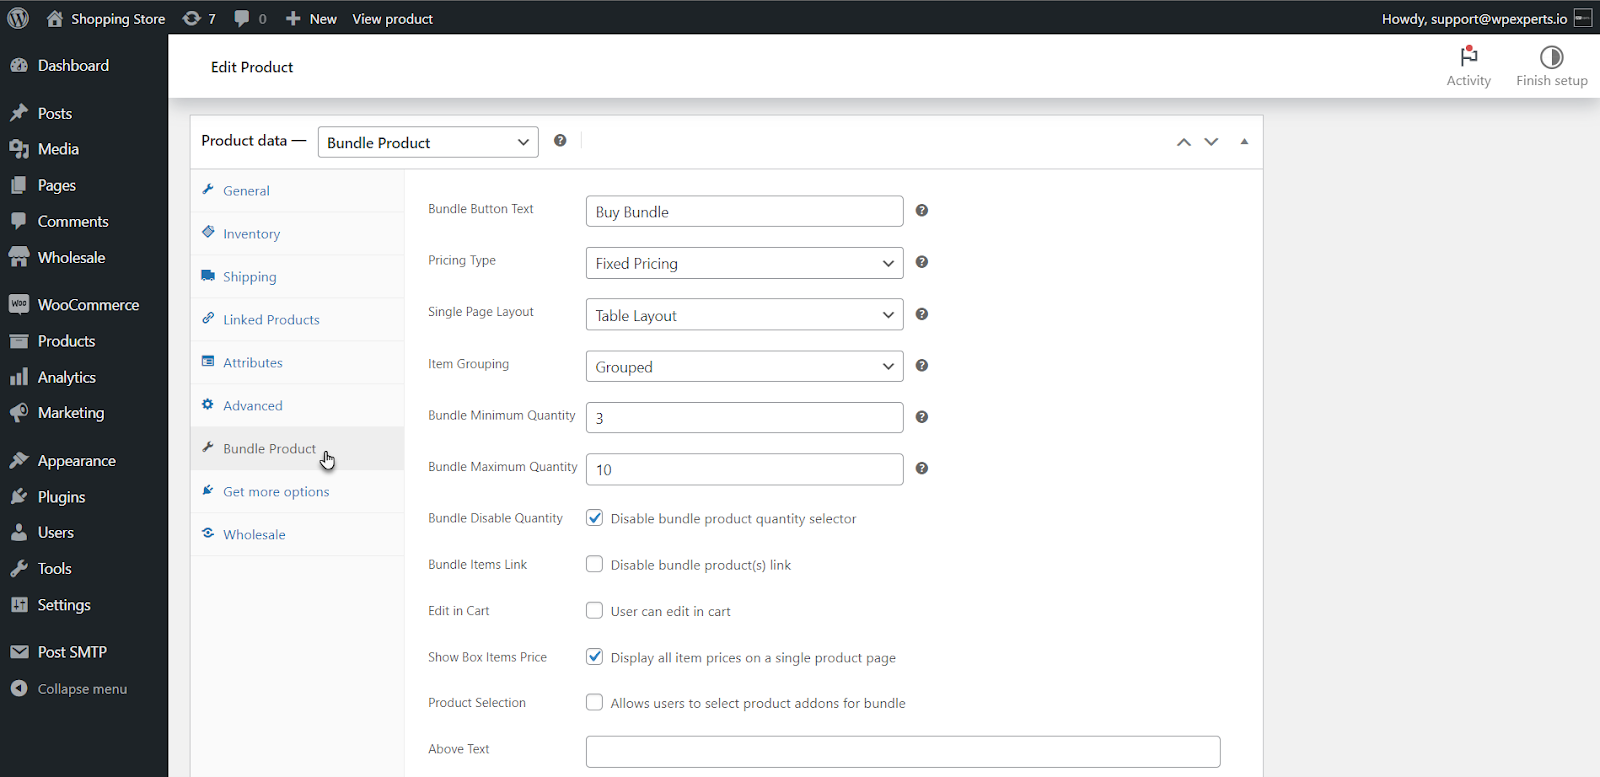
Fixed Pricing
- Go to: Admin Dashboard > Products.
- Add or Edit a product.
- Navigate to the Bundle Product tab.

- Select pricing type to Fixed Pricing.

- Once done, click the Update button.
Front-End Impact (Product Page)
- Navigate to your shop.
- Select the bundle from your shop.
- The bundle product page will open on the front end.
- As you can see, the prices of the bundle products are now fixed after we have set the pricing type to Fixed.
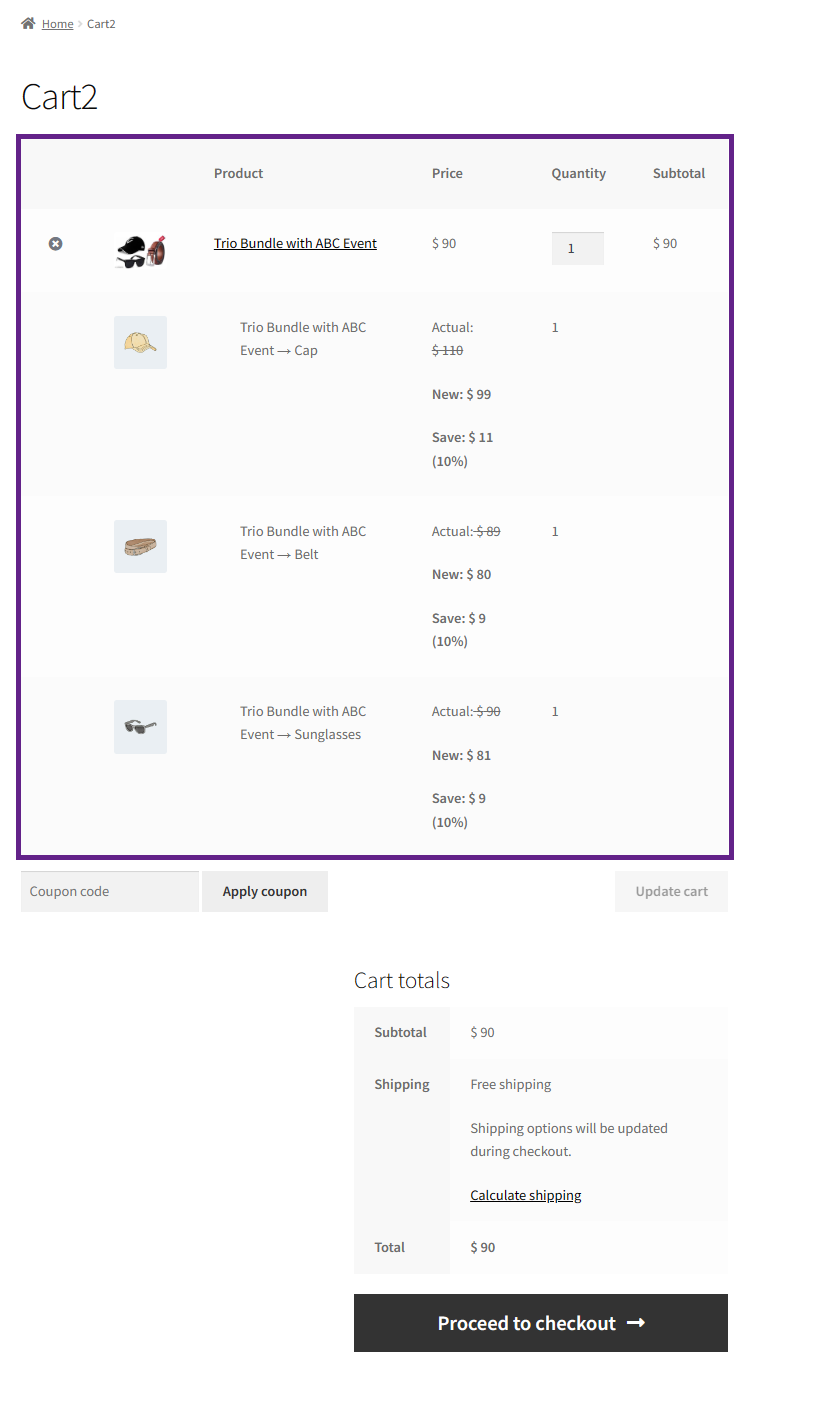
Front-End Impact (Cart Page)
- You’ll see this once you add the bundle to your cart.
Per product pricing without bundle price
- Go to: Admin Dashboard > Products.
- Add or Edit a product.
- Navigate to the Bundle Product tab.
- Select Pricing Type to Per product pricing without bundle price.
- Once done, click the Update button.
Front-End Impact (Product Page)
- Navigate to your shop.
- Select the bundle from your shop.
- The bundle product page will open on the front end.
- As you can see, the wholesale prices of individual bundle products are combined to form the total bundle price, which does not include the bundle price.
Front-End Impact (Cart Page)
- You’ll see this once you add the bundle to your cart.
Per Product pricing with Bundle Price
- Go to: Admin Dashboard > Products.
- Add or Edit a product.
- Navigate to the Bundle Product tab.

- Select Pricing Type to Per product pricing with bundle price.

Front-End Impact (Product Page)
- Navigate to your shop.
- Select the bundle from your shop.
- The bundle product page will open on the front end.
- You’ll notice that the bundle price and wholesale prices of each bundled product are included.
Front-End Impact (Cart Page)
- You’ll see this once you add the bundle to your cart.
Discount Type (Percent)
- When the admin enters Discount Type Percent with a Wholesale Value from back-end settings after creating a wholesale role, customers with the same wholesale role can select bundle products at discounted rates set by the admin on the front-end.
Back-End Settings
- Go to: Admin Dashboard > Wholesale > Settings.
- Navigate to the Wholesale Price Global tab.
- Adjust the settings according to your needs.
- Select Percent discount from the Discount Type dropdown.
- Enter the discount value in the Wholesale Value input box.
- Once done, click the Save Changes button.

Front-End Impact
- Navigate to your shop.
- Navigate to the bundle from your shop.
- As you can see, the price of our bundle is now fixed.
Fixed Pricing
- Go to: Admin Dashboard > Products.
- Add or Edit a product.
- Navigate to the Bundle Product tab.
- Select pricing type to Fixed Pricing.
- Once done, click the Update button.
Front-End Impact (Product Page)
- Navigate to your shop.
- Select the bundle from your shop.
- The bundle product page will open on the front end.
- As you can see, the prices of the bundle products are now fixed after we have set the pricing type to Fixed.
Front-End Impact (Cart Page)
- You’ll see this once you add the bundle to your cart.
Per product pricing without bundle price
- Go to: Admin Dashboard > Products.
- Add or Edit a product.
- Navigate to the Bundle Product tab.

- Select Pricing Type to Per product pricing without bundle price.
- Once done, click the Update button.
Front-End Impact (Product Page)
- Navigate to your shop.
- Select the bundle from your shop.
- The bundle product page will open on the front end.
- As you can see, the wholesale prices of individual bundle products are combined to form the total bundle price, which does not include the bundle price.
Front-End Impact (Cart Page)
- You’ll see this once you add the bundle to your cart.
Compatibility of Wholesale Suite with Smart Product Bundles
↑ Back to top- Download the Wholesale Suite plugin by clicking here.
- Install the plugin and activate it.
- For further information on plugin settings, please visit the Wholesale Suite documentation.
Discount Type (Fixed)
- When the admin enters discount type Fixed with a wholesale value from back-end settings after creating a wholesale role, customers with the same wholesale role can select bundle products at discounted rates set by the admin on the front end.
Please Note: To ensure Wholesale Suite compatibility, it’s necessary to configure the wholesale prices for bundle products individually.
Back-End Settings
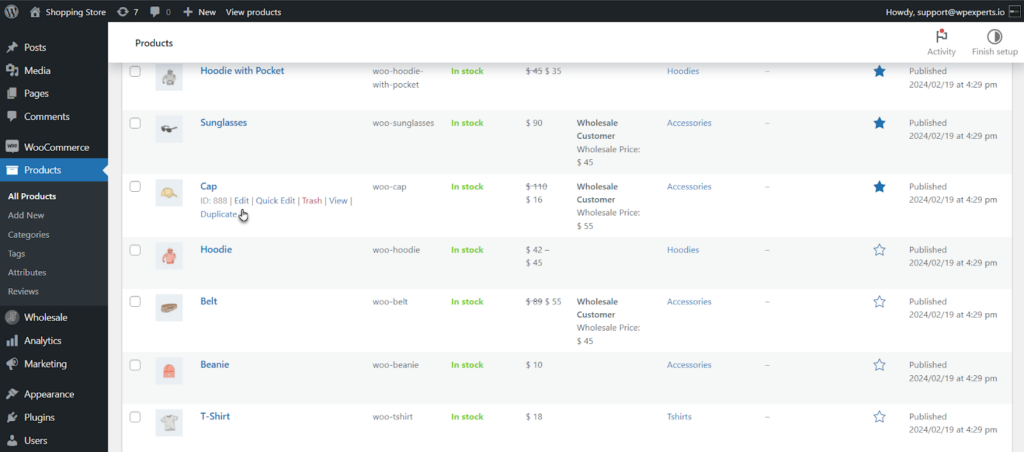
- Go to: Admin Dashboard > Products > All Products.
- Edit the product included within the bundle.
- Navigate to the Product Data tab on the Edit Product page.

- Select pricing type to Fixed.
- Set the Wholesale Price of the product.
- Once done, click the Update button.

- Repeat the steps for the remaining bundle products.
Front-End Impact (Product Page)
- Navigate to your shop.
- Select the bundle from your shop.
- The bundle product page will open on the front end.
- As you can see, the price of our bundle is now fixed.
Front-End Impact (Cart Page)
- You’ll see this once you add the bundle to your cart.
Discount Type (Percent)
- When the admin enters discount type Percent with a wholesale value from back-end settings after creating a wholesale role, then customers with the same wholesale role can select bundle products at discounted rates set by the admin on the front-end.
Please Note: To ensure Wholesale Suite compatibility, it’s necessary to configure the wholesale prices for bundle products individually.
Back-End Settings
- Go to: Admin Dashboard > Products > All Products.
- Edit the product included within the bundle.
- Navigate to the Product Data tab on the Edit Product page.
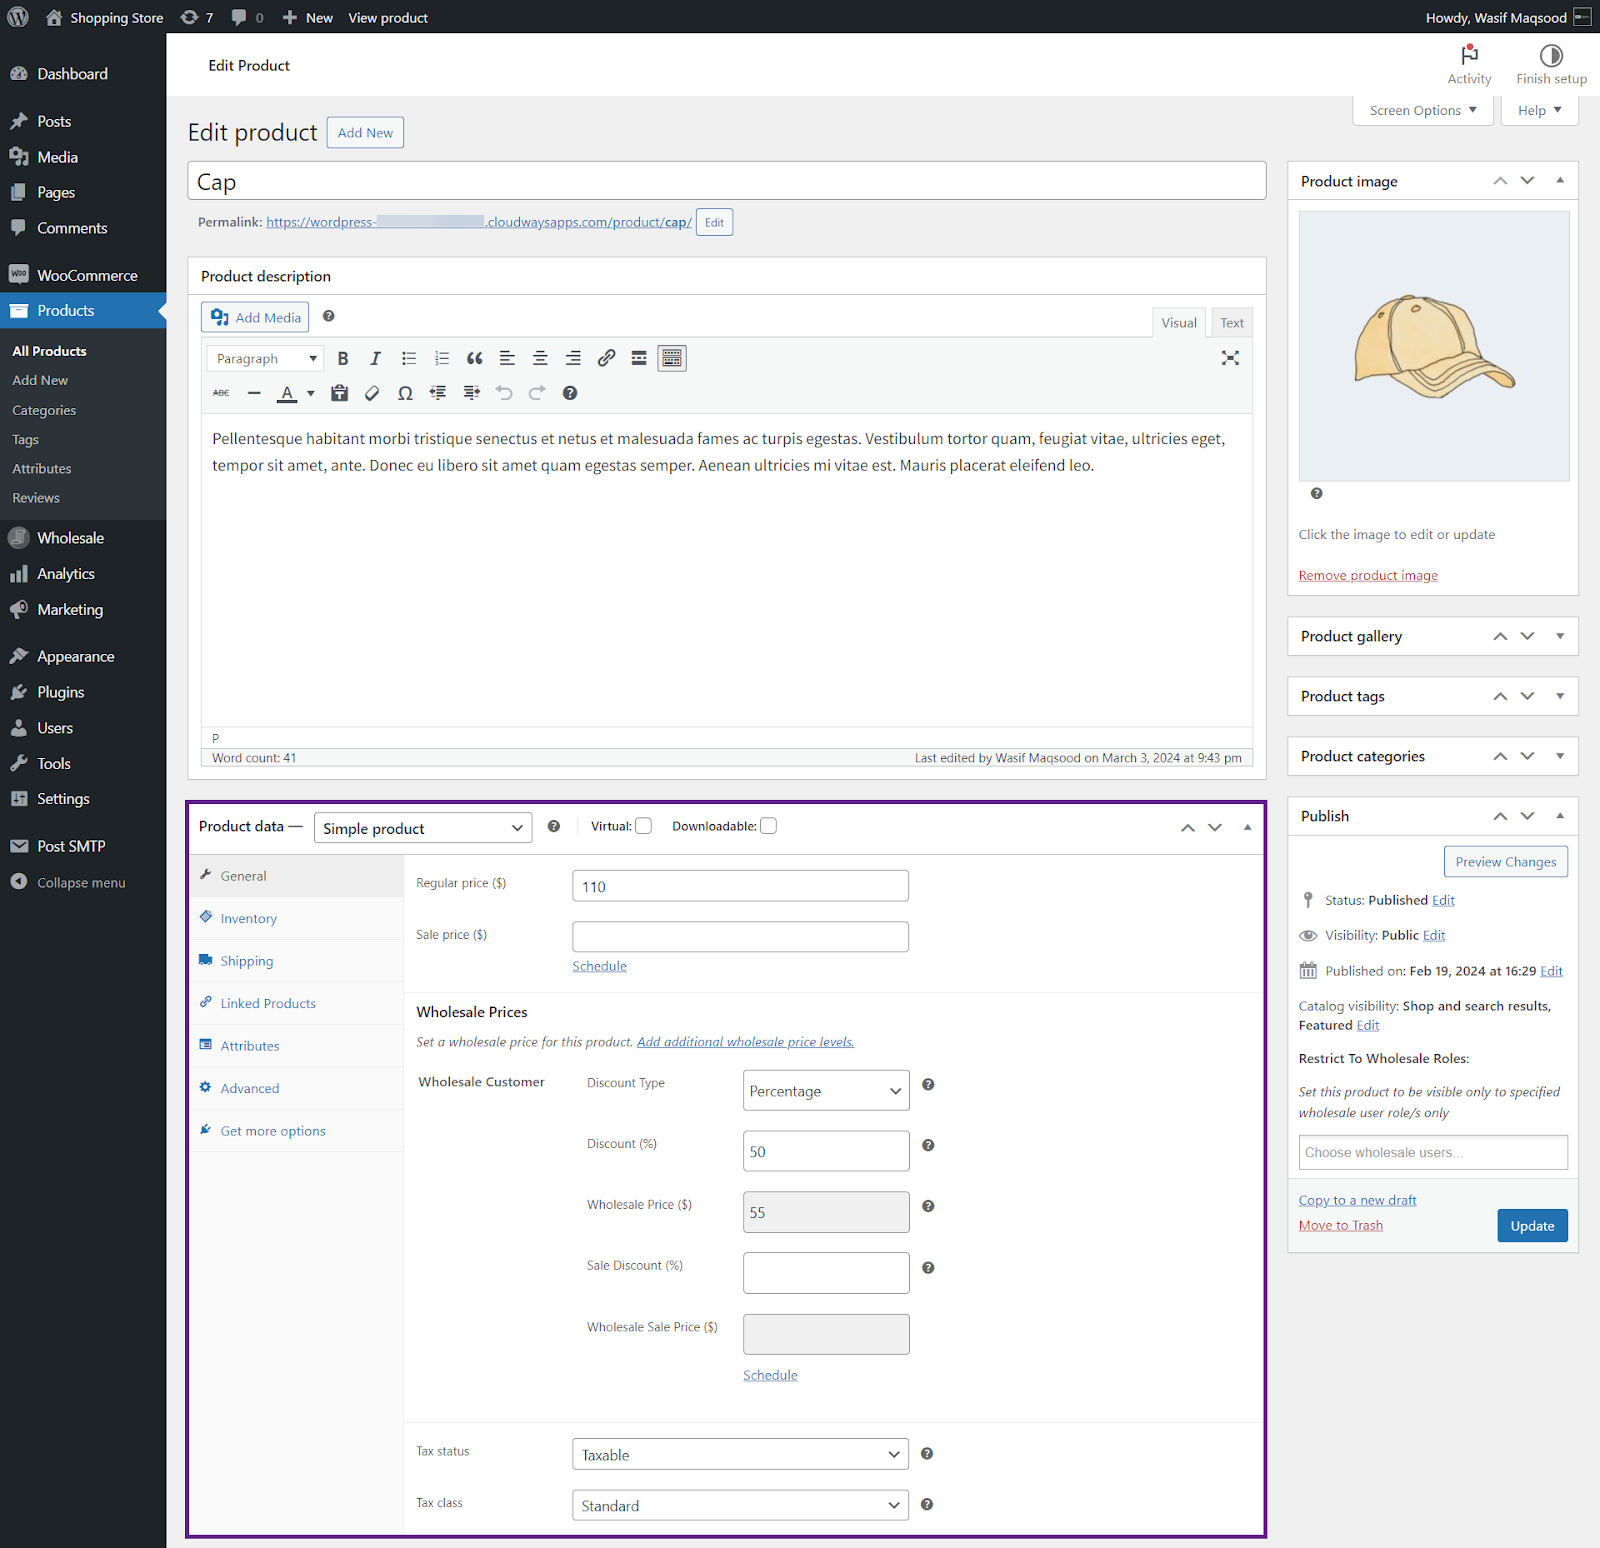
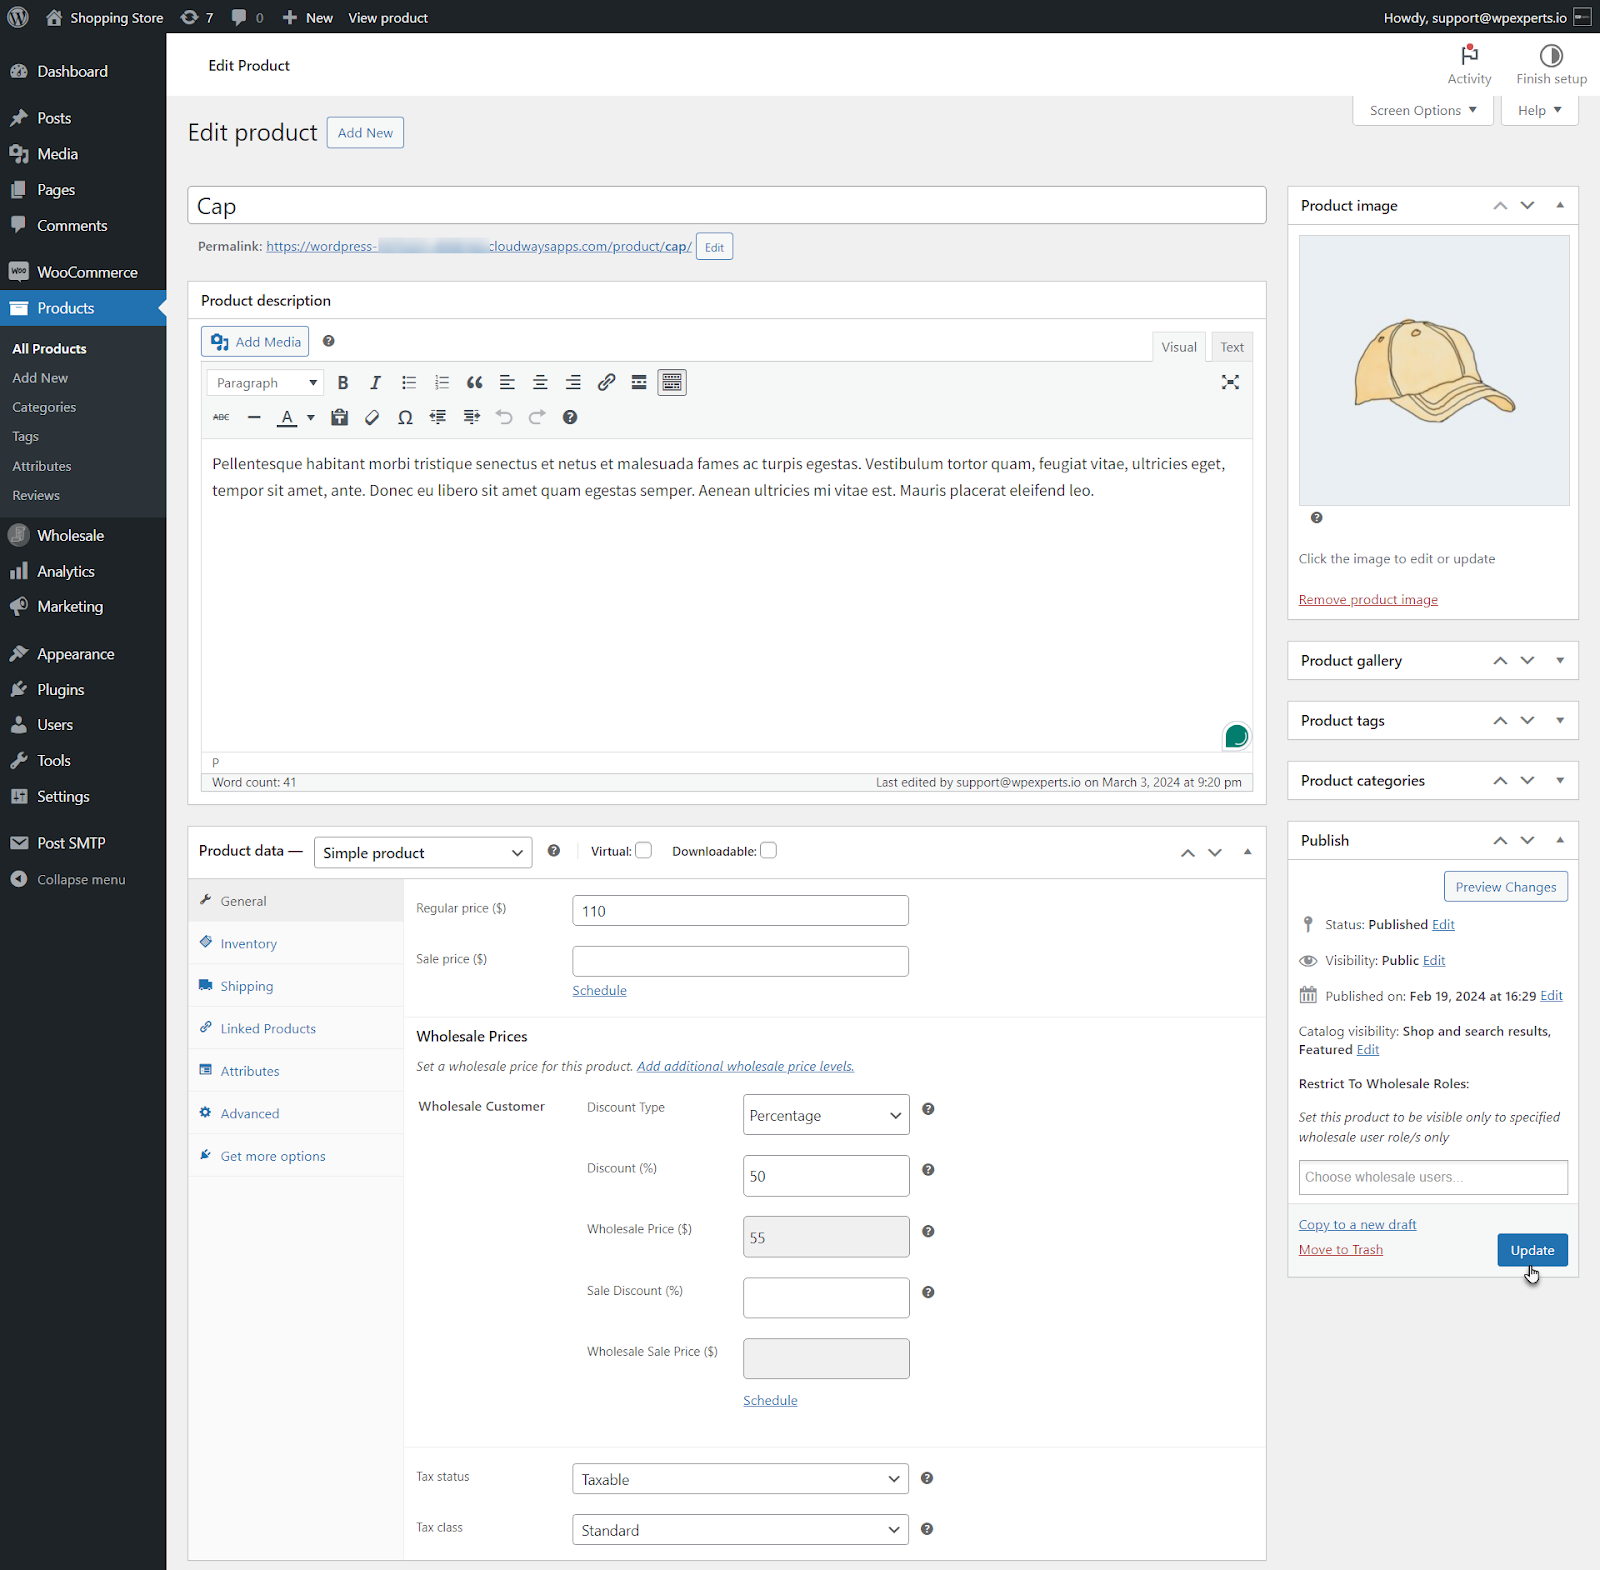
- Select pricing type to Percentage.
- Set the Wholesale Price of the product.
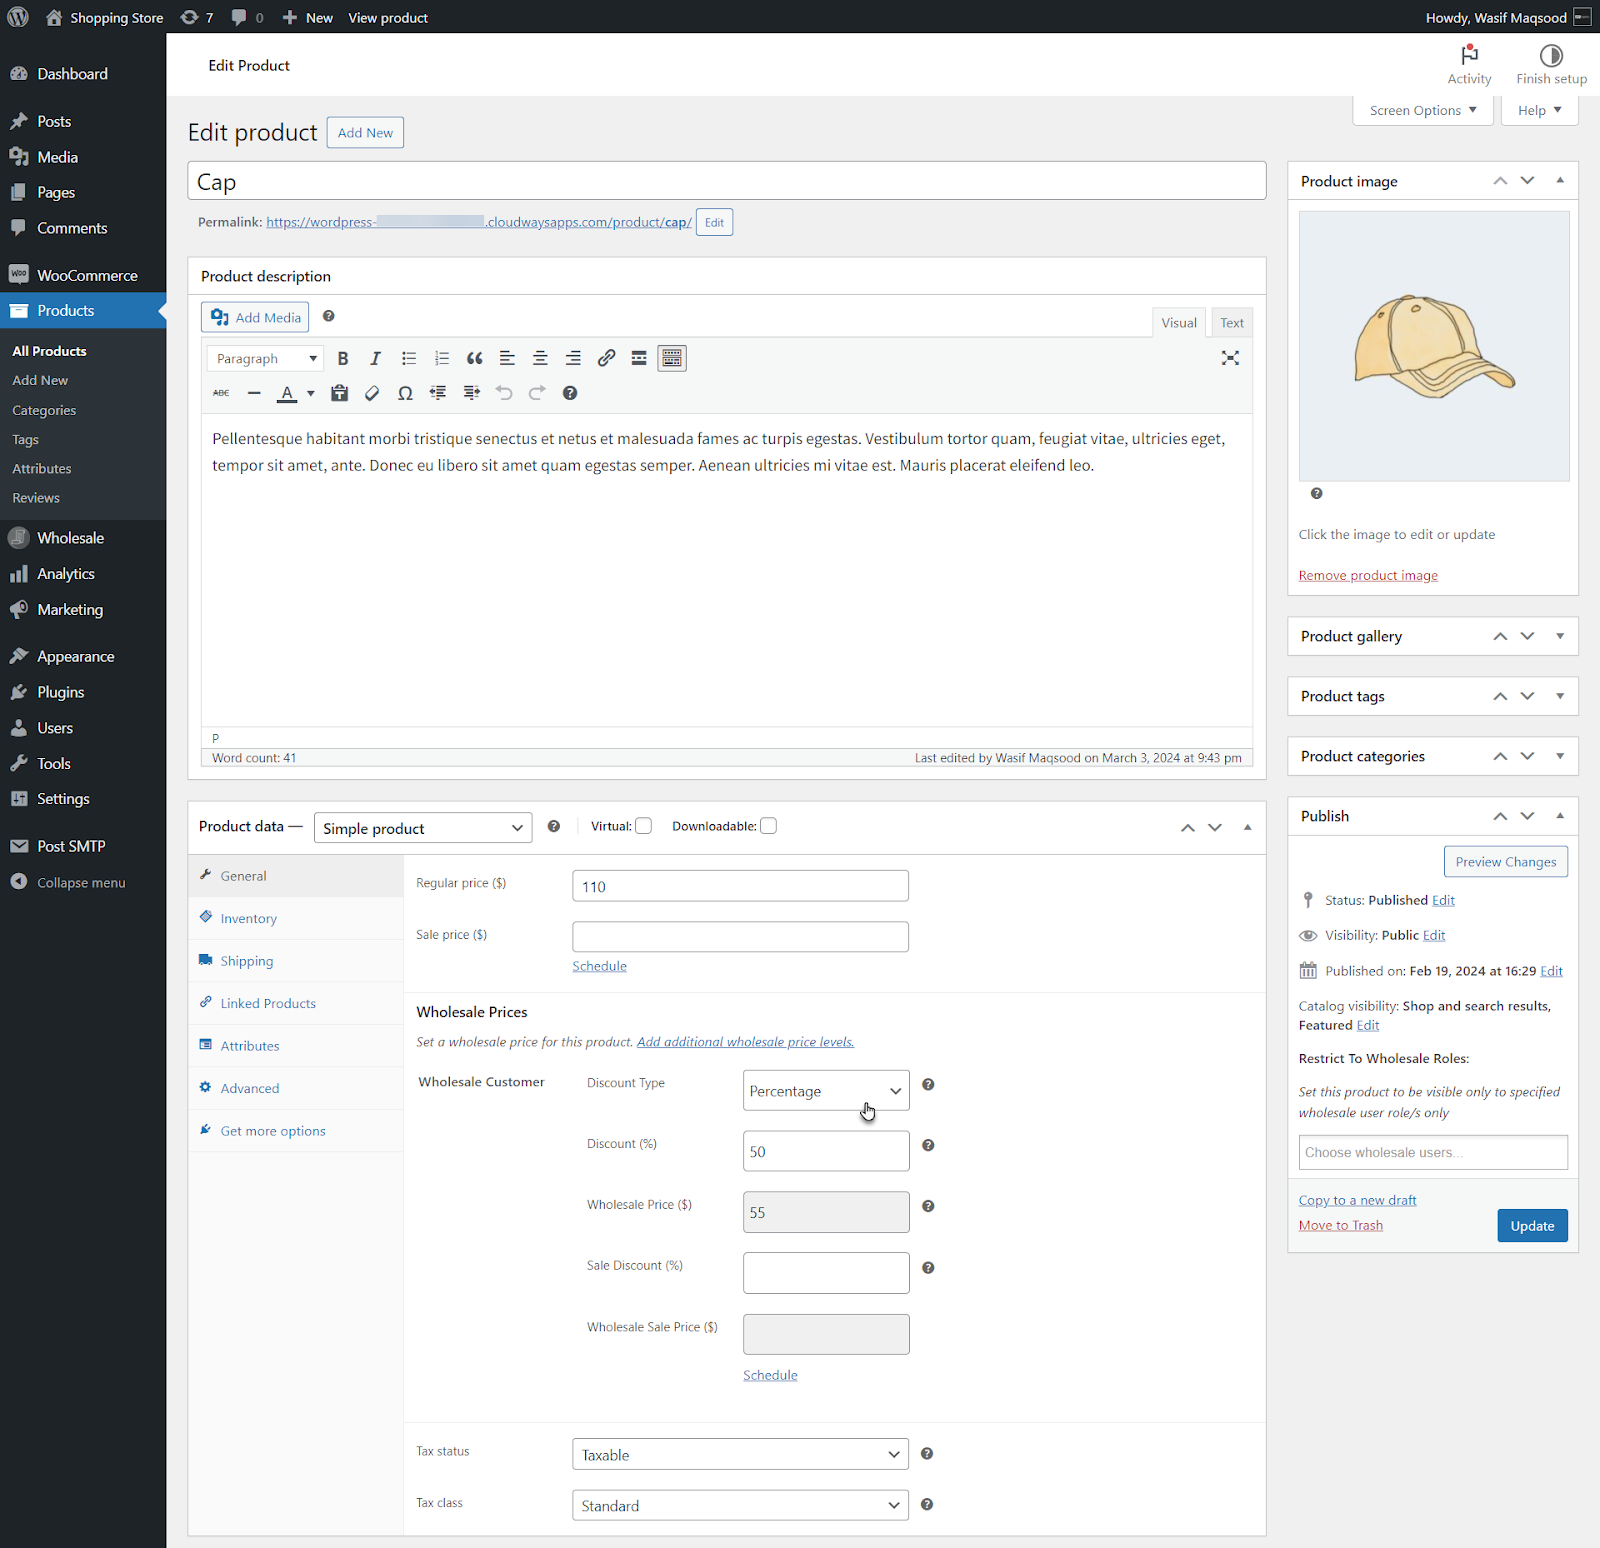
- Once done, click the Update button.
- Repeat the steps for the remaining bundle products.
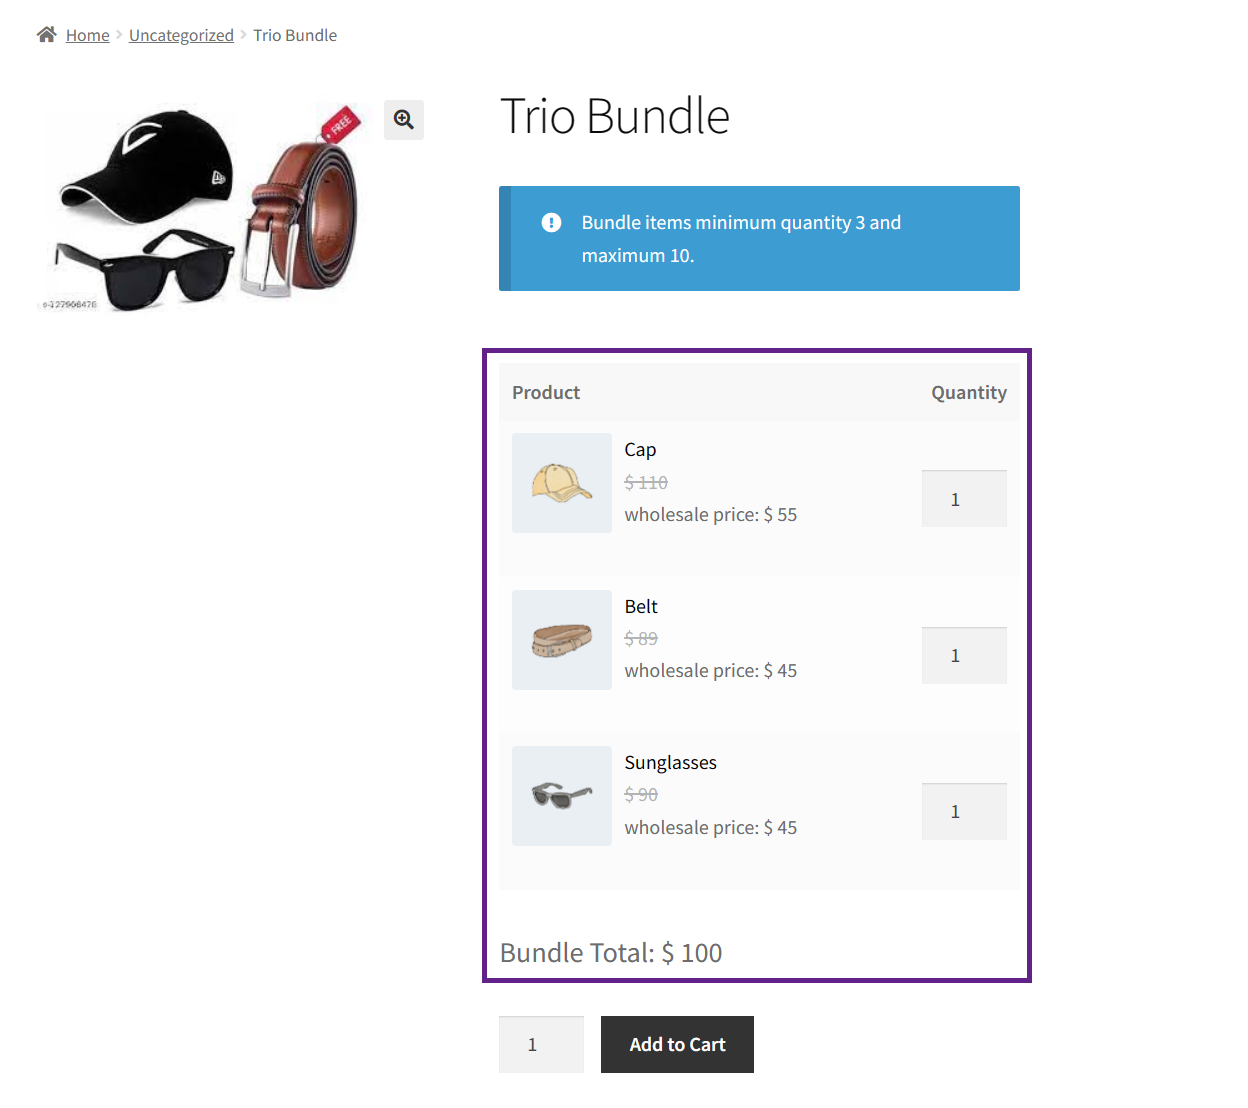
Front-End Impact (Product Page)
- Navigate to your shop.
- Navigate to the bundle from your shop.
- As you can see, the price of our bundle is now fixed.
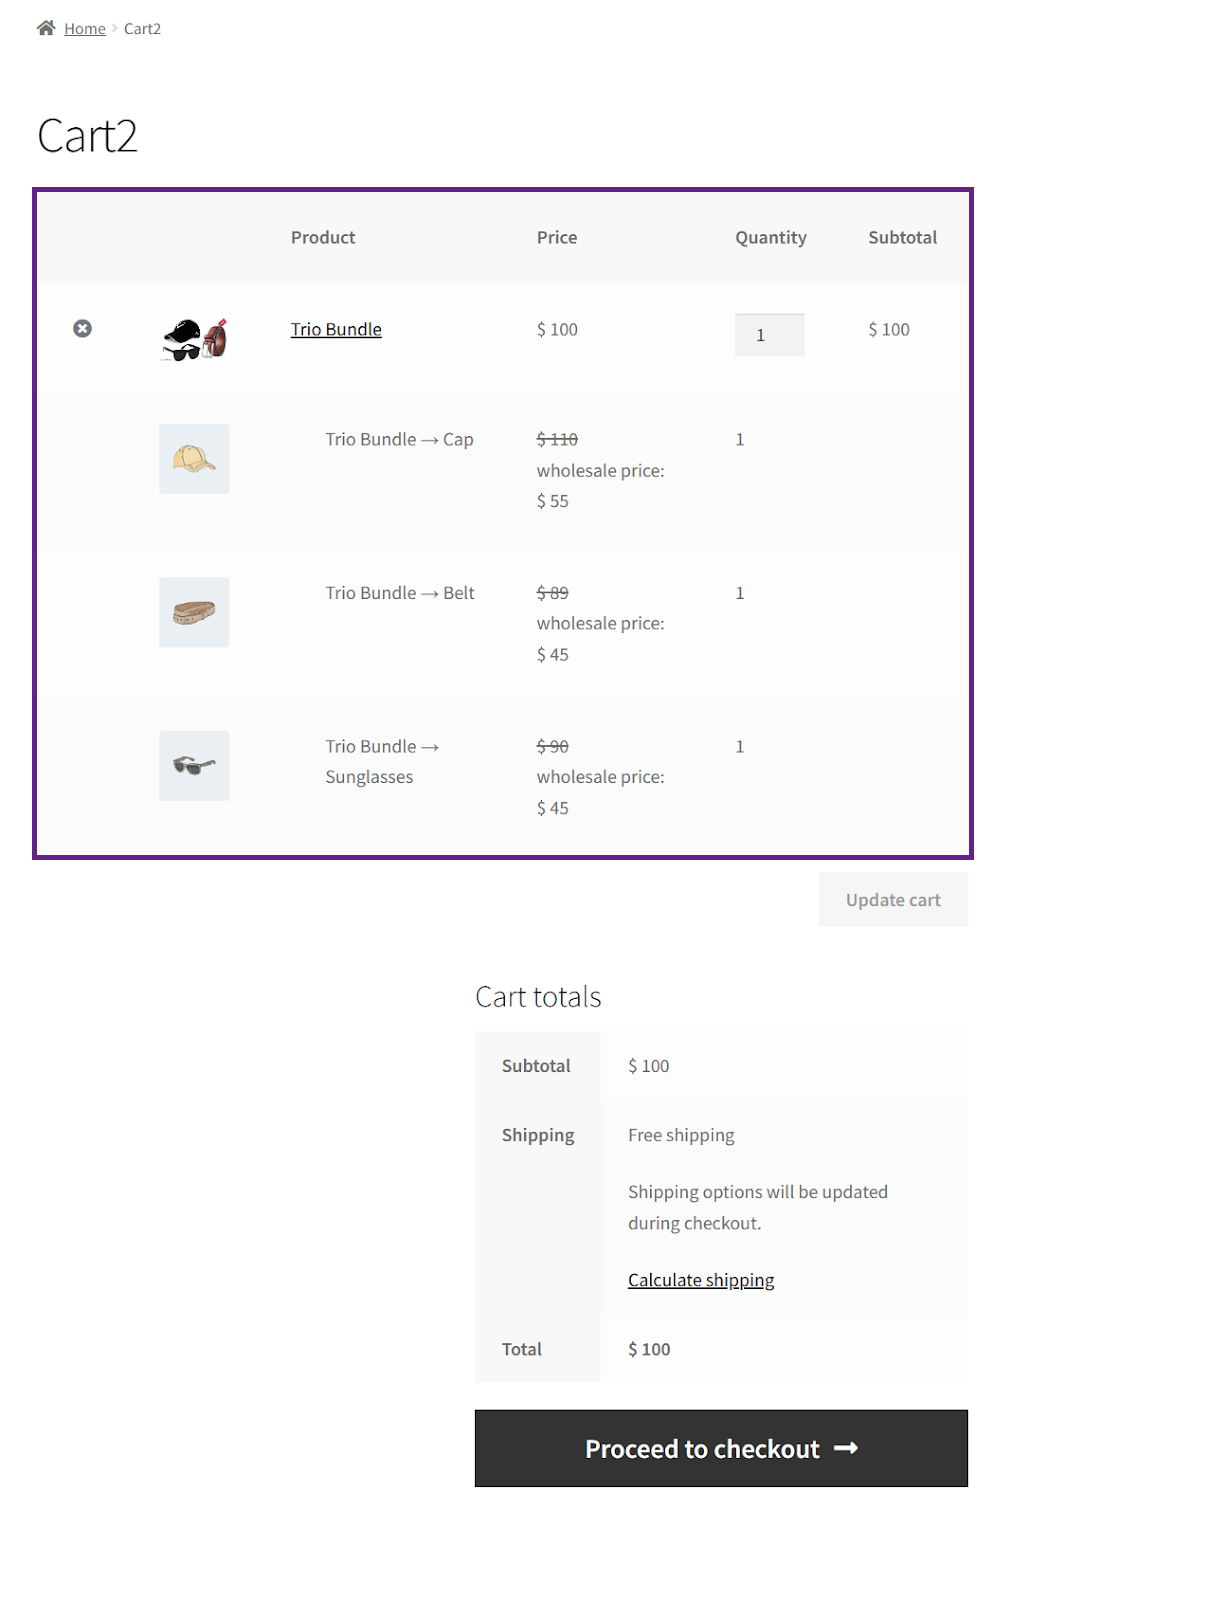
Front-End Impact (Cart Page)
- You’ll see this once you add the bundle to your cart.
Compatibility of FooEvents with Smart Product Bundles
↑ Back to top- Download the FooEvents plugin by clicking here.
- Install the plugin and activate it.
- For further information on plugin settings, please visit the FooEvents documentation.
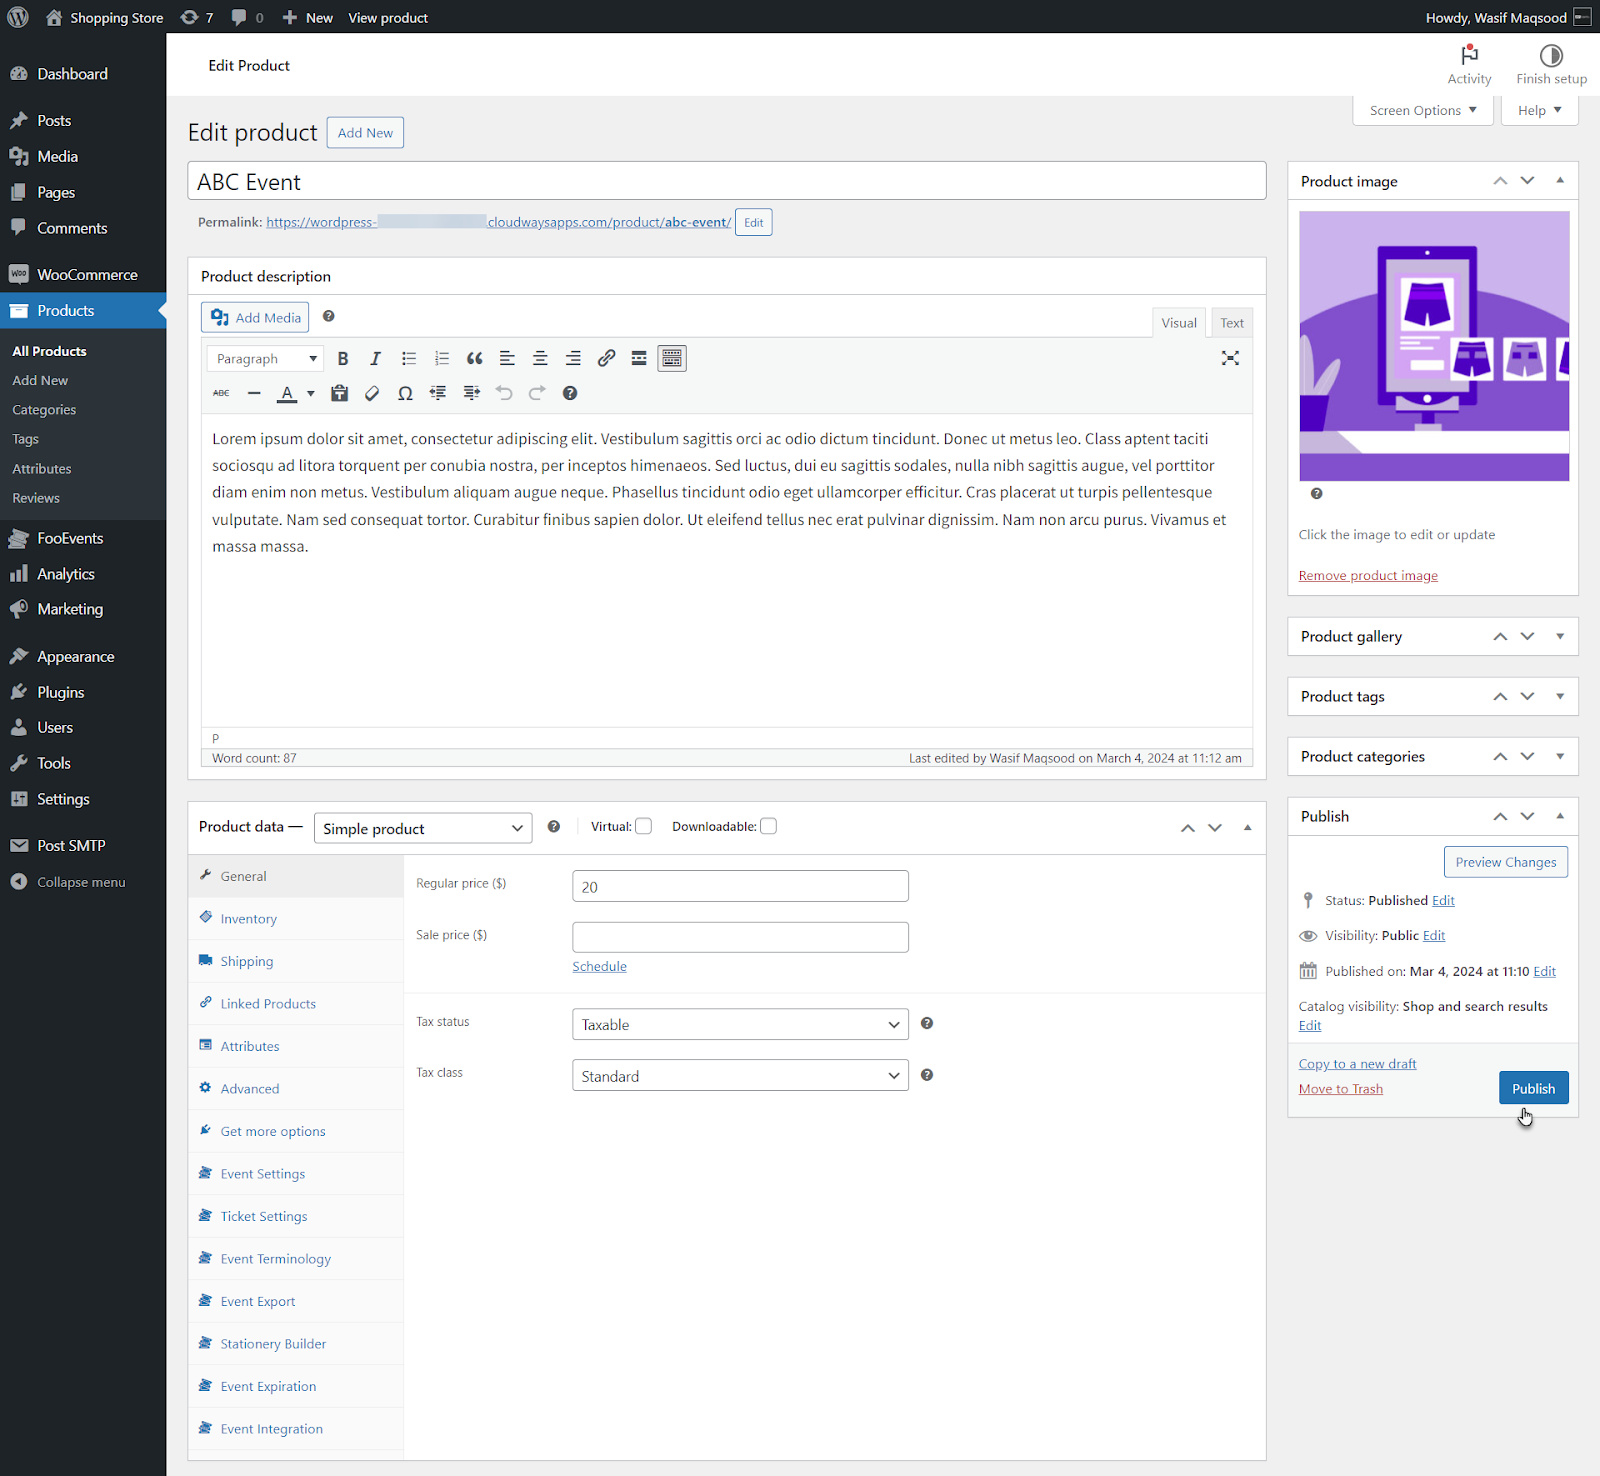
Back-End Settings (Creating an Event)
- Go to: Admin Dashboard > Products > Add New.
- Create a Simple or a Variable product.
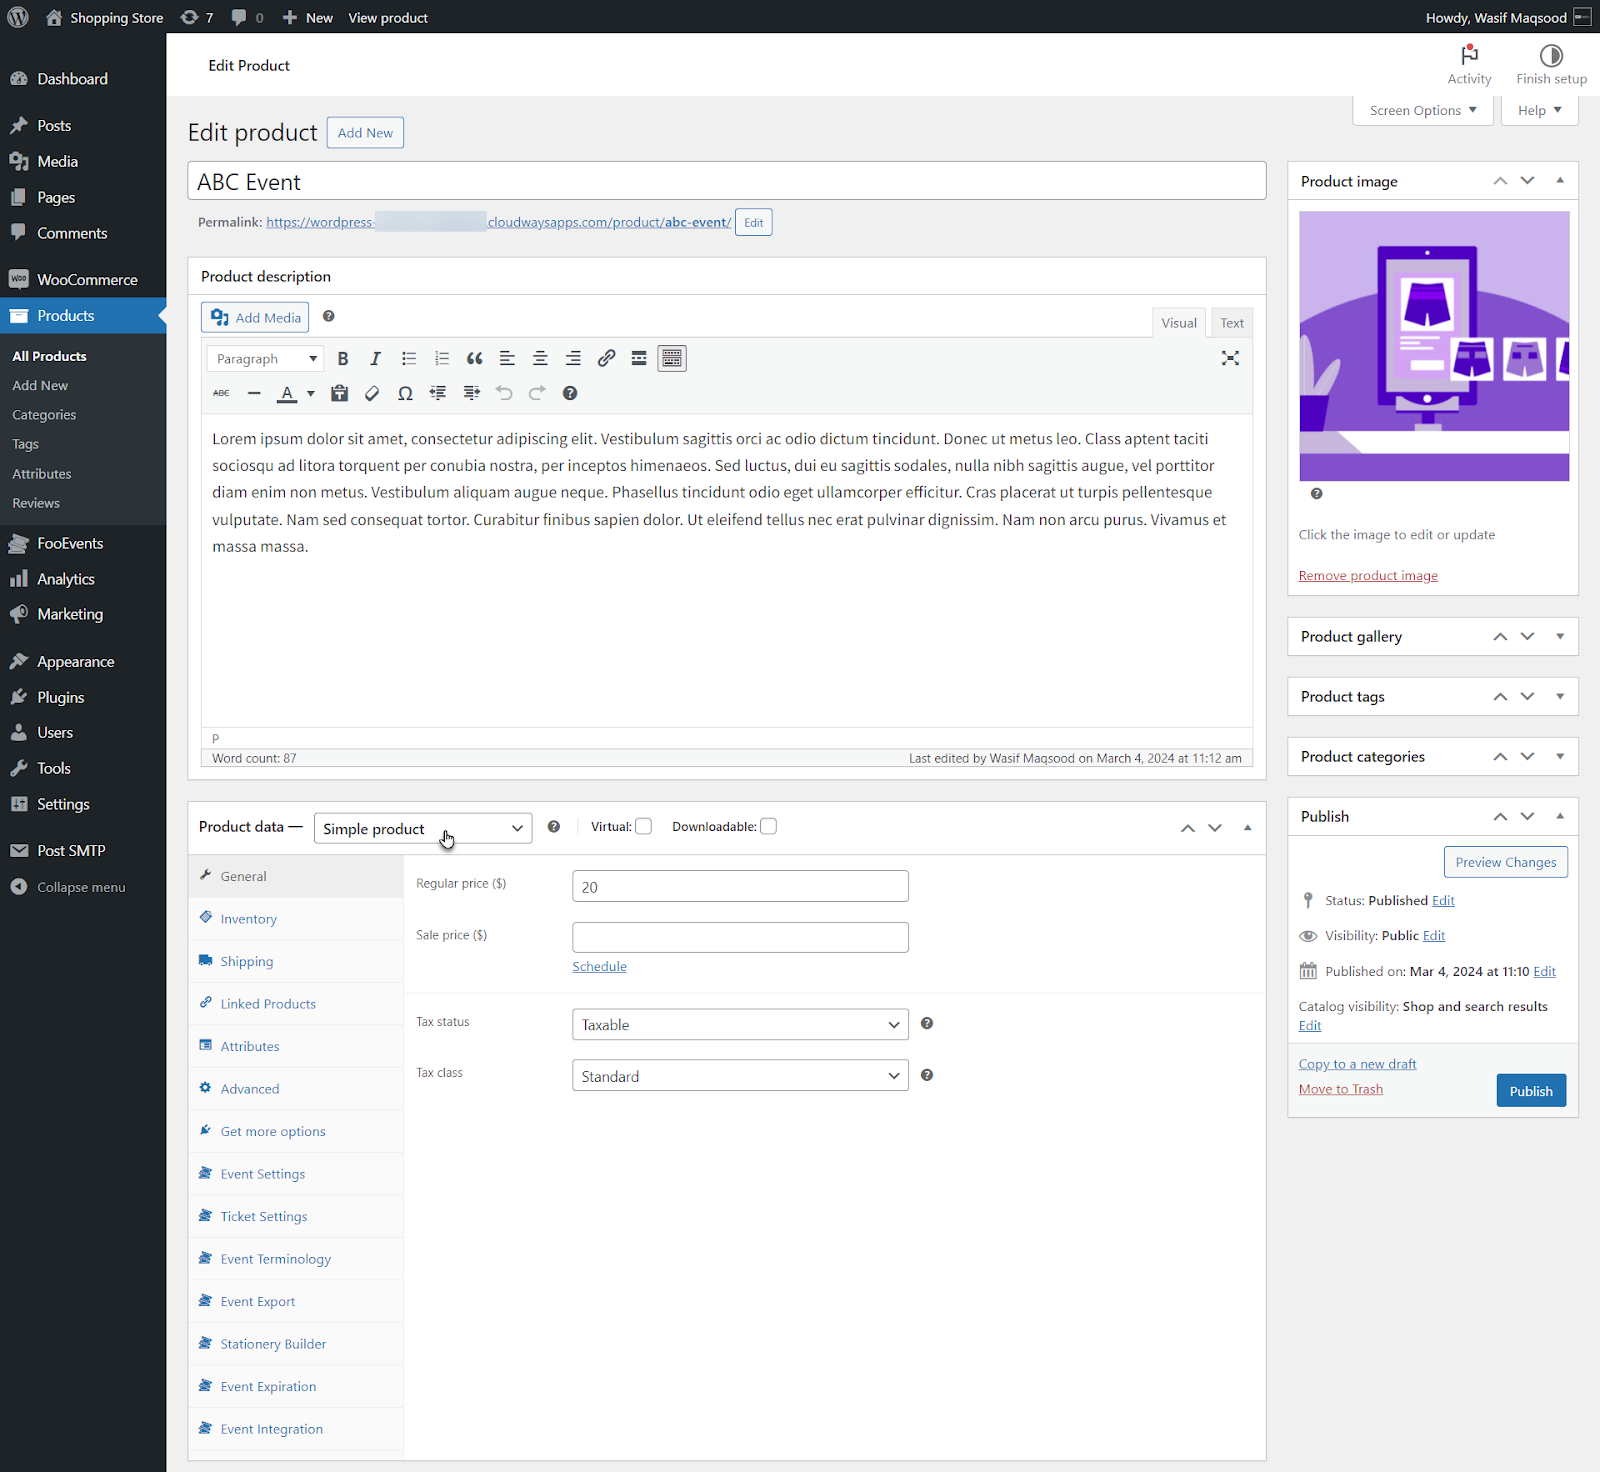
- Create an event by adjusting the settings according to your needs.
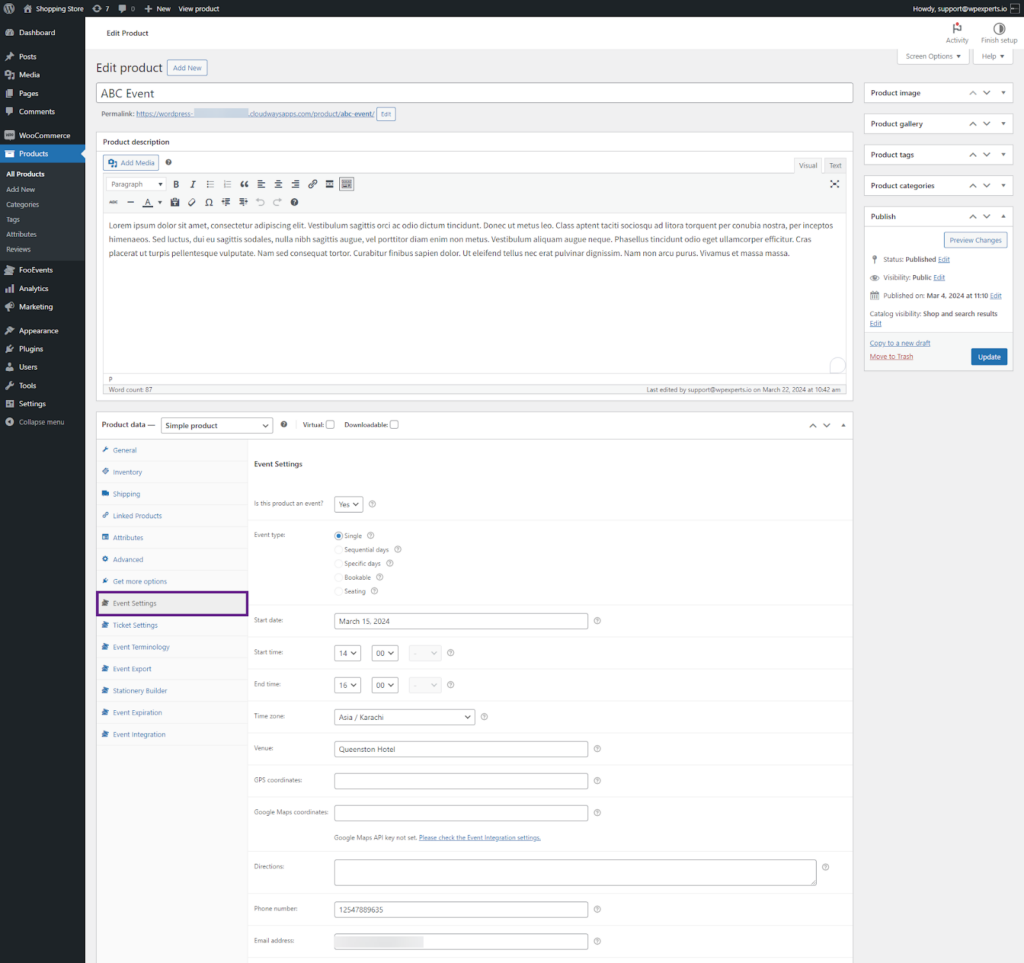
- Once done, click the Publish button.
Back-End Settings (Adding Event to the Bundle)
- Go to Admin Dashboard > Products > All Products.
- Select the bundle where you wish to include the event.
- Add the event to the bundle as a product.
- To access additional event settings within the bundle, click on the event in the bundle as shown below.
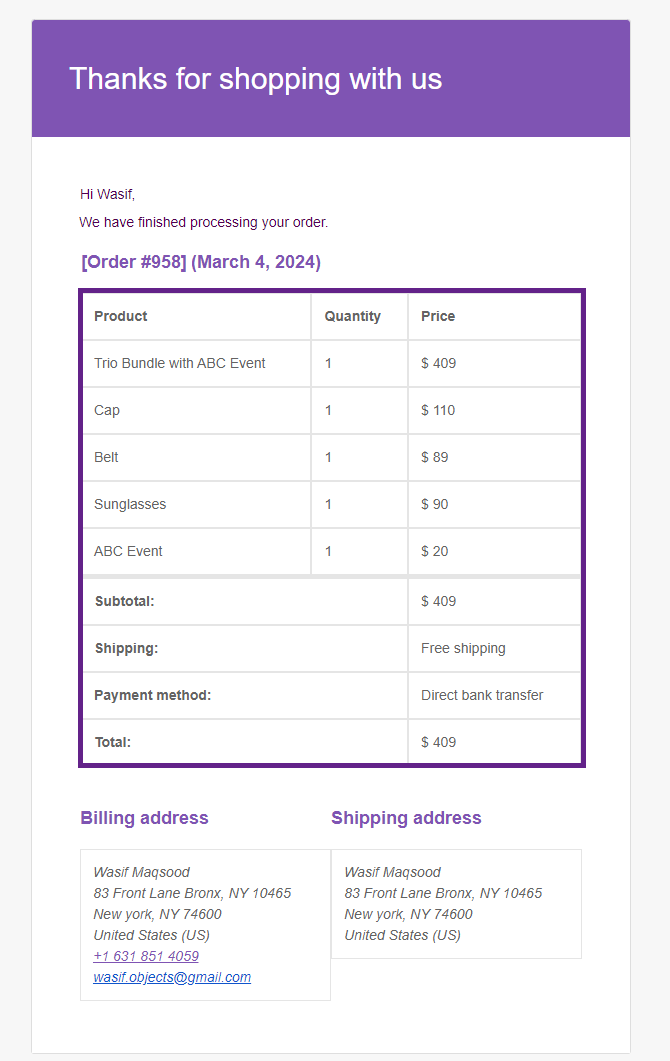
Front-End Impact
- Navigate to the bundle from your shop.
- Click the bundle product.
- Click the Add to Cart button and place an order.
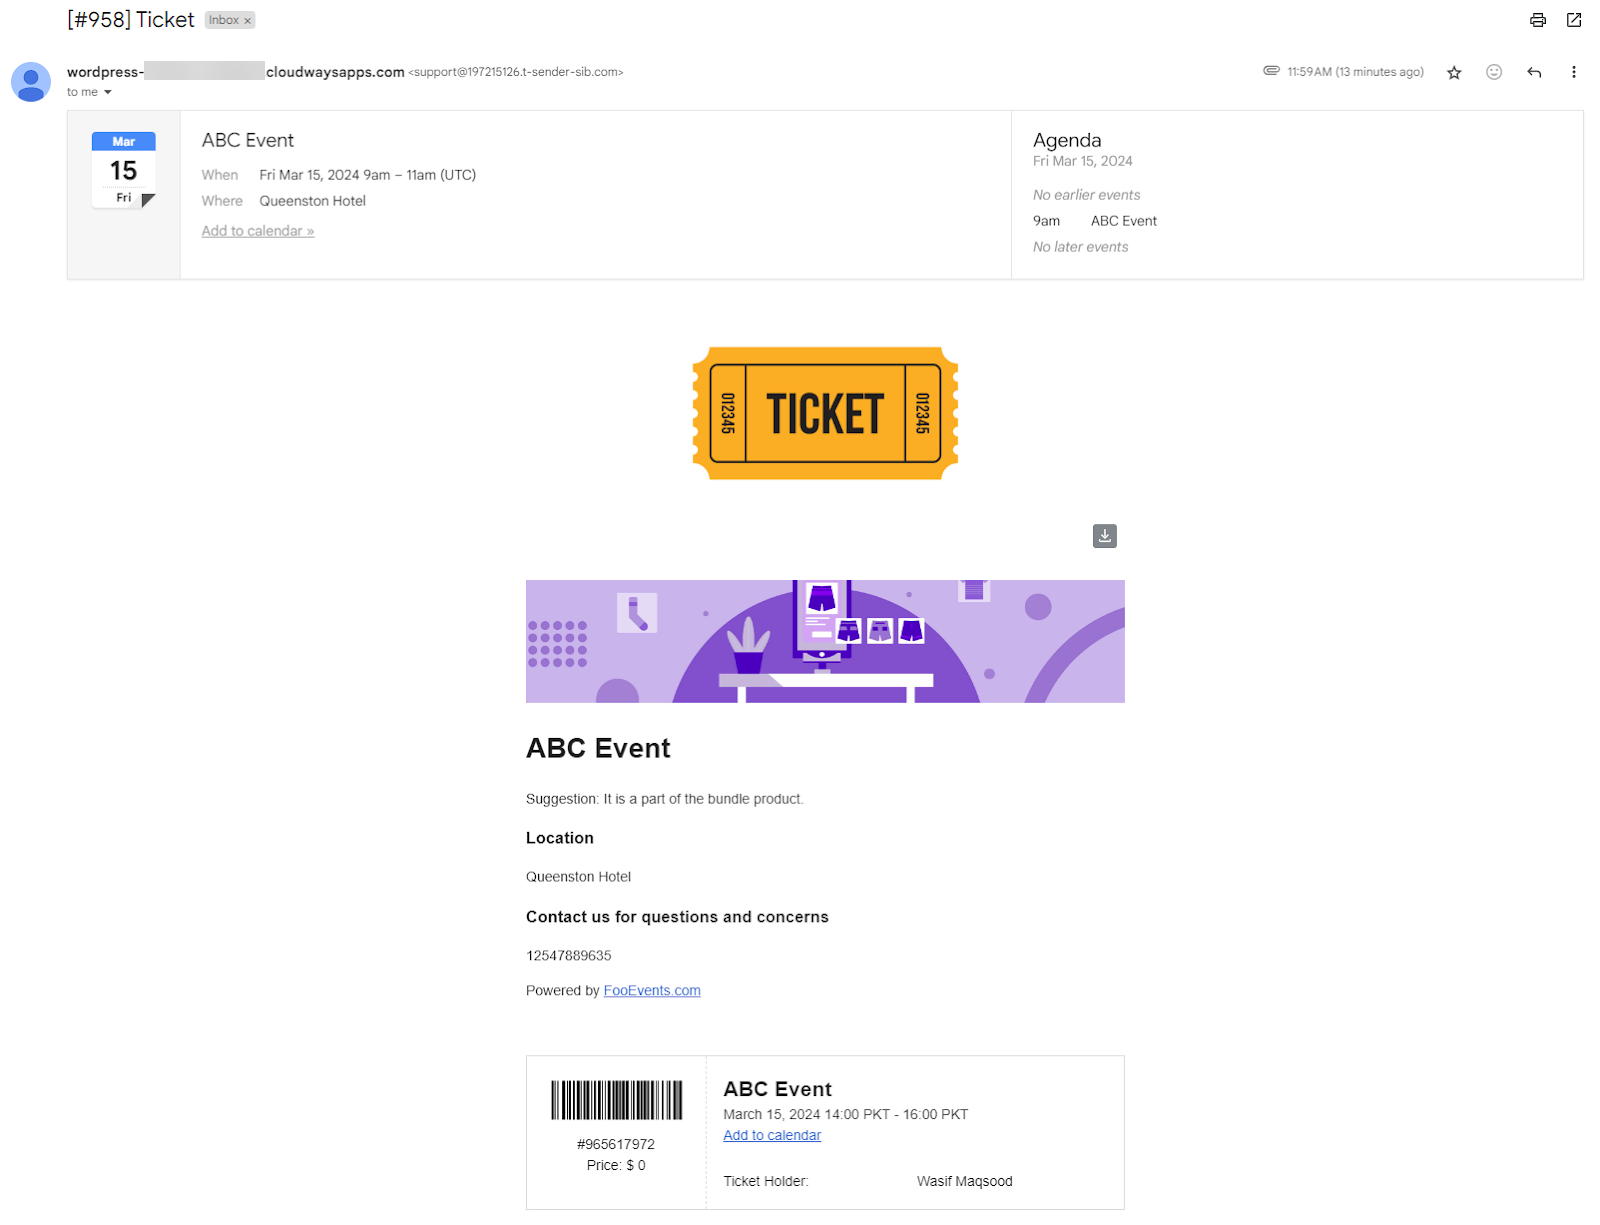
- When the customer places an order, and the admin completes it from Order settings in WooCommerce, the customer will receive the email. Your order is now complete, and the email for each ticket is sent separately.
- This is the ticket email that the customer will receive once the admin completes the order.