Using Resources in Bookings allows you to provide specific types of Availability, or handle how Bookings can be made.
Resources can represent anything necessary for fulfilling a booking, such as rooms, equipment, staff members, or any other tangible or intangible assets. By setting up resources, you can effectively allocate and manage the availability and capacity of these resources in relation to your bookable products or services.
Each resource can have its own unique characteristics, availability schedule, and capacity limitations, and it can also be shared between multiple bookable products.
Here are a few examples of resources for Booking systems:
- Staff Members: If you offer services that require the assistance of specific individuals, such as hairdressers, personal trainers, or tour guides, you can assign them as resources. Each staff member can have their own availability schedule, allowing customers to book appointments or sessions with their preferred staff member.
- Rooms or Venues: If you manage a hotel, rental property, or event space, you can define rooms or venues as resources. Customers can choose from available rooms or venues and make reservations for specific dates and times.
- Equipment or Assets: If you offer rentals or require customers to book specific equipment, such as bikes, cars, or audiovisual equipment, you can set up these items as resources. Customers can select the desired equipment and schedule their rental period.
- Services or Activities: If your business offers different types of services or activities, such as spa treatments, workshops, or classes, you can create resources to represent each service or activity. Customers can select the service or activity they want and book a suitable time slot.
- Meeting Rooms or Conference Spaces: If you provide meeting rooms or conference spaces for booking, you can set them up as resources. Customers can choose the desired room and book it for specific dates and durations.
Adding a new resource
↑ Back to topTo add a global resource or a resource that can be used site-wide:
- Go to Bookings > Resources. A list of current resources and any products they are assigned to is displayed.

- Select Add Resource at the top. The Add New Resource screen appears.
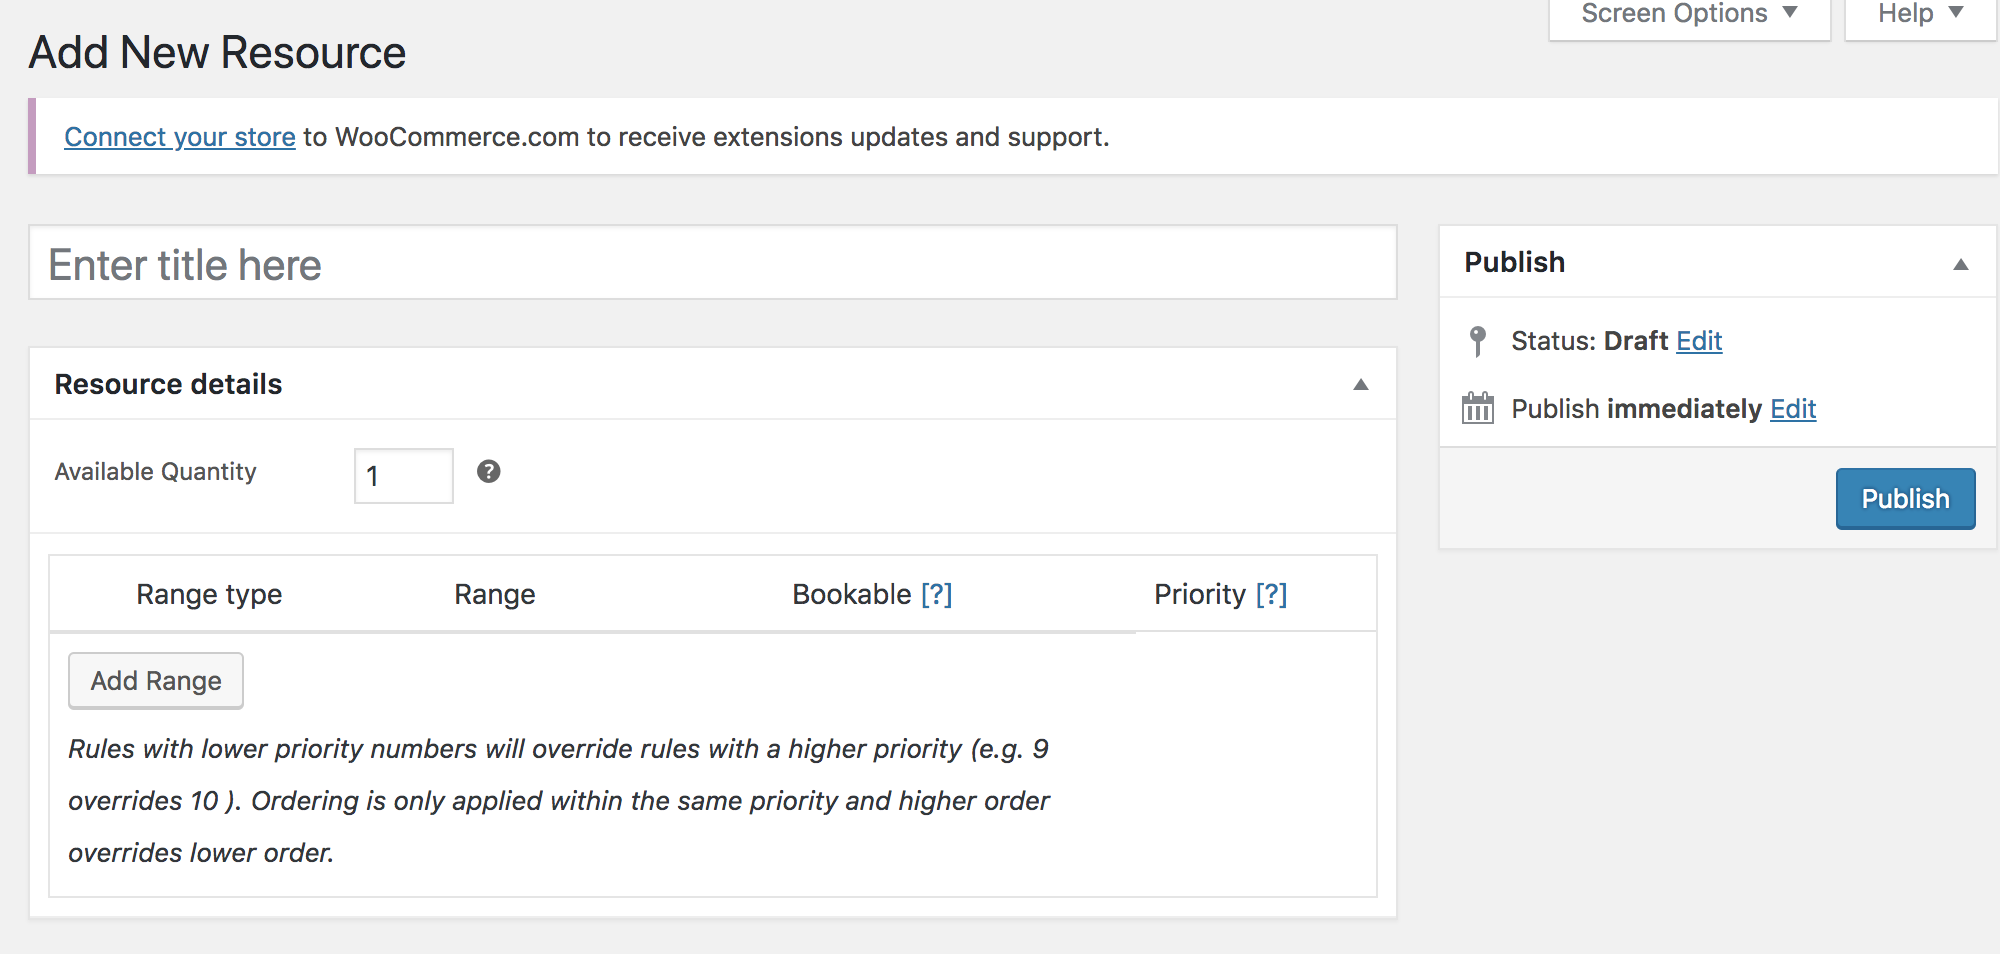
- Enter a name/reference for the resource. Make sure you name your resources appropriately and do not use the same name twice to make managing your site easier as your site grows.
- Input the Available Quantity: This represents the maximum number of bookings that can be accommodated by the resource within each booking block.
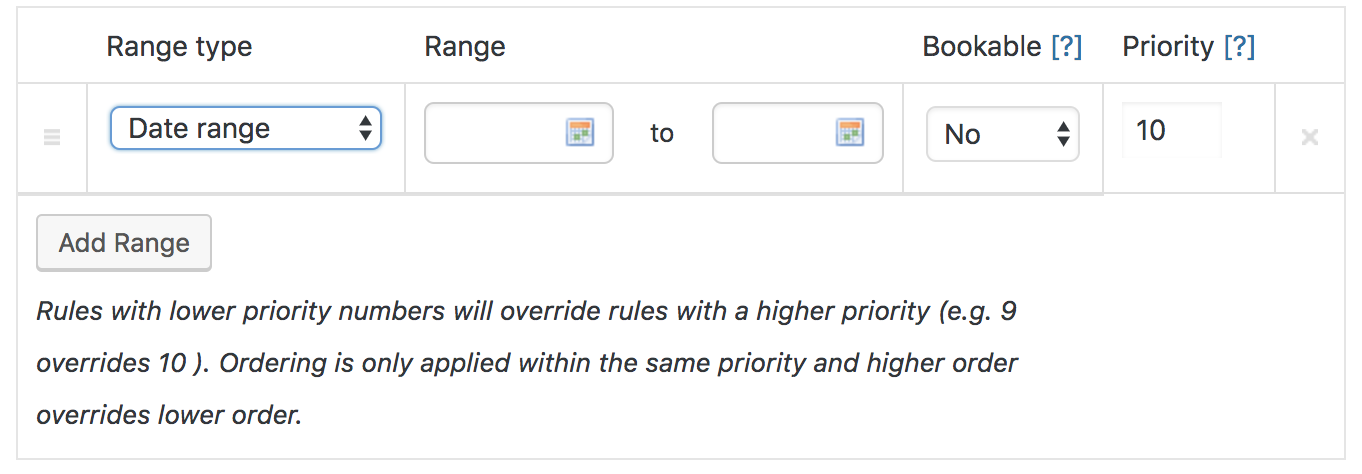
- Add Range if the resource has any restrictions on availability. Similar to Availability on a Bookable product. More details at: Custom Availability Range.
- Publish to make the resource available.
Please also read Understanding How Priority Affects Availability Rules to set up effective availability rules
Adding a resource to a product
↑ Back to topOnce the resource has been added, you can assign the resource to products.
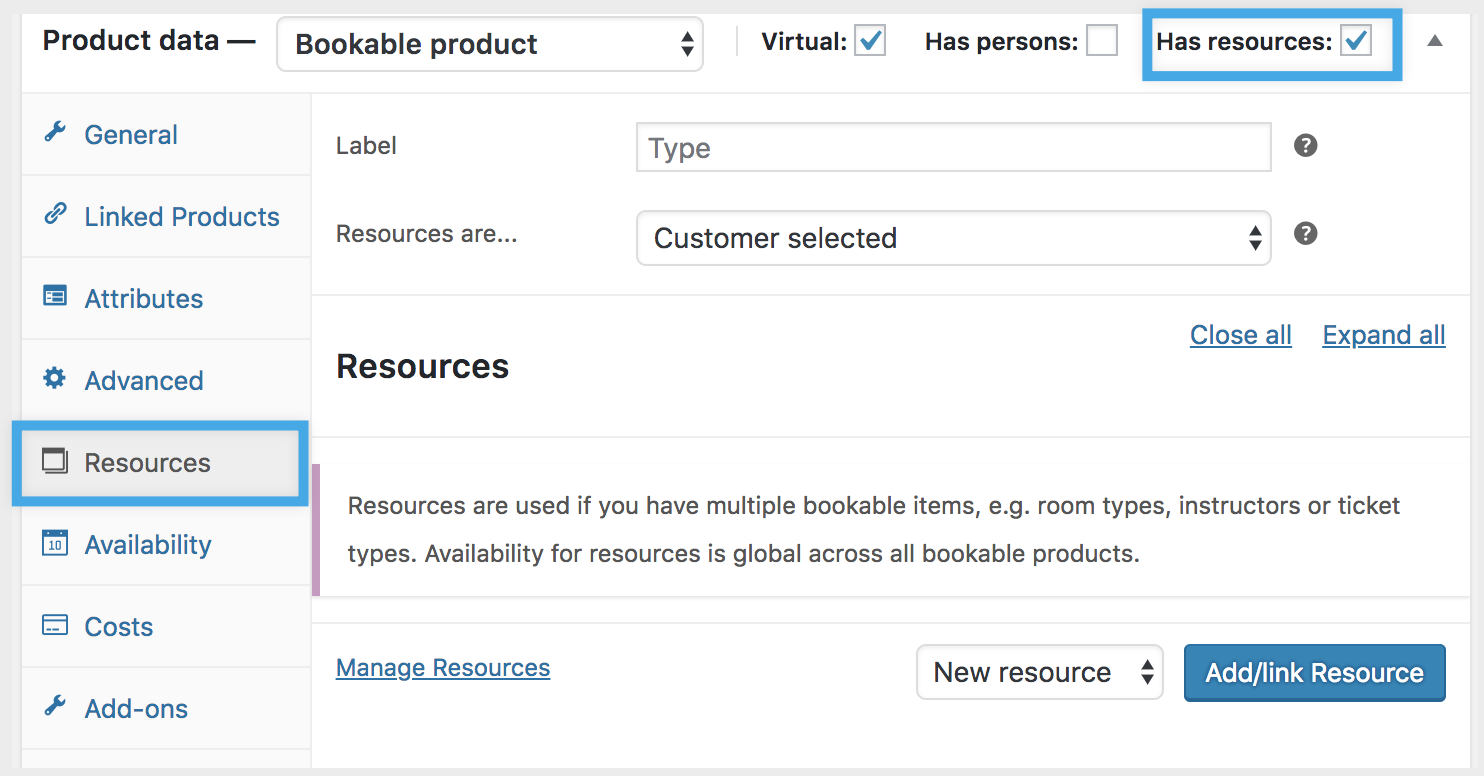
To add a resource to a bookable product:
- Go to WooCommerce > Products.
- Select the bookable product you would like to Edit.
- Scroll down to Product Data and tick the Has Resources box.
- Go to the Resources tab.
- Enter a Label to be shown to customers – this will show before the Resource name.
- Select a Resource from the dropdown in the lower right.
- New resource: Select Add/link Resource, then you are prompted for the resource name. Once entered, a new global resource is created in the system.
- Existing resource: Select Add/link Resource, then you are prompted to enter a Base/Block cost. The Base cost is applied when the resource is chosen; the Block cost is multiplied by the number of blocks booked.
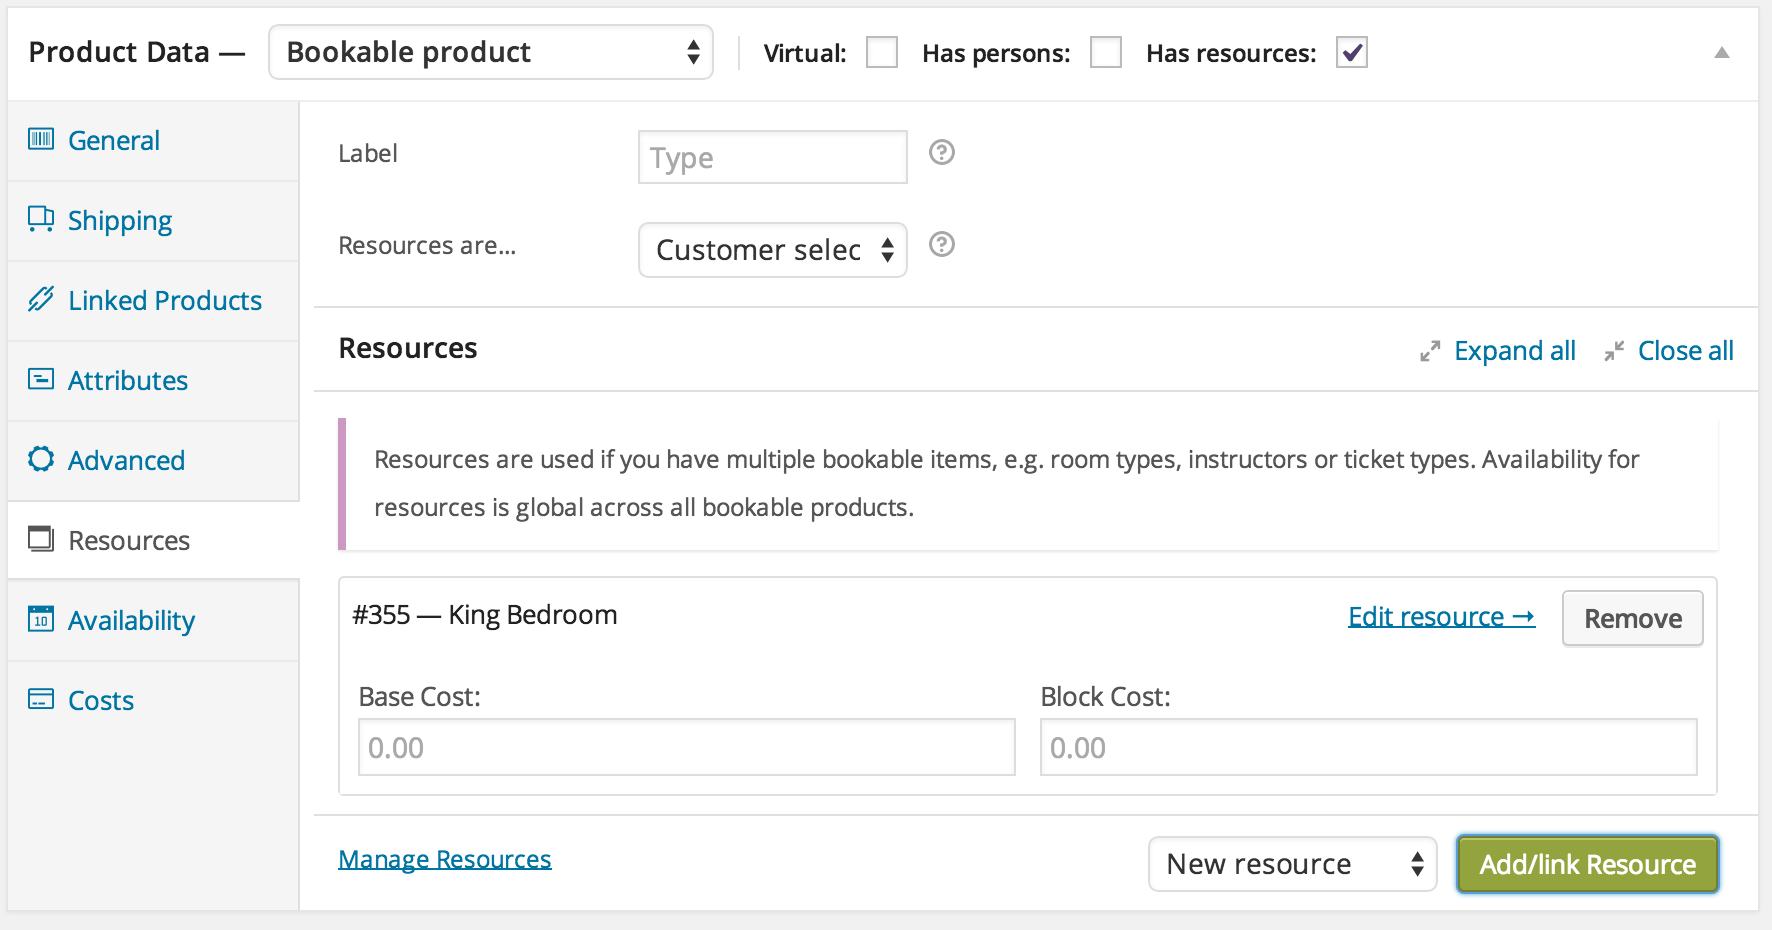
- Update the Bookable Product to save resources.
Sharing Resources Across Multiple Products
↑ Back to topResources can be added to multiple Bookable Products with a global level of availability or individual availability. Even though a Bookable Product can have multiple resources associated with it, only one resource can be assigned per booking.
Using Resources across multiple products will share the calendar between different products.
Examples of using the same resource for multiple booking products include:
- John – A therapist (resource) can share the same calendar between multiple booking products.
- An assistant who can be booked to organize a wedding or a 50th birthday party, but not both at the same time.
- A room that can be rented for a kid’s birthday party or for a company event, but not at the same time.
There is a range of Use-Cases in the documentation that illustrate how Resources can be used.
Booking Start Times When Products Share Resources
↑ Back to topWhen two or more bookable products share resources, each product’s booking start times are determined by its own settings rather than another product’s confirmed bookings.
For example, consider the following products which both share the same First block starts at... time of 2:00 pm:
- Product A is 90 mins (60 duration + 30 buffer)
- Product B is 60 mins (30 duration + 30 buffer)
If someone books Product B at 2:00pm, Product A will not be bookable at 3:00pm. WooCommerce Bookings will simply see the 2:00-3:00 time as unavailable and look for the next available start time for Product A, which would be 3:30.
The next available time for any given product is based on its own start times as calculated by:
- The first available time in the day
- The product’s bookable duration
- Any buffer the product has
Questions and Support
↑ Back to topSomething missing from this documentation? Do you still have questions and need assistance?
- Have a question before you buy this extension? Please fill out this pre-sales form – please include the name of this extension in your query.
- Already purchased and need some assistance? Get in touch with a Happiness Engineer via the WooCommerce.com Support page and choose this extension name from the “I need help with” dropdown