Installation
↑ Back to topWordPress Dashboard
↑ Back to topThis is the recommended way of installing any WordPress plugin available on the official repository.
- Open the WordPress Dashboard of your website
- Navigate to Plugins → Add new
- Search for License Manager using the search bar located on the top-right side of the screen
- In the displayed search results, click on Install Now on the License Manager
- Click on Activate if you wish to activate the plugin immediately
Manual Installation
↑ Back to topTo manually install the plugin, follow these steps:
- Open the plugin website on WordPress.org
- Download the plugin by clicking the Download button located on the top-right side of the screen
- Open your WordPress Dashboard
- Navigate to Plugins → Add new
- At the top of the screen, click Upload plugin
- Click on Browse… and select the plugin file you previously downloaded, then click on Install Now
- Click on Activate plugin if you wish to activate it immediately
Setup
↑ Back to topCryptographic Secrets
↑ Back to topThe plugin stores all license keys in an encrypted fashion inside the database. During activation, the plugin will create the following directory.
wp-content/uploads/lmfwc-files
Inside this directory, the plugin creates two files (defuse.txt and secret.txt). The contents of these files are used to encrypt, decrypt, and hash all license keys.
Before doing anything else, please create a backup of these two files and store them somewhere safe. If anything happens, and these files are deleted or overwritten, you will permanently lose all license keys stored in your database!
Security
↑ Back to topThe plugin will also create a .htaccess file in the above-mentioned directory. This file disables direct browser access to the folder, preventing unwanted visitors from seeing your cryptographic secrets.
However, if your server runs NGINX instead of Apache, the file is completely ignored. In this case, you can either manually create a NGINX directive or follow the guide in the optimization subsection (recommended).
We recommend that you move the cryptographic secrets into the configuration file of your WordPress website, also known as „wp-config.php“. This will reduce the amount of requests to the server file system and move the cryptographic secrets to a safer place.
To do this, open the wp-config.php file and add the following lines to it:
[php] define('LMFWC_PLUGIN_SECRET', 'secret.txt');
define('LMFWC_PLUGIN_DEFUSE', 'defuse.txt'); [/php]
Replace secret.txt and defuse.txt with their file contents, respectively. Afterward, create a backup of these two files somewhere safe (if you haven’t already) and delete the lmfwc-files directory completely.
If your license keys are not visible anymore, then something went wrong. You can always restore the files and remove the two added lines to revert the changes.
Plugin Settings
↑ Back to topGeneral
↑ Back to topThe general settings section has been divided into three sub-sections: License keys, My account, and REST API.
Go to WooCommerce > Settings > License Manager > General
License Keys
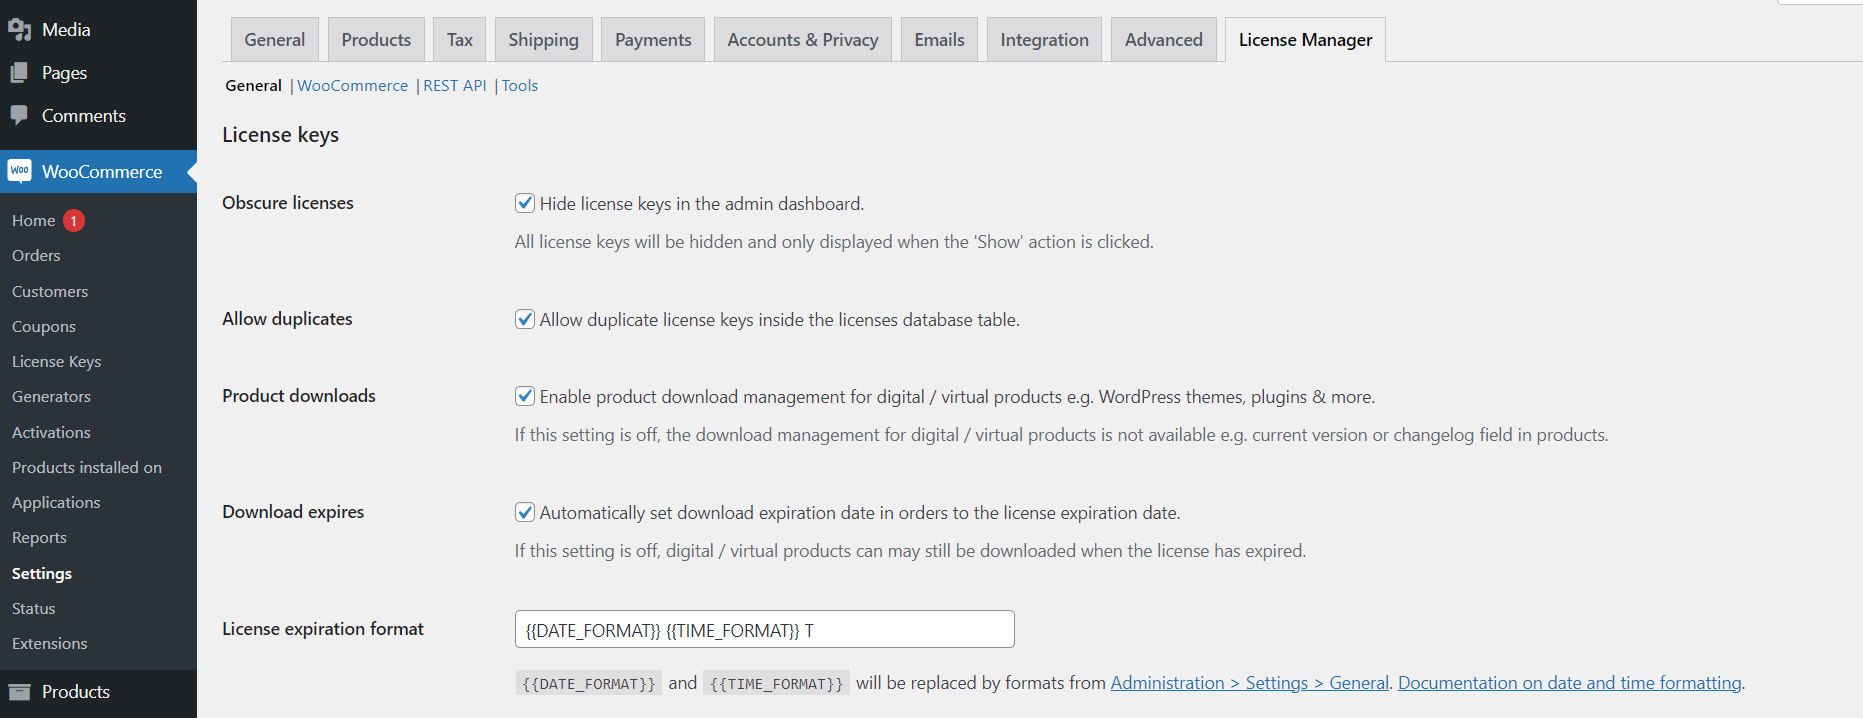
The “license keys” settings section
The “Obscure licenses” setting allows users to configure whether license keys will be hidden in the administrator interface (backend). This will prevent anyone from directly looking at the plain-text, decrypted license keys.
Backend Configuration:

Obscure licenses impact:
The “Allow duplicates” setting allows the user to add duplicate license keys to the database. When adding a license key, the plugin will no longer check if said license key is already present inside the database.
The Product downloads allow you to enter the changelog and product version from settings (Pro)
The Download expires allows you to download the digital/virtual products when the license has expired (Pro)
The License Expiration Format allows you to format the date and time of license expiry shown on the order and my account pages.
REST API
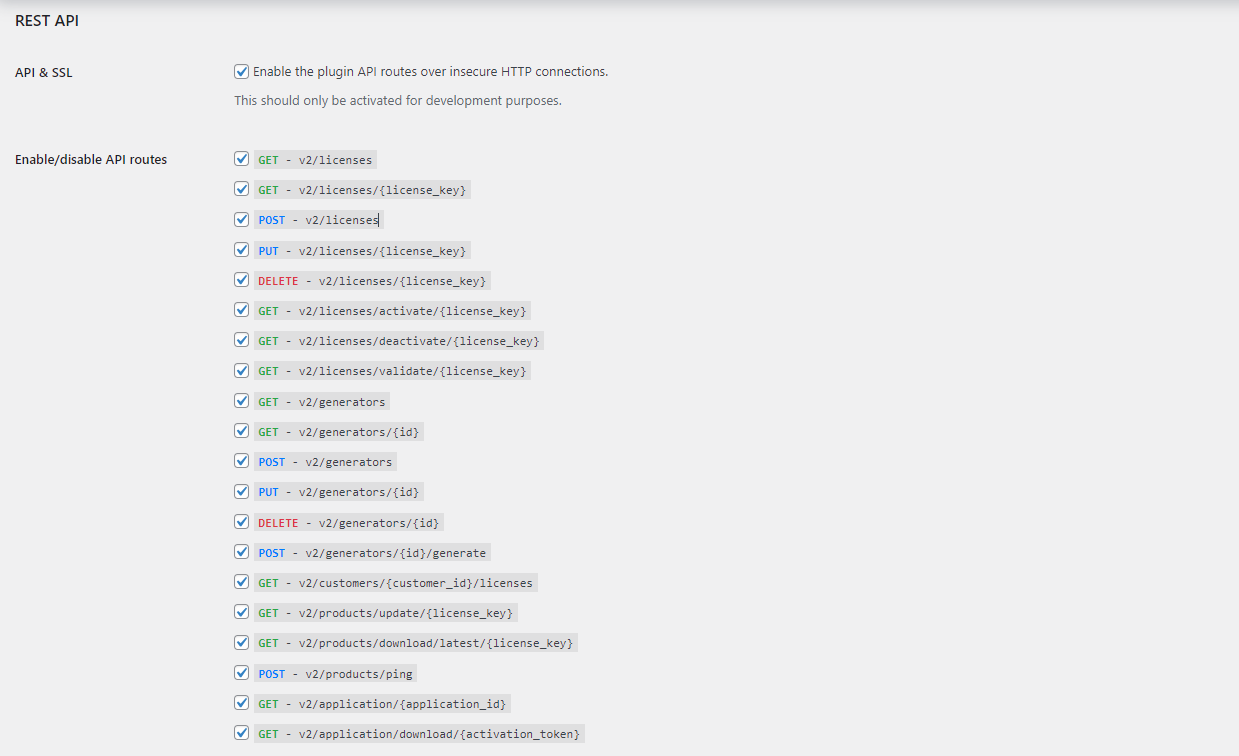
The “REST API” settings section
The “API & SSL” setting determines whether the REST API will be accessible over insecure HTTP connections instead of the secure HTTPS channel. This should only be used in development or testing/staging environments, never in a productive environment. Leaving this setting on a productive website exposes your API calls to man-in-the-middle attacks.
The “Enable/disable API routes” allows users to enable and disable API routes individually. Always turn off the REST API routes that your application does not use.
WooCommerce
↑ Back to topThe WooCommerce settings section has been divided into three sub-sections: License key delivery, Branding, and My account.
Go to Dashboard > WooCommerce > Settings > License Manager > WooCommerce
License Key Delivery
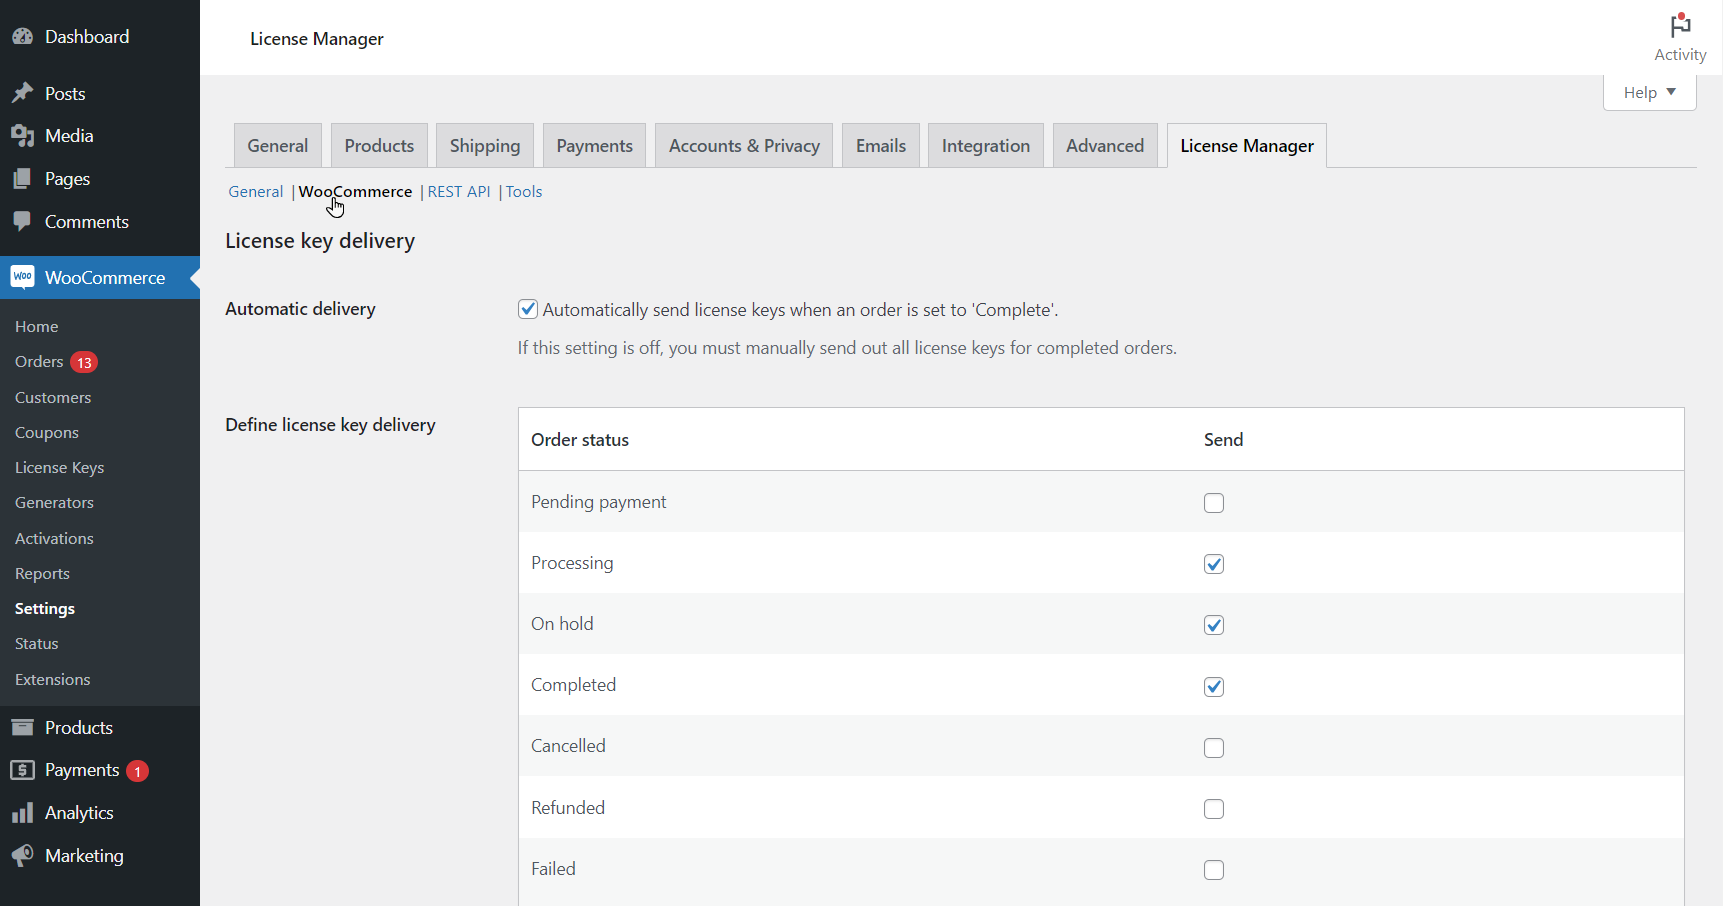
The “license key delivery” settings section
The “Automatic delivery” setting determines whether license keys will be automatically delivered after the triggered order delivery. This is great if you want to run manual checks on the orders before sending out your licenses, however in most scenarios you will probably want to have this setting turned on.
The “Define license key delivery” setting allows the user to individually enable the order status on which the license key would be delivered.
The “Stock management” setting enables automatic stock management for WooCommerce products
Backend Configuration:

Stock Synchronize in Products:
Go to Dashboard > Products > Inventory Tab and enable the track stock quantity option.
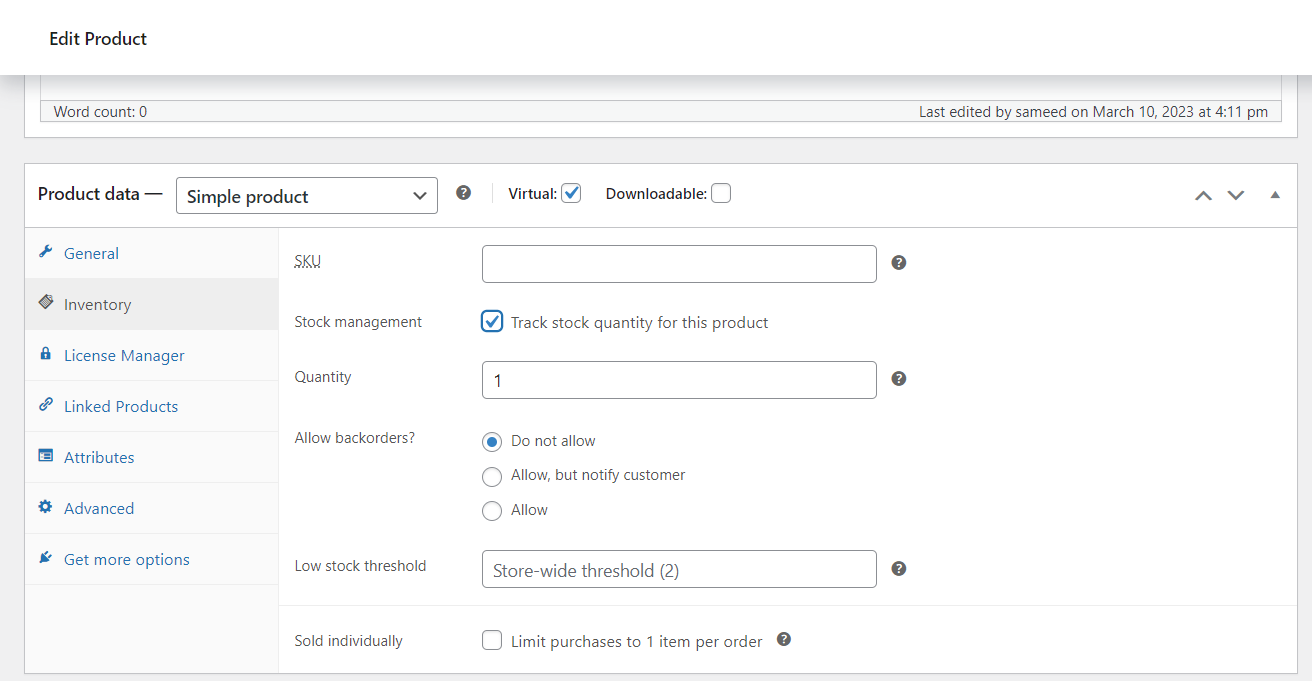
Go to License Manager Tab, enable sell license keys for this product, and sell license keys from available stock options to enable automatic stock sync.
Branding
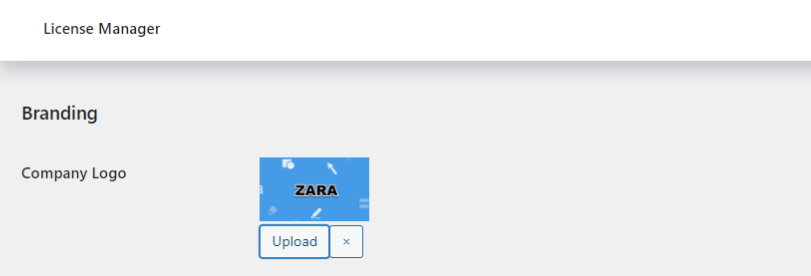
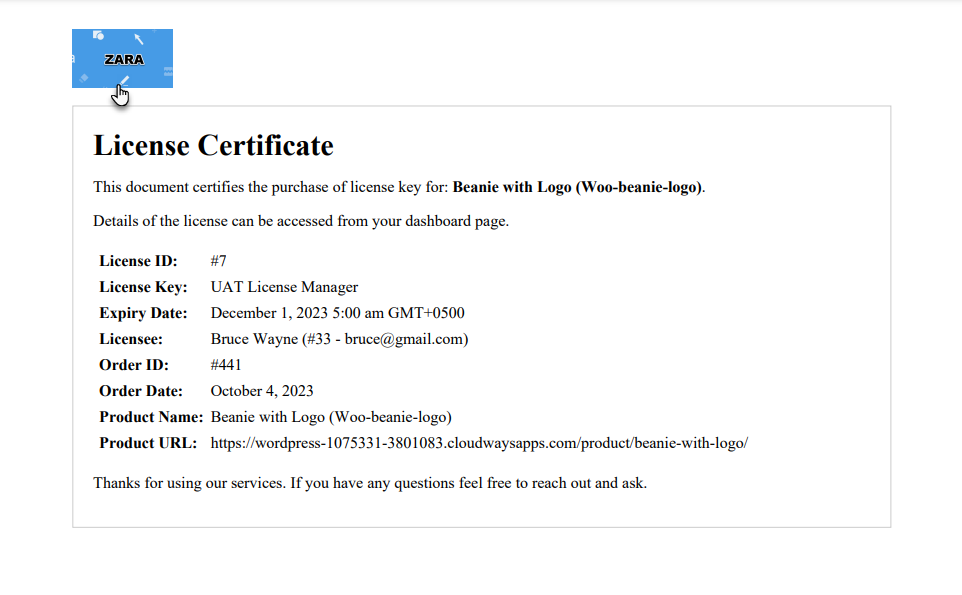
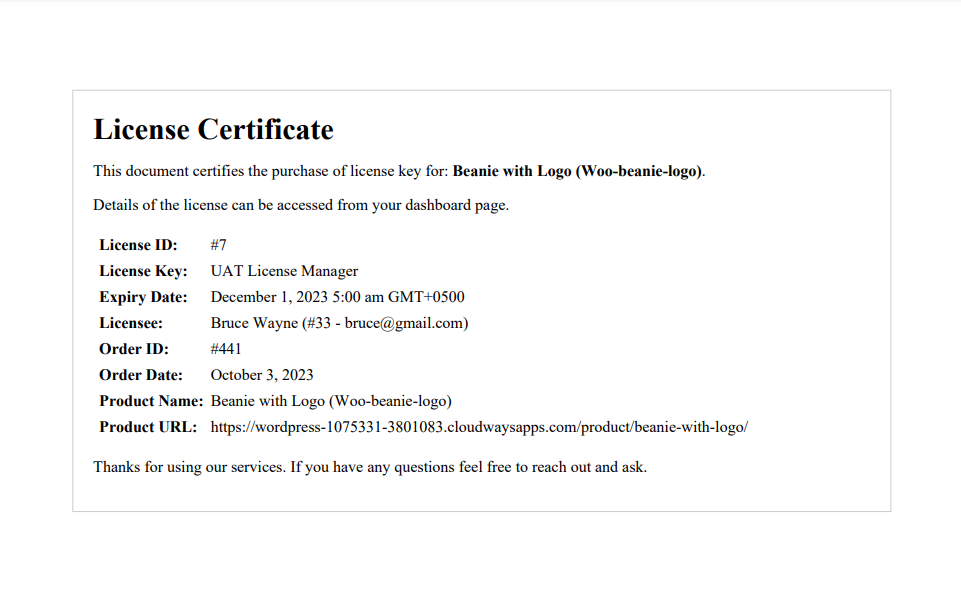
The “Company Logo” setting allows the user to upload an image that will be displayed on a License Certificate when it is downloaded by the end-user.
Company Logo impact:
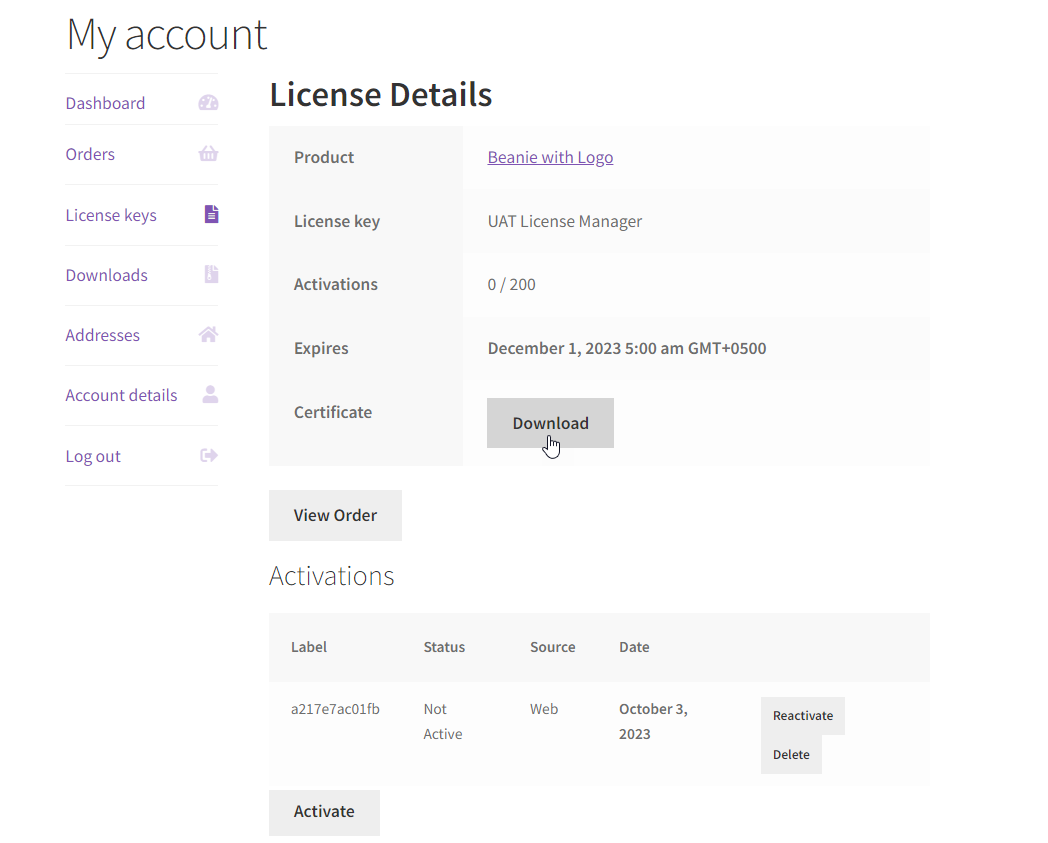
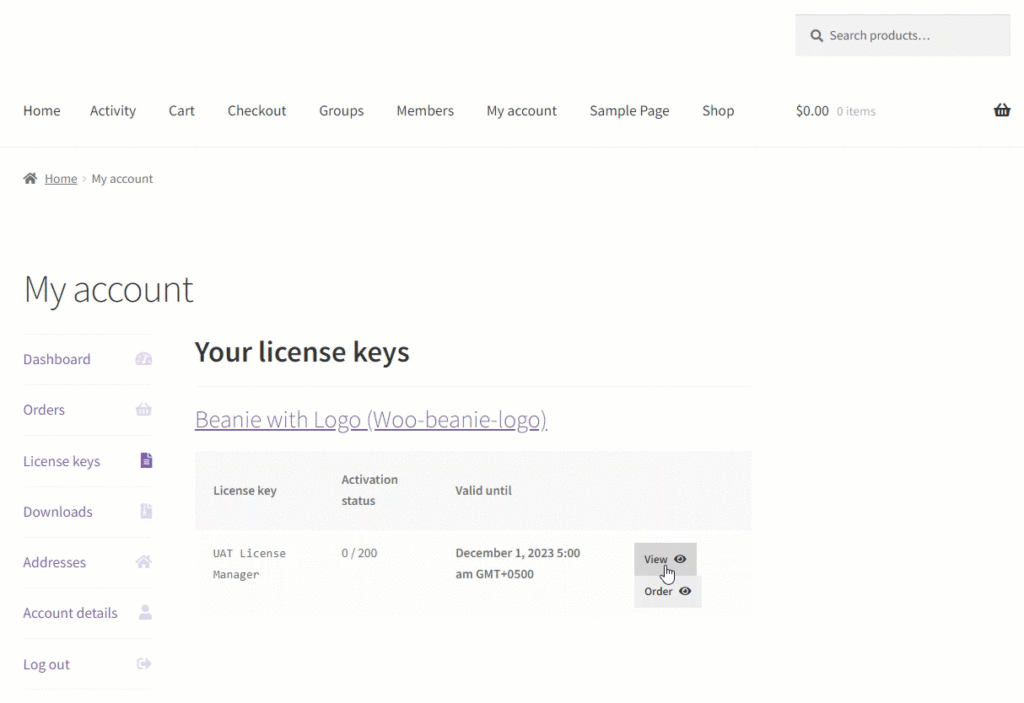
Navigate to My Account > License keys and click on view
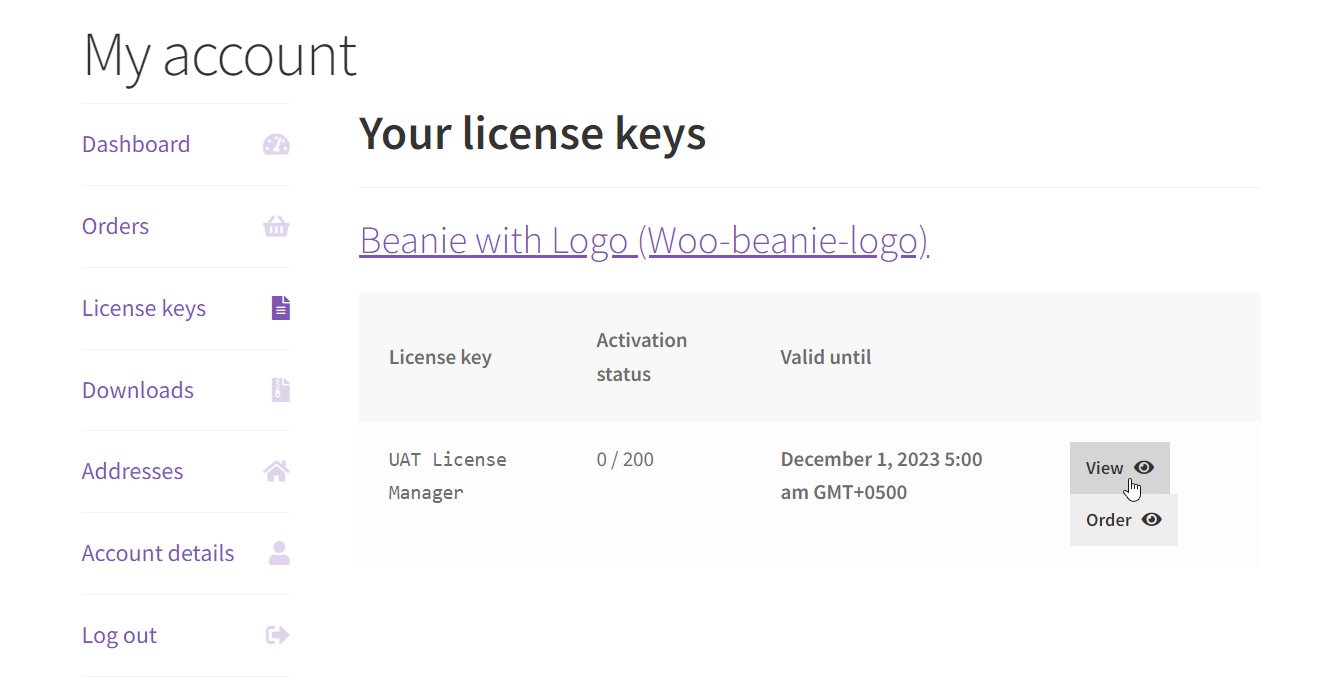
Click the Download button next to the certificate to download the product license certificate.
Now your Company Logo will appear inside the pdf certificate downloaded
My Account
- Admin can select options from My account and give rights to the customer on the user end.
- Go to the Dashboard → WooCommerce → Settings → License Manager.
- Navigate to the WooCommerce tab.

- Scroll down to My accounts.
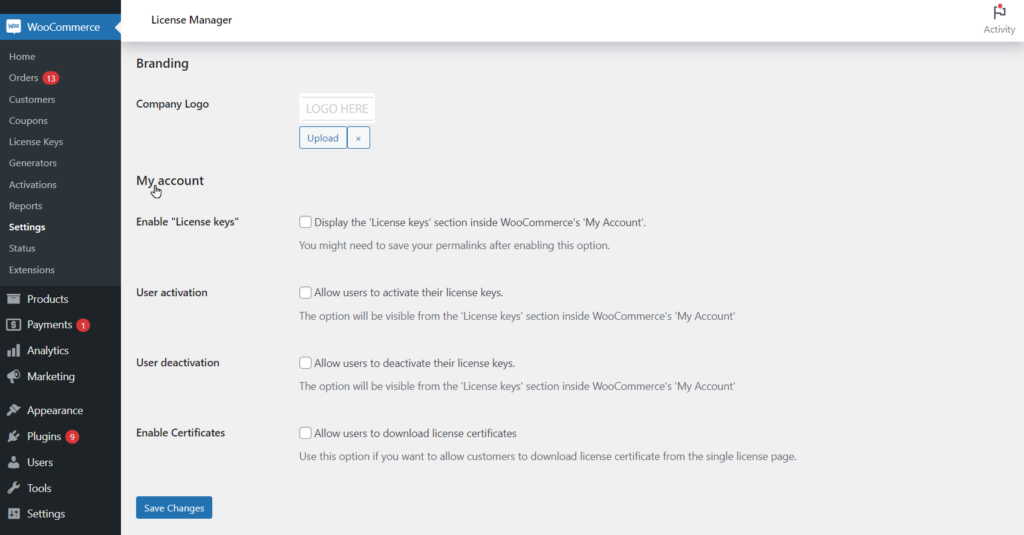
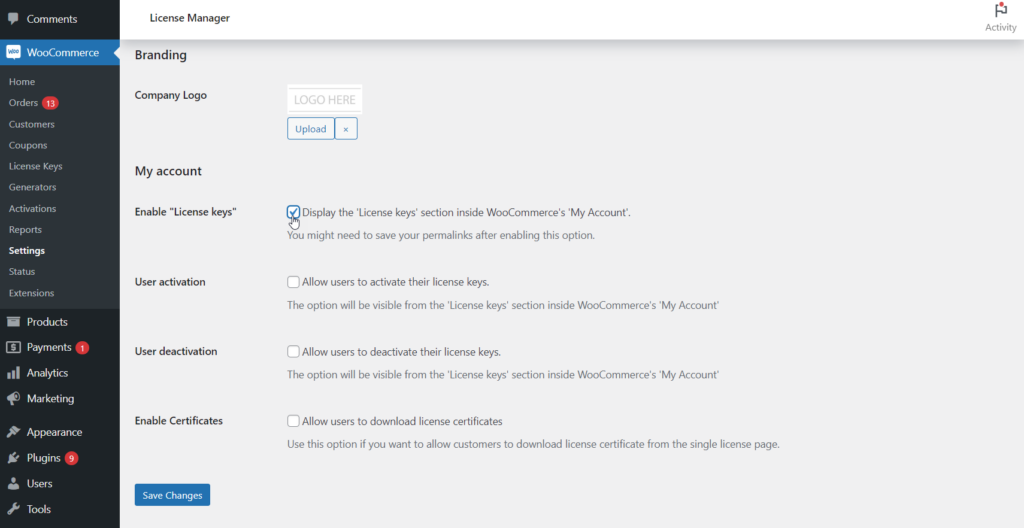
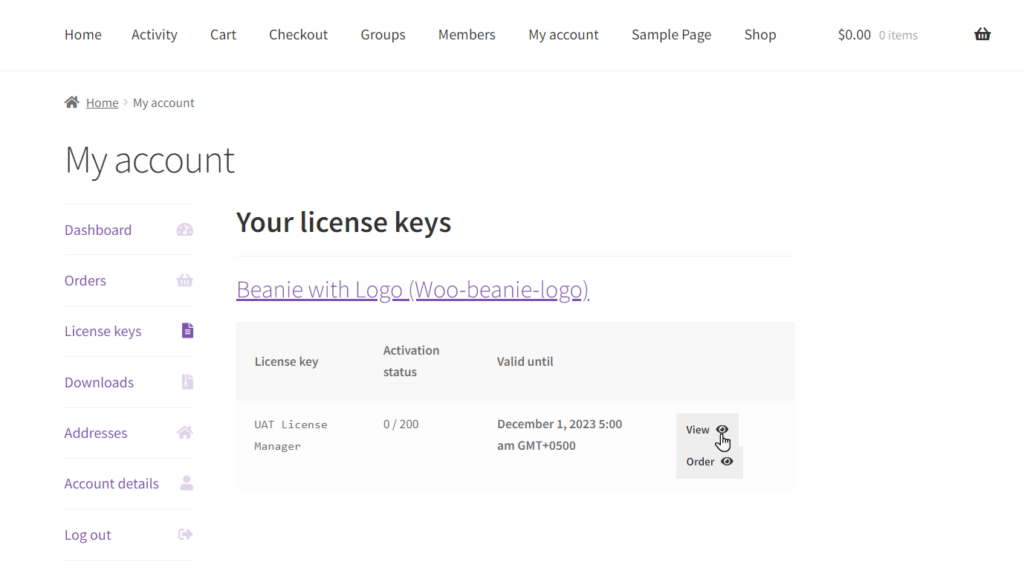
Enable “License Keys”
- Admin can display the License Keys tab on the WooCommerce My Account page.
- Navigate to the My account → Enable “License Keys”.
- Click on the checkbox of Enable “License Keys”.
- Click on the Save Changes button.
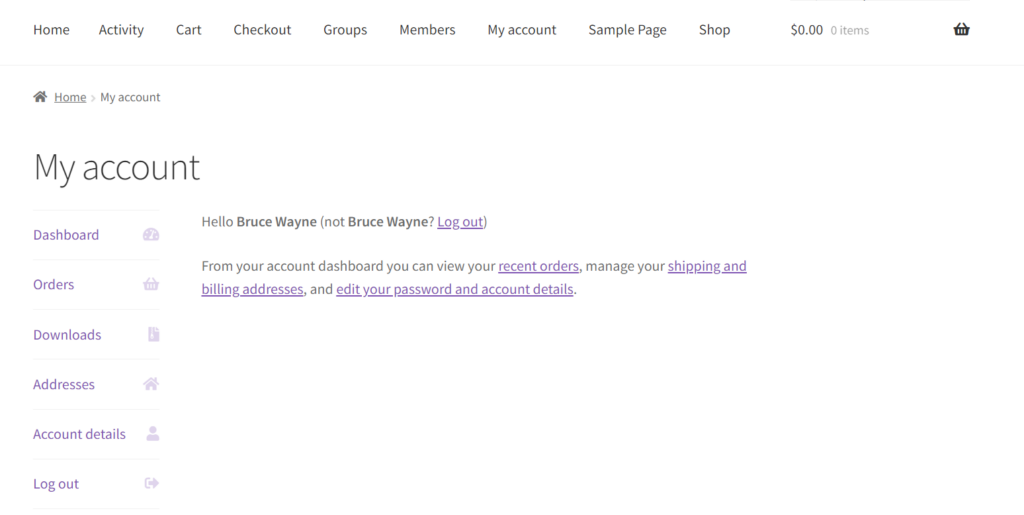
- Front-End Impact
BEFORE
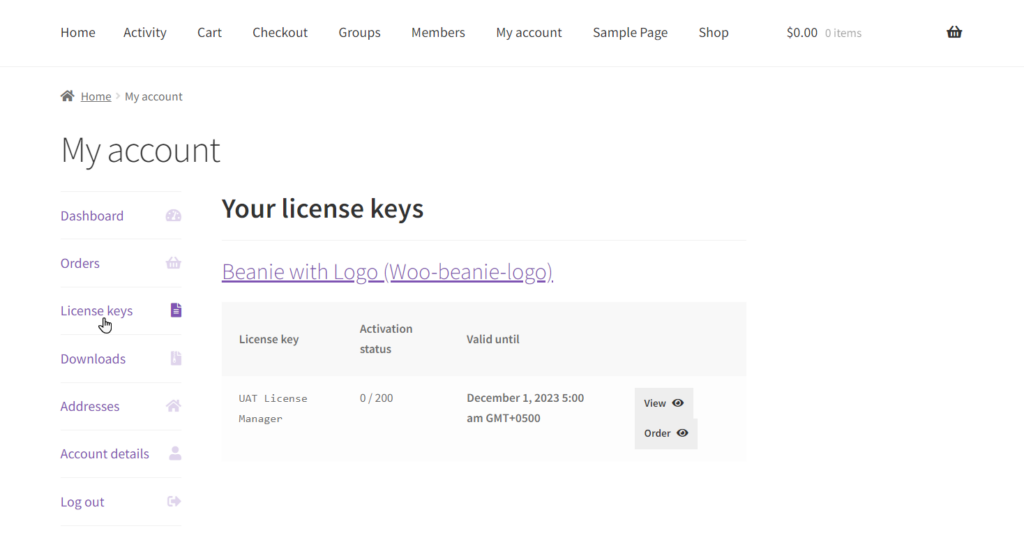
AFTER
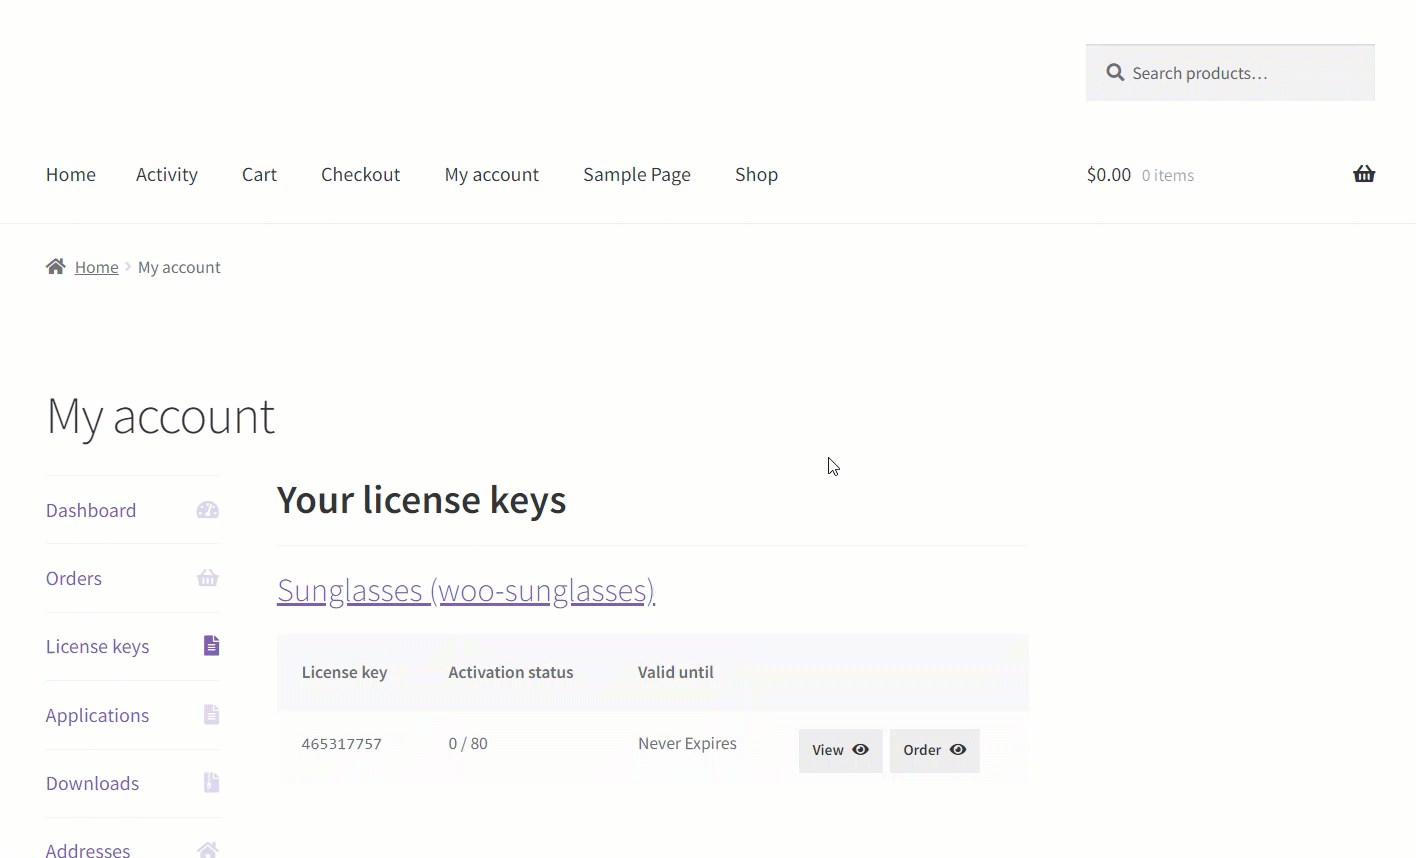
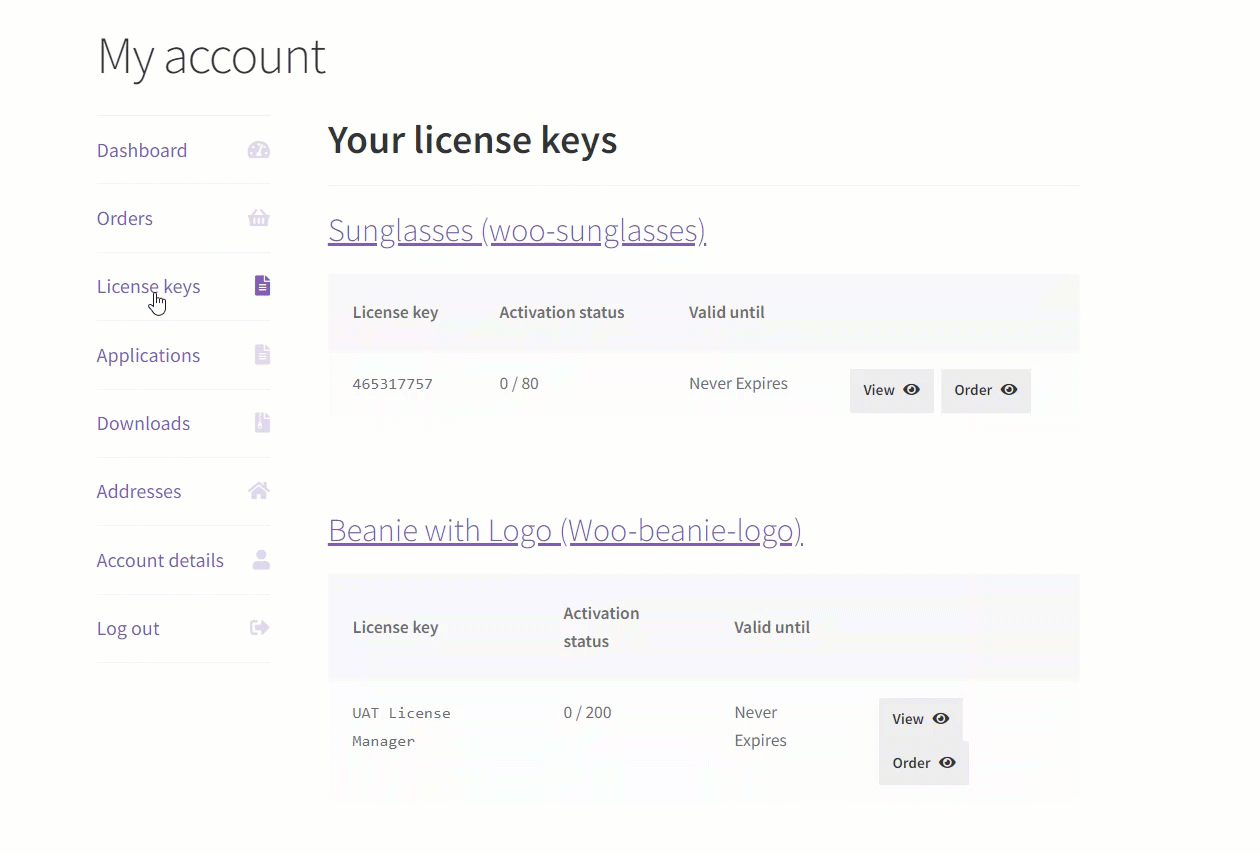
- All the Licenses associated with Products will be displayed.
- Navigate to the My Account → License keys.
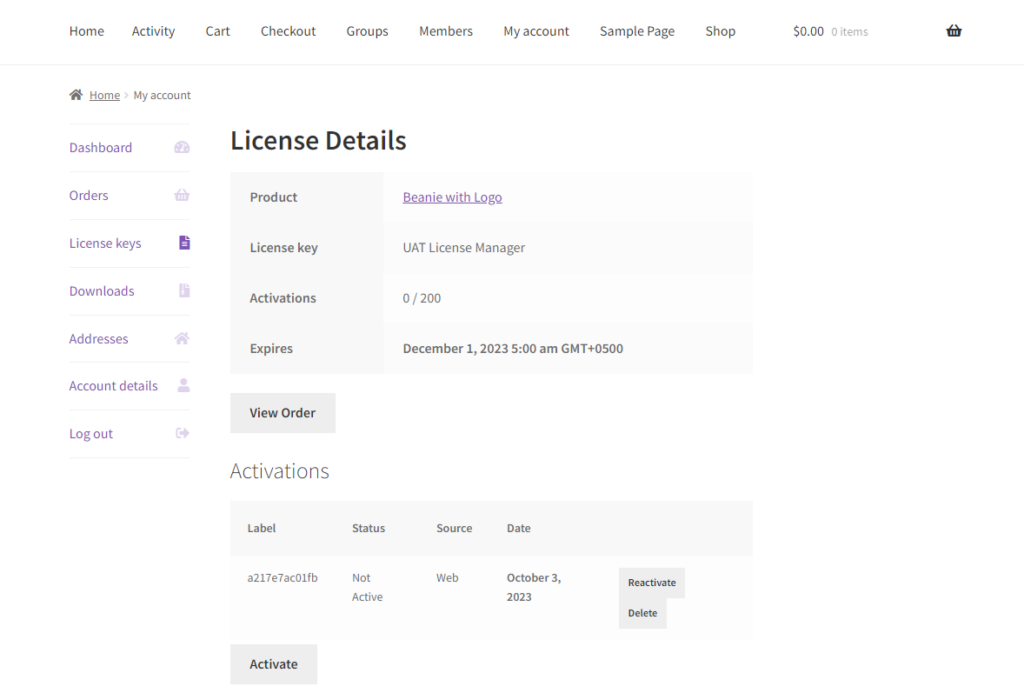
User Activation
- Admin can display the Activate button inside the License Keys section on the WooCommerce My Account page.
- Navigate to the My account → User activation.
- Click on the checkbox of User activation.
- Click on the Save Changes button.

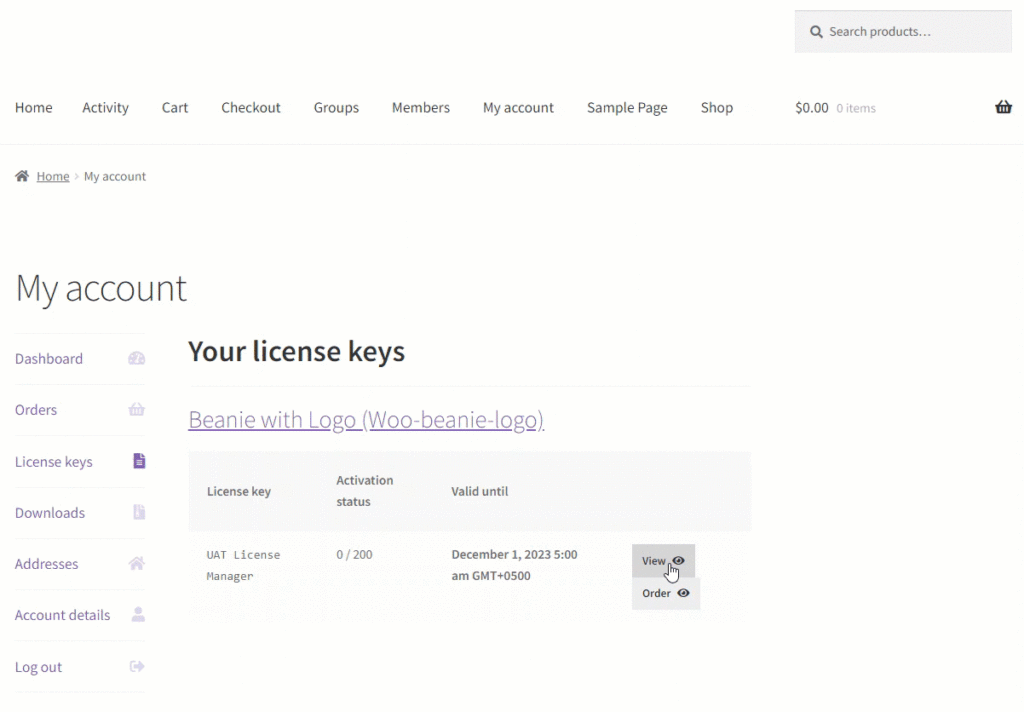
Front-End Impact
- All the Licenses associated with products will be displayed.
- Navigate to the My Account → License keys.
- Click on the View button.

BEFORE
AFTER
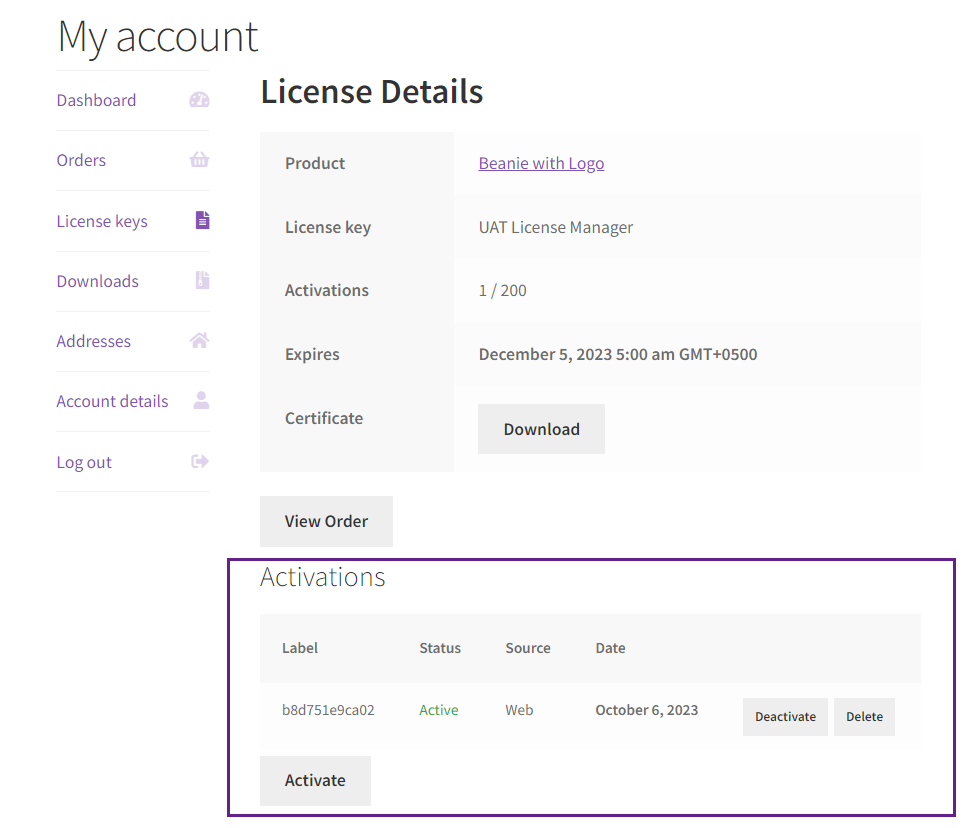
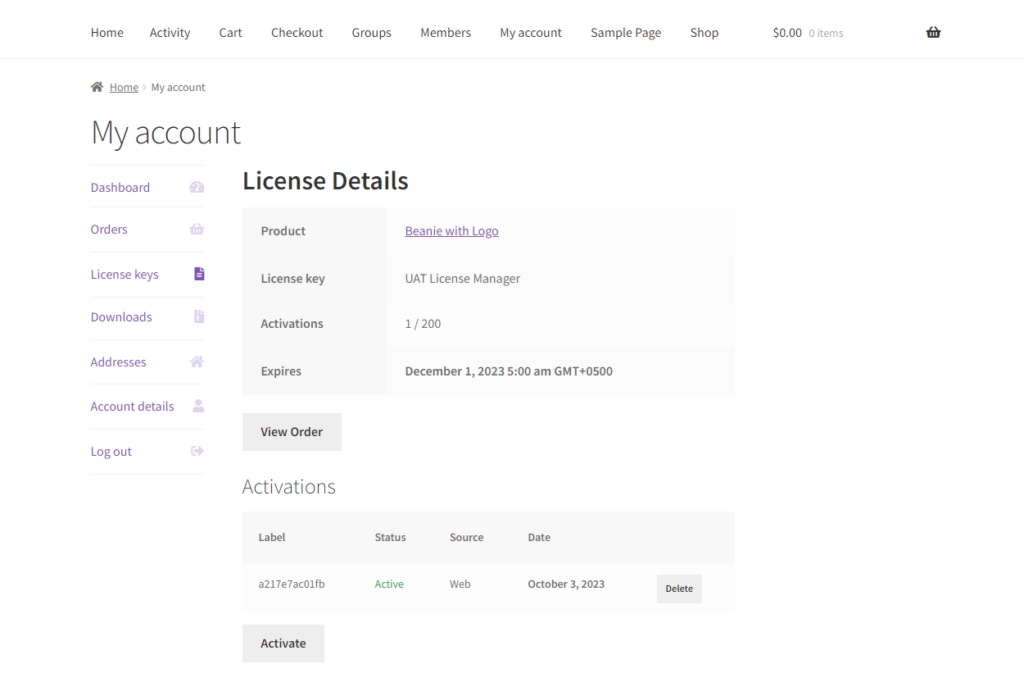
- Navigate to the Activations.
- Click on the Activate button to activate the product license.
- After clicking the Activate button, the license will be added to the Activations table.
User Deactivation
- Admin can display the Deactivate button inside the License Keys section on the WooCommerce My Account page.
- Navigate to the My Account → User deactivation.
- Click on the checkbox of User deactivation.
- Click on the Save Changes button.

Front-End Impact
- All the Licenses associated with products will be displayed.
- Navigate to the My Account → License keys.
- Click on the View button.

BEFORE
AFTER
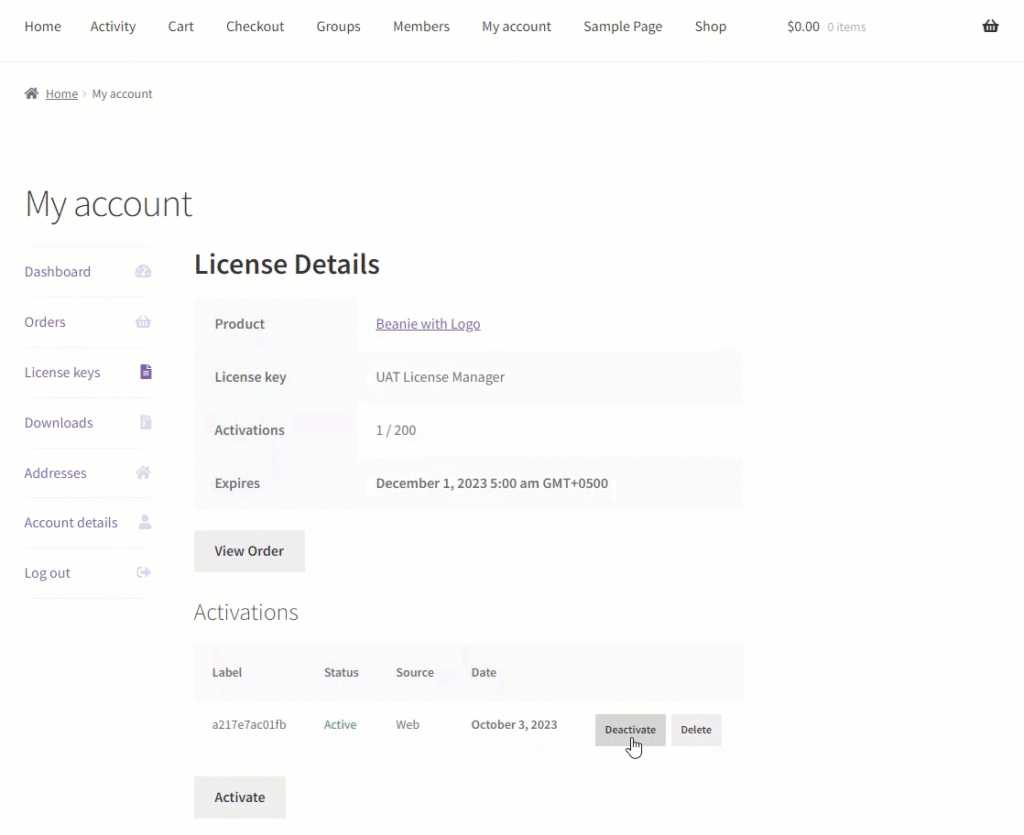
- Navigate to the Activations.
- Click on the Deactivate button to deactivate the product license.
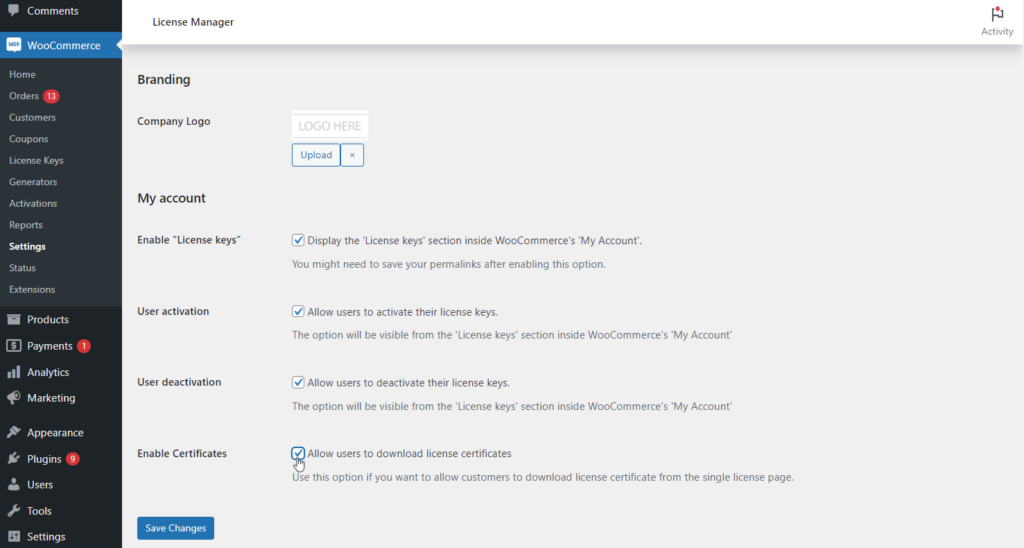
Enable Certificates
- Admin can display the Download button inside the License Keys section on WooCommerce My Account page.
- Navigate to the My Account → Enable Certificates.
- Click on the checkbox of Enable Certificates.
- Click on the Save Changes button.
Front-End Impact
- All the Licenses associated with products will be displayed.
- Navigate to the My Account → License keys.
- Click on the View button.
BEFORE
AFTER
- Navigate to the Certificate.
- Click on the Download button to download the product license.
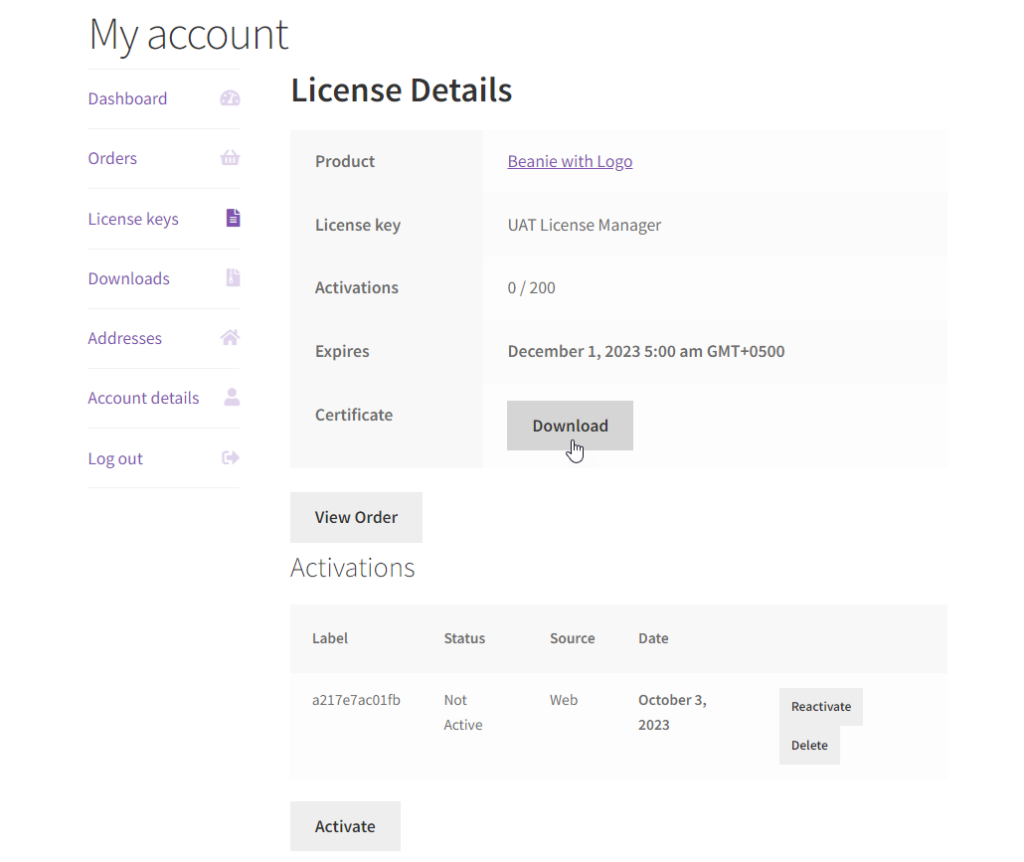
License Certificate
REST API
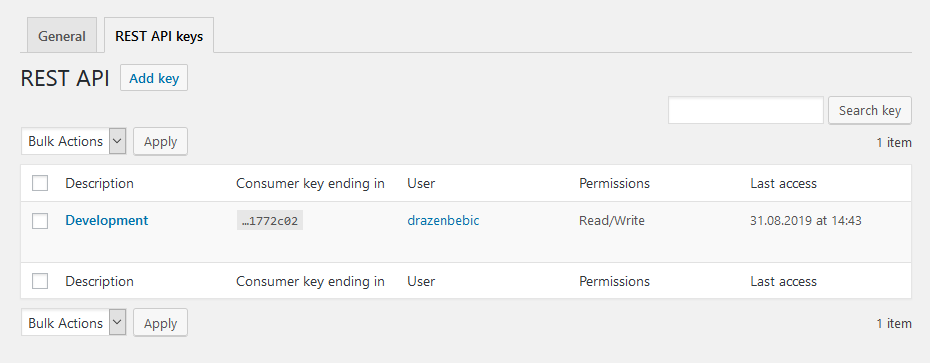
↑ Back to topFollow the navigation to License Manager → Settings → REST API to open this settings tab. Here you can manage all of your REST API keys. This includes:
- Adding new REST API keys
- Editing existing REST API keys
- Revoking (deleting) REST API keys
Tools
↑ Back to topFollow the navigation to License Manager → Settings → Tools to open this settings tab. On this page you will find all settings which relate to the license key export.
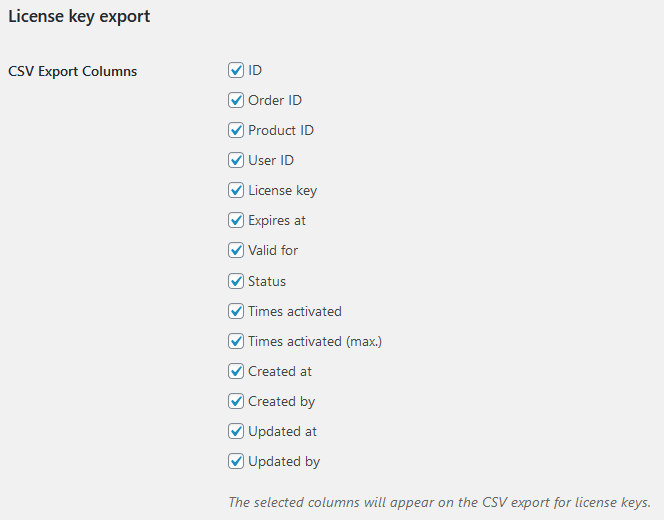
The “License key export” settings section
Database Migration
- Admin can do a one-click migration of License Key from Digital License Manager to License Manager.
- Go to Dashboard => WooCommerce => Settings => License Manager.
- Navigate Tools => Database Migration
- Select plugin Digital License Manager from the drop-down menu.
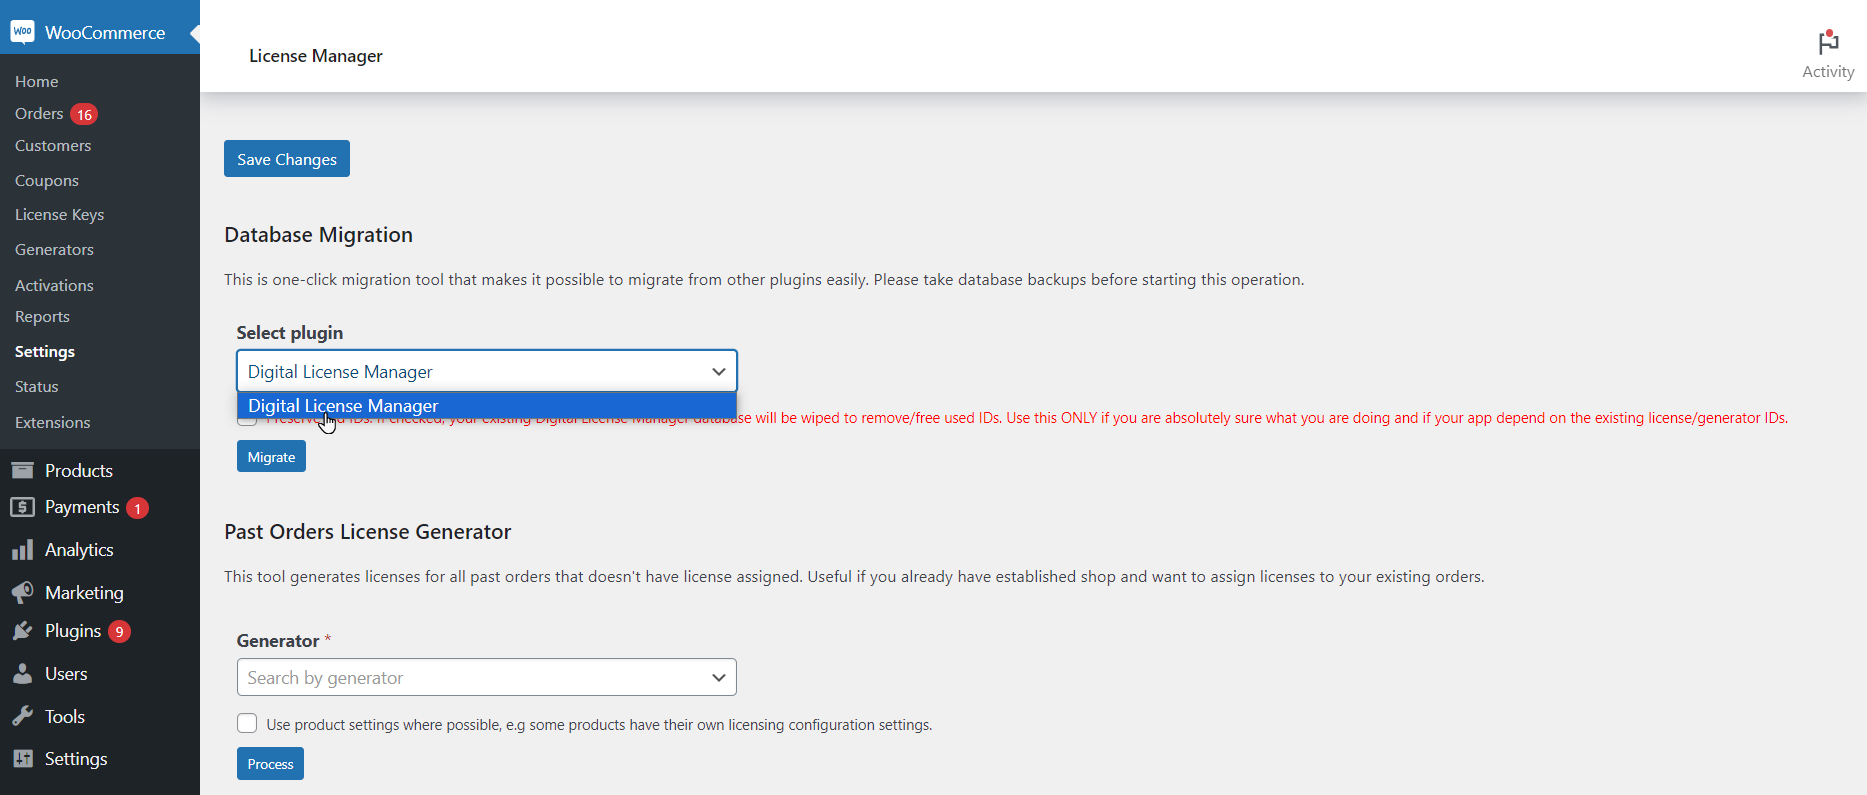
- Select the checkbox below the Select plugin drop-box, if admin wants to wipe out the License Keys present in License Manager while migration of all existing License Keys in Digital License Manager, otherwise click on Migrate button without clicking on check-box.
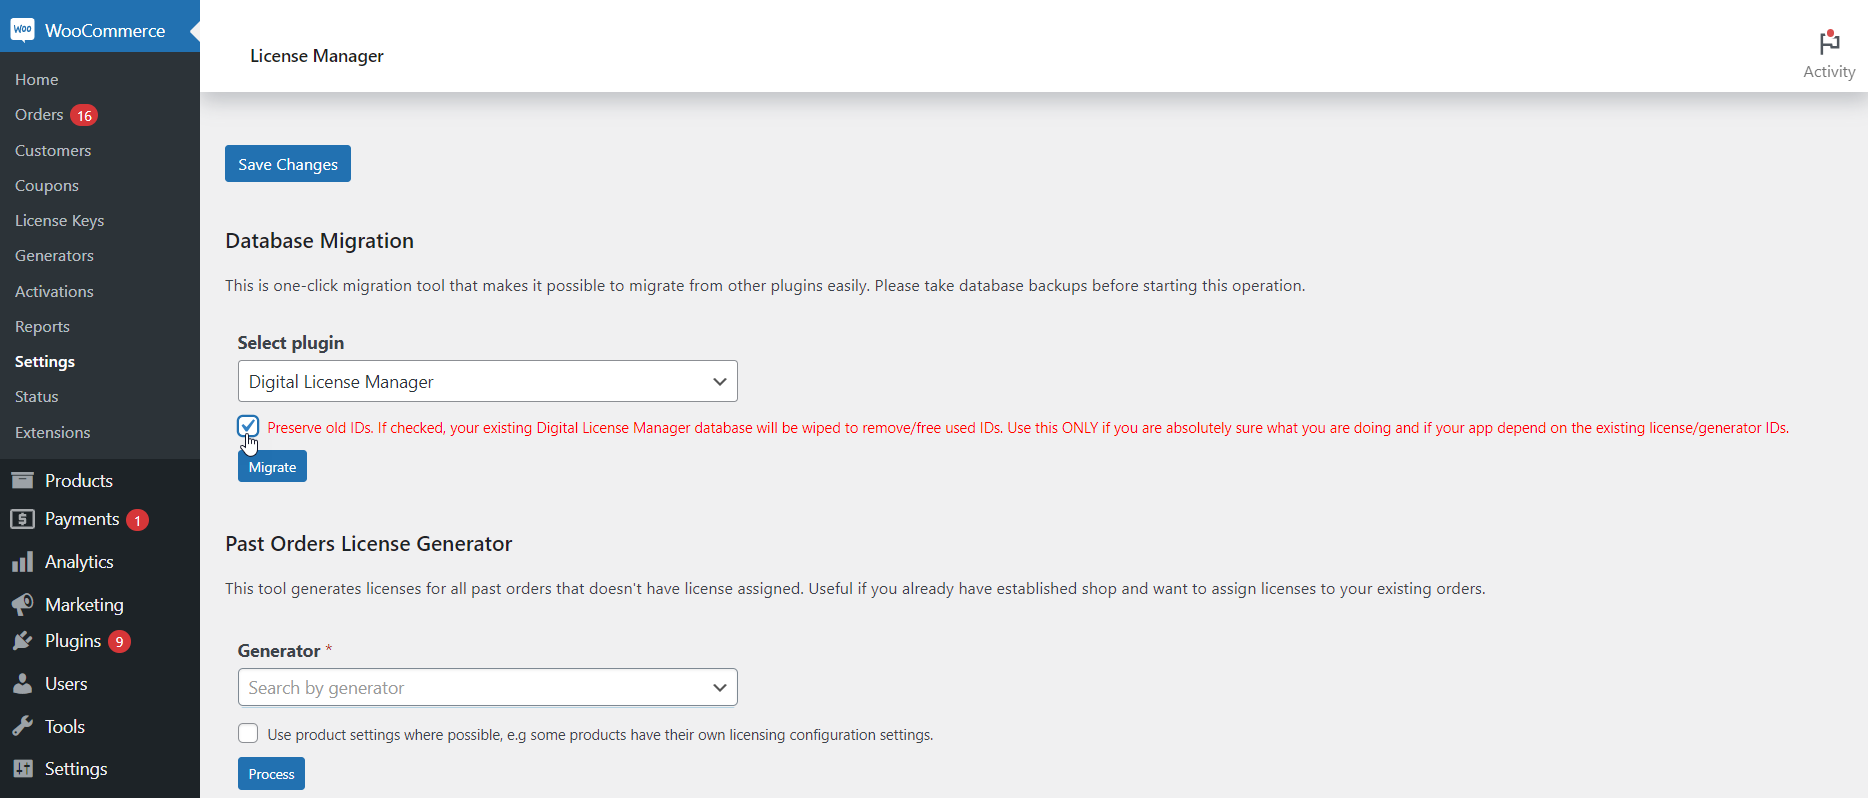
Note: Preserve old IDs. If checked, your existing Digital License Manager database will be wiped to remove/free used IDs. Use this ONLY if you are absolutely sure what you are doing and if your app depends on the existing license/generator IDs.
Past Orders License Generator
- Admin can generate licenses for all past orders that do not have a license assigned.
- Go to Dashboard => WooCommerce => Settings => License Manager.
- Navigate Tools => Past Orders License Generator
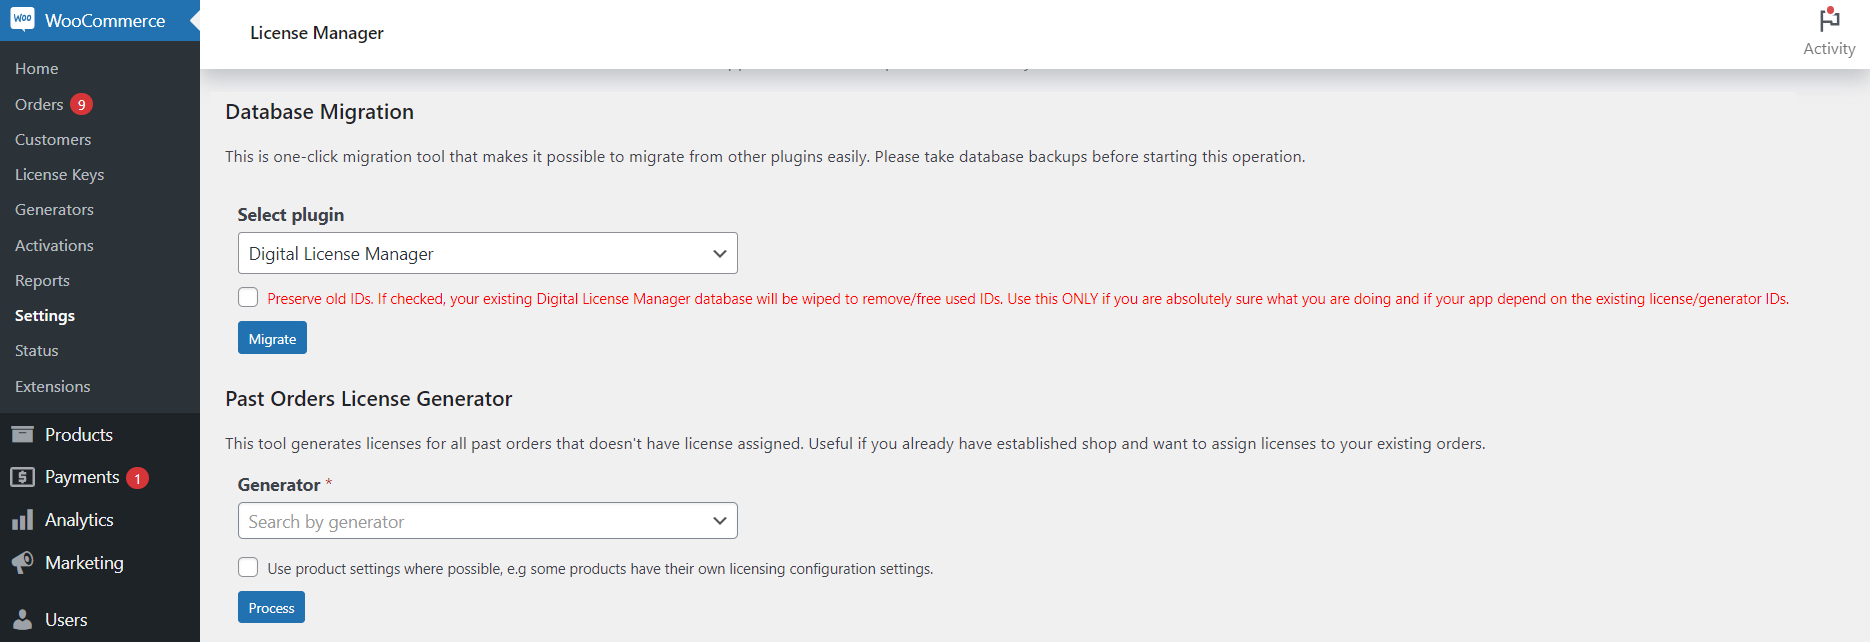
- Search and select Generator in the Search by generator drop-down menu.
- Click on Process.
- Admin can check the license keys assigned to the product’s past orders placed in Orders.
- Navigate Dashboard => Products => License keys.
BEFORE
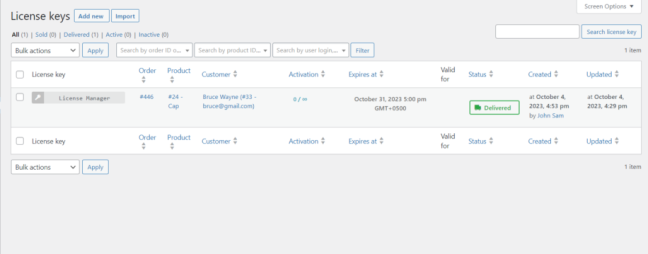
AFTER

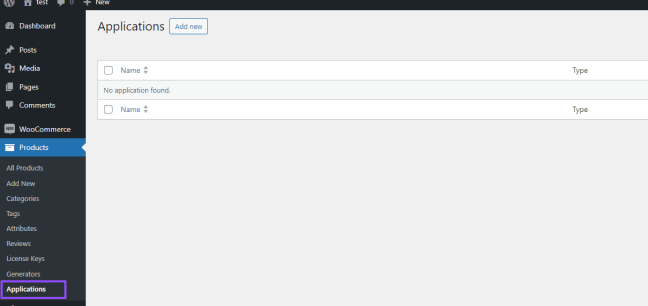
Application (Pro)
↑ Back to topOverview
↑ Back to topAdmin can sell the digital application with licenses by attaching the zip file of the application to be sold along with the license. Admin also has the option to add versions of the application. On the Dashboard, navigate to Products → Applications and click on the Add New button.
This will open the Application Page, enter the name of the application and select the application type from the drop-down menu. Click on Save.
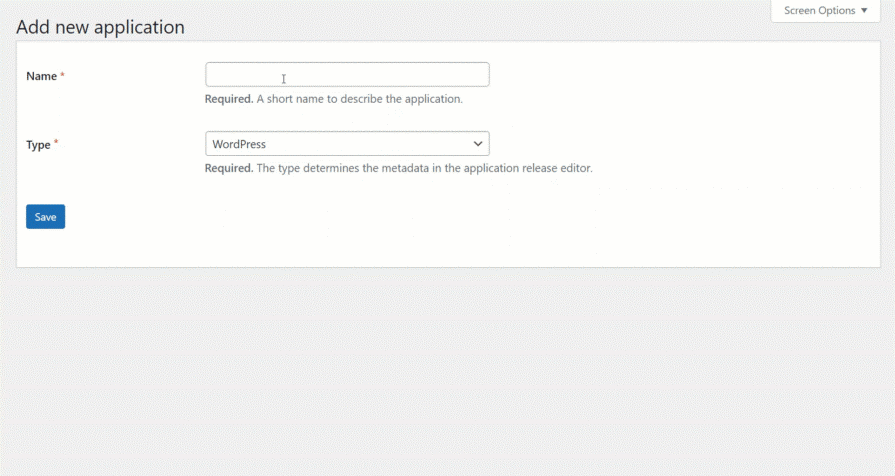
Note: Once users have selected and saved the settings, then the further options will be displayed.
- Navigate to the Application Releases on the right sider-bar.
- Click on the ➕ sign.
- Enter the Version in the Version text-box.
- Enter a file by clicking on the Choose File button of Release file.
- Enter a short description of amendments in this version in the text-box of Changelog.
- Enter the version on which your application is tested within the text-field of Test up to.
- Enter the minimum WordPress version required to run your application in the text-field of the Minimum WordPress version.
- Enter the minimum PHP version required to run your application in the text-field of the Minimum PHP version.
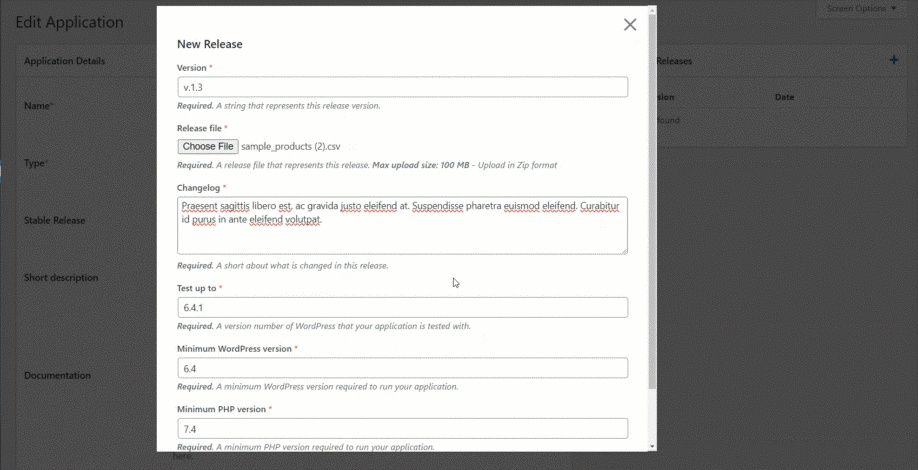
- Select the Stable Release from the drop-down menu text-box.
- Enter short description of the application in the Short Description text-box.
- Enter the documentation of the application in the Documentation text-box.
- Enter the support information about the application in the Support text-box.
- Click on the ➕ Add button to upload the File image and Description in the Gallery.
Note: Admin can Add more than one screenshot in the Gallery option.
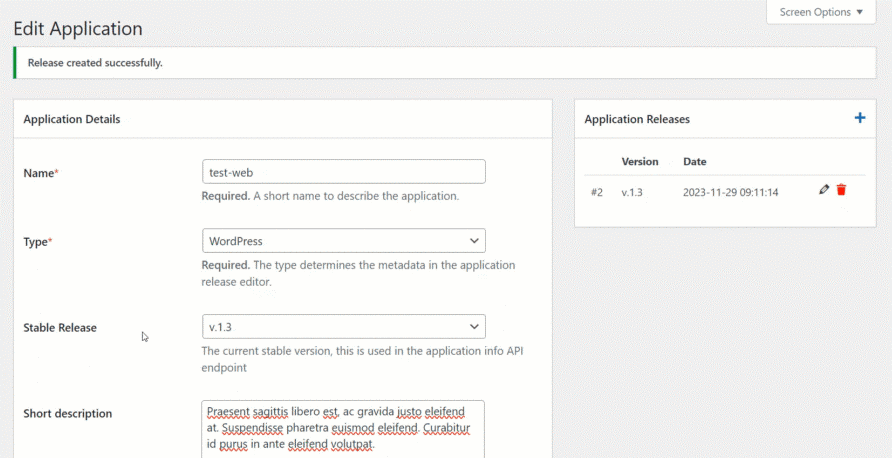
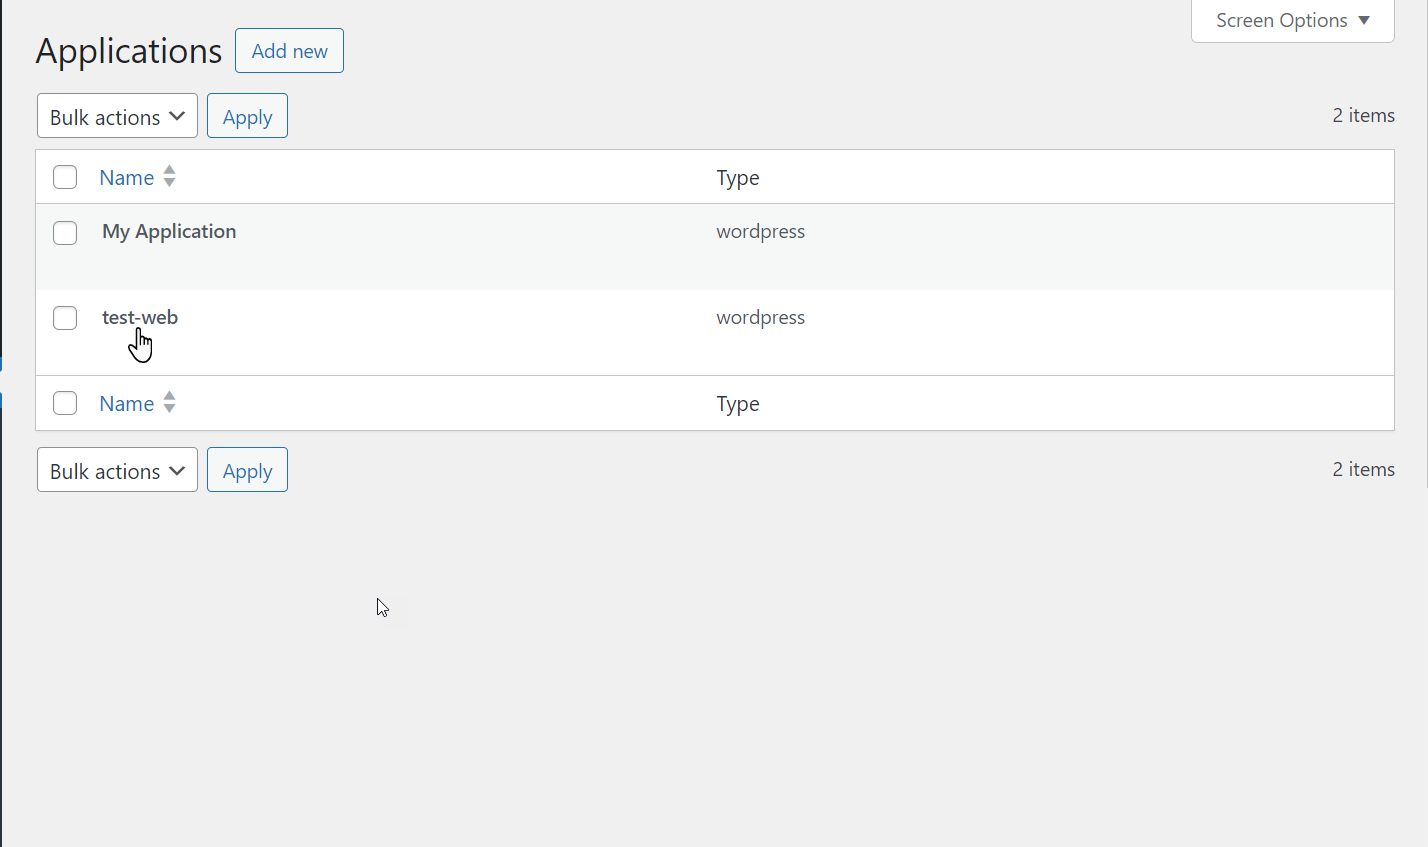
The saved application will appear in the Applications table.
In the Products section, go to All Products, click on the Add New button to create a new product or Edit any existing product.
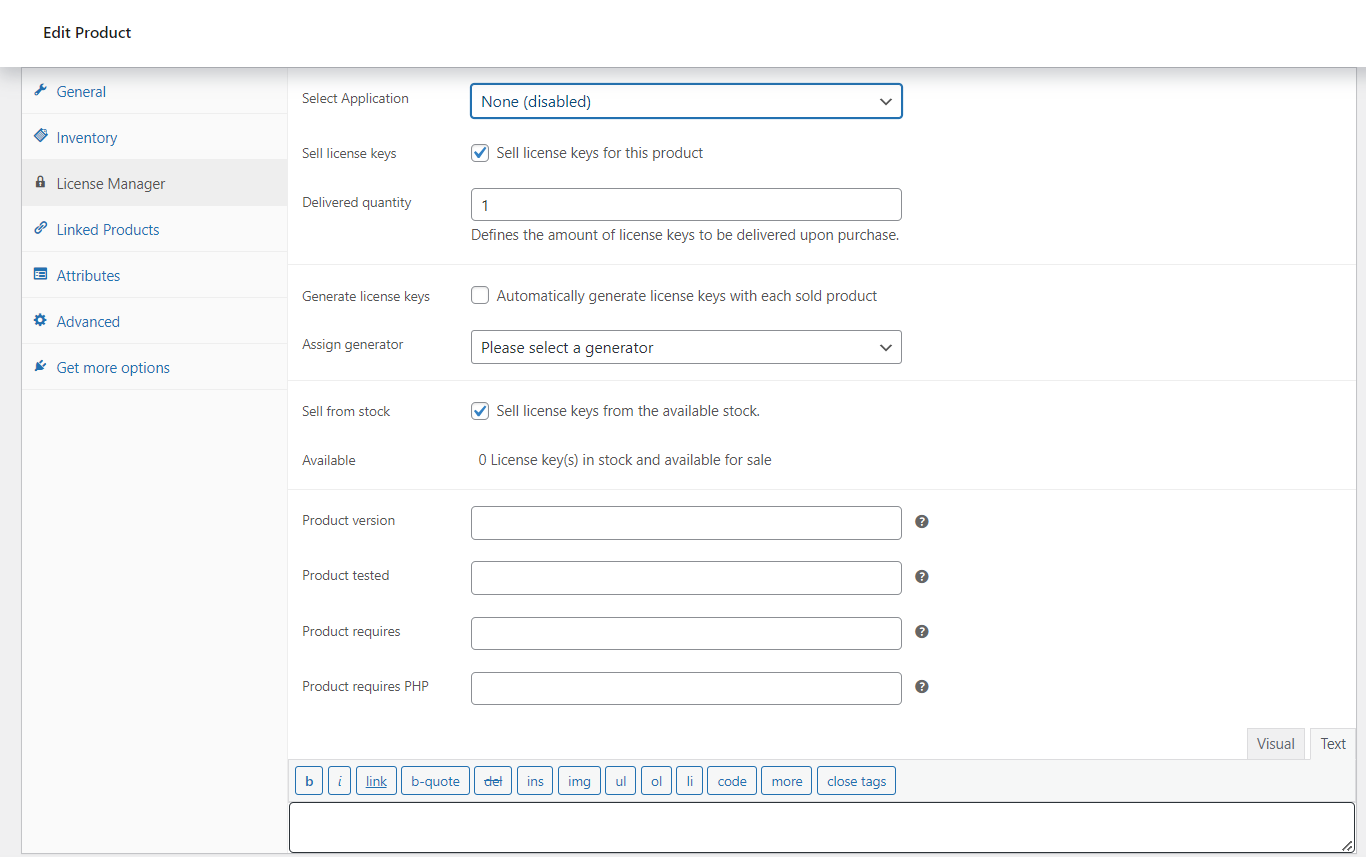
- Navigate to the Product Data → License Manager.
- Navigate to the Select Application.
- Select the application from the drop-down menu.
- Click on the Update button.

Impact On Product page
All the other descriptions will be displayed in sections below
- After the user placed the order successfully.
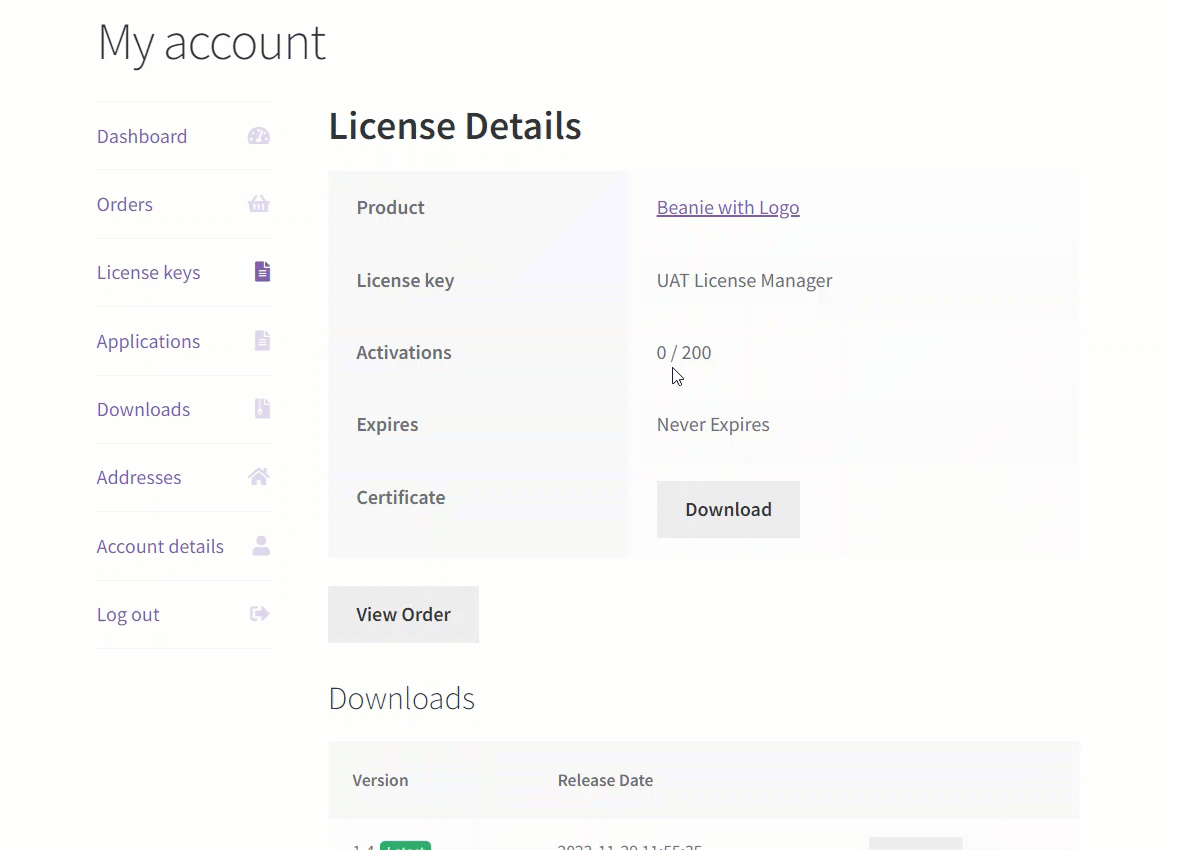
- Navigate to the My Account → License Key.
- Click on the View button.
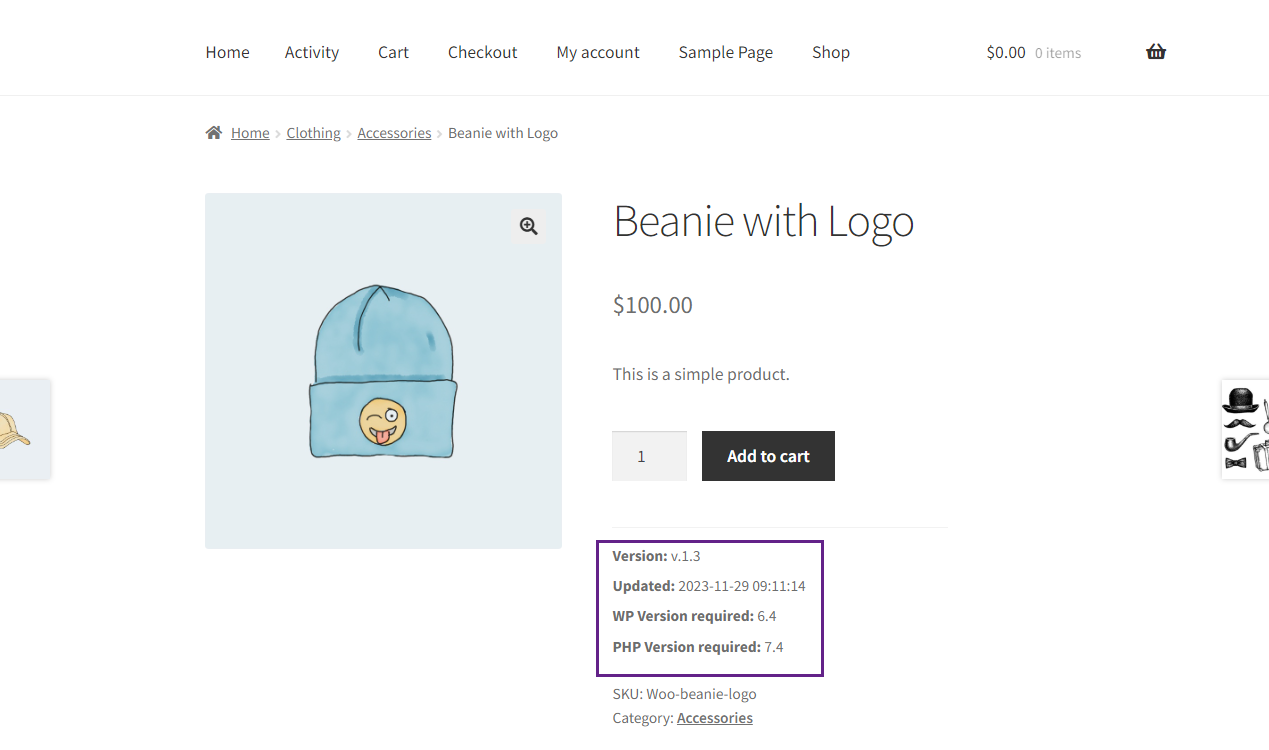
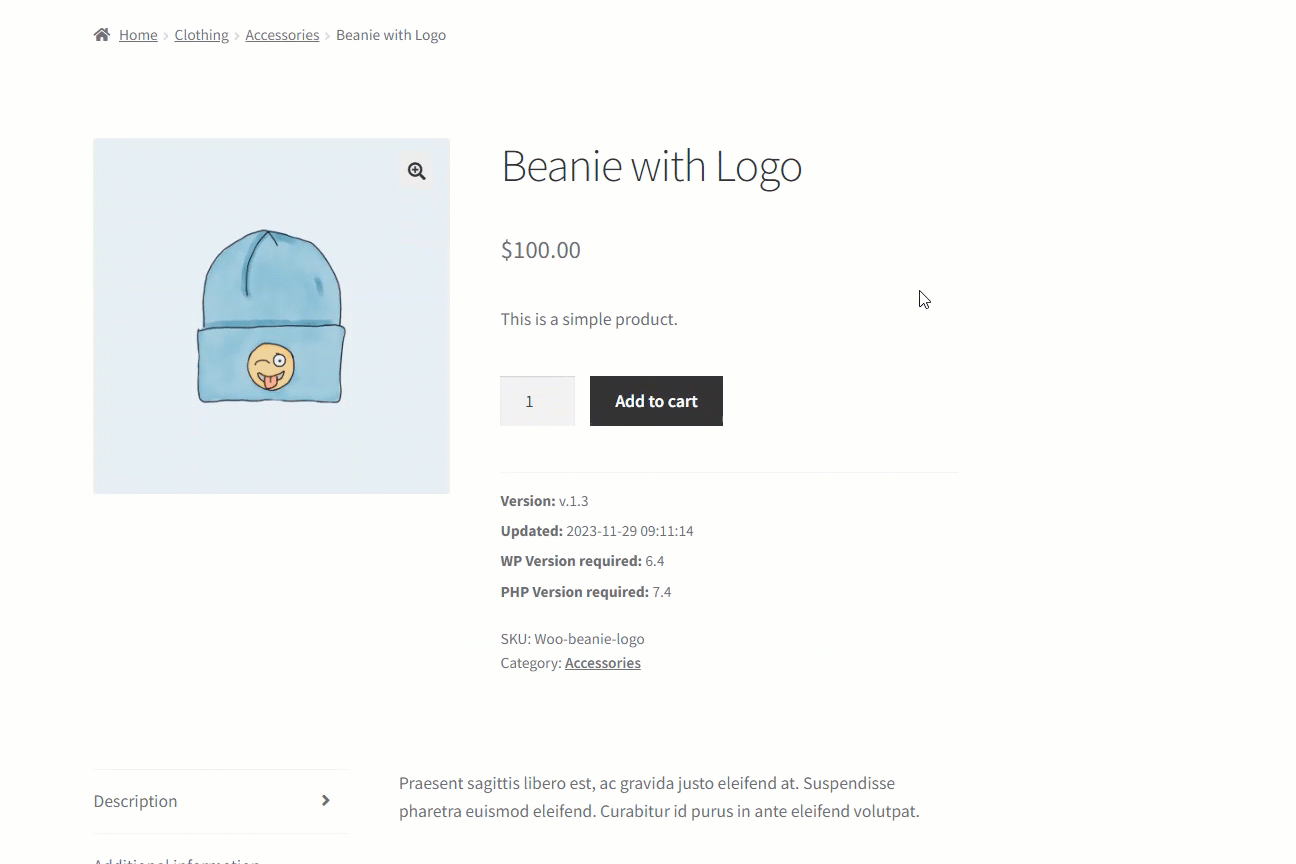
- Navigate to the Downloads section , where the user can see the Version and Release Date of the application and can download them by clicking on the Download button.
Activation
↑ Back to topOverview
↑ Back to topGo to Dashboard → Analytics→ Activations
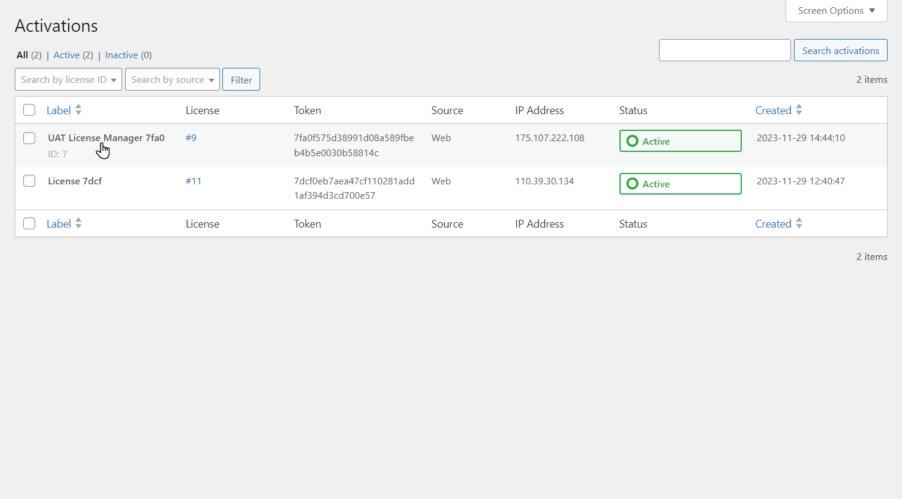
Here under the Status, you can see the current status of your License.
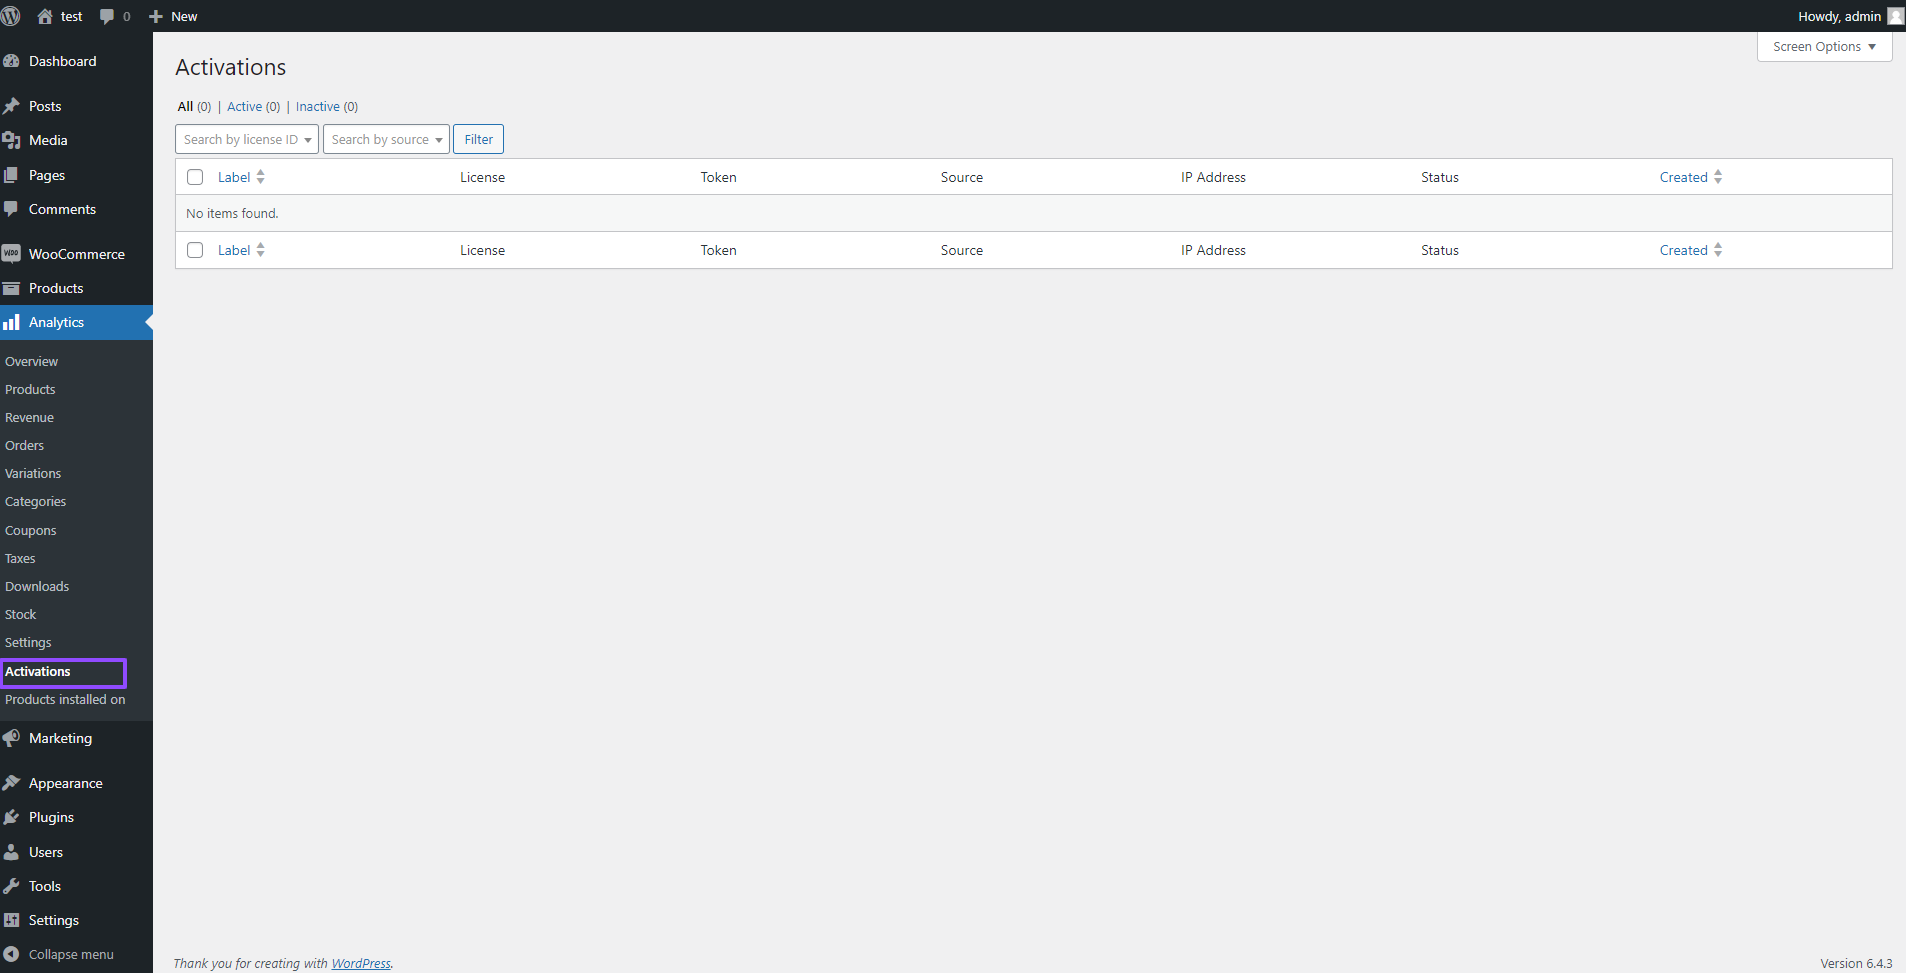
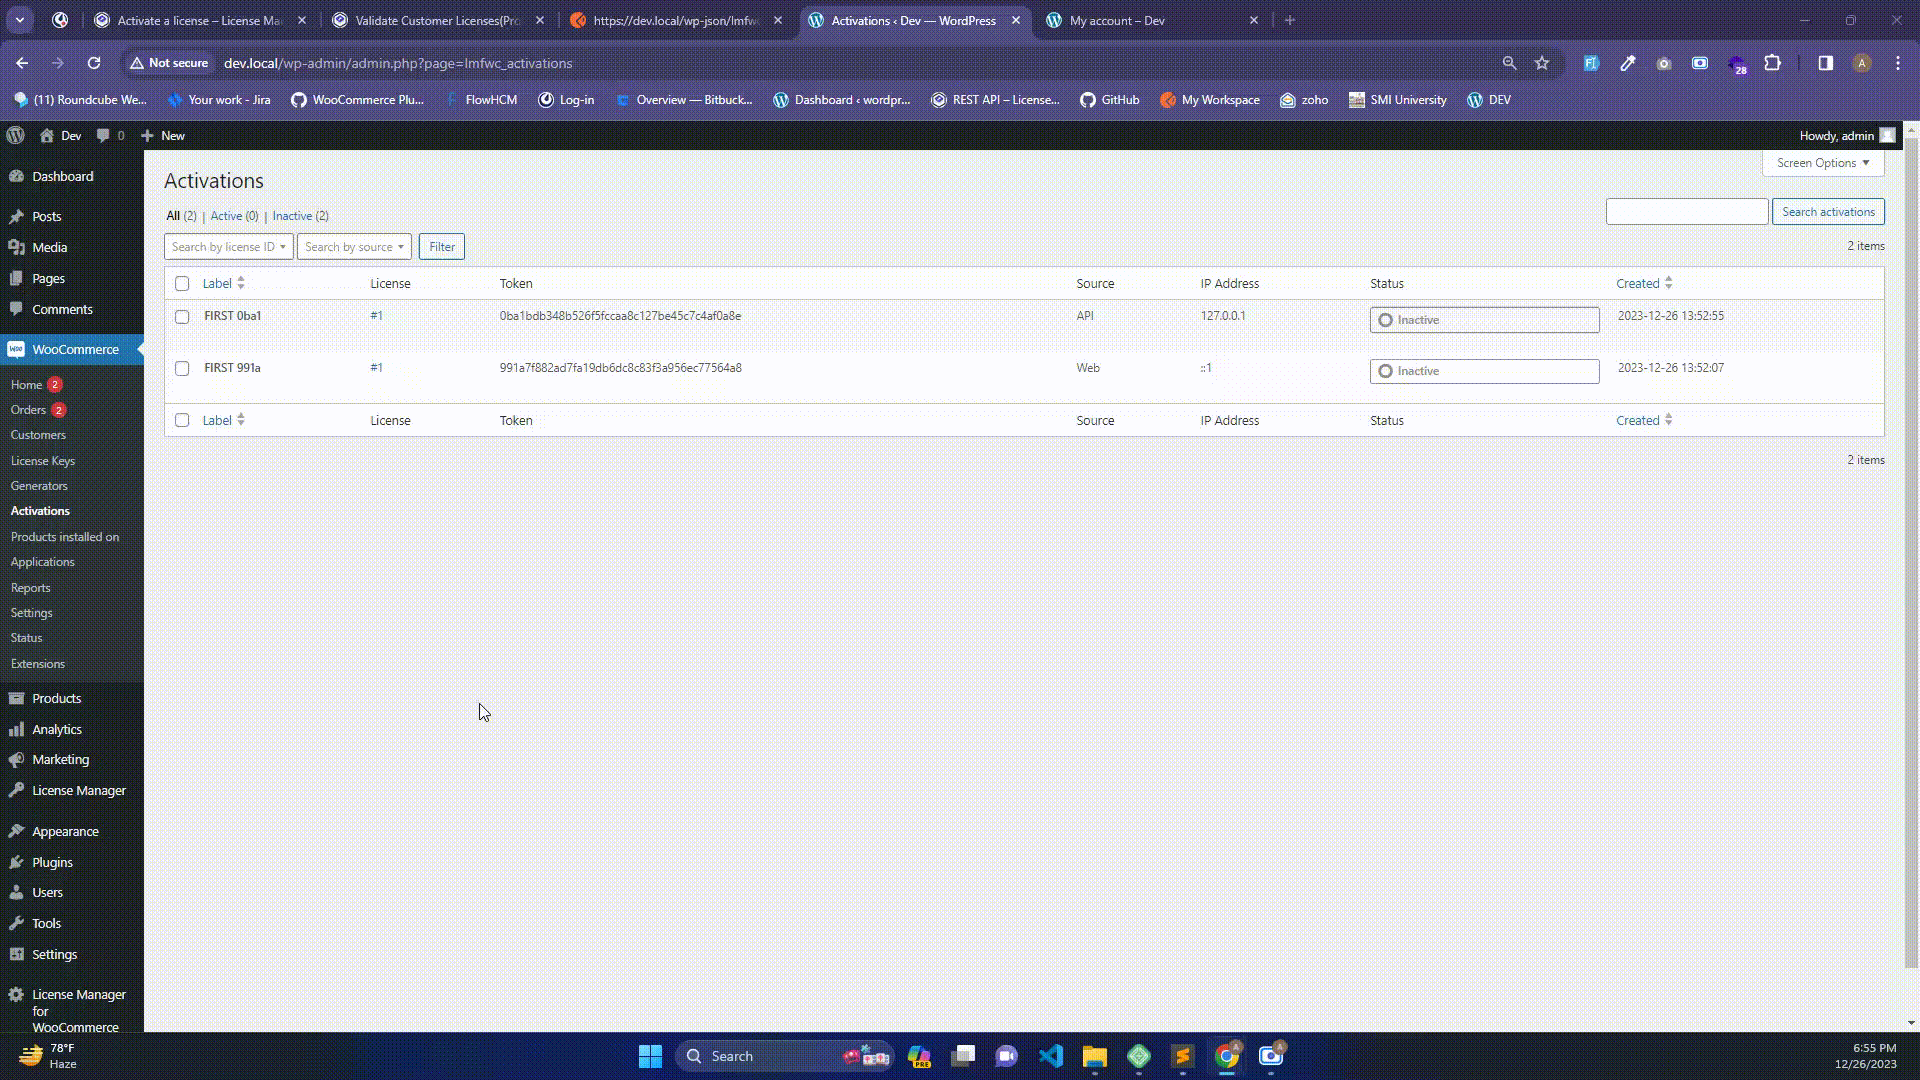
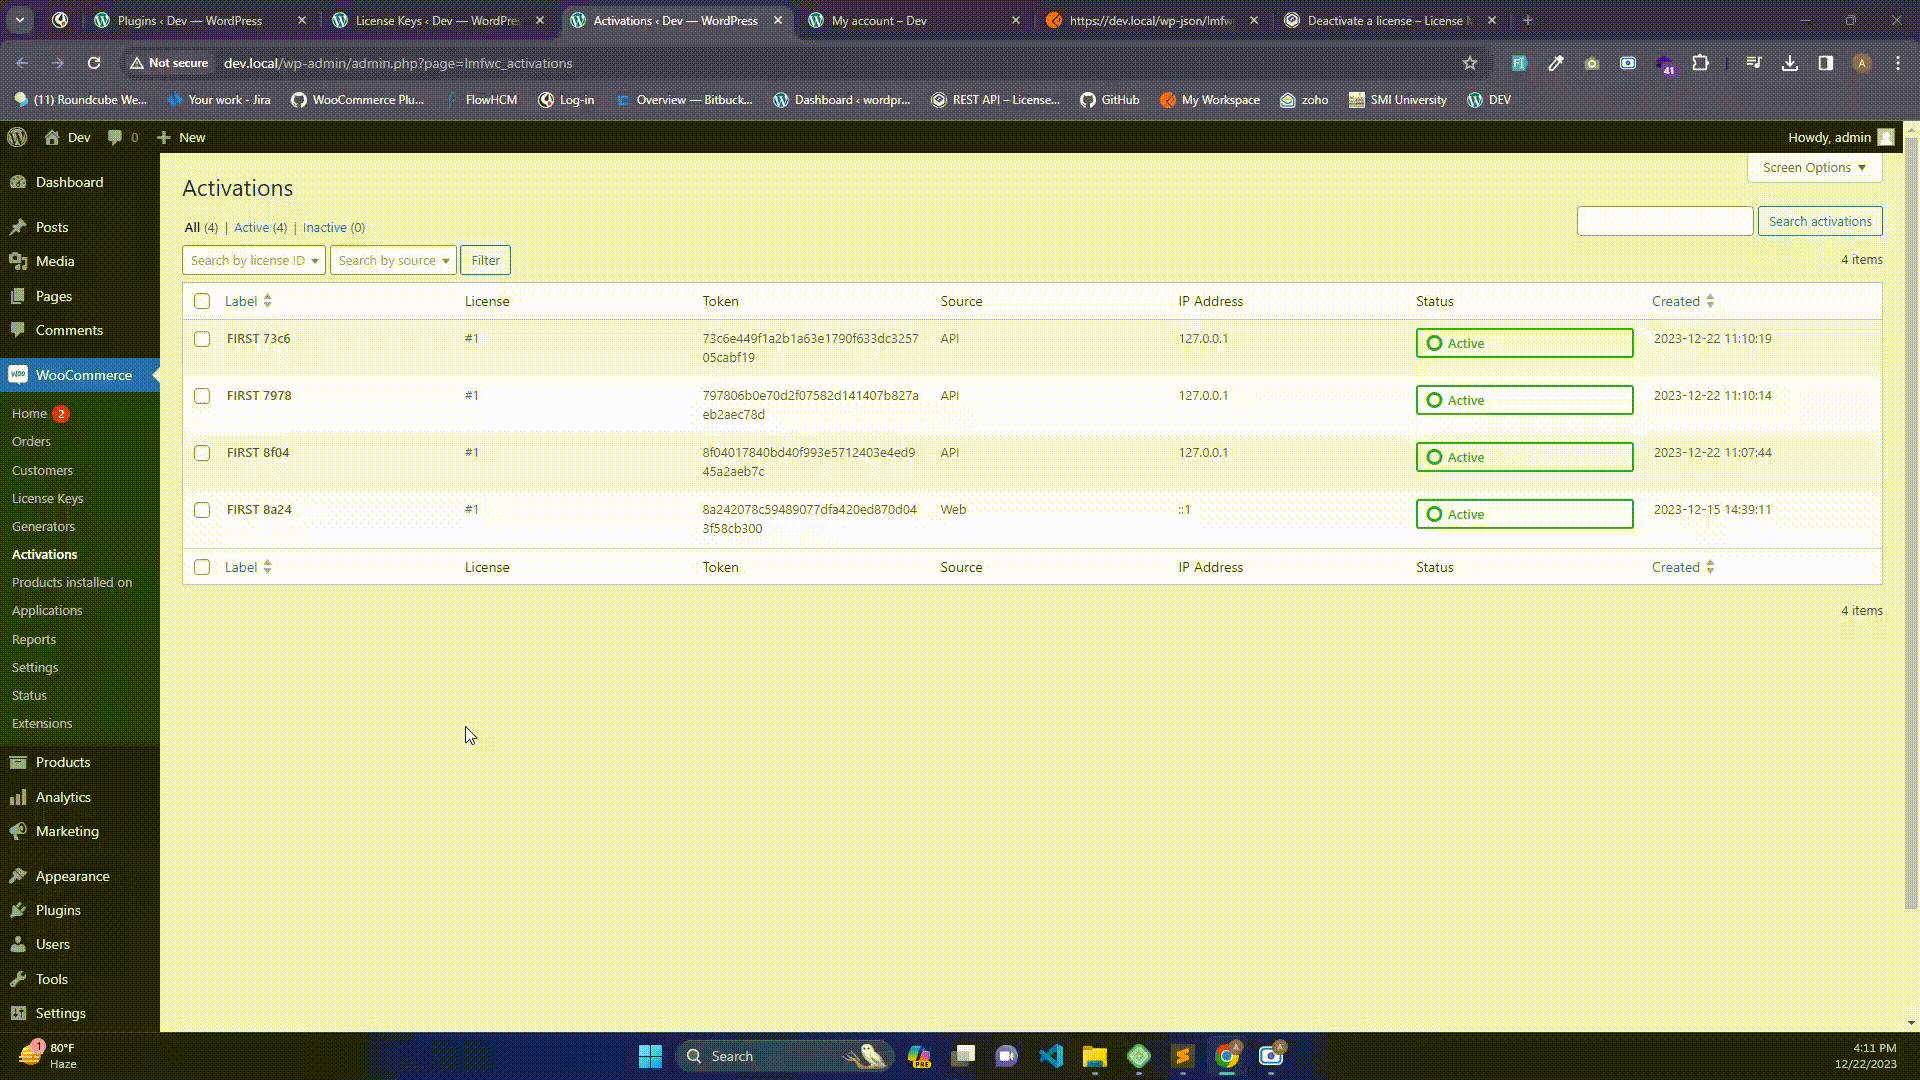
Note: Admin cannot create an Activation. It can only be done by the User-end and will display on the Admin-end in the Activations tab.
In order to Activate your license, go to My Account > License Keys, click on View on the license which you want to activate or you can also activate a license key via our API
Scroll down to Activations and click on Activate button. Your license will be Activated.
On Admin-End
Admin can check the activated licenses in the Activations table.
License Key
↑ Back to topOverview
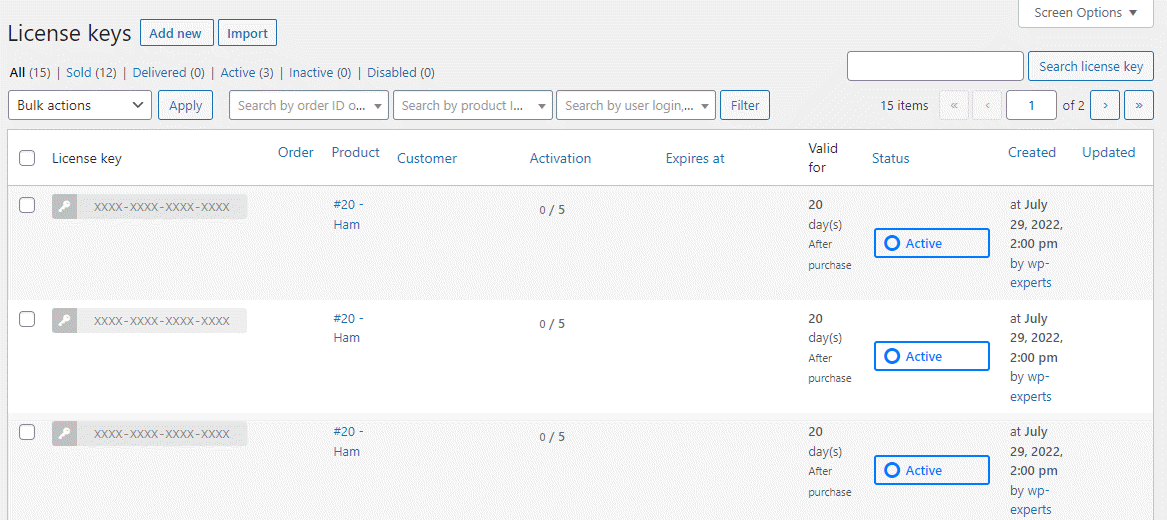
↑ Back to topYou can view all of your license keys when navigating to the Products → License keys page. Here you can also perform a variety of actions on your license keys. Below you’ll find a table explaining the individual fields of the license key overview table.
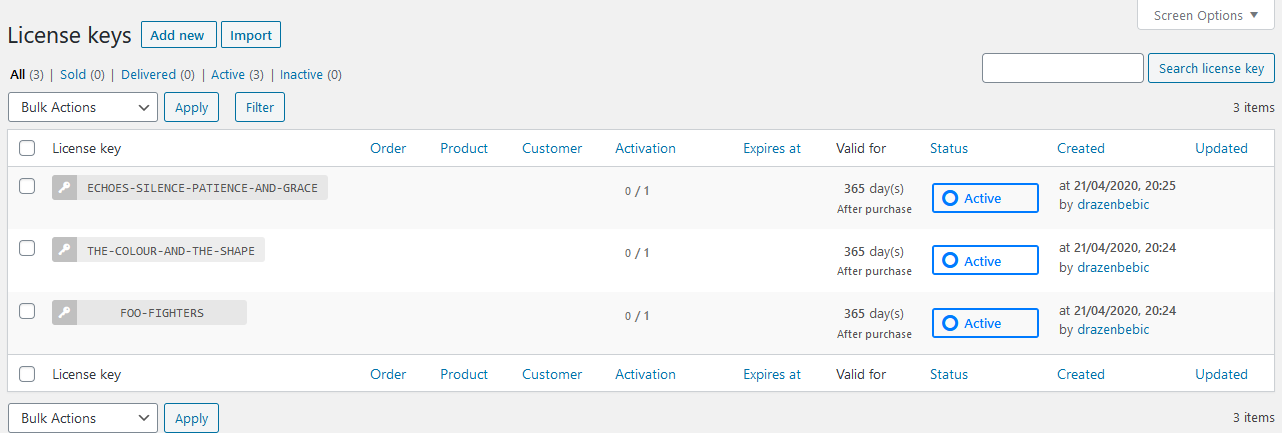
The “License keys” table
| Column | Description |
|---|---|
| License key | The license key string |
| Order | The WooCommerce Order to which this license key belongs |
| Product | The WooCommerce Product to which this license key belongs |
| Customer` | The WooCommerce Customer to which this license key belongs |
| Activation | Current number of license activations |
| Activation | Maximum number of arrived license activations |
| Created at | Timestamp of the license key creation date |
| Expires at | Timestamp of the license key expiry date (if available) |
| Valid for | Number of days for which the license key is valid after purchase. |
| Status | The current license key status |
Adding License Keys
↑ Back to topThere are two ways of adding license keys to the database, either one-by-one or in bulk. Both options can be found when navigating to the License Manager → License keys page.
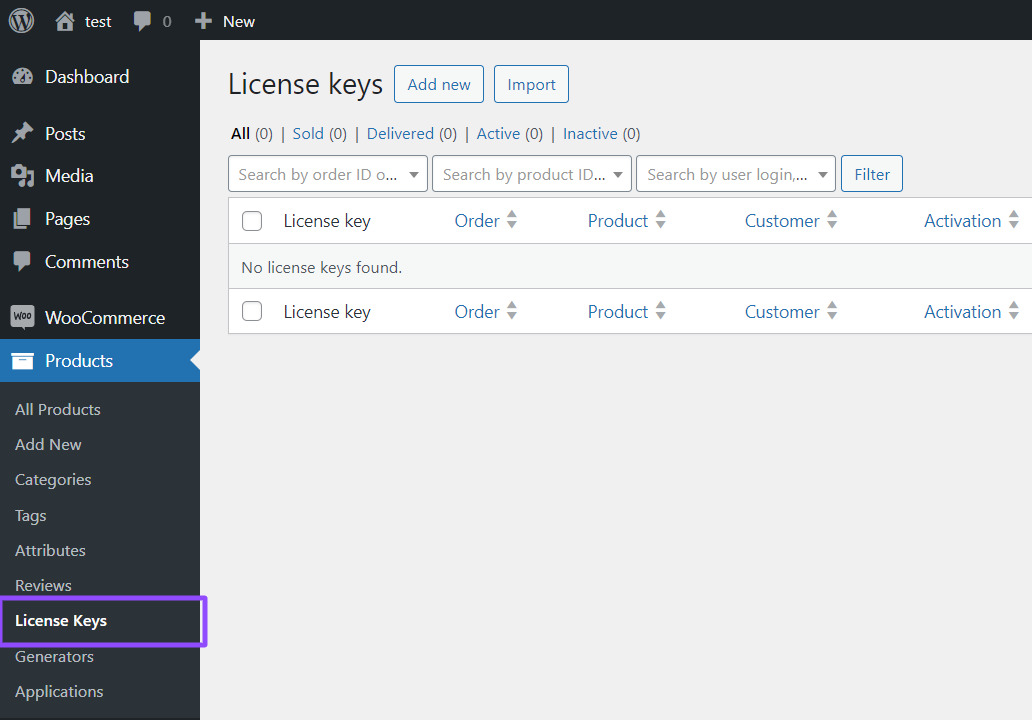
Options for adding license keys
Adding a Single License Key
By clicking the “Add new” button displayed in Figure 1, you will be redirected to the form for adding a single license key. Please read through the field descriptions to understand what each of them represent.
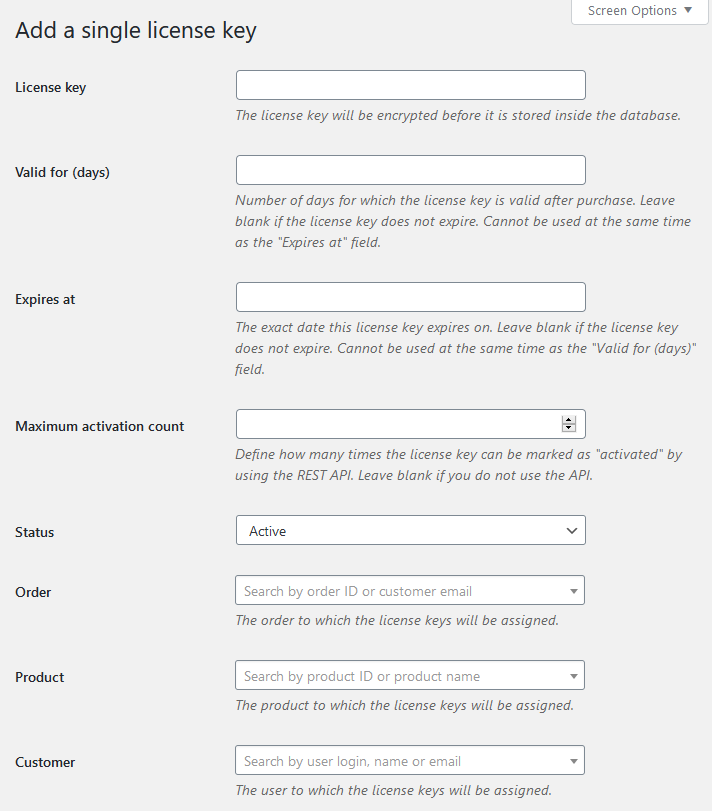
Adding a single license key
Importing License Keys
If you already have a list of license keys in a compatible format (CSV or TXT), you can add those license keys in bulk, using the „Import” button shown in Figure 3.
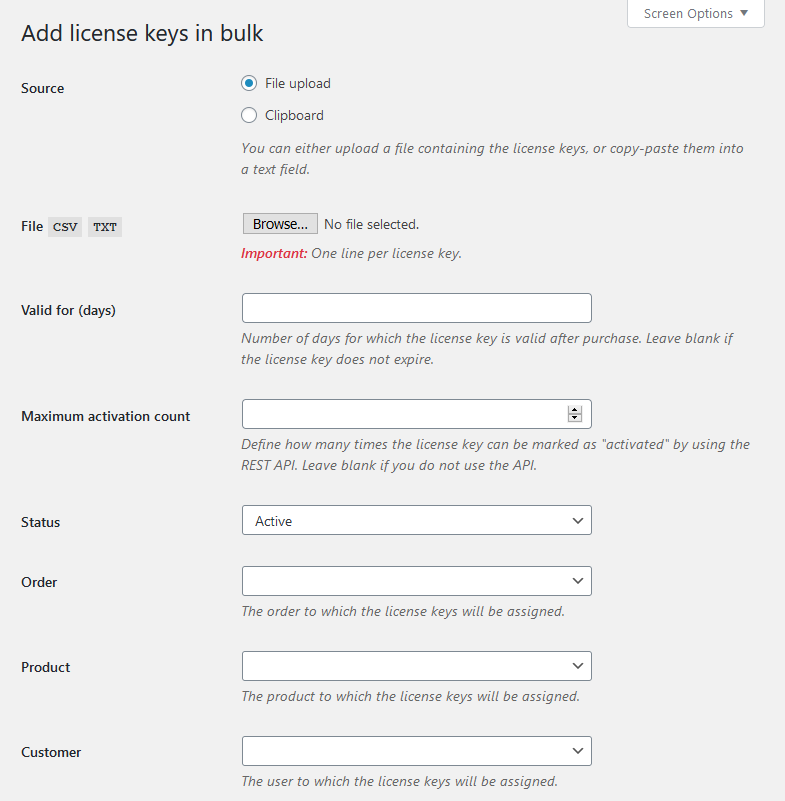
Adding license keys in bulk
**Note* When importing license keys from csv include only license keys in csv not all data, see the screenshot of csv

Editing License Keys
↑ Back to topIt is possible to edit any and all license keys, even the ones already delivered to customers – so be careful! First, navigate to the License Manager → License keys page and find the license key you wish to edit. Afterwards, hover and click the „Edit” action link as shown below.

The „Edit“ license key action link
By clicking the action link you will be redirected to a new page, containing the form with the data of the license key as it currently is. Make your changes and click the „Save“ button.
Exporting License Keys
↑ Back to topYou can export your license keys in two formats: CSV and PDF. To do so, navigate to the License Manager → License keys page, mark the license keys you wish to export (by ticking their checkboxes) and select either “Export (CSV)” or “Export (PDF)” from the bulk-actions dropdown, shown below.

Available bulk actions
Generators
↑ Back to topOverview
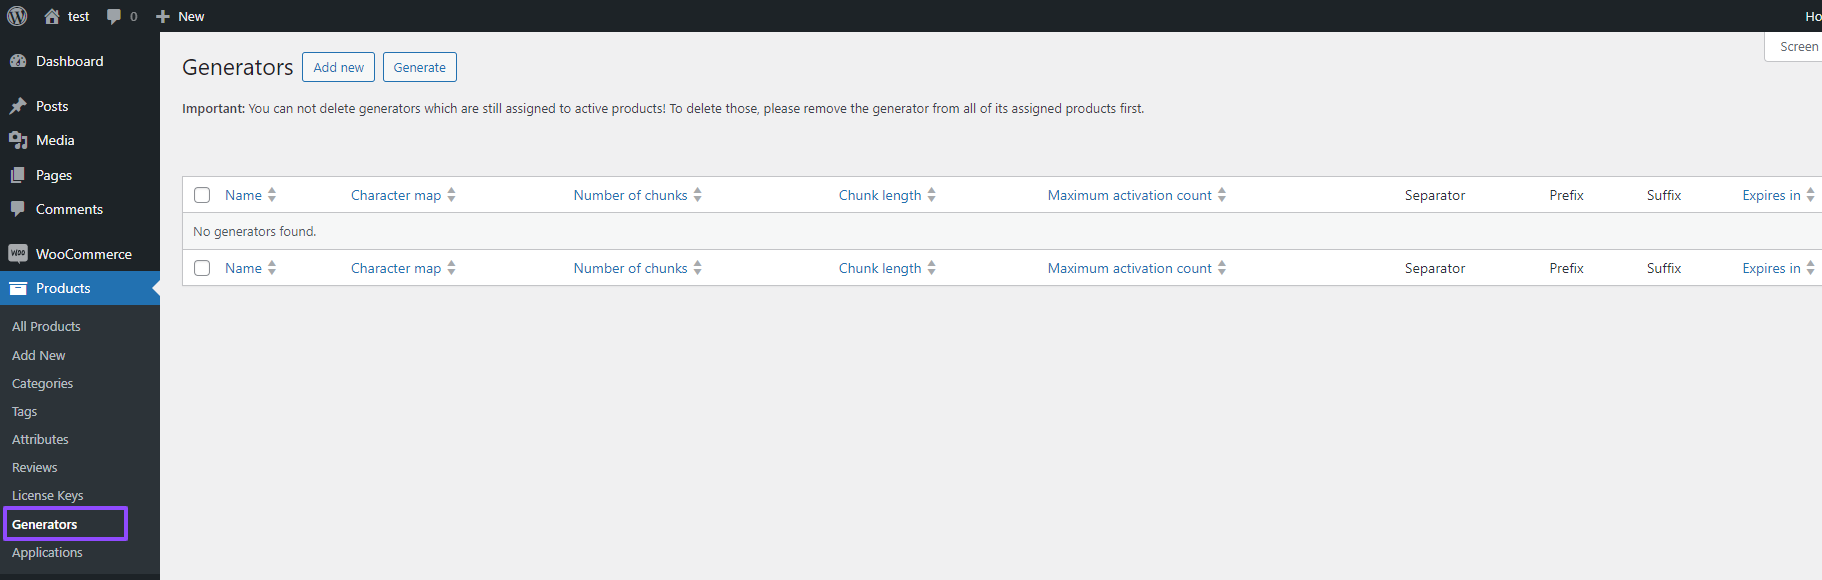
↑ Back to topYou can view your generators when navigating to the Products→ Generators page. Here you can also perform a variety of actions on them. Below you’ll find a table explaining the individual fields of the license key overview table.
The “Generators” table
| Column | Description |
|---|---|
| Name | Short generator description/name |
| Character map | The characters used for license key generation |
| Number of chunks | Number of individual character chunks |
| Chunk length | The length of an individual character chunk |
| Maximum activation count | Number of times the license key can be activated via the API |
| Separator | The separator between the chunks |
| Prefix | Special character added at the beginning of the license key |
| Suffix | Special character added at the end of the license key |
| Expires in | Number of days the license key expires in when bought |
Adding Generators
↑ Back to topNavigate to the License Manager → Generators page and click the “Add new” button at the top of the page. You will be redirected to the form. Please read the description of every field, so that you understand how each one of them affects the license key.
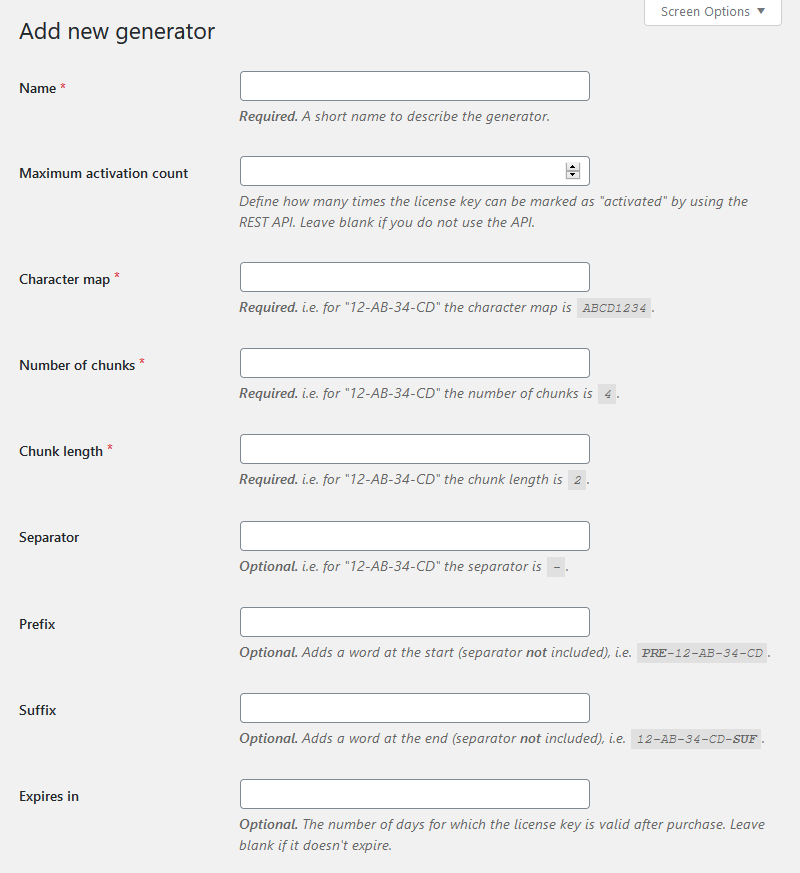
The “Add generator” form
Editing Generators
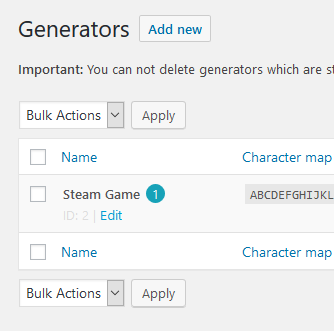
↑ Back to topNavigate to the License Manager → Generators page and hover with your mouse over an existing generator. Click the „Edit” action link to open the form.
Editing a generator
Generating License Keys
↑ Back to topBy clicking the Generate button at the top of the Generators page, you will be redirected to the Generate license keys page, where you can use a specific generator to freely generate a chosen number of licenses.
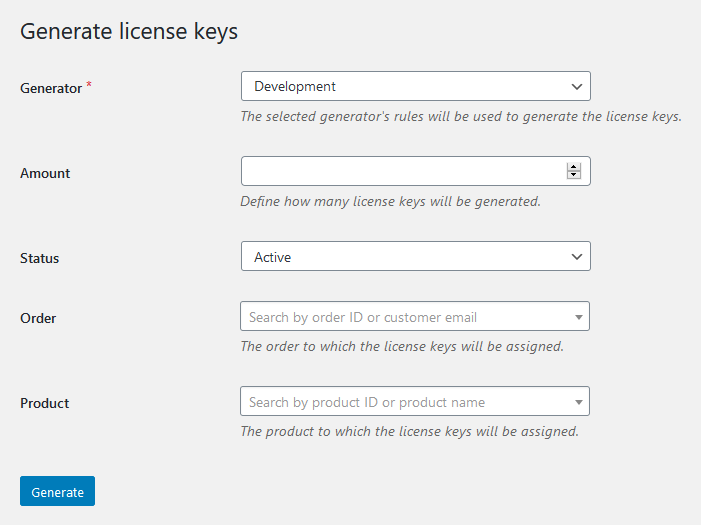
The “Generate license keys” form
WooCommerce Products
↑ Back to topSimple Product
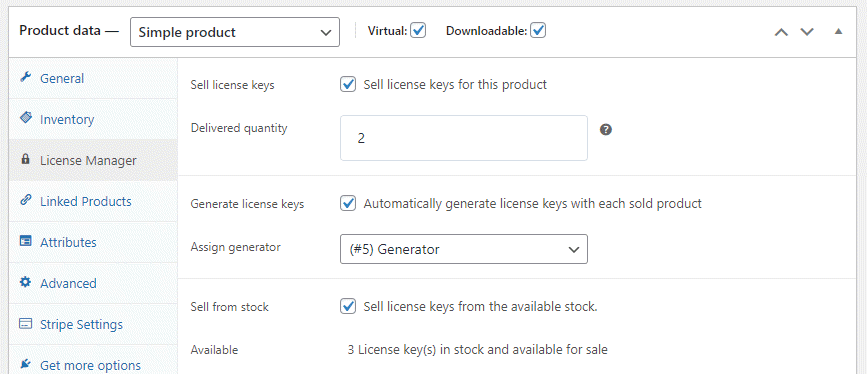
↑ Back to topWhile editing a simple WooCommerce product, a new data tab inside the product data box will appear. This tab lets you do the following:
- Set the product to sell license keys
- Set the amount of license keys to be delivered upon purchase
- Choose whether to use a generator or not
- Assign a previously created generator to the product
- Choose whether to sell license keys from the available stock
- View the available stock amount
- Select the application option
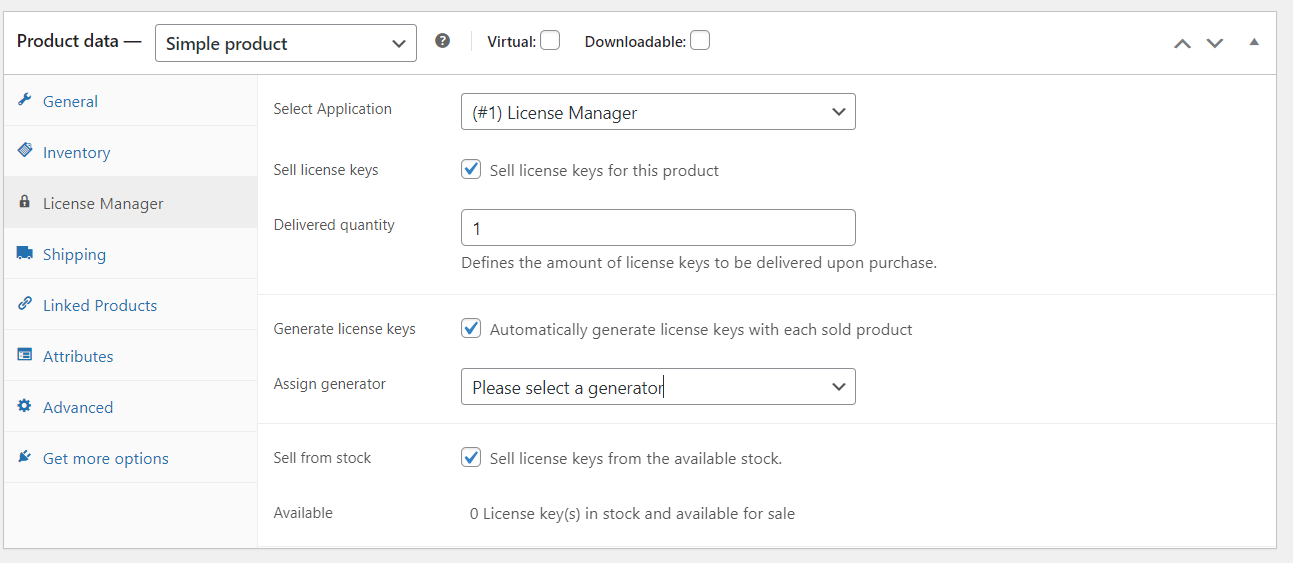
The new “License Manager” WooCommerce product data tab and its options
Variable Product
↑ Back to topThe same options for simple products will also appear for each variation of a variable product. Clicking the “Variations” tab will display the currently available product variations. Simply expand the variation you wish to edit and scroll a bit down, you will find a “License Manager for WooCommerce” section as show below.
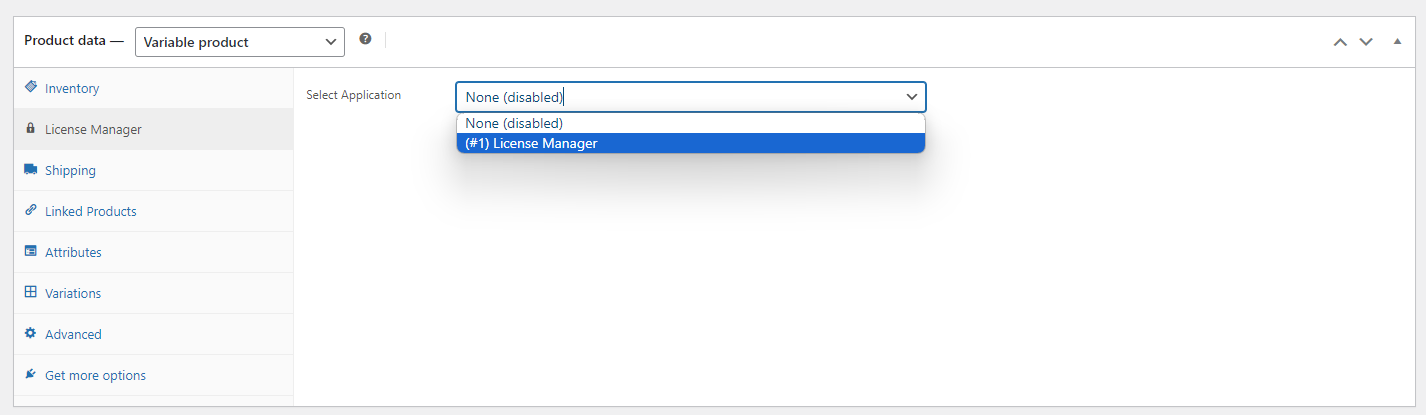
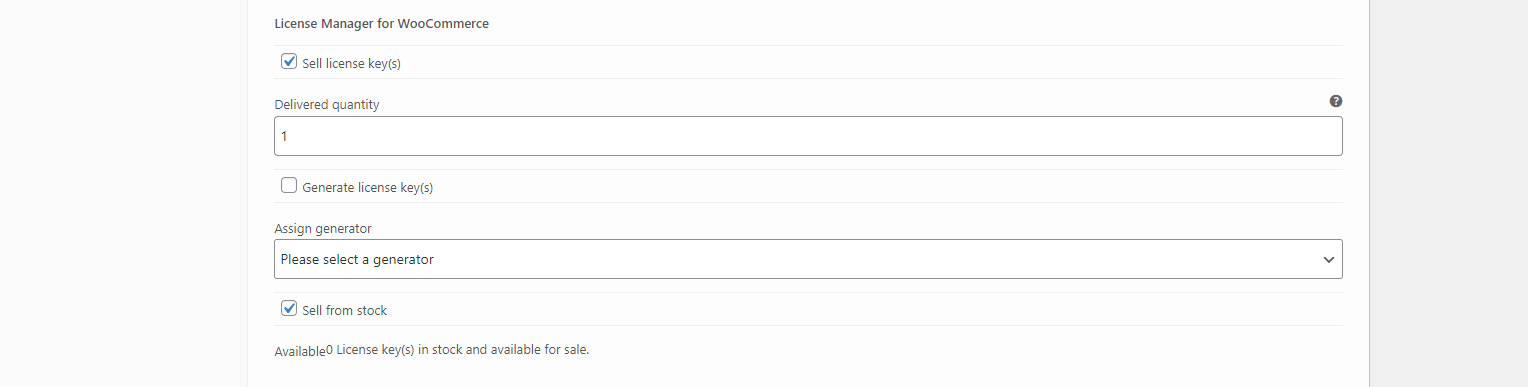
The “License Manager for WooCommerce” options for variable products
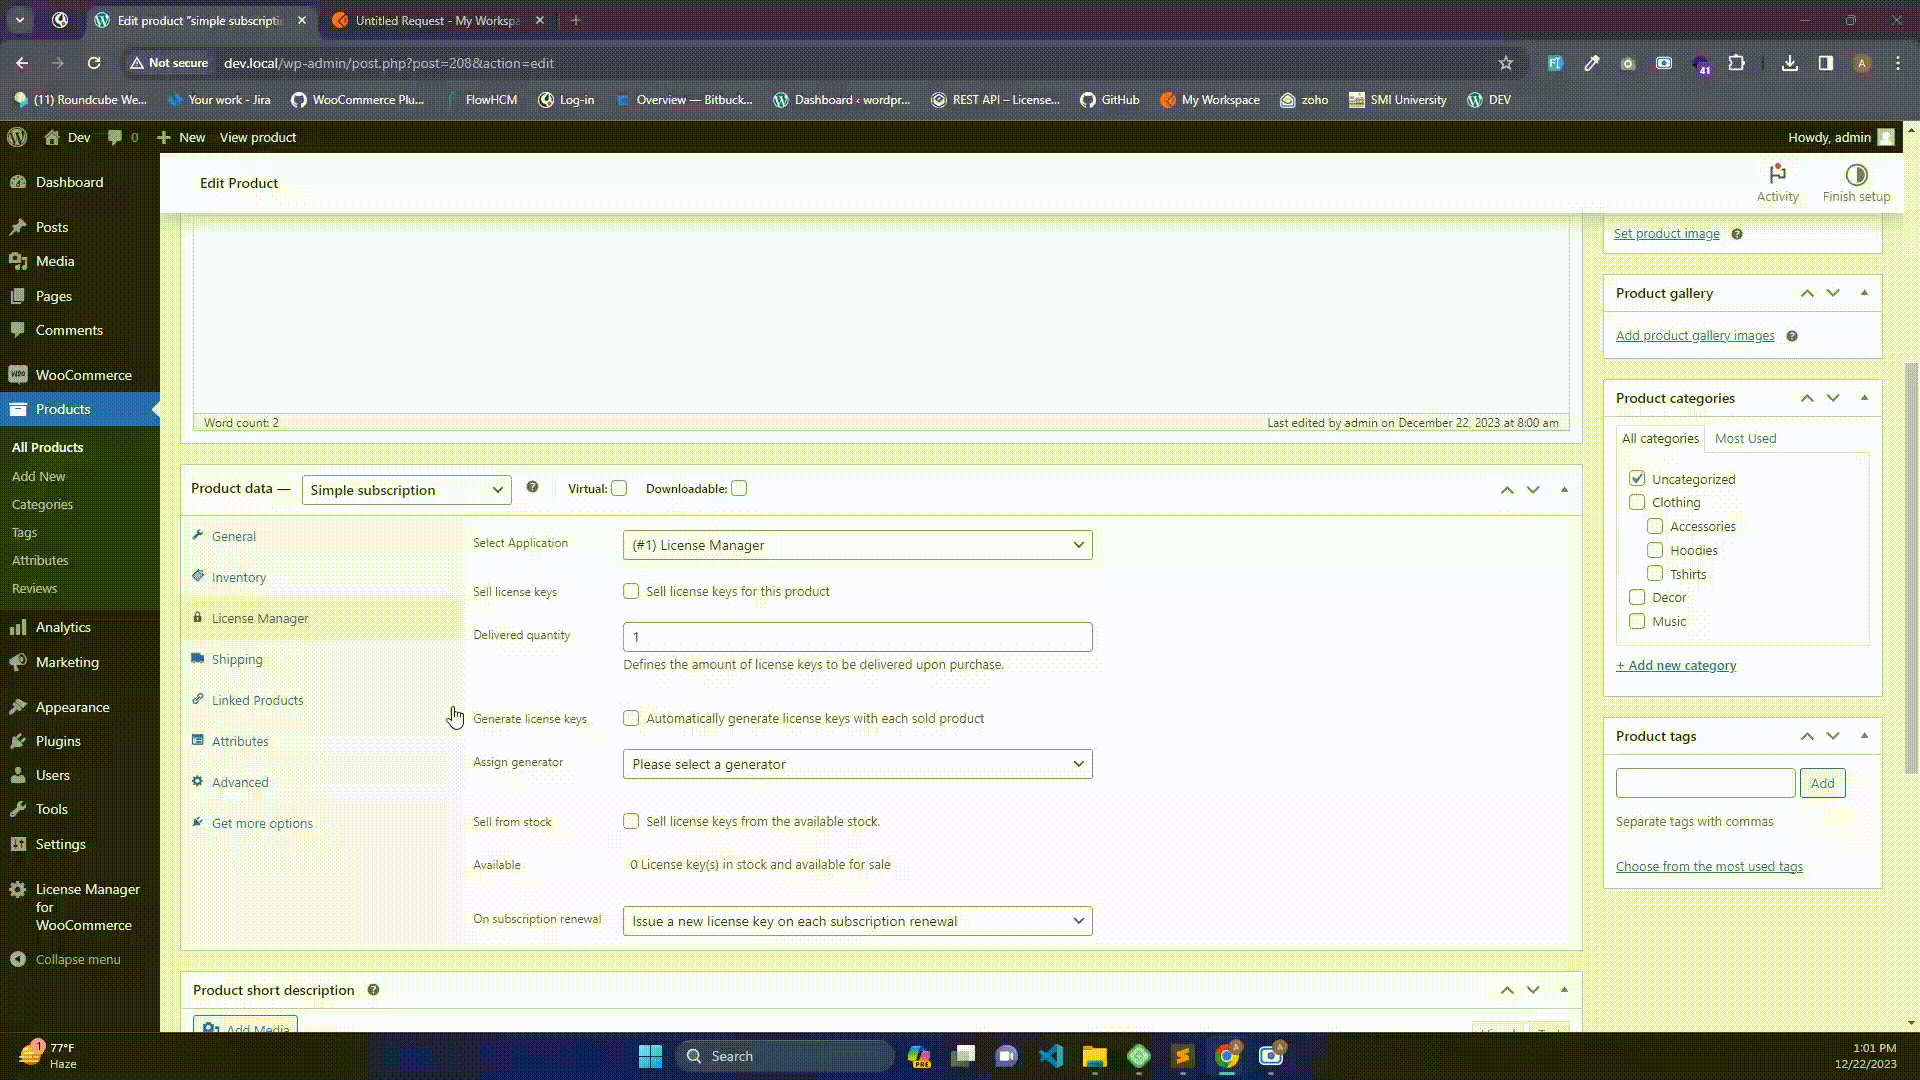
Simple Subscription (Pro)
↑ Back to topWhile editing a simple WooCommerce product, a new data tab inside the product data box will appear. This tab lets you do the following:
- Set the product to sell license keys.
- Specify the number of license keys to be delivered upon purchase.
- Decide whether to use a generator or not.
- Assign a previously created generator to the product.
- Choose whether to sell license keys from the available stock.
- View the available stock amount.
- Select the application to sell with license .
- Select subscription renewal options.
- Issue a new license upon each subscription renewal.
- Extend the existing license with each renewal.
- Set the license extension to the WooCommerce subscription interval.
- Set the license extension to your custom interval.
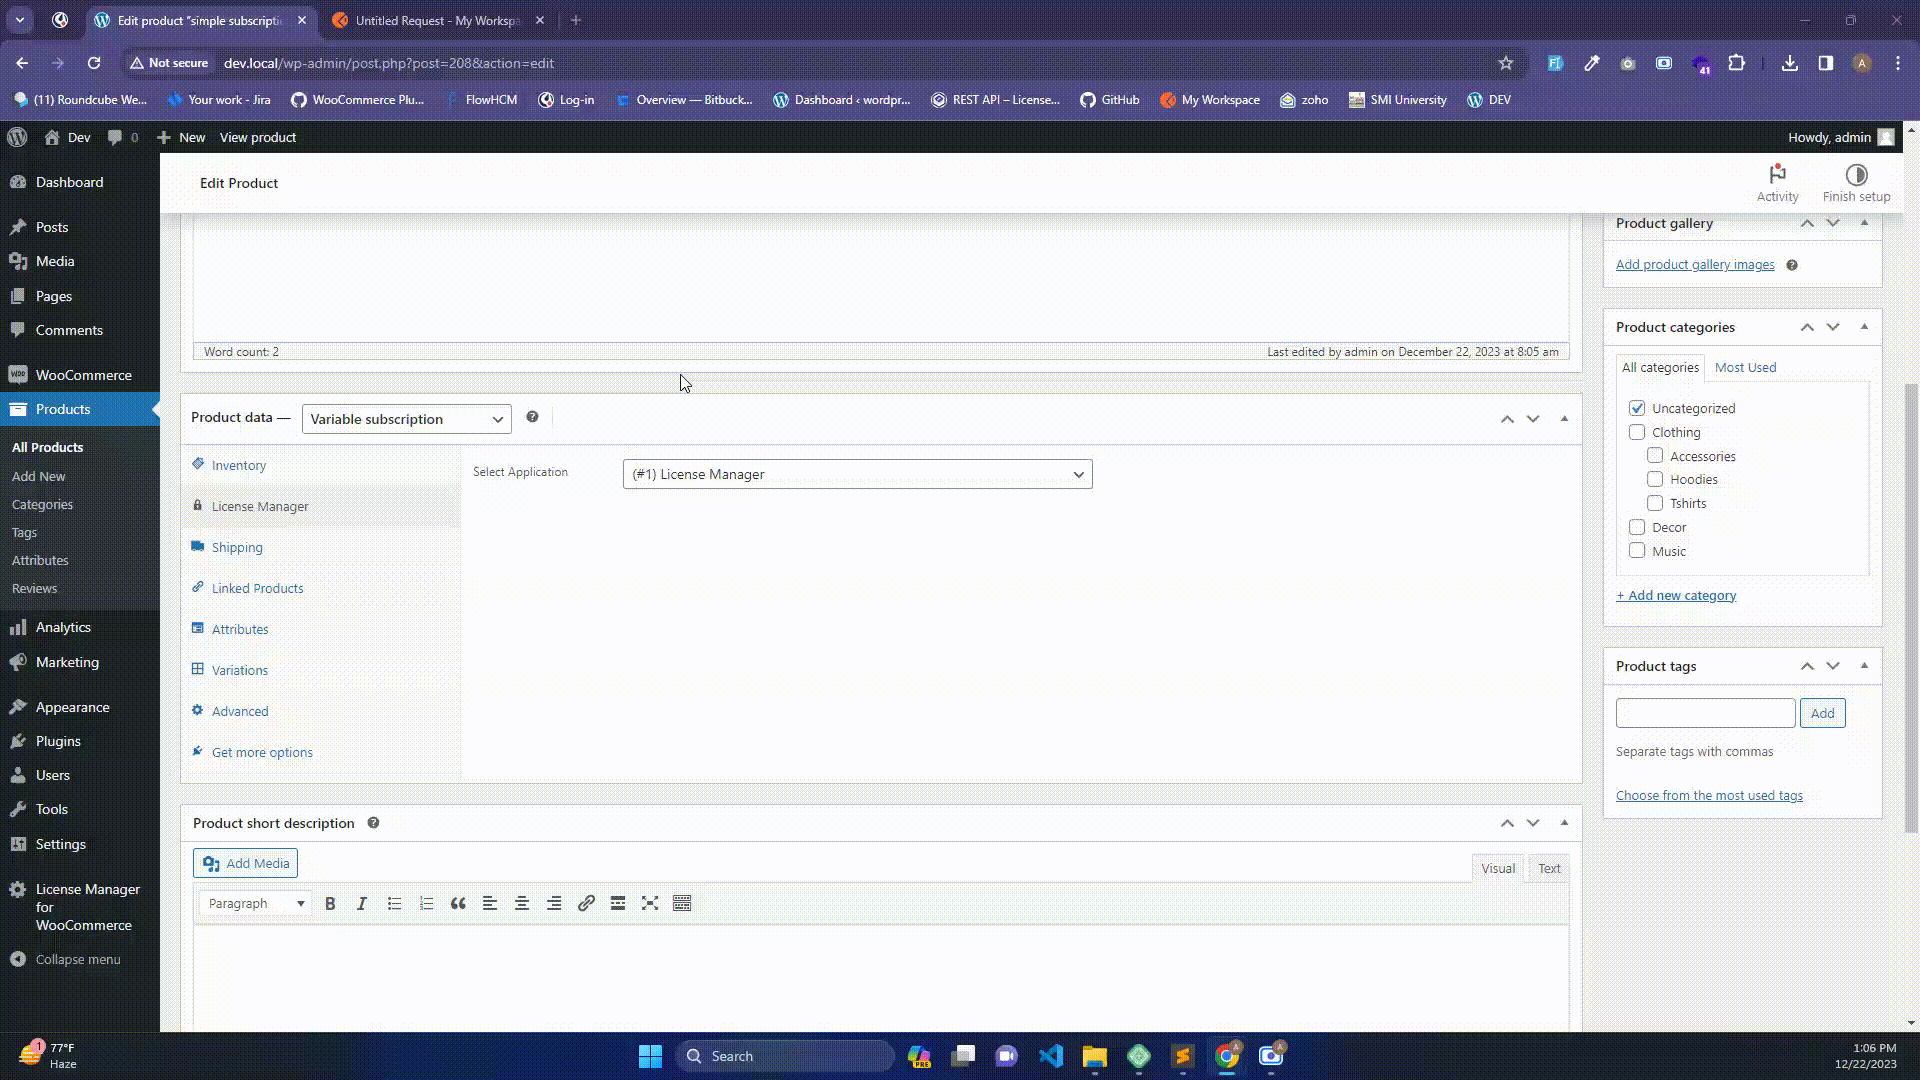
Variable Subscription (Pro)
↑ Back to topThe same options for simple products will also appear for each variation of a variable product. Clicking the “Variations” tab will display the currently available product variations. Simply expand the variation you wish to edit and scroll a bit down, you will find a “License Manager for WooCommerce” section as show below.
- Select the application to sell with license .
- Select subscription renewal options.
- Issue a new license upon each subscription renewal.
- Extend the existing license with each renewal.
- Set the license extension to the WooCommerce subscription interval.
- Set the license extension to your custom interval.
WooCommerce Orders
↑ Back to topOrder License Keys
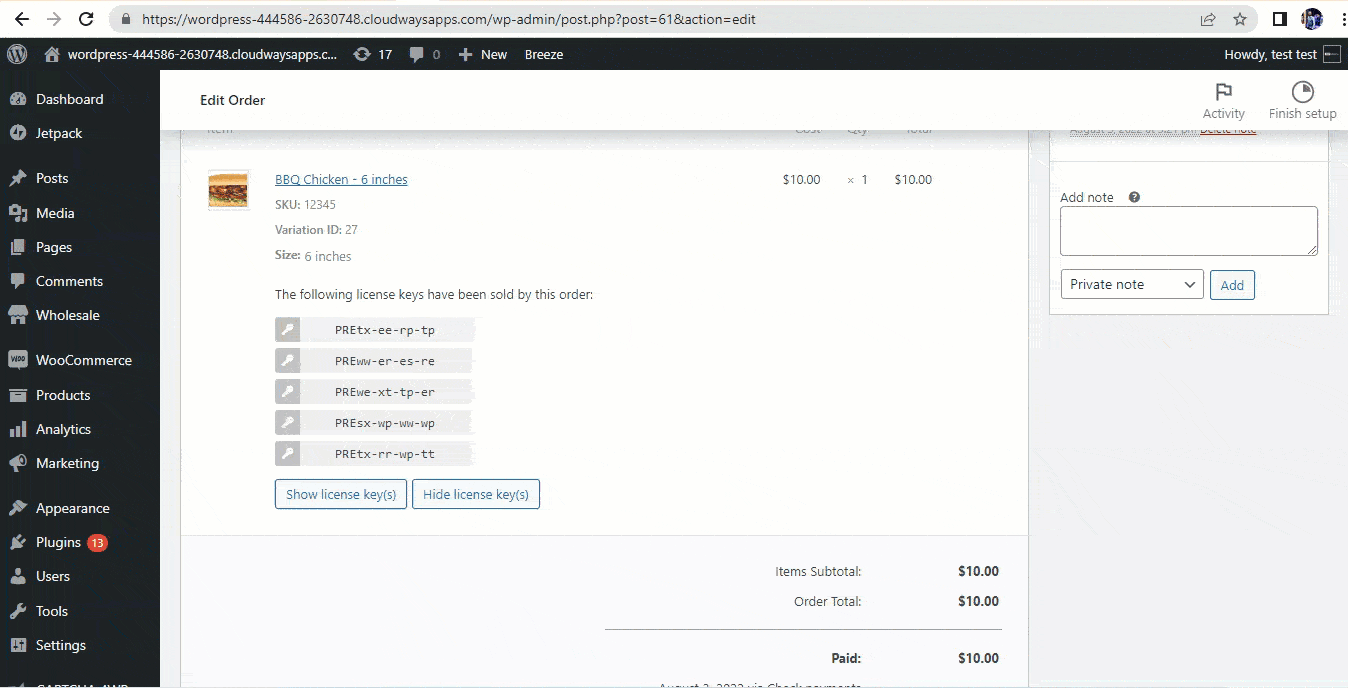
↑ Back to topIf a WooCommerce order contains licensed products, then the corresponding license keys will be used/generated once the order status is set to “Completed”. These license keys will then be visibly marked as sold/delivered in the license key overview, and inside their corresponding orders. An example of this is shown below; an order which contains two licensed products.
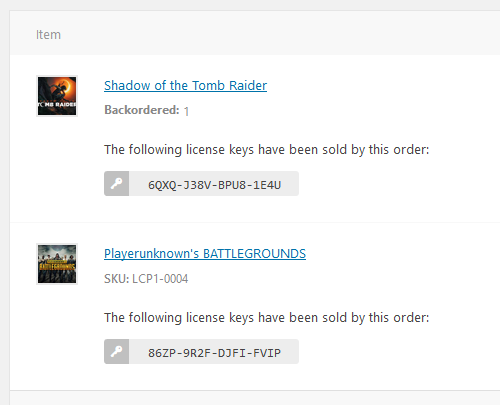
License keys sold by a WooCommerce order are displayed inside the order itself
Resend License Keys
↑ Back to topIf you had to edit or replace the license keys for an existing order you can easily email the customer their new license keys. When editing an order, check out the “Send license key(s) to customer” order action on the right-hand side of the screen, as shown below.

License keys sold by a WooCommerce order are displayed inside the order itself
Tutorials & How-To
↑ Back to topREST API
↑ Back to topValidating Custom Request Data
This tutorial will demonstrate how you can perform additional request data validation, and abort a REST API call if your validation did not pass. In this specific tutorial we will pass an additional UUID to the license activation request, then check if the license has previously been activated using that UUID, if that’s the case we will return an error.
To sum everything up, we will demonstrate the following:
- Adding additional parameters to the activation request
- Validating the additional parameters on server-side
- Returning an error if validation did not pass
The first thing you need to do, is to modify your REST API license activation request. Simply add a JSON object with a key named uuid and its value. It’s also important to set the Content-Type header to application/json.
Then, you will need to pass a function to the lmfwc_rest_api_validation filter. This filter takes 3 arguments. The function in that filter will look something like this:
[php]function lmfwc_tutorial_check_uuid($result, $server, $request) {
// Not our route, nothing to do...
if (strpos($request->get_route(), '/lmfwc/v2/licenses/activate') === false) {
return true;
}
// Retrieve the body parameters
$body = $request->get_json_params();
// The request body was empty, or the "uuid" property is missing.
if (!$body || !array_key_exists('uuid', $body)) {
return new WP_Error(
'lmfwc_rest_data_error',
'The UUID is missing from the request.',
array('status' => 400)
);
}
// Obtain the license key from the request URL
$licenseKey = explode('/lmfwc/v2/licenses/activate/', $request->get_route())[1];
// Retrieve the license object
$license = lmfwc_get_license($licenseKey);
// The license was not found
if (!$license) {
return new WP_Error(
'lmfwc_rest_validation_error',
'The license was not found.',
array('status' => 404)
);
}
// Check if the license key already has this UUID
$previousActivation = lmfwc_get_license_meta($license->getId(), 'activation_uuid', true);
// Throw an error if that's the case
if ($previousActivation && $previousActivation === $body['uuid']) {
return new WP_Error(
'lmfwc_rest_validation_error',
'The license was already activated using this UUID.',
array('status' => 403)
);
}
// Hasn't been used before, proceed
return true;
}
add_filter('lmfwc_rest_api_validation', 'lmfwc_tutorial_check_uuid', 10, 3);[/php]
We first must check if we are on the correct route. If so, the function will then retrieve all needed variables and check if they are correct. Lastly, we obtain the activation_uuid meta key from the license, and check its value against the value provided in the request body. Please note, that the meta key name can be anything, it’s up to you to define it.
Modifying Response Data
This tutorial will demonstrate how you can modify the REST API response. In this example, we will create an activation object consisting of an ID, the client proxy (should the client be using one), and the client IP address. This activation object will be stored in the license meta when the “Activate license” request has been made. The same methods and techniques shown here can be used to modify any other response. You can even remove response data, by using the PHP unset() method.
To sum everything up, we will demonstrate the following:
- Hooking into the
lmfwc_rest_api_pre_responsefilter. - Creating an activation object
- Storing our activation object inside the license meta
- Adding our activation object back to the response.
The process is rather simple, you need to hook into the lmfwc_rest_api_pre_response filter by using the WordPress method add_filter(). This filter takes 3 arguments. Your code would then look something like this:
[php]function lmfwc_tutorial_modify_response($method, $route, $data) {
// First check if we are on the correct route
if ($route !== 'v2/licenses/activate/{license_key}') {
return $data;
}
// Now we will save an activation object for this license/activation. The
// activation object will be an array consisting of an ID, the proxy (if
// The remote party is using a proxy), and the user's remote address (IP).
// Please note that we're just using the PHP "uniqid()" method for the ID,
// you can of course use something more appropriate.
$activation = array(
'id' => uniqid(),
'http_x_forwarded_for' => $_SERVER['HTTP_X_FORWARDED_FOR'],
'remote_addr' => $_SERVER['REMOTE_ADDR']
);
// Save to the license meta
lmfwc_add_license_meta($data['id'], 'activation', $activation);
// Add the $activation variable to the response
$data['activation'] = $activation;
// Return the result
return $data;
}
add_filter('lmfwc_rest_api_pre_response', 'lmfwc_tutorial_modify_response', 10,
Theming
↑ Back to topTemplate Structure & Overriding Templates Via a Theme
License Manager template files contain the markup and template structure for frontend and HTML emails of your store.
How to Edit Template Files
Edit files in an upgrade-safe way using overrides. Copy the template into a directory within your theme named /woocommerce keeping the same file structure but removing the /templates/ subdirectory.
Example: To change the Your license key(s) heading text in the license delivery email, copy: wp-content/plugins/license-manager-for-woocommerce/templates/emails/lmfwc-email-order-license-keys.php to wp-content/themes/yourtheme/woocommerce/emails/emails/lmfwc-email-order-license-keys.php
The copied file is safe to edit and will now override the default template file.
Do not edit these files within the core plugin itself as they are overwritten during the upgrade process and any customizations will be lost.
Rest API
Getting Started
↑ Back to topRequirements
↑ Back to topWordPress permalinks must be enabled at: Settings > Permalinks
API keys
↑ Back to topTo access the REST API routes, you will first need to create a pair of API keys. These API keys are used to access the REST API routes as a specific user.
Navigate to the WooCommerce > Settings > License Manager > REST API keys. Here you will be presented with the following screen:
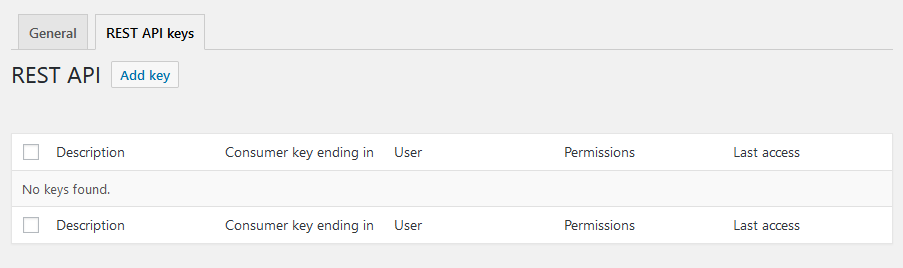
Overview of REST API keys
On this screen, press the “Add key” button at the top of the page. From here on, you will be redirected to the following form:
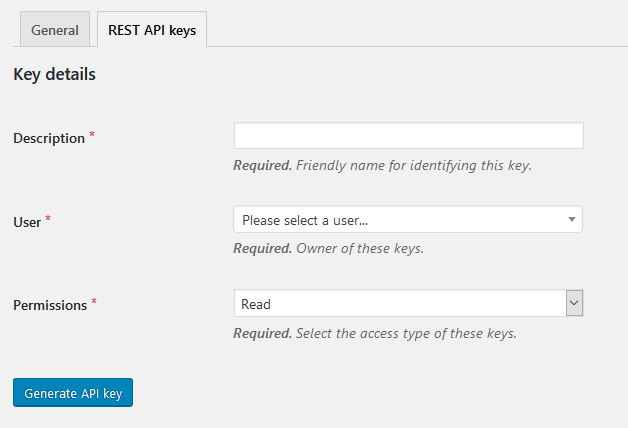
“Create REST API keys” form
All fields are required. The “Description” field provides a name for this REST API key pair, which should summarize what it is the keys are being used for. The “User” field is a searchable dropdown field which determines to whom these keys will be assigned to. The “Permissions” field grants the REST API keys either read, write, or read/write permissions.
After filling out the form and pressing the “Generate API key” button, you will be redirected to the following page:
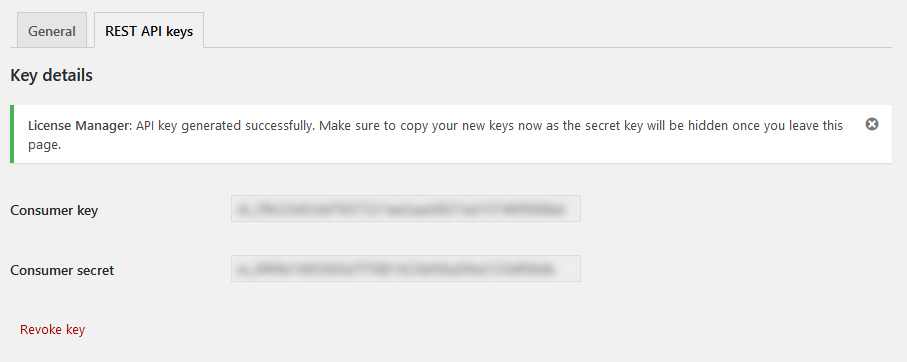
REST API keys have been created
As the success message instructs, you should now store these keys somewhere safe, as this is the last time you will see the secret key. If you do not save the REST API keys, or lose them, you will not be able to recover them. Because the consumer secret is stored as a hash inside the database, it is impossible to revert. Should this occur, you will need to generate a pair of new REST API keys.
Test If The API is Working
↑ Back to topMaking a Basic Request
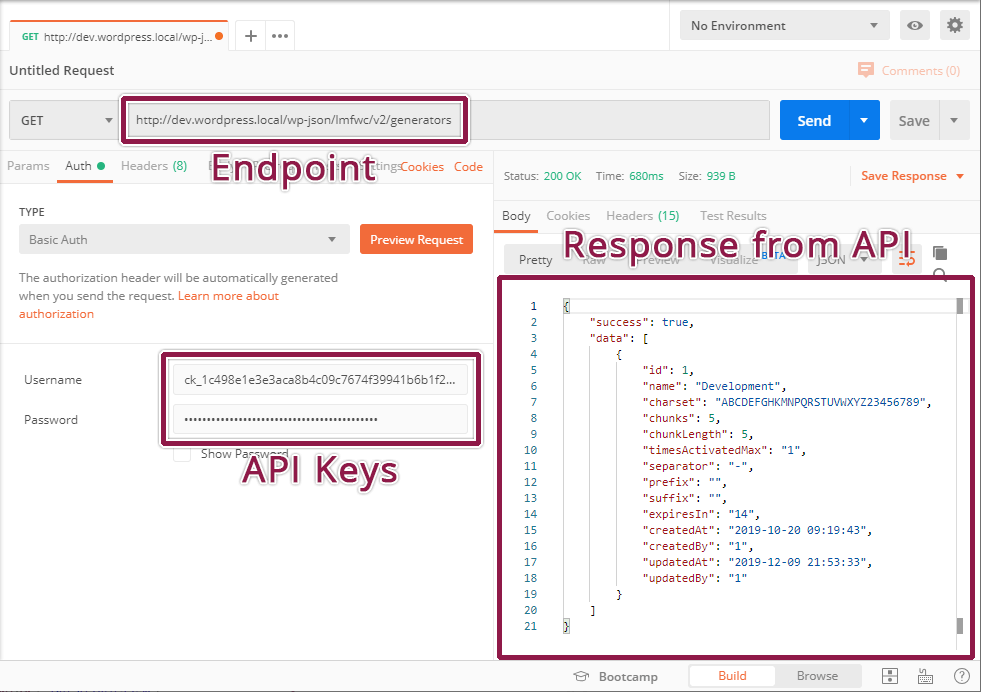
The request URL we’ll test is wp-json/lmfwc/v2/generators. On localhost the full URL may look something like this: http://dev.wordpress.local/wp-json/lmfwc/v2/orders. Modify this to use your own site URL.
In Postman, you need to set the fields for request type, request URL, and the settings on the authorization tab. For Authorization, choose basic auth and enter your consumer key and consumer secret keys from the License Manager for WooCommerce into the username and password fields.
Once you’re done, hit send, and you’ll see the JSON response from the API if everything went well. The response should look like this:
POSTMAN window
That’s it! The API is working.
If you have problems connecting, you may need to disable SSL verification – see the connection issues section below.
401 Unauthorized
Your API keys or signature is wrong. Ensure that:
- The user you generated API keys for actually has access to those resources.
- The username when authenticating is your consumer key.
- The password when authenticating is your consumer secret.
- Make a new set of keys to be sure.
If your server utilizes FastCGI, check that your authorization headers are properly read.
Consumer Key is Missing
If you are receiving the 403 HTTP status, coupled with the lmfwc_rest_no_ssl_error error message, the plugin is refusing the request because you are not using a secure (SSL) connection. You can use the plugin settings to allow the REST API to function on insecure HTTP connections. To do so, go to License Manager > Settings
Do not disable this setting on a productive environment. Allowing the REST API to be used on insecure connections will expose your license keys to Man-in-the-Middle attacks.
Developer Documentation
↑ Back to topList Licenses
↑ Back to topDescription
This route is used to retrieve all license keys from the database. Be very careful, if you do not need to use this API route in your productive environment then it is best to disable the route altogether via the settings page. The response contains an array of license key data objects.
Request URL
GET
/wp-json/lmfwc/v2/licenses
Response Example:
{

    “success”: true,

    “data”: [

        {

“id”: 1,

“orderId”: 165,

            “productId”: 20,

            “userId”: 1,

            “licenseKey”: “FIRST”,

            “expiresAt”: 2023-12-28 00:00:00”,

         “validFor”: null,

            “source”: 2,

            “status”:  2,

            “timesActivated”: 1,

            “timesActivatedMax”: 5,

            “createdAt”: “2023-12-11 07:27:15”,

            “createdBy”: 1,

            “updatedAt”: “2023-12-22 10:52:18”,

            “updatedBy”: 1

“activationData”: [

        {

            “id”: 3,

            “token”: “8a242078c59489077dfa420ed870d043f58cb300”,

        “license_id”: 1,

            “label”: null,

           “source”: 1,

            “ip_address”: “::1”,

            “user_agent”: “Mozilla/5.0 (Windows NT 10.0; Win64;

x64) AppleWebKit/537.36 (KHTML, like Gecko) Chrome/120.0.0.0 Safari/537.36″,

“meta_data”: null,

           “created_at”: “2023-12-15 14:39:11”,

            “updated_at”: “2023-12-15 14:41:30”,

           “deactivated_at”: null

}

]

            },

       {

“id”: 19,

“orderId”: null,

“productId”: null,

“userId”: null,

“licenseKey”: “license_key”,

“expiresAt”: null,

“validFor”: null,

“source”: 2,

“status”: 3,

“timesActivated”: null,

“timesActivatedMax”: null,

“createdAt”: “2023-12-21 15:19:22”,

“createdBy”: 1,

“updatedAt”: null,

“updatedBy”: null,

“activationData”: [ ]

}

]

}
Retrieve a License
↑ Back to topDescription
Retrieves a single license key by the license key string itself. The response contains the queried license key data object.
Request URL
GET
/wp-json/lmfwc/v2/licenses/{license_key}

Response Example:
{

“success”: true,

“data”: {

“id”: 1,

“orderId”: 165,

“productId”: 20,

“userId”: 1,

“licenseKey”: “FIRST”,

“expiresAt”: “2023-12-28 00:00:00”,

“validFor”: null,

“source”: 2,

“status”: 2,

“timesActivated”: 1,

“timesActivatedMax”: 5,

“createdAt”: “2023-12-11 07:27:15”,

“createdBy”: 1,

“updatedAt”: “2023-12-22 10:52:18”,

“activationData”: [

{

“id”: 3,

“token”: “8a242078c59489077dfa420ed870d043f58cb300”,

“license_id”: 1,

“label”: null,

“source”: 1,

“ip_address”: “::1”,

“user_agent”: “Mozilla/5.0 (Windows NT 10.0; Win64; x64) AppleWebKit/537.36 (KHTML, like Gecko) Chrome/120.0.0.0 Safari/537.36”,

“meta_data”: null,

“created_at”: “2023-12-15 14:39:11”,

“updated_at”: “2023-12-15 14:41:30”,

“deactivated_at”: null

}

]

}

}
Create a License
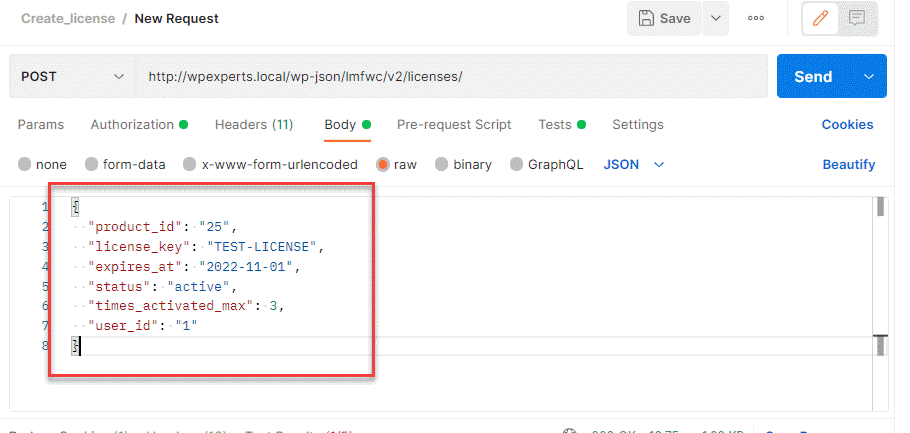
↑ Back to topDescription
Creates a new license key with the given parameters from the request body. It is possible to leave out certain keys, or explicitly set them to “null”. The response will contain the newly created license key data object.
Request URL
POST
/wp-json/lmfwc/v2/licenses
Request Headers
Content-Type: application/json
**Note* You can also use “valid_for”: “45” number of days instead of
Expires_at, please do not use both at a time
Request Body:
{
  "product_id": "25",
  "license_key": "TEST-LICENSE",
  "expires_at": "2022-11-01",
  "status": "active",
  "times_activated_max": 3,
  "user_id": "1"
}
Response Example:
{

“success”: true,

“data”: {

“id”: 69,

“orderId”: null,

“productId”: 25,

“userId”: 1,

“licenseKey”: “TEST-LICENSE”,

“expiresAt”: “2022-11-01 00:00:00”,

“validFor”: null,

“source”: 3,

“status”: 3,

“timesActivated”: null,

“timesActivatedMax”: 3,

“createdAt”: “2022-08-01 13:34:42”,

“createdBy”: 1,

“updatedAt”: null,

“updatedBy”: null

}

}
Update a License
↑ Back to topDescription
Performs an update of the license key. The request will not update key values that aren’t present in the request body, however if they are present their value will be updated, even if it’s a null value. The request will return the updated license key data object.
Request URL
PUT
/wp-json/lmfwc/v2/licenses/{license_key}
Request Headers
Content-Type: application/json
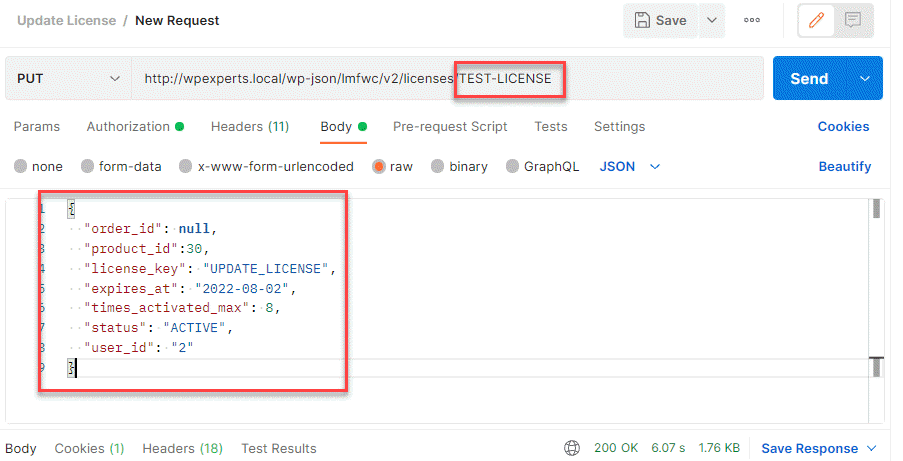
Request Body:
{
  "order_id": null,
  "product_id": 30,
  "license_key": "UPDATE_LICENSE",
  "expires_at": "2022-08-02",
  "times_activated_max": 8,
  "status": "ACTIVE",
  "user_id": "2"
}Response Example:
“success”: true,

“data”: {

“id”: 31,

“orderId”: null,

“productId”: 30,

“userId”: 2,

“licenseKey”: “UPDATE_LICENSE”,

“expiresAt”: “2022-08-02 00:00:00”,

“validFor”: null,

“source”: 3,

“status”: 3,

“timesActivated”: null,

“timesActivatedMax”: 8,

“createdAt”: “2022-07-29 11:20:24”,

“createdBy”: 1,

“updatedAt”: “2022-07-29 11:24:52”,

“updatedBy”: 1

}

}
Delete a License
↑ Back to topDeletes a license by its key value. The response contains success = true if the license is deleted.
Request URL
DELETE
{SITE_URL}/wp-json/lmfwc/v2/licenses{license_key}
Request Headers
Content-Type: application/json
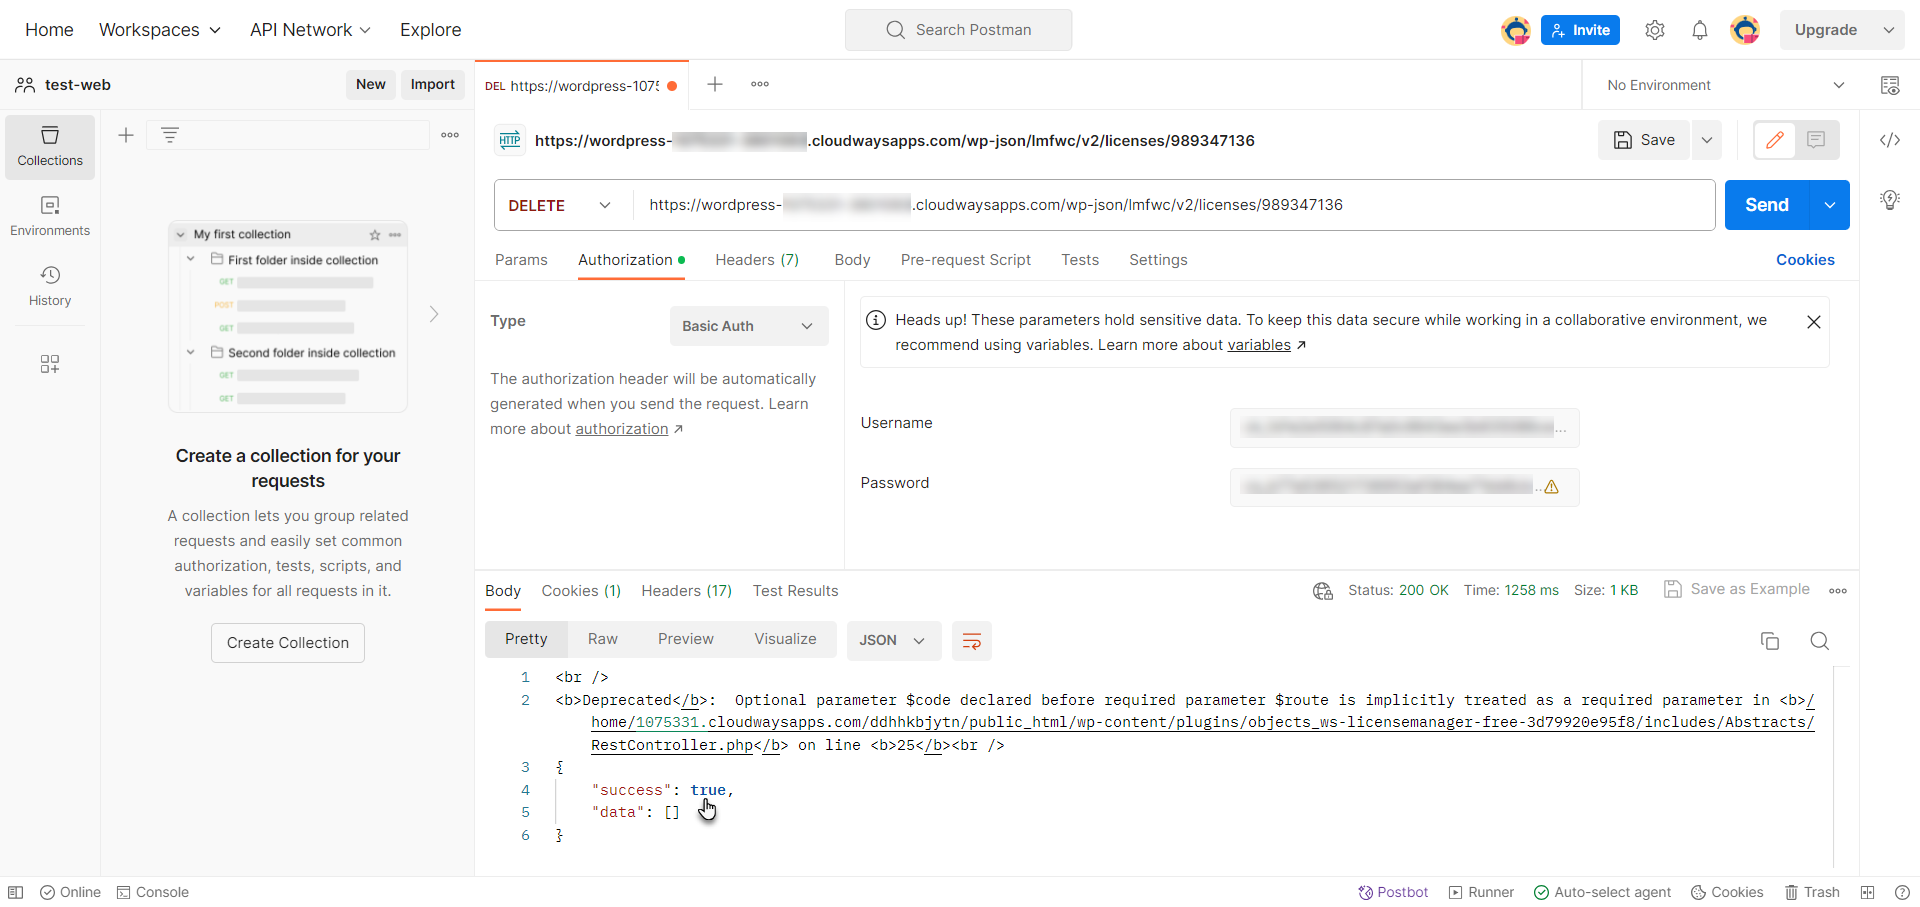
Response
{

    "success": true,

    "data": []

}
Activate a License
↑ Back to topDescription
Increments the times_activated value by one (1). The plugin will check if there is a times_activated_max value, if there is and if the times_activated value has not reached the limit set by times_activated_max, then the times_activated will be incremented by 1, and the updated license key data object will be returned, It will create an activation token in activation page
Request URL
GET
/wp-json/lmfwc/v2/licenses/activate/{license_key}
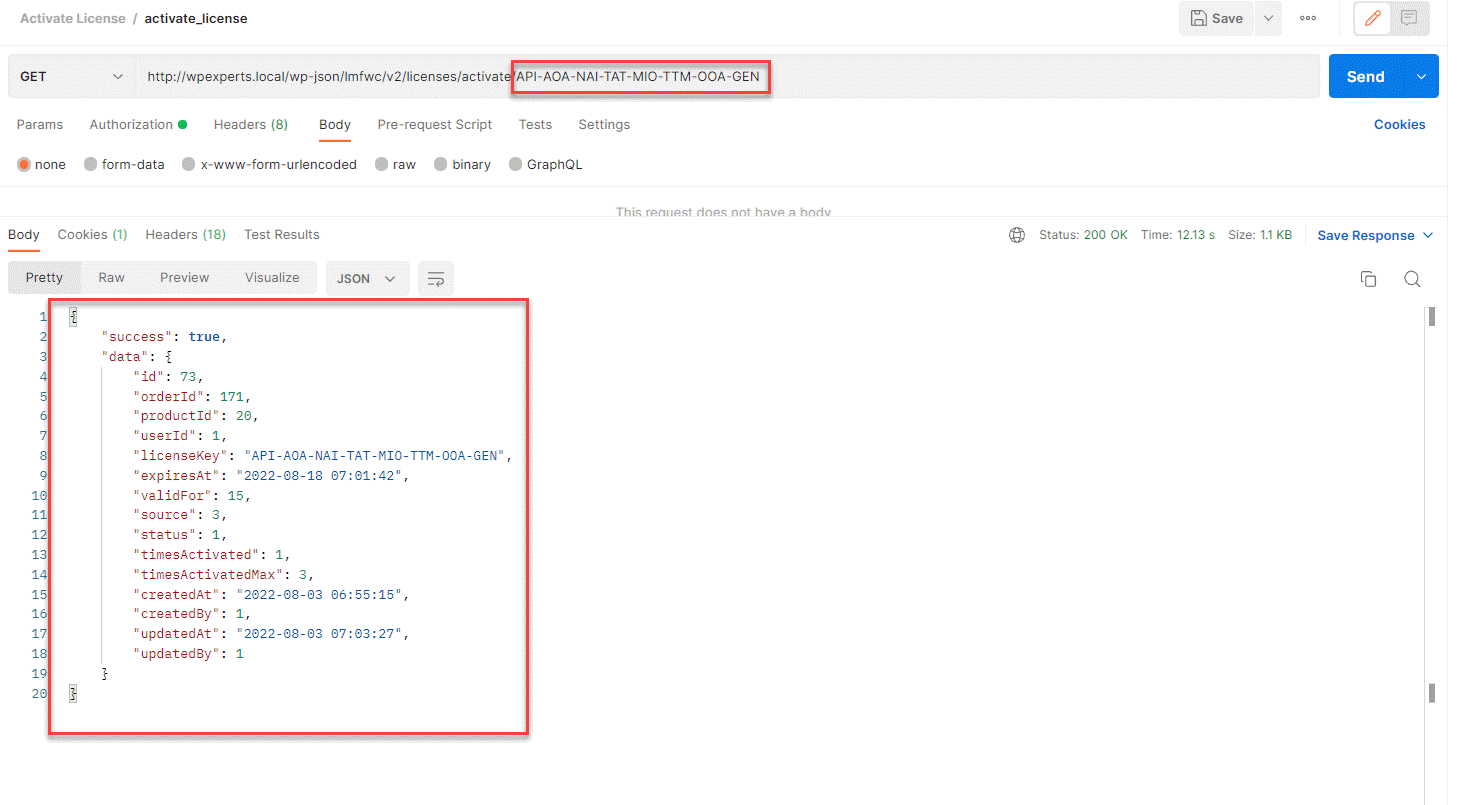
Response Example:
{
   "success":true,
   "data":{
      "id":1,
      "orderId":165,
      "productId":20,
      "userId":1,
      "licenseKey":"FIRST",
      "expiresAt":"2023-12-28 00:00:00",
      "validFor":null,
      "source":2,
      "status":2,
      "timesActivated":2,
      "timesActivatedMax":5,
      "createdAt":"2023-12-11 07:27:15",
      "updatedAt":"2023-12-22 11:07:44",
      "activationData":{
         "id":6,
         "token":"8f04017840bd40f993e5712403e4ed945a2aeb7c",
         "license_id":1,
         "label":null,
         "source":2,
         "ip_address":"127.0.0.1",
         "user_agent":"PostmanRuntime/7.36.0",
         "meta_data":null,
         "created_at":"2023-12-22 11:07:44",
         "updated_at":null,
         "deactivated_at":null
      }
   }
}
Reactivate a License
↑ Back to topDescription
Increments the times_activated value by one (1). The plugin will check if there is a times_activated_max value, if there is and if the times_activated value has not reached the limit set by times_activated_max, then the times_activated will be incremented by 1, and the updated license key and activation data object will be returned, it will reactivate the activation token by passing in the parameters
Request URL
GET
/wp-json/lmfwc/v2/licenses/activate/{license_key}
Response Example:
{
   "success":true,
   "data":{
      "id":1,
      "orderId":165,
      "productId":20,
      "userId":1,
      "licenseKey":"FIRST",
      "expiresAt":"2023-12-28 00:00:00",
      "validFor":null,
      "source":2,
      "status":2,
      "timesActivated":2,
      "timesActivatedMax":5,
      "createdAt":"2023-12-11 07:27:15",
      "updatedAt":"2023-12-22 11:07:44",
      "activationData":{
         "id":6,
         "token":"8f04017840bd40f993e5712403e4ed945a2aeb7c",
         "license_id":1,
         "label":null,
         "source":2,
         "ip_address":"127.0.0.1",
         "user_agent":"PostmanRuntime/7.36.0",
         "meta_data":null,
         "created_at":"2023-12-22 11:07:44",
         "updated_at":null,
         "deactivated_at":null
      }
   }
}
Deactivate a License
↑ Back to topDescription
Decrease the times_activated value by one (1). It is not possible to deactivate a license key whose times_activated is null or already zero. Deactivations can be performed by the licensee key and by passing the activation token. When only the license key is passed in the deactivate license API, then all activations will become inactive. To deactivate a single activation, you will use this route /wp-json/lmfwc/v2/licenses/deactivate/{license_key} like this. In the parameters, you will pass the token.
Request URL
GET
/wp-json/lmfwc/v2/licenses/deactivate/{license_key}
Response Example:
{

    “success”: true,

    “data”: {

        “id”: 73,

        “orderId”: 171,

        “productId”: 20,

        “userId”: 1,

        “licenseKey”: “API-AOA-NAI-TAT-MIO-TTM-OOA-GEN”,

        “expiresAt”: “2022-08-18 07:01:42”,

        “validFor”: 15,

        “source”: 3,

        “status”: 1,

        “timesActivated”: 0,

        “timesActivatedMax”: 3,

        “createdAt”: “2022-08-03 06:55:15”,

        “createdBy”: 1,

        “updatedAt”: “2022-08-03 07:09:33”,

        “updatedBy”: 1

    }

}
Validate a License
↑ Back to topDescription
Checks the current activation status of a license key. The response will contain the number of activations, the maximum activation count, and the remaining activations.
Request URL
GET
/wp-json/lmfwc/v2/licenses/validate/{license_key}
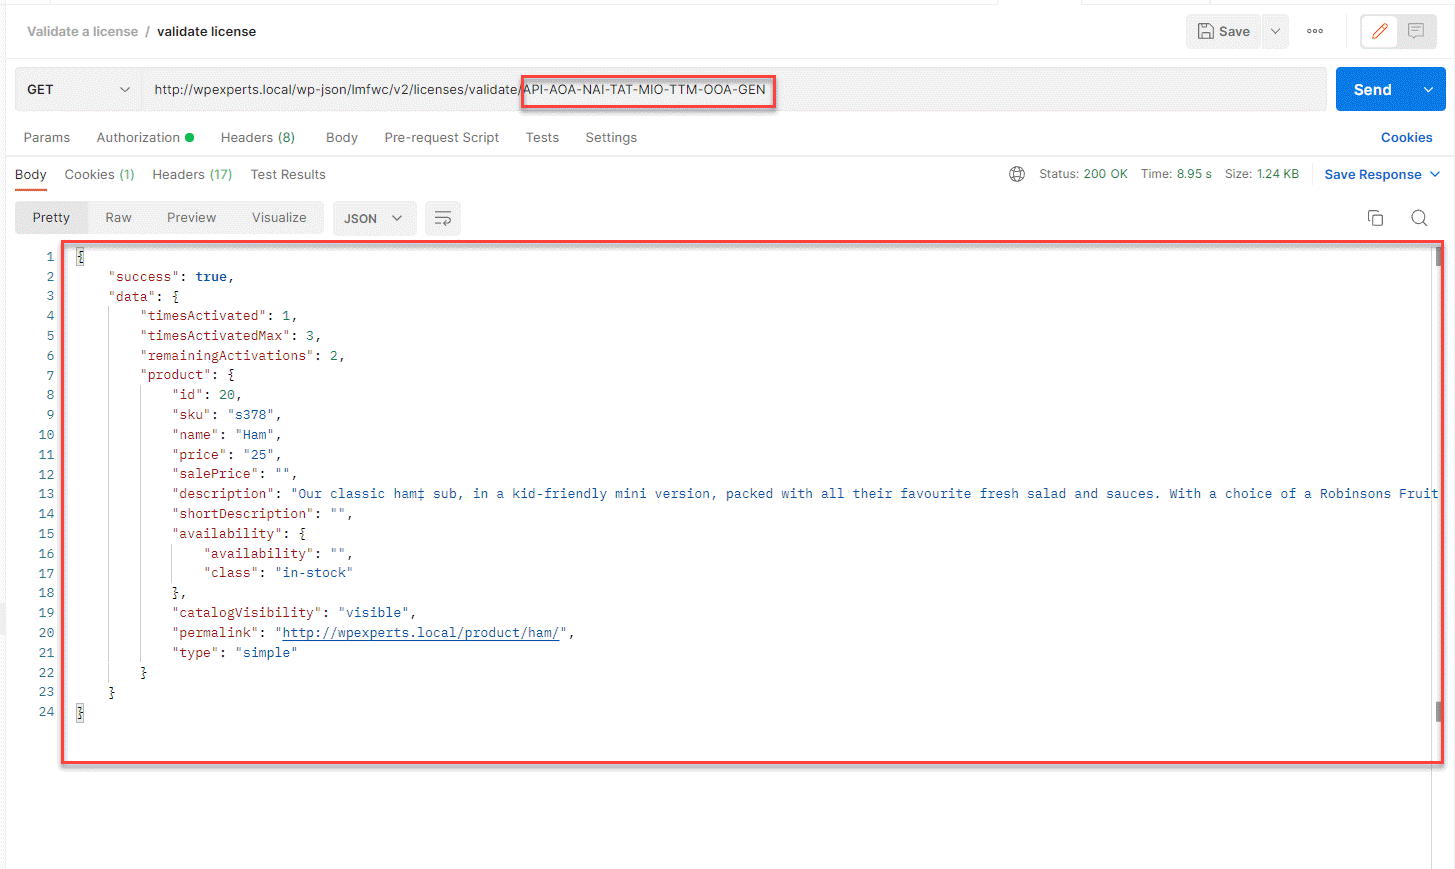
Response Example:
{
    "success": true,
    "data": {
        "id": 1,
        "orderId": 165,
        "productId": 20,
        "userId": 1,
        "licenseKey": "FIRST",
        "expiresAt": "2023-12-28 00:00:00",
        "validFor": null,
        "source": 2,
        "status": 2,
        "timesActivated": 0,
        "timesActivatedMax": 5,
        "createdAt": "2023-12-11 07:27:15",
        "createdBy": 1,
        "updatedAt": "2023-12-26 13:14:34",
        "updatedBy": 1,
        "activationData": [
            {
                "id": 11,
                "token": "99011e7d2f7fab83bbbcdeb72d427353b4fe66d3",
                "license_id": 1,
                "label": null,
                "source": 2,
                "ip_address": "127.0.0.1",
                "user_agent": "PostmanRuntime/7.36.0",
                "meta_data": null,
                "created_at": "2023-12-26 13:13:10",
                "updated_at": "2023-12-26 13:14:34",
                "deactivated_at": "2023-12-26 13:14:34"
            }
        ]
    }
}
List All Generators
↑ Back to topDescription
Retrieves all currently available generators. The response will contain an array of generator data objects.
Request URL
GET
/wp-json/lmfwc/v2/generators
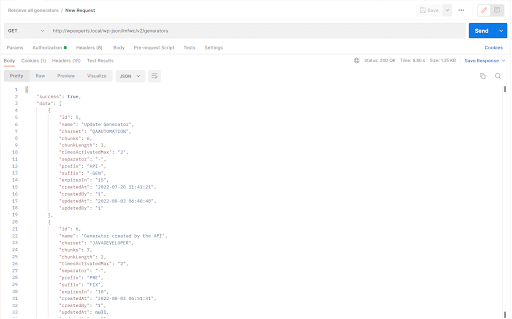
Response Example:
{

“success”: true,

“data”: [

{

“id”: 5,

“name”: “Update Generator”,

“charset”: “QAAUTOMATION”,

“chunks”: 6,

“chunkLength”: 3,

“timesActivatedMax”: “3”,

“separator”: “-“,

“prefix”: “API-“,

“suffix”: “-GEN”,

“expiresIn”: “15”,

“createdAt”: “2022-07-28 11:41:21”,

“createdBy”: “1”,

“updatedAt”: “2022-08-03 06:48:40”,

“updatedBy”: “1”

},

{

“id”: 6,

“name”: “Generator created by the API”,

“charset”: “JAVADEVELOPER”,

“chunks”: 7,

“chunkLength”: 2,

“timesActivatedMax”: “2”,

“separator”: “-“,

“prefix”: “PRE”,

“suffix”: “FIX”,

“expiresIn”: “10”,

“createdAt”: “2022-08-03 06:51:31”,

“createdBy”: “1”,

“updatedAt”: null,

“updatedBy”: null

}

]

}
Retrieve a Specific Generator
↑ Back to topDescription
Retrieves a single generator by its ID. The response contains the generator data object.
Request URL
GET
/wp-json/lmfwc/v2/generators/{generator_id}
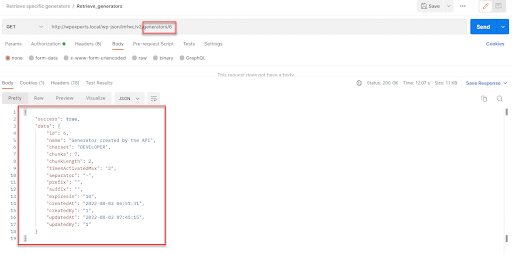
Response Example:
{

“success”: true,

“data”: {

“id”: 6,

“name”: “Generator created by the API”,

“charset”: “DEVELOPER”,

“chunks”: 7,

“chunkLength”: 2,

“timesActivatedMax”: “2”,

“separator”: “-“,

“prefix”: “”,

“suffix”: “”,

“expiresIn”: “10”,

“createdAt”: “2022-08-03 06:51:31”,

“createdBy”: “1”,

“updatedAt”: “2022-08-03 07:45:15”,

“updatedBy”: “1”

}

}
Create a Generator
↑ Back to topDescription
Creates a new generator. The response contains the newly created generator data object.
Request URL
POST
/wp-json/lmfwc/v2/generators
Request Headers
Content-Type: application/json
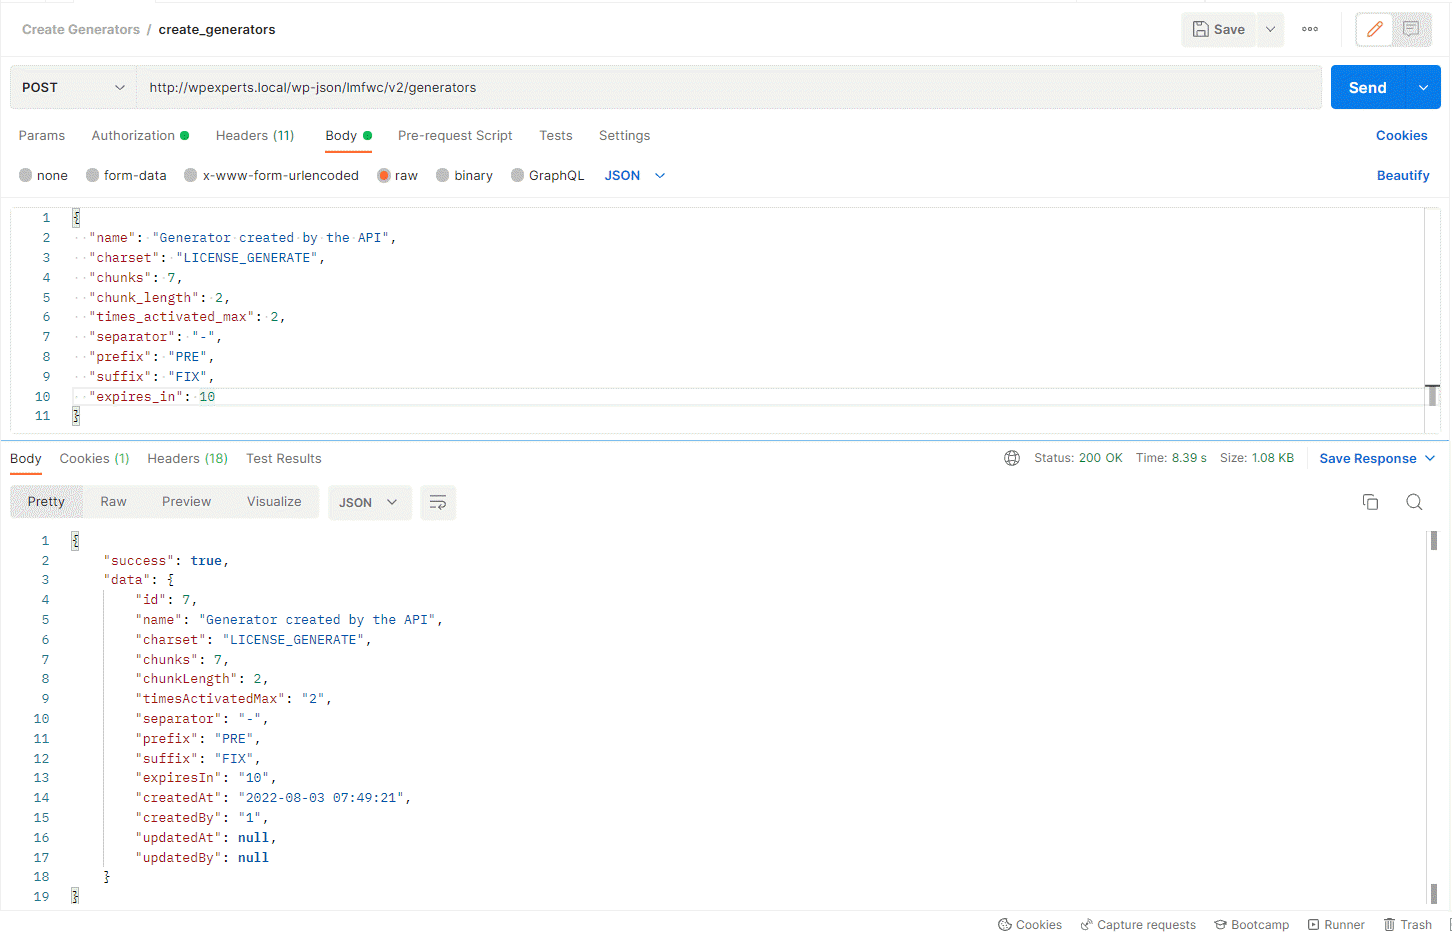
Request Body:
{
  "name": "Generator created by the API",
  "charset": "LICENSE_GENERATE",
  "chunks": 7,
  "chunk_length": 2,
  "times_activated_max": 2,
  "separator": "-",
  "prefix": "PRE",
  "suffix": "FIX",
  "expires_in": 10
}
Response Example:
{

    “success”: true,

    “data”: {

        “id”: 7,

        “name”: “Generator created by the API”,

        “charset”: “LICENSE_GENERATE”,

        “chunks”: 7,

        “chunkLength”: 2,

        “timesActivatedMax”: “2”,

        “separator”: “-“,

        “prefix”: “PRE”,

        “suffix”: “FIX”,

        “expiresIn”: “10”,

        “createdAt”: “2022-08-03 07:49:21”,

        “createdBy”: “1”,

        “updatedAt”: null,

        “updatedBy”: null

    }

}
Update a Generator
↑ Back to topDescription
Updates a generator by its ID. The response contains the updated generator data object.
Request URL
PUT
/wp-json/lmfwc/v2/generators/{generator_id}
Request Headers
Content-Type: application/json
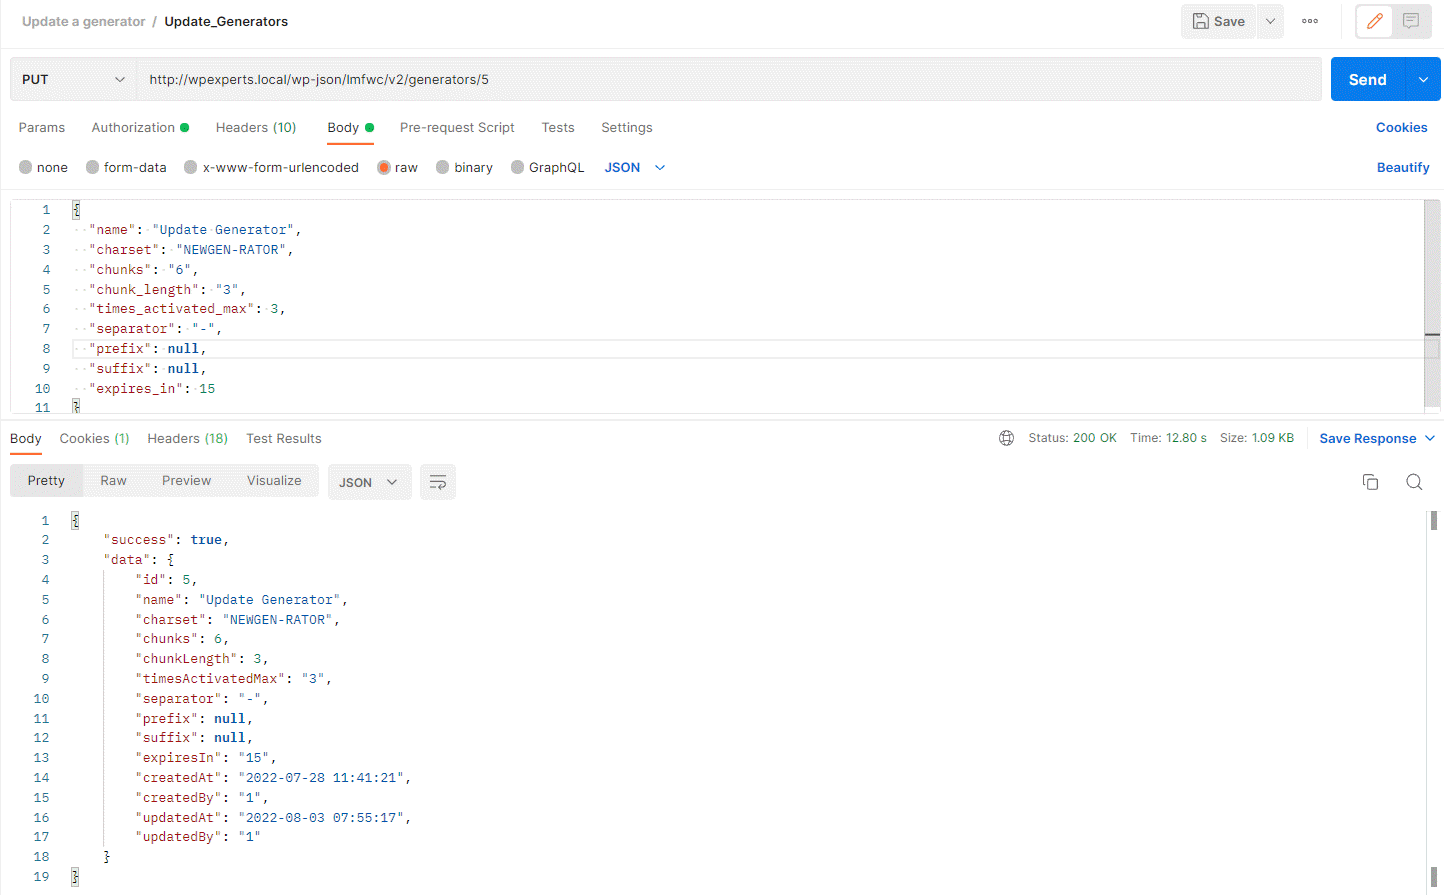
Request Body:
{
  "name": "Update Generator",
  "charset": "NEWGEN-RATOR",
  "chunks": "6",
  "chunk_length": "3",
  "times_activated_max": 3,
  "separator": "-",
  "prefix": null,
  "suffix": null,
  "expires_in": 15
}
Response Example:
{

“success”: true,

“data”: {

“id”: 5,

“name”: “Update Generator”,

“charset”: “NEWGEN-RATOR”,

“chunks”: 6,

“chunkLength”: 3,

“timesActivatedMax”: “3”,

“separator”: “-“,

“prefix”: null,

“suffix”: null,

“expiresIn”: “15”,

“createdAt”: “2022-07-28 11:41:21”,

“createdBy”: “1”,

“updatedAt”: “2022-08-03 07:55:17”,

“updatedBy”: “1”

}

}
Delete a Generator
↑ Back to topDescription
Deletes a generator by its ID. The response contains success = true if the generator is deleted.
Request URL
DELETE
{SITE_URL}/wp-json/lmfwc/v2/generators/{generator_id}
Request Headers
Content-Type: application/json
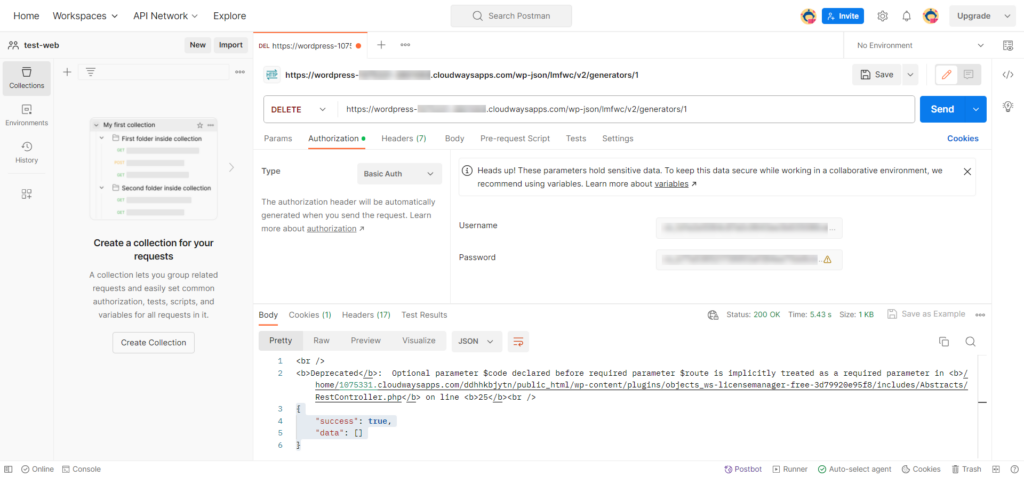
Response
{ “success”: true,
“data”: []
}
Generate Licenses (Pro)
↑ Back to topDescription
Generate generators by generator ID. The response contains the generated keys.
Request URL
POST
/wp-json/lmfwc/v2/generators/1/generate
Request Headers
Content-Type: application/json
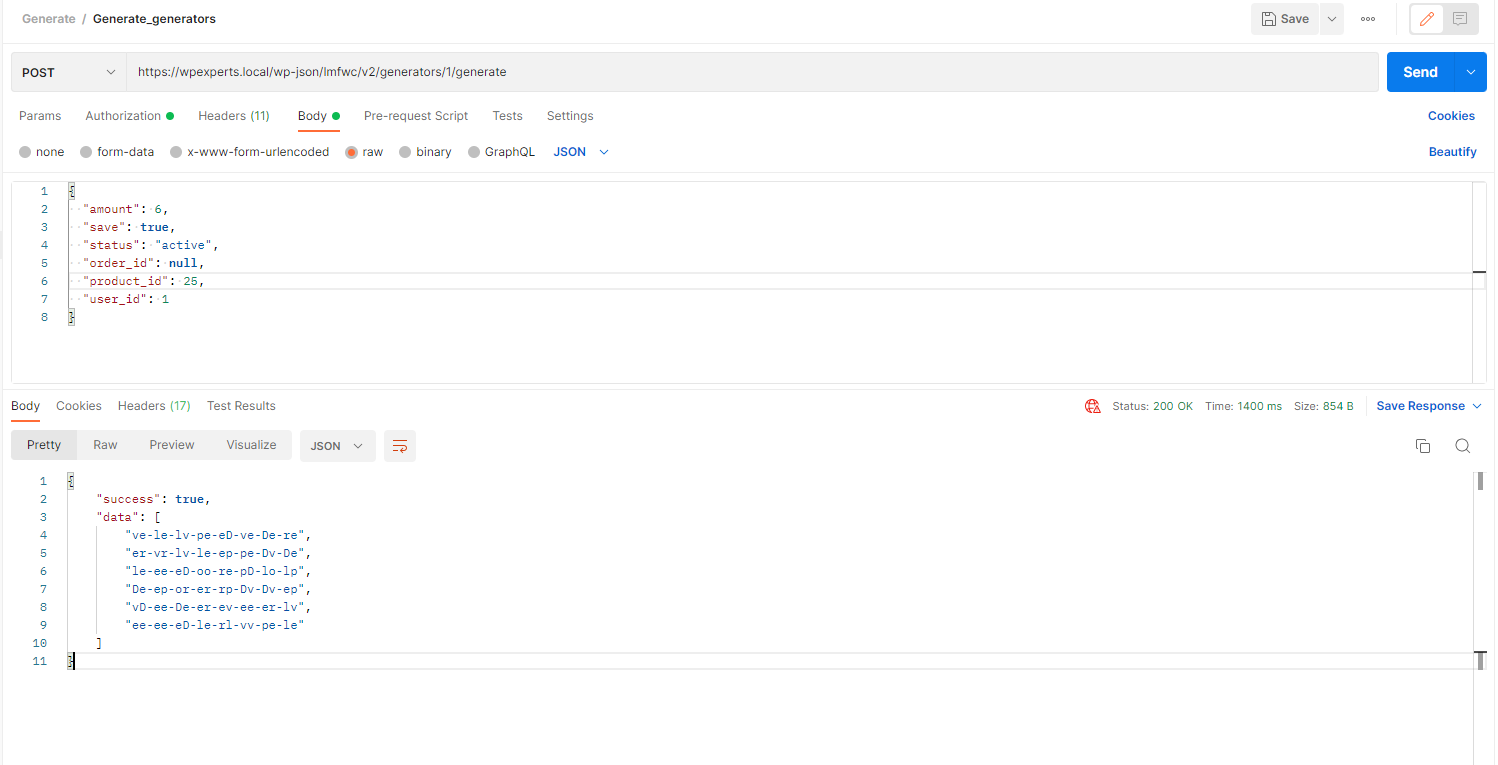
Request Quest Body:
{
  "amount": 6,
  "save": true,
  "status": "active",
  "order_id": null,
  "product_id": 25,
  "user_id": 1
}
Response Example
{

“success”: true,

“data”: [

“ve-le-lv-pe-eD-ve-De-re”,

“er-vr-lv-le-ep-pe-Dv-De”,

“le-ee-eD-oo-re-pD-lo-lp”,

“De-ep-or-er-rp-Dv-Dv-ep”,

“vD-ee-De-er-ev-ee-er-lv”,

“ee-ee-eD-le-rl-vv-pe-le”

]

}
Validate Customer Licenses (Pro)
↑ Back to topDescription
Get customer’s licenses by customer’s id which licenses assigned to customer
Request URL
GET
wp-json/lmfwc/v2/customers/1/licenses
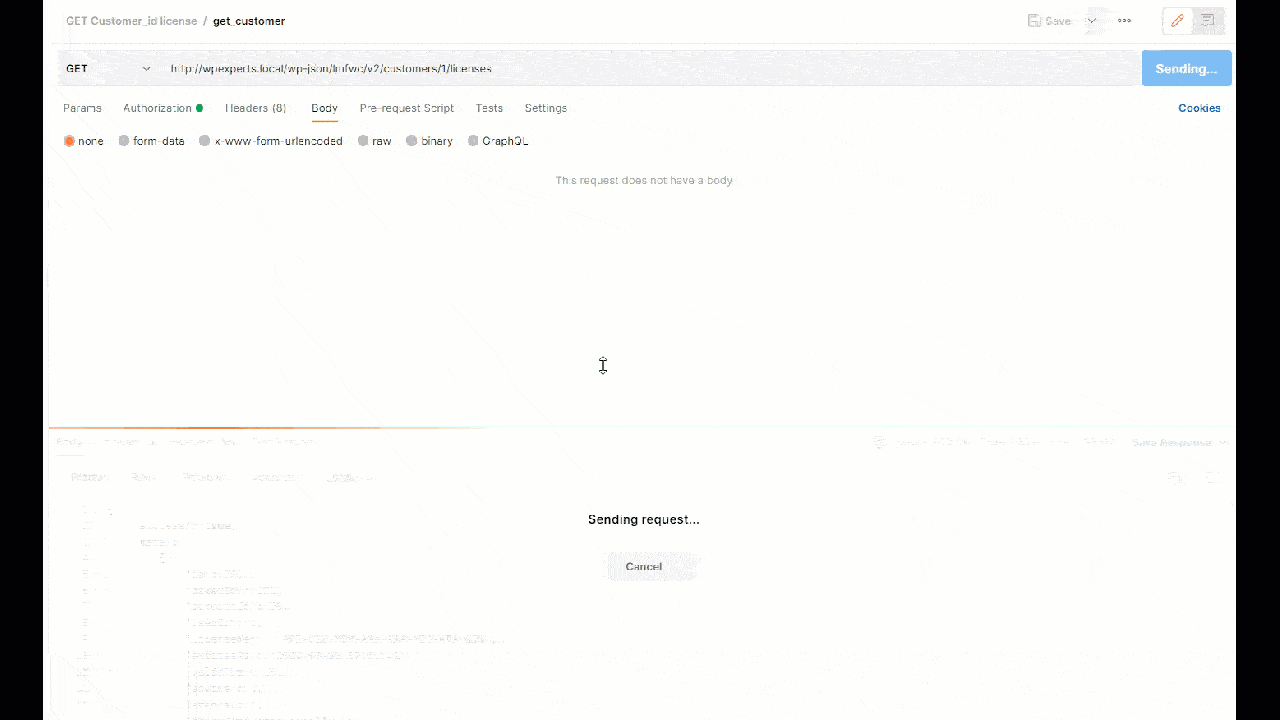
Response Example:
{

    “success”: true,

    “data”: [

        {

            “id”: 70,

            “orderId”: 171,

            “productId”: 20,

            “userId”: 1,

            “licenseKey”: “API-OIQ-MOM-AAA-AAA-MIO-ATA-GEN”,

            “expiresAt”: “2022-08-18 07:01:42”,

            “validFor”: 15,

            “source”: 3,

            “status”: 1,

            “timesActivated”: null,

            “timesActivatedMax”: 3,

            “createdAt”: “2022-08-03 06:55:15”,

            “createdBy”: 1,

            “updatedAt”: “2022-08-03 07:01:42”,

            “updatedBy”: 1

        },

        {

            “id”: 71,

            “orderId”: 171,

            “productId”: 20,

            “userId”: 1,

            “licenseKey”: “API-MNA-AUA-AMT-OIA-AAA-OAT-GEN”,

            “expiresAt”: “2022-08-18 07:01:42”,

            “validFor”: 15,

            “source”: 3,

            “status”: 1,

            “timesActivated”: null,

            “timesActivatedMax”: 3,

            “createdAt”: “2022-08-03 06:55:15”,

            “createdBy”: 1,

            “updatedAt”: “2022-08-03 07:01:42”,

            “updatedBy”: 1

        },

        {

            “id”: 72,

            “orderId”: 171,

            “productId”: 20,

            “userId”: 1,

            “licenseKey”: “API-OOU-AOA-OAT-UOT-OTN-TOA-GEN”,

            “expiresAt”: “2022-08-18 07:01:42”,

            “validFor”: 15,

            “source”: 3,

            “status”: 1,

            “timesActivated”: null,

            “timesActivatedMax”: 3,

            “createdAt”: “2022-08-03 06:55:15”,

            “createdBy”: 1,

            “updatedAt”: “2022-08-03 07:01:42”,

            “updatedBy”: 1

        }
Products/Ping (Pro)
↑ Back to topDescription
Create a ping request to check for the connection between REST API Server and the Client
Request URL
POST
wp-json/lmfwc/v2/products/ping
Request Headers
Content-Type: application/json
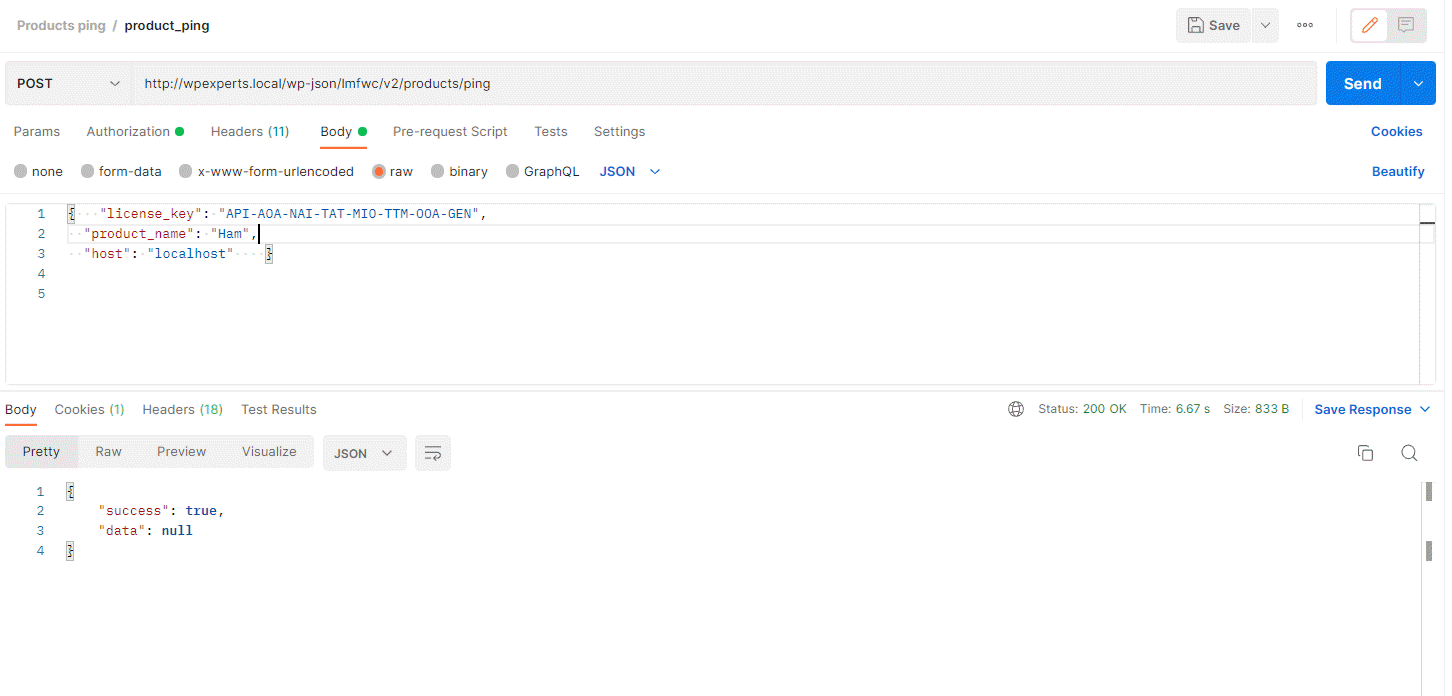
Request Body Example:
{
  "license_key": "API-AOA-NAI-TAT-MIO-TTM-OOA-GEN",
  "product_name": "Ham",
  "host": "localhost"
}
Response Example:
{

    “success”: true,

    “data”: null

}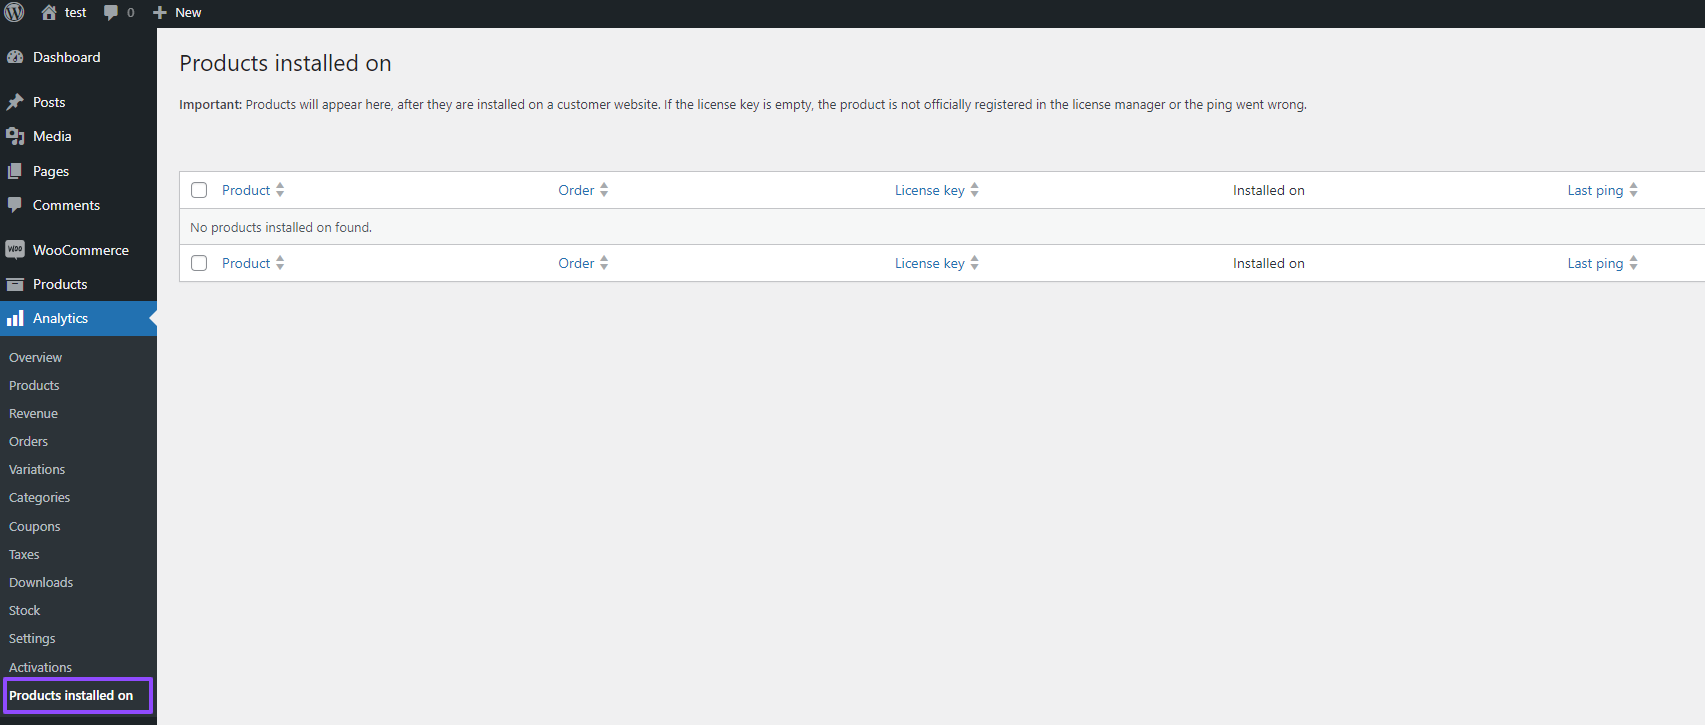
After hit the products ping API admin would able to see the ping details in Products installed on menu
Analytics > Products installed
Products/Update (PRO)
↑ Back to topDescription
It will show the products details in which products license key is assigned
Request URL
GET
wp-json/lmfwc/v2/products/update/{license_key}
Request Headers
Content-Type: application/json
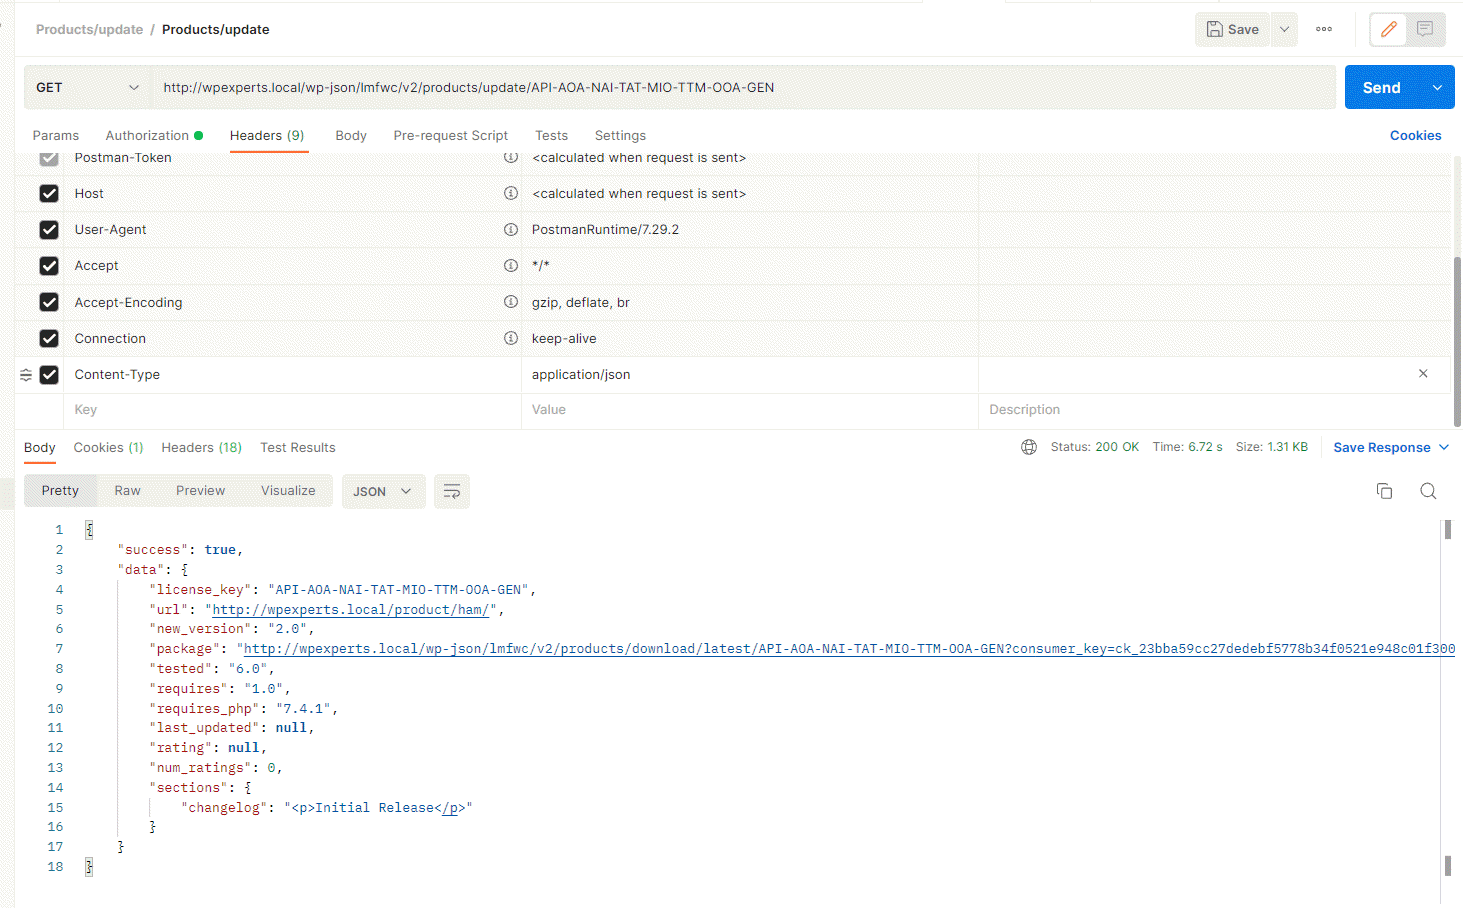
Response Example:
{

    “success”: true,

    “data”: {

        “license_key”: “API-AOA-NAI-TAT-MIO-TTM-OOA-GEN”,

        “url”: “http://wpexperts.local/product/ham/”,

        “new_version”: “2.0”,

        “package”: “http://wpexperts.local/wp-json/lmfwc/v2/products/download/latest/API-AOA-NAI-TAT-MIO-TTM-OOA-GEN?consumer_key=ck_23bba59cc27dedebf5778b34f0521e948c01f300&consumer_secret=cs_0821d6a54dd8adcb71cf3dbf9d3663c6c1084722”,

        “tested”: “6.0”,

        “requires”: “1.0”,

        “requires_php”: “7.4.1”,

        “last_updated”: null,

        “rating”: null,

        “num_ratings”: 0,

        “sections”: {

            “changelog”: “<p>Initial Release</p>”

        }

    }
Download Products (Pro)
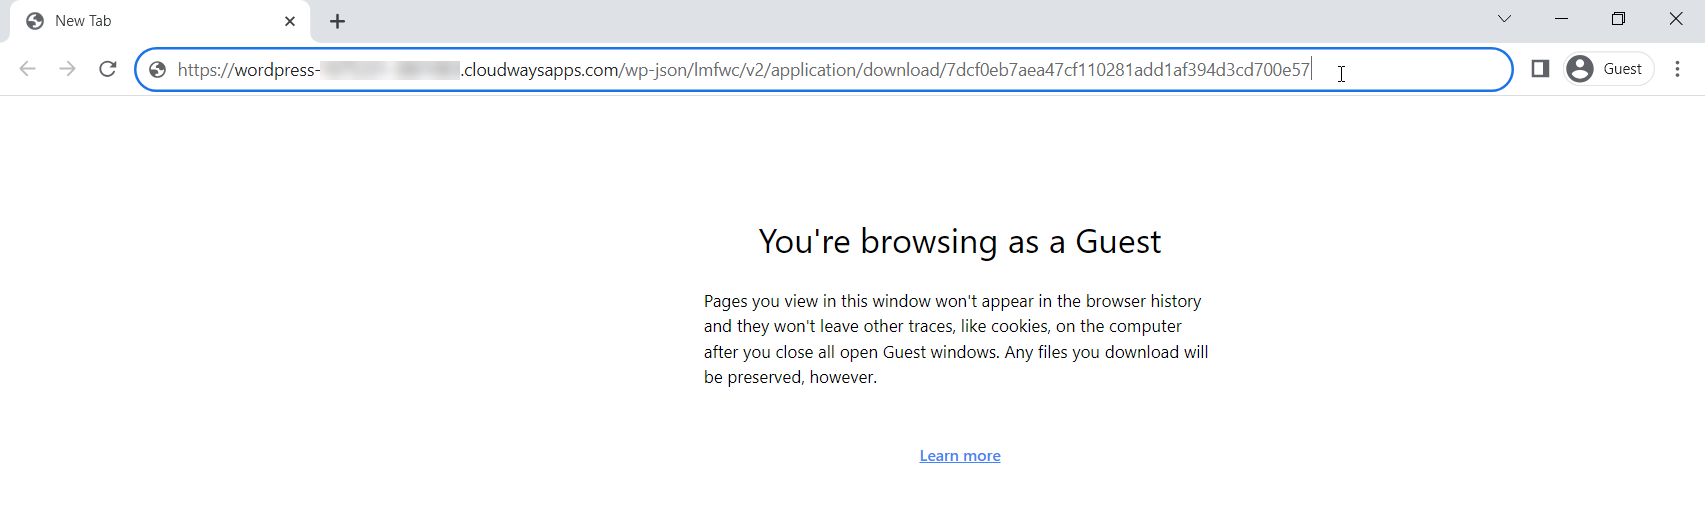
↑ Back to topDescription
Download the latest products of your license when hit this API, please use this API only in the browser..
Request URL
wp-json/lmfwc/v2/products/download/latest/{license_key}
Response
Retrieve an Application (Pro)
↑ Back to topDescription
Retrieves a single application by its ID. The response contains the queried application data object.
Request URL
GET
{SITE_URL}/wp-json/lmfwc/v2/application{application_id}
Request Headers
Content-Type: application/json
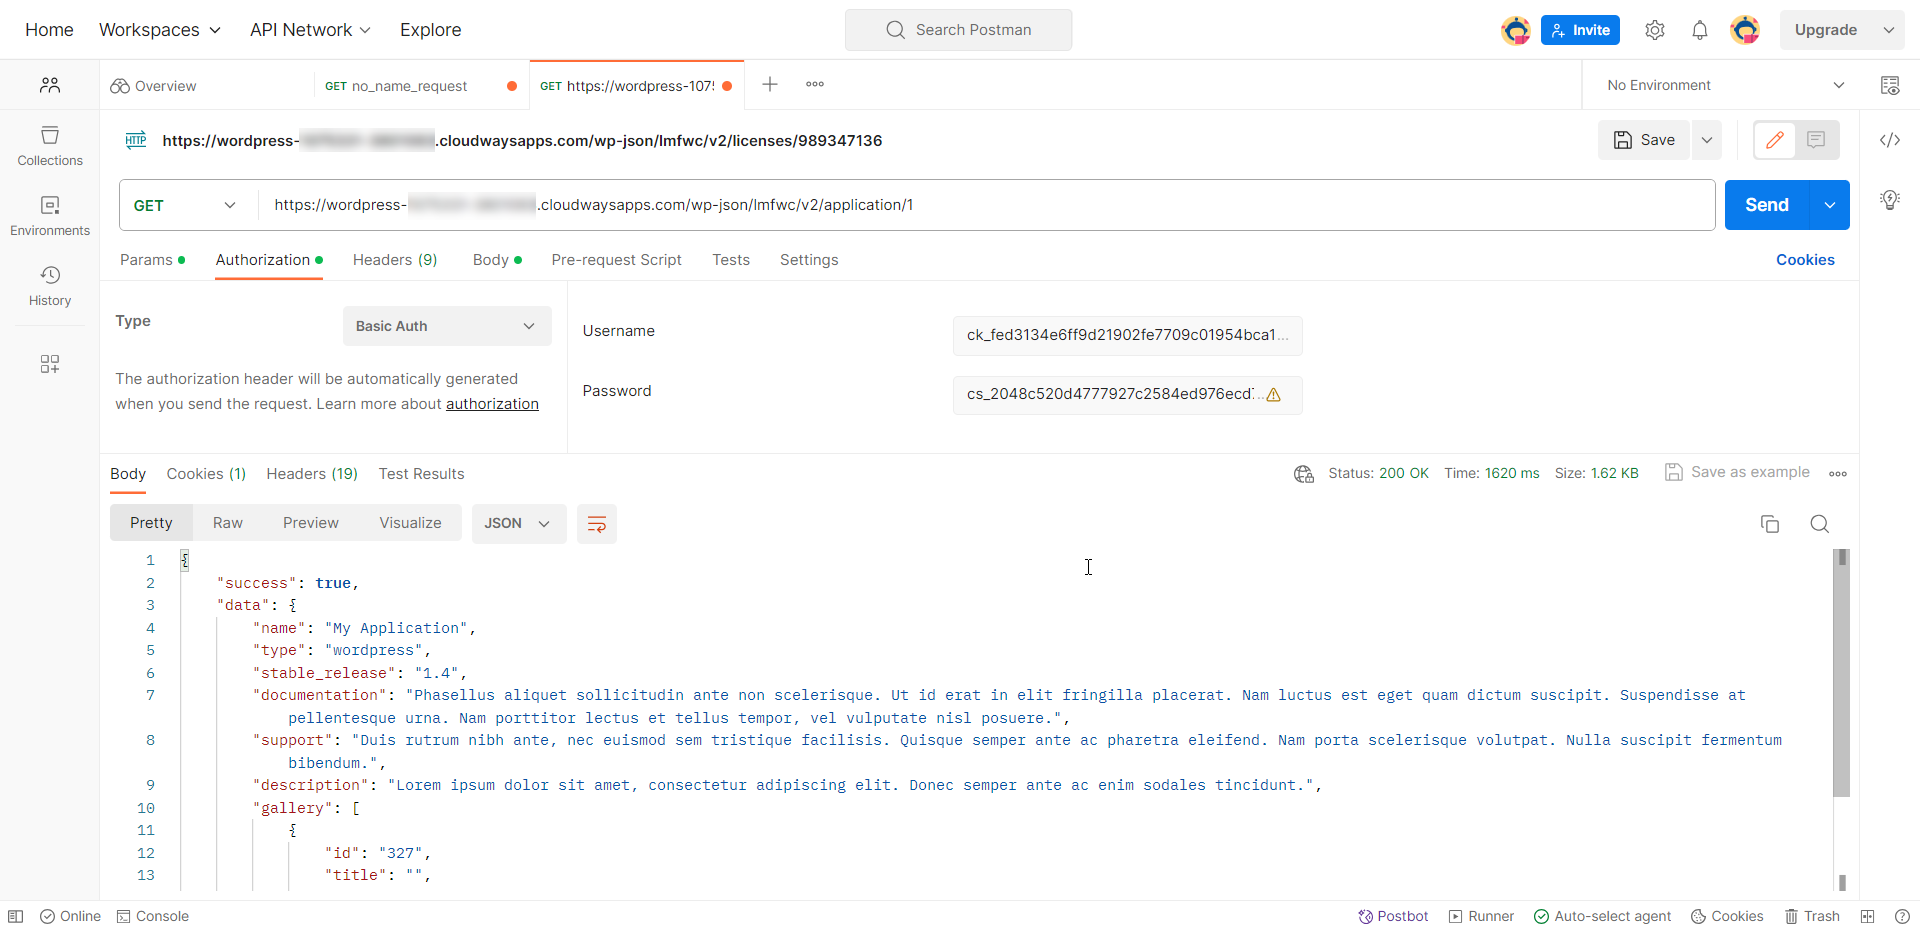
Response
{
“success”: true,
“data”: {
“name”: “My Application”,
“type”: “wordpress”,
“stable_release”: “1.4”,
“documentation”: “Phasellus aliquet sollicitudin ante non scelerisque. Ut id erat in elite fringilla placerat. Nam luctus est eget quam dictum suscipit. Suspendisse at pellentesque urna. Nam porttitor lectus et tellus tempor, vel vulputate nisl posuere.”,
“support”: “Duis rutrum nibh ante, nec euismod sem tristique facilisis. Quisque semper ante ac pharetra eleifend. Nam porta scelerisque volutpat. Nulla suscipit fermentum bibendum.”,
“description”: “Lorem ipsum dolor sit amet, consectetur adipiscing elit. Donec semper ante ac enim sodales tincidunt.”,
“gallery”: [
{
“id”: “327”,
“title”: “”,
“description”: “Nulla suscipit fermentum bibendum.”,
“url”: “https://wordpress-***********.cloudwaysapps.com/wp-content/uploads/2023/09/default-point-type.png”
}
]
}
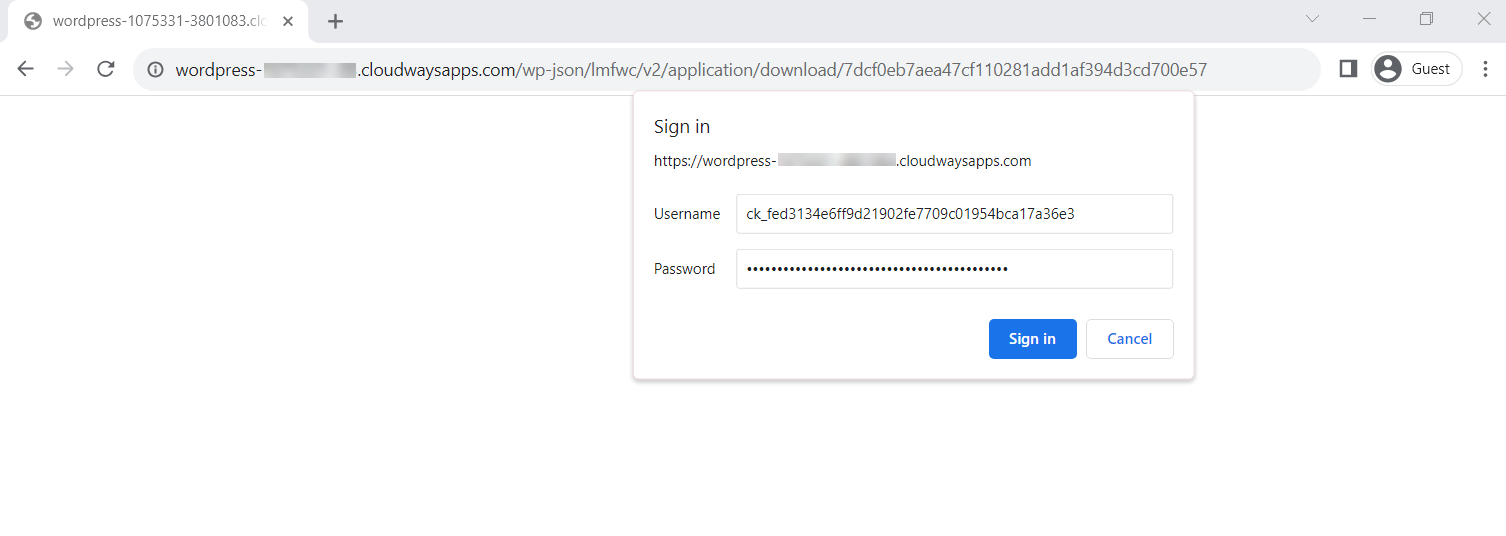
} Download Application (Pro)
↑ Back to topDescription
Download the latest version of your application when this API is hit, please use this API only in the browser
Request URL
GET
{SITE_URL}/wp-json/lmfwc/v2/application/download/{activation_token}
Request Headers
Content-Type: application/json
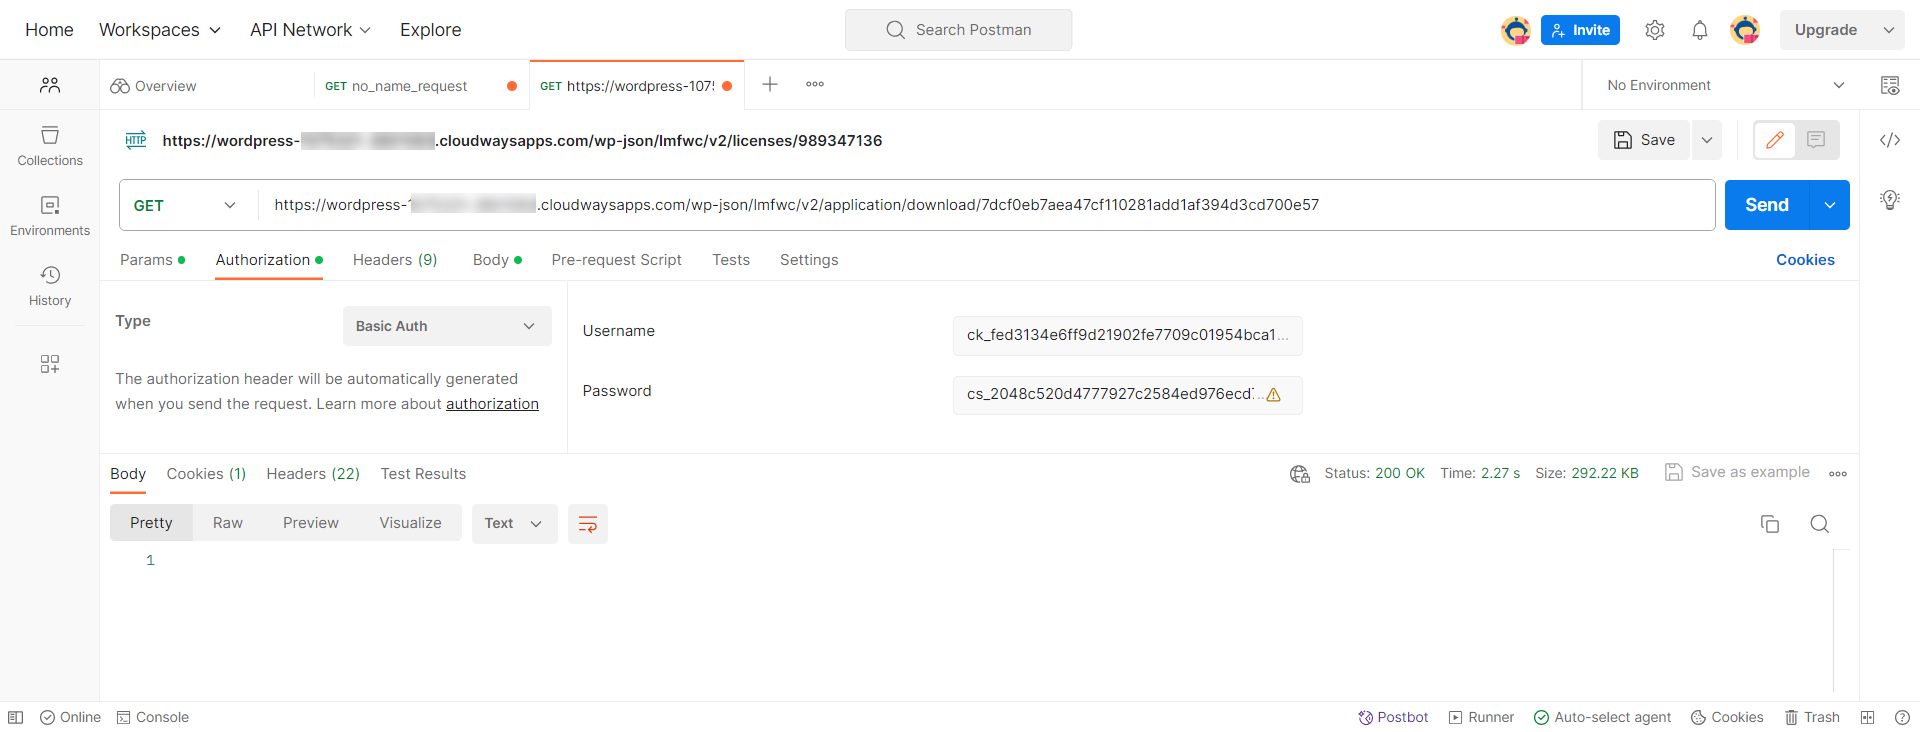
Response
Open a new tab and paste the request URL in the search bar.
- Enter the consumer key and consumer secret in the alert bar.
- Click on the Sign in button.
- Resulting will download the application.
Libraries
↑ Back to topNode.js
↑ Back to topIf you would like to submit your own library, please email us at libraries@licensemanager.at. We will feature your library here along with a link to your website.
Python
↑ Back to topIf you would like to submit your own library, please email us at libraries@licensemanager.at. We will feature your library here along with a link to your website.
PHP Library
↑ Back to topIf you would like to submit your own library, please email us at libraries@licensemanager.at. We will feature your library here along with a link to your website.
Ruby Library
↑ Back to topIf you would like to submit your own library, please email us at libraries@licensemanager.at. We will feature your library here along with a link to your website.
.NET Libraries
↑ Back to topIf you would like to submit your own library, please email us at libraries@licensemanager.at. We will feature your library here along with a link to your website.
| Author | GitHub | Website |
|---|---|---|
| stigzler | stigzler/stigzler.support.wcLicenseManagerNet | MagoArcade.org |
C Library
↑ Back to topIf you would like to submit your own library, please email us at libraries@licensemanager.at. We will feature your library here along with a link to your website.
C# Library
↑ Back to topIf you would like to submit your own library, please email us at libraries@licensemanager.at. We will feature your library here along with a link to your website.
C++ Library
↑ Back to topIf you would like to submit your own library, please email us at libraries@licensemanager.at. We will feature your library here along with a link to your website.
Golang Library
↑ Back to topIf you would like to submit your own library, please email us at libraries@licensemanager.at. We will feature your library here along with a link to your website.
Internal API
Database Structure
↑ Back to toplmfwc_api_keys
↑ Back to topTable Structure
| Name | Type | Null | Default |
|---|---|---|---|
| id | BIGINT(20) | false | None |
| user_id | BIGINT(20) | false | None |
| description | VARCHAR(200) | true | null |
| permissions | VARCHAR(10) | false | None |
| consumer_key | CHAR(64) | false | None |
| consumer_secret | CHAR(43) | false | None |
| nonces | LONGTEXT | true | null |
| truncated_key | CHAR(7) | false | None |
| last_access | DATETIME | true | null |
| created_at | DATETIME | true | null |
| created_by | BIGING(20) | true | null |
| updated_at | DATETIME | true | null |
| updated_by | BIGING(20) | true | null |
lmfwc_generators
↑ Back to topTable Structure
| Name | Type | Null | Default |
|---|---|---|---|
| id | BIGINT(20) | false | None |
| name | VARCHAR(255) | false | None |
| charset | VARCHAR(255) | false | None |
| chunks | INT(10) | false | None |
| chunk_length | INT(10) | false | None |
| times_activated_max | INT(10) | true | null |
| separator | VARCHAR(255) | true | null |
| prefix | VARCHAR(255) | true | null |
| suffix | VARCHAR(255) | true | null |
| expires_in | INT(10) | true | null |
| created_at | DATETIME | true | null |
| created_by | BIGING(20) | true | null |
| updated_at | DATETIME | true | null |
| updated_by | BIGING(20) | true | null |
lmfwc_licenses
↑ Back to topTable Structure
| Name | Type | Null | Default |
|---|---|---|---|
| id | BIGINT(20) | false | None |
| order_id | BIGINT(20) | true | null |
| product_id | BIGINT(20) | true | null |
| user_id | BIGINT(20) | true | null |
| license_key | LONGTEXT | false | None |
| hash | LONGTEXT | false | None |
| expires_at | DATETIME | true | null |
| valid_for | INT(32) | false | null |
| source | VARCHAR(255) | false | None |
| status | TINYINT(1) | false | None |
| times_activated | INT(10) | true | null |
| times_activated_max | INT(10) | true | null |
| created_at | DATETIME | true | null |
| created_by | BIGING(20) | true | null |
| updated_at | DATETIME | true | null |
| updated_by | BIGING(20) | true | null |
lmfwc_licenses_meta
↑ Back to topTable Structure
| Name | Type | Null | Default |
|---|---|---|---|
| meta_id | BIGINT(20) | false | None |
| license_id | BIGINT(20) | false | 0 |
| meta_key | VARCHAR(255) | true | null |
| meta_value | LONGTEXT | true | null |
| created_at | DATETIME | true | null |
| created_by | BIGING(20) | true | null |
| updated_at | DATETIME | true | null |
| updated_by | BIGING(20) | true | null |
Products Installed on
↑ Back to top| Column | Type | Comment |
| meta_id | bigint(20) unsigned Auto Increment | |
| license_id | bigint(20) unsigned [0] | |
| meta_key | varchar(255) NULL | |
| meta_value | longtext NULL | |
| created_at | datetime NULL | |
| created_by | bigint(20) unsigned NULL | |
| updated_at | datetime NULL | |
| updated_by | bigint(20) unsigned NULL |
Filters Reference
↑ Back to toplmfwc_table_licenses_column_name
↑ Back to topDescription
This filter is used to add or modify column headers on the Licenses page/table.
Parameters
| Name | Type | Description |
|---|---|---|
$columns | Array | Array containing key/value pairs of existing columns. |
Usage
[php]add_filter('lmfwc_table_licenses_column_name', function($columns) {
$columns['foo_fighters'] = 'Foo Fighters';
return $columns;
});[/php]
This will add a new column by the name of Foo Fighters.
lmfwc_table_licenses_column_value
↑ Back to topDescription
This filter is used to add or modify column values on the Licenses page/table.
Parameters
| Name | Type | Description |
|---|---|---|
$item | Array | Associative array of column name and value pairs. |
$column_name | Array | Name of the current column. |
[php]add_filter('lmfwc_table_licenses_column_name', function($columns) {
if ($column_name !== 'foo_fighters') {
return $item;
}
$item[$column_name] = "Walk";
return $item;
});[/php]
This will add the text “Walk” into the foo_fighters column.
Actions Reference
↑ Back to toplmfwc_event_post_order_license_keys
↑ Back to topDescription
This action fires after license keys have been sold. The hook fires for license keys which have been generated, as well as license keys which have been sold from stock.
Parameters
| Name | Type | Description |
|---|---|---|
$args | array | Associative array containing two keys: orderId and licenses. |
Usage
[php]add_action('lmfwc_event_post_order_license_keys', function($args) {
$orderId = $args['orderId'];
$licenses = $args['licenses'];
foreach ($licenses as $license) {
// Do something
}
});[/php]
Functions Reference
↑ Back to toplmfwc_add_license()
↑ Back to top[php]
function lmfwc_add_license(string $licenseKey, array $licenseData)
[/php]
Description
Adds a new license to the database.
Parameters
$licenseKey (string) (Required)
The license key being added.
$licenseData (array) (Optional)
Key/value pairs. The keys must match the license table columns names.
Return Value
(bool|LicenseManagerForWooCommerce\Models\Resources\License)
License model on success, false on failure.
Source Code
/includes/functions/lmfwc-license-functions.php#24
lmfwc_get_license()
↑ Back to top[php]function lmfwc_get_license(string $licenseKey)[/php]
Description
Retrieves an existing license from the database.
Parameters
$licenseKey (string) (Required)
The license key to retrieve.
Return Value
(bool|LicenseManagerForWooCommerce\Models\Resources\License)
License model on success, false on failure.
Source Code
/includes/functions/lmfwc-license-functions.php#113
lmfwc_get_licenses()
↑ Back to top[php]function lmfwc_get_licenses(array $query)[/php]
Description
Retrieves multiple existing licenses from the database.
Parameters
$query (array) (Required)
Key/value pairs. The keys will be used to match the license table columns names, and the values will be used to match the values of those columns.
Return Value
(bool|LicenseManagerForWooCommerce\Models\Resources\License[])
License model array on success, false on failure.
Source Code
/includes/functions/lmfwc-license-functions.php#136
lmfwc_update_license()
↑ Back to top[php]function lmfwc_update_license(string $licenseKey, array $licenseData)[/php]
Description
Updates an existing license.
Parameters
$licenseKey (string) (Required)
The license key being updated.
$licenseData (array) (Optional)
Key/value pairs. The keys must match the license table columns names.
Return Value
(bool|LicenseManagerForWooCommerce\Models\Resources\License)
License model on success, false on failure.
Source Code
/includes/functions/lmfwc-license-functions.php#155
lmfwc_delete_license()
↑ Back to top[php]function lmfwc_delete_license(string $licenseKey)[/php]
Description
Deletes a license from the database.
Parameters
$licenseKey (string) (Required)
The license key to delete.
Return Value
(bool)
True on success, false on failure.
Source Code
/includes/functions/lmfwc-license-functions.php#304
lmfwc_activate_license()
↑ Back to top[php]function lmfwc_activate_license(string $licenseKey)[/php]
Description
Activates a license if it has not already reached its maximum activation count.
Parameters
$licenseKey (string) (Required)
The license key to activate.
Return Value
(bool|LicenseManagerForWooCommerce\Models\Resources\License)
License model on success, false on failure.
Source Code
/includes/functions/lmfwc-license-functions.php#343
lmfwc_reactivate_license()
↑ Back to top[php]function lmfwc_reactivate_license(string $activation_token
)[/php]
Description
Activates a license if it has not already reached its maximum activation count.
Parameters
$activation_token(string) (Required)
Activation token to reactivate
Return Value
(bool|LicenseManagerForWooCommerce\Models\Resources\License)
License model on success, false on failure.
Source Code
/includes/functions/lmfwc-license-functions.php#693
lmfwc_deactivate_license()
↑ Back to top[php]function lmfwc_deactivate_license($licenseKey, $args)[/php]
Description
Deactivates a license if it has not already reached 0 activations.
Parameters
$licenseKey (string) (Required)
The license key to deactivate.
$args (array) (Required)
The specific activation token to deactivate
Return Value
(bool|LicenseManagerForWooCommerce\Models\Resources\License)
License model on success, false on failure.
Source Code
/includes/functions/lmfwc-license-functions.php#399
lmfwc_add_license_meta()
↑ Back to top[php]function lmfwc_add_license_meta(int $licenseId, string $metaKey, mixed $metaValue)[/php]
Description
Adds a new meta entry to a license, if it already exists a new row in the database table will be added.
Parameters
$licenseId (string) (Required)
The ID of the license key.
$metaKey (string) (Required)
Name of the meta entry.
$metaValue (mixed) (Required)
Value of the meta entry.
Return Value
(mixed|bool)
Meta value on success, false on failure.
Source Code
/includes/functions/lmfwc-meta-functions.php#24
lmfwc_get_license_meta()
↑ Back to top[php]function lmfwc_get_license_meta(int $licenseId, string $metaKey, bool $single = false)[/php]
Description
Retrieves single or multiple license meta entries.
Parameters
$licenseId (string) (Required)
The ID of the license key.
$metaKey (string) (Required)
Name of the meta entry.
$single (bool) (Optional)
If multiple meta entries exists, setting this parameter to true will retrieve all of them.
Return Value
(mixed|mixed[]|bool)
Meta value on success, false on failure.
Source Code
/includes/functions/lmfwc-meta-functions.php#57
lmfwc_update_license_meta()
↑ Back to top[php]function lmfwc_update_license_meta(int $licenseId, string $metaKey, mixed $metaValue, mixed $previousValue = null)[/php]
Description
Updates an existing license meta entry. If the meta key doesn’t already exist, a new row in the database table will be added. If the $previousValue parameter is passed, the meta entry with that value will be updated.
Parameters
$licenseId (string) (Required)
The ID of the license key.
$metaKey (string) (Required)
Name of the meta entry.
$metaValue (mixed) (Required)
Value of the meta entry.
$previousValue (mixed) (Optional)
The previous value of the meta entry.
Return Value
(bool)
True on success, false on failure.
Source Code
/includes/functions/lmfwc-meta-functions.php#107
lmfwc_delete_license_meta()
↑ Back to top[php]function lmfwc_delete_license_meta(int $licenseId, string $metaKey, mixed $metaValue = null)[/php]
Description
Deletes a license meta entry. If the $metaValue parameter is passed, the function will look for the meta entry with a matching value to delete.
Parameters
$licenseId (string) (Required)
The ID of the license key.
$metaKey (string) (Required)
Name of the meta entry.
$metaValue (mixed) (Optional)
Value of the meta entry.
Return Value
(bool)
True on success, false on failure.