Overview
↑ Back to topHeads up! Cross-border must be enabled on your account by Avalara before you can use this feature in WooCommerce AvaTax! Please contact Avalara to set up cross-border.
Cross-Border by Avalara helps merchants that sell internationally calculate the Duty and Import Tax assessed at the border for their shipped products and process payment for those fees at checkout. This lets you reduce customs delay and remove unexpected fees, ensuring an optimal experience for international purchases as they pay all fees at checkout and receive their shipments on time as expected.
In this guide, we’ll walk through how to setup Cross-Border by Avalara so it can be used with WooCommerce AvaTax. For details about setting up and using WooCommerce AvaTax in general, please visit the WooCommerce AvaTax documentation.
Requirements
↑ Back to top- WooCommerce AvaTax v1.10+
- All requirements for WooCommerce AvaTax
- A service entitlement enabled for your Avalara account; contact Avalara to get this setup
- You can enter prices inclusive or exclusive of taxes; click here for more information
Setup
↑ Back to top- Configuring target countries to identify the countries where you collect and sell to
- Classifying your product catalog so that Avalara knows your WooCommerce product IDs and the harmonized system / tariff codes (HS codes) for those products
- Set up Seller Importer of Record from WooCommerce admin to calculate duties and taxes accordingly.
Configure target countries
↑ Back to top- Do you have a permanent establishment in this jurisdiction?
- When shipping to this jurisdiction, who is the importer of record?
- Are you shipping using a Delivery Duty Paid (DDP) or Delivery at Place (DAP) service?
-
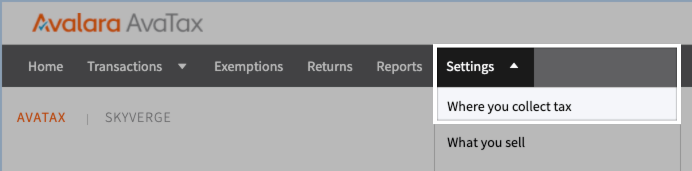
- Login to your Avalara account and go to Settings > Where you collect tax.
-
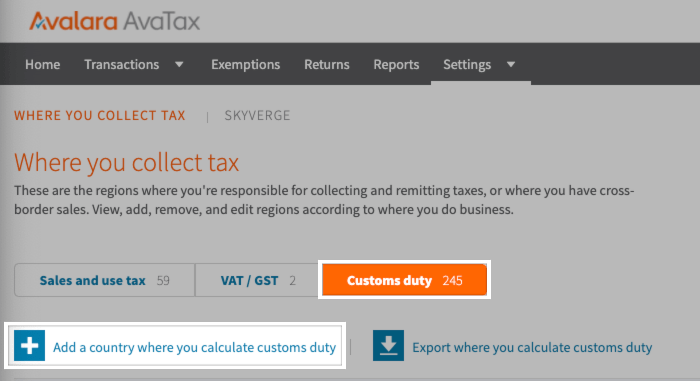
- Select the Customs duty tab, then click Add a country where you want to collect customs duty.
-
- Select one or more countries to add and click Add selected countries.

-
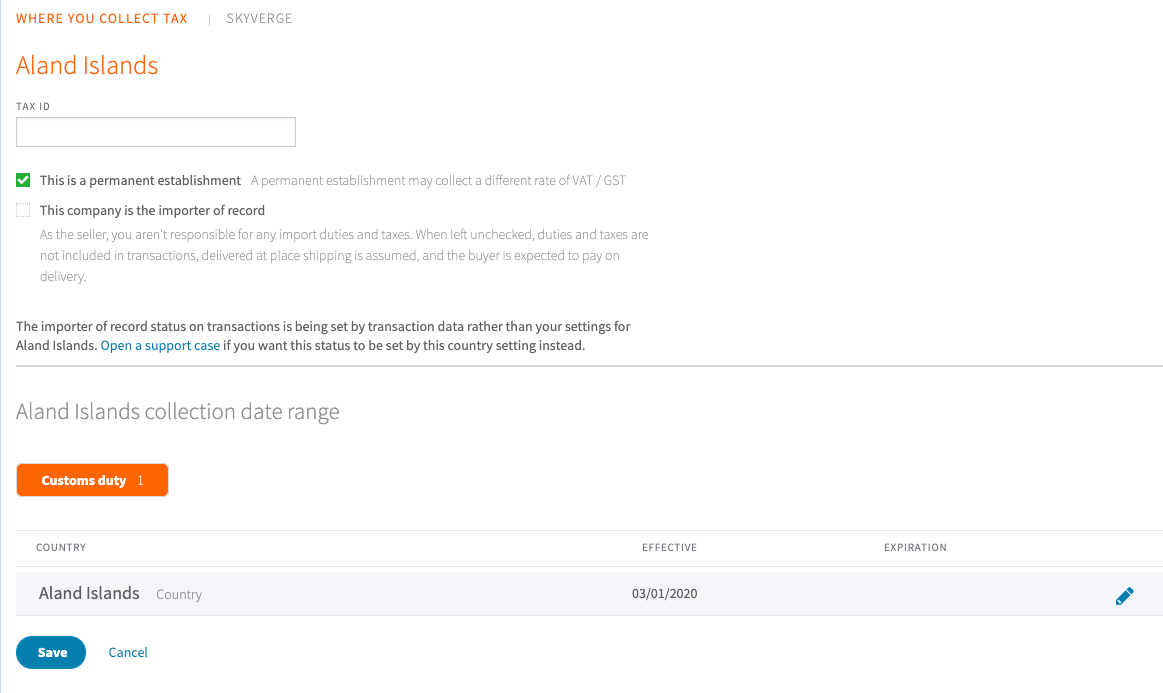
- Find the newly-added country in the Nexus list and click Details.

-
- Update the country’s detail page as needed and click Save.
Note: If you intend to collect all costs from your customers, select the This company is the importer of record setting.
-
- Repeat steps 4-5 as needed for each country you’ve added.
- Now, go back to Settings > Where you collect tax and select the VAT / GST tab. Repeat steps 3-5 as needed.

Set up Seller Importer of Record from WooCommerce admin
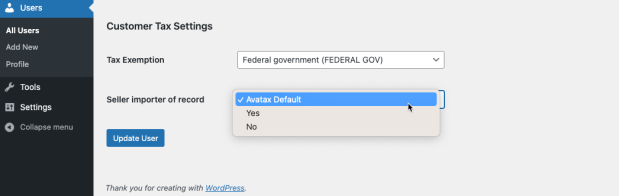
↑ Back to top- Go to Users and select All Users. You get a list of all users set up in WooCommerce.
- Select Edit for the desired user to change the user settings.
- In the Edit User page, under Customer Tax Settings, select the applicable value from the Seller importer of record drop-down options:
- Yes: The seller pays for import duties. The buyer does not pay the taxes and is treated as it is included in the price. The checkout page displays the included Duty and taxes.
- No: The buyer pays for the import duties at the time of delivery in the destination country. The Duty is not included in the transaction and the checkout page displays the following message along with the applicable taxes:
“Estimated import customs duty & tax calculated. The buyer is the importer of record and will pay import customs duty & tax upon arrival in the destination country. 27.01 Import Duty and 47.9 VAT applies“
- AvaTax Default: The Duty and taxes are calculated depending on the selection for This company is the importer of record checkbox in AvaTax. The checkout page displays the included taxes or message accordingly.
- Select Update User to save your settings.
Automatically sync your product catalog
↑ Back to topPlease make sure that you’ve set up your Avalara account and plugin settings for the Production environment before continuing.
There are charges by Avalara when products are classified for the first time and when products are re-classified.
To sync your product catalog:
-
- Go to WooCommerce > Settings > Tax, and select the AvaTax page.
- Scroll to Connection Settings and make sure the Environment field is set to Production using Avatax production credentials. The product catalog can’t be synced in the development environment.
- Under Cross-border classification, enable Sync products to classify for cross-border duties. Once enabled, these connection fields will show up:
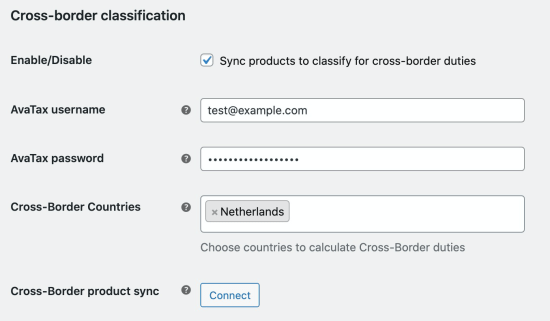
- Fill in the connection fields:
- AvaTax username – Fill in your Avalara AvaTax username.
- AvaTax password – Fill in your Avalara AvaTax password.
- Cross-Border Countries – Select countries to calculate Cross-Border duties. This may affect your monthly AvaTax bill.
- Click Save Changes. Once your AvaTax credentials are saved, scroll back to the Cross-border classification sectiom to connect.
- Click the Connect button for Cross-Border product sync. This will begin syncing your product catalog to Avalara AvaTax for classification. Once the sync begins, an admin notice will display “Your catalog is syncing to AvaTax.”
Pause or end a product sync
If you need to pause or end the product sync, you can disconnect to stop sending product data to Avalara AvaTax.- Go to WooCommerce > Settings > Tax, and select the AvaTax page.
- Scroll to Cross-border classification, and select the Disconnect button.
- A pop-up will ask you to confirm the disconnection. Once confirmed, this will end the product sync process.
Variable products
If you have variable products, the parent product and variations will be synced for classification. All variable products inherit codes from the parent product and there are no additional fees for syncing the variations.Re-classify products
When a product is updated, it can trigger a re-classification if any of the fields sent to Avalara Avatax are changed. This means that the product will be synced again to create new tariff codes. There are charges by Avalara when a product is re-classified through this process. A re-classification is only triggered when the following fields are changed:- Product description (Falls back to short description.)
- Product title
- Product category (Only switching to a new category will trigger a re-classification. You can rename a category without triggering re-classification.)
Manually classify your product catalog
↑ Back to topSend products to Avalara via SFTP or API
You can import your products to Avalara with several methods. Click here for guides on how to send products to Avalara and map their tariff codes. If you decide to send the products via SFTP, you must provide the products in the Google product feed format. We recommend creating a product export from WooCommerce by going to WooCommerce > Products > Export. Here are some additional resources to assist with creating the Google product feed:- AvaTax guidelines for importing Google product catalogs
- ⚠️ Please note that while this document recommends using the product SKU for the Google product feed’s id field, you must use the product ID from WooCommerce instead. This will allow the plugin to find the product in AvaTax based on the AvaTax Item Code.
- Guide to Google product feed / WooCommerce product export mapping
Add products to Avalara manually
Alternatively, you can also add products manually by following the steps below:- Go to Settings > What you sell.
- Click Add an item.
- Update the item page with the following details:
- Enter the Item Code. ⚠️ The Item Code should match the WooCommerce product ID for this product.
- Enter the Item Description. This can be the product’s name.
- Update the Avalara tax code field.
- Under Harmonized tariff codes, click Add or update tariff codes and populate the country and tariff code fields.
- Repeat step 4 for every country that you want to sell this product in.
- Click Save and get attributes.
- Update the product attributes if required.
- Click Save.
 When an order is placed on WooCommerce, the plugin will now be able to find the products based on their AvaTax Item Code and AvaTax can then return the proper rates based on the entered country and tariff codes.
Checkout experience
↑ Back to top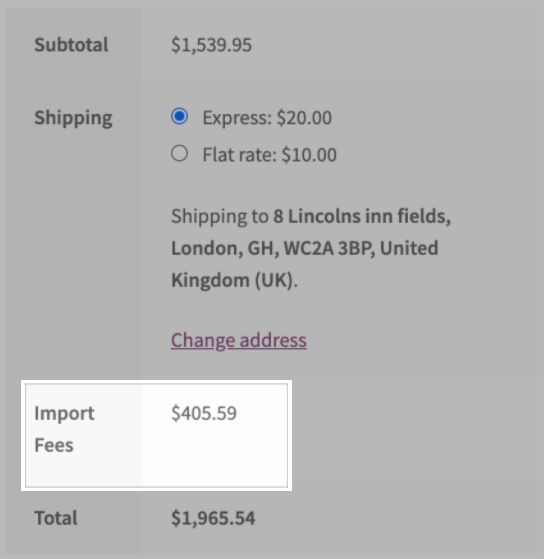 If Display tax totals are set to “itemized”, customers will see each cross-border duty or fee listed individually at checkout.
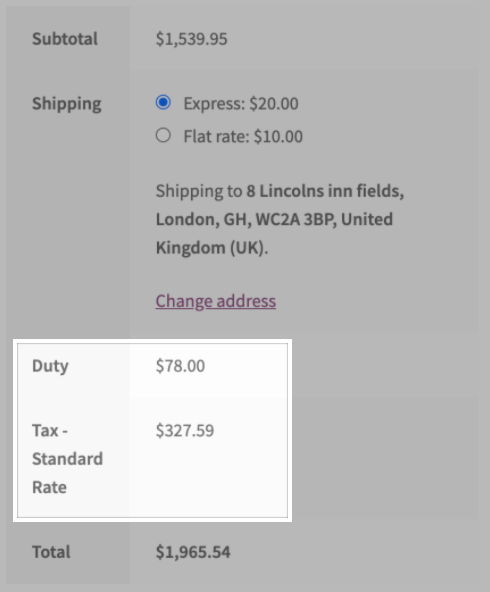 If you are not the importer of record, the fees will be estimated after the order is submitted and can be viewed on the transaction in your Avalara account.
Managing international orders
↑ Back to top
Note: Manually adding orders with cross-border calculation is not currently supported. If you need to submit an order on behalf of a customer, we recommend using the User Switching plugin to do so from the frontend.
Refunding orders
↑ Back to topViewing orders in Avalara
↑ Back to topCross-border reporting
↑ Back to top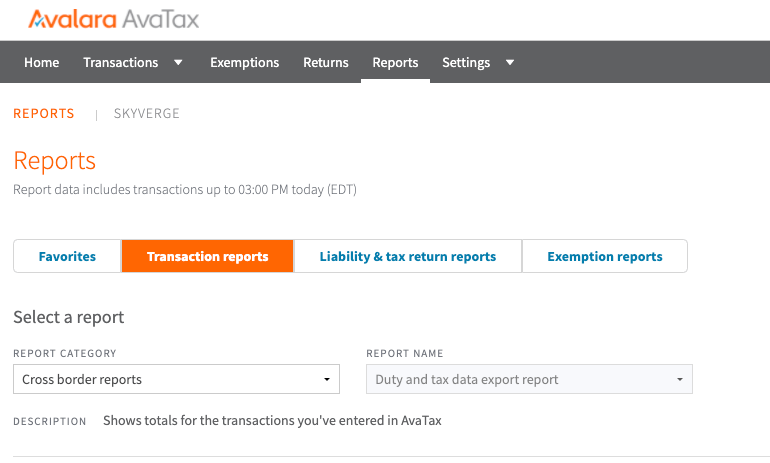
Frequently asked questions
↑ Back to topAutomatically syncing products
↑ Back to topTroubleshooting
↑ Back to top- Check the WooCommerce AvaTax documentation to ensure that the plugin is configured properly.
- Please ensure that you meet the requirements for Cross-Border and contact your Avalara representative to ensure they’ve enabled Cross-Border on your account.
- Check the FAQs to see if they address your question.
Syncing errors
↑ Back to top- Go to WooCommerce > Settings > Tax tab > AvaTax page.
- Scroll down and enable Log API requests, responses, and errors for debugging.
- Once enabled, please attempt another resync to generate the logs and send the logs in your support request.
Error messages
↑ Back to topCross-border is not enabled on this account. Please contact your Customer Account Manager to setup Cross-Border tax calculation.
Please contact your Avalara representative to enable Cross-Border on your account.
Please select at least one supported country.
Make sure you’ve selected at least one country in the Cross-Border Countries field. Are there no supported countries in the drop-down menu? Please make sure that you’ve
set up your target countries in your Avalara account.
For Developers
↑ Back to topFilters
↑ Back to topapply_filters( 'wc_avatax_wait_time_to_get_classifications', DAY_IN_SECONDS )
This filter accepts any integer that represents the amount of seconds to wait between a request for classification creation and receiving the HS code. DAY_IN_SECONDS is its default value which equals to 86400 (24 hours).