Optimise your inventory, predict customer demand, automate stock replenishment, and manage purchase orders with the Inventory Management for WooCommerce extension.
Shelf Planner’s Inventory Management for WooCommerce solves a merchant’s costliest problem: accurately predicting customer demand for hundreds of products every day.
This extension offers a plug-and-play forecasting engine that helps you optimise your inventory and improve your margins and sell-through, all while reducing waste. Beautiful.

Installation
↑ Back to top- Download the extension from your WooCommerce dashboard.
- Go to Plugins > Add New > Upload and select the ZIP file you downloaded.
- Click Install Now, and then Activate Plugin.
- An installation wizard will guide you through a few simple steps to help create the correct sales forecast based on your business model and assortment architecture.
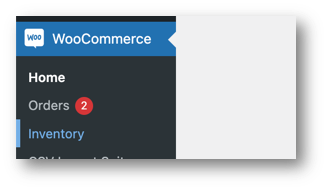
After installation and completion of the Installation Wizard, a new ‘Inventory’ label is added to the WooCommerce menu:
Getting Started
↑ Back to topReports & Leaderboards
↑ Back to topThe Inventory link opens a new window with a landing page showing the main reports. The reports presented on this page will be populated automatically, as soon as the sales forecast for your products has been generated.
This process can take anything from a couple of minutes to half an hour, but it is running on the background.
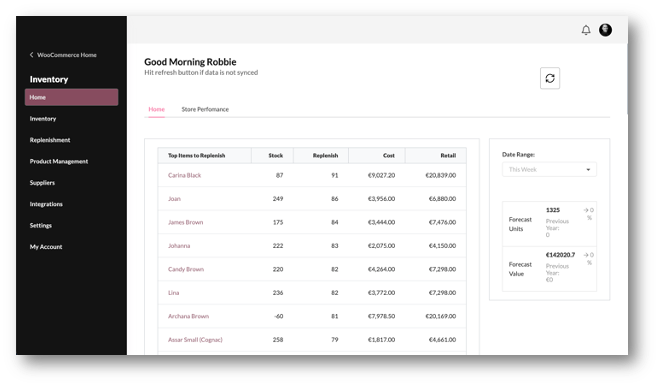
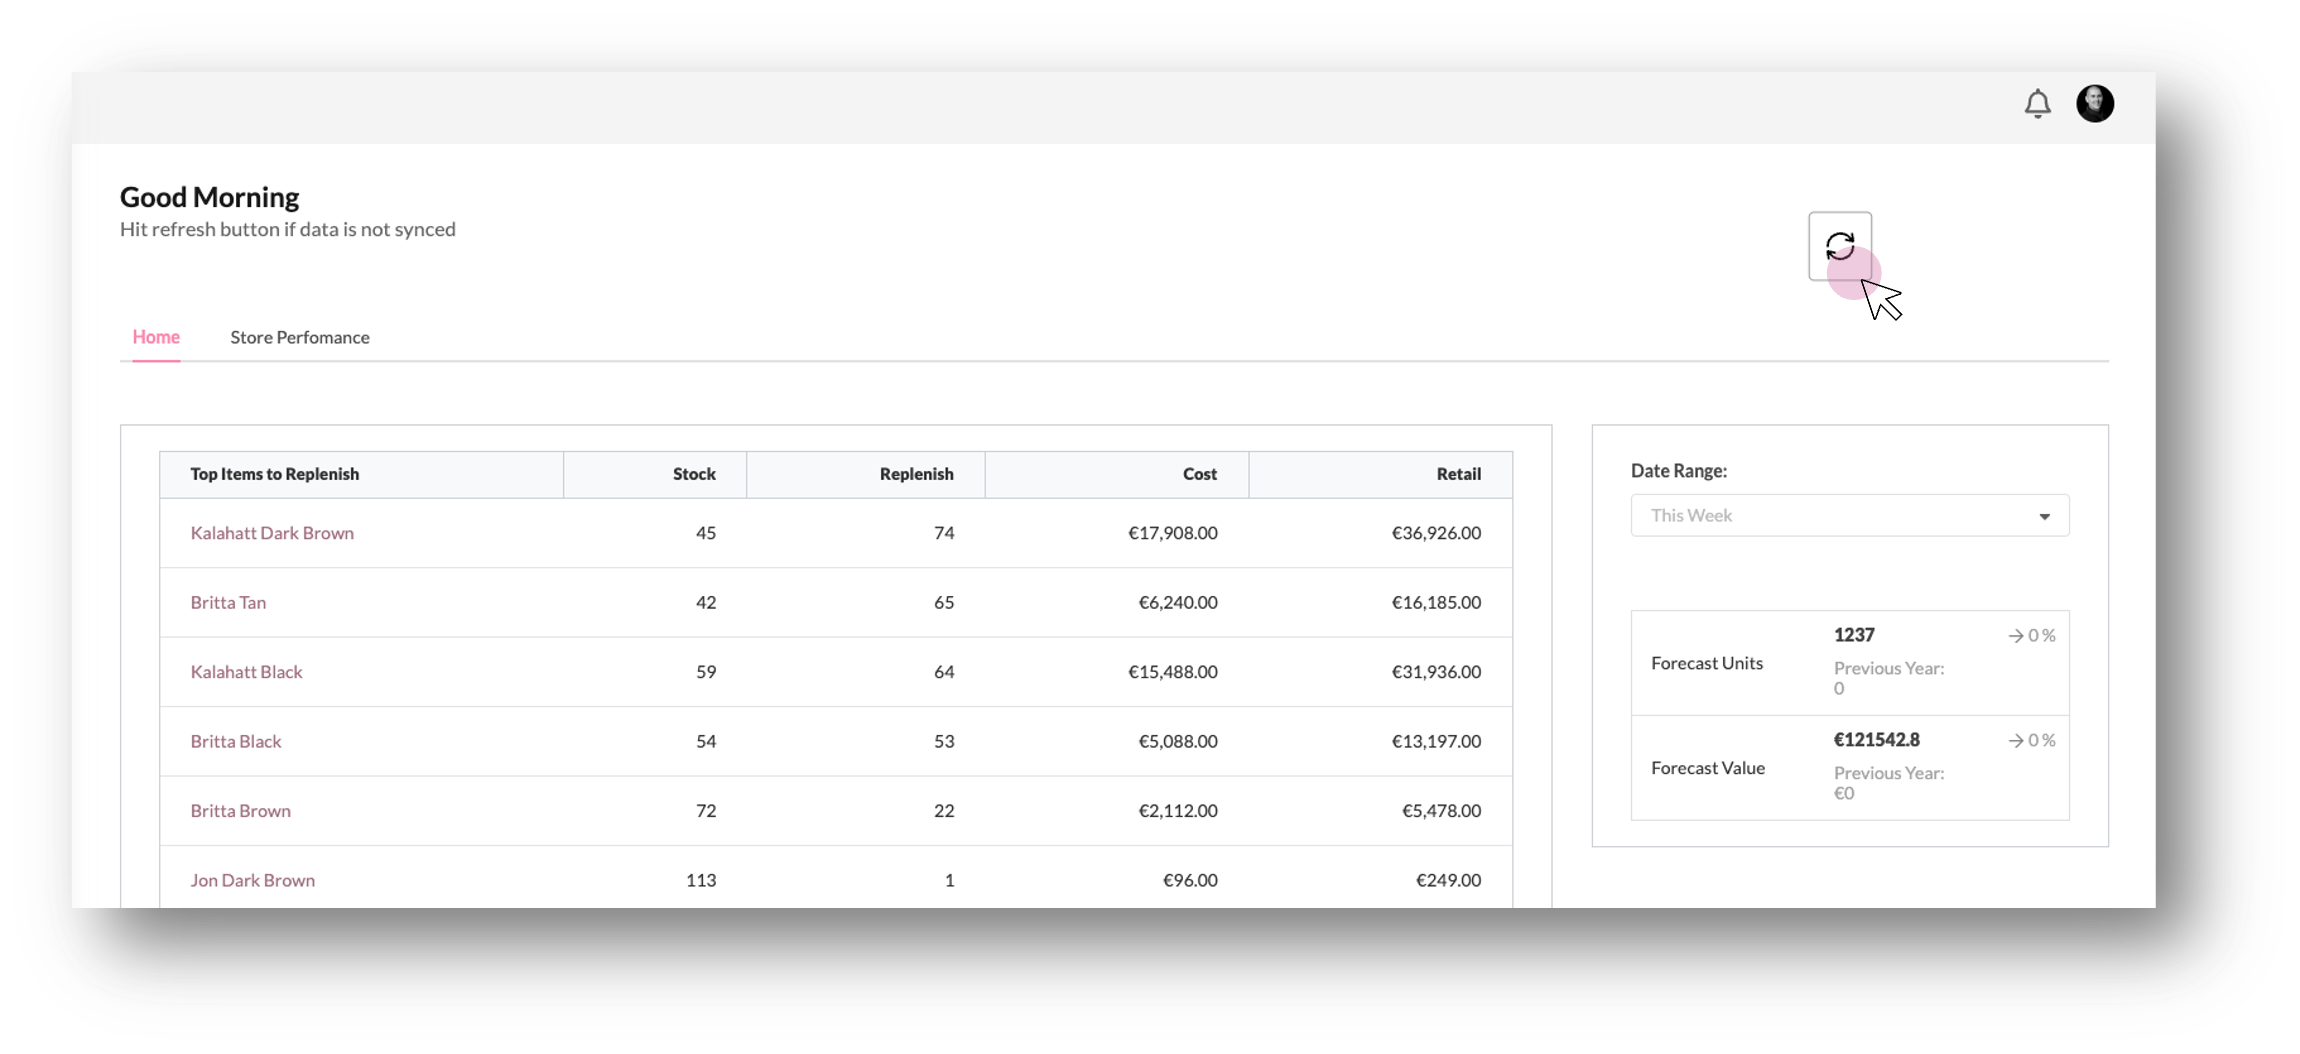
The Home page, or landing page, shows a number of reports that help you as a merchant to understand the performance of your store better. While the process is running, you can hit the ‘Refresh’ button on the top right corner to speed up the process.
1.) Top Items to Replenish
↑ Back to topThe Out of Stock Reports shows the top 10 items that need immediate attention. Based on the sales forecast, the report shows the replenishment proposal.
The Stock is the available stock on hand. The Replenish value shows the units to Replenish based on your store’s Sales Forecast, Lead Times, Incoming Stock, and Back Orders.
The Order Value is shown in Cost and Retail Value. Retail value is the Sale Price before any discounts.
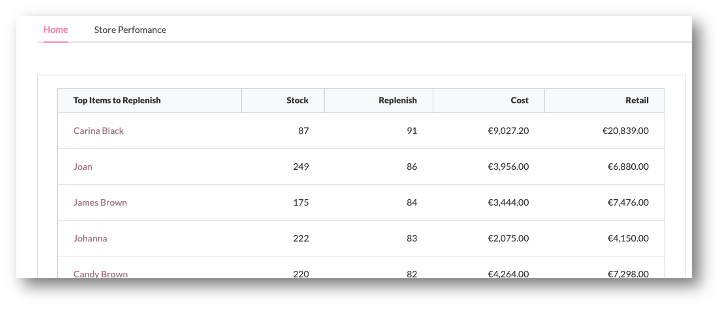
The table only shows the Top 10 items that need reviewing, based on the Replenishment quantity, descending from highest to lowest. To see all products and for more analyses, you can follow the link to the Stock Detail reports.
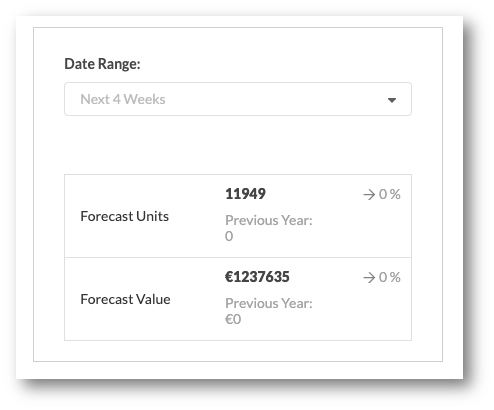
2.) Sales Forecast
↑ Back to topThe second report on the Home page shows the Sales Forecast for your entire store, compared to the same period last year.
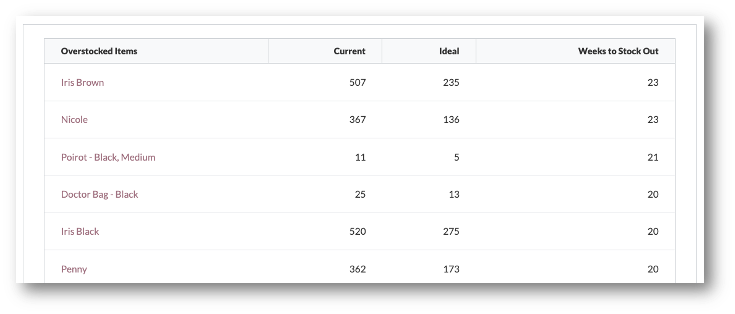
3.) Overstock Reports
↑ Back to topThe overstocked Items Report show all products that have too much stock on hand.
The Current stock unit represents the available stock, not including any incoming stock. The Ideal Stock is the model stock, or optimal stock you should have for this item, based on the sales forecast.
In the example below, the product ‘Iris Brown’ has 507 units on hand, but based on the lead time and weeks of stock settings, the optimal stock for this item is 235.
The Weeks to Stock Out means that with the current rate of sales, it would take 23 weeks to sell this product through.
4.) Potential Lost Sales Reports
↑ Back to topUnderstock situations can lead to lost sales opportunities and are one of the critical measures to have a look at as a store owner.
In this paragraph, we will look at the different levels of Lost Sales by Category and Product and explain how the calculation is made. We will also discuss the other parameters that impact the calculation.
On the homepage, you will find two reports in the section Leaderboards – one for Lost Sales in Units and Value by Category (1) and one for Lost Sales by Product. (2)
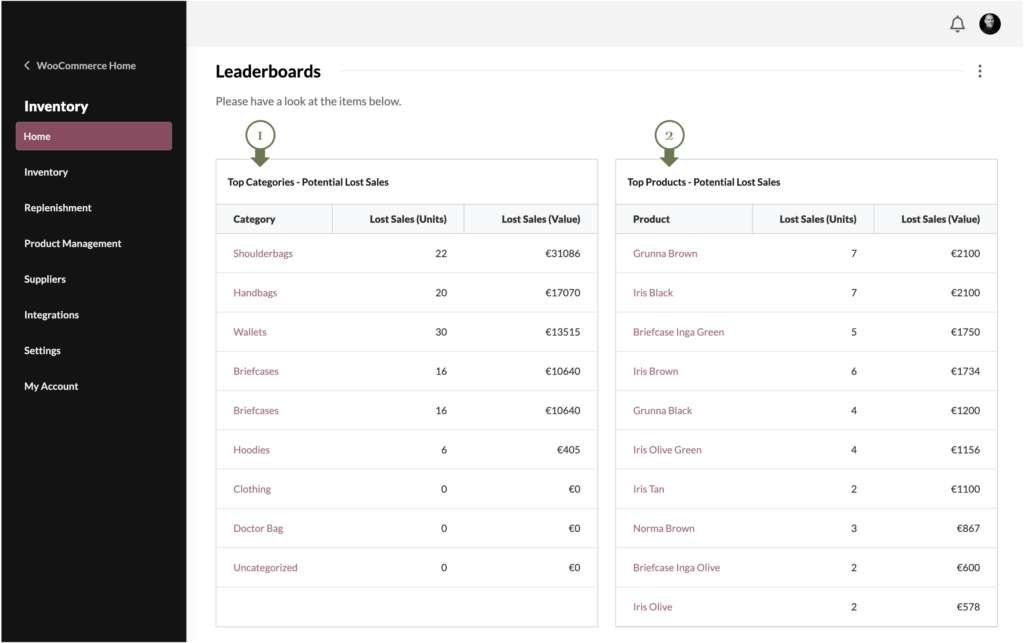
The Potential Lost Sales by Category is the Sum of Potential Lost Sales by Product in Units.
The potential Lost Sales by Category in Value is the Sum of all Lost Sales in Value by Product for this Category.
Lost Sales by Product
For each item in the store, the potential Lost Sales are calculated by looking at the following:
- Sales Forecast for the product
- Weeks of Stock set for the product
- Lead Time for the product/product’s supplier
- The sum of incoming stock and stock on hand
If there is a shortage of stock for the selected period and the sales forecast is positive, this is considered a potential lost sale.
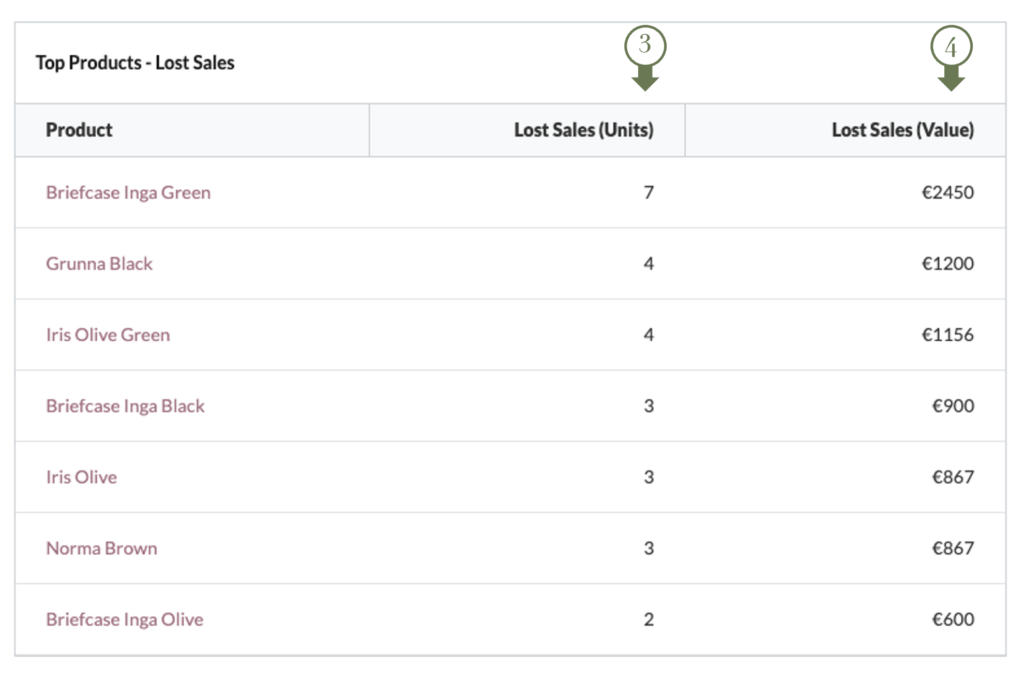
For example, the Lost Sales in Units for ‘Briefcase Inga Green’ (3) is 7 units based on a Weeks of Stock of 8 Weeks, a Sales Forecast for this item during this period, the current stock on hand, and any incoming stock (in this example, there is no incoming stock and no stock on hand)
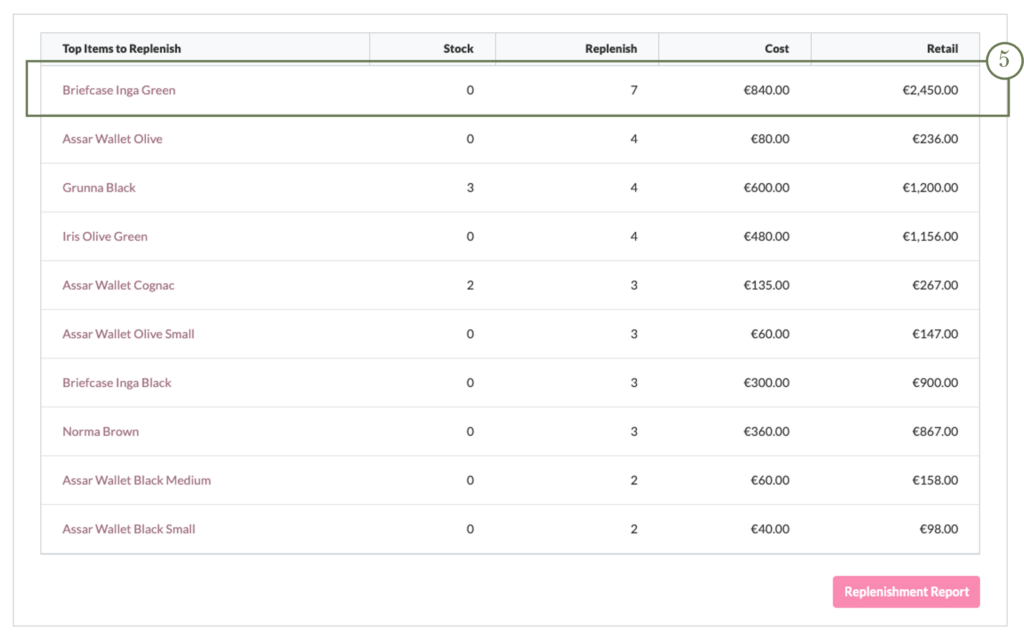
As shown above (5) there is also an order proposal for this item in the Replenishment Report.
5.) Profit & Margins
↑ Back to topThe second tab in the home page – Store Performance – shows the profit and margin for your products and categories.
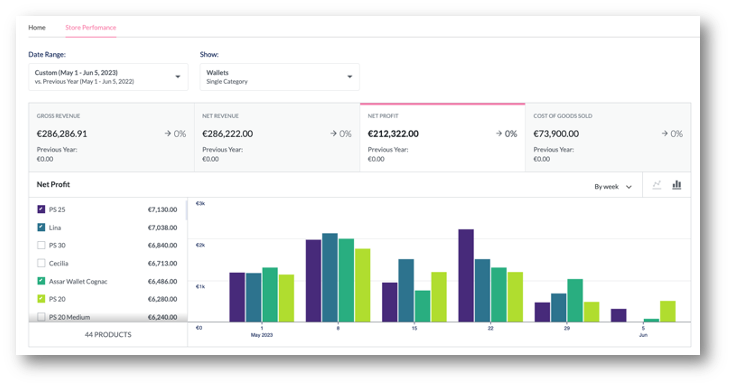
The report at the top of the screen, shows your Gross Revenue and Net Revenue, similar to the standard revenue reports in WooCommerce Analytics. However, the 3rd and 4th tab show you your products’ and categories Net Profit and Cost of Goods Sold.
These calculations are based on your product’s Cost Prices and Shipping Cost, Markdowns and other discounts.
6.) Cost Of Goods Sold (COGS)
↑ Back to topIn the Store Performance Report, the table on the far right shows the Cost of Goods Sold (COGS) for products and categories.
You can easily track total profit and cost of goods by managing the cost price of simple and and variable products.
Costs are automatically calculated on checkout so that you can see your profit in addition to simple sales information, and the in-depth reports provide exactly the details you need to improve your bottom line.
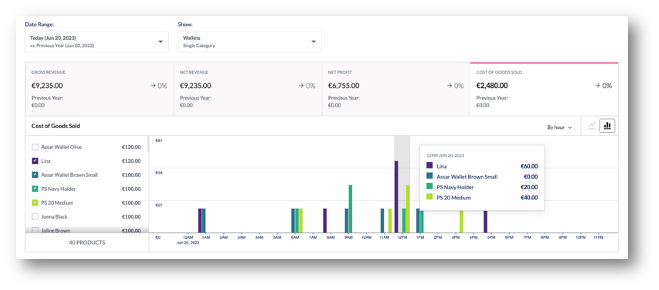
Like in the standard WooCommerce reports, you can look at aggregated level (Category) and on Product Level, or compare categories to each other.
7.) Profit & Margin Leaderboards
↑ Back to topAt the bottom of the Store Performance page, you will find the leaderboards for margins and profit.
The top table shows the Net Profit for both Category and Product.
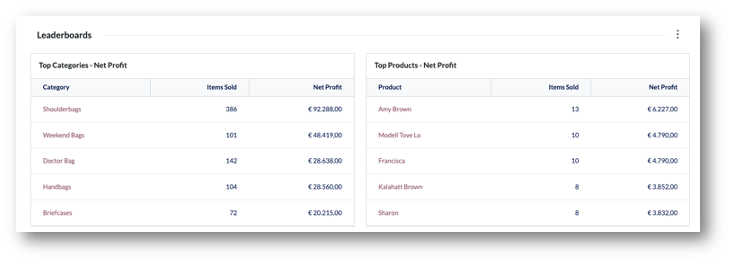
The second table shows the Net Margin in % by Category and Product.
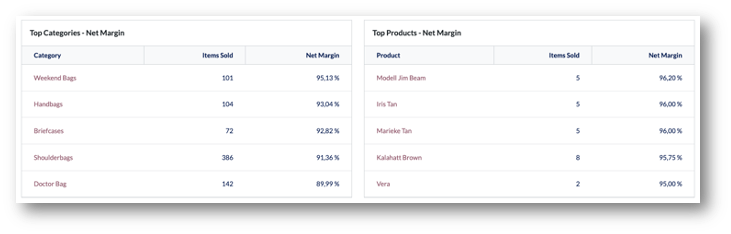
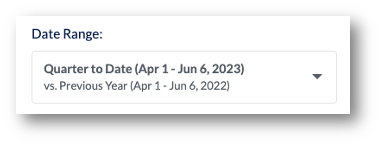
Both tables are filtered by using the Date Range at the top of the page:
Inventory & Stock Detail
↑ Back to topOur ambition is to make inventory management as easy as possible.
The inventory pages are split into 2 parts; the first page is showing a report that includes all the main KPIs to understand the overall stock performance of the store.
The second page – Manage Inventory – is where you can edit and manage all your products’ inventory from a single page.
Stock Performance
↑ Back to topThe Stock Performance reports are divided into two sections; the top table shows the current stock position for your categories. The second table at the bottom of the screen shows the current stock position for all products and variations.
You can add or exclude KPIs from the report by using the tick boxes in the filter (1).

The table at the bottom of the page has the same KPIs but focuses on individual products and SKUs.
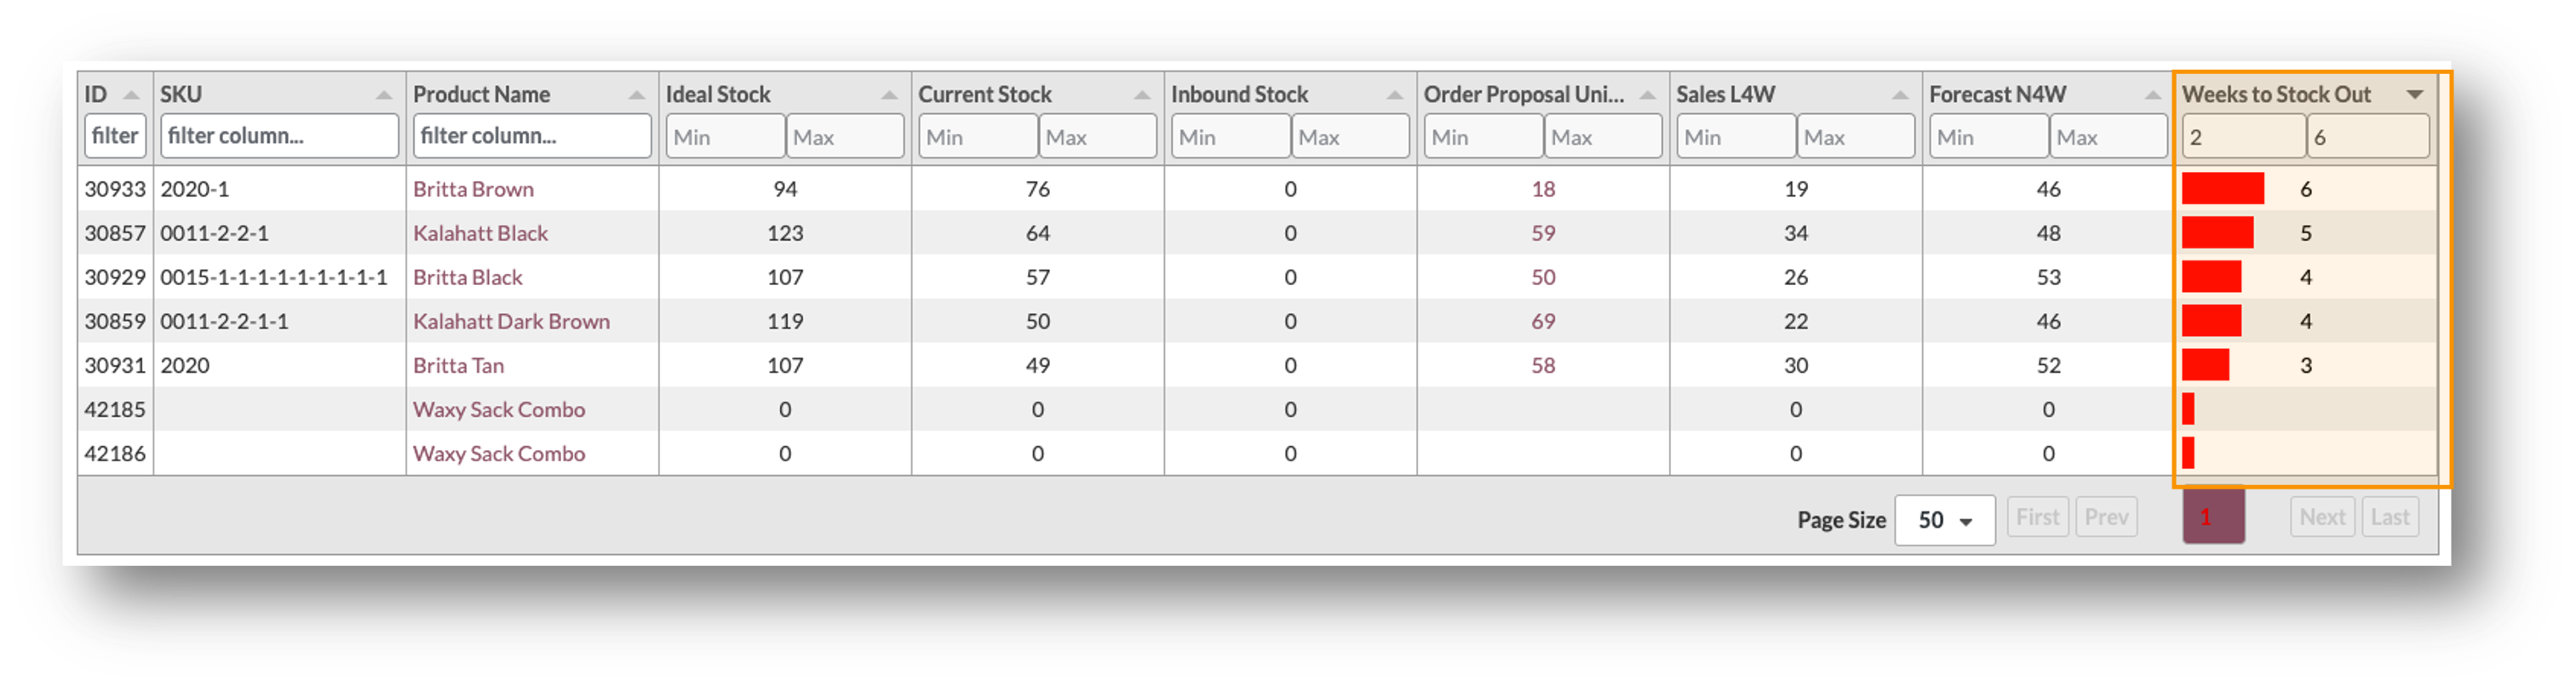
The table header (1) allows you to flexibly filter on any of the values in the table, for example descending/ascending, or based on particular values, include or exclude values.

You can also filter the tables by entering a bandwidth, for example filtering on all items that have a weeks of cover between 2 and 6 weeks:
KPI’s and Calculations
↑ Back to topIn this chapter we’ll explain the calculations behind each of the KPI’s and measures in the Stock Analyses Reports.
Ideal Stock
The Ideal Stock is one of the key metrics used in this extension. It represents the stock you should have at your disposal to meet your customer demand. It is sometimes also referred to as Model Stock.
Simplified, the Ideal Stock takes into account these two parameters:
- Customer Demand Variation (for example, your actual demand exceeds your original sales forecast)
- Supplier Delivery Variation (for example, supply deliveries are later than originally planned lead times)
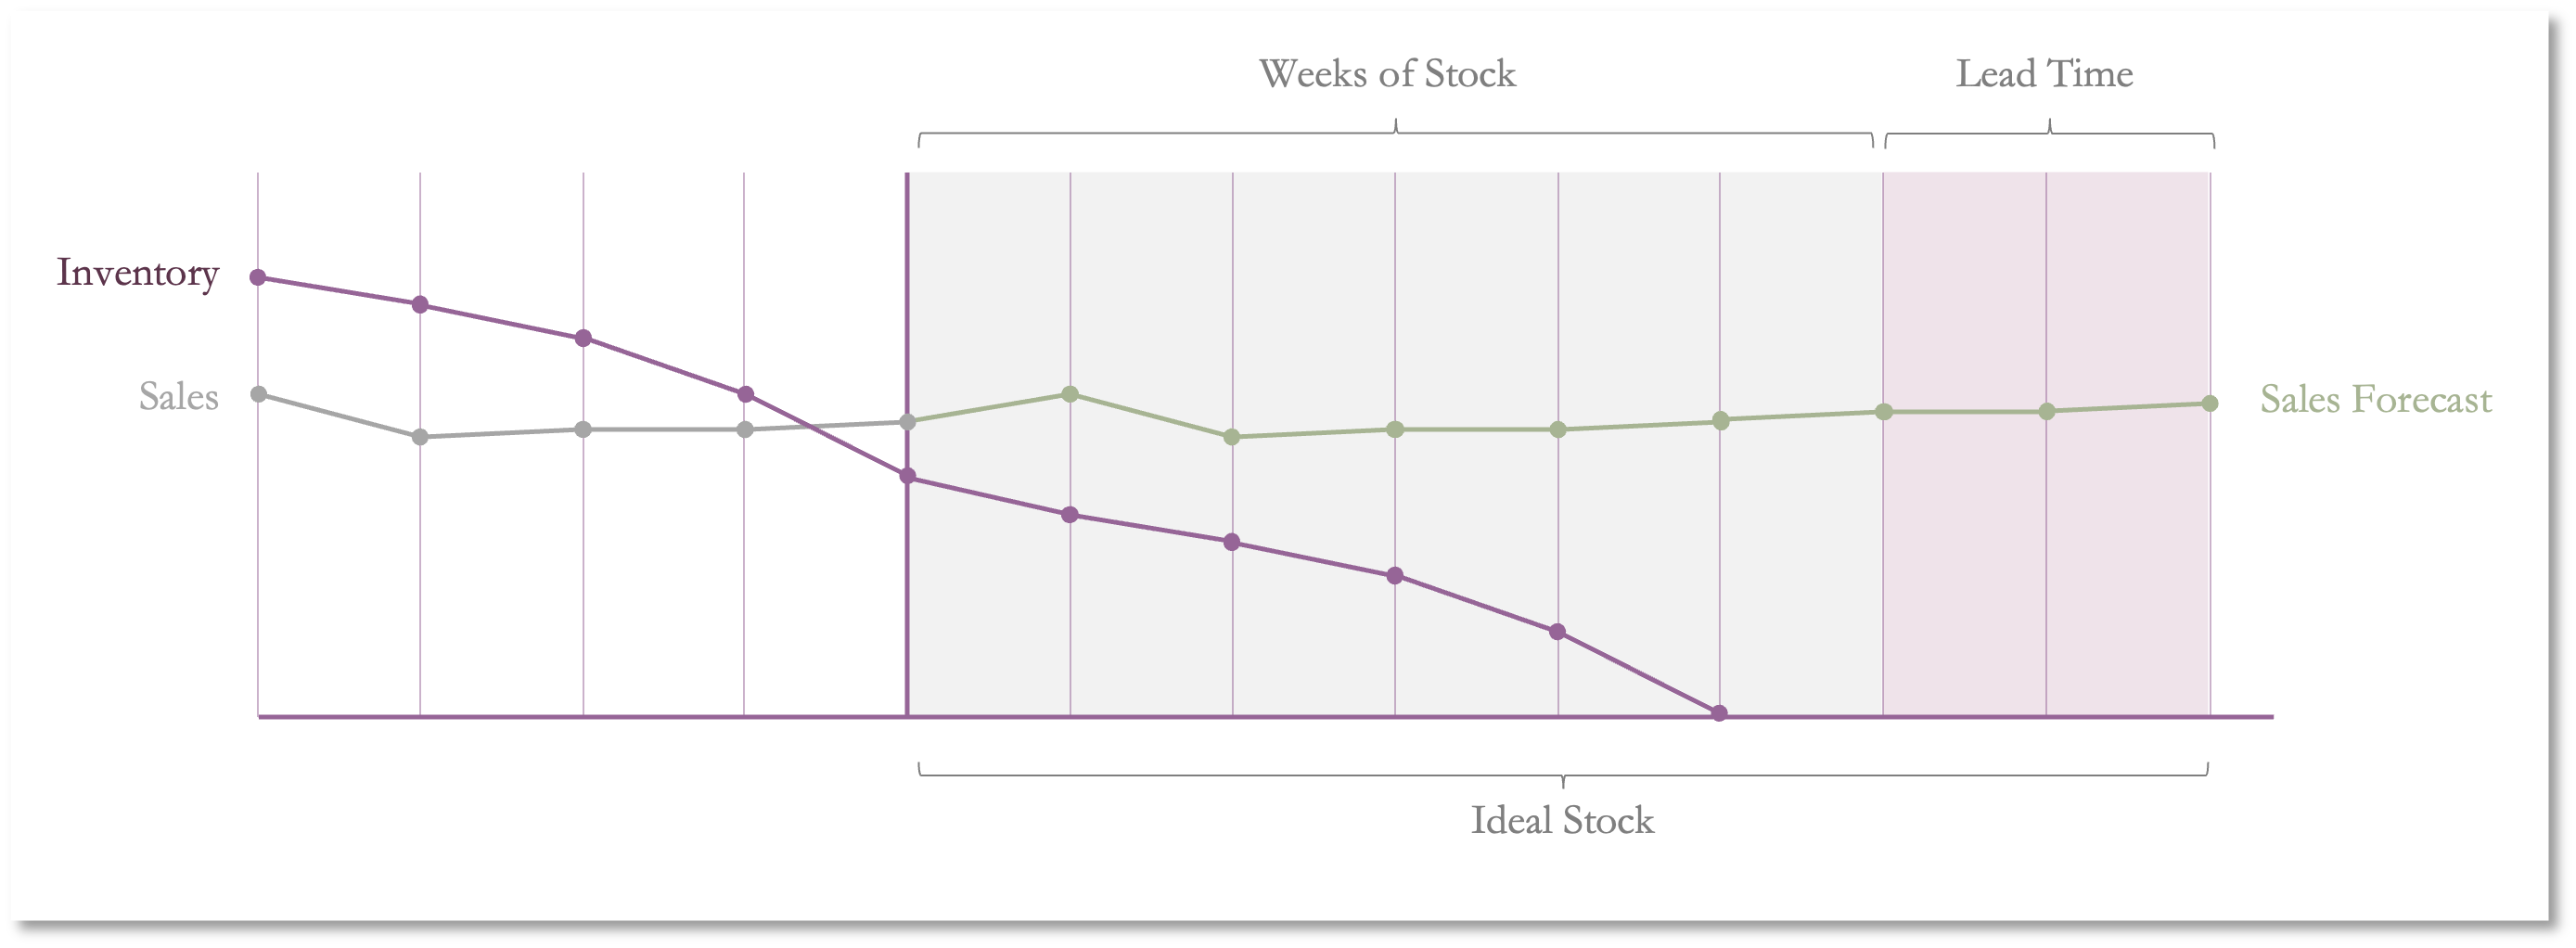
As illustrated in the image above, the Ideal Stock is determined by the Weeks of Stock and the Lead Time for the product. Both of these parameters are set in weeks. For example, if you want to keep 6 weeks of cover, and your supplier has 2 weeks of lead time for the product, the ideal stock is calculated with 8 weeks.
Order Proposals
The Order Proposal in the Inventory Management extension are calculated live, based on actual sales, the sales forecast for the product (SKU) and any incoming stock.
Weeks To Stock Out
The Weeks To Stock out, which is often referred to as Weeks of Stock or Weeks of Cover, is one of the most important KPI’s for any retailer.
It is calculated using the sales forecast, current stock and incoming stock.

Inventory Management
↑ Back to topThe second page in the Inventory tab allows you to manage all inventory values for all products in one go.
You can filter by simply typing the product name in the ‘Search’ (1), by filtering on Supplier (2), or by filtering on Category (3).

Some values (Ideal Stock, Backorders, Order Proposals) are calculated fields and cannot be changed.
The Current Stock (4) is the default WooCommerce stock value by Product and can be changed for any product on this page.
The Incoming Stock (5) is either calculated when the integrated PO management is used, or it can be overwritten here. To overwrite the incoming stock, tick the box ‘Override Inc. Stocks’ and change the value.
Set Up & Configuration
↑ Back to top1.) Terminology
↑ Back to topFor the purpose of explaining Inventory Management for WooCommerce and the different features and capabilities:
| Ideal Stock | The Ideal Stock, sometimes also referred to as Model Stock, is the calculated optimal quantity required, based on your customers’ demand. The Ideal Stock is calculated on item or category. |
| Incoming Stock | Incoming Stock represent the quantity of a particular item or category that has been ordered and shipping and is scheduled for receipt. |
| Weeks of Stock | Weeks of Stock, sometimes also referred to as Weeks of Cover is the main parameter to define how many weeks of stock you want to keep, based on the products’ sales forecast. |
| Weeks to Stock Out | Weeks to Stock Out is the measure of how many weeks the inventory for a particular item or a category will last with the current Sales Forecast |
| Order Proposal Units | Indication of quantity that needs to be ordered to restore the ideal stock for the item. |
| Replenish | Indication of quantity that needs to be ordered to restore the ideal stock for the item. |
| Overstocked Items | Quantity in units with which a product has too many units on stock, compared to its Ideal Stock. |
| Lead Time | Lead Time for a product is the amount of time it takes to process an order, manufacture a product, delivery a good, or a combination of these processes. |
| Sales Forecast Units | Sales Forecast in Units for the selected period. |
| Sales Forecast Value | Sales Forecast in Value for the selected period (in forecast reports). The Value is shown following the WooCommerce Currency Options. |
| Sales L4W | Actual Sales in the Last 4 Weeks (L4W) in units. |
| Forecast N4W | Forecast for the next 4 weeks. |
| Forecast N8W | Forecast in units/value for the next 8 weeks |
| Potential Lost Sales | The potential lost sales (in value / unit) is the missed sales opportunity when your items run out of stock and do not get replenished in time. |
2.) Forecast Generation
↑ Back to topAfter activation of Inventory Management for WooCommerce, the extension’s forecasting engine will generate a probabilistic sales forecast for all your products in the store.
Depending on the size of your assortment (breadth and depth of the items) and the amount of historical data, this can take 5 minutes to one hour. This process runs in the background and will not affect your store’s performance or any other activities.
To see the current status of the forecast generation, you can have a look at the API’s & Integrations page, under Inventory / Integrations:
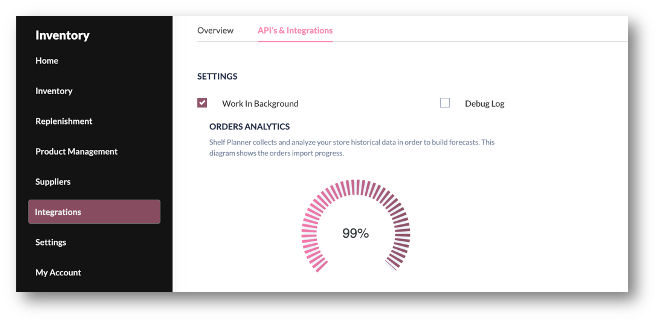
Once the forecast has been generated, you will see the first Order Proposals generated. You will also see the reports on the Store Performance page getting populated.
In the following chapters, we will guide you through the steps required to get the most out of your recommendations.
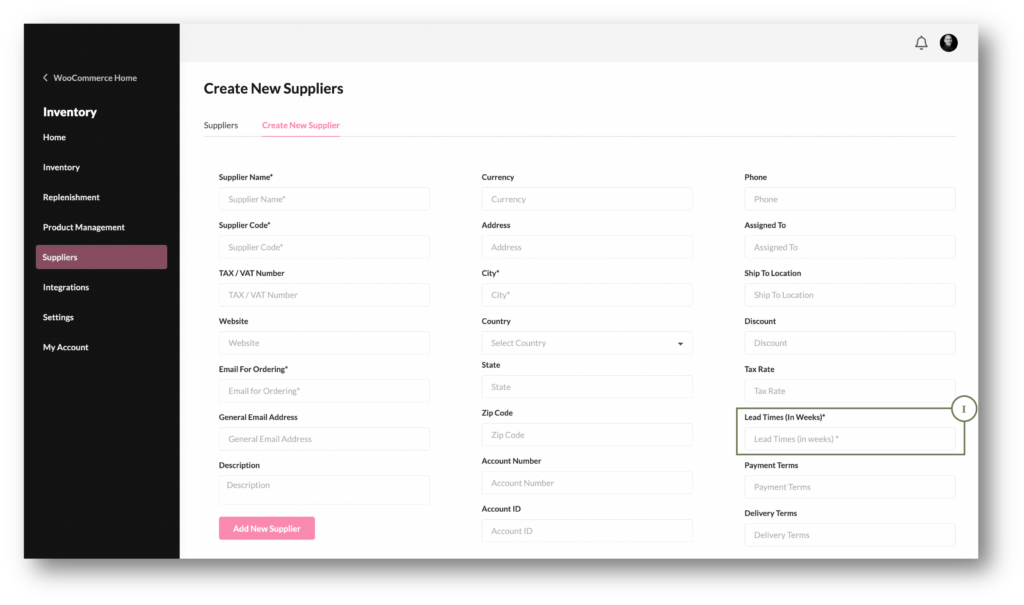
3.) Set Up Suppliers
↑ Back to topTo add a new supplier, move to the Create New Supplier tab.
Here you can add all relevant information for your supplier. Some of the fields are mandatory and will show up on the order forms;
- Supplier Name
- Supplier Code – create a unique code for the supplier (free text, used for PO creation and tracking)
- Currency – the currency used for creating purchase orders (use the 3-letter abbreviation for the currency)
The Lead Time in Weeks (1) is a significant value that helps to calculate the Order Proposals. The lead times can also be managed at the Product Level, but this is the supplier’s default parameter for the lead time.
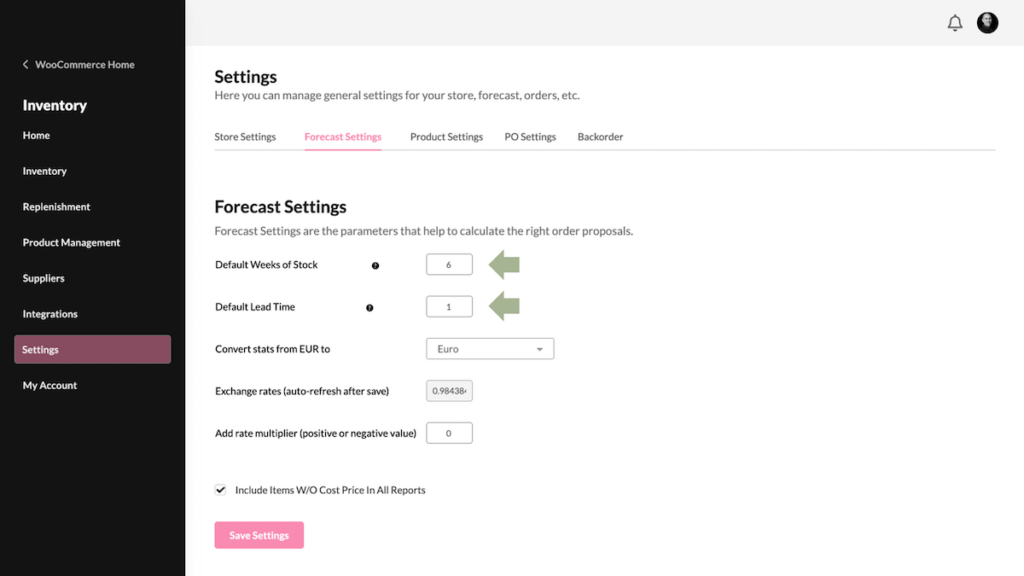
4.) Forecast Parameters
↑ Back to topWeeks of Stock
The ‘Weeks of Stock’ parameter determines how many weeks of safety stock you want to keep for each product. In other words, it determines how many weeks of sales you want to keep on hand before you re-order.
By default, this parameter is set to 6 weeks. If you don’t change this parameter, all your products will keep six weeks of stock in your inventory to ensure you can cover six weeks of sales.
The Weeks of Stock can be managed on two levels:
a.) Default (managed in Forecast Settings)
In the Forecast Settings, you can change the default settings for Weeks of Stock. If no value is entered for individual products, this value is used for all products in the store.
Weeks of Stock by Product
You can edit and change the Weeks of Stock on a product level directly in the Product Management pages;
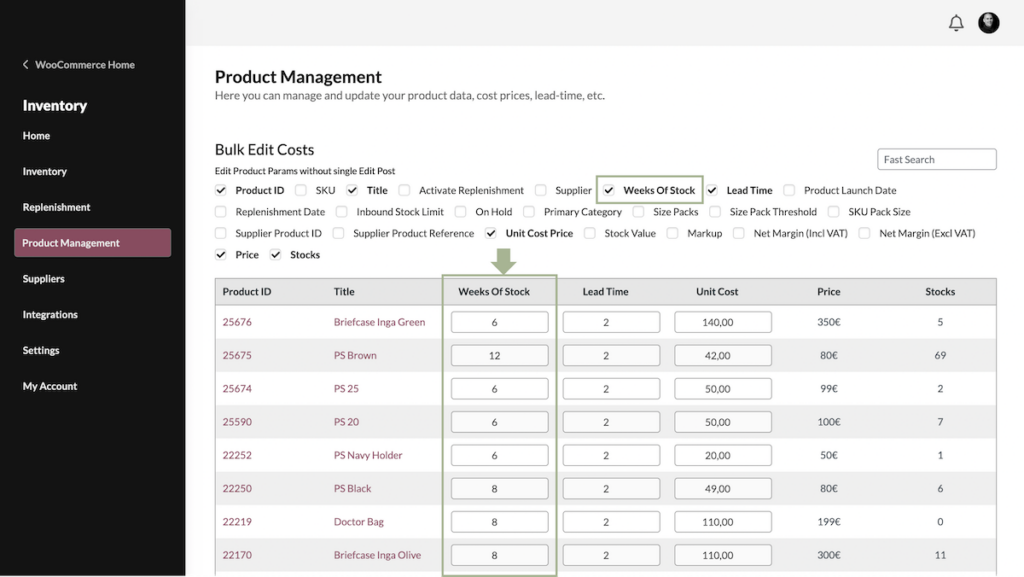
The Weeks of Stock by product take precedence. The calculation will fall back on the default value if no value is entered.
Lead Time
The second parameter that affects the order proposals is the lead time.
Lead Times can be set up on different levels:
- Default (all products in the store)
- By Supplier (managed in the Supplier pages)
- By Product (manage in the Product Management pages or single product pages.)
Lead Time by Product takes precedence – if no value is entered, the calculation will fall back on the lead time value set by Supplier. If neither of these parameters is present, the default value for Lead Time is used.
Minimum Stock vs Ideal Stock
For some products, you should use a Minimum Stock. Minimum Stock is a standard feature in WooCommerce.
By default, the extension uses the Ideal Stock based on your store’s sales forecast and the parameters you have set for products and suppliers. In some cases, you might want to use a Minimum Stock, for example, for slow-moving items or for items you want to make sure you always have on hand.
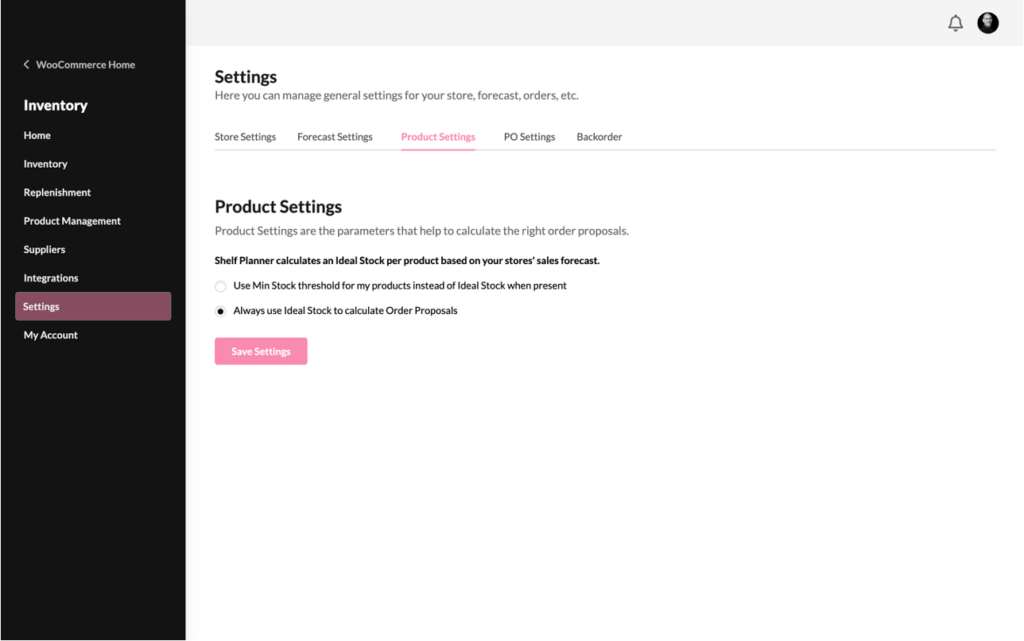
If you want to use the Minimum Stock feature, switch the setting to ‘Use Min Stock..’
You can change the value for Min Stock in the Product pages by editing the Low Stock Threshold:
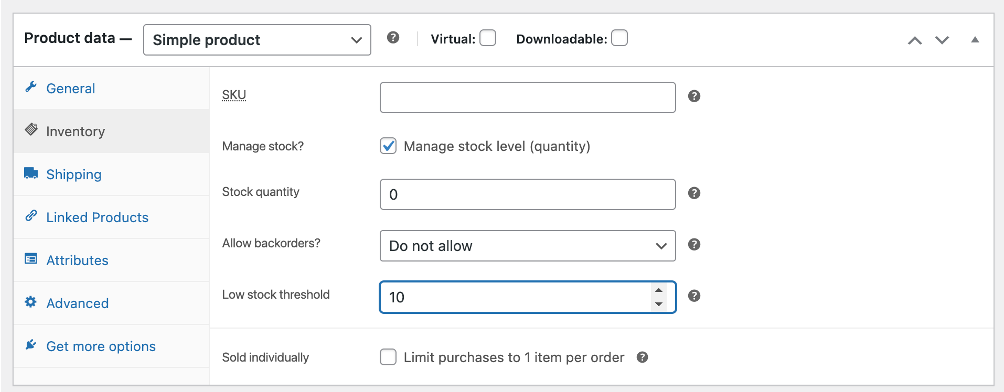
The Low Stock Threshold is now used to drive your order Proposal:
5.) Set Cost Prices
↑ Back to topManaging Cost Prices is pivotal for any retailer.
Knowing the difference between cost and value can increase profitability: the cost of your product or service is the amount you spend to produce it. The price is your financial reward for providing the product or service. The value is what your customer believes the product or service is worth.
The easiest way to manage and update cost prices for your products is on the Product Management pages:
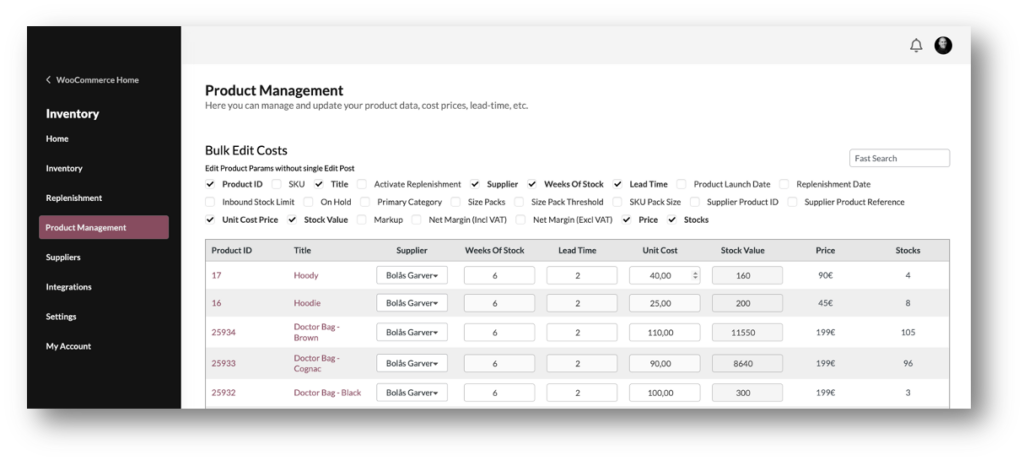
After entering the Cost Price, the extension automatically calculates the Stock Value for all Products and Categories.
Inventory Management for WooCommerce is compatible with Product CSV Import Suite - for more information check out the chapter Compatibility & Integrations.
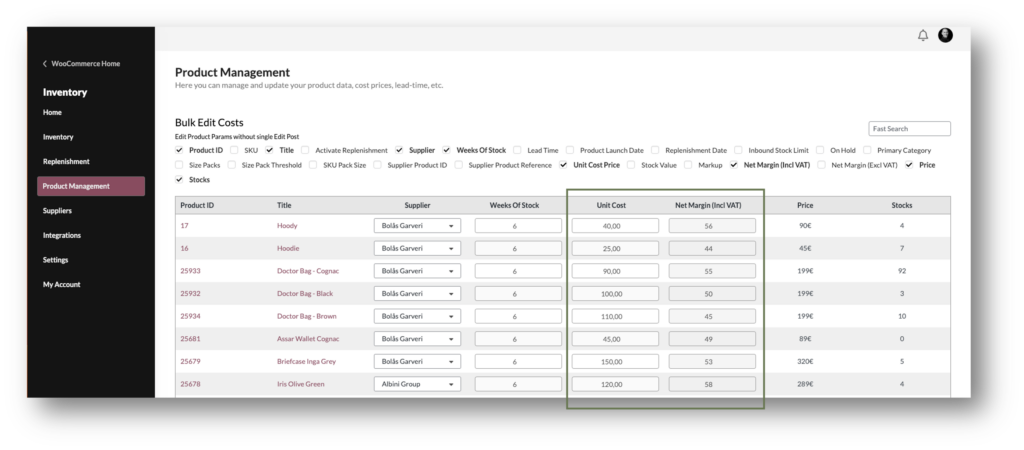
If you’re selling including VAT, you can choose the margin including or excluding VAT:
Suppliers
↑ Back to topKnowing exactly when to order and how much is to a large extent dependent on the incoming stock.
The Inventory Management for WooCommerce extension allows you to create and manage purchase orders directly from the extension.
Set Up Suppliers
↑ Back to topTo add a new supplier, move to the tab ‘Create New Supplier’.
Here you can add all relevant information for your supplier. Some of the fields are mandatory and will show up on the order forms;
- Supplier Name – a free text for the Supplier Name
- Supplier Code – create a unique code for the supplier (free text, used for PO creation and tracking)
- Currency – currency used for creating purchase orders (use the 3-letter abbreviation for the currency)
The Lead Time in Weeks (1) is an important value that helps to calculate the Order Proposals. The lead times can also be managed at a Product Level, but this is the default parameter for the lead time by the supplier.

The Lead Time in Weeks (1) is an important value that helps to calculate the Order Proposals. The lead times can also be managed at a Product Level, but this is the default parameter for the lead time by the supplier.
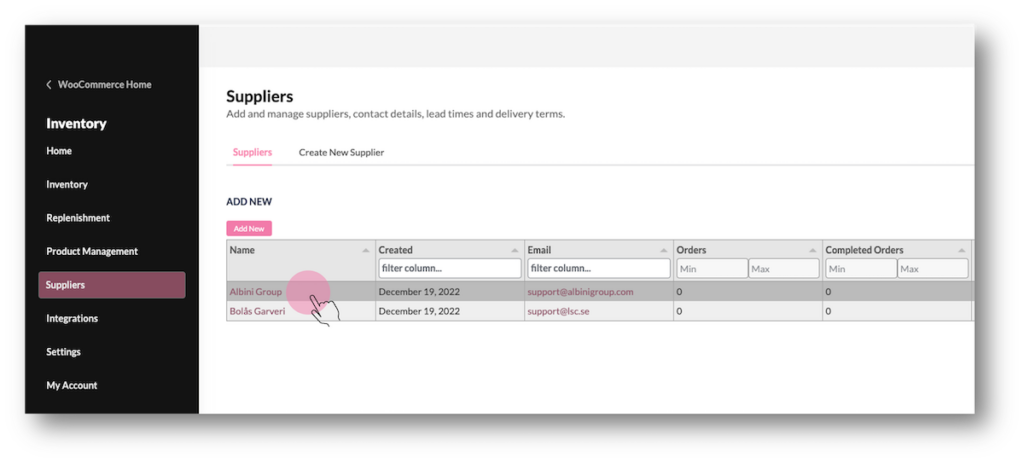
Manage Suppliers
↑ Back to topIf you have created a new supplier, you can manage and update the supplier by simply selecting the supplier from the Supplier Table:
Replenishment & PO Creation
↑ Back to topKnowing exactly when to order and how much is to a large extent dependent on the incoming stock.
The Inventory Management for WooCommerce extension allows you to create and manage purchase orders directly from the extension.
This article will guide you through all steps required to create and manage purchase orders.
Purchase Order Settings
↑ Back to topTo create purchase orders, start by entering your company’s profile and contact information in the Settings/PO Settings.
Company Name, Address, Postal Code, City, and Country are mandatory fields. Other fields can be added and will appear on the PDF form.
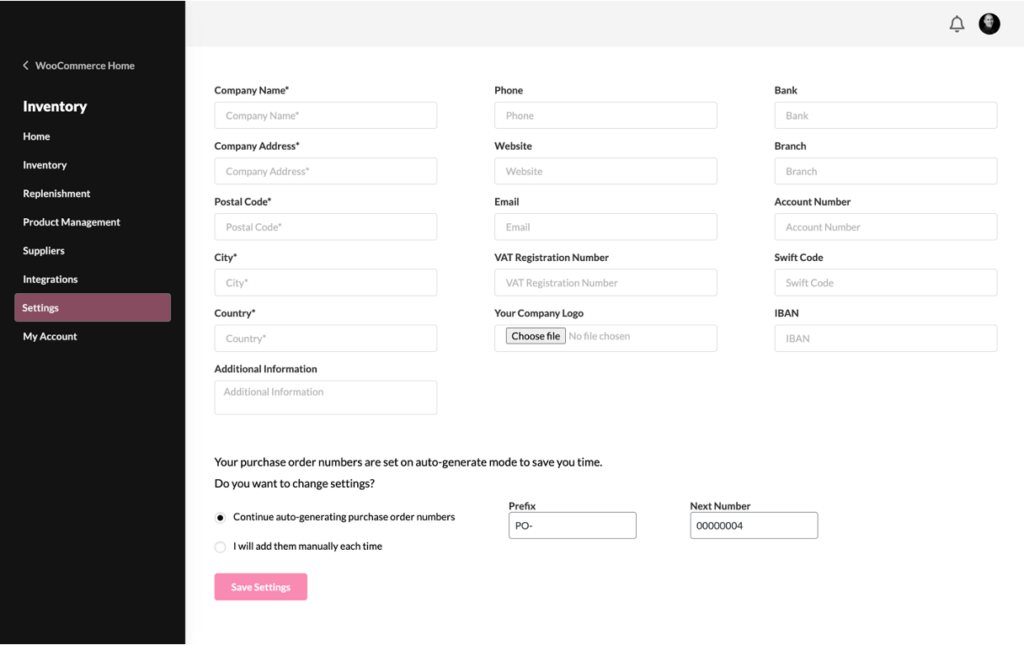
You can autogenerate PO numbers, or enter them manually at each time.
The PO Prefix is used as a free text entry.
Set Up Suppliers
To add a new supplier, move to the tab ‘Create New Supplier’.
Here you can add all relevant information for your supplier. Some of the fields are mandatory and will show up on the order forms;
- Supplier Name
- Supplier Code – create a unique code for the supplier (free text, used for PO creation and tracking)
- Currency – currency used for creating purchase orders (use the 3-letter abbreviation for the currency)
The Lead Time in Weeks (1) is an important value that helps to calculate the Order Proposals. The lead times can also be managed at a Product Level, but this is the default parameter for the lead time by the supplier.
You can read more about how to manage your suppliers in the chapter Suppliers.
Cost Prices & Lead Times
Once you have set up suppliers, you can add cost prices and lead times to your products.
Cost Prices (Cost of Goods Sold)
The easiest way to manage and update cost prices for your products is on the Product Management pages.
Cost Prices are required for a product before you can create a purchase order.

Lead Times
Lead Times can be set up on different levels:
- Default (all products in the store)
- By Supplier (managed in the Supplier pages)
- By Product (manage in the Product Management pages, or single product pages.)
Lead Time by Product takes precedence – if no value is entered, the calculation will fall back on the lead time value set by Supplier. If neither of these parameters is present, the default value for Lead Time is used.
Default Lead Time
After installation, all products in your store have a default Lead Time, which can be managed in the Settings / Forecast Settings:
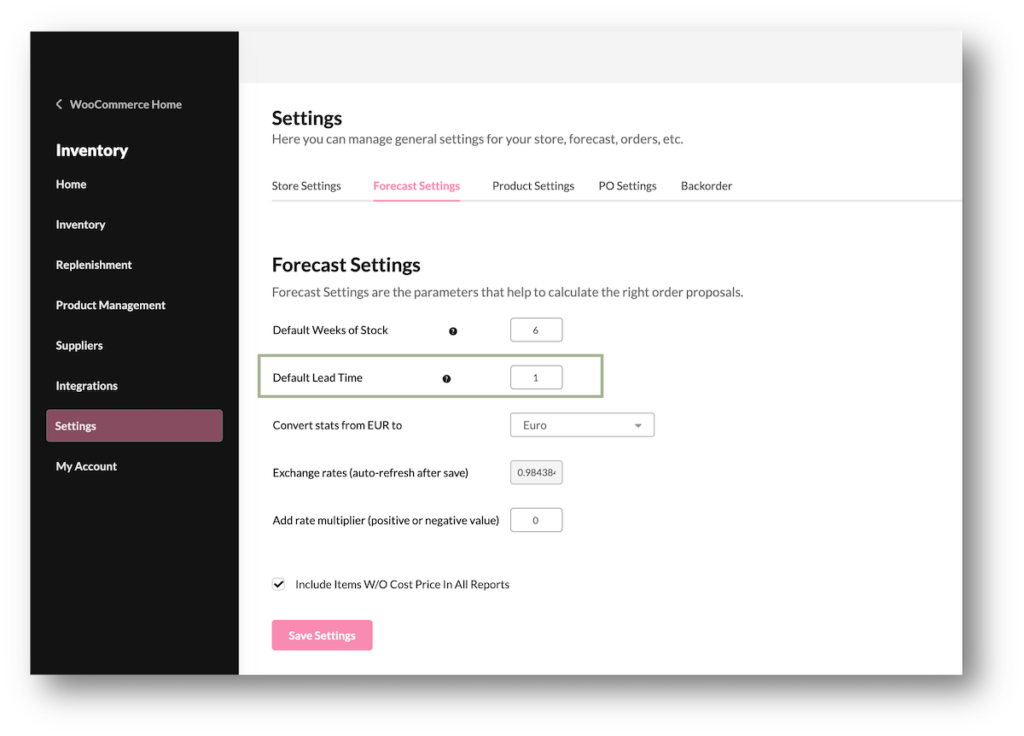
By default, the lead time is set to 2 weeks, but this is dependent on the supplier, product, and perhaps even category.
Lead Time by Supplier
The second level on which you can manage the lead time is on Supplier.
In the Supplier settings, you can set a generic lead time for all products from this supplier;
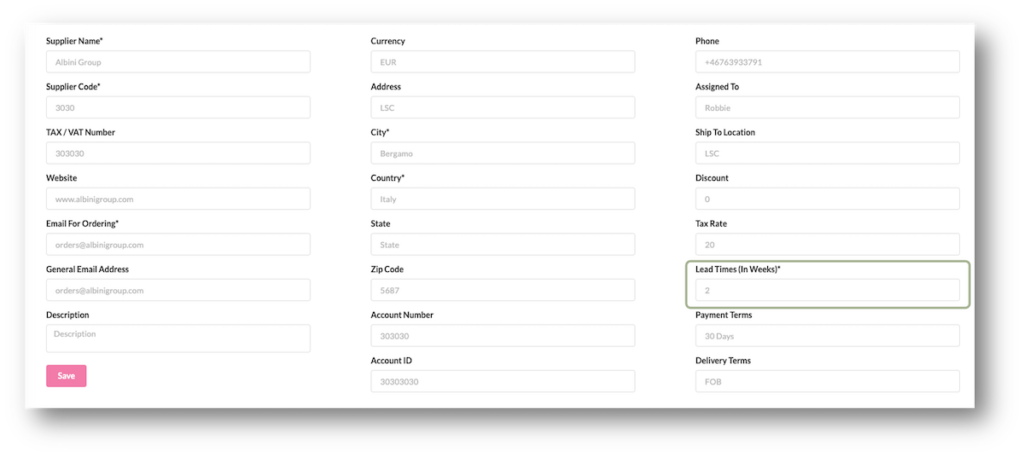
The Lead Time by Supplier takes precedence over the Default Lead Time.
This means, if you have not set any lead time on a product level, this value will be applied to all products from this supplier. Also, if you have set a lead time by product for some of the supplier’s products, these products will use the product-specific lead time. All other products assigned to this supplier will use the supplier’s lead time.
Lead Time by Product
The third level you can manage lead times on is the Lead Time by Product.
The easiest way to manage the Lead Time by Product is on the Product Management pages:
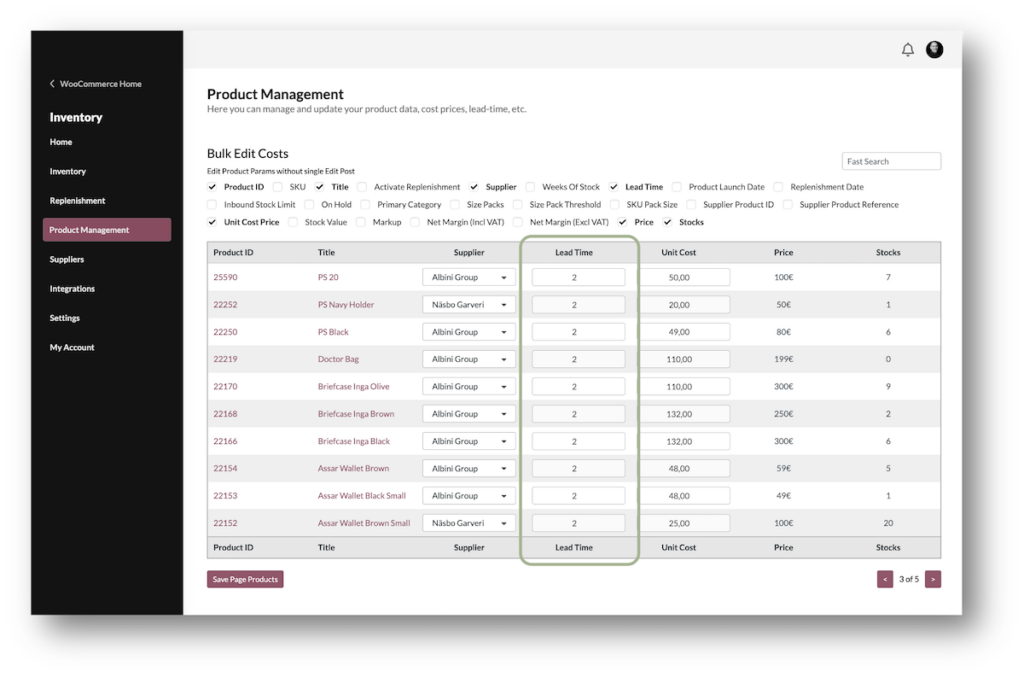
Make sure you have selected the ‘Lead Time’ measure in the filter and simply update the value for Lead Time by Product.
If you have already set a lead time by the supplier, this value will be present in this table. In this case, you can simply update the value by product.
Create Purchase Orders
↑ Back to topOnce you have set all required parameters, you can create Purchase Orders directly from the ‘Replenishment’ pages.
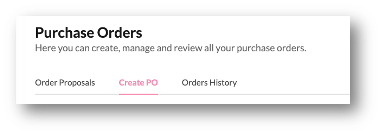
The Replenishment is divided into three tabs;
- Order Proposals
- Create Purchase Orders
- Order History
In the next chapter, we’ll walk you through these pages.
Order Proposals
↑ Back to topThe first tab on the Replenishment page shows the Order Proposal. Here you can filter on Supplier and Category to look at the details of the proposals.
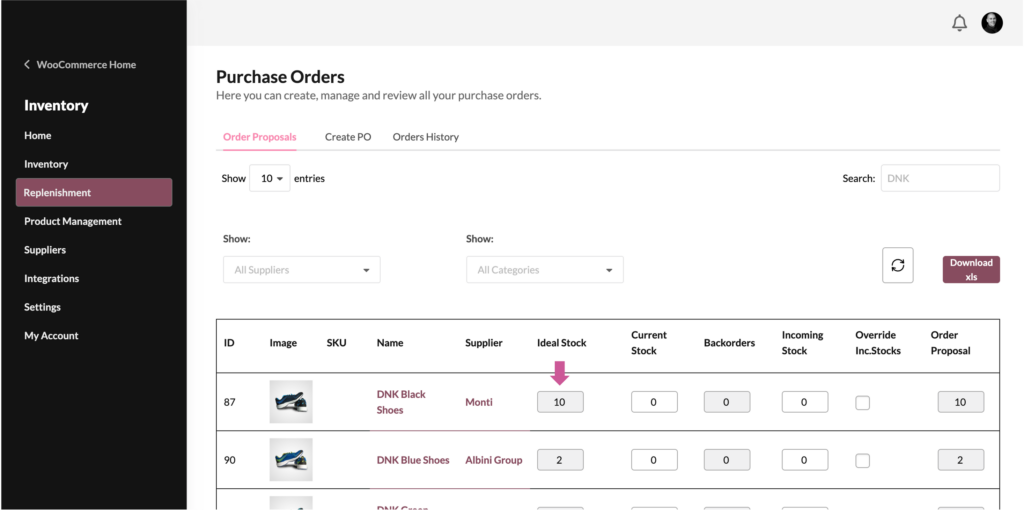
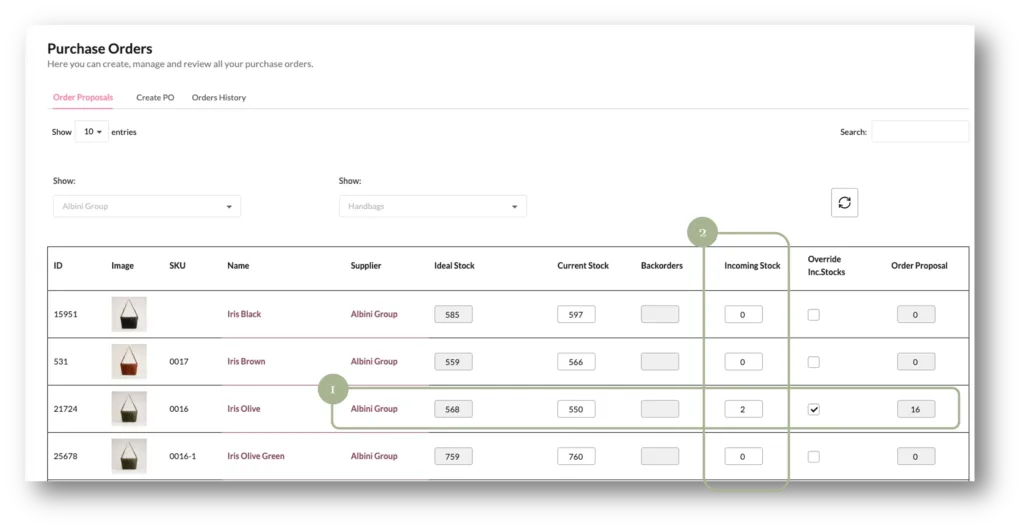
The Order Proposal shows the products’ Ideal Stock, Back Orders, Incoming Stock, and the Order Proposal (1).
The Order Proposal is created live, based on your stores’ sales forecast, but a critical component in the calculation is the Incoming Stock (2).
If you don’t use the integrated Purchase Order creation the extension offers, this is where you can change the incoming stock for individual products.
Create Purchase Orders
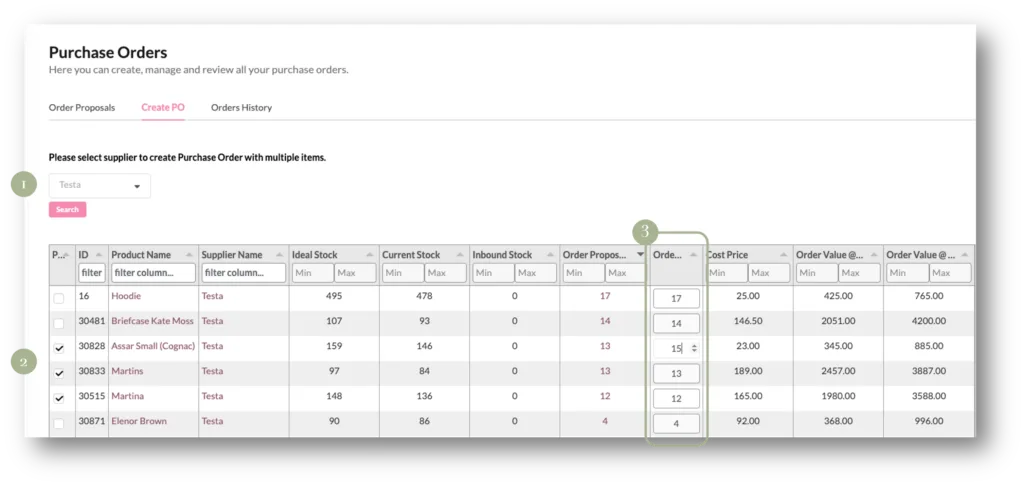
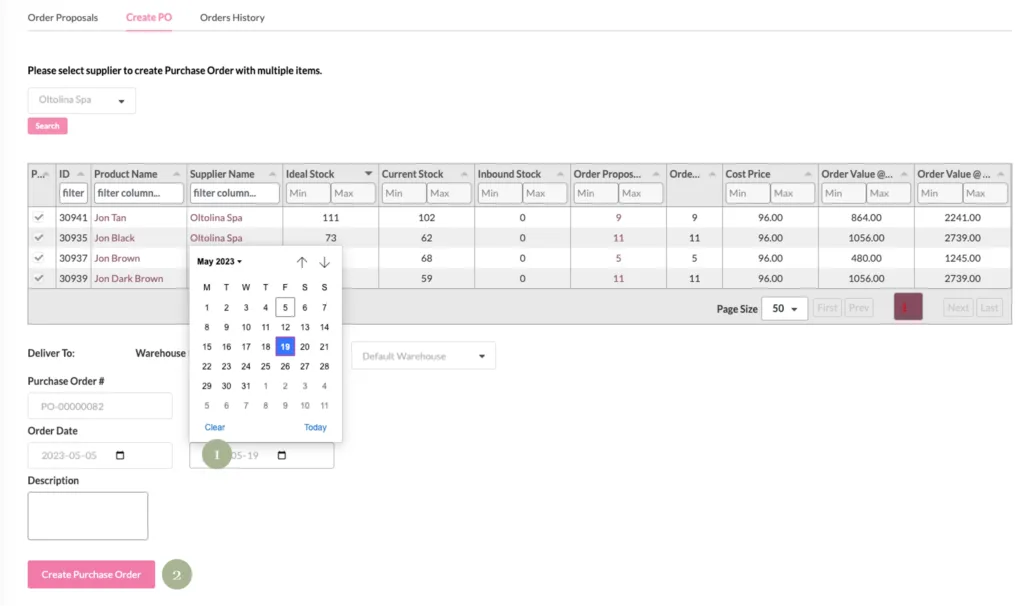
↑ Back to topThe second tab in the Replenishment page – Create PO – allows you to create purchase orders for single items or multiple in one go.
To start, select a supplier (1).
You can filter the table using the top bar, or search for individual products in the same way as the Stock Detail reports.
To select the products, simply tick the boxes on the left-hand side. (2)
You can change the quantity of the order (3) and the table will automatically recalculate the Order Value at Cost and Order Value at Retail price for the order.
By pressing the ‘Create Purchase Order’ below the table, you will be able to set the estimated delivery time for the order:
In the calendar picker (1), you can select the date for delivery. This date is pre-filled based on the lead time by product and the lead time by the supplier.
PO Status & History
↑ Back to topAfter creating the PO (2), you will be able to create a PDF file for the order. The information you have entered in the PO Settings will appear on the final purchase order:
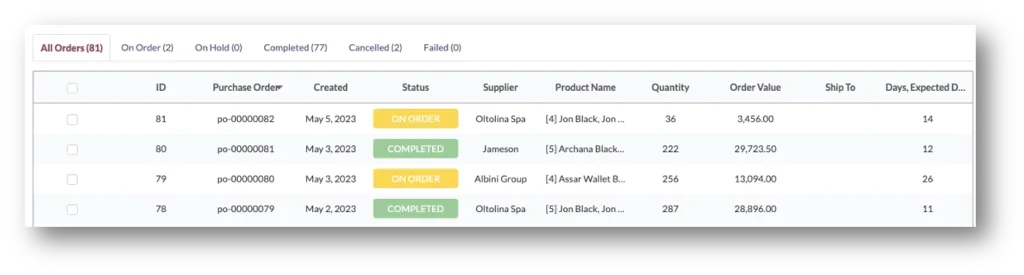
The Incoming Stock is automatically updated on the Stock Report pages. Once the order has been received, you can change the status to completed.
Changing the status of the purchase order from On Order to Completed, Cancelled, On Hold will also update the order proposal calculation accordingly.
Compatibility & Integrations
↑ Back to topProduct CSV Import Suite
↑ Back to topInventory Management for WooCommerce is compatible with the WooCommerce extension – Product CSV Import Suite.
This extension lets you import thousands of products and supports complex products and custom data from Product Vendors, Brands, Google Product Feed and more.
Inventory Management uses a number of specific measures and custom data that can be imported if you have this extension installed:
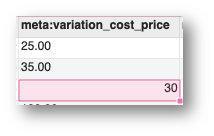
| meta: variation_cost_price | Cost Price for the product and variation |
| meta:inbound_stock | Measure that Inventory Management for WooCommerce is using to calculate the order proposals for all products and variations. |
| meta:inbound_stock_override | The flag that allows you to set the inbound stock parameter manually. |
Variation Cost Price
If you want to upload the cost price for your products, simply fill out the value with up to 2 decimals
Inbound Stock
If you are not using the Purchase Order management feature in our extension, you can override the incoming or inbound stock in the Inventory Management pages, or through the CVS Import Suite:
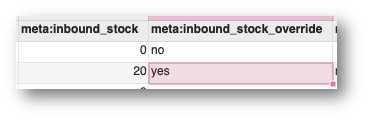
If you upload values for the incoming stock, please make sure you set the ‘override’ to yes in the CSV file as well.
For more information on how to use the Product CSV import, please have a look at the documentation for the extension.
Troubleshooting
↑ Back to top1.) Reports are not showing values
↑ Back to topIf you do not see any values, or if you are missing products in the Stock Performance reports, most likely Cost Prices for products are not entered yet.
As soon as Cost Prices are entered, you will see the items in all reports. If you do not want to enter Cost Prices, you can force the population of all products in the Forecast Settings:

2.) Forecast is not updated
↑ Back to topThe Sales Forecast is calculated with live data, but we update the sales forecast for your store only once per week, every Monday morning for your time zone.
After installation it will take between 10-20 minutes to generate the sales forecast for your store. During this process, you can refresh the reports by hitting the refresh button on the home page:
If for some reason your forecast (and order proposals) is not present in the tables, you can manually update the forecast in the Integrations page:
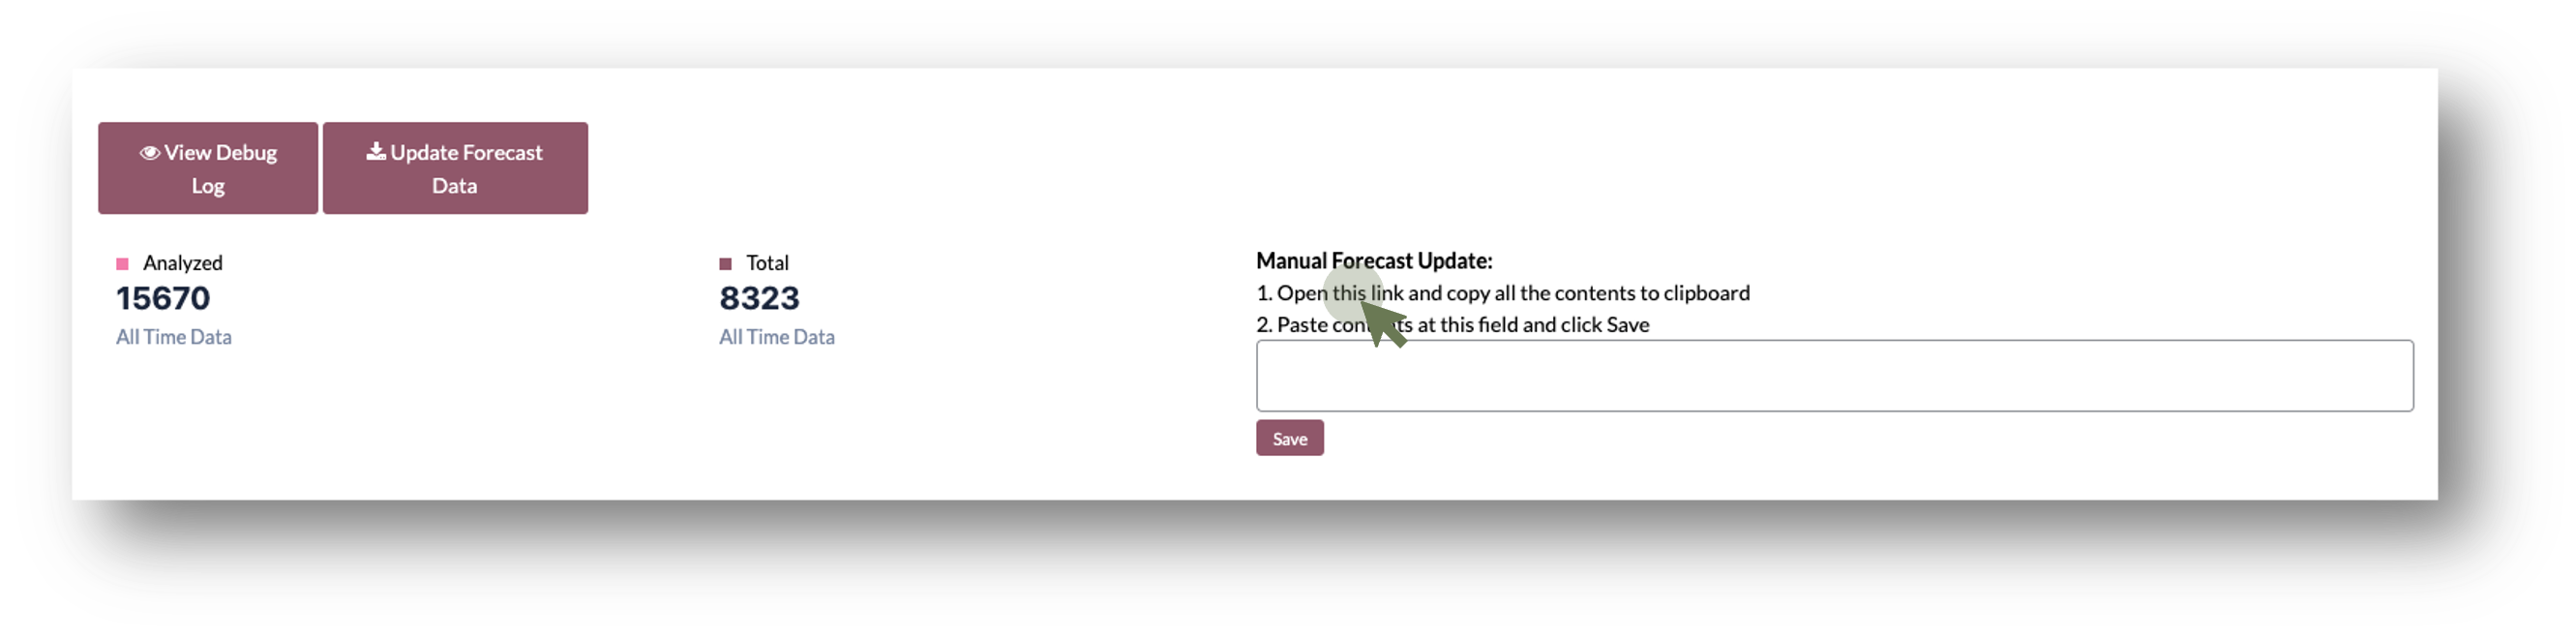
To manually update the forecast, open the link (1) – a new window will open with the sales forecast:
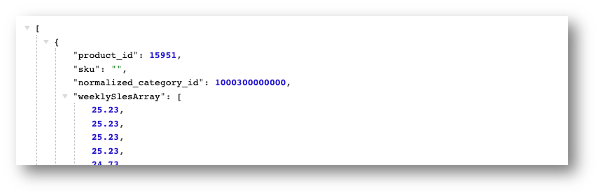
Copy all the data and paste it in the field on the integration page:
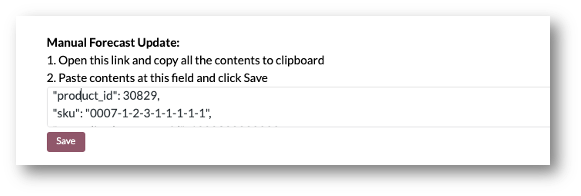
After saving the data, the order proposals, the ideal stock and the sales forecast will be updated throughout the extension.
Frequently Asked Questions
↑ Back to top– How long before I start seeing my sales forecast and order proposals?
↑ Back to topImmediately, our dashboard provides real-time analytics.
However, depending on your store size, it might take a couple of minutes before you see data updated in the reports.
You can check the progress in the ‘Integrations’ tab, or update the data manually on the Home page by hitting the refresh button.
– Can I get more frequent updates on my sales forecast than a weekly sales forecast?
↑ Back to topYes, you can. The Sales Forecast is calculated with live data, but we update the sales forecast for your store only once per week, every Monday morning for your time zone.
However, if you want to update the forecast on demand, you can do this in the ‘Integrations’ and ‘Update Forecast Data’, or simply hit the ‘Refresh’ button on the Home page to update the sales forecast on Demand.
– How do you calculate my store’s sales forecast?
↑ Back to topOur forecasting engine analyses your store’s historical and daily sales, as well as external data sets that factor for local events, news trends, weather, holidays, and even school schedules. This is then translated into a daily sales forecast for all your products.
The order proposals are then calculated based on the sales forecast per product and variation, based on the stock parameters you have entered – weeks of stock and lead time.
– Is your extension compatible with WooCommerce’ High Performance Order Storage (HPOS)?
↑ Back to topWe are working on making our extension compatible with HPOS, but at the moment, the extension is not compatible. As soon as it become the new standard for WooCommerce, we will be compatible.
Support
↑ Back to topI couldn’t find my answer here. What do I do?
If you couldn’t find what you’re looking for in the documentation, you can open a ticket through the WooCommerce Support Portal with us, and our 24/7 support team will be happy to give you a hand!