Gamification for WooCommerce is a premium WooCommerce extension that gives you an easy way to gamify your WooCommerce website. Introduce game-elements to motivate action and drive engagement with prospects, customers, partners, sales, and more. Reward your users with points, ranks, badges, and discount coupons so you can get build brand loyalty while also engaging new customers.
Store Owner’s Guide
↑ Back to topIntroduction
↑ Back to topGamification for WooCommerce extension helps you to build a rewarding system for your WooCommerce store customers. Using gamification tactics, you can attract new customers while retaining existing ones by keeping them engaged.
You can automatically reward discount coupons to WooCommerce store customers whenever they achieve a higher rank or unlock a new badge. Using Gamification for WooCommerce, your customers can pay a payment in parts on WooCommerce checkout using their gamification points and remaining amount through the activated payment gateway.
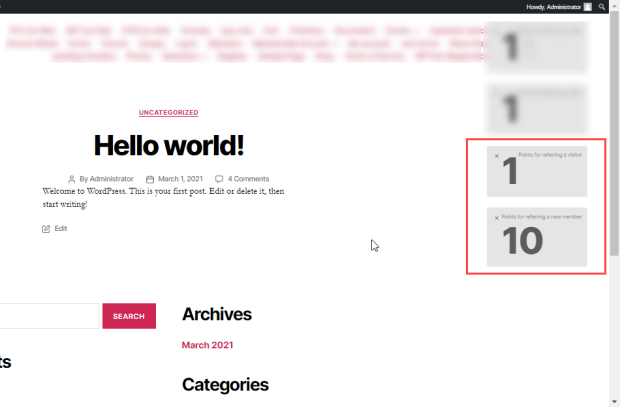
Gamification for WooCommerce facilitates initiating referral promotion through rewarding referrers and referred with points on successful product purchase completion.
Requirements
↑ Back to topInstallation
↑ Back to top- After downloading the plugin, install it on your WordPress system.
- Log in to your WordPress admin panel.
- Click on the Plugins tab on the left side menu.
- Click Add New.
- Click on Upload Plugin button at the top of page.
- Click on Choose File.
- Select the gamification-for-woocommerce.zip file from the directory.
- Click install now.
- After uploading click the Activate Plugin button.
- That’s all. (You will now see the settings and hook in myCred hooks and settings).
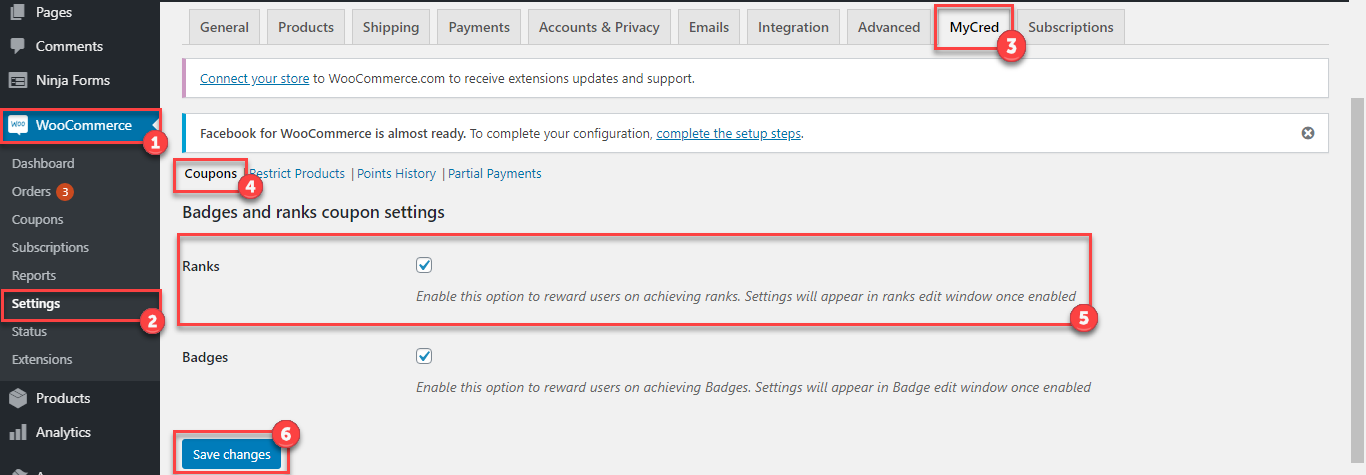
Coupons on Ranks
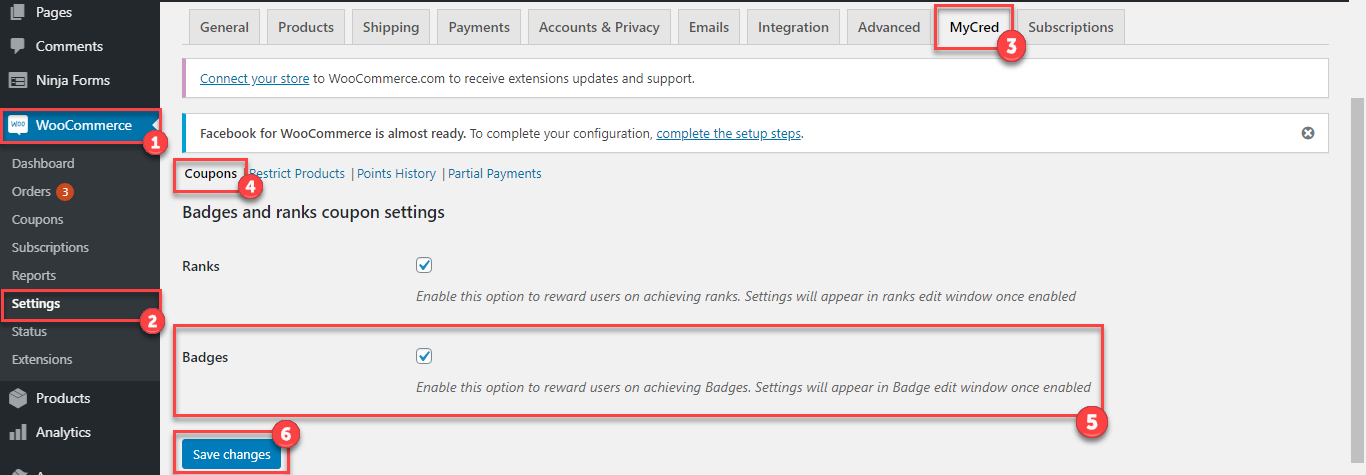
↑ Back to top- When the plugin is installed and activated, a tab will be visible in WooCommerce settings by name of myCred.
- To award coupons when a user acquires a rank through myCred these options have to be enabled.
Activate Ranks Add on
↑ Back to top- To award Ranks to users they must be created before, to create Ranks some settings must be done.
- Ranks Add on must be activated from the Add on tab.
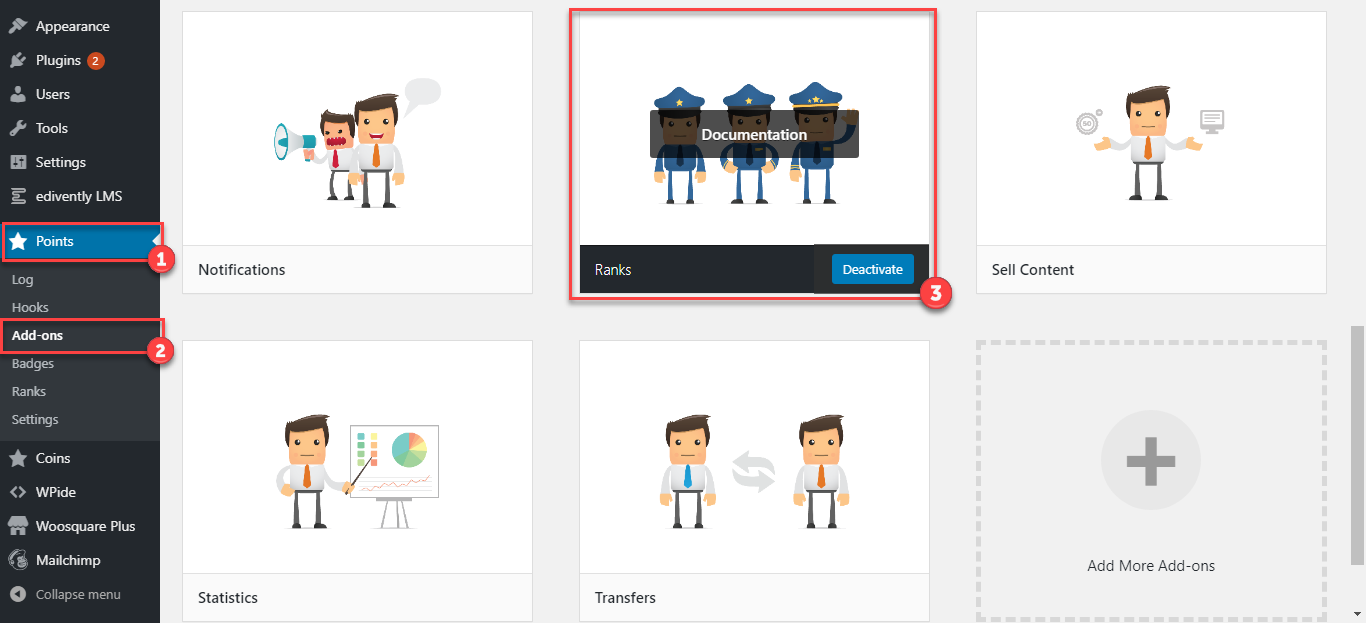
- Go to Points tab.
- Click Add-ons, different Add-ons will be displayed.
- Activate Rank Add-on just by clicking on the Activate button that appears on the Add-on.
After Ranks Add on is activated, tabs will be displayed inside the Points tab.
Create Ranks
↑ Back to topOnce Ranks Add-on is activated, Ranks can be created.
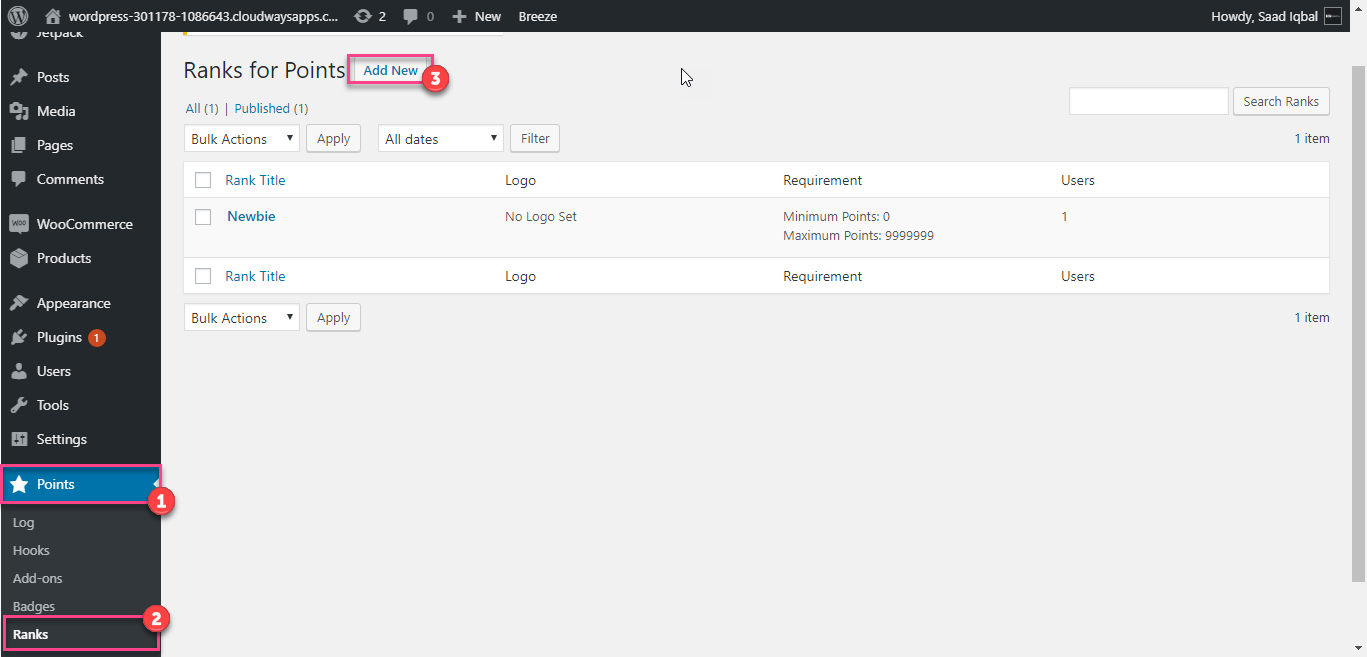
- Go to Points tab.
- Click Ranks to create a Rank.
- Click Add New.
Now a new Rank page will be displayed where a new Rank can be created.
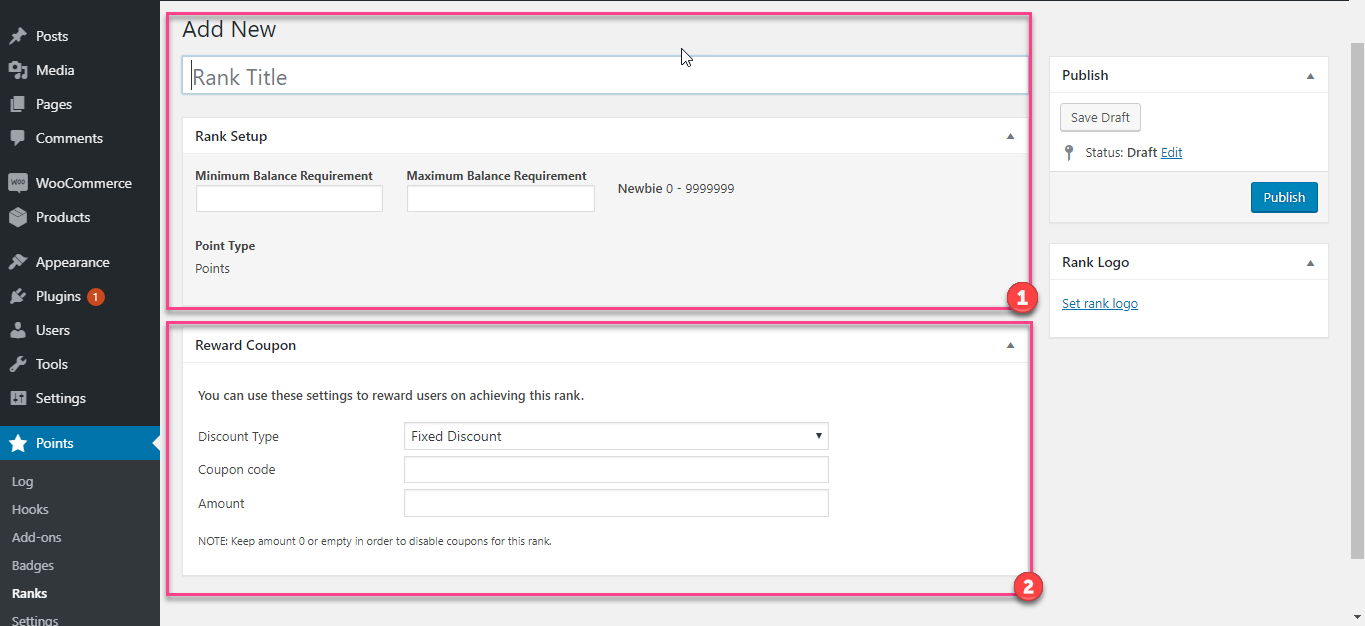
- Enter Rank title, Min/Max Balance Requirement for the Rank and select Point type.
- Also create a Coupon by setting the Discount type, Coupon code and Amount of the Coupon. Click publish.
Badges
↑ Back to topCoupons on Badges
- When the plugin is installed and activated, a tab will be visible in WooCommerce settings by name of myCred.
- To award coupons when a user acquires a badge through myCred these options have to be enabled.
Activate Badges Add on
↑ Back to top- To award Badges to users they must be created before, to create Badges some settings must be done.
- Badges Add-ons must be activated from the Add-ons tab.
- Go to Points tab.
- Click Add-ons, different Add-ons will be displayed.
- Activate Badge Add-on just by clicking on the Activate button that appears on the Add-on.
After Badges Add on is activated, tabs will be displayed inside the Points tab.
Create Badges
↑ Back to topOnce Badges Add-on is activated, Badges can be created.
- Go to Points tab.
- Click Badges to create a Badge.
- Click Add New.
Now a new Badge page will be displayed where a new Badge can be created.
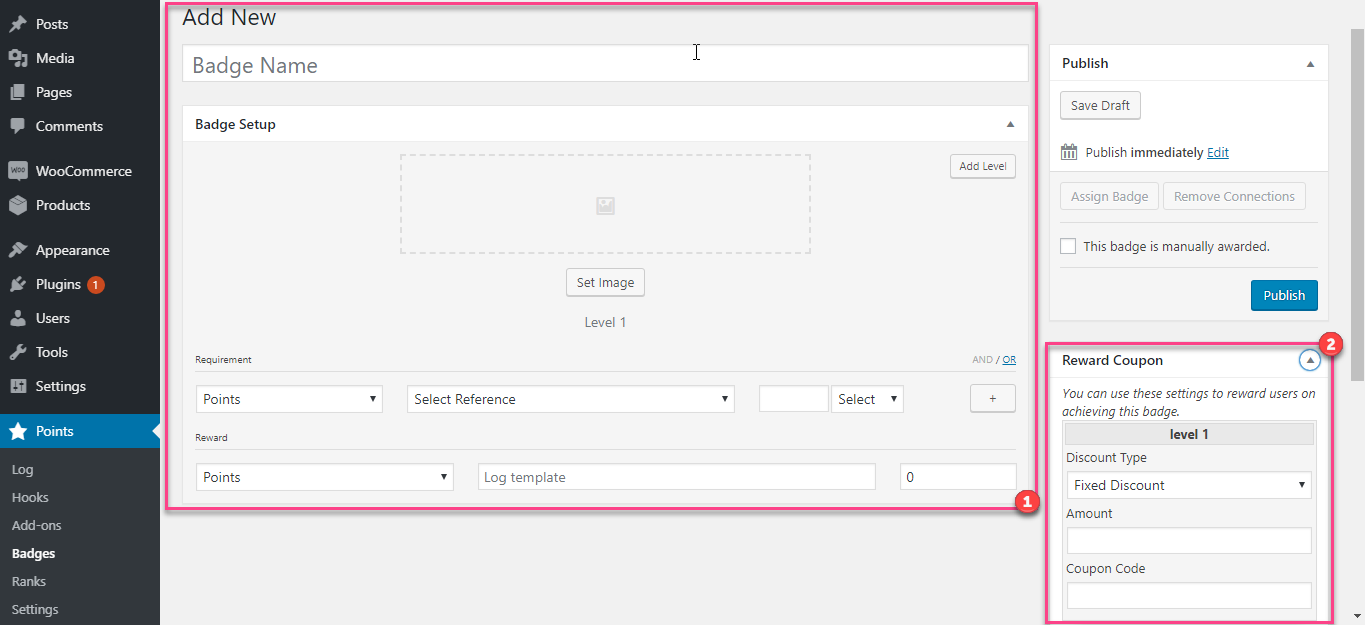
- Create a Badge by setting its name, Point type, reference, the amount of times(s) this badge you want to be rewarded. Also a log template and points amount. You can also set levels and image for this badge.
- Also create a Coupon by setting the Discount type, Coupon code and Amount of the Coupon. Click publish.
Reward Coupons
↑ Back to top![]()
- Reward Coupons has three settings Discount type, Coupon code and Amount, these settings can be edited to create a new coupon for a respective rank or a badge.
- Discount Type can be set to Fixed discount for applying any fixed amount on a discount coupon, or Percentage discount can be set to apply a coupon discount, depending on the percentage specified.
- Coupon code for the Coupon will be consisting of letters numbers or special signs, consumers can enter these codes when checking out through WooCommerce to obtain a discount on the current purchase.
- Amount set for a particular Coupon will be the amount of points given to the user when the Coupon is rewarded.
- Now, when a user achieves a respective rank or a badge they will be awarded the coupon.
- The coupon will be generated and visible from my account page in My Coupons tab.
- The coupon can also be edited from the WooCommerce Coupons tab. The coupon will be saved in the Coupons tab after it was generated for the defined scenario.
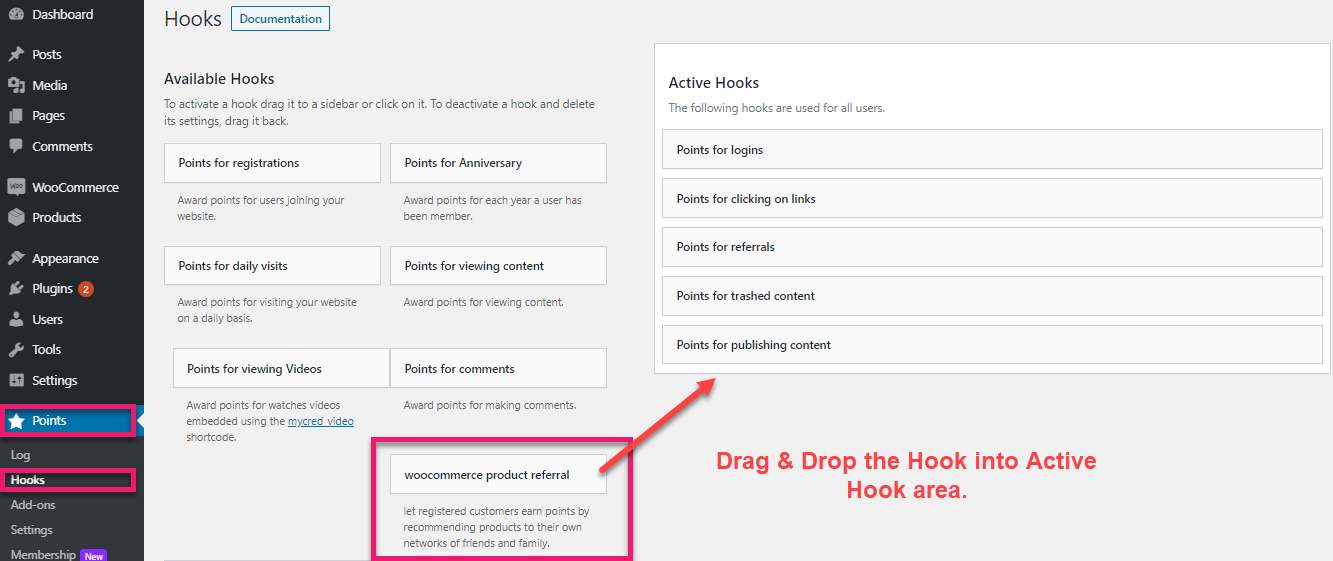
Hooks
↑ Back to topHooks must be activated because hooks basically are conditions due to which Points, Ranks or Badges are awarded to a particular user.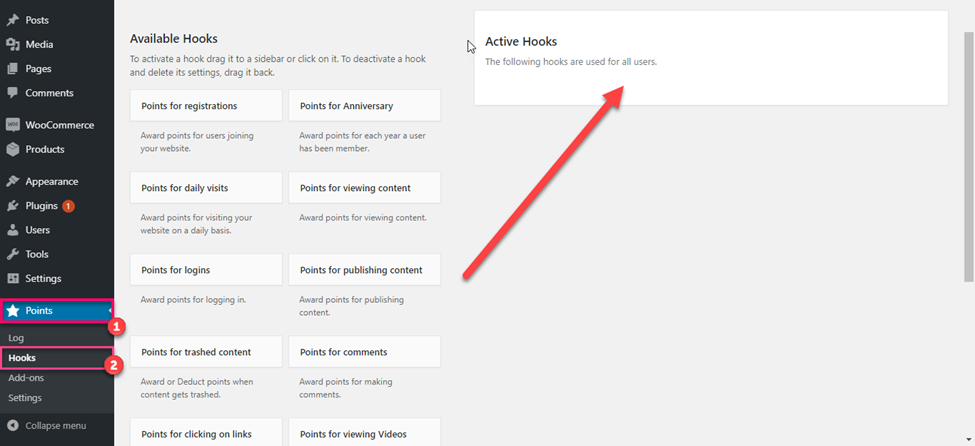
- To activate Hooks go to Points tab.
- Click on Hooks tab, then different available Hooks will be displayed. Click and drag the hooks you want to activate, from Available Hooks towards Active Hooks.
Restrict Products
↑ Back to topRestrict Products feature make products accessible for a user who has a particular Rank or a Badges.

- Go to WooCommerce tab.
- Click Settings.
- And click on MyCred tab.
- Click on Restrict Products option.
- Click on Enable checkmark and click save changes.
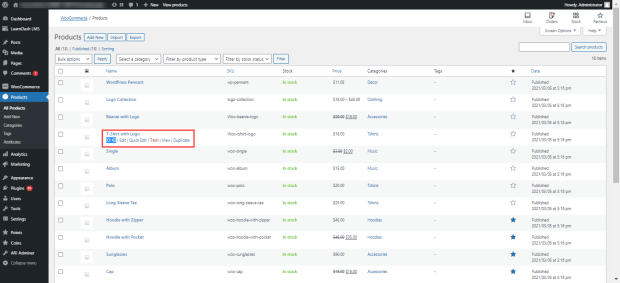
In the Products tab you can edit your restrict products settings.
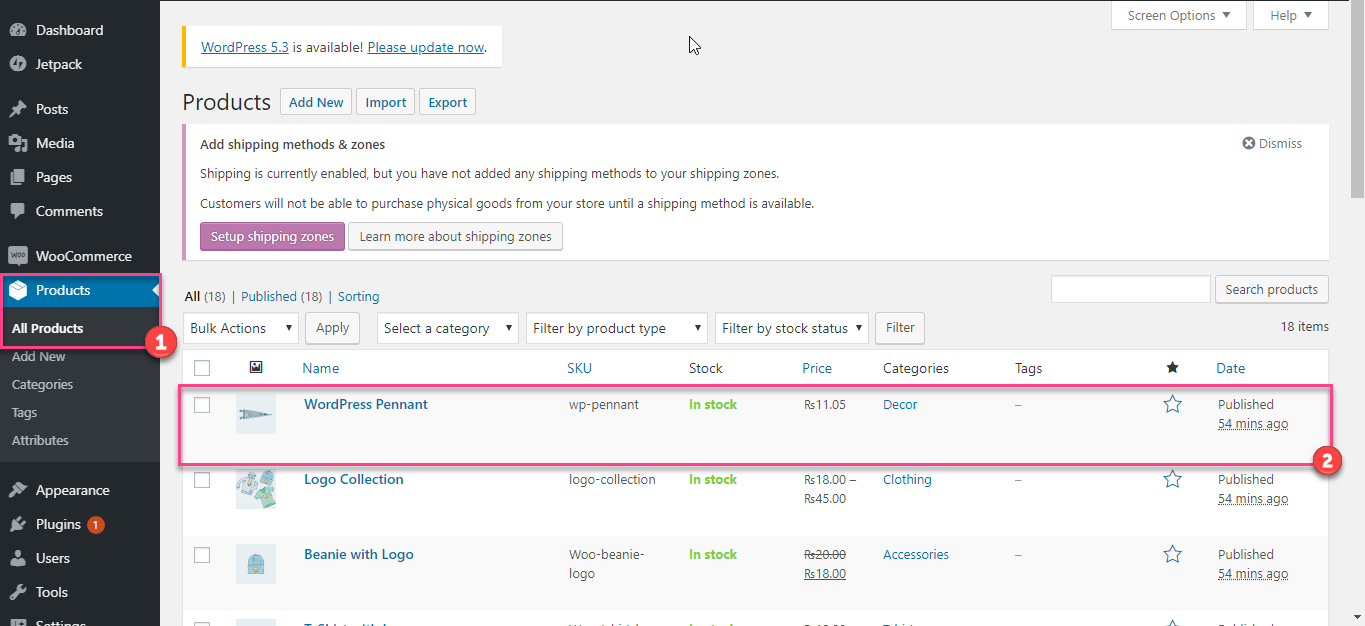
- Go to Products tab.
- Click the product you want to restrict.
Now an Edit product page will open for the product where you can find Restrict Products settings.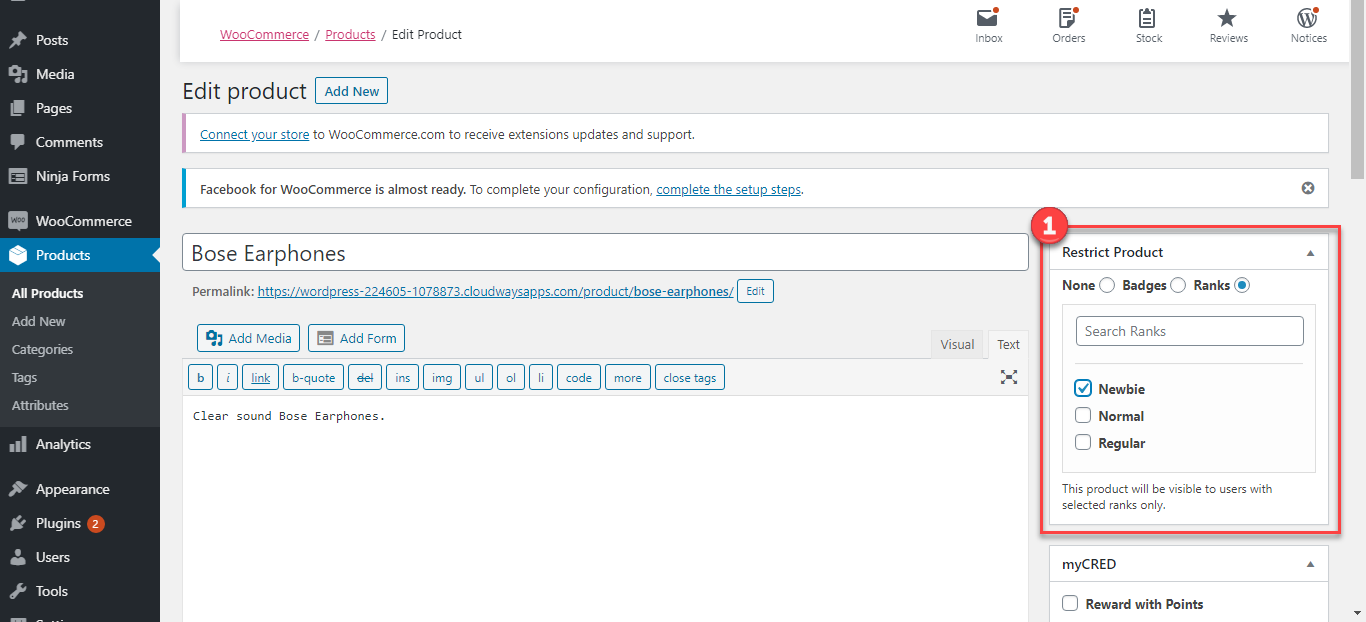
- Here you can Restrict this product on either Ranks or Badges.
Now this Restricted product will be shown to the only user with a particular rank or badge according to the settings set by the admin.
Points History
↑ Back to topPoints History displays myCred points log on user’s My Account page.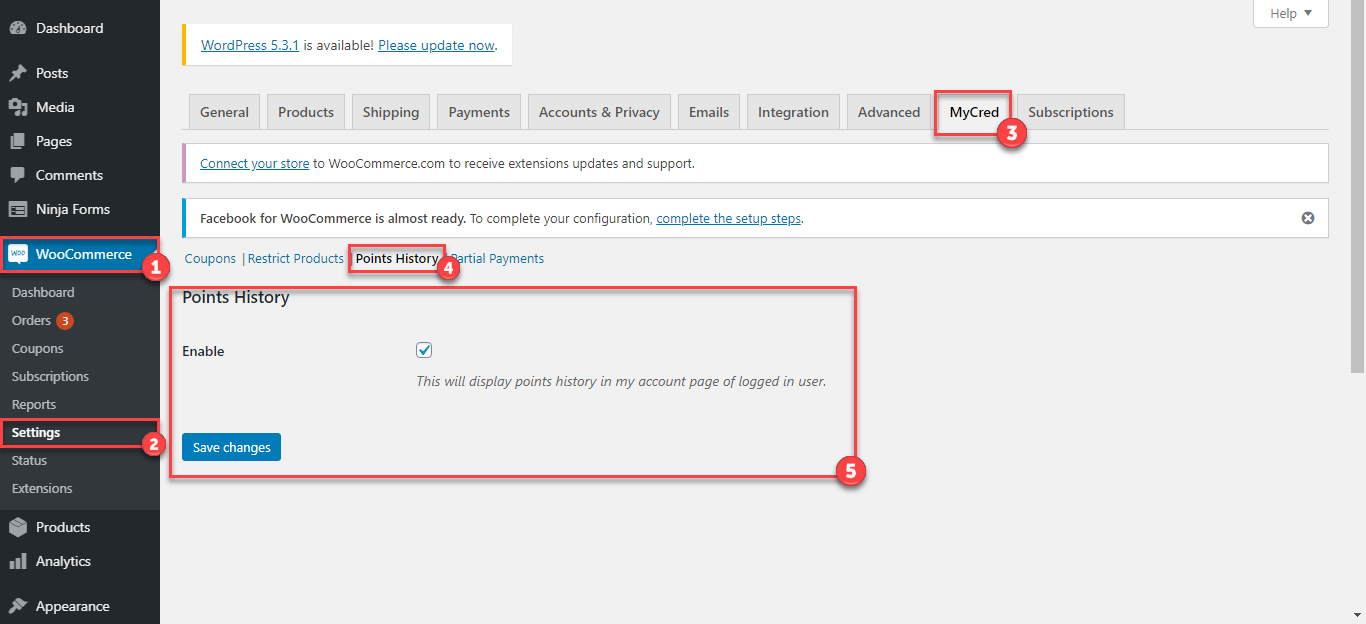
- Go to WooCommerce tab.
- Click Settings.
- And click on MyCred tab.
- Click on Points History option.
- Click on Enable checkmark and click save changes.
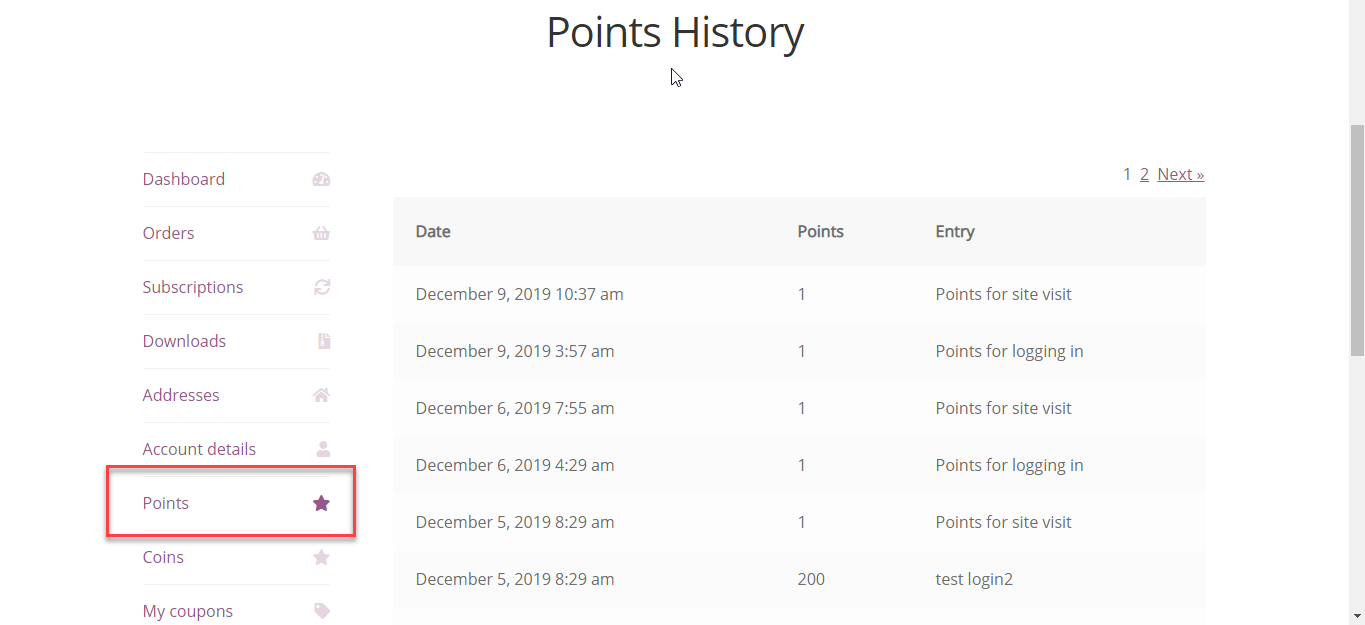
- Here on the account page the user can see his/her points history.
Display Rewards
↑ Back to topDescription
With This Functionality Now admin can display how many points User will earn on Single Product Page, Cart Page and on Checkout Page.
How It Works
↑ Back to topReward Points For Each Product
You can set rewards points for Each product.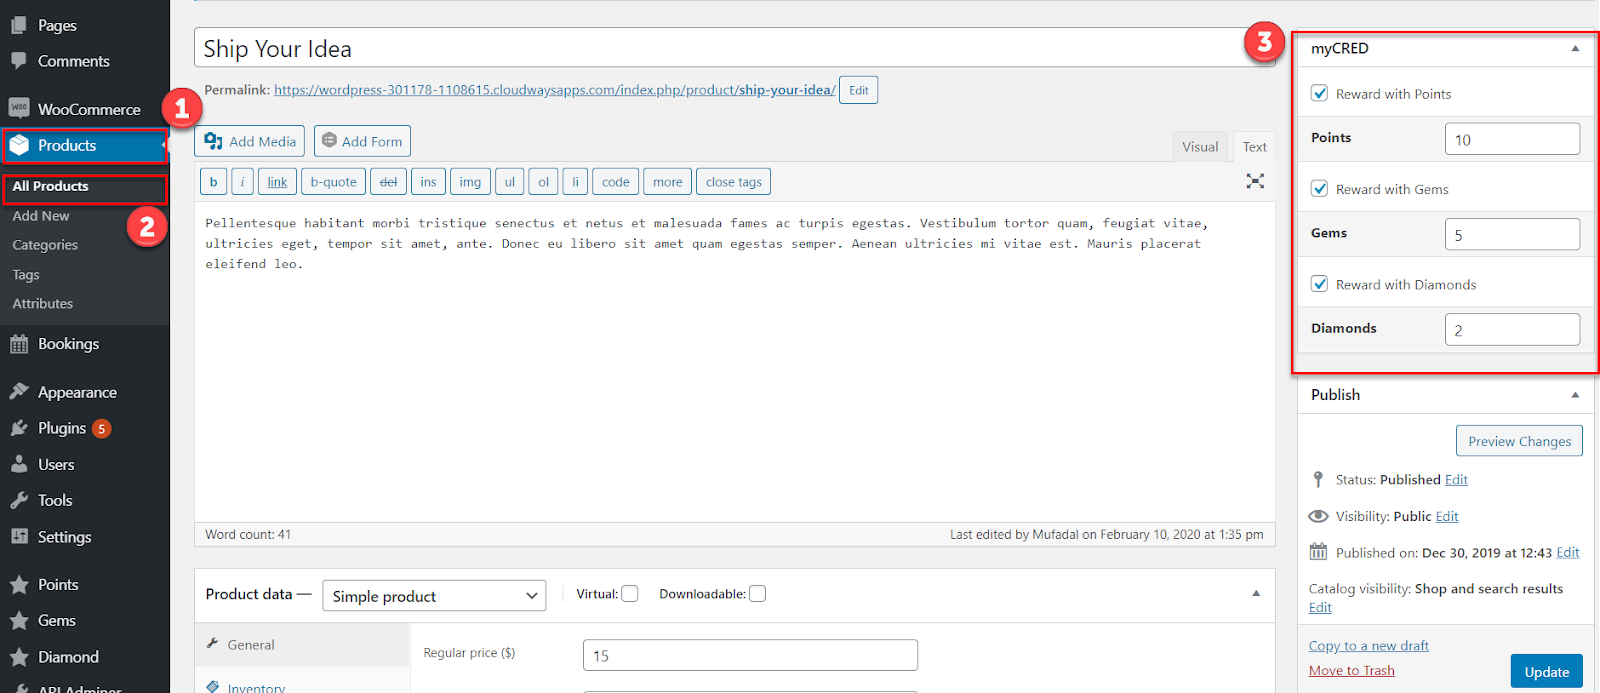
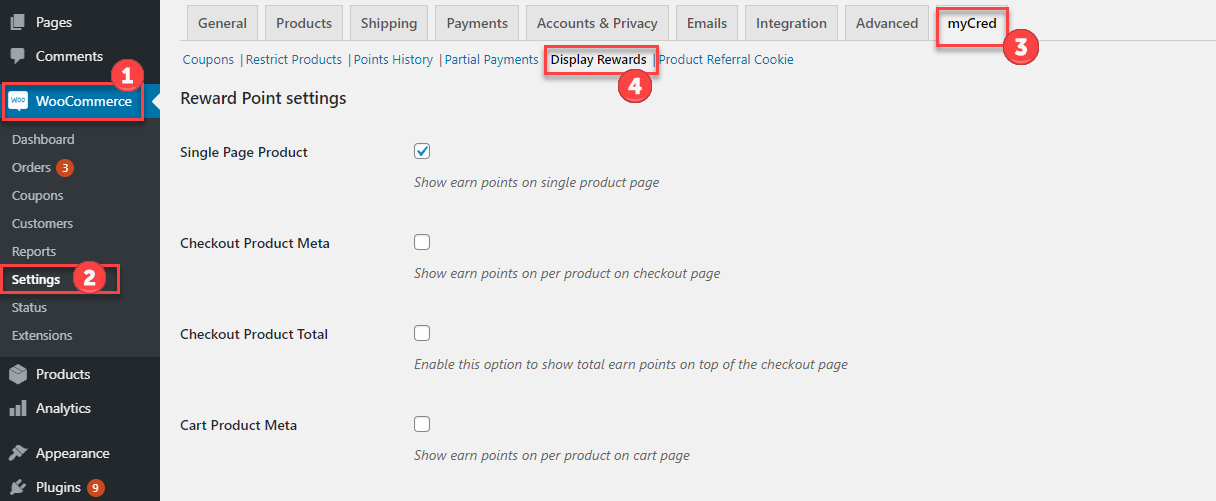
Display Rewards Point Settings:
Click on WooCommerce→Goto Setting→myCred Tab→Display Rewards→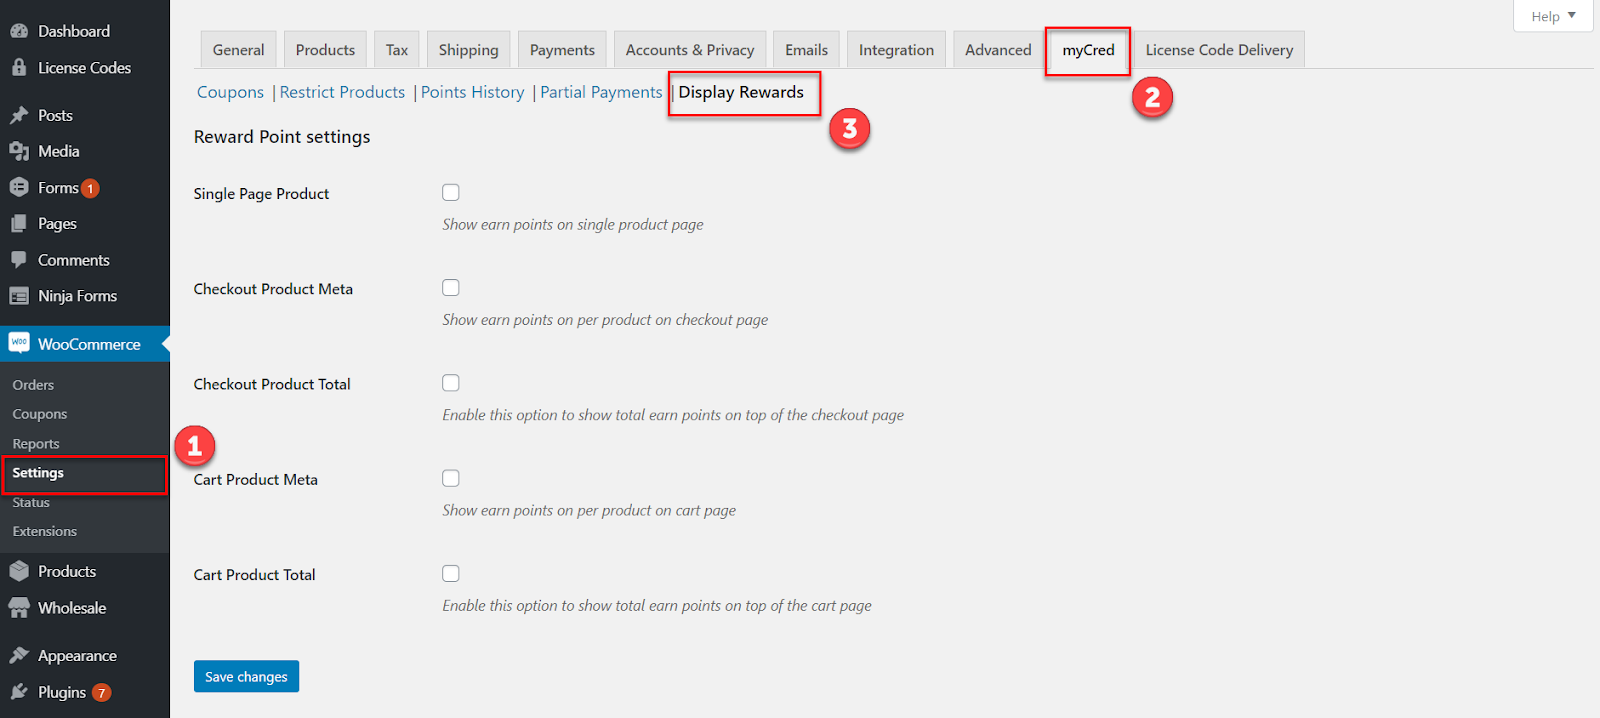
1. Reward Point On Single Product Page Back-End View→
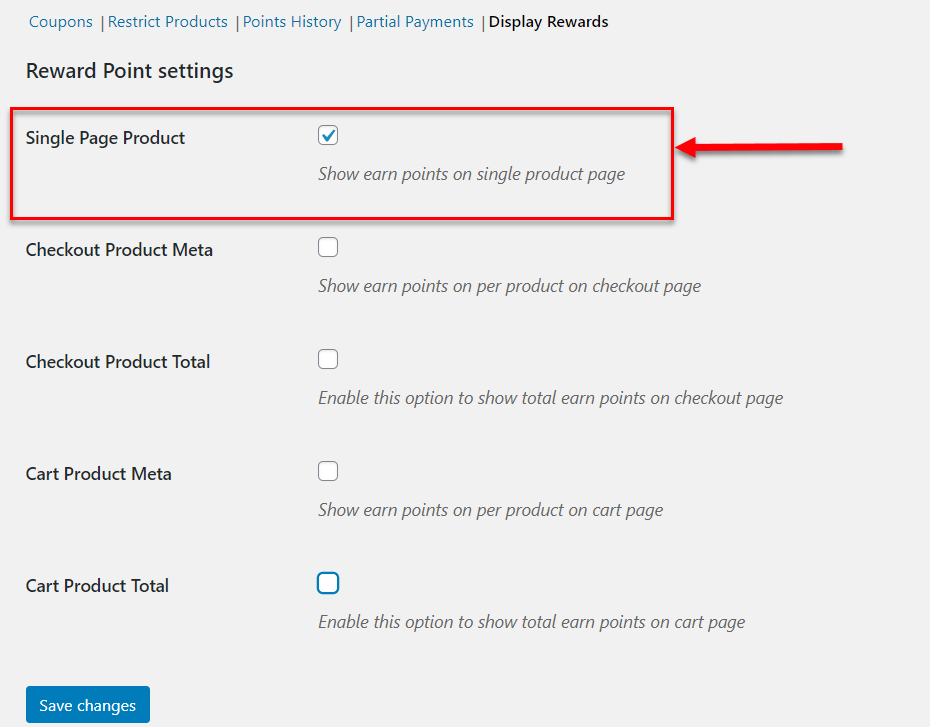
Front-End View→

2. Reward Point On Cart Page
Back-End View→
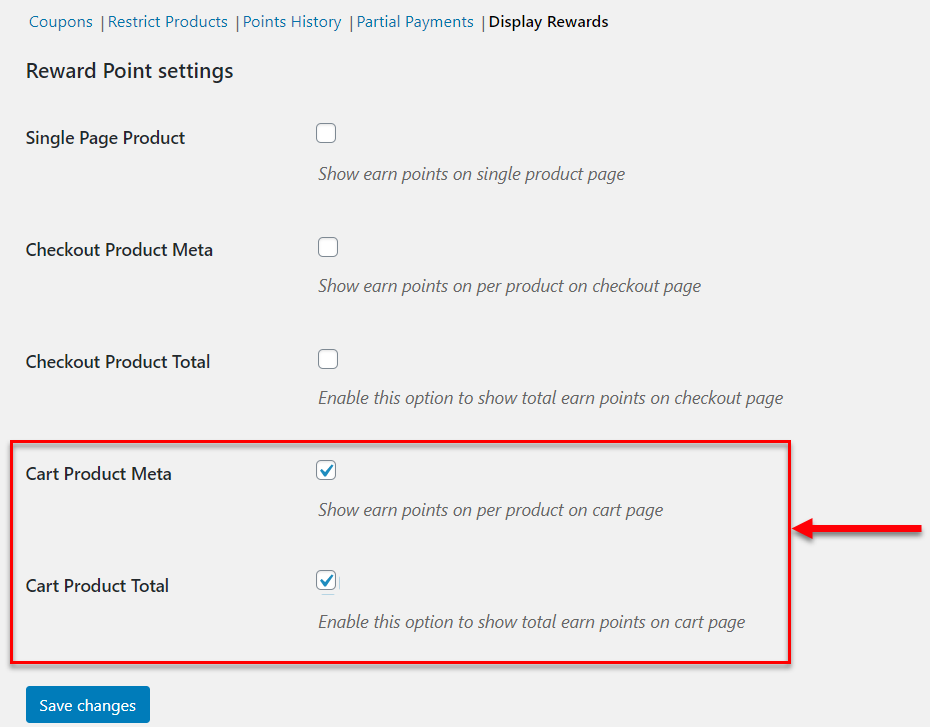
Front-End View→ 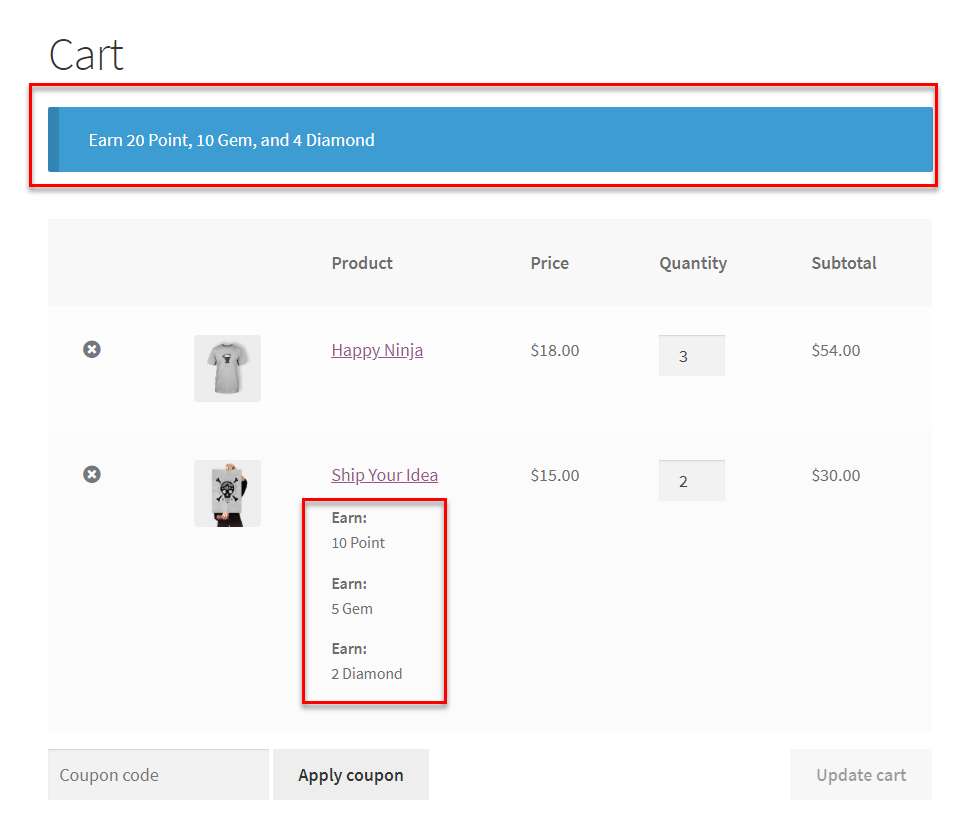
3. Reward Point On Checkout Page
Back-End View→ 
Front-End View→ 
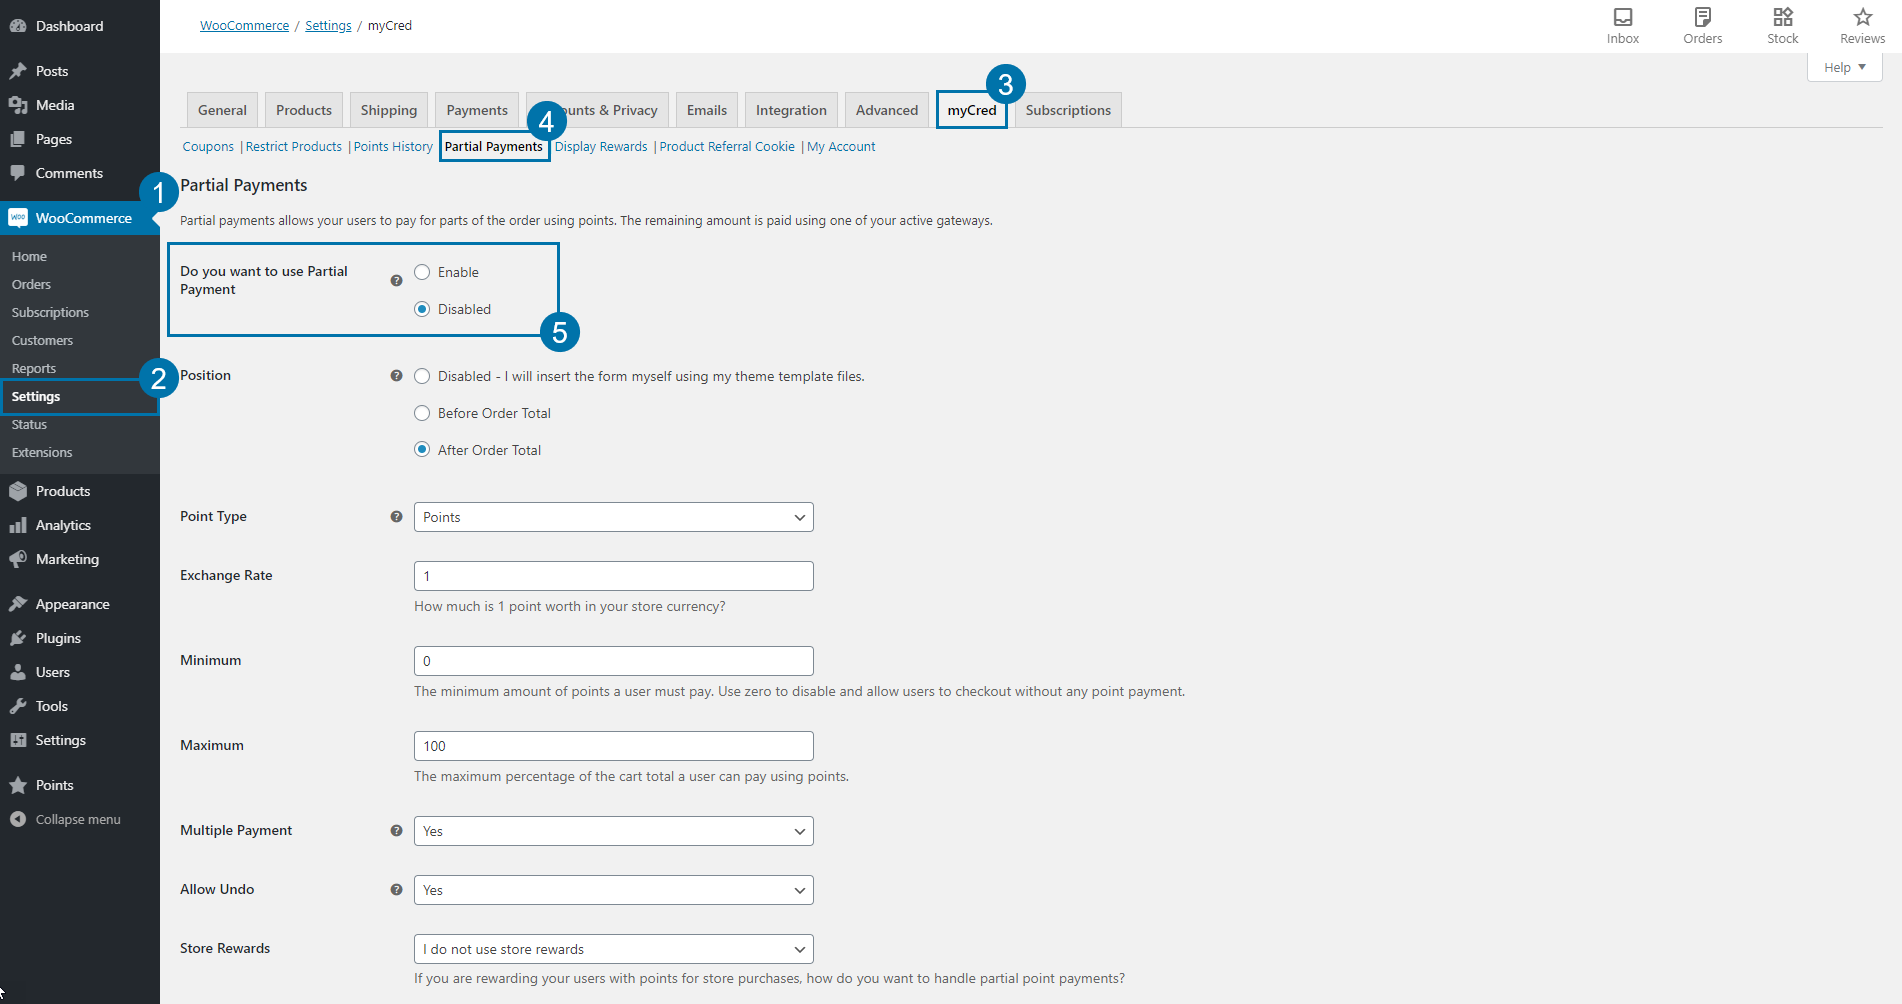
Partial Payments
↑ Back to topPartial payments allows users to pay for parts of the order using points. The remaining amount is paid using one of your active gateways.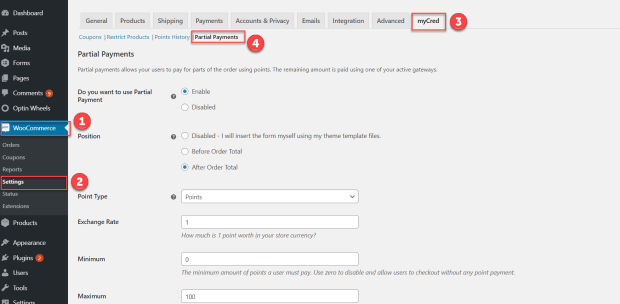
- Go to WooCommerce tab.
- Click Settings.
- And click on MyCred tab.
- Click on Partial Payments option.

- Once you successfully install and configure the extension, you will be provided with the options to manage partial payment as per your requirements. Admin able to see the new option called (Do you want to use Partial Payment). By default, partial payment option is enabled for all settings. However, the admin can manually enable/disable the option for which enabling is required.
- First select the partial payment for position, it can be set to Before Order Total, After Order Total or Disabled where the position can be set using my theme template files.
- Next we need to select which point type we want to accept as payment and the exchange rate between the selected point type and your store currency.
- Next you are given the option to set a minimum payment requirement. This minimum is only enforced if the user want to make a partial payment. They can still checkout without making any point payment what-so-ever.
- We can also enforce a maximum cap where a user can only pay for a certain percentage of the order total. This would mean the user would need to make some form of payment using some other payment gateway.
- Next you need to decide if users can make multiple payments and if they can undo their payments. Undoing a payment will result in the points being fully refunded to the users account.

- If you are using store rewards in myCred, you can select if the point amount the user pays is deducted or not from the payout.
- Next, we need to decide what points can be used as payment for. You can select if points can pay for taxes (if used), shipping (if applicable) or products that are marked as “on sale” in WooCommerce.
- After that, we need to select if we want to use an input field where a user needs to type in the amount they want to spend or if we want to use a convenient slider. Both can be set to have a “step” value which dictates how much the point amount increments.
- If you use the input field options, your users can of course type in any amount, the increment only works when you click on the up or down button inside the input field.
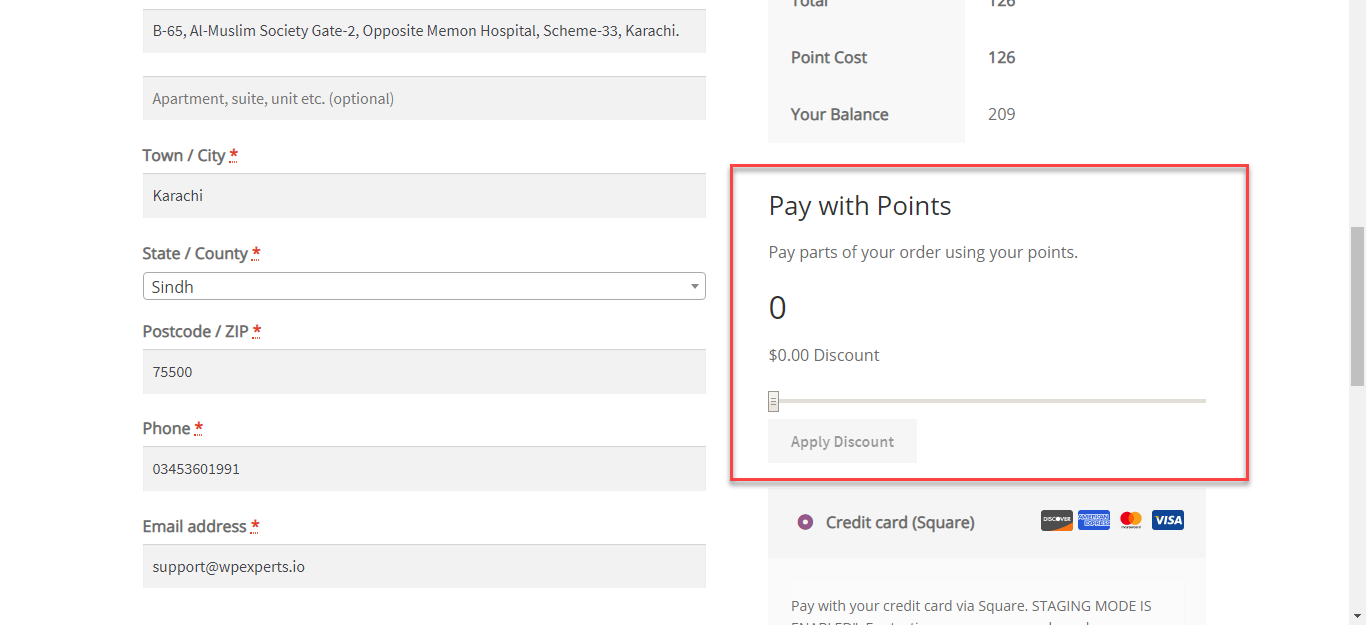
- As the user types in an amount or moves the slider, they will be able to see above how many points they choose and the amount it gives in discount.

- Next you are given the option to insert a title and description that are inserted above the input field / slider in the form, along with changing the button label.
- Finally we need to set some log entry templates. These templates are what your customers will see in their points history (if shown).
- These fields are mandatory and can not be left empty! If you do, the user will be charged the point amount but there will be no record of the payment and will result in no refunds!
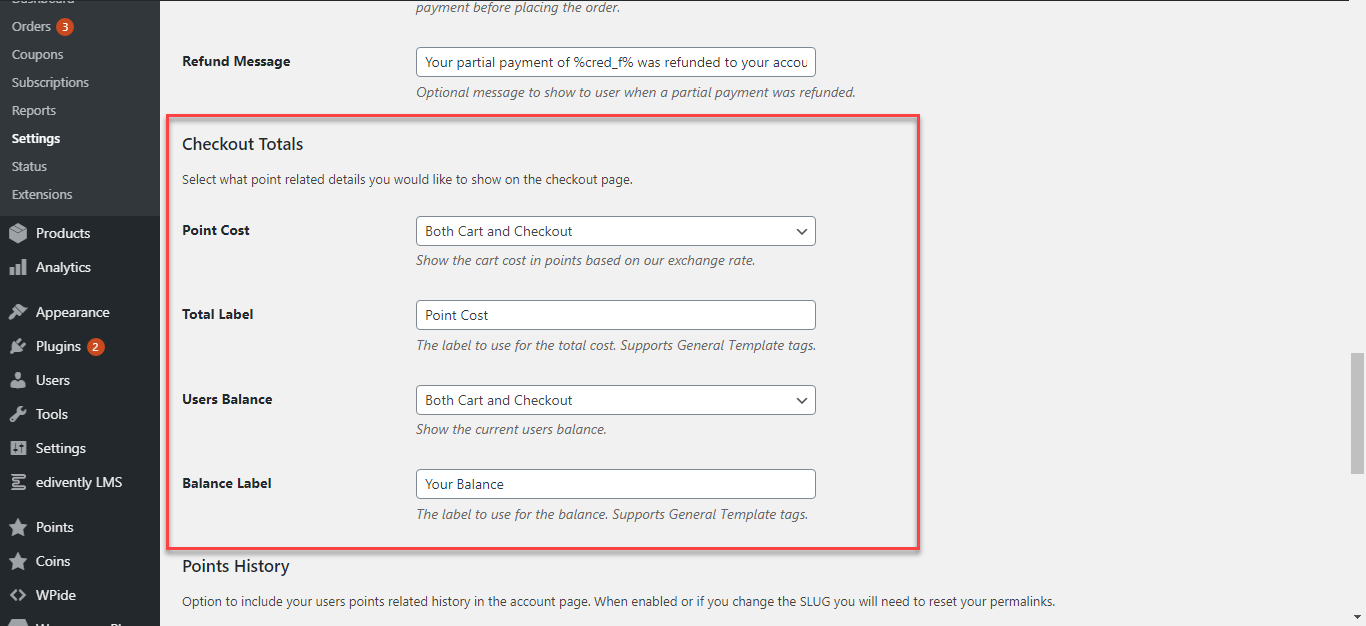
You can also select what point related details you would like to show on the checkout page. That includes Point Cost and User Balance.
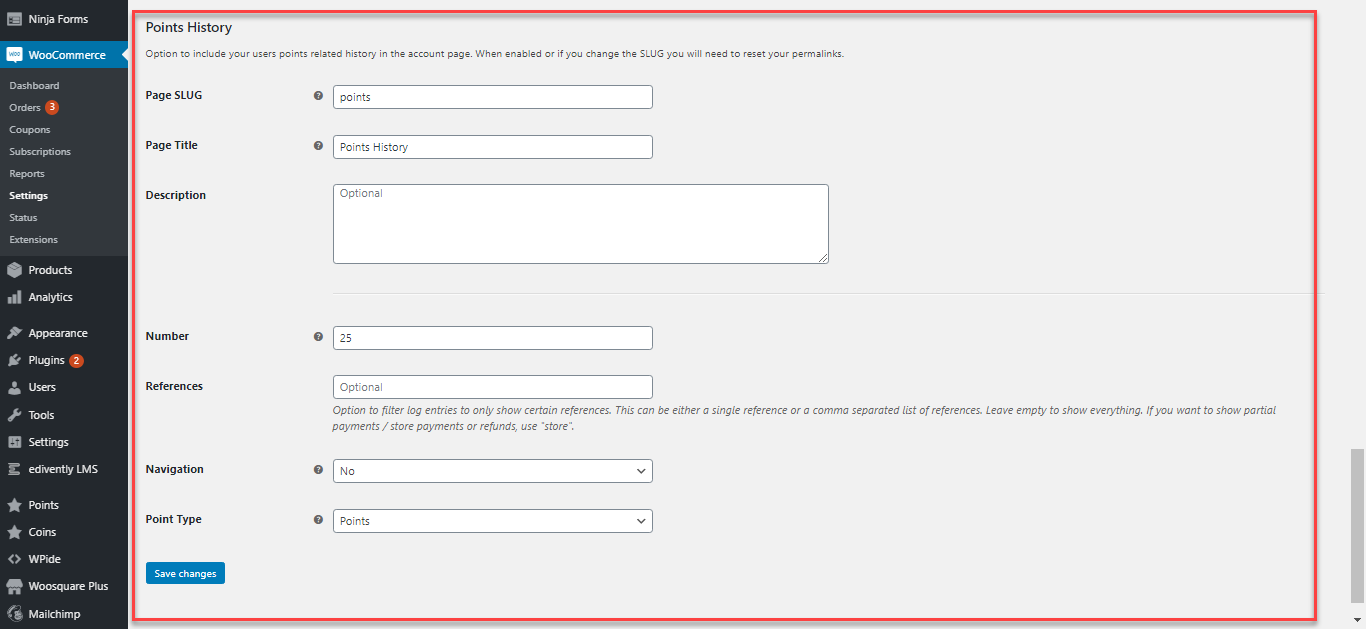
- This is an option to include your user’s points related history in the account page. When enabled or if you change the SLUG you will need to reset your permalinks.
- Remember to click on save changes when read
- Here you can pay through points.
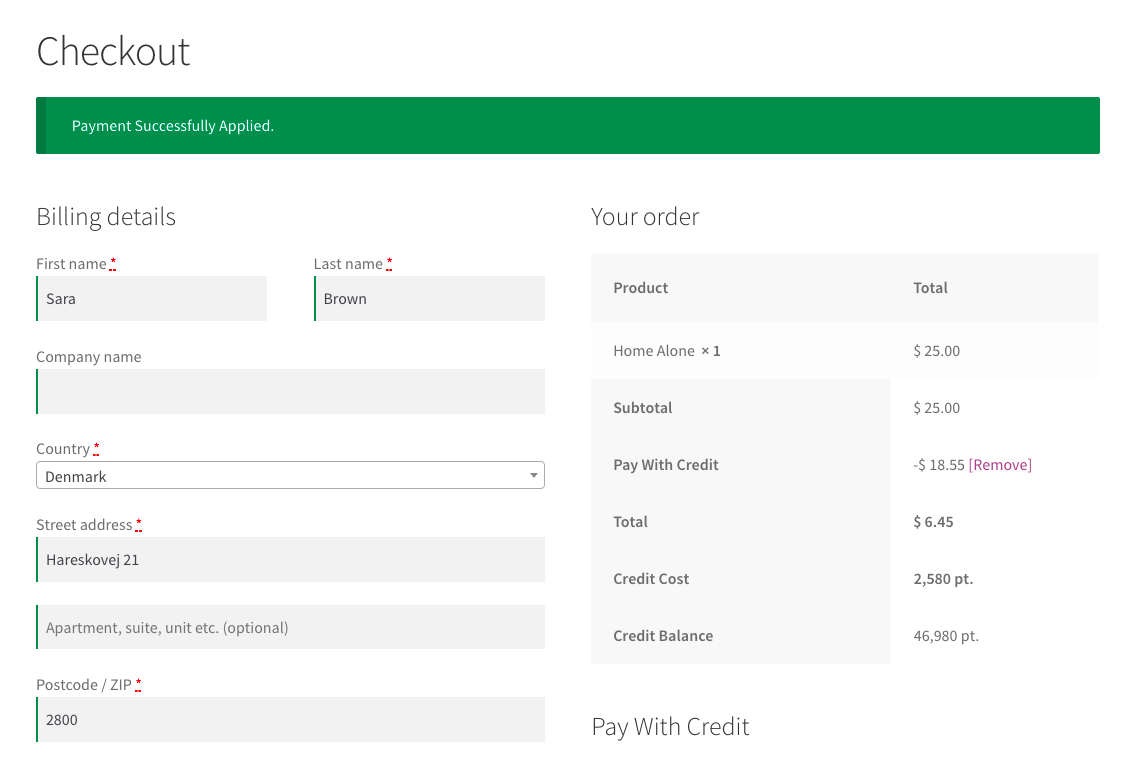
- WooCommerce will update the checkout page and the order total automatically when a coupon is added or removed.
Reward Points on Cart Total
↑ Back to top- Go to WooCommerce ➜ Settings ➜ myCred.
- Click Display Rewards option.
- Scroll down to Global Reward Setting.
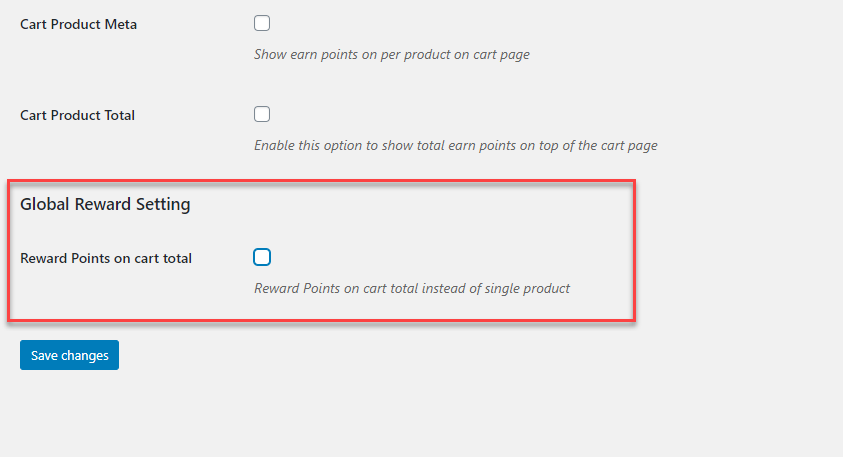
- Enable Reward Points on Cart total.
- Select Point Type.
When Global Reward Setting is enable it will override the single product points reward value.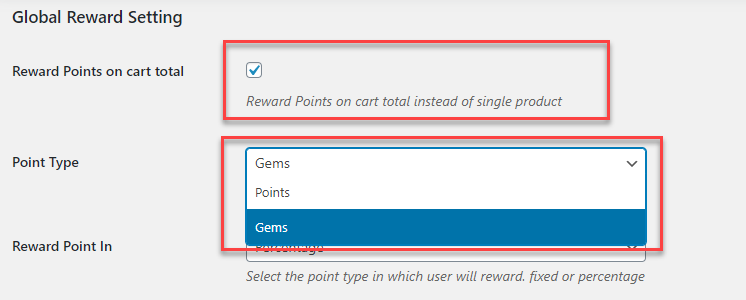
- Select Reward Type.
- Fixed: Reward points with fixed value on cart total regardless of total amount.
- Percentage: Reward points on percentage basis depends on total amount for e.g. (If the order total is $100 and reward percentage is 10%. 10 Points will be the store reward for the user).
- Exchange Rate: Define the conversion rate of points against the currency for e.g. ($10 = 1 point).

- Enter points value either for fixed or percentage type.
Reward point value field will only enable when you select either fixed or percentage reward point in option.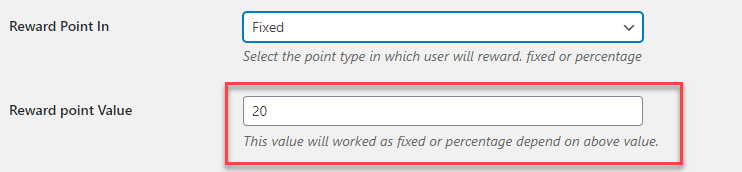
- Set the exchange rate for 1 point in your store.
Exchange rate field will only enable when the Exchange rate option is selected from the Reward point in option.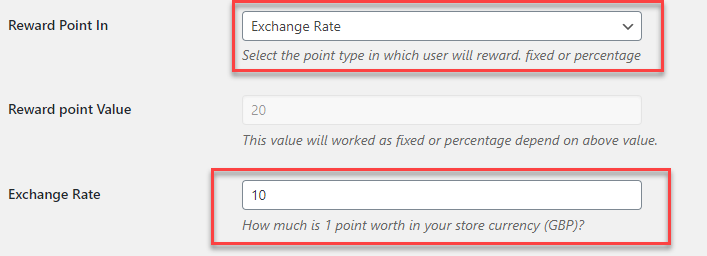
- Enter the message to display at the cart and checkout page.
- Save Changes
For Points use {points} and for types use {type}.

Front-End View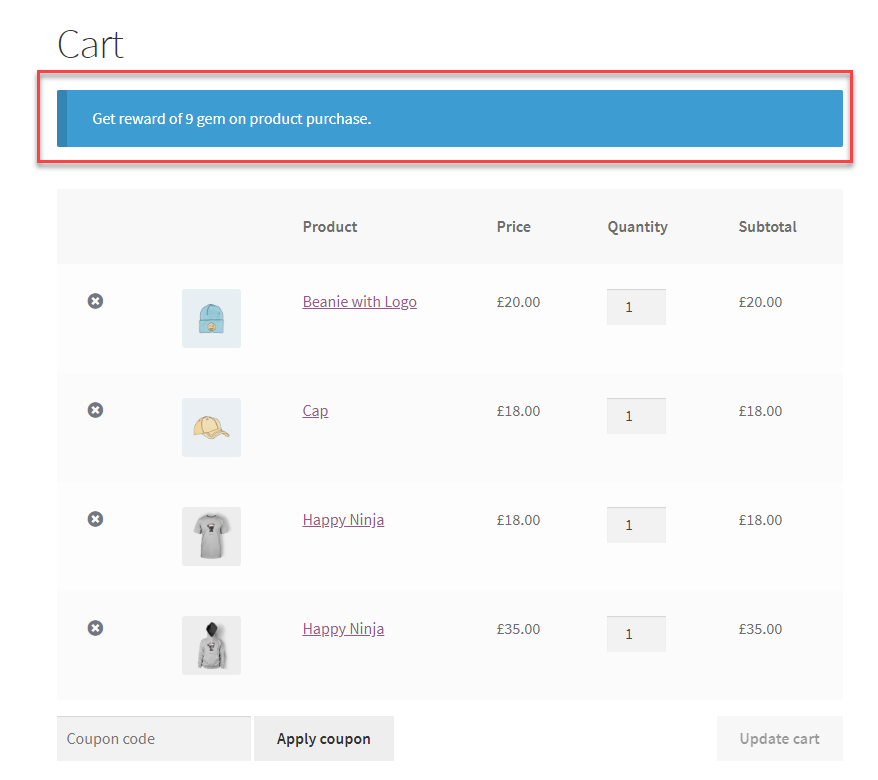

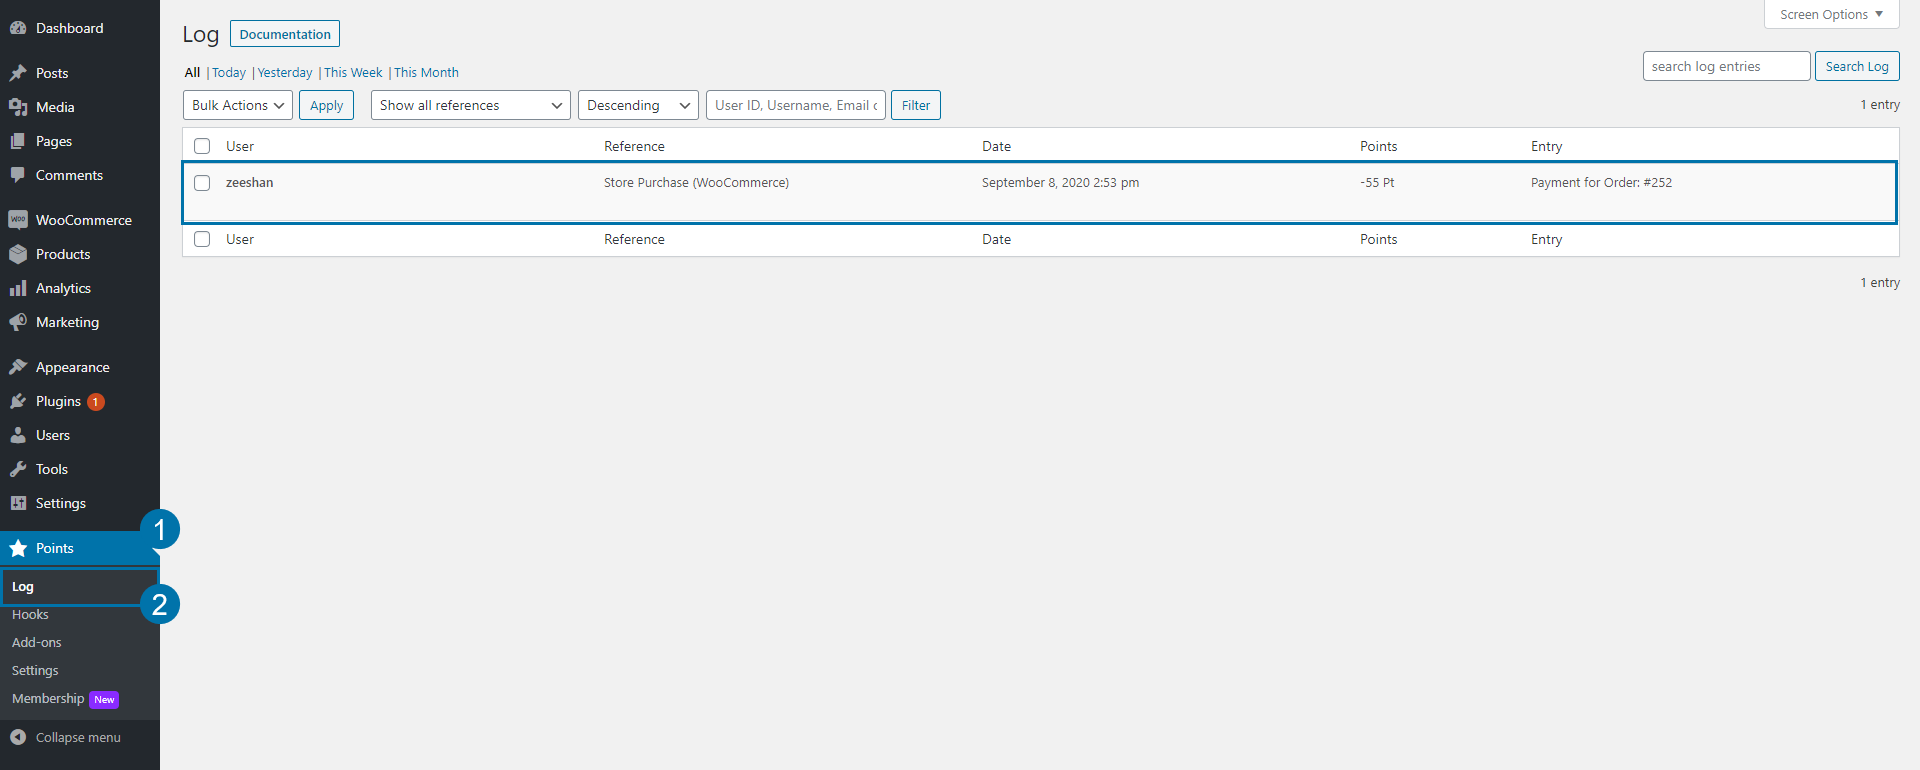
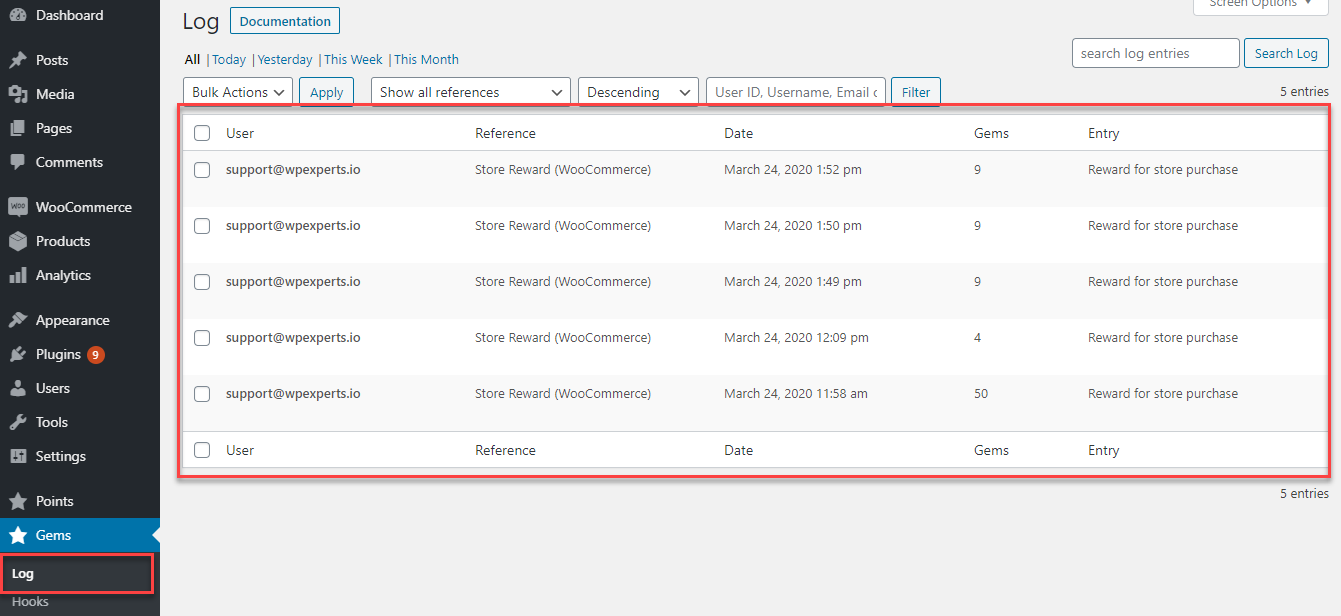
Logs
↑ Back to topPoints will be awarded on completion of order. Logs are generated for the specific point type.
- Go to Point Type ➜ logs.
WooCommerce Product Referral
↑ Back to topAward your users with points on successful purchase of WooCommerce referral products.
- Go to Points ➜ Hooks.
- Drag & Drop WooCommerce Product Referral Hooks ➜ Active Hooks.
- Enter Points & Limits for Referrer.
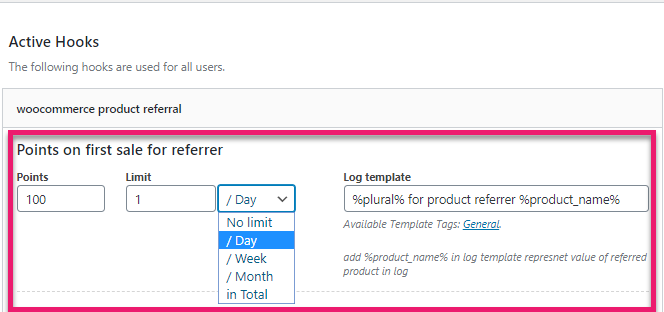
- Enter Points & Limits for Referee.

- Select the referral link format either based on ID or Username.
- Save settings.

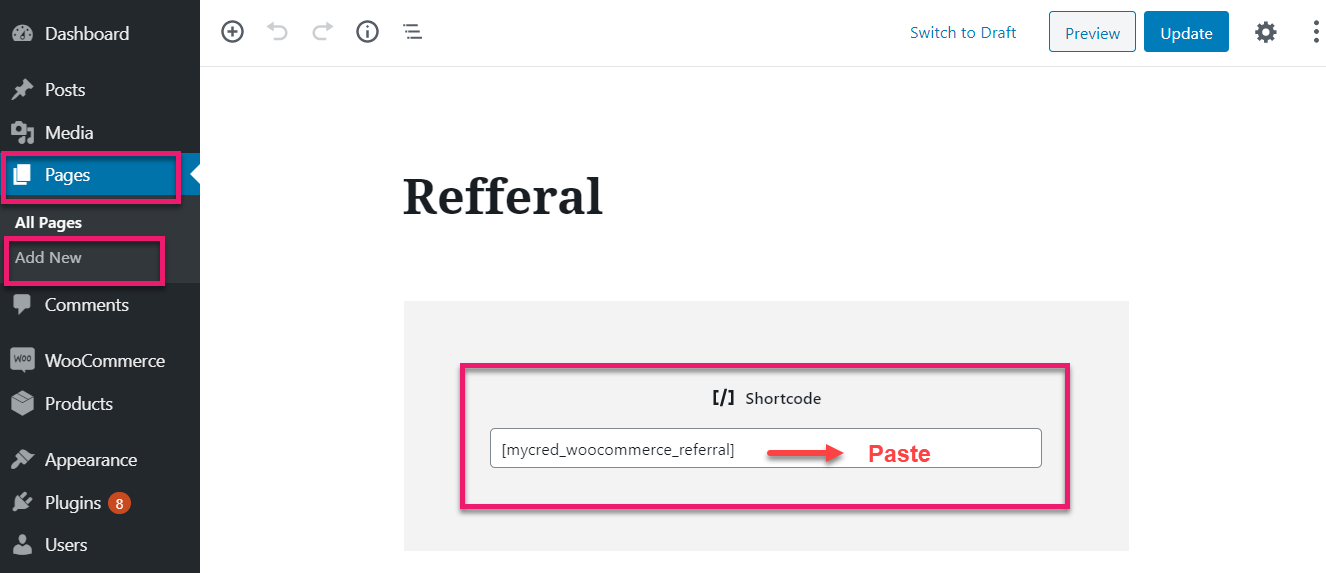
Shortcode
↑ Back to top- Copy [mycred_woocommerce_referral] shortcode.
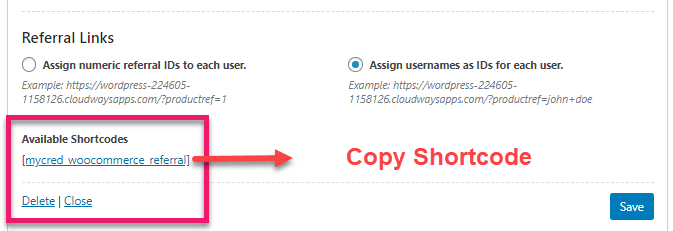
- Place on any page or post.
- Publish / Update.
Enable Referral Cookie
↑ Back to top- Go to WooCommerce Settings ➜ myCred ➜ Product Referral Cookie.
- Enable make cookie expire.
- Enter cookie expiration in days.
- Save Changes.

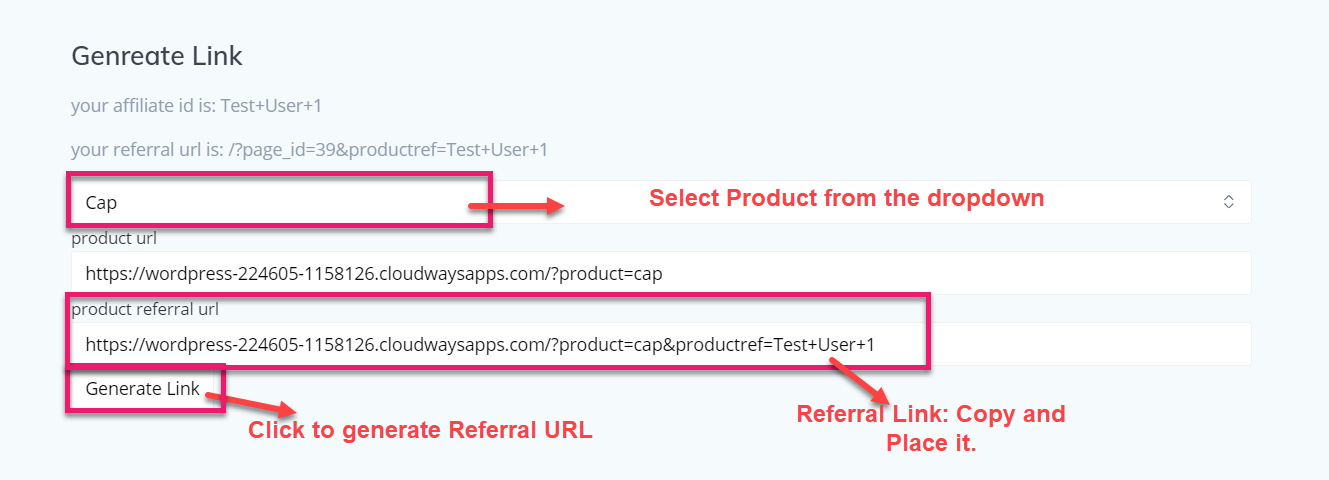
Generate Link
↑ Back to topUser must be logged in to generate their Referral Link.
- Go to Generate Referral Link page.
- Select product from the dropdown.
- Click Generate Link Button.
- Copy Product Referral URL.
- Place it anywhere.
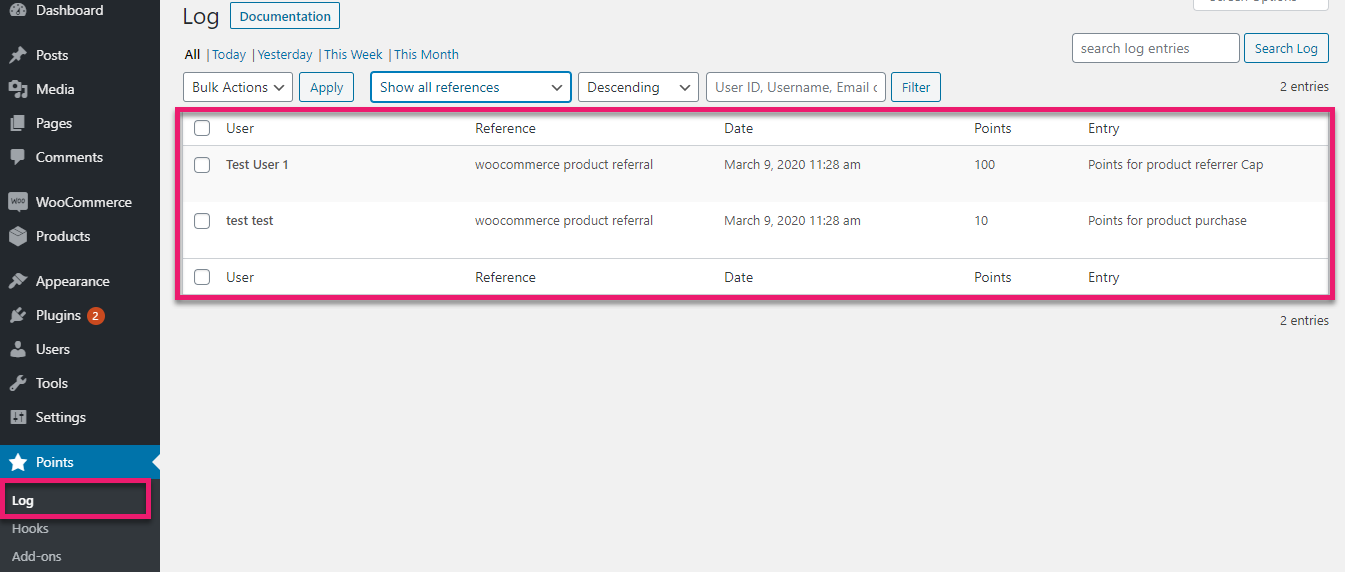
Logs
↑ Back to topLogs will be generated when the purchase of the referral product is recorded with the referral link. Referee will get points if they are registered and logged in.
- Go to Points ➜ Logs.
Signup Referral Hook
↑ Back to topConditions Functionality On Points For Referral:
↑ Back to top- The points for referral hook has been integrated with new functionality of Condition, using this new feature user can restrict the points awarding mechanism based on condition that it would apply on selected products or products except those that are mentioned.
- To achieve this, a field has been integrated into the respective hook, where the user can define the product ids that are to be restricted.
- Products can be awarded points for referral based on three conditions, it can be set on all products and the points for a referral will be awarded on all products, Products except option will only award points for referral on the products which do not have their ids defined in the field and Selected products can be defined with ids in the field and the points for referral will be awarded on the selected products only.

- When the user purchases the product according to the condition provided in the hook the plugin will award points for referral.
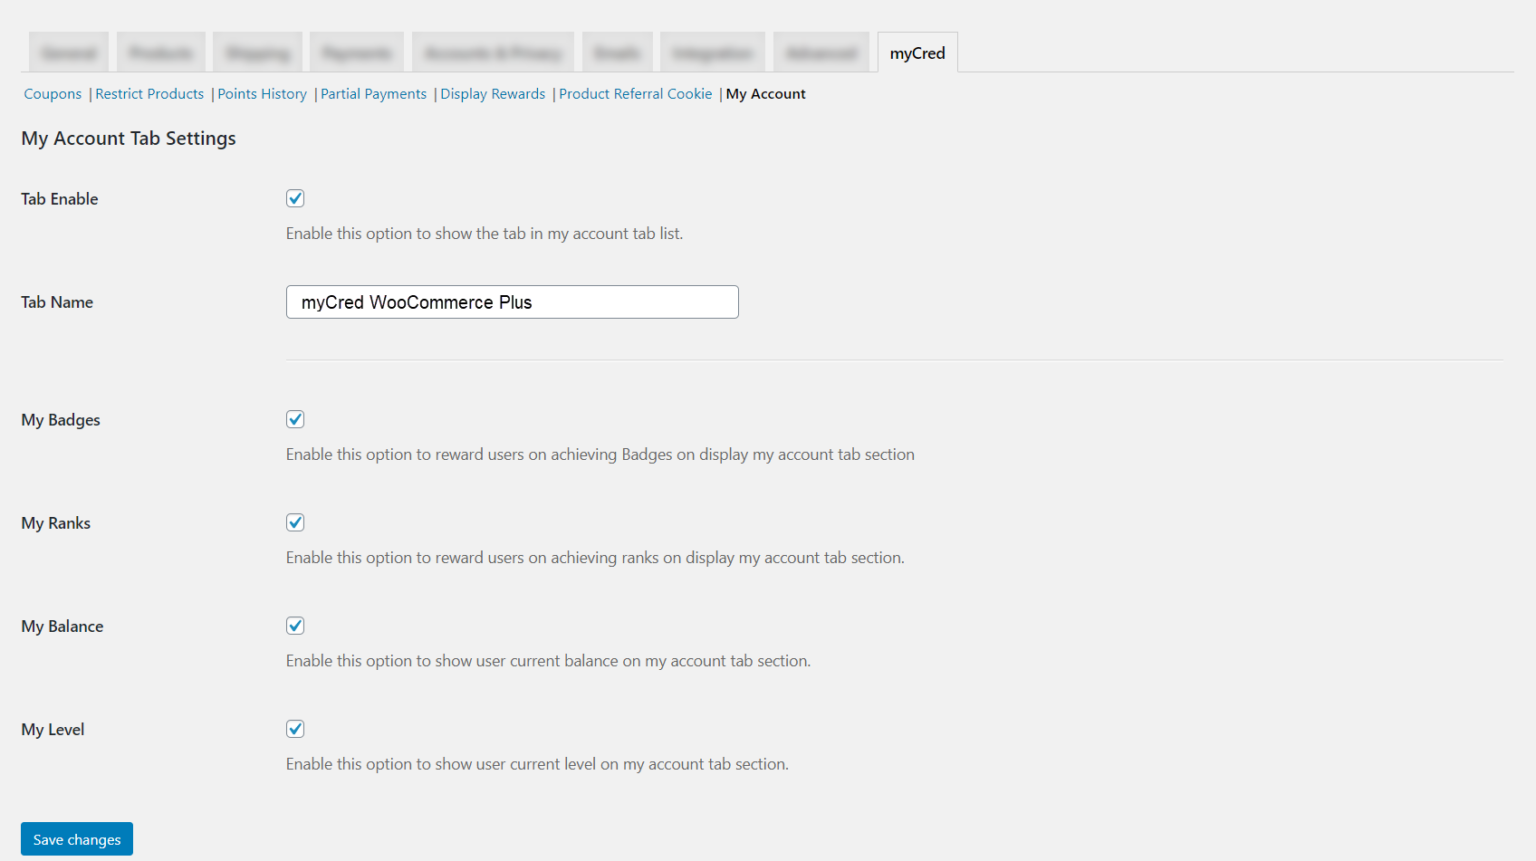
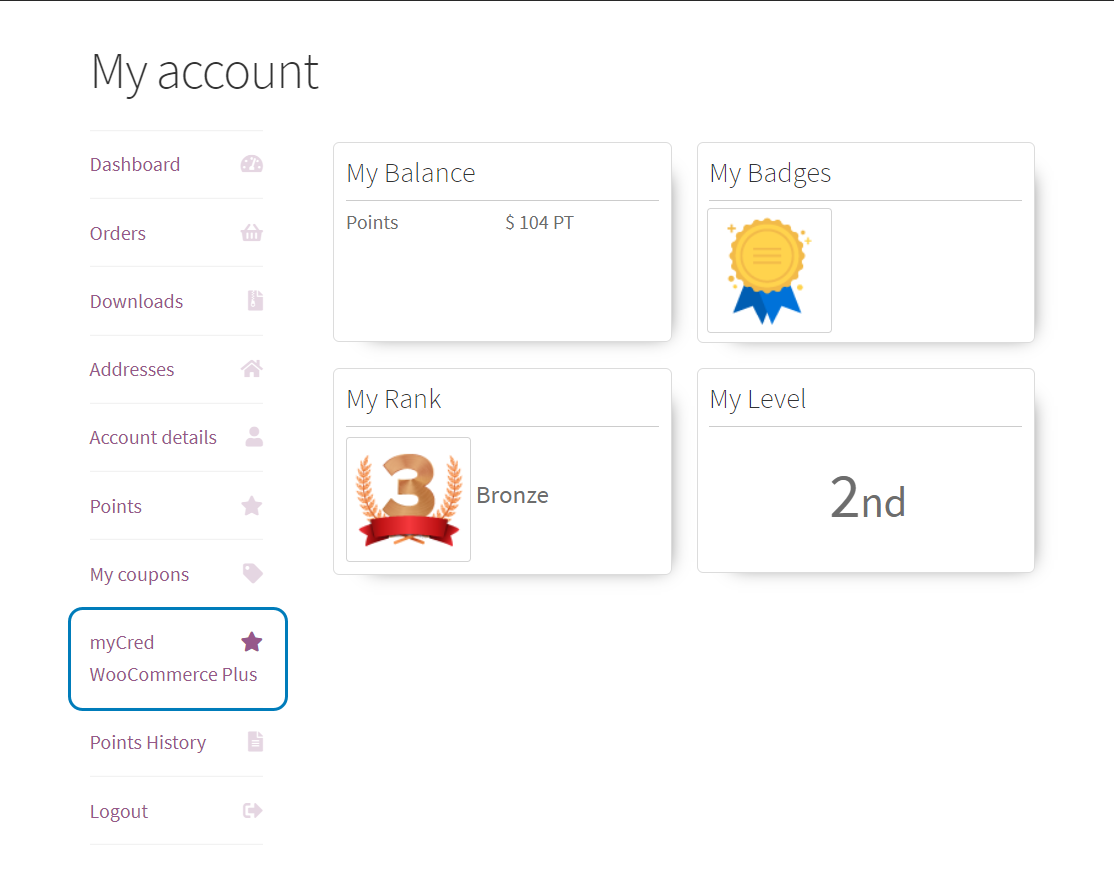
My Account
↑ Back to top- Navigate to the WooCommerce > Settings > myCred
- Click on the My Account tab
- Enable the following option as per your requirement:
- Tab Enable
- Tab Name: (Enter label text)
- My Badges
- My Ranks
- My Balance
- My Level
- Save your changes.
WooCommerce Subscription payment
↑ Back to top- Navigate to the WordPress admin Dashboard > WooCommerce > Settings
- Click on the myCred tab > Partial Payments
- Disable the Partial Payment option if is enabled
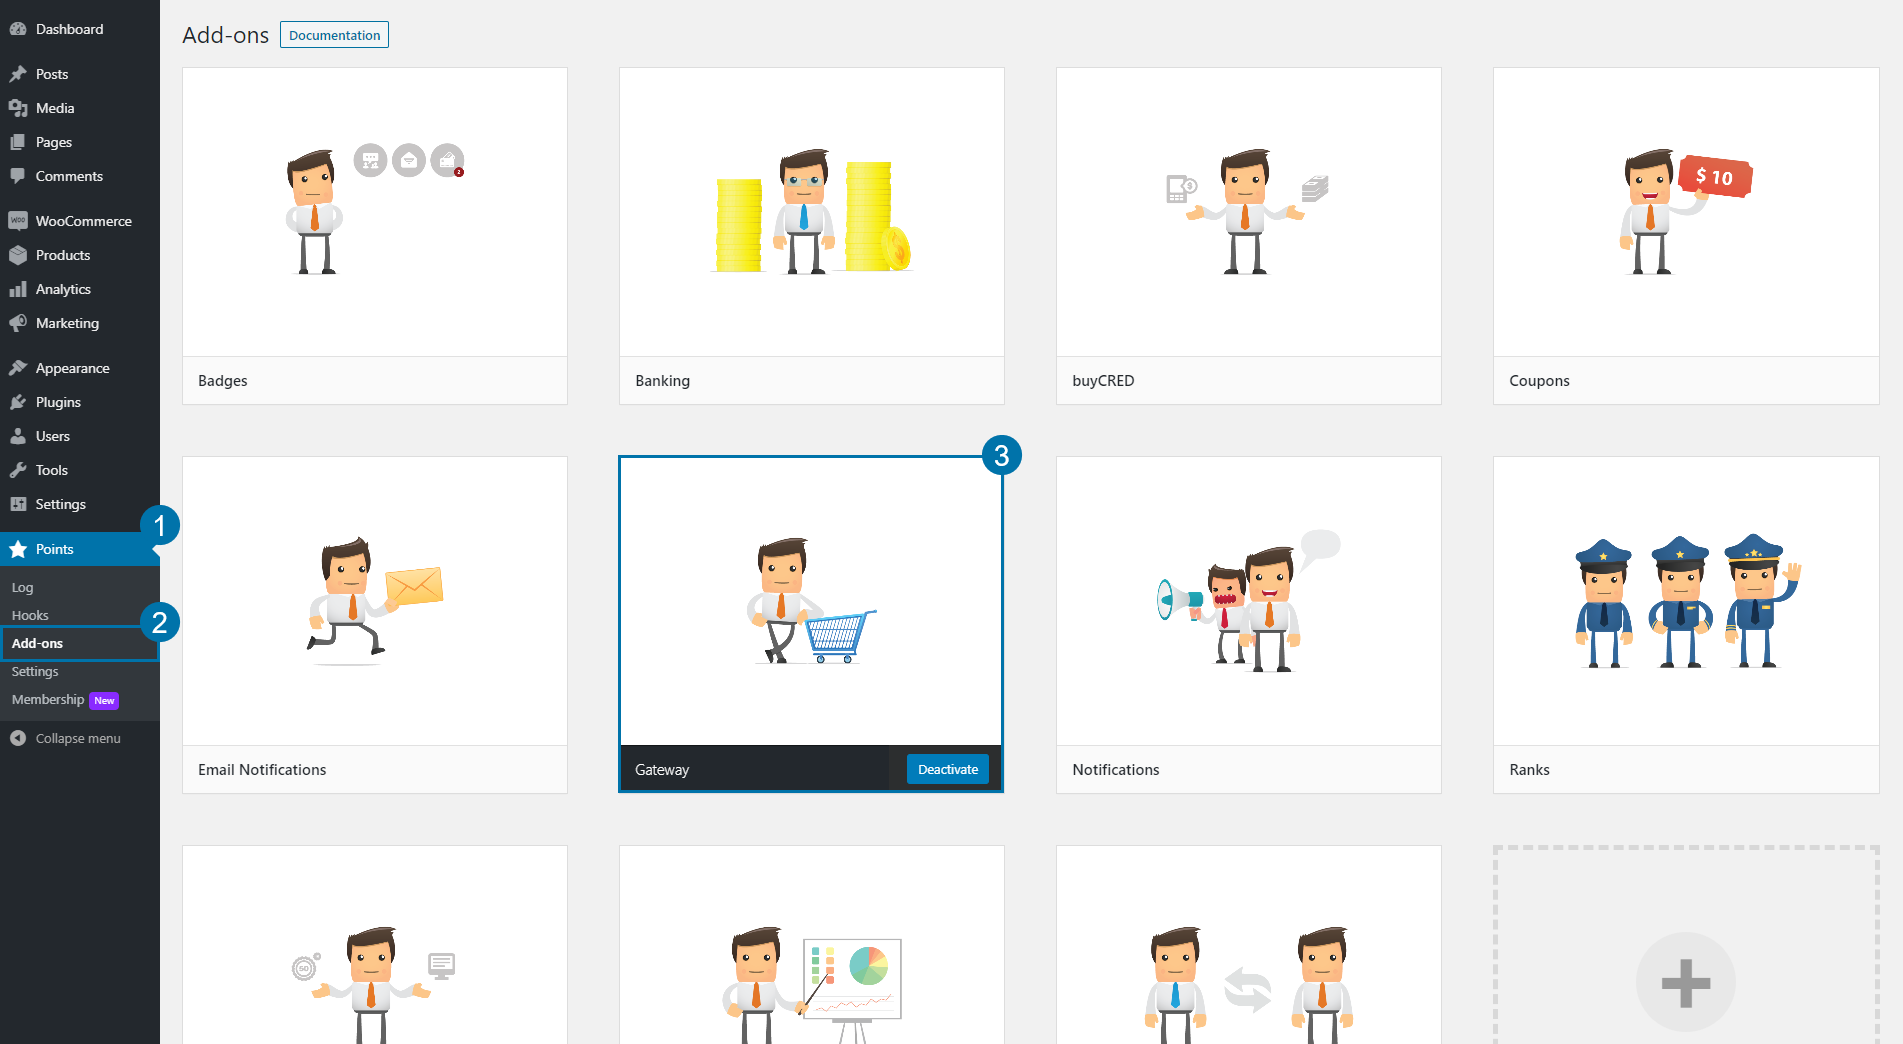
- On the Dashboard > Go to the Points > Add-ons
- Activate the Gateway add-on.
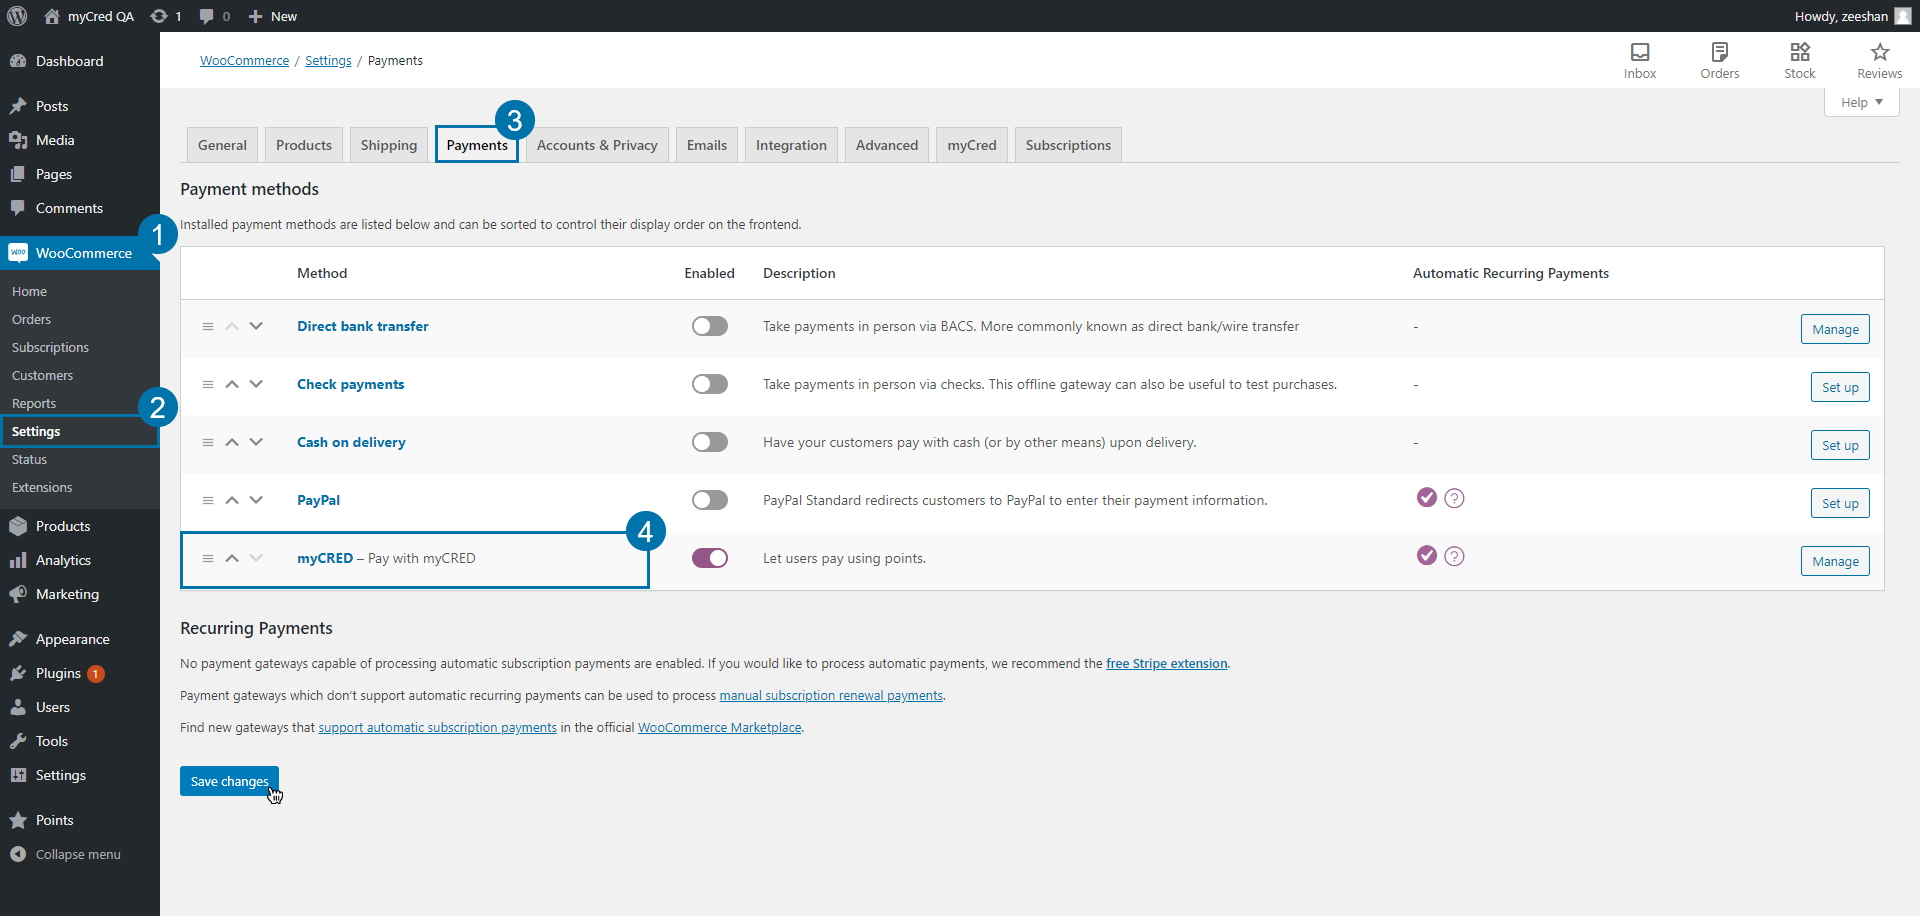
- Head over to the WooCommerce > Settings
- Click on the Payments tab and
- Enable the myCred – (Pay with myCRED) payment gateway
- Click on the “Save Changes” button.
- Click on Manage for myCred settings. You can select Point Types, set up Exchange Rates, add custom labels.

- To create a woocommerce subscription product:
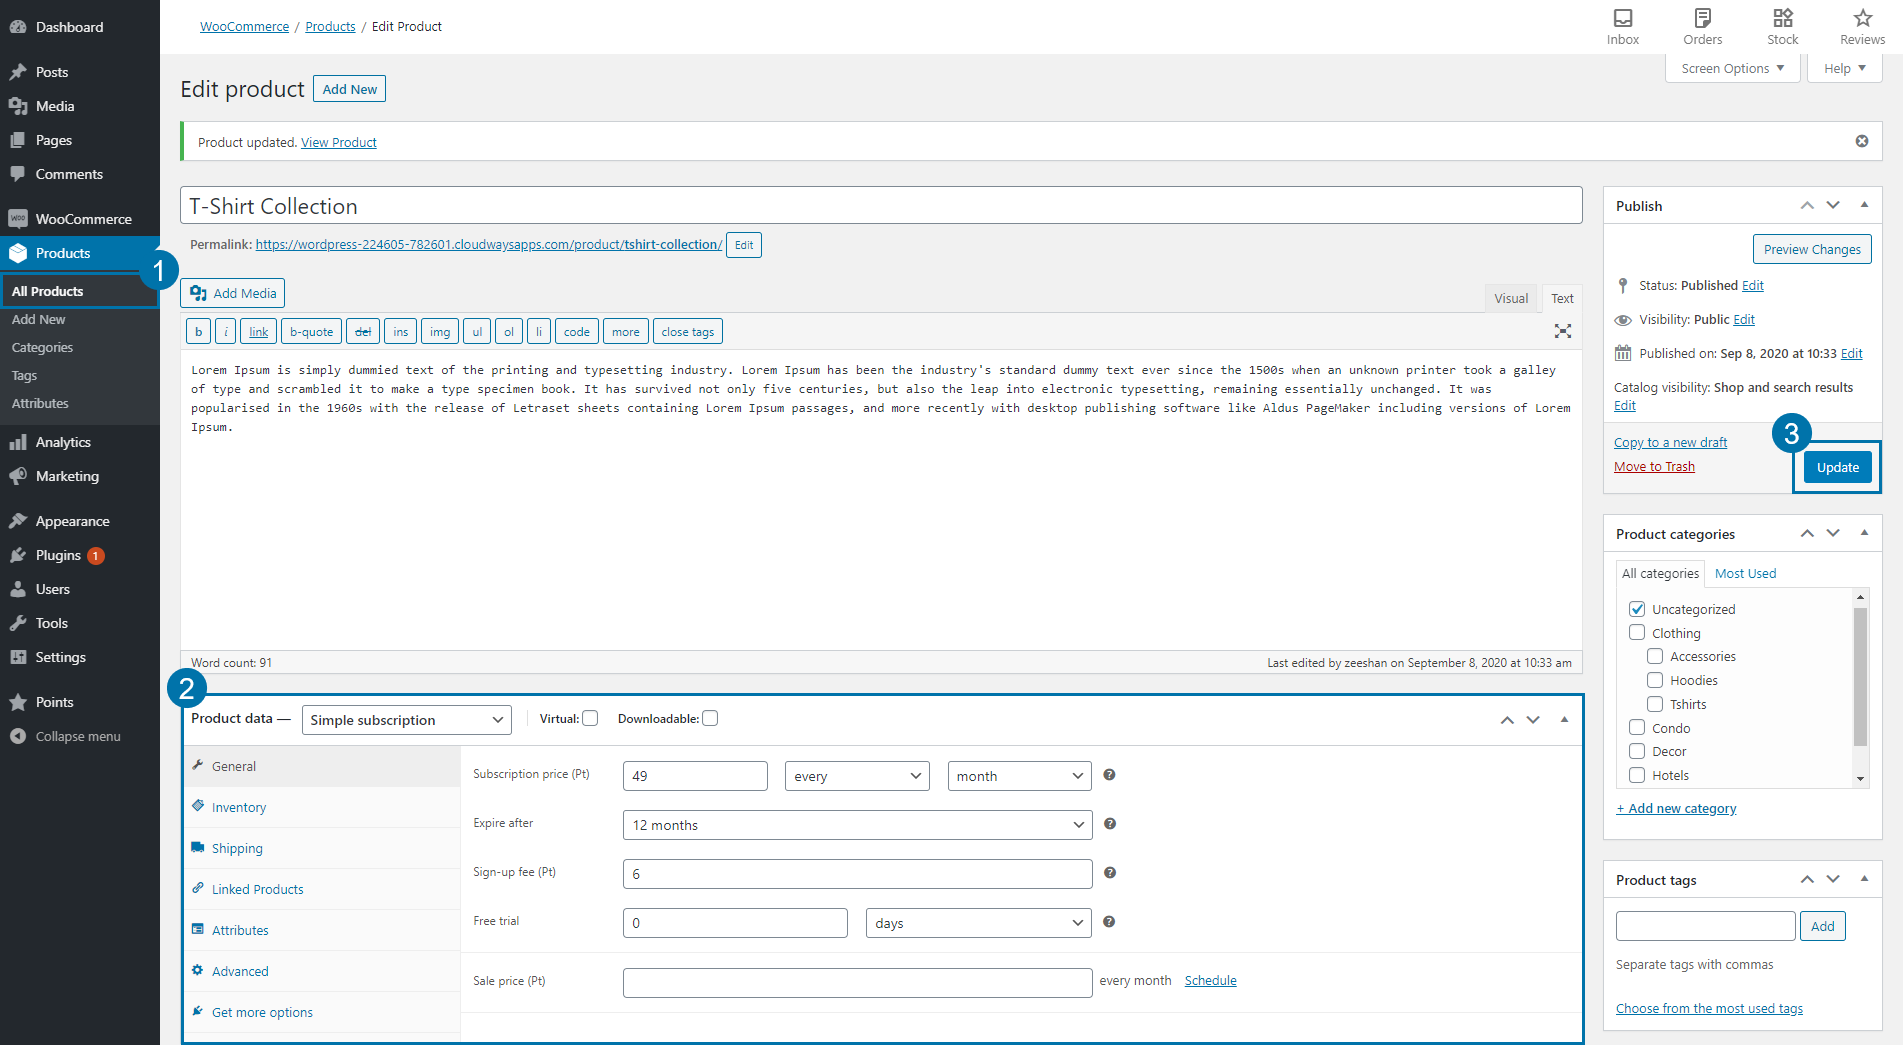
- Simple Subscription:
- Go to: WooCommerce > Products > Add Product
- Select the Simple Subscription as the product type
- In the General tab, set the terms for the subscription (Subscription price, Expire after, Sign-up fee, and Free trial)
- The Sale price field is exceptional
- Hit the Publish button.
- Simple Subscription:
-
- Variable Subscription:
- Go to: WooCommerce > Products > Add Product
- Select the Variable Subscription as the product type
- Add product Attributes
- Each variation have unique properties
- Click on the Publish button and view the product on the frontend.
- Variable Subscription:
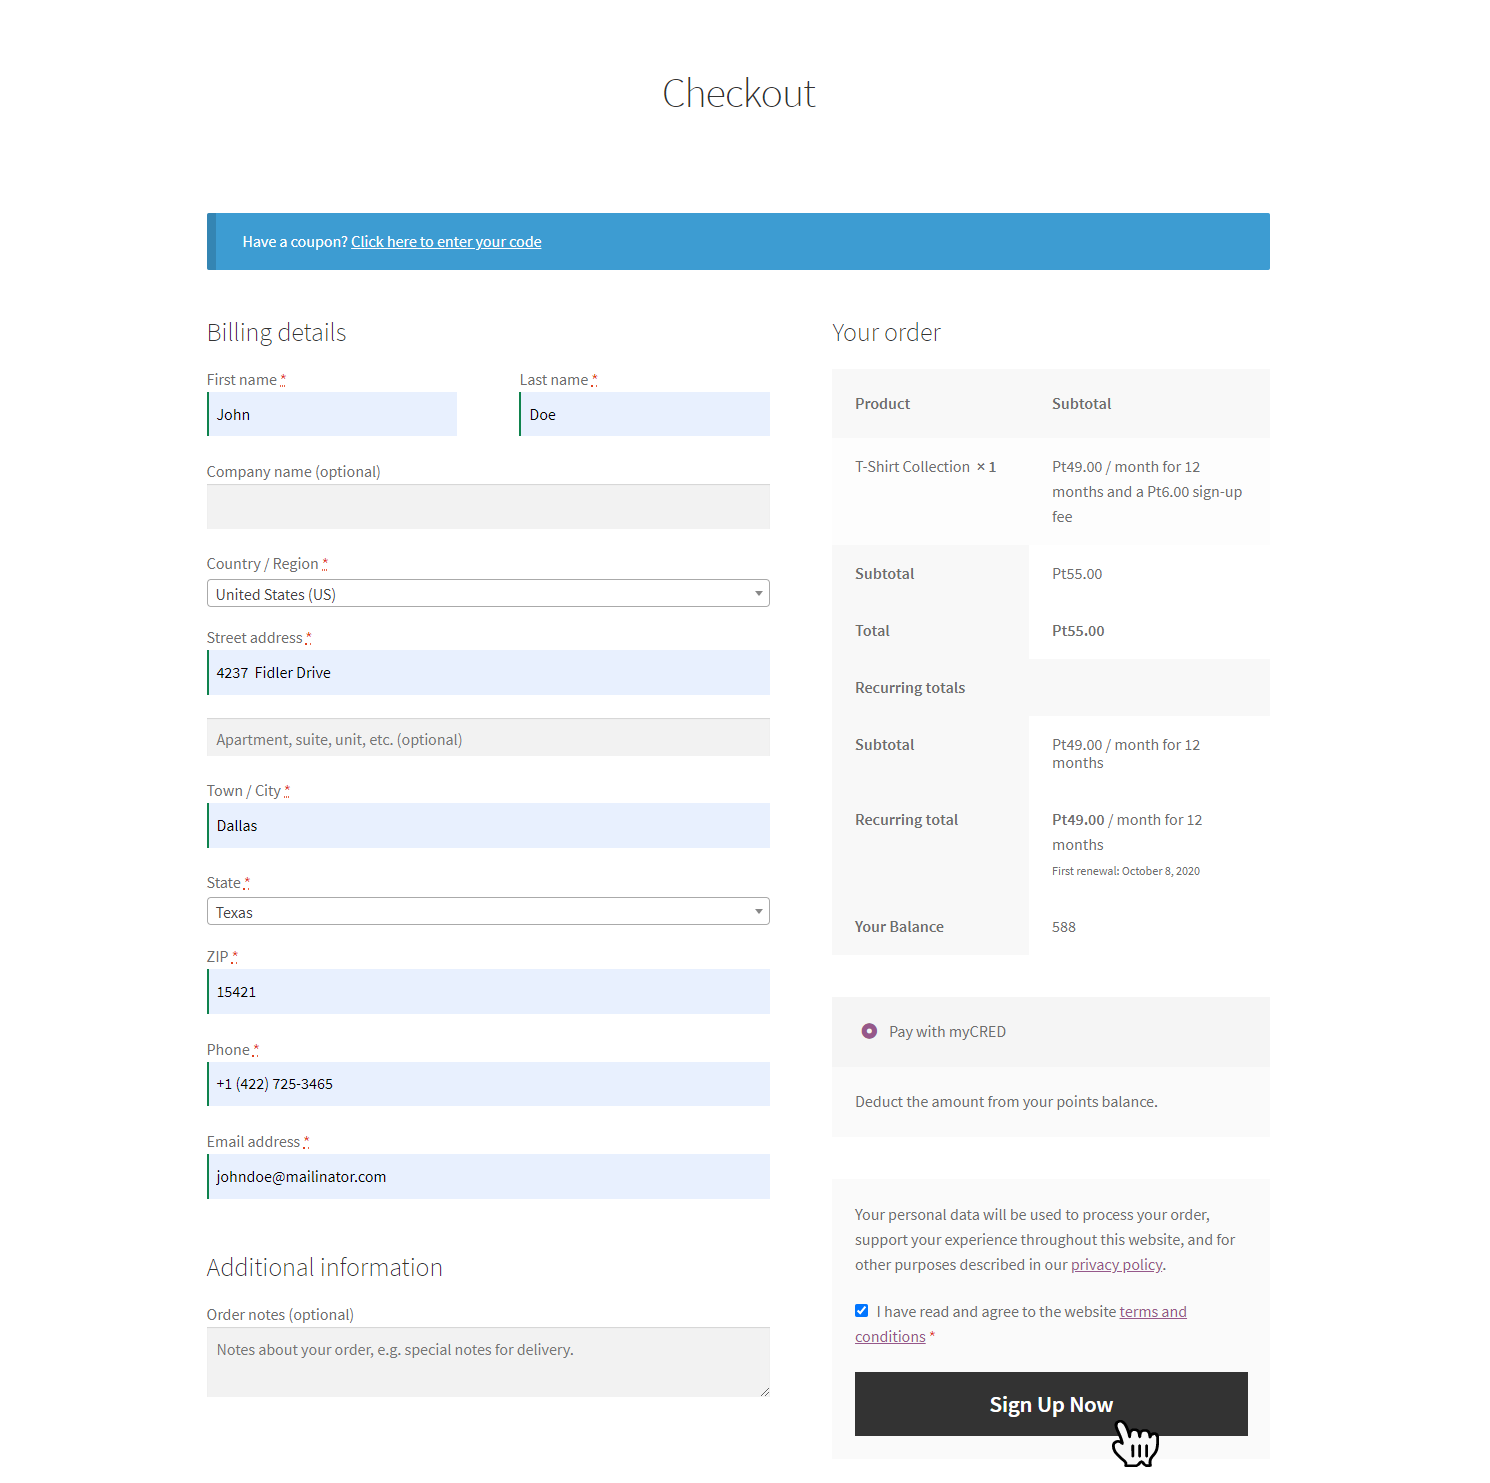
- Click the “Sign Up Now” button.

- Fill up the Checkout form and
- Select Pay with myCRED gateway
- Click the Sign Up Now button
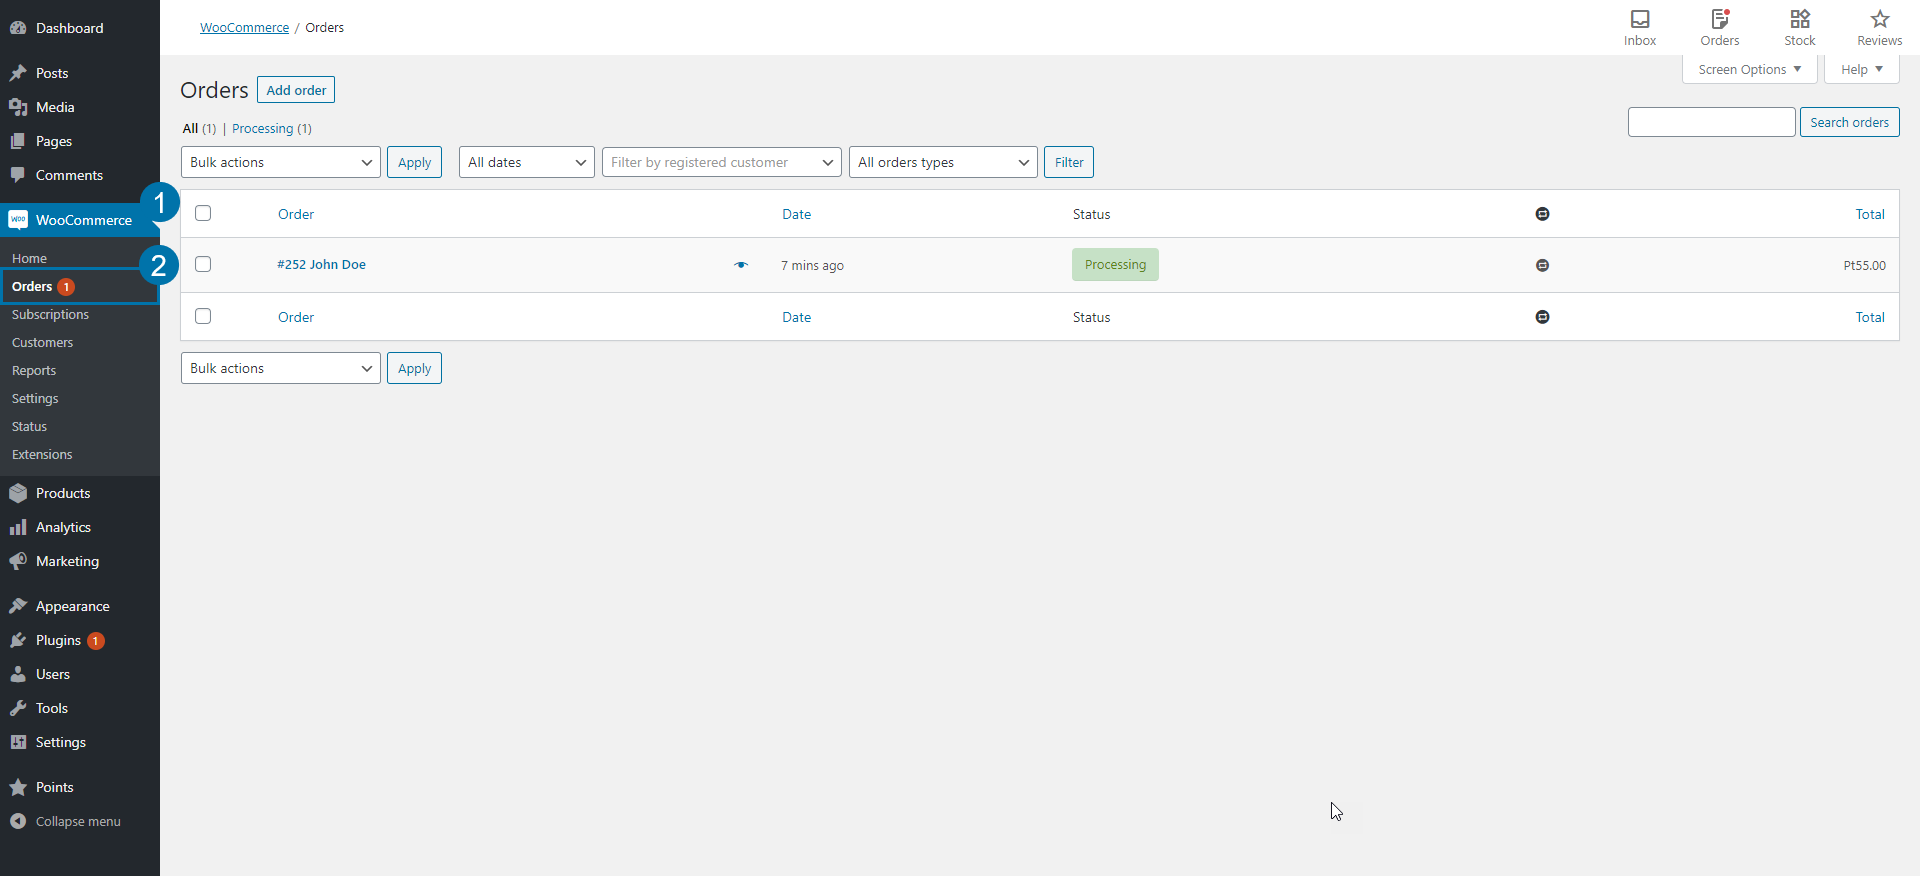
- Go to the WooCommerce > Orders
- Click the order number and customer name to see the single order page, where you can Edit order details, Related order, and Update Status
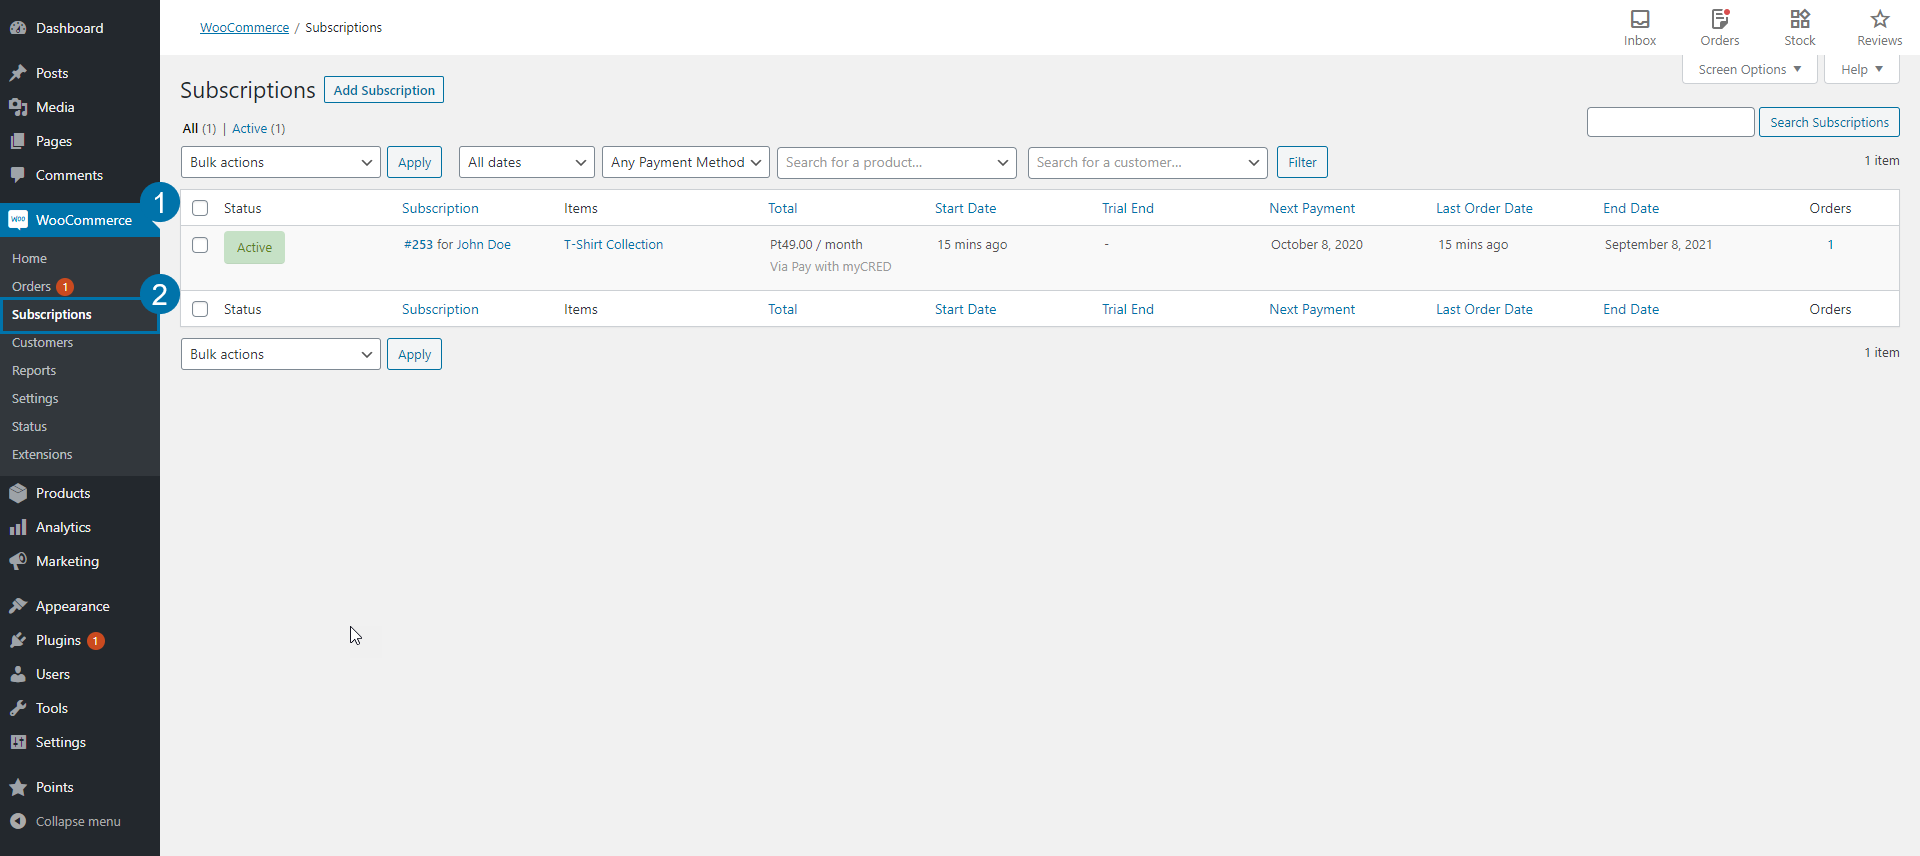
- On the WooCommerce > Subscriptions page, you can manage and view all subscription orders.
- Go to My Account > Subscriptions. To view all your subscriptions.

- View the log entry of Store purchase order