Enable users to personalize their My Account page with the WooCommerce Customize My Account page plugin and help them improve navigation and user experience.
Installation
↑ Back to top- Download WooCommerce Account Dashboard from your WooCommerce dashboard.
- At the WordPress admin panel, go to Plugins > Add New > Upload and select the ZIP file you just downloaded.
- Click Install Now, and then Activate Plugin.
Setup and Configuration
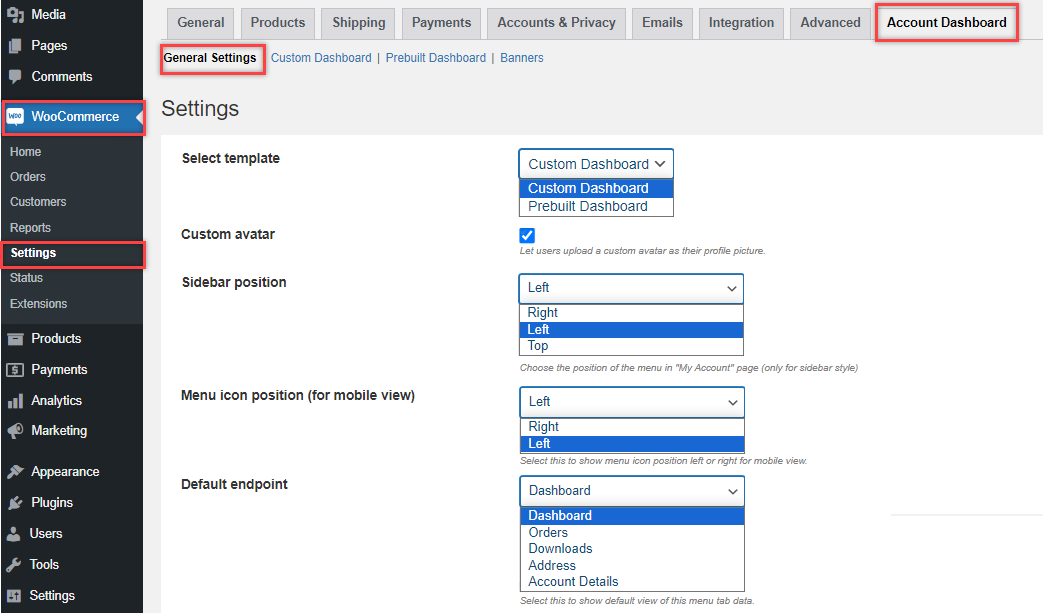
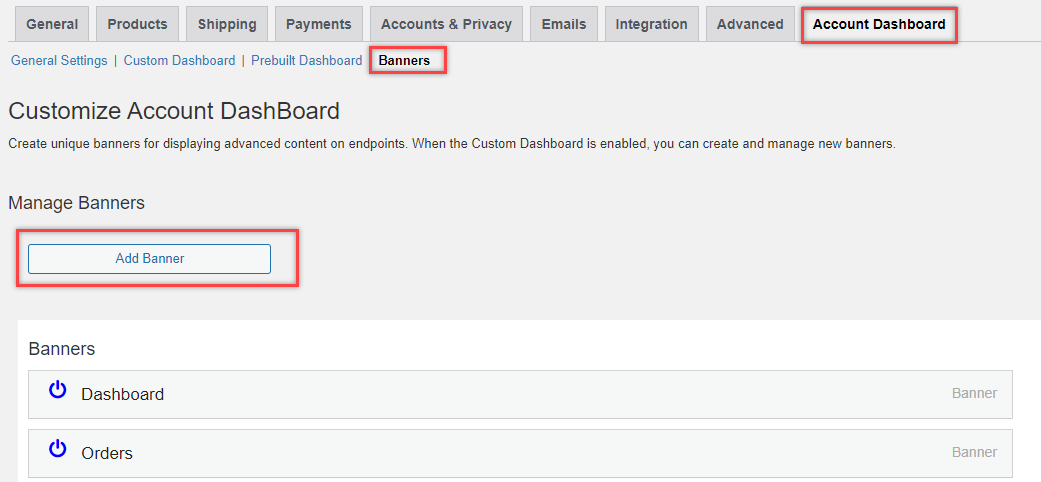
↑ Back to topTo configure the customize my account for WooCommerce extension, go to WooCommerce within the WordPress admin panel. You will find the Account Dashboard tab. Upon clicking, you will find three tabs General Settings, Custom Dashboard, and Prebuilt Dashboard, Banners.
To configure the extension, go to WooCommerce within the WordPress admin panel. You will find the Account Dashboard tab. Upon clicking, you will find three tabs General Settings, Custom Dashboard, and Prebuilt Dashboard.
General Settings For Custom Dashboard
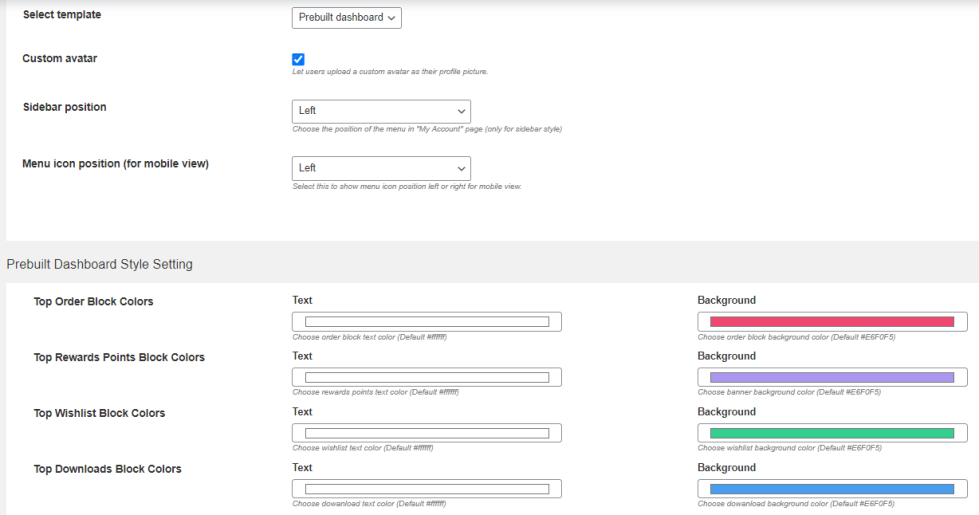
↑ Back to topIn General Settings, you can set the template that will be displayed to customers, position the endpoints, customize their sizes, and set their colors. Different settings are available for prebuilt dashboards, which will also be discussed later.
- Select Template: WooCommerce my account page has two template options Custom and Prebuilt Dashboard. You can select the template of your choice and display it at the front end for your customers. It enables you to customize my account page. The WooCommerce my account page customization feature provides users with the option to create a personalized design from scratch or to use a pre-built template.
- Custom Avatar: By enabling this option, you can allow users to display their avatars on their account dashboards and upload their preferred images. This feature can be disabled if you do not want users to be able to upload avatars.
- Sidebar Position: Customize WooCommerce my account page to set the position of your endpoints and choose from the three options i.e. left, right, and top.
- Menu Icon Position (for mobile view): Choose the default position for WordPress WooCommerce menu icon. Align it with the custom account page menu by setting it to the left or right.
- Default EndPoint: It allows you to set the default endpoint to open whenever the customer clicks on the WooCommerce my account page. You can set any default or custom endpoint to act as the default endpoint. However, it only works if you select the custom dashboard option.
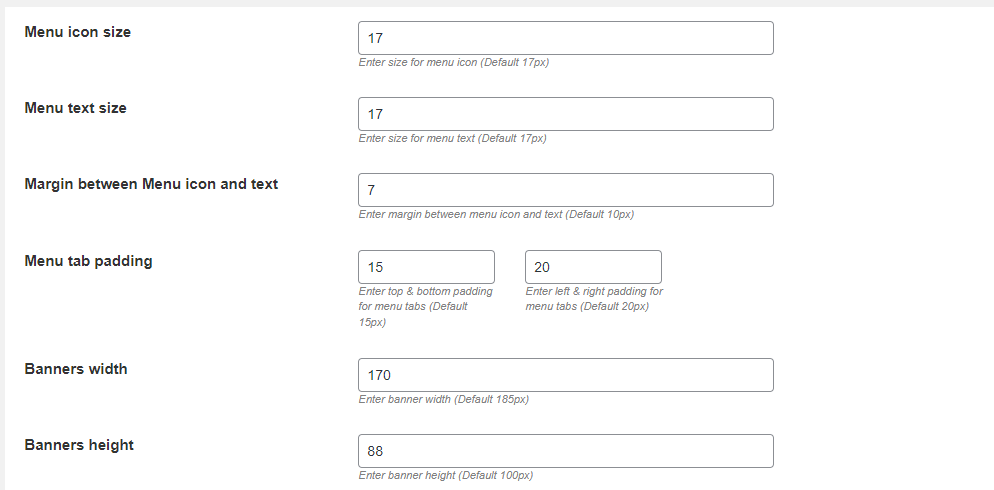
- Menu Icon Size: WooCommerce my account customization plugin allows you to set the size of the icon for the endpoint. It also enables you to increase or decrease the size of the endpoint icon for better visibility.
- Menu Text Size: The WooCommerce customize my account page offers the ability to customize menu text size. Text can be adjusted to fit more information on the screen or to improve readability.
- Margin Between Menu Icon and Text: WooCommerce my account page allows you to set the margin between the icon and name of the endpoint. This feature allows you to adjust the endpoint minimizing the CSS and theme compatibility issue.
- Menu Tab Padding: You can adjust the size of the endpoint according to your preference. It allows you to adjust the height and width of the endpoint to align with your store theme.
- Banners Width: Customize my account for WooCommerce enables you to set the width of the banners.
- Banners Height: Set the height of your WooCommerce my account dashboard banners to as per your preference.
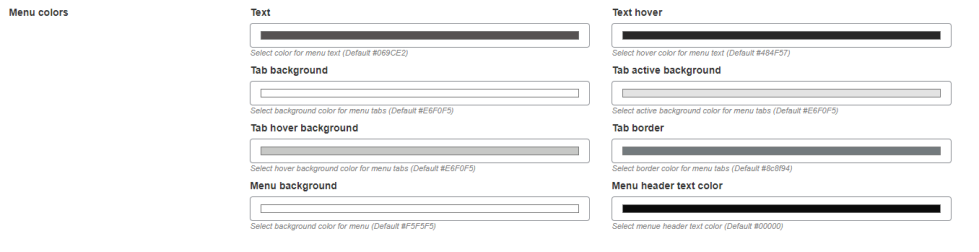
- Menu Colors: It allows you to further edit WooCommerce my account page and make it to your liking. The font and button color of the endpoints can be customized. Additionally, endpoints can have different hover colors and background colors.
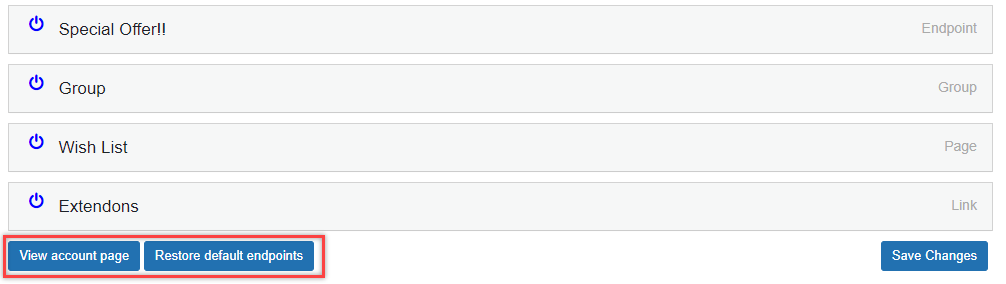
Custom Dashboard
↑ Back to topNext to the general settings tab, is the Custom Dashboard tab. Here, you can create and manage endpoints such as Group, Endpoint, Page, and Link.
- Add Group: Make the group of the multiple endpoints show the fewer items in the sidebar. You can include the icon for the group and enable it for specific user roles.
- Add Endpoint: Allows you to edit default endpoints, change the name, and icons, and assign the specific endpoint to the user role. Include custom content in the endpoint to replace the default content.
- Add Page: Create a page endpoint to display a specific page on the user dashboard.
- Add Link: Include a link endpoint to refer customers to specific products or pages. You can include a custom link in the endpoint.
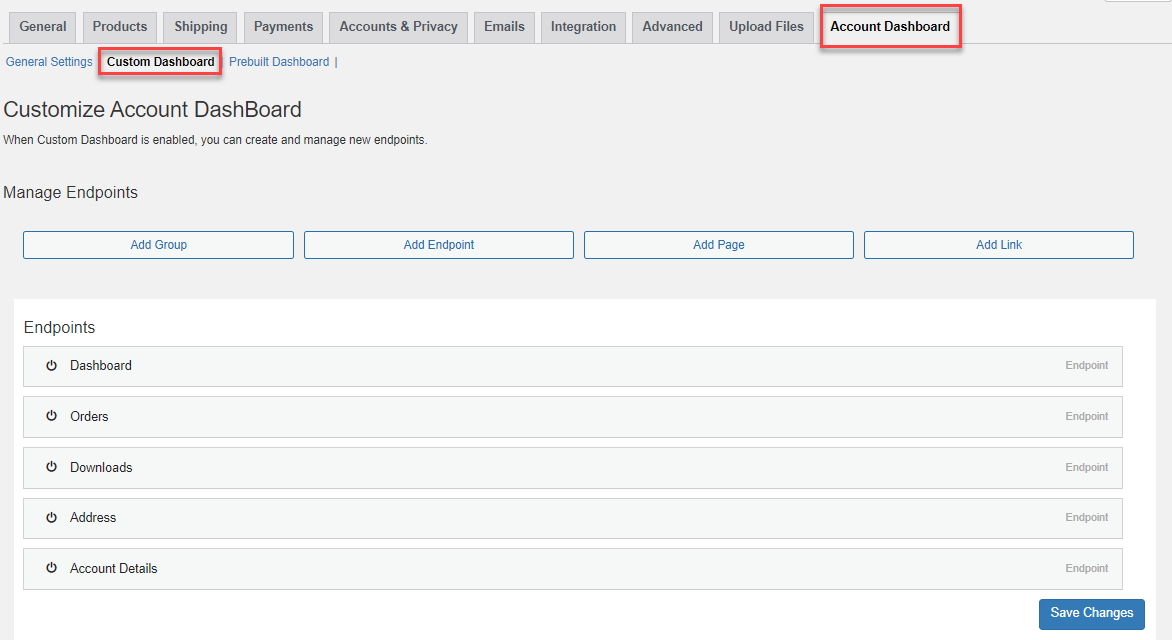
The My Account Page provides options for customizing the appearance of both default and created endpoints.
How to Create or Customize the EndPoint?
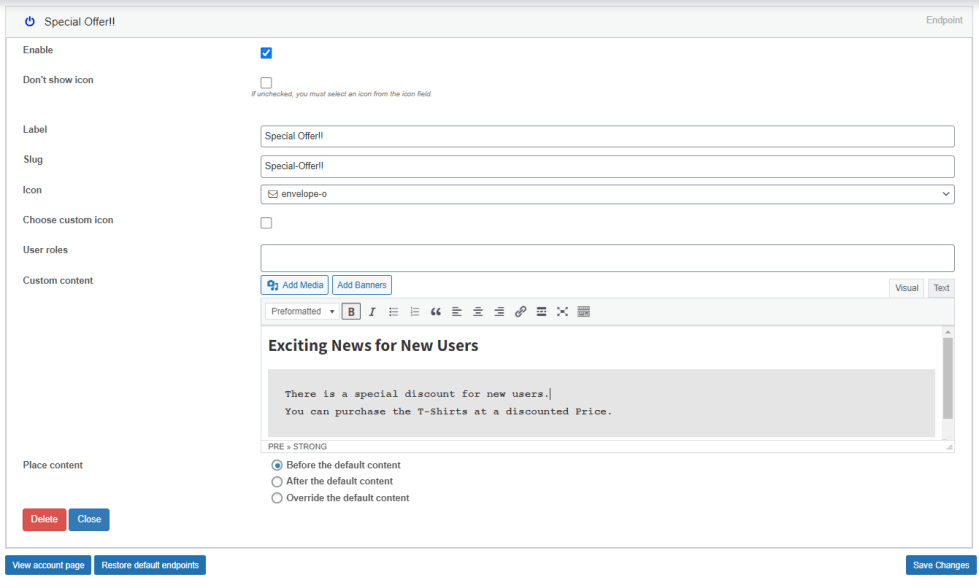
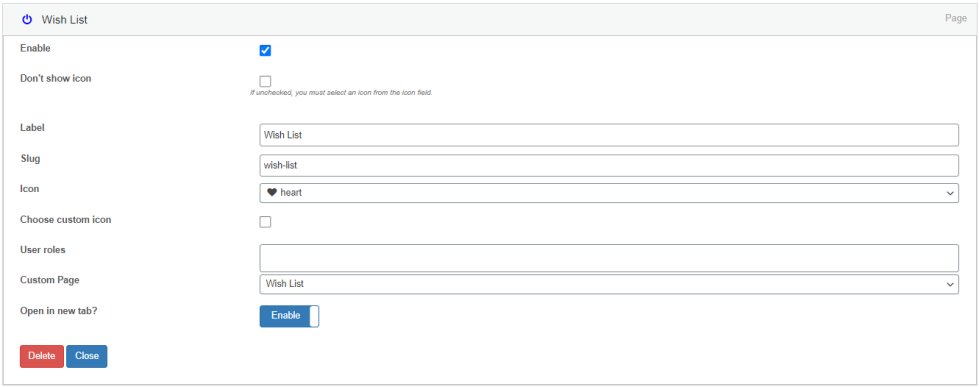
↑ Back to topYou can easily create and customize the existing endpoint with the edit WooCommerce My Account page plugin. It allows you to include custom content with the help of a WSYING editor. Some of the options in the simple endpoints are:
- Enable: Checkbox to enable or disable the endpoint
- Don’t Show Icon: Checkbox to hide the icon of the endpoint on the front end.
- Choose Custom Icon: Click on the checkbox to upload the custom icon, which will replace the icon from the drop-down menu. You can upload icons in multiple formats i.e. SVG, PNG, JPG, JPEG, and GIF.
- Label: Enter the custom label for the endpointIcon: Select an icon from a variety of options to display alongside your endpoint.
- User Roles: Choose one or more user roles for which you want the endpoint to be visible. Leaving this field empty will make the endpoint visible to all user roles.
- Custom Content: Enter your personalized content in this section to show any information you desire under the endpoint. This could include hyperlinks, shortcodes, multimedia, text, and more. You can also add the banners.
- Place content: You can set the position where to show the content when the banners are inserted into the endpoints. Display content before and after or even override the default content with banners.
How to Create or Customize the Group Endpoint With The Customize My Account for WooCommerce Plugin?
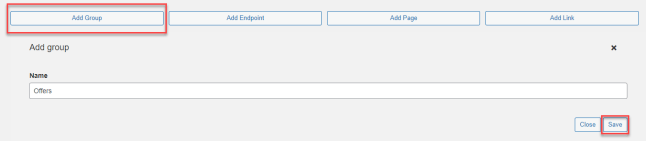
↑ Back to topBy selecting this option, you will be able to create a group of endpoints. It will act as a parent item and contain sub-items. There is no restriction on what endpoints can be included in the subitems.
For the creation of a new group, click the ‘Add Group’ button. Then enter the desired name for the group and press save to proceed.
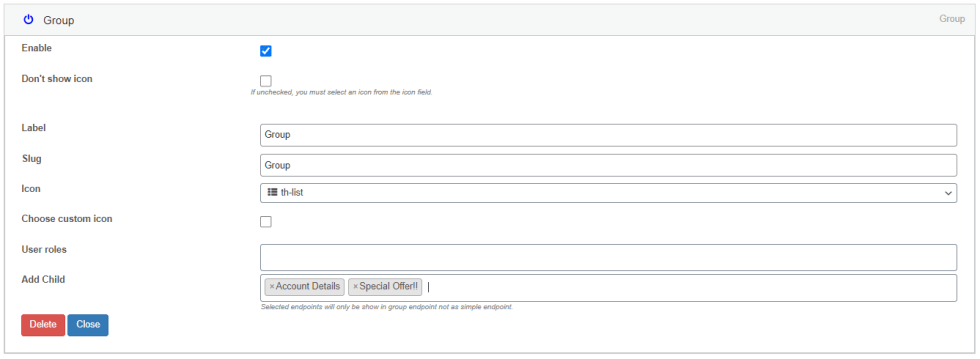
As the new endpoint always appears at the end of the group, you can drag and drop the group to adjust its position. After setting the position click on the endpoint to customize.
Set the label, slug, icon, and user roles just like the above-mentioned simple endpoint. In the group endpoint, you can add multiple child endpoints by clicking on the ‘Add Childs’ field. It will display the list of the endpoint. You can include multiple endpoints.
How to Add a Page as An Endpoint?
↑ Back to topClick on the Add Page button and set the custom endpoint name for the page you want to display on the WooCommerce my account page.
Set the label, slug, and user roles and choose the custom icon for the page endpoint. After that click on the custom page option and choose the page you want to display at the endpoint. You can also choose the pages which aren’t displayed in the store. You can enable open in new tab to display the page in the new tab.
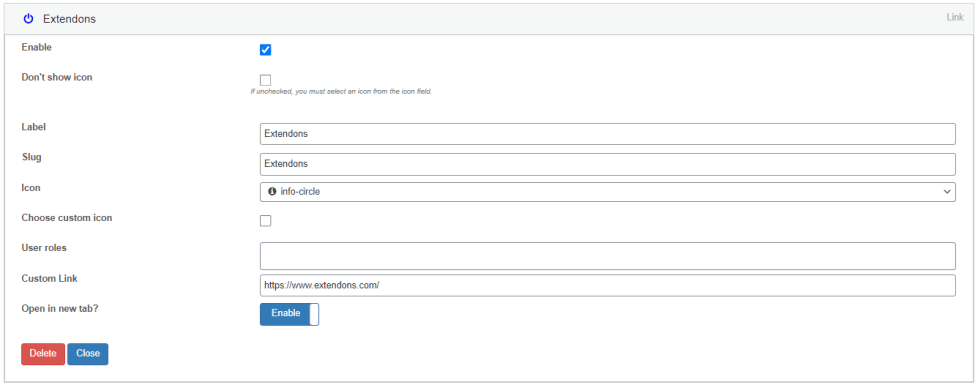
How to Add the Link Endpoint with the WooCommerce Customize My Account Page Plugin?
↑ Back to topFollow the same steps to create the endpoint and adjust the position of the endpoint. The configuration of the link endpoint is very similar to the page endpoint. You just need to include the custom link that you want to open upon clicking on the endpoint. You can also open the link in a new tab with the help of the open in new tab option.
General Setting for Prebuilt Dashboard
↑ Back to topYou can customize my account page WooCommerce prebuilt dashboard to some extent. Depending on your preference, you can position the endpoints such as left, right, and top.
Similarly to custom dashboards, you can enable or disable custom avatars in general settings. However, you can also customize the text and background colors of blocks.
Prebuilt Dashboard
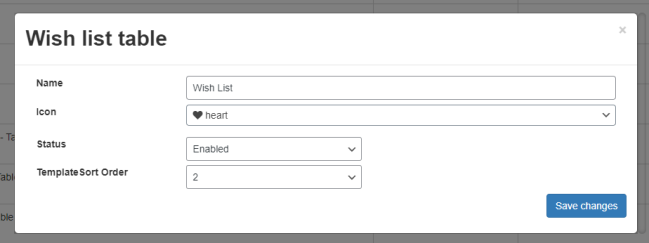
↑ Back to topThe Prebuilt dashboard doesn’t offer the functionality to create new endpoints but can customize the existing endpoint. You can customize the endpoint according to your needs and preferences.

You can customize the name of the endpoint and enhance the visibility of the endpoints by assigning them custom icons. The customize my account page WooCommerce plugin also allows you to enable or disable the endpoint. Also, it empowers you to set the sorting order of the endpoints as per your preferences.
Banners:
↑ Back to topYou can create unlimited numbers of banners and display them in the endpoints. Customize my account for WooCommerce allows you to personalize the banners according to your specific needs. Here are some customizing options for the banners. The banners will only work if you have enabled the custom dashboard.
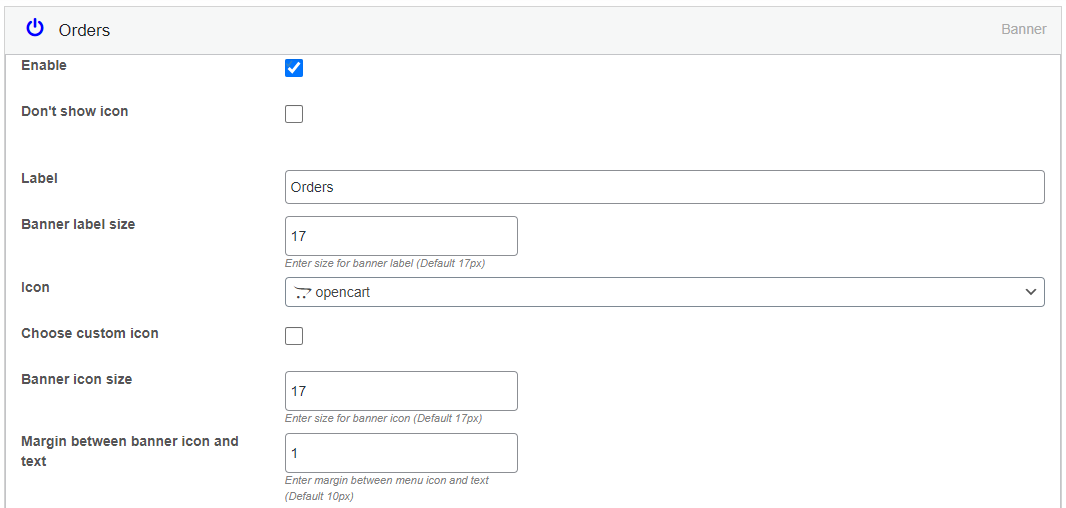
- Enable: Click to checkbox and enable/disable the banner.
- Don’t Show Icon: Check the box to hide the icon for a specific banner or uncheck it to display.
- Label: Set the custom label of the banner. It allows you and your customer to easily differentiate the banner.
- Banner Label Size: Enter the size of the banner label size. You can adjust the size according to your preference.
- Icons: Set the custom icon which represents the banner perfectly.
- Choose Custom Icon: Set the custom icon for the banner by clicking on the checkbox and upload the custom icon. The allowed format for the icons is SVG, PNG, JPG, JPEG, and GIF.
- Banner Icon Size: Choose the banner icon size that suits the WooCommerce my account page’s overall appearance.
- Margin between Banner icon and text: Set the margin between the banner icon and text to improve the visibility of both.
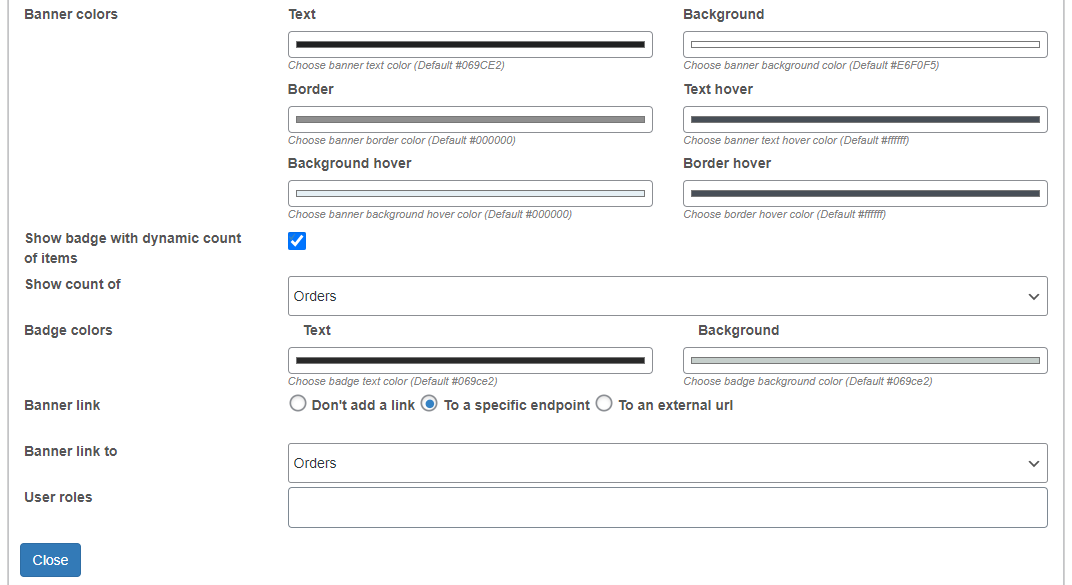
- Banner Colors: You can set the colors of the banners to match your overall store theme. You can set text, background, and border colors.
- Show Badge with Dynamic count of items: Checkbox to display the dynamic counts of items on the banners. You can then select the endpoint on which the item counts will be displayed. It is useful if you create a banner for orders, wishlist, etc. Moreover, you can also customize the colors of the count badge.
- Banner Link: Link the banner to a specific custom endpoint or any external URL. It will be redirected to a specific endpoint or URL.
- User Roles: Select the user role to display the banner to that specific user.
Restore to Default Endpoints
↑ Back to topWith just one click, you can delete all the Custom Dashboard endpoints and restore the WooCommerce default endpoint. An account page can also be accessed from the backend by clicking a button to review your changes.