This guide provides an overview of the features available to a store manager with the WooCommerce Bookings extension to create and manage bookings.
Answers not found here may be located at Bookings FAQ
Availability settings
↑ Back to topAvailability (what slots can be booked) can be controlled via the Availability tab. This article is continued here.
Costs for Bookable Products
↑ Back to topCosts for specific slots are controlled from the Costs tab.
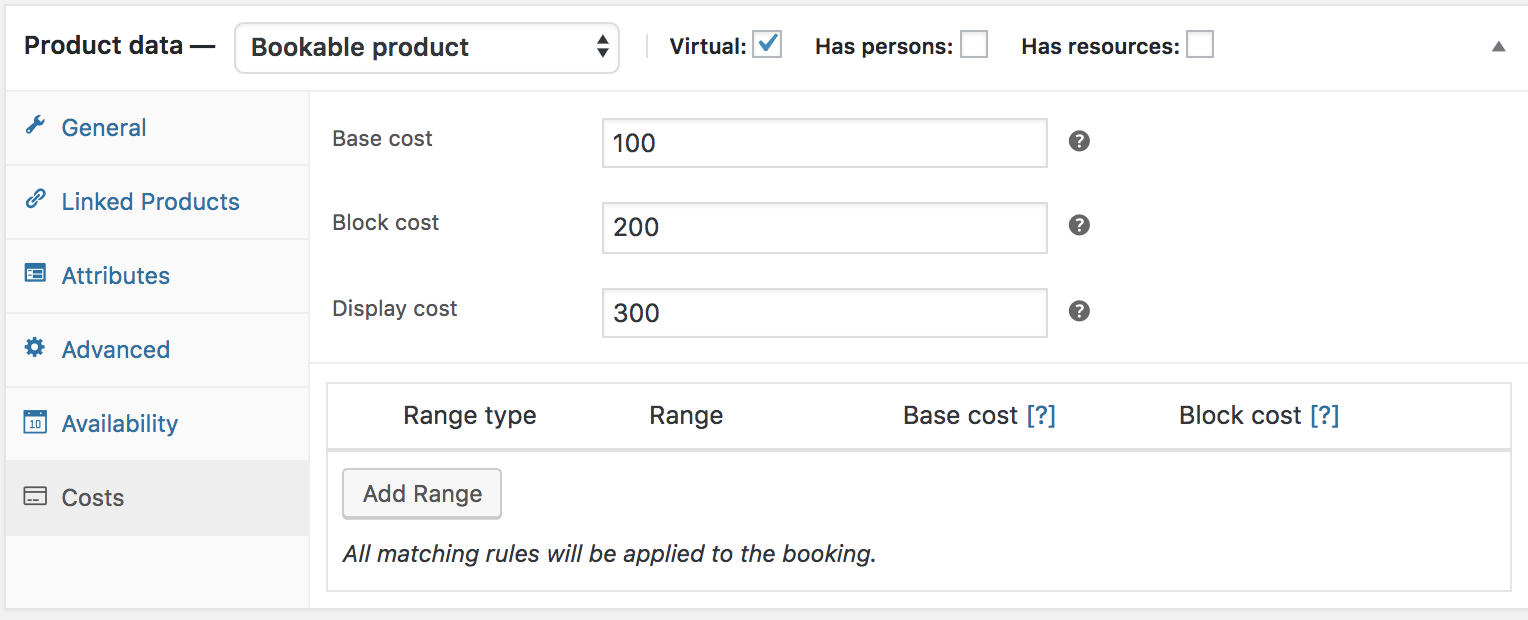
The two main costs you can add are Base cost and Block cost.
Base Cost
↑ Back to topBase cost is applied to the booking regardless of a customer’s choices on the booking form.
Block Cost
↑ Back to topBlock cost is the cost per block that was assigned in the General tab. If a customer books multiple blocks, this cost is multiplied by the number of blocks booked.
Display Cost
↑ Back to topDisplay cost does not affect the actual cost of the product. In the example above, the product page displays 300 on the frontend. The cost is displayed to the user on the front end. Leave blank to have it calculated for you. If a booking has varying costs, the lowest available cost is shown and is prefixed with the word “From:”
Custom Cost Range
↑ Back to topBeneath the display cost, you have an area where you can define extra costs. This works similarly to availability. Click Add Range to begin:

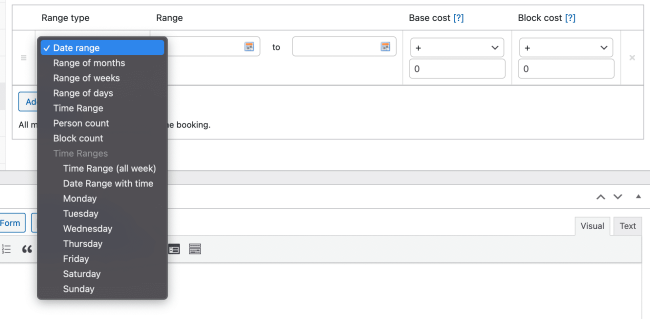
A row appears where you can input the range type, from/to and cost:

The from/to values differ based on the range type:
- Date range: from/to will show a date picker field
- Range of months: from/to will show a dropdown of months (January to December)
- Range of weeks: from/to will show a dropdown of weeks (1 to 52)
- Range of days: from/to will show a dropdown of days of the week (Monday to Sunday)
- Time range: from/to will show time inputs (You can also set it to a specific day of the week from the options available in the dropdown)
- Date range with time: set based on a custom date range
- Persons count: from/to will show the number inputs (Applies only if the “Has Person” option is enabled)
- Block count: from and to will show the number inputs
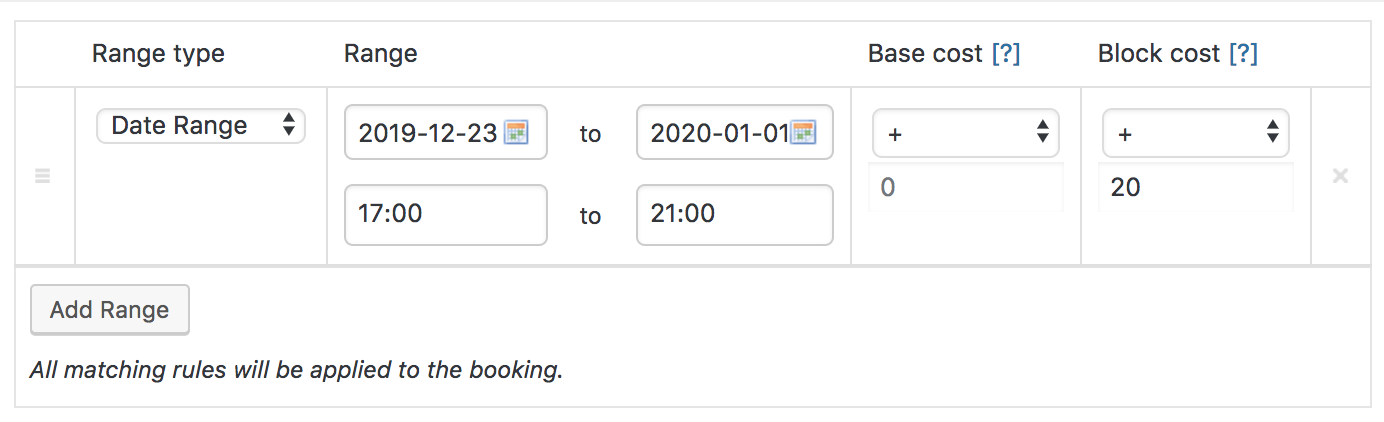
Base cost and Block cost can be added, subtracted, multiplied, or divided by the amount you enter. You can also directly set the costs applied for the rule.
Rows can be removed by clicking the X on the far right or dragged and dropped to sort using the handle on the far left.
Persons
↑ Back to topIf the booking can be made for multiple persons at once, tick the “Has Persons” checkbox. Once selected, a new tab appears:

Min and Max Persons
↑ Back to topYou can set a min and maximum for persons. Similar to duration, the customer can input a value on the frontend booking form, if enabled.
Multiple all costs by person count
↑ Back to topIf “Multiply all costs by person count” is enabled, all costs are multiplied by the number of persons the customer selects.
Count persons as bookings
↑ Back to topIf “Count persons as bookings” is enabled, the person count is used as the quantity against the block. The “Max bookings per block” setting above under Availability determines the upper limit for allowed persons per block. Once the limit is reached, more persons cannot be booked.
Person Type
↑ Back to top
The Person Type setting allows you to create different types of people that you can disable on the product page. This can be useful for setting Different pricing depending on the Person type. You can set different prices for different person types. For example, you might want to charge a higher price for adults than for children.
To set up different person types, tick the Enable Persons Type checkbox in your Persons Tab. Once you tick this checkbox, you have the option to add multiple types.
- Give your Person type a name and define the cost for the type. Adding a description is optional.
- You can define a minimum and a maximum number for each person type. For example, you could require at least one adult for each booking while making children optional (minimum 0). If you leave Max blank, there are no other restrictions than those of the bookable product itself.

Clicking the Unlink button will remove the person type from the product. The person type will still exist, but be hidden, this is so previously created bookings are not broken.
Resources
↑ Back to topThe “Resources” setting refers to a feature that allows you to define and manage the various resources required for your bookable products or services. Resources can represent anything necessary for fulfilling a booking, such as rooms, equipment, staff members, or any other tangible or intangible assets.
By setting up resources, you can effectively allocate and manage the availability and capacity of these resources in relation to your bookable products or services. Each resource can have its own unique characteristics, availability schedule, and capacity limitations, and it can also be shared between multiple bookable products.
Examples:
- You own a yoga studio and you want to offer yoga classes that include the use of yoga mats. You could create a resource called “Yoga Mat” and assign it to your yoga classes (booking product). You could then set the price of the yoga mat resource to $2 and the availability of the yoga mat resource to be limited to 10 bookings per day.
- You own a restaurant and you want to offer table reservations that include the use of a highchair. You could create a resource called “Highchair” and assign it to your table reservations. You could then set the price of the highchair resource to $5 and the availability of the highchair resource to be limited to 2 bookings per table.
Tick the Has resources checkbox to enable a new tab:
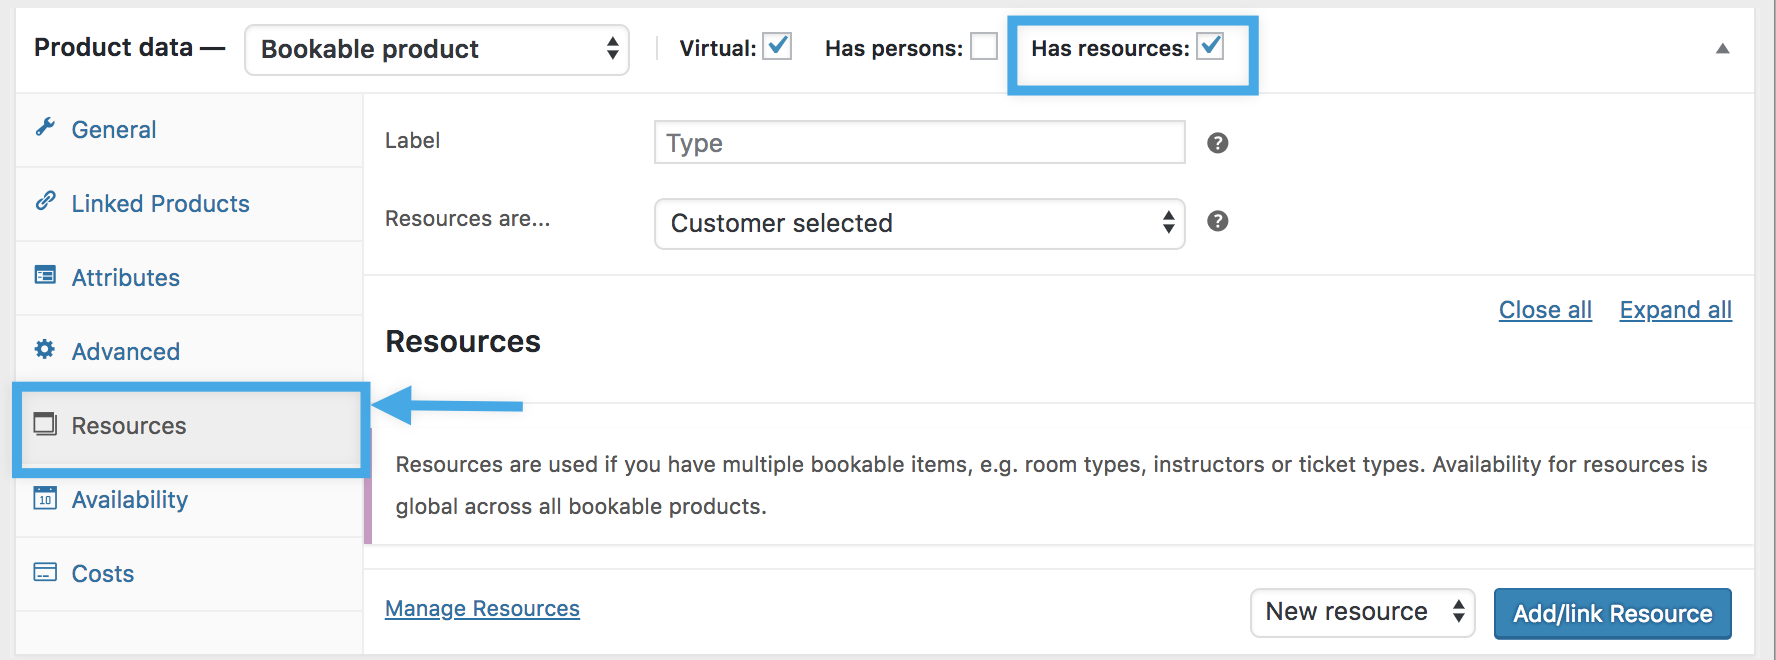
Resources are
↑ Back to topThere are two types of bookable resources:
- Customer selected: A booking form shows a dropdown list of resources that the customer can select.
- An example use case for a customer-selected resource would be a room type, such as single and twin rooms that the customer can select from the product page while booking.
- Automatically assigned: A resource is automatically assigned to a customer booking if available.
- An example use case for an automatically assigned resource would be a hair salon where the resources are staff and someone is assigned a booking. More at: Hair Salon – Bookings Use Case.
After enabling resources, choose your type. If you have chosen Customer selected be sure to give your resource a label. This is what is shown on the frontend booking form.
Resources can be used globally across multiple products. Even though a bookable product can have multiple resources associated with it, only one resource can be assigned per booking.
Adding & Managing Resources
↑ Back to topPlease learn more about Resouces at: Resources in Bookings
Managing Bookings
↑ Back to topPlease refer to the documentation at: Managing Bookings
Bookings Settings
↑ Back to topPlease refer to the documentation at: Booking Settings
Use Cases
↑ Back to topPlease refer to the documentation at: Use Cases
Questions and Support
↑ Back to topSomething missing from this documentation? Do you still have questions and need assistance?
- Have a question before you buy this extension? Please fill out this pre-sales form – please include the name of this extension in your query.
- Already purchased and need some assistance? Get in touch with a Happiness Engineer via the WooCommerce.com Support page and choose this extension name from the “I need help with” dropdown