This scenario will walk through how to use WooCommerce, WooCommerce Bookings, and WooCommerce Product Add-Ons to create a bookable product that makes use of varying pricing, resources, person types, and additional product add-ons to achieve the desired configuration.

Scenario
↑ Back to topAlexi has a recording studio and needs a website where people can book his two rooms. When offering the rooms he has the following requirements:
- He is open from 9:00 am to 1:00 pm and 5:00 pm to 11:00 pm, Monday to Saturday
- He is closed on public holidays and Sundays
- He wants to rent rooms for a minimum of 1 hour and a maximum of 3 hours per booking
- He wants the price to be $7.00/hour but from 6:00 pm the rate must be $3.00/hr higher
- His rooms are not huge, so the maximum capacity is 5 people per room
- Room #2 is not available on Saturday because he and his friends use it
- He can rent instruments, speakers and cables
Products Used
↑ Back to topSetup and Configuration
↑ Back to topCreating a Bookable Product
↑ Back to top- In the sidebar of your WordPress Admin, click on Products.
- Click on the Add New button on the top.
- Under Product data select Bookable Product.
Configure the General Tab
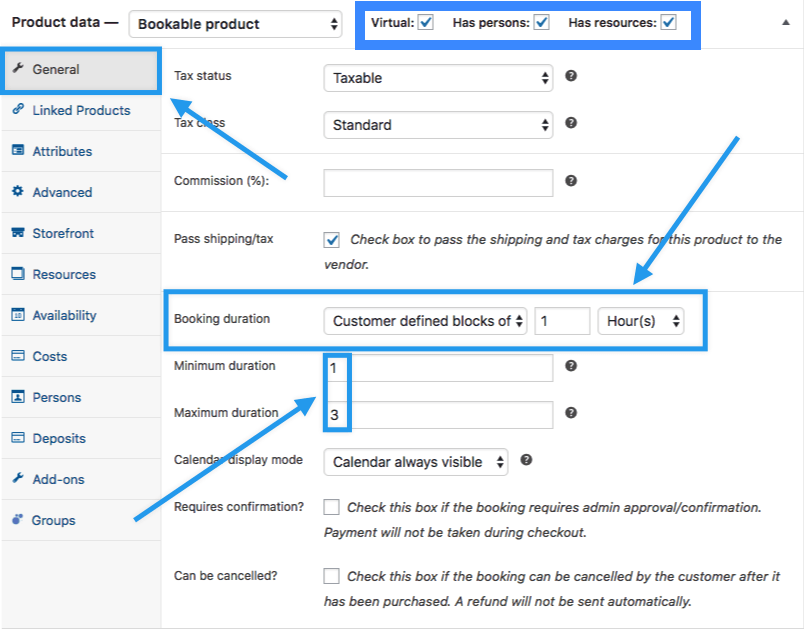
↑ Back to top- On the General tab please click Virtual, Has Persons, and Has Resources as all of these options will be required for this scenario.
- Select the dropdown menu next to Booking Duration and select
Customer defined blocks of, enter1in the next field, and selectHoursas the measurement of time in the final dropdown. - In the Minimum Duration field enter
1and for Maximum Duration enter3this enforces the minimum and maximum time allotments for the product.
Configure the Resources Tab
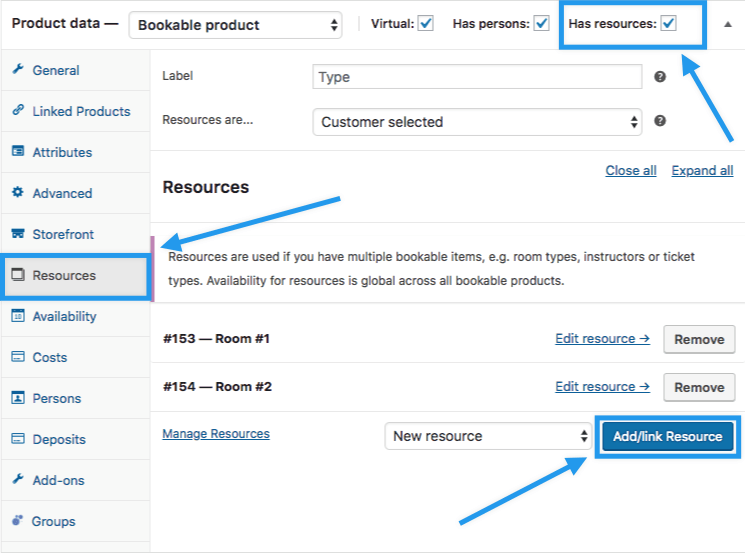
↑ Back to top- Select the Resources tab (note: The tab only appears if you selected Has Resources in the section above)
- Select Add/link Resource to add a resource
- Name your resource (e.g., Room 1 or Studio 1) when the window opens, and select OK.
- Repeat steps #2 and #3 to add another resource (e.g., Room 2 or Studio 2).
Configure the Availability Tab
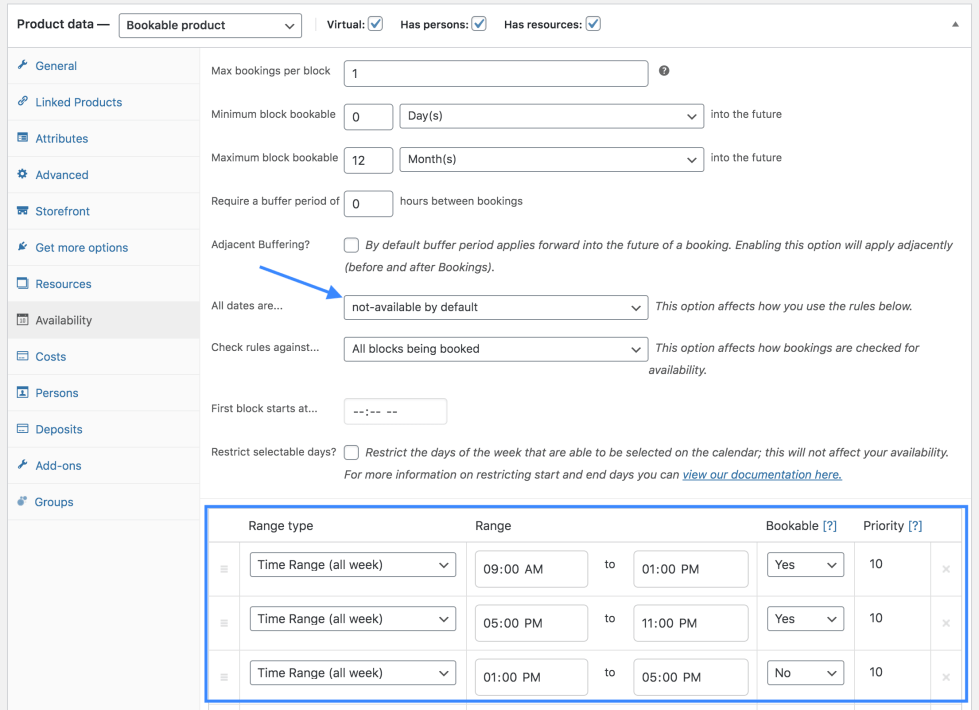
↑ Back to top- On the Availability tab select the dropdown next to the All Dates Are setting and select
not-available by default - At the bottom of the tab click Add Range three times, in the newly added table click the dropdown under Range Type and set it to
Time Range (all week)for all three entries. - Add the time ranges the studio will and will not be available under Range, in the first field enter
09:00am - 01:00pm, in the second05:00pm to 11:00pm, and in the third01:00pm to 05:00pm - Under the Bookable column select
Yesin the first two rows, andnoin the third. - Keep the Priority for all three time ranges to
10.
Configure the Costs Tab
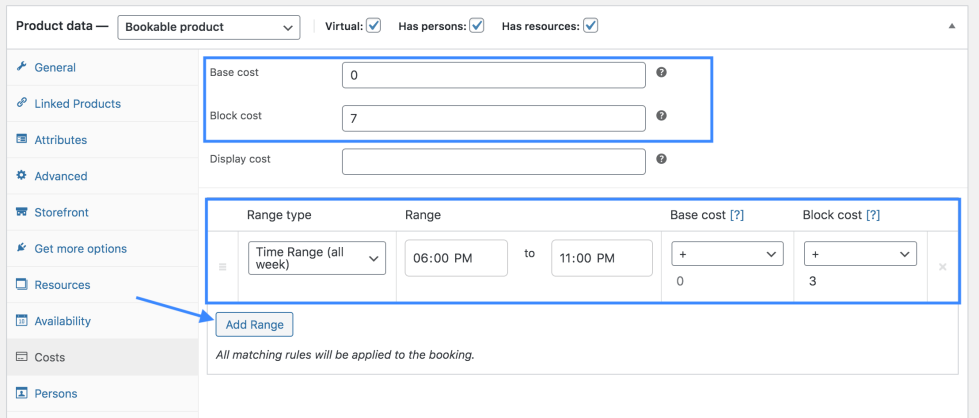
↑ Back to top- Ensure the Base Cost is set to
0and the Block Cost is set to7. - Click Add Range.
- In the new table select
Time Range (all week)under Range Type and enter06:00 PM to 11:00 PMas the Range. - In our example, we have a price increase of $3 from 6 pm – 11 pm. Under Block Cost click the dropdown and select
+and add3in the numerical field.
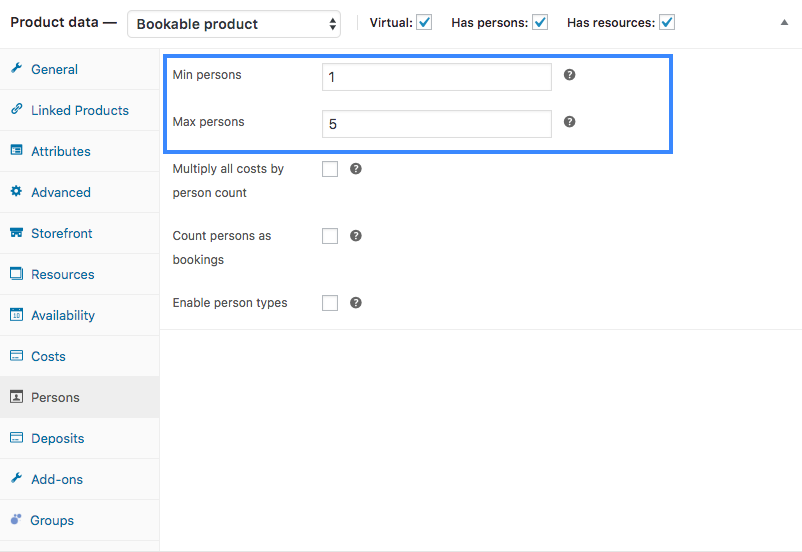
Configure the Persons Tab
↑ Back to top- On the Persons tab set the Min Persons to
1and the Max Persons to5 - Publish to save.
Manage Resources
↑ Back to top- Return to the Resources tab and click Manage Resources near the bottom of the tab.
- A new browser tab opens and shows you the Bookable Resources you created near the start of this use case.
- Click Edit next to Room 1, ensure the Available Quantity is set to
1and click Update to save. - Click Edit next to Room 2, ensure the Available Quantity is set to
1. - Click Add Range, under the dropdown for Range Type select
Range of Daysand under Range select fromSaturdaytoSunday. - Ensure Bookable is set to
No. - Keep the Priority as
10. - Click Update to save the changes.

Set the Store Global Availability
↑ Back to top- Since the studio is closed on Sundays and public holidays we’ll want to configure this in Bookings > Settings > Store Availability.
- Click Add Range near the bottom of the page.
- Under Range Type select
Range of Days, under Range select fromSundaytoSunday, and under Bookable selectno - Since this rule needs to supersede our other availability configurations set the Priority to
9. - Repeat the above steps substituting
Date Rangeas the Range Type and then select the specific date/dates under Range. Repeat the process again for each public holiday you would like to account for. - Save changes.

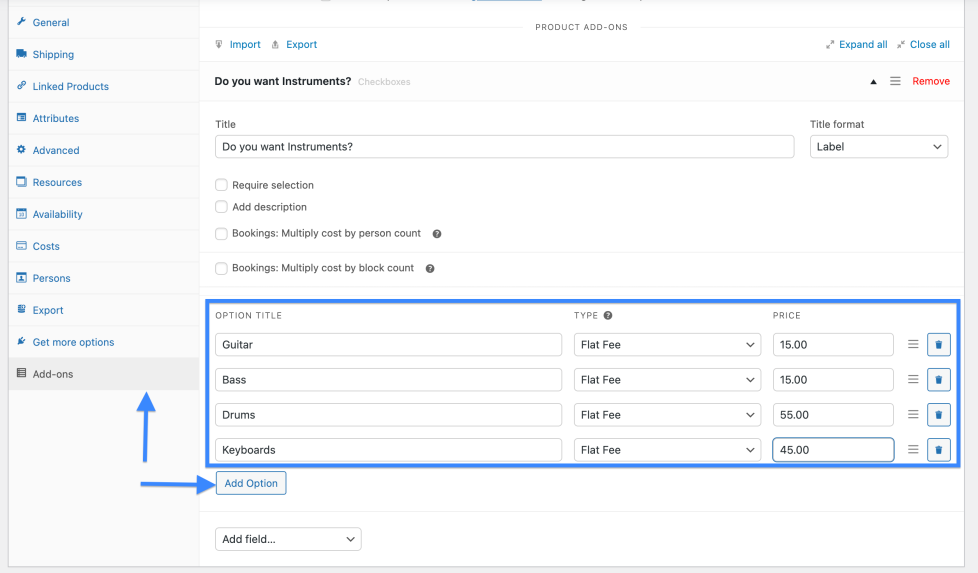
Configure any Product Add On’s
↑ Back to top- Back in the bookable product, with WooCommerce Product Add-Ons enabled click on the Add-Ons tab.
- Click the Add Field dropdown and select
Checkbox. - In the Title field enter
Do You Need Instruments?and selectLabelunder the Title Format dropdown. - Click Add Option near the bottom of the page to add fields for each instrument type.
- Label each option as a separate instrument (Guitar, Bass, Drums, Keyboards, etc.), select
Flat Feeunder the Price dropdown for each, and add a cost in the last box. - Update to save.
- Repeat steps #2 – #5 to add another section for cables and speakers.
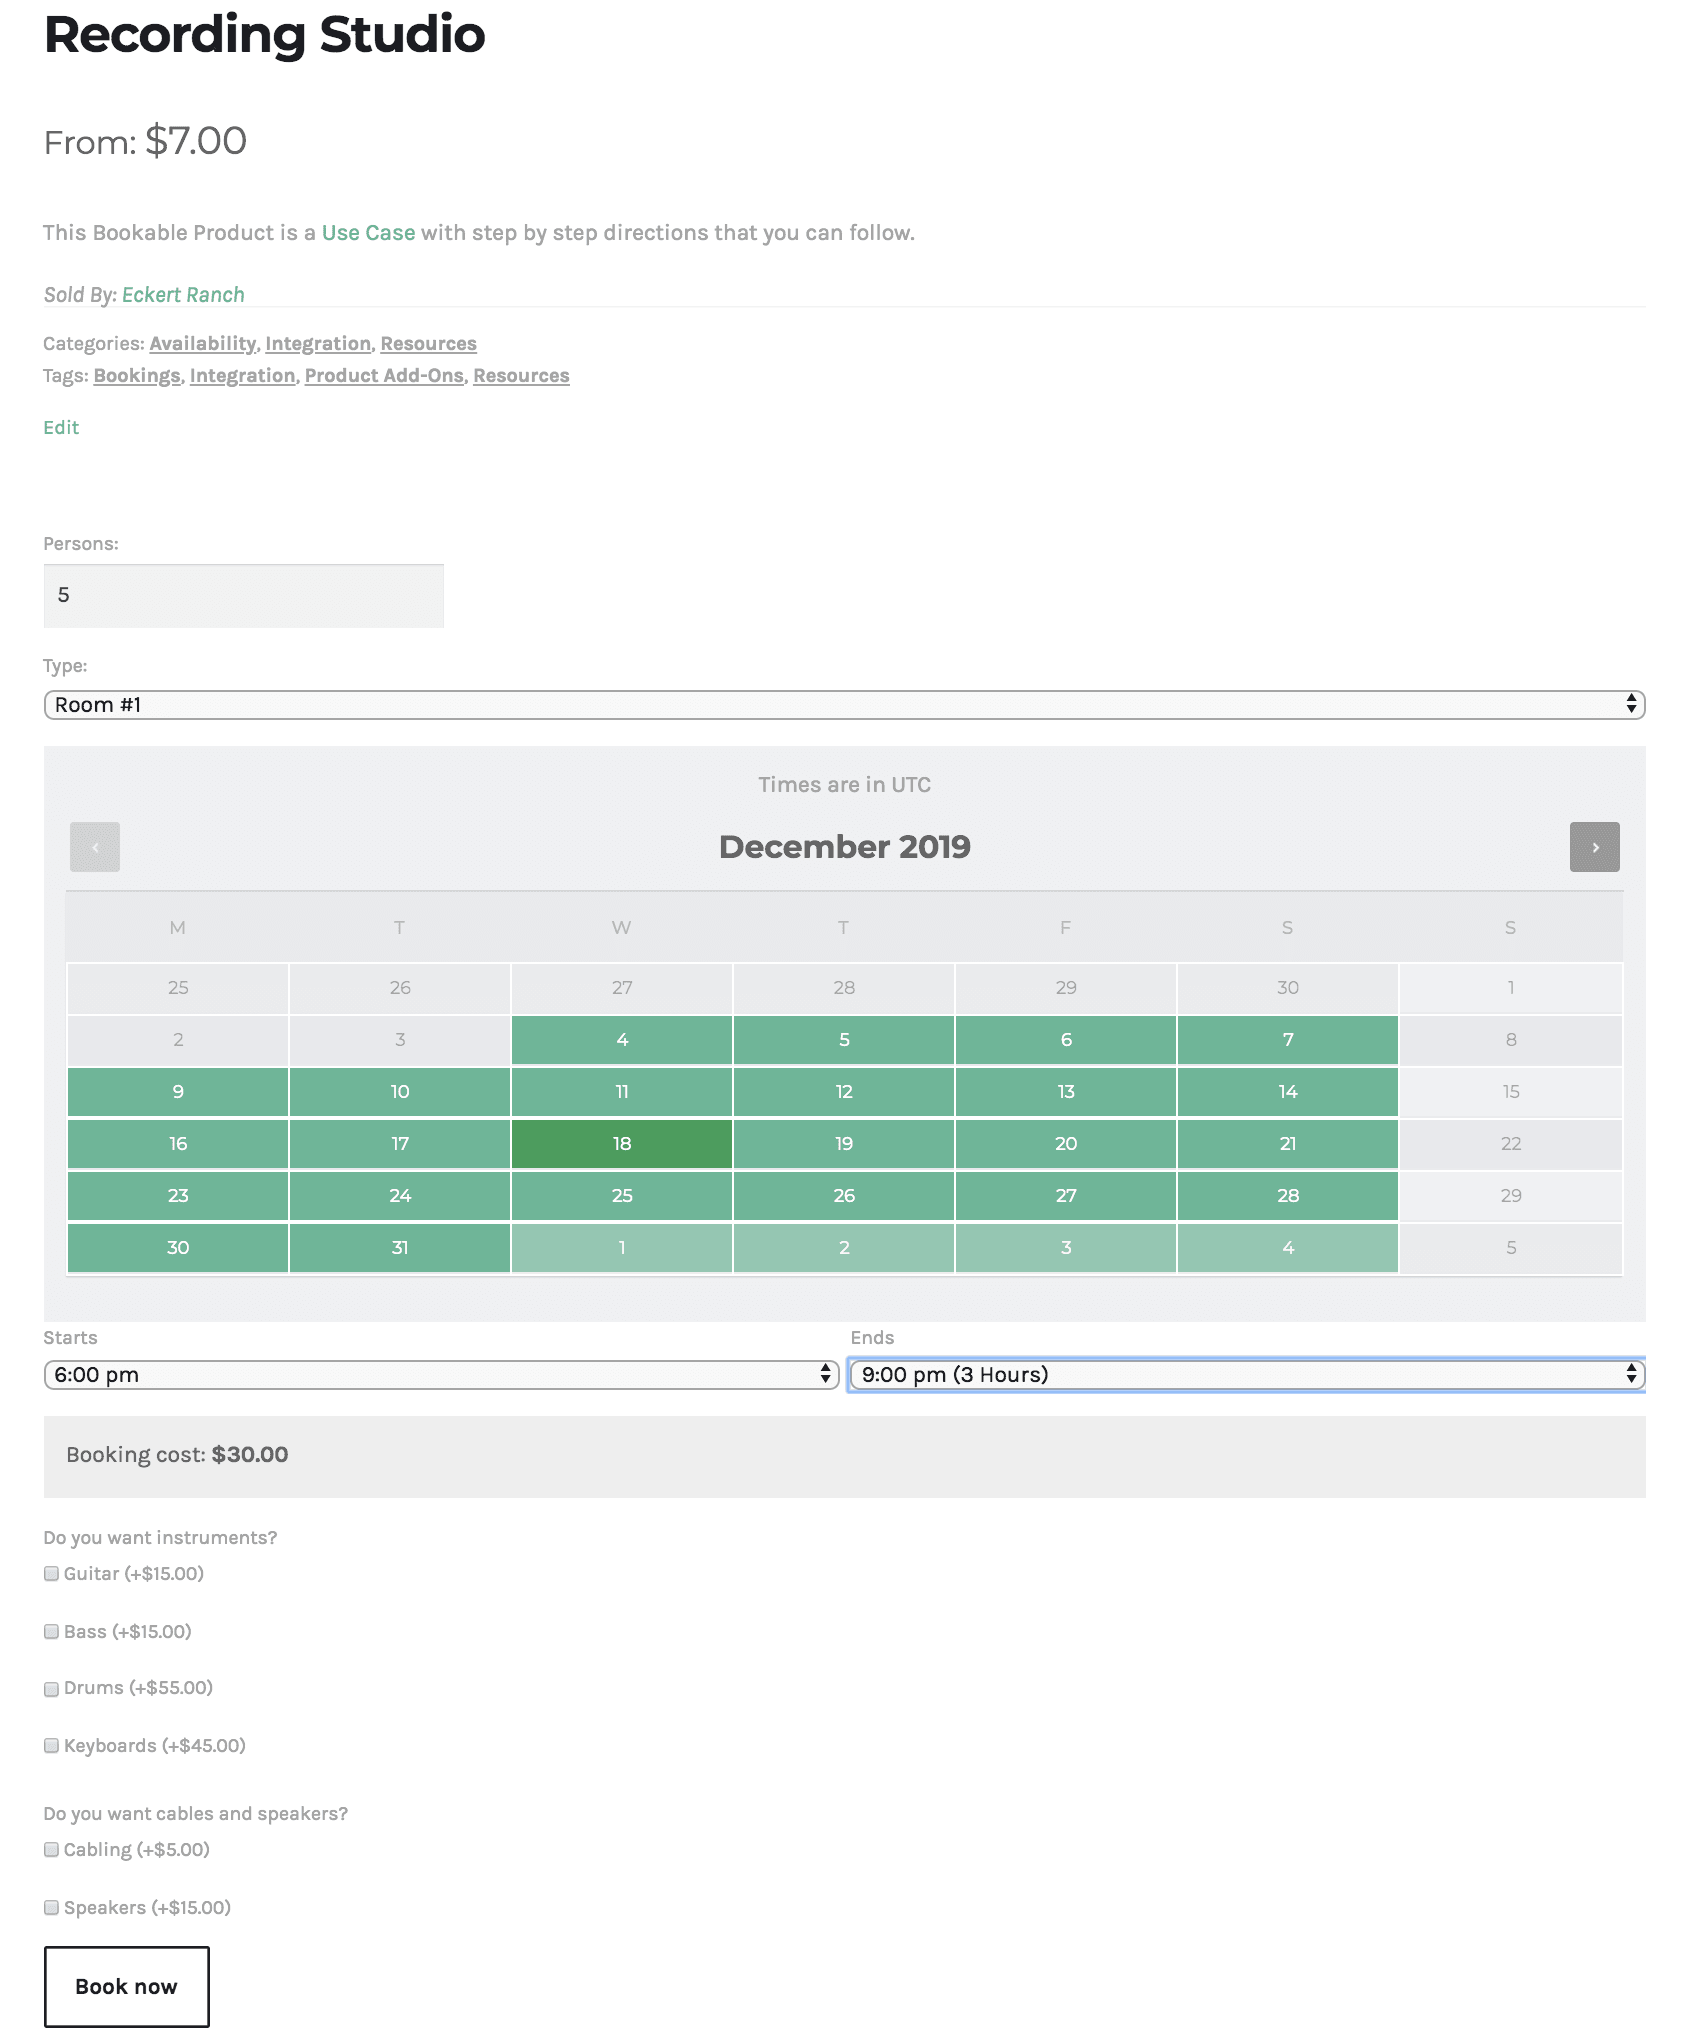
Usage
↑ Back to topThis is what the user will see when visiting the front end of your site:
Questions and Support
↑ Back to topSomething missing from this documentation? Do you still have questions and need assistance?
- Have a question before you buy this extension? Please fill out this pre-sales form – please include the name of this extension in your query.
- Already purchased and need some assistance? Get in touch with a Happiness Engineer via the WooCommerce.com Support page and choose this extension name from the “I need help with” dropdown