The all-new subscription-based Shopify Connector for WooCommerce enables you to scale your business to a broader customer base. Simply select the plan suitable to your business and sell seamlessly.
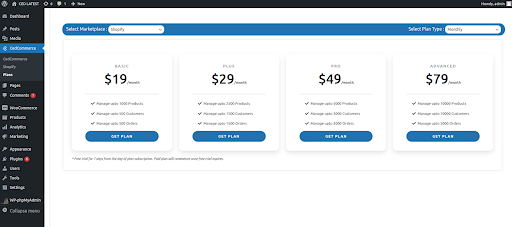
- Flexible subscription: From basic to advance, choose the one for your business. You can easily switch the plans as required.
- Get access to a well-refined product data import with features like Fetching Shopify collections, specifying markup types and values, and filtering out-of-stock products.
- The plugin offers a simple solution to import customer data from your Shopify store to WooCommerce.
- Use refined filters to import a precise data log to your WooCommerce store and reduce redundancy.
To extend your Shopify store’s functionality, you must create a private app on Shopify.
Here are the steps to create a private app:
- Log in as the store owner.
- From Shopify admin go-to Settings .
- Search for `Apps and sales channels` on left menu bar.
- Click on Develop apps and then click on `Create an app`. Enter details such as the app name and a contact email address. Shopify uses this email address to contact the developer if there is an issue with the private app.
- Click on Create app.
- Look for Configure Admin API scopes and provide the required read/write access.
- Install your app.
- Now, you will get the admin API access token and your Shopify store URL.
- Please copy and paste the Admin API access token as Shopify dont allow to view this again because it provides authenticated Admin API access.
After this, you must configure the Shopify Connector for the WooCommerce app.
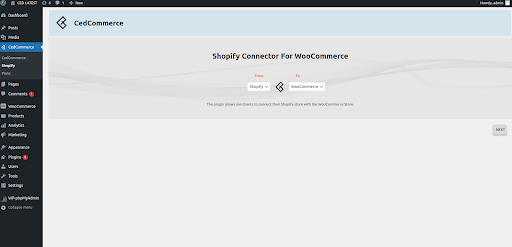
- Step 1: After you have downloaded CedCommerce’s plugin, navigate to Marketplaces > Shopify.
- Step 2: Select the marketplace as Shopify in the drop-down menu.
- Step 3: Opt for the most suitable plan for your business.
- Step 4: On the right corner, subscription durations are provided. Choose the duration as monthly or yearly from the drop-down menu.
- Step 5: From the left panel, switch to Shopify. The import is selected by default as: From Shopify to WooCommerce.
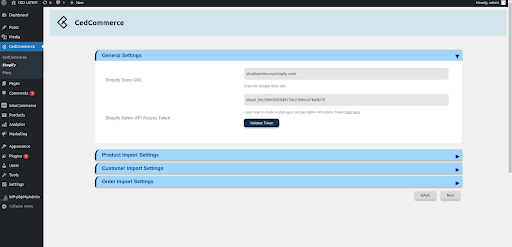
- Step 6: Click on Next. Under General Settings, enter the following details:
-
- Shopify Store URL
- Shopify Admin API Access Token.
- Click Validate Token.
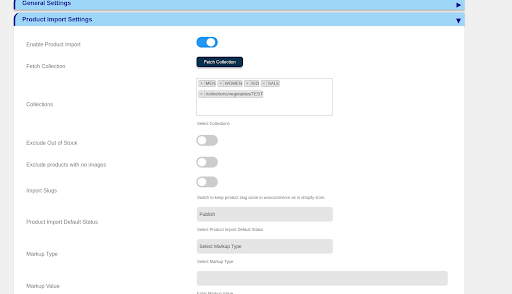
- Step 7: Click into Product Import Settings. Under this section, you have the following options:
- Enabling the product import action.
- Select and fetch the collection from Shopify to WooCommerce.
- Ability to exclude out-of-stock products.
- You can also exclude products with no images.
- Easily import slugs from Shopify to WooCommerce.
- You can mark the default status of the product imported to WooCommerce as:
- Published.
- Draft.
- Pending.
- Gain profit with the markup type and value. You can select the type of markup from the drop-down menu as:
- Fixed Price, i.e., a fixed price, will be added to the imported products on WooCommerce.
- Percentage, i.e., a fixed percentage, will be added to the price of the products on WooCommerce.
- In the Markup value column, you can add the value of either a fixed price or percentage you want to go with.
- Under the WooCommerce category, you can select the categories under which the products will be imported into the WooCommerce store.
- Select the chunk size of the product import. You can enter the size as per your requirement.
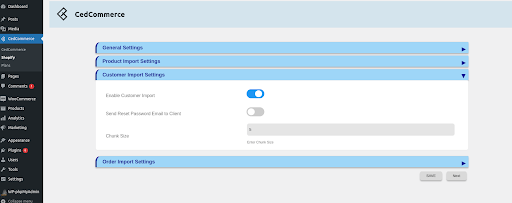
 Step 8: Customer Import Setting.
Simply import your customer data from Shopify to WooCommerce under the customer import setting. You can:
Step 8: Customer Import Setting.
Simply import your customer data from Shopify to WooCommerce under the customer import setting. You can:
- Enable the Customer Import.
- Inform the clients by sending reset password emails to them.
- Select the chunk by which you want to import the data.
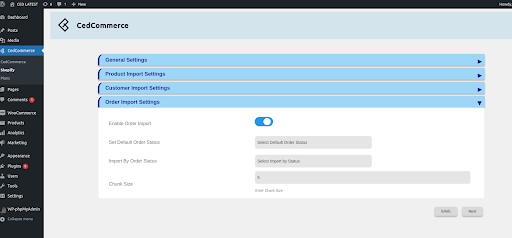
 Step 9: Order Import Setting.
Import orders from Shopify under the Order import tab. You can:
Step 9: Order Import Setting.
Import orders from Shopify under the Order import tab. You can:
- Enable the import.
- Choose the default status of the orders from the drop-down menu as:
- Pending Payment.
- Failed.
- Processing.
- Complete.
- On hold.
- Canceled.
- Refined.
- Or you can simply import the orders based on their status in the Shopify store. Choose the status from the drop-down menu and import.
- Select the chunk size for the import.
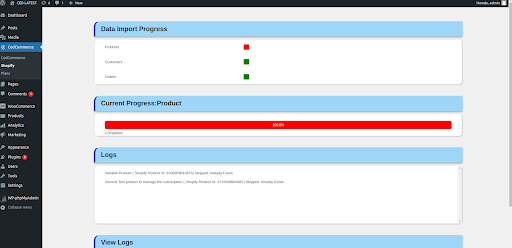
 Step 10: Data Import Progress.
Track the progress of your data import once you have carried out all the essential steps. The import progress & logs will be shown as follows:
Step 10: Data Import Progress.
Track the progress of your data import once you have carried out all the essential steps. The import progress & logs will be shown as follows:
 Our experts are available 24*5 to help you with the plugin. Feel free to connect with us.
FAQ
How are categories created on product import?
Ans.
Our experts are available 24*5 to help you with the plugin. Feel free to connect with us.
FAQ
How are categories created on product import?
Ans. Product categories are created with the same name as the Shopify collection name. Once the product is imported from Shopify to WooCommerce, the plugin will create a WooCommerce Category and the name will be the same as the Shopify Collection name.
Contact us for further assistance. We provide you with a dedicated account manager to help with the setup process. Get 24*5 support from our team via call, WhatsApp, and Skype.