Installation
↑ Nach oben- Download the .zip file from your WooCommerce account.
- Go to: WordPress Admin > Plugins > Add New and Upload Plugin with the file you downloaded with Choose File.
- Install Now and Activate the extension.
More information at: Install and Activate Plugins/Extensions.
Setup and Configuration
↑ Nach obenTo use the Prepaid for WooCommerce Subscriptions extension, you will need to have WooCommerce Subscriptions installed.
Prepaid for WooCommerce Subscriptions extends default subscription products by providing the option to add prepaid plans for regular subscriptions. You can add an unlimited amount of prepaid plans for each subscription. For example, if you have a subscription product with a 1-month recurring payment for $10, the extension allows you to create several prepaid plans for that product. For instance, a prepaid plan can be created for 12 months subscription length and another one for 18 months.
Version 4.0 update:
↑ Nach obenSwitching from a regular to prepaid subscription plan
↑ Nach obenStarting from the 4x version of the plugin, users can upgrade their current subscription plans from regular to prepaid period.
First of all, to let your users switch between regular and prepaid subscriptions plans you should enable this option here in WooCommerce > Settings > Prepaid Subscriptions:
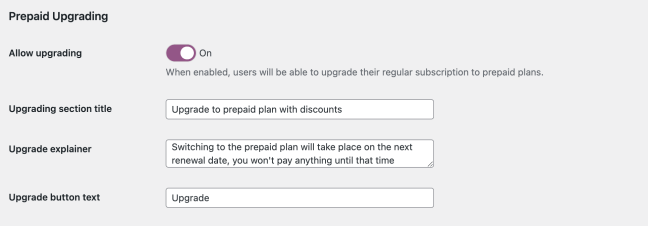
All the texts and labels you see here should be customized according to your needs and will appear on the user account > subscription page. Use those fields to give your customers a better perspective of how switching works and what are the benefits.
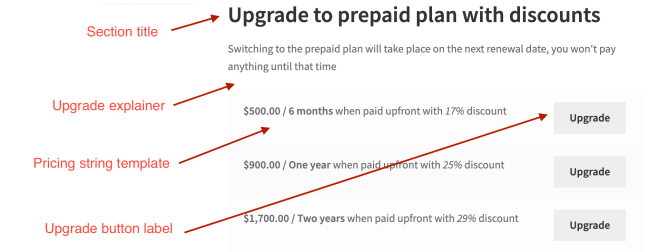
You can add a section title, a little explainer, and name the button to switch, the pricing string will be taken from the options above in the settings. And here is how it looks on the subscription management page for users:
Considering the case when you have a regular monthly subscription:

Which costs $100 every month.
You decided to add two prepaid plans to that subscription as an option for 6 months:

And one more for an annual subscription with monthly delivery:
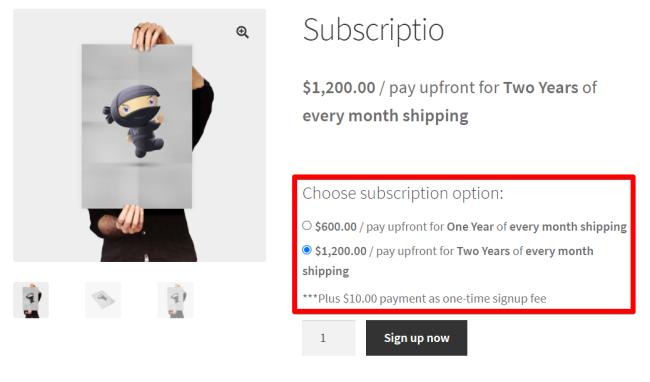
Users then can choose between a regular or prepaid plan on the product page:

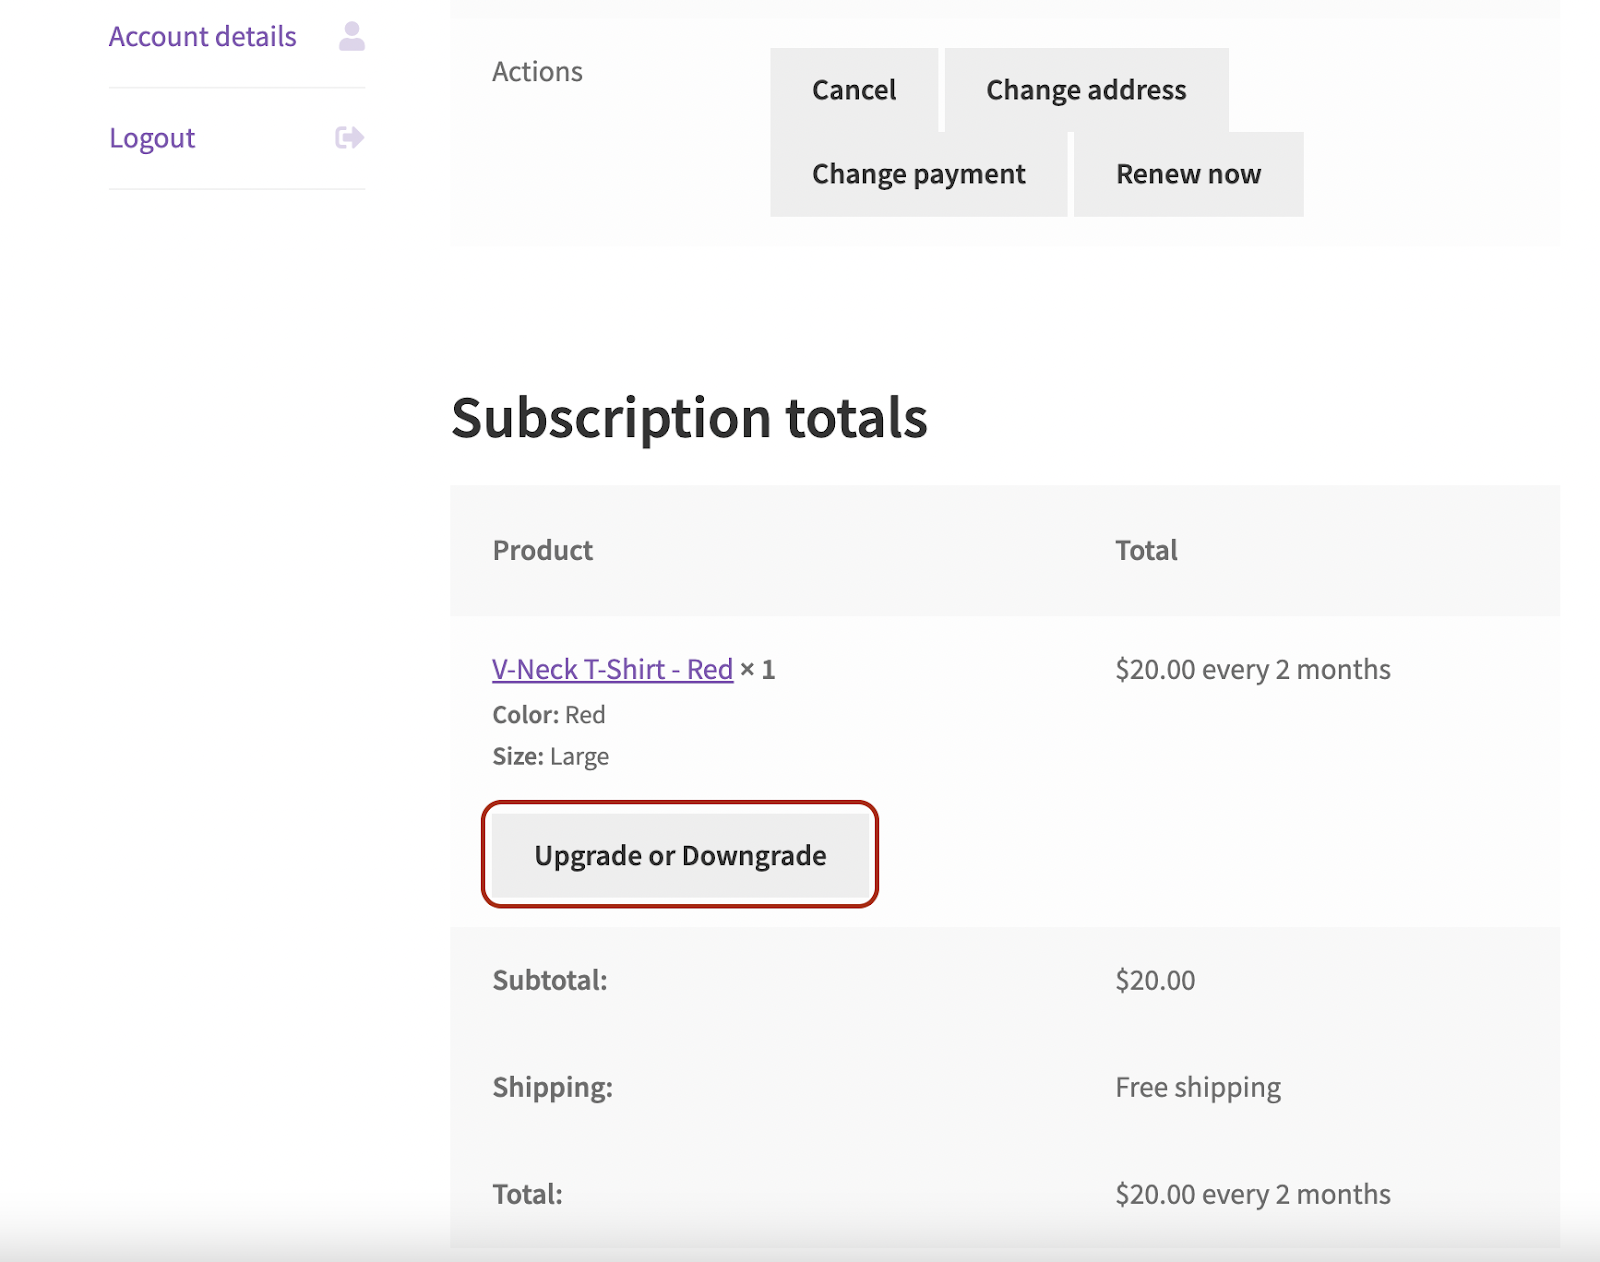
In addition to this, all current subscribers now can upgrade from their regular $100/month plan to 6 Months or Annual plan from their subscription management page (my-account):

Customers can upgrade right from their account, without need to go through cart and checkout once more.
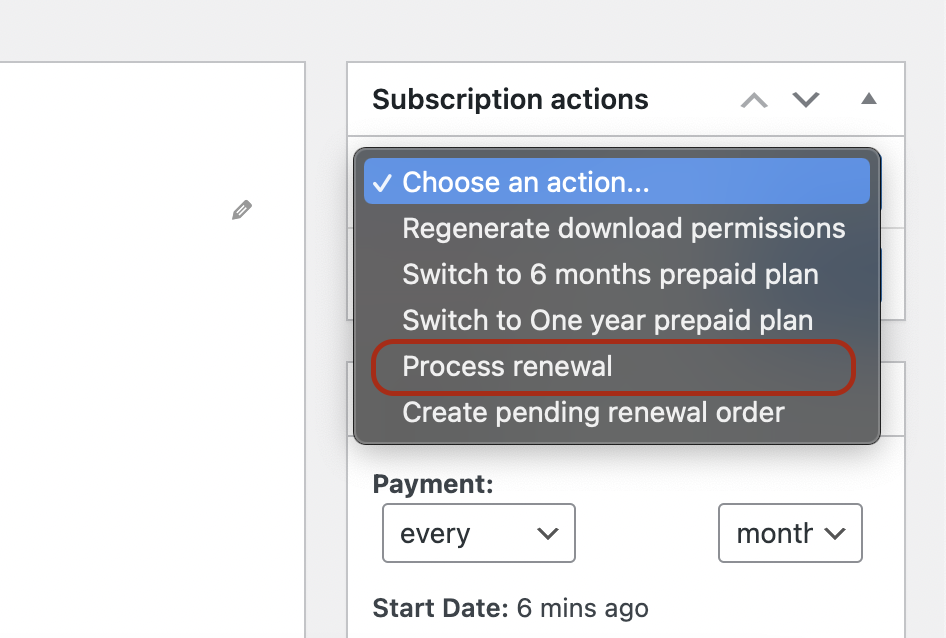
Note: upgrade won’t happen right away if they have an ongoing subscription. Plugin will postpone the upgrading event to the date of the next renewal. Eg. if the user purchased an initial monthly subscription plan on April 11, and decided to upgrade to a prepaid plan on April 12, their current subscription will remain untouched until May 11, when the next renewal takes place – they will be charged the cost of the prepaid plan and granted subscription to whole prepaid period. In case you need it, the admin can set the upgrade to prepaid immediately, by triggering the renewal event via the subscription page:
The same can be done by customers in their subscription management area:

The upgrading can be reached by old users (who had subscriptions running even before Prepaid plugin installation), or by those who just bought a regular subscription.
The store manager can do the same on the customers’ behalf from the wp-admin panel.
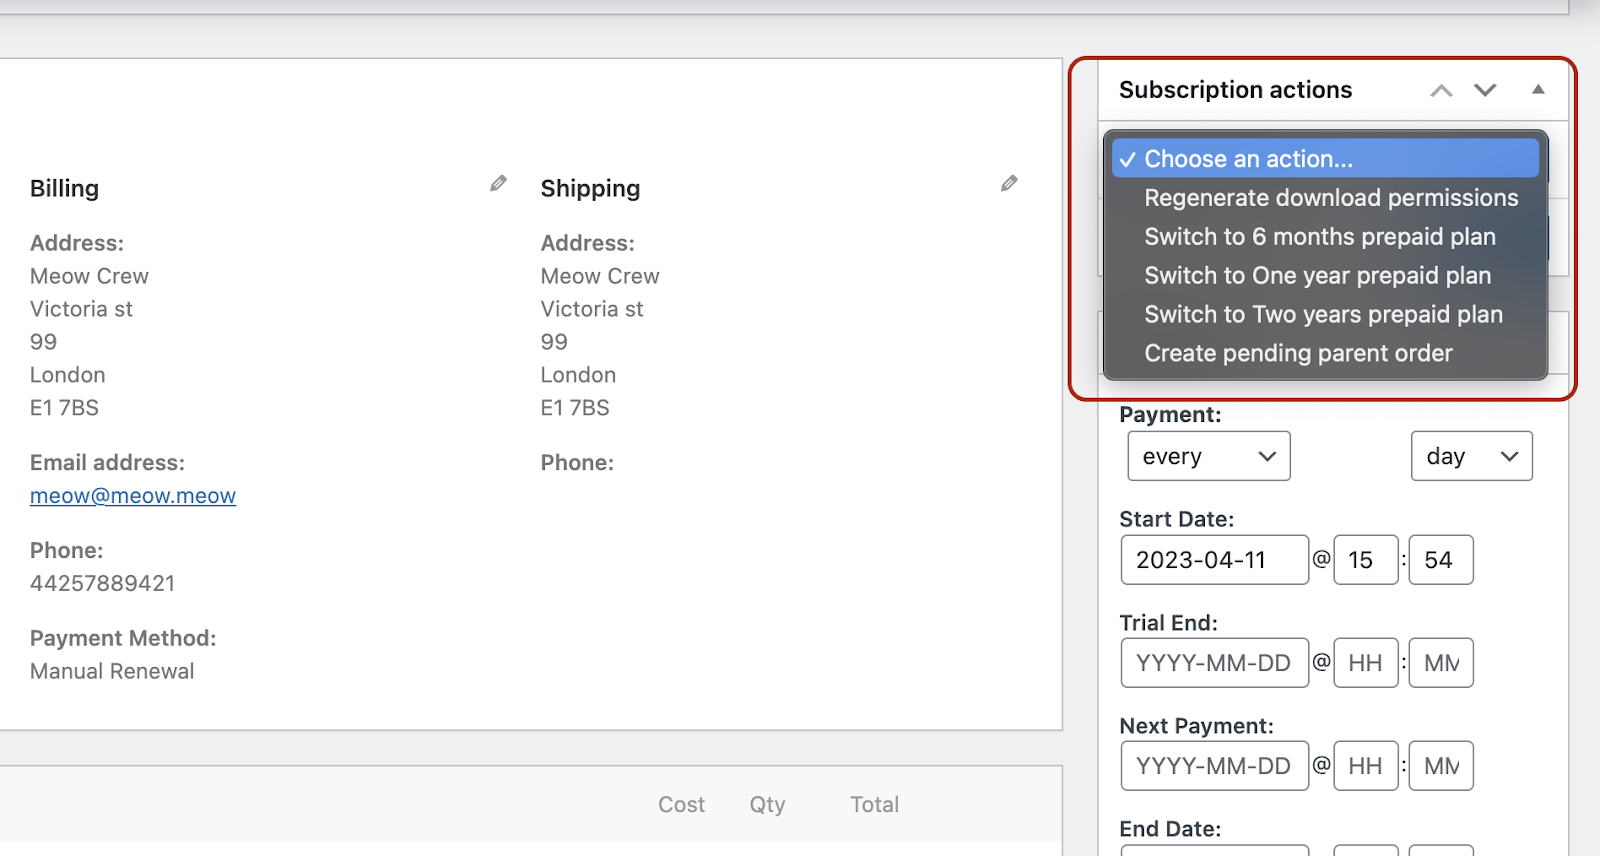
When you visit the subscription page in the WooCommerce > Subscriptions, you can find options to switch subscription to any plan set for this subscription product in the Subscription Actions box: Switching here works the same as switching triggered by customers themself. So, the plugin will wait for the current subscription period to expire and then charge the cost of the prepaid plan. As said before, you can trigger renewal from this actions box, to make the upgrade happen right off the bat.
For variable subscriptions.
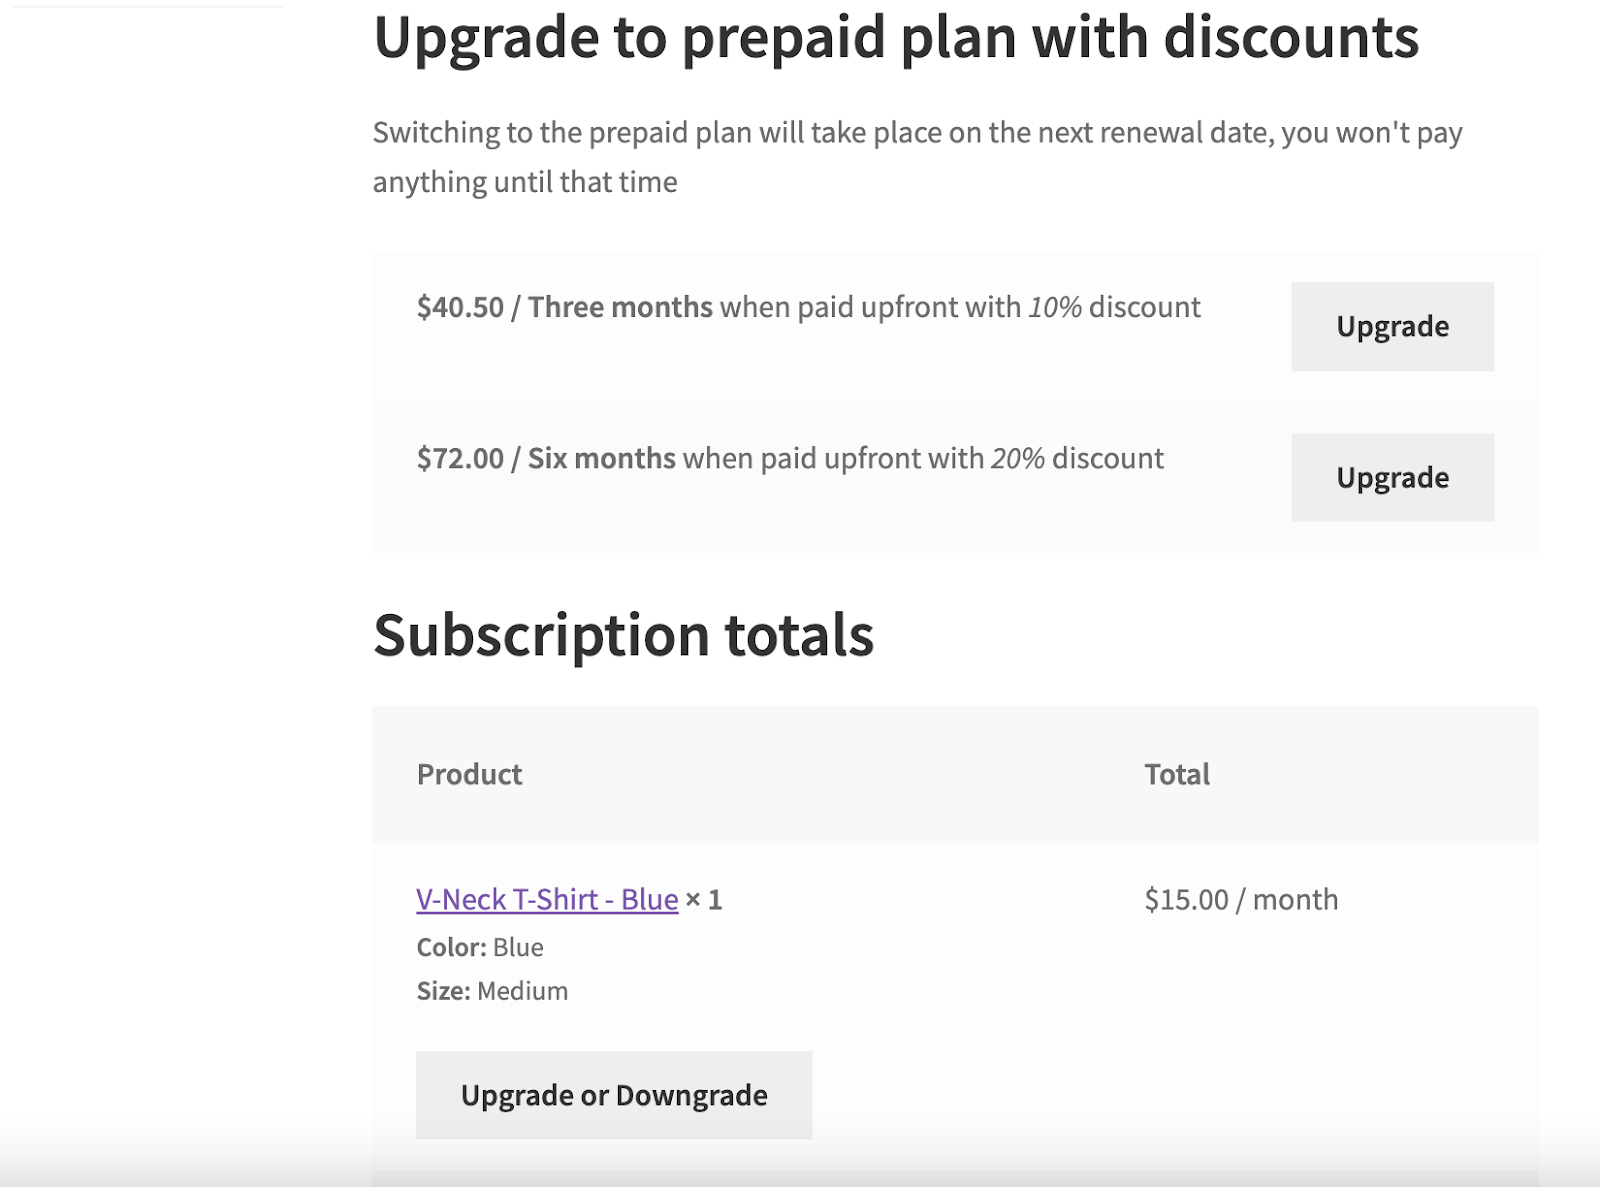
Customers can only switch between prepaid plans assigned to the current variant they signed up. So, for example, if you have a subscription to the “Red” option, which doesn’t have any prepaid plans:
You won’t be able to switch to prepaid plans assigned to the “Blue” variant:

To make that switching happen, user need to upgrade\downgrade to subscription variant that has prepaid options:
When they have assigned variation with prepaid options, they can upgrade to prepaid plans:
Adding a prepaid plan to the subscription through the wp-admin panel
↑ Nach obenReminder: prepaid plans made by Prepaid for WooCommerce Subscriptions are not separate products, variations, or product types. Prepaid plans are the same products as regular subscriptions that simply modify the subscription schedule and cost. For that reason, you cannot add\edit prepaid plans in the subscription as you do for other products in this area:
In case you want to add or remove prepaid plans to current user subscription we have added an option to switch between regular and prepaid subscriptions for admin user.
For example, if you have added three prepaid options to your subscription:

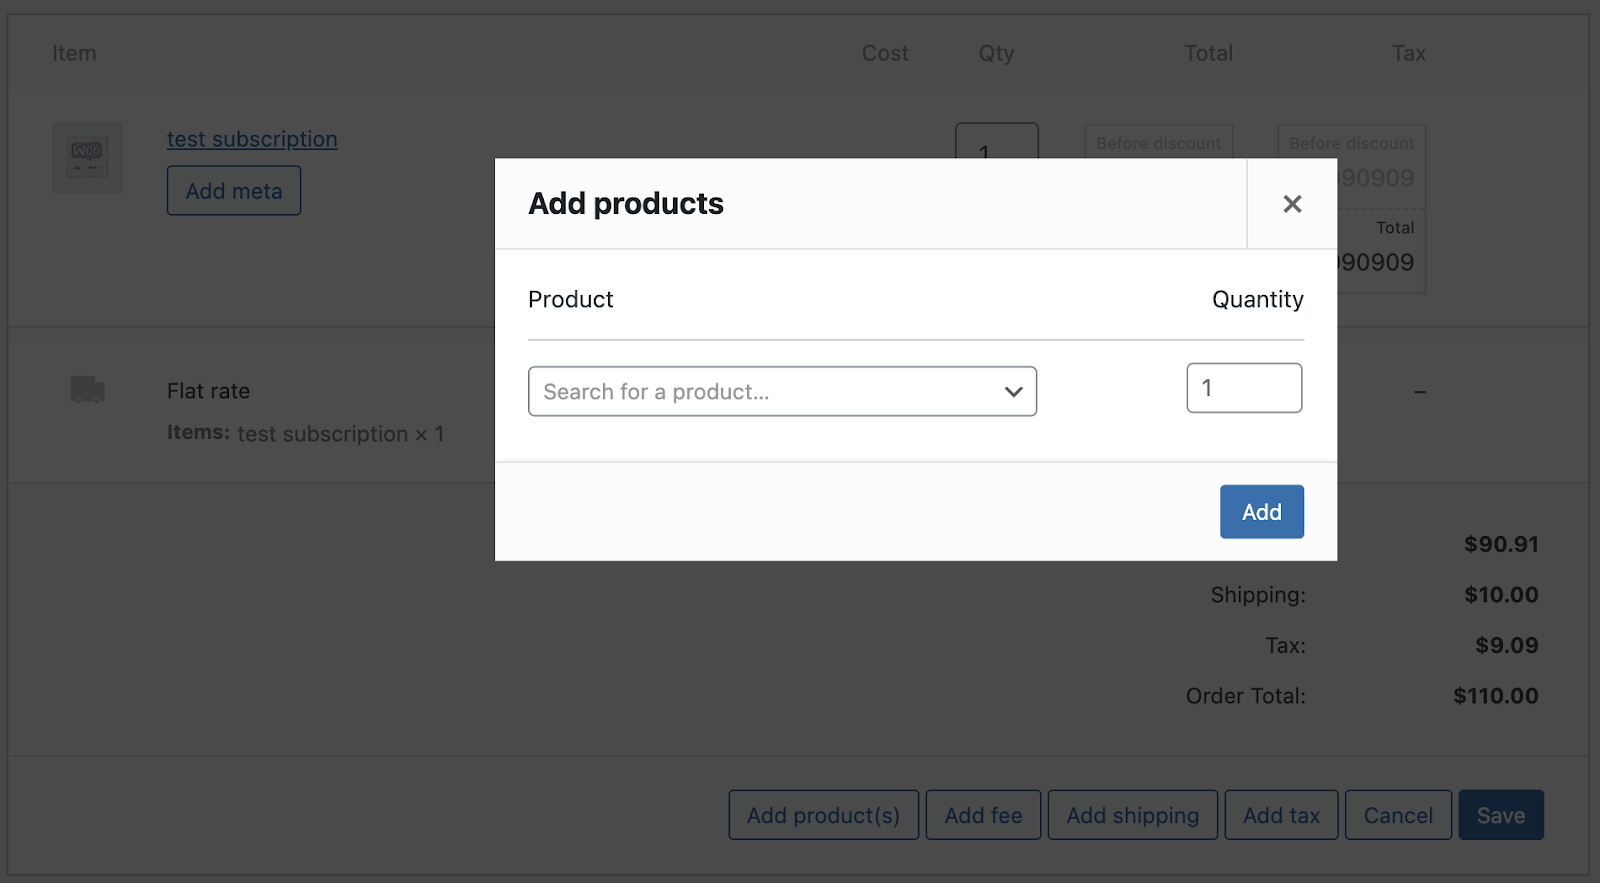
And need to add this to current customer subscription or create new subscription from scratch, you go to WooCommerce > Subscriptions > Add Subscription (or choose the current one). Then choose Add Items and select subscription product with prepaid plans:

When you assigned a subscription to the customer and clicked on the “Update” button, then go to the Subscription actions box to create parental order:

After you create parental order (which will come with the regular subscription cost) you can then switch to any prepaid plan available for that product:
Note that you cannot assign a prepaid plan right away, you need to trigger “Create pending parent order” with regular subscription cost and only then switch to prepaid plans.
Version 3.0 update:
↑ Nach oben3rd version of Prepaid for WooCommerce subscription includes 3 new vital features:
- Add to cart link
- Canceling subscription warning
- Variable subscription products support
Add-to-cart link
↑ Nach obenWe added the direct link to purchase prepaid plans for those cases when you need to offer a subscription not from the product page, but from the pricing table or any other place outside of the product page.
If you have a pricing table offering different subscription lengths and buttons to purchase plans just like on the following example:

To let customers purchase subscriptions directly by clicking on Add to cart button, you can use add-to-cart links created for each prepaid plan. Add-to-cart link appears in prepaid plan section right after you set plan and update product, you can find it here:

You simply need to copy the URL and then assign it to the button (or any other place) where you need to offer prepaid plan purchase.
Canceling subscription
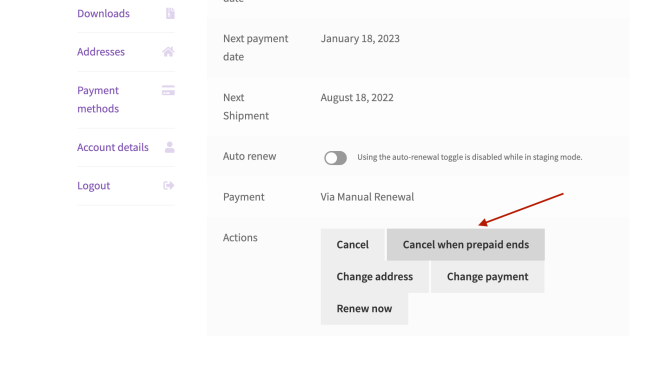
↑ Nach obenWhen your customer wants to cancel a prepaid subscription they can do it the same as for a regular subscription. In that case, no more renewals would take place. They should have canceling option because there are a lot of cases when they may want to cancel even if they have prepaid pieces left. E.g. Prepaid for Woo Subscriptions offers 3 different types of payment for delivery and if you choose the default one, subscribers will be charged for each delivery, then canceling makes sense.
Also, they can choose to cancel the prepaid subscription only when next renewal comes and receive all prepaid pieces of the subscription that had left.
So there are two scenarios for canceling a prepaid subscription:
- Regular cancel subscription button on user account – cancels prepaid subscription right away, no matter how many prepaid pieces have left. Starting from that point, users stop receiving renewal orders.
- Cancel prepaid button – subscription won’t be canceled right off the bat but will wait till all prepaid pieces are delivered and cancel after the last free renewal comes.
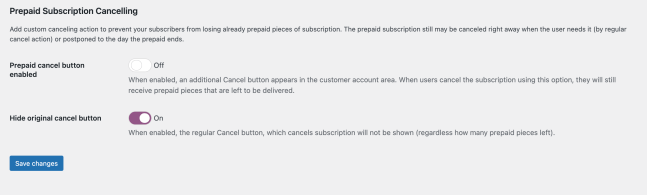
On the plugin setting page, you can find the section called ‘Prepaid Subscription Cancelling’, from where you can control how the canceling of prepaid subscriptions will be.
Note that those settings won’t affect regular subscriptions, only purchased prepaid plans.
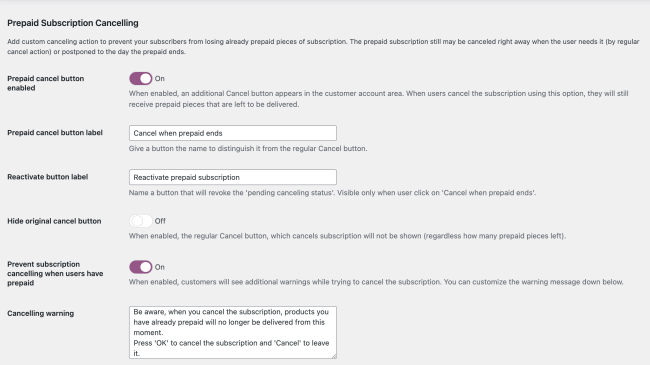
Prepaid cancel button enabled – when turned on, customers will see the ‘cancel prepaid button’, and when clicked, the prepaid subscription will be designated to end when the last prepaid piece is delivered.
Prepaid cancel button label – Rename cancel prepaid butto to whatever you want to be shown on user account.
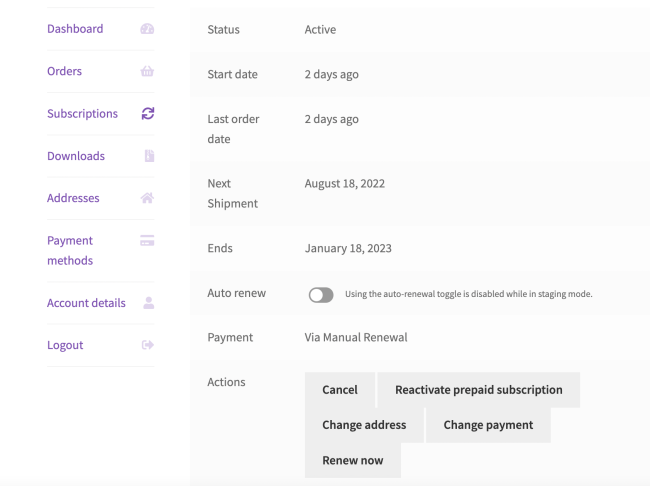
Reactivate button label – when the user chooses to cancel prepaid, they will have an option to reverse the decision and reactivate the prepaid. In case of reactivation, the prepaid will be renewed as usual. You can rename the button to whatever fits you best.
If the prepaid plan comes with the trial period – the prepaid cancel button will appear only when the trial ends and the initial payment proceeds.
Hide original cancel button – you can choose to hide or show the default canceling button that will cancel the prepaid subscription right away, as usual.
Prevent subscription cancelling when users have prepaid – when regular cancel is shown, you can add your custom notice that will be shown when the user tries to withdraw. You can point out that this will revoke all future renewals and offer to try ‘cancel when prepaid ends’ button.
But when they cancel the subscription, no more pieces will be delivered, including those which have been prepaid.
That’s why we designed an additional feature to help you prevent canceling of ongoing subscription. In the general plugin settings you can enable an option called Prevent subscription canceling and write custom warning text:

And now, when subscriber tries to cancel their subscription, they will find an additional popup, explaining the consequences of canceling and asking to confirm their choice.

We trigger default browser notifications and place your custom text into Notification.body.
So there’s no way to change warning pop-up styling using your theme/plugin files.
You can also go for the following setup:
In this case, both ‘regular cancel subscription’ and ‘cancel when prepaid ends’ will be disabled and your subscribers won’t have an option to cancel their subscription at all.
Variable subscription products support
↑ Nach obenYet you could create prepaid plans only for simple subscription products, starting from the 3rd version you can create prepaid plans for variable products as well.
There are two options to assign prepaid plans to subscription variation:
Create prepaid plans for each product variation

You have the same properties to fullfil as for simple subscription prepaid plans:
Prepaid for – the amount of subscription sequence you want to offer on the prepaid matter. For example, if you run monthly subscription, you can offer prepaid for 12 pieces and that would mean prepaid for one year with monthly delivery. Basically, number of pieces is equal to number of orders received in one subscription.
Pricing type – there’re two types: flat and percentage. A flat price means you can enter any price for the subscription period. Percentage means that the plugin will calculate the regular price of such subscription length (сonsidering price of simple subscription) and apply the chosen discount to that price.
Prepaid price – the cost for the whole prepaid period (12 months in our example). The plugin will automatically calculate any discount; it determines the regular price for that amount of subscription pieces and compares it to the price you entered.
Prepaid sale price – you can also accept the sale price to offer some time limited\unlimited discounts.
Plan name – give the title to this subscription type to explain what people are paying for. Later you can use this variable to build explanatory pricing strings for product and cart/checkout pages.
Discount (%) – when you pick up a percentage discount in the pricing type field, you should specify what discount to apply to the regular subscription price of that length. For instance, if a monthly subscription costs $50, the price for 12 pieces would be $50*12 = 600, and with 10% off, it would be $540.
Default option – you can choose any prepaid plan to be used as the default option. When you don’t use it – a regular subscription will be defined as default. Default means this option will be pre-selected on the product page.
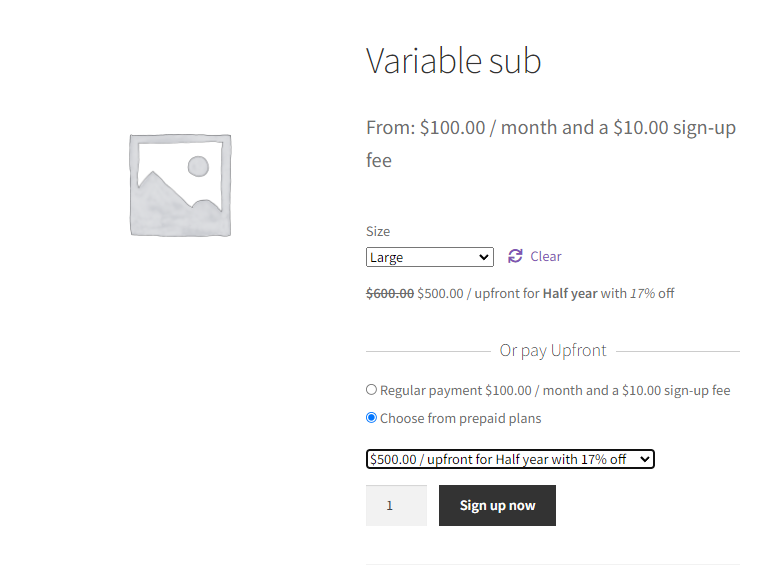
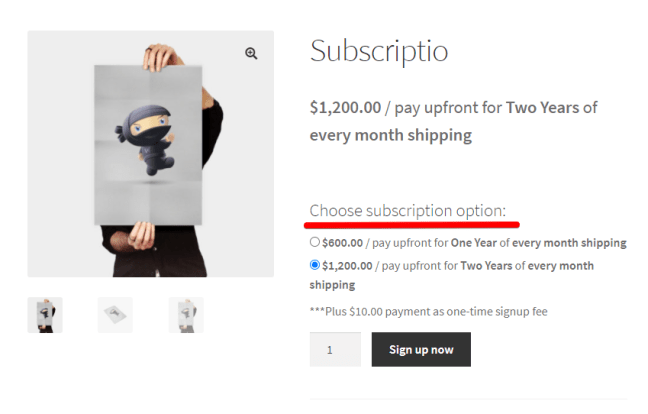
The variable subscription product page will look like this if you use Layout #1:

Or with an additional dropdown list if you use Layout #2:
It’s not necessary to assign prepaid plans for each of the variations, you can use it only for those variations you want to.
Create general prepaid plans for all product variation
In case you have the same pricing for all subscription variations and want to have the same prepaid plans for each product, you can create general prepaid plans. To do so, go to the variable product page and find the Prepaid options tab in the Product data infobox.

Note, that if you already have independent prepaid plans set on variation level, the general plan won’t apply for those variations. But if you set independent prepaid plans for one variation only and left all other variations empty – the general plan will apply to those “empty” prepaid variations.
How to add a prepaid plan for a subscription product
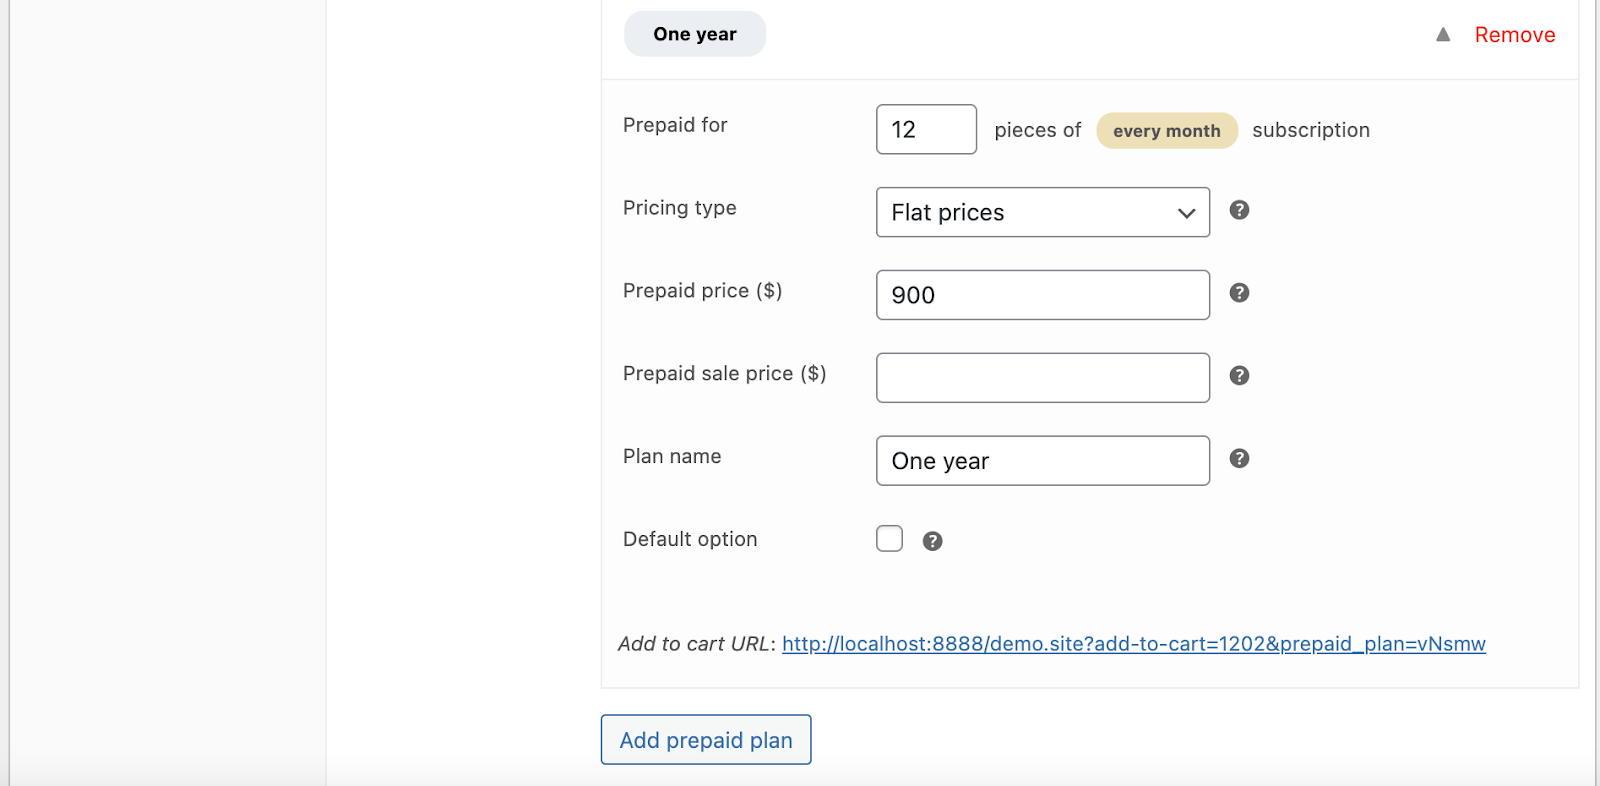
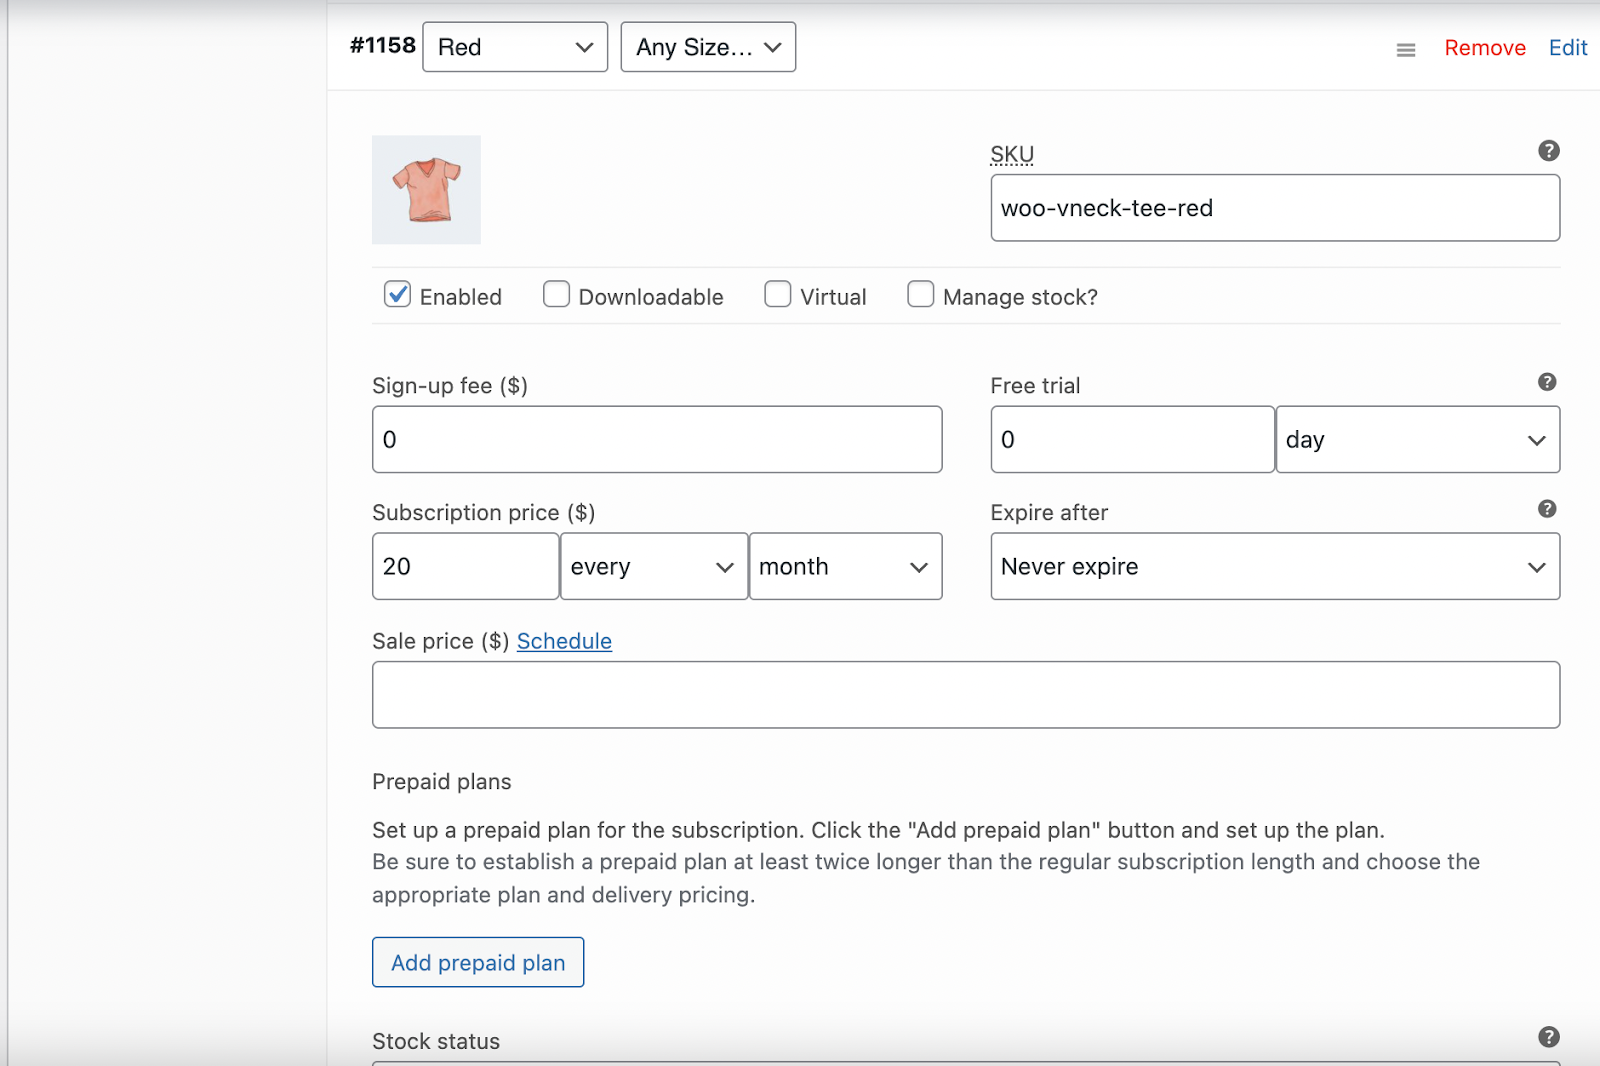
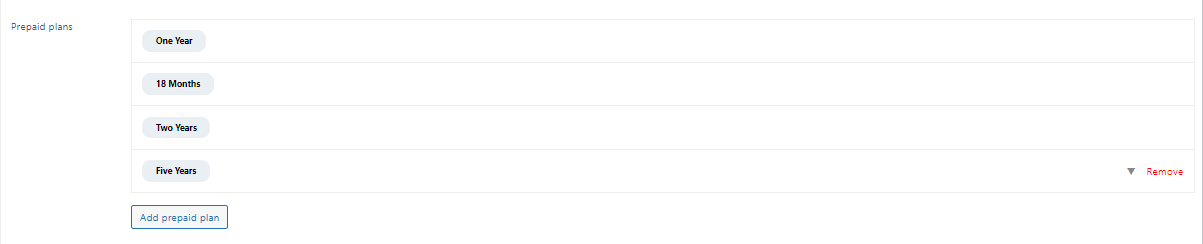
↑ Nach obenAfter plugin activation, go to any subscription product page, and under the General tab, you’ll find a new button to add prepaid plans (as displayed below) :
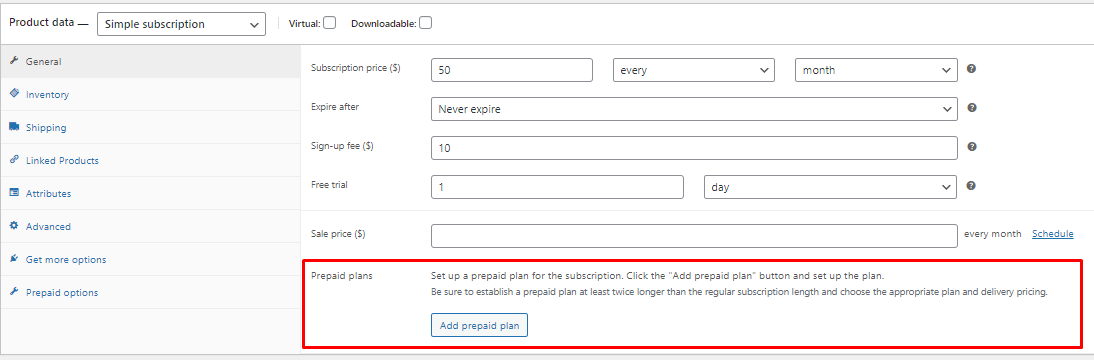
Click on Add prepaid plan button to expand the prepaid section and add a prepaid plan for this particular subscription.
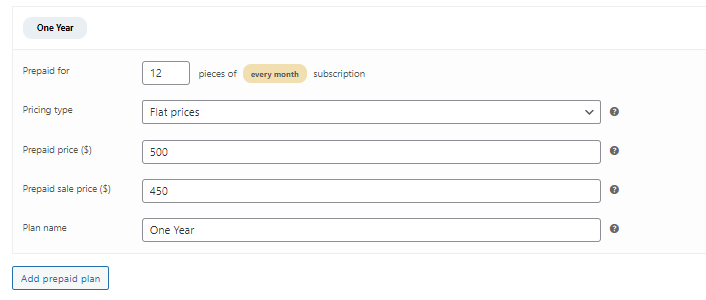
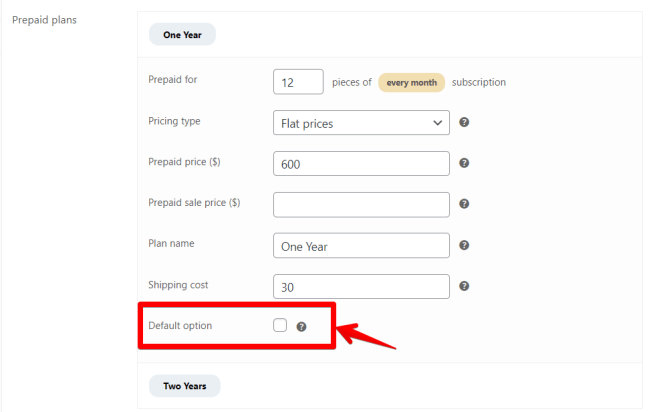
Here the following fields can be set for the prepaid plan:
Prepaid for – the amount of subscription pieces you want to offer for the prepaid plan For example, for a monthly subscription, you can offer a prepaid plan for 12 pieces for one year with monthly delivery. Number of pieces is equal to number of orders received in one subscription.
Pricing type – two types are offered: flat prices and percentage discount. A flat price allows you to enter any price for the subscription period. Percentage discount calculates the regular price of the subscription length (based on the price of the simple subscription) and applies the chosen discount to that price.
Prepaid price – if flat prices is selected in the pricing type field, you can specify the cost for the entire prepaid period (12 months in our example). The plugin will automatically calculate any discount; it determines the regular price for that amount of subscription pieces and compares it to the price you entered.
Prepaid sale price – if flat prices is selected in the pricing type field, you can also set a sale price to offer limited\unlimited discounts on the prepaid plan.
Plan name – give the title to this subscription type to explain what people are paying for. Later you can use this variable to build explanatory pricing strings for product and cart/checkout pages.

Discount (%) – if percentage discount is selected in the pricing type field, you can specify the discount to apply to the regular subscription price of that length. For instance, if a monthly subscription costs $50, the price for 12 pieces would be $50*12 = 600, and with 10% off, it would be $540.
Default option – choose what plan will be preselected on the frontend (product page and catalog). In case you don’t pick up default and a regular subscription is available – this will be the default one. When you use Disallow regular subscription option and regular subscription isn’t available – the first prepaid plan will be preselected as default.
You can create as many plans as you wish for each of your subscription products. Later, you can easily edit or remove plans. Please note that by removing the prepaid plan, it will no longer be available for purchase. However, for customers who have already registered and prepaid their subscriptions, they will still receive their products.
Note, each of fulfilled orders counts as one piece of subscription delivered (including the initial order). Then, in case you sell 12 orders of subscription, the distributtion will be following: 1 initial order + 11 free orders ($0.00 cost of product in those renewal orders) and 13th order will cost the same as initial order (and then 11 more free), and so on. Therefore, if you don’t want to count the initial order as one period of subscription (eg, if your subscription period is set to start from another date), then concider adding one more piece into the prepaid subscription setup (like 13 pieces instead of 12 pieces for the annual subscription).
Create orders on a different schedule to the billing period
↑ Nach obenThere’re two methods available to you for offering prepaid plans:
- Offer prepaid options in addition to regular subscriptions. E.g., pay for one or two years and get a monthly delivery or pay every month as usual.
- Offer ONLY prepaid options and ship on a different schedule. E.g., pay upfront for three or six months and get weekly shipping without the option to pay every week.
In case you want to offer delivery on a particular schedule different from the billing cycle – you should use the second method.
You can also offer both ways to purchase prepaid options because this is configurable at the product level. So some products may be with additional prepaid options, some can be ONLY prepaid available.
To set up different shipping schedules to billing cycle, go to the product page and set up prepaid plans the way it’s described above.
Then go to the Prepaid Options tab and enable the option named Disallow regular subscription:
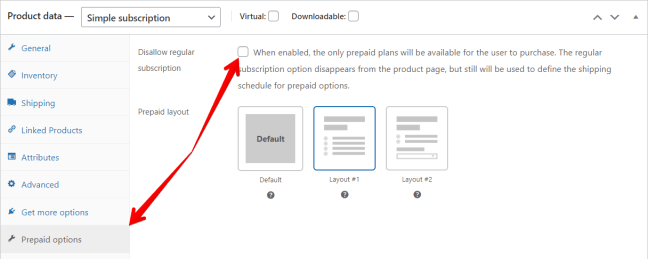
After that, you can see that the default subscription option doesn’t appear on the frontend anymore.
But still, when you use Disallow regular subscription, orders (and deliveries) will renew on a regular schedule which is indicated in the subscription:

And don’t forget to select what prepaid plan will be the default one to be preselected on the product page and catalog.
Layouts and frontend customization
Once you have created prepaid plans for each desired subscription product, you can let your users know about the benefits of prepaid options.
By navigating to WooCommerce > Settings > Prepaid Subscriptions, you can choose a suitable design for the product page and configure information strings templates.
Default layout – you have two designs to choose from; this will be used as the default template for every newly created subscription product page with prepaid plans. This will not impact regular subscription pages without prepaid options.
Layout #1 – uses radio boxes to display regular and prepaid plans.

Layout #2 – this template displays two options to customers – regular subscription or prepaid. If ‘Prepaid plans’ is selected, a dropdown list appears where they can select one of the prepaid plans.
Layout #2 offers an additional field – Prepaid option name.

Here you can enter a custom title for all prepaid plans which will be displayed as the second option in the dropdown list.
You can also change the layout for each subscription product separately by going to the Prepaid options tab in the Product data area on the Edit product page:

Next, choose from one of the options: Default (as selected in general settings), Layout #1, Layout #2.
Title for additional prepaid options – is an additional field under WooCommerce > Settings > Prepaid Subscriptions that displays on the product page to separate regular subscription information from prepaid plans. It is used in both layouts but only for subscription products with additional prepaid plans (where regular subscription available as well).

Title for prepaid options only – this text template is used for products where Disallow regular subscription is enabled. You can use it to explain prepaid plans terms or give tips on how to select the best plan.
Templates
Three templates help explain prepaid conditions to your users and guide them to their purchase.
You can use the following variables to make it more suitable for every prepaid plan:
{plan_price} – price settled in “prepaid price” or calculated price w/ discount (e.g. $100)
{plan_title} – the name of a prepaid plan specified in the “plan name” field on the product page
{plan_discount} – discount which is registered as the prepaid plan discount in the “discount (%)” field, or is calculated automatically from the difference between the regular price of subscription multiplied by the number of prepaid pieces and prepaid plan price
{trial_period} – trial period length (number + days/weeks/months) settled in subscription details (e.g. 7 days)
{signup_fee} – cost settled as a signup fee for a subscription (e.g. $10)
{subscription_period} – renewal period settled on subscription product level (e.g. year, month, week, day)
{subscription_length} – period settled in “expire after” field in the subscription product (e.g. 12 months)
We settled default templates for the Pricing string template and Pricing cart string template, but we left Plans description empty because additional subscription conditions (like signup fee or trial) may be blank.
Plans description – is the area provided where you can explain additional information regarding prepaid subscription conditions. You can also add information about signup fees, a trial period, or subscription length. This area is common to all prepaid plans assigned to one subscription product (that’s why you cannot use variables related to specific prepaid plans). This area may also be left blank.

Pricing string template – is displayed on the product page next to the radio box or in the plan dropdown. Let your customers see what they are paying for – prepaid length, cost, and discount. Default templates are provided however you can customize the pricing string according to your product’s needs. This is a common template in both layouts.
Note: markup used in this template is not supported in Layout #2.

Pricing cart string template – is displayed on the cart and checkout pages and shares subscription condition details in the cart. Default templates are provided however you can customize the pricing cart string template. Keep details short and concise.

Shipping
↑ Nach obenAfter configuring prepaid plans and templates for the frontend, the plugin provides you with three different options to apply for shipping:

Pay by default – when this option is chosen, customers pay the same shipping price as a regular subscription. So, whatever customers pay for a regular subscription, they would pay the same amount as usual and at the same term for a prepaid subscription.
For instance, if you have a regular subscription cost of $50/month with $10 cost for shipping, and customers buy a prepaid plan of $500/year, they would still pay $10 every month for shipment. The first payment would be $500+10 = $510, and for the next 11 months, they pay $0 for subscription and $10 for shipment.
Pay for each subscription piece upfront – works differently from the first option; your regular shipping cost (for a regular subscription) is multiplied by the number of subscription pieces in the prepaid plan and charges the customer once for the entire prepaid period at checkout.
Using the same example as above:
Regular subscription costs $50/month, and shipping costs $10 every time. The prepaid plan for the year costs $500/year and consists of 12 pieces of a regular subscription, plus $10 for every delivery. So, your customers will see $500/year for a subscription and $120/year ($10*12) for shipping on their checkout.
Pay custom price – this option allows you to specify the flat-rate cost for each prepaid plan separately charging the customer once they sign up. If this option is selected, an additional field, Shipping cost appears when adding prepaid plans:

Here you can specify the price for delivery that will be charged upfront for the whole subscription period.
To use this option, a Flat rate shipping method will need to be enabled in Shipping settings.

Please note: if a prepaid plan product with a custom shipping price is in the cart with any other product, this shipping price will override all other shipping options.
Email notifications
↑ Nach obenPrepaid for WooCommerce Subscription also enriches standard subscription emails (for both admins and customers) with prepaid subscription information if you have this option enabled:

Emails contain information about customers’ subscriptions, number of prepaid pieces and the next renewal:

We also include an additional notice at the end of the subscription term informing the customer their subscription will be auto-renewed unless they cancel:

Subscription management
Prepaid for WooCommerce Subscription also inserts additional columns extending the subscription\orders pages.
Extended Subscription page (table):

Prepaid sequence displays how many prepaid pieces are left and how many have been delivered. Other relevant information about prepaid plans is provided with extended Item, extended Total and Next Payment columns.
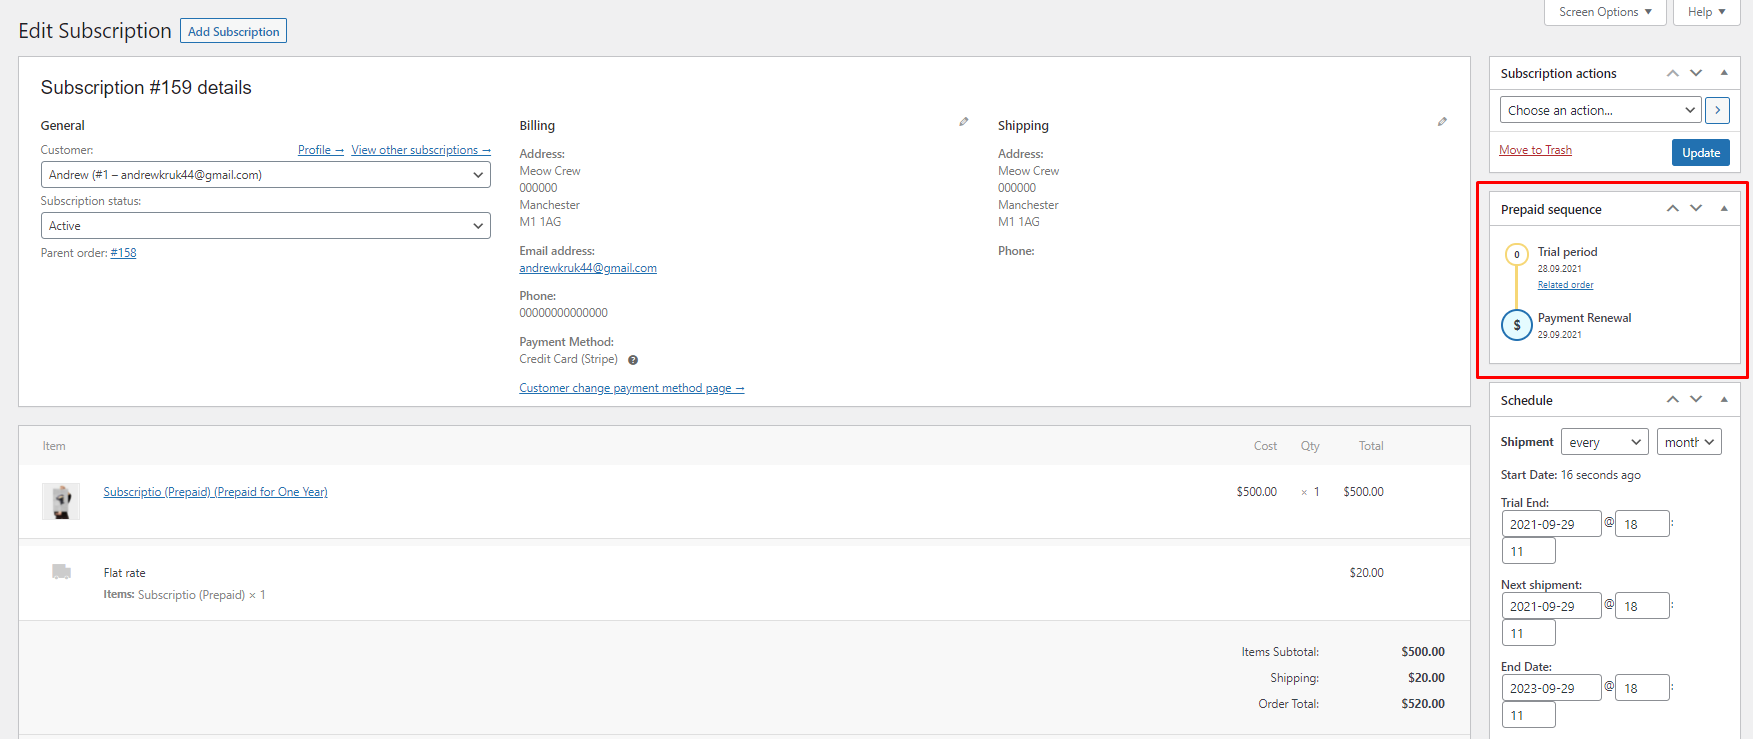
On the Subscription page, you can also find the new Prepaid sequence info box (as displayed below):
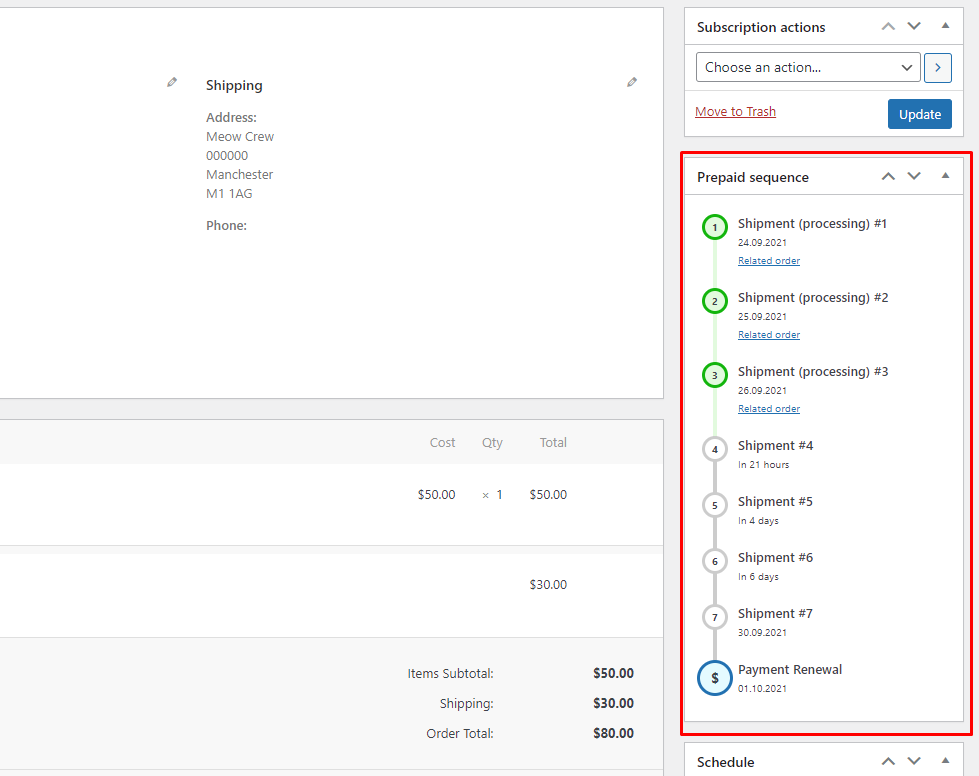
Here, you can visually see prepaid subscription status, which pieces have been delivered, when the trial ends, when the next shipment is, and the payment renewal date.
My account (for customers)
Your clients will find adjustments to the subscription page in their accounts as well. They can see the next shipment and next payment date (which will be different in most cases):


And correct subscription totals with all needed information on future payments:

Use Cases
↑ Nach obenHere are some use cases of how you can use (and how it works) prepaid subscriptions to solve your problems.
Selling prepaid plan for a regular subscription.
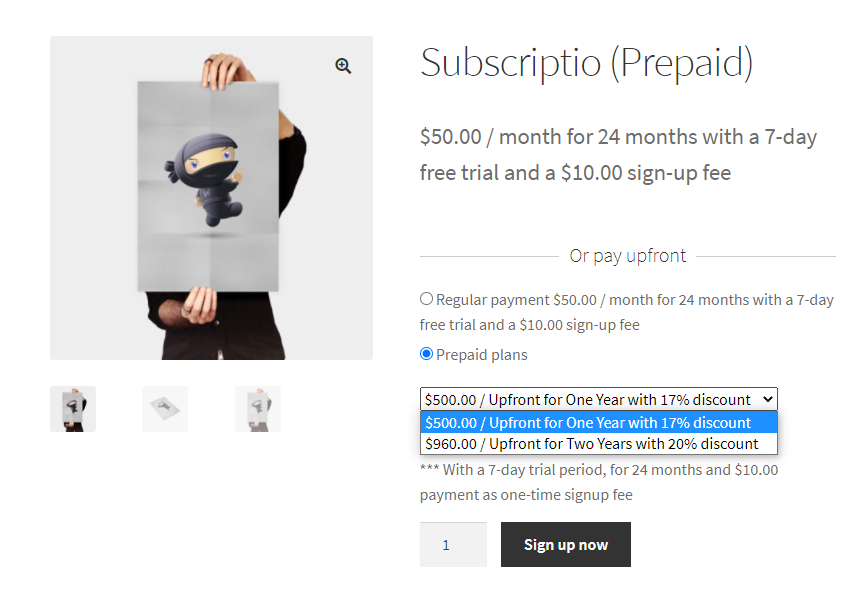
In the following example, you can see the most commonly used setup: regular monthly subscription and two prepaid plans for monthly delivery for one and two years:

The setup would look like this on the frontend:

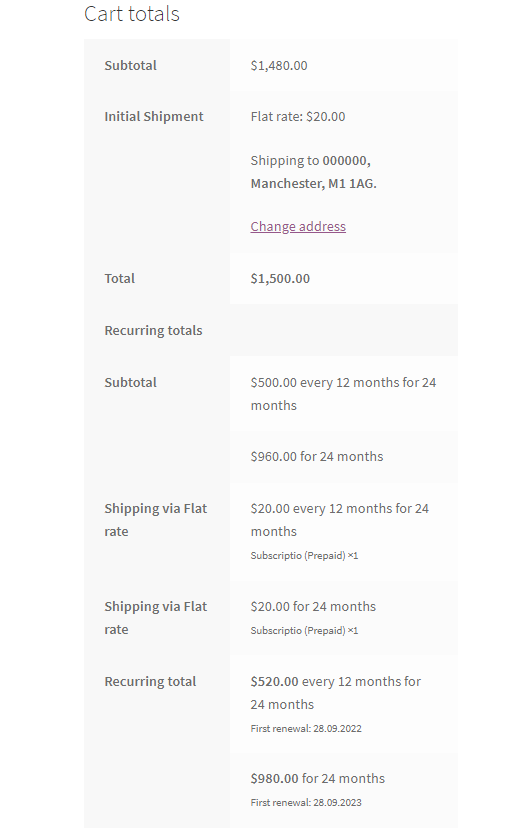
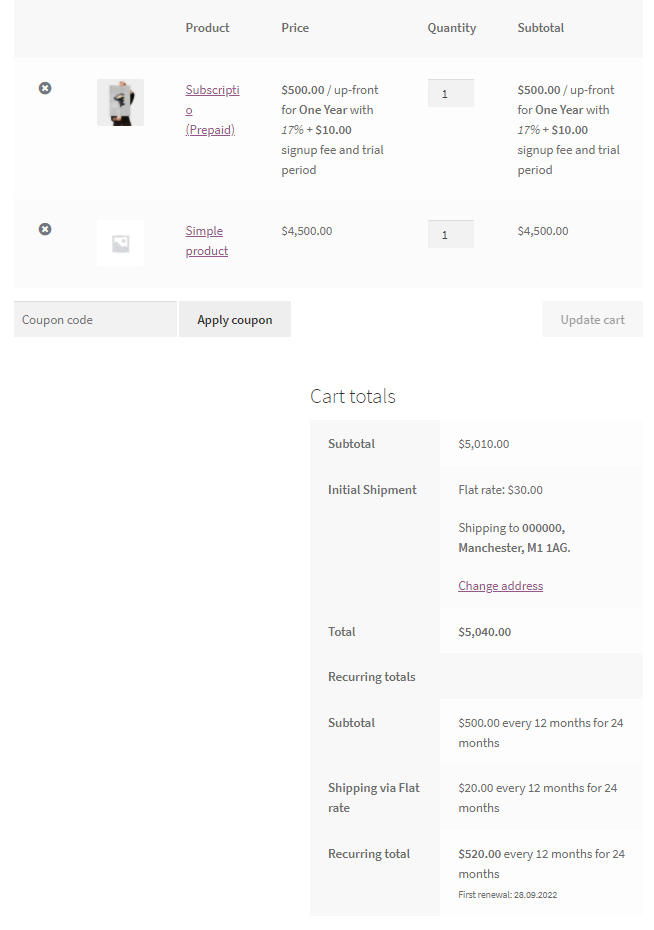
When customers choose to sign up for the prepaid option for one year, they’ll find the following in their cart:

It is important to customize the Pricing cart string template so your clients have a clear understanding of what they’re paying for.
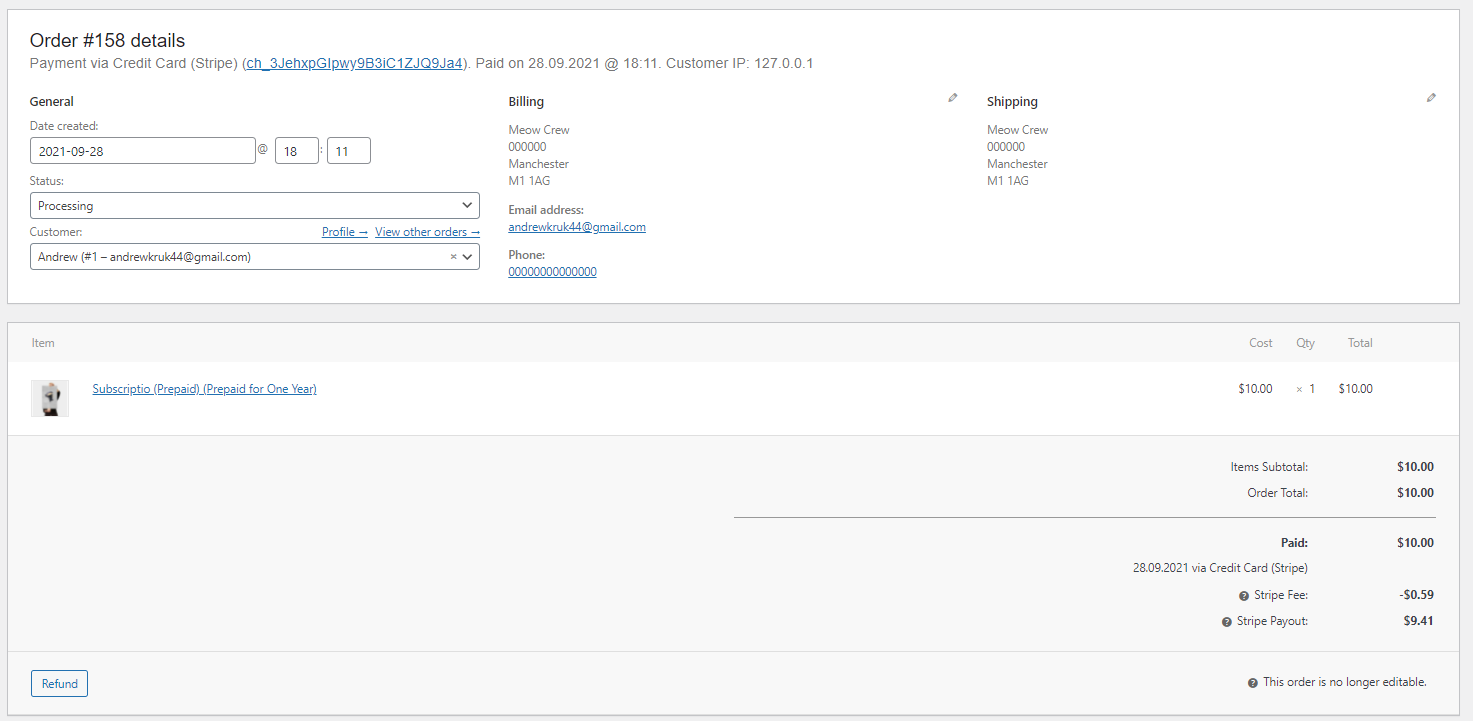
In the following example, you can see that the customer pays only $10 now (signup fee) and has 1 day of a free trial. After the trial, the customer will be charged $500 for a one year subscription and receive delivery each of those 12 months, plus pay $20 for shipping during the renewal process.
The checkout page is not much different from the cart:

At the same time, the store owner will find this subscription with additional information on prepaid conditions in the WooCommerce > Subscriptions section:
Along with the related order with $10 payment as the signup fee:
After the trial ends, the Prepaid Sequence section will display as below:
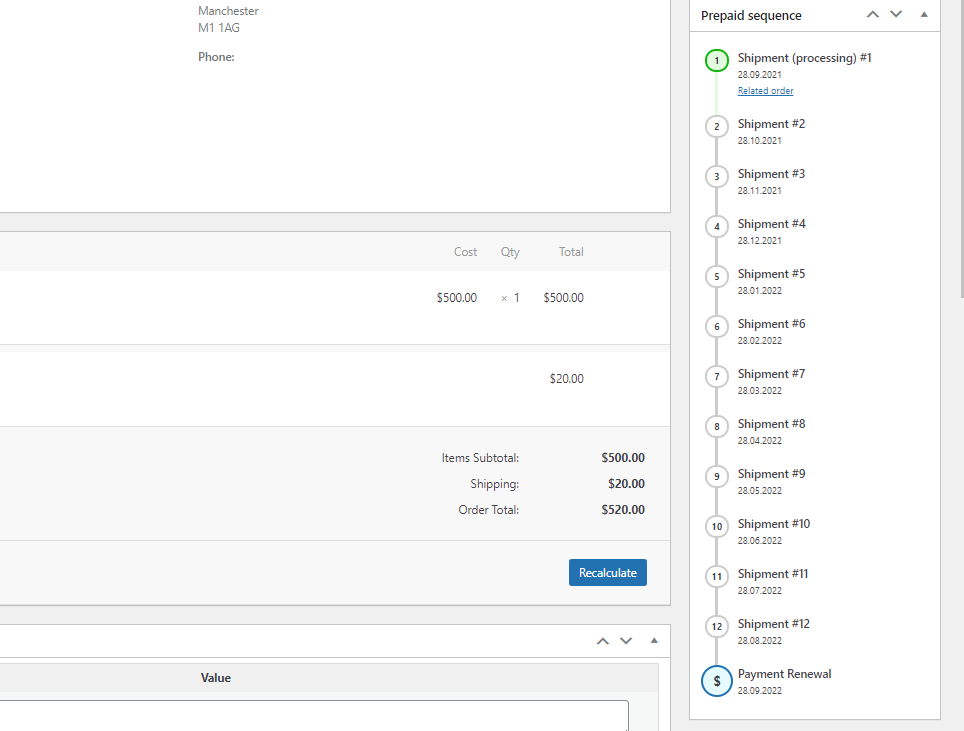
Plus, a new order will be fulfilled, where prepaid plan price and shipping cost will be taken into account:

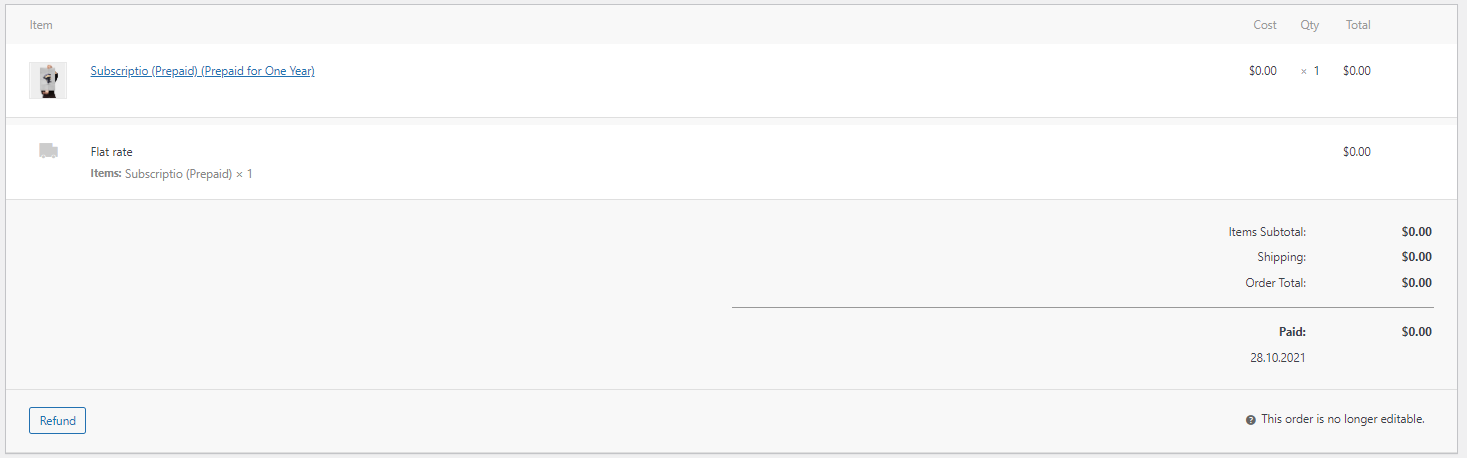
When the time comes (in a month in our example), the next subscription piece will proceed:

And you will find the next order with $0 payment (because they paid upfront for subscription and shipping):
Selling few prepaid subscriptions in one order:
If the subscriptions have the same renewal or shipping frequency, it’s not much different from selling solo subscriptions. The only difference will be in the cart total:
There would be two separate recurring totals (if they are for different lengths), but only one charge for shipping because they have the same delivery frequency and could be delivered in one piece.
Selling prepaid subscriptions together with the regular product:
If you have the Mixed Checkout option enabled (in WooCommerce > Settings> Subscriptions settings), then your customers will be able to buy different types of products in one cart:
They will pay the price for regular products + instant payments for a subscription (prepaid plan cost + signup fee) + shipping cost.
Selling prepaid subscription together with the regular subscription:
The only difference here may be based on shipping cost. If the prepaid plan being purchased has the custom price shipping option applied, the shipping cost for a regular subscription (controlled by shipping method) would be applied as well. The customer will see the following:

You can see that the client will be charged twice for shipping. If you plan to sell mixed products and want to avoid this, do not use the custom price shipping option on the prepaid subscription plan.
You can also choose to rely on default rules set by the WooCommerce Subscriptions plugin when selling mixed products in one cart. The Prepaid for WooCommerce Subscriptions plugin doesn’t change how the WooCommerce Subscriptions plugin operates if you have the Mixed Checkout option enabled.
Testing
Before installing Prepaid for WooCommerce Subscriptions on the production site, we strongly recommend you test it on the dev/staging environment.
You will need to ‘Enable Test Mode’ within the payment gateway you use. Stripe, for example:
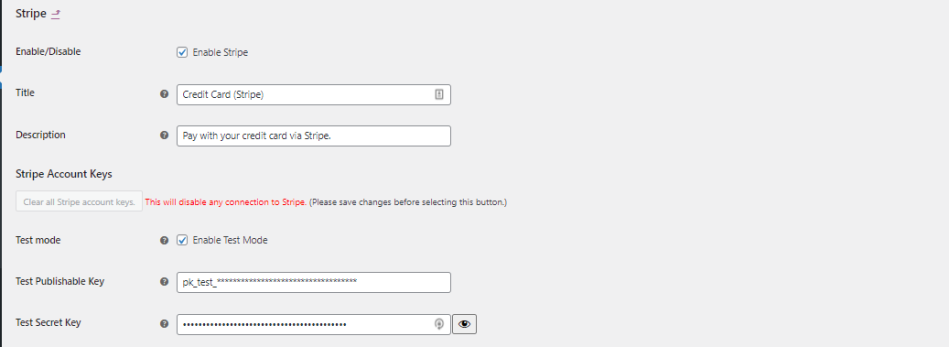
Next, go to your payment gateway documentation/your account on their website to find test keys and test cards. If you use Stripe, you can take a look here – https://stripe.com/docs/testing#charges-api.
Then you’re free to go and create prepaid plans for your regular subscriptions as described above. Be sure to test at least one case for different subscription setups (with or without trial, signup fee, expire after, different lengths, and so on).
To avoid waiting for subscriptions that proceed for a long time, you can use the Schedule tool (you can find it on each subscription page):

To test if the trial ends well and your clients will be appropriately charged, you can reschedule the trial to end in the present time and then reschedule “next shipment” to one hour after the trial ends (this can be set under WooCommerce > Subscriptions). After an hour, you can check if everything went smoothly, if orders have been created, and the test card has been charged.
If you don’t want to wait for processing of the next shipment, you can check for all actions which should take place in the future and listed in the Scheduled Actions tool (Tools > Scheduled Actions > Pending):
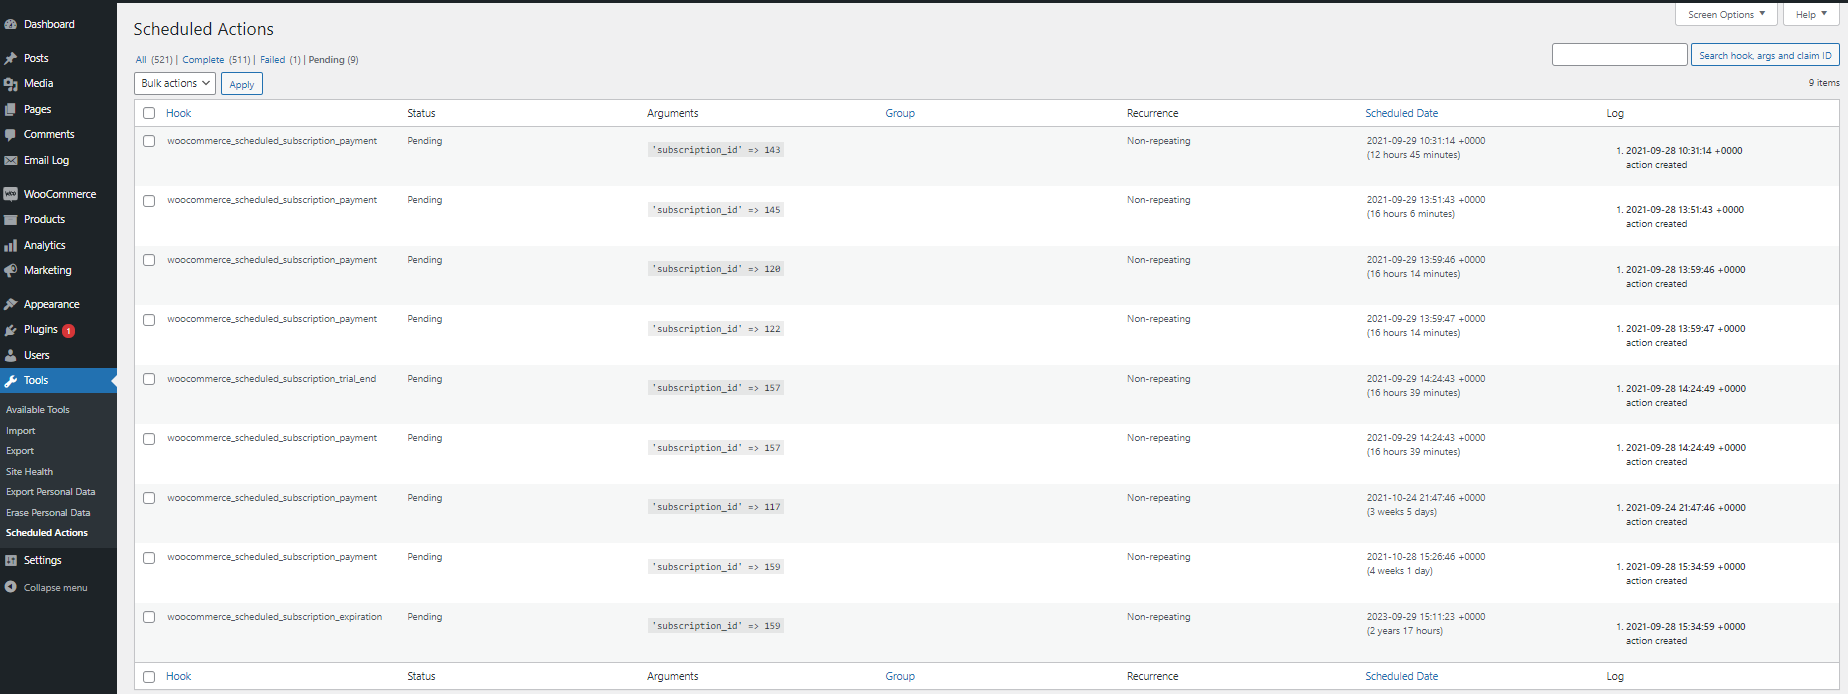
Then, to test the subscription id hook, (it should be named “woocommerce_scheduled_subscription_payment”) and click Run to take this action immediately:
After, you can go to the subscription and order pages to see if everything worked as expected.

Integrations
↑ Nach obenMetorik Integration
↑ Nach obenMetorik team designed integration with Prepaid plans, so the default subscription period that is used for MRR reports. E.g. if you have annual subscription that is set to be renewed monthly and you set 12 pieces of subscription for that prepaid plan, Metorik recognises such plan as annual subscription, not monthly.
Limitations
1. Prepaid for WooCommerce Subscriptions works with both Simple and Variable subscription products (but products should be subscription-based only).
2. There is no option to switch between regular and prepaid subscriptions level. You can cancel one subscription and pay for another subscription type.
3. Prepaid plans don’t work with the prorated payments option. You still can use synchronizing renewals, but only when prorated first renewal is set to never, and the full amount is charged upfront. That means no grace period or any other type of delayed payments are available.
4. If you use custom pricing for shipping and clients buy two subscription plans with different shipping costs, only the only charge for the first one will apply in the cart.