Overview of the plugin
↑ Back to topShowcase your products to shoppers on Google with Google Shopping Integration for WooCommerce. Drive maximum campaign performance and optimize ad spending by seamlessly feeding rich product data to Google Merchant Center. Reduce the redundancy and track your ads performance with a full-automation tool by CedCommerce.

Key highlights
↑ Back to top- Easy and full automation: The integration automates Google Ads campaigns for WooCommerce products, simplifying marketing with flexible email, GMC, and Google Ads ID options.
- Single-click account verification: Quickly verify your store with a single-click site claim. Gain complete control over attribute mapping and push product info to Google Shopping feed, reducing redundancy and targeting the right shoppers efficiently.
- Google Ads Campaign Automation: Effortlessly sync WooCommerce products with Google Listings & Ads, set a daily budget. Utilize Google’s real-time data to target the right audience by specifying ad timing and locations.
- Performance and conversion tracking: Gain audience insights through conversion creation and reporting. Track user actions like calls, purchases, app installations, and more.
Getting started with the plugin
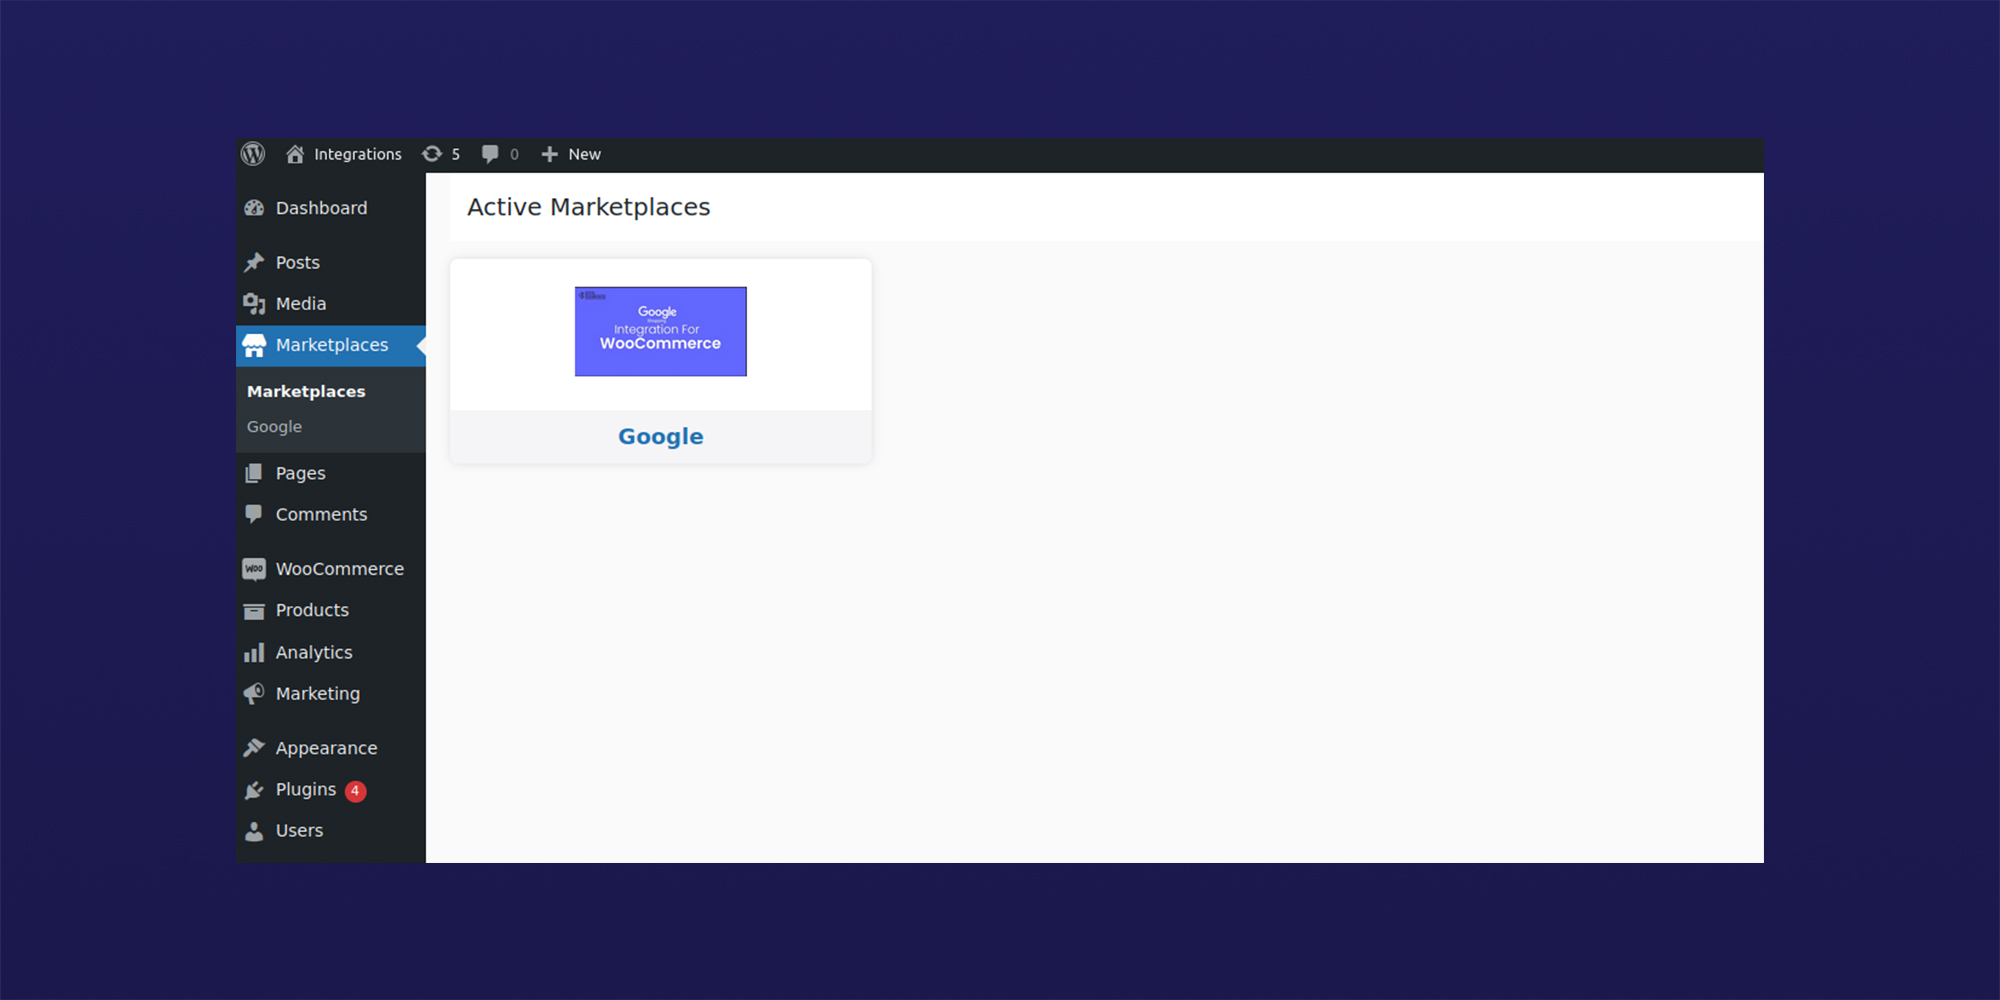
↑ Back to topInstall the plugin on your WordPress website, and you will have the Marketplace option on your dashboard. Click on the Marketplace option, and you will get the Google plugin, as shown in the image below.
Next, click on the Google Shopping integration for WooCommerce, and you will be directed to the onboarding process.
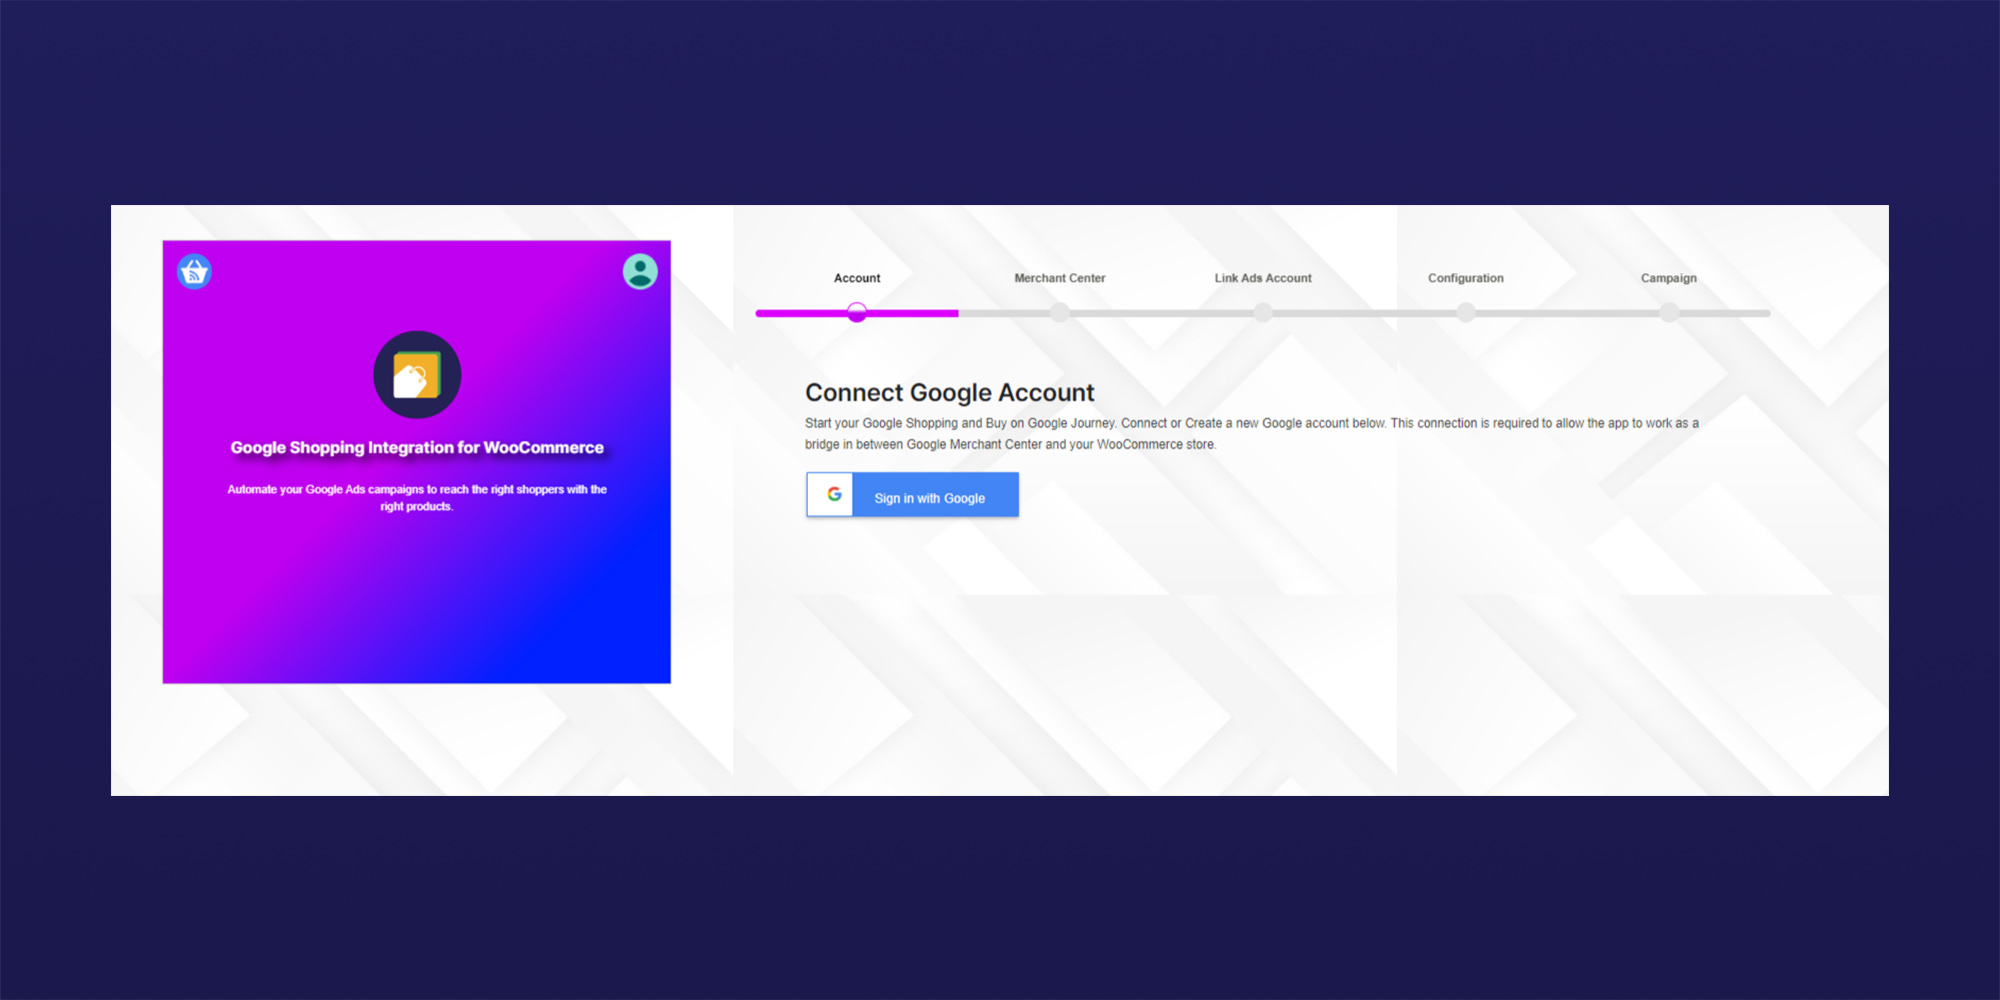
Connecting Google Account:
↑ Back to topThe onboarding process of the plugin is quite simple, with just 5 simple steps to follow –
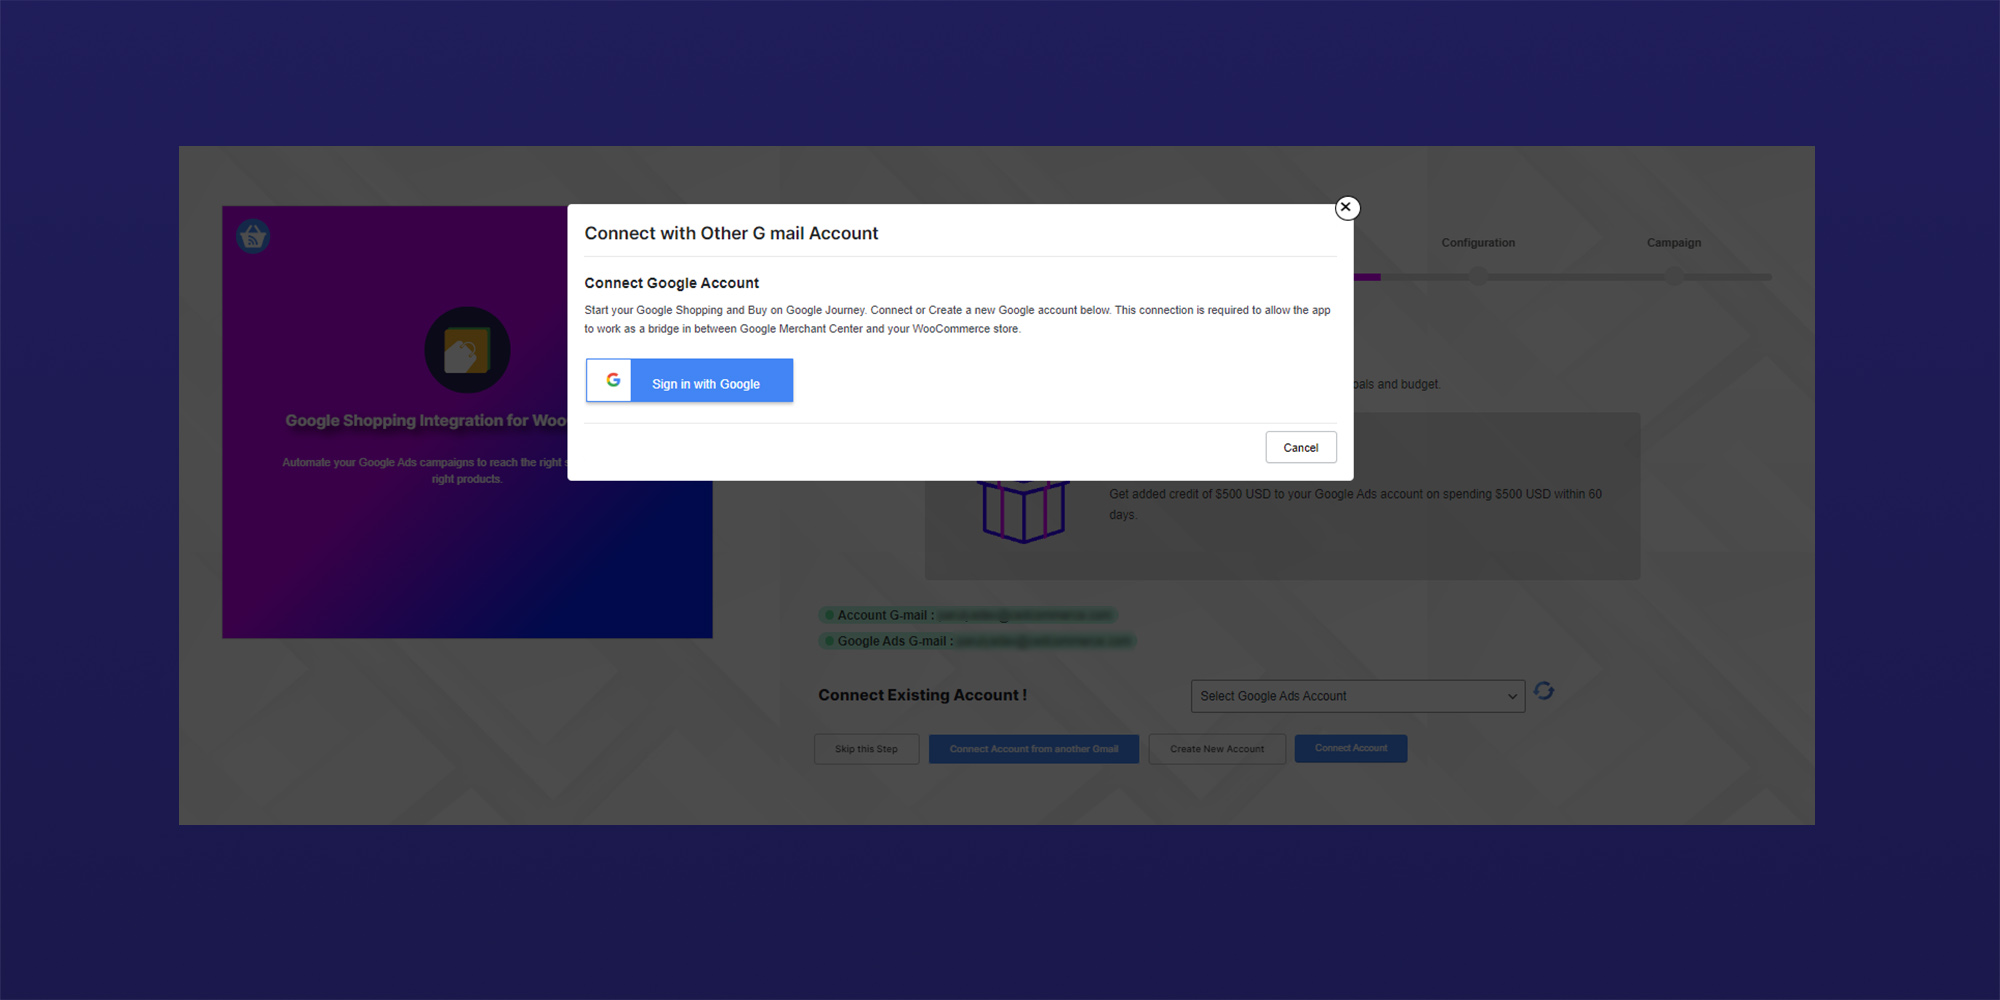
Once you install and add the integration to your WooCommerce store, you can simply use your Google account for the connection process.
Click on Sign in with Google and agree to the terms and conditions.
Note: Accepting these is a crucial step. This is required to allow the app to work as a bridge between Google Merchant Center and your WooCommerce store. You can also change or create a new account on the same window.
Connect Google Merchant Center:
To start your selling journey on Google Shopping, you will have to connect your Google Merchant Accounts with the integration.
Note: Google Merchant Center is a platform that allows businesses to upload and maintain product information, including pictures and pricing, to be displayed in relevant Google Shopping searches.
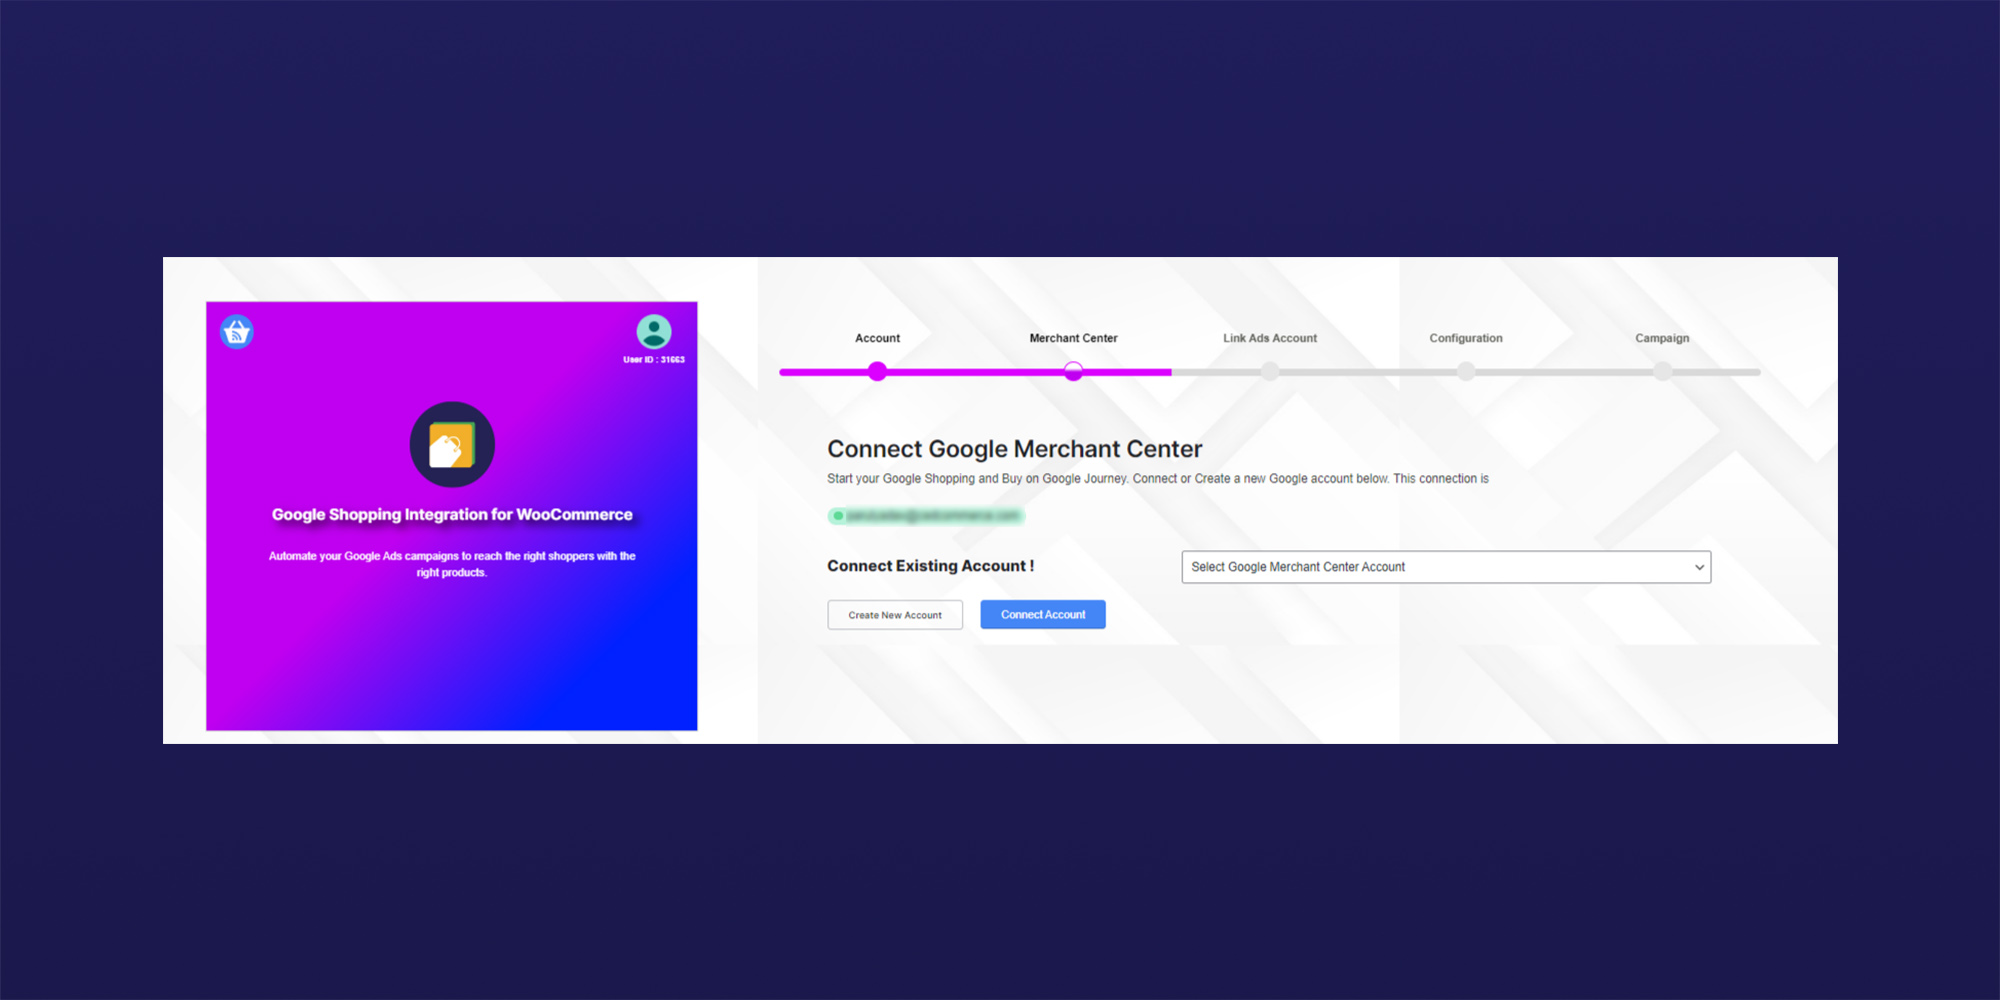
Here you can Create New Account or Connect an Existing Account.
To Create New Google Merchant Account:
– Enter a new account name for your account and click on Create Account. 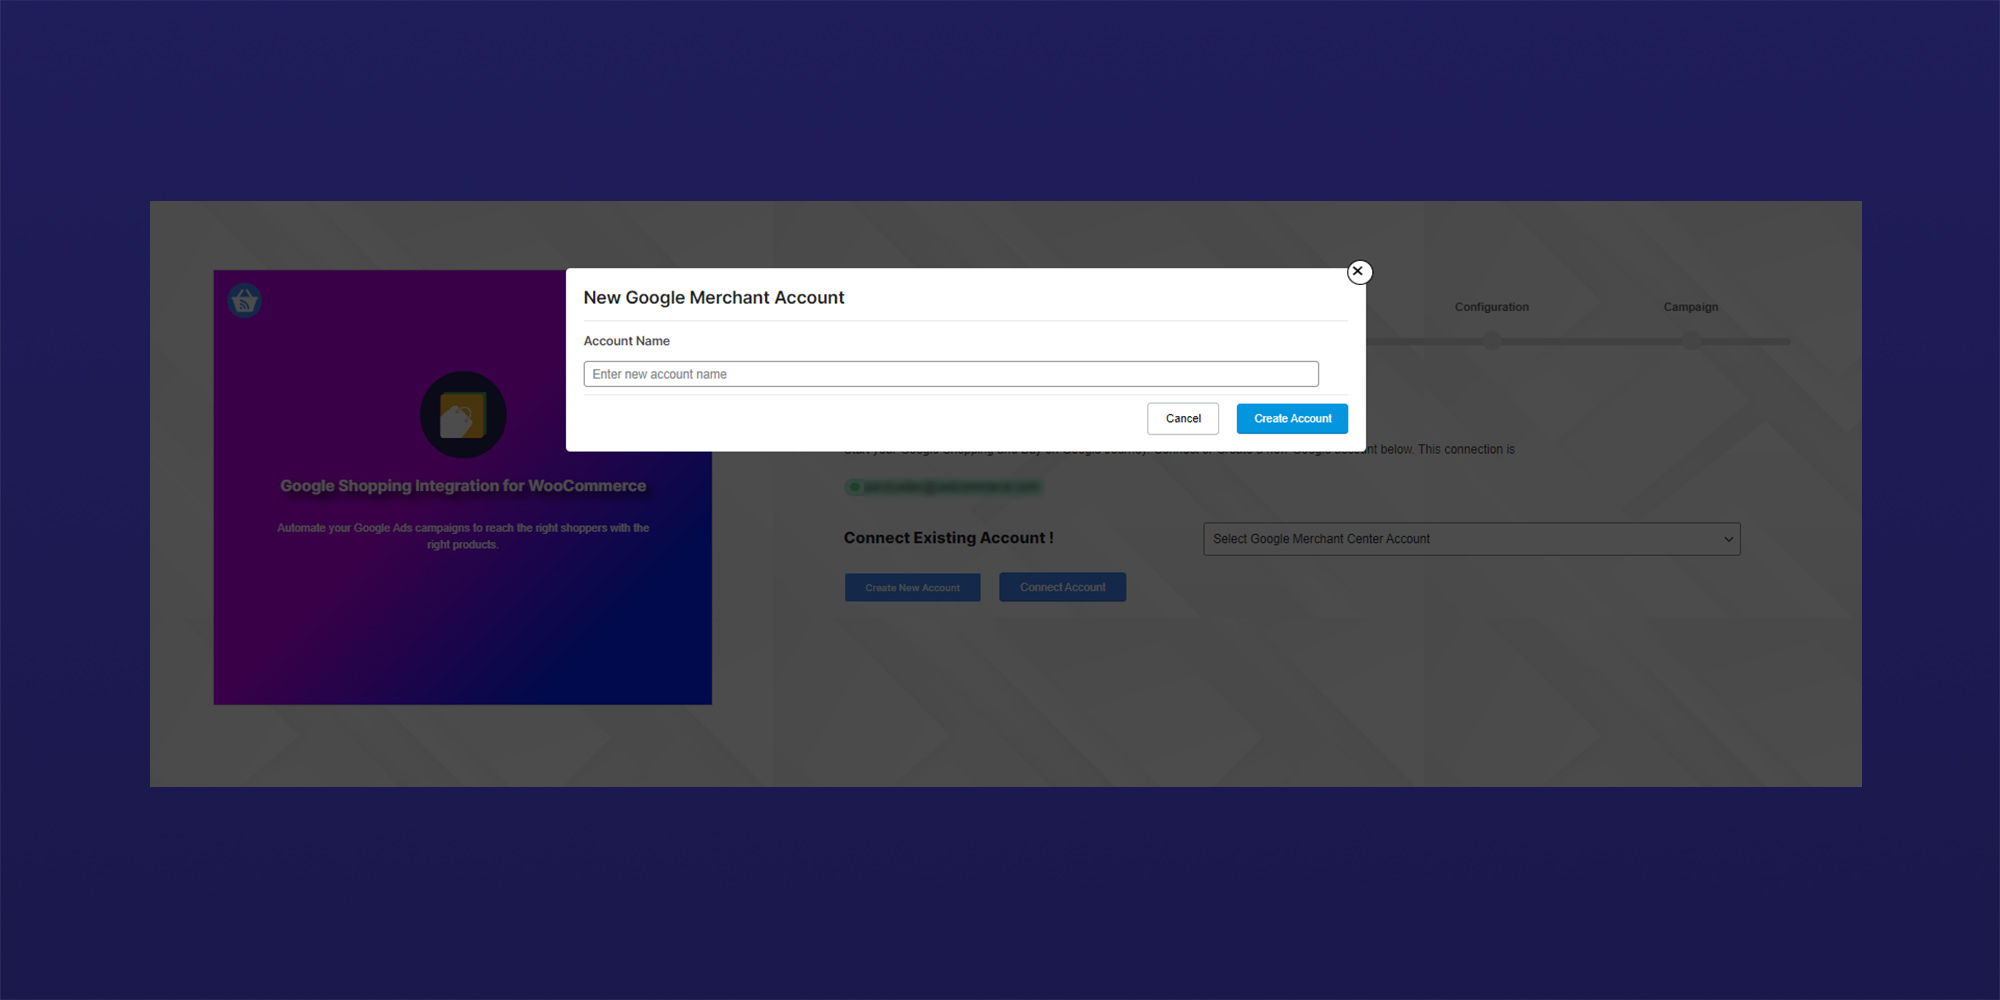
To Connect Account:
– Select the account you want to integrate from the drop-down menu and click Connect Account.
– The drop-down menu has both existing and newly created accounts to choose from.
Note: Once you have authenticated your Google account successfully, enable the required programs in your Google Merchant Center before submitting. You must enable the Google Ads program so that Google can review it for the selling purpose.
Connect Google Ads Account:
With the Google Ads Account, you can set up paid ads tailored to your business to reach new shoppers.
In the app, you can:
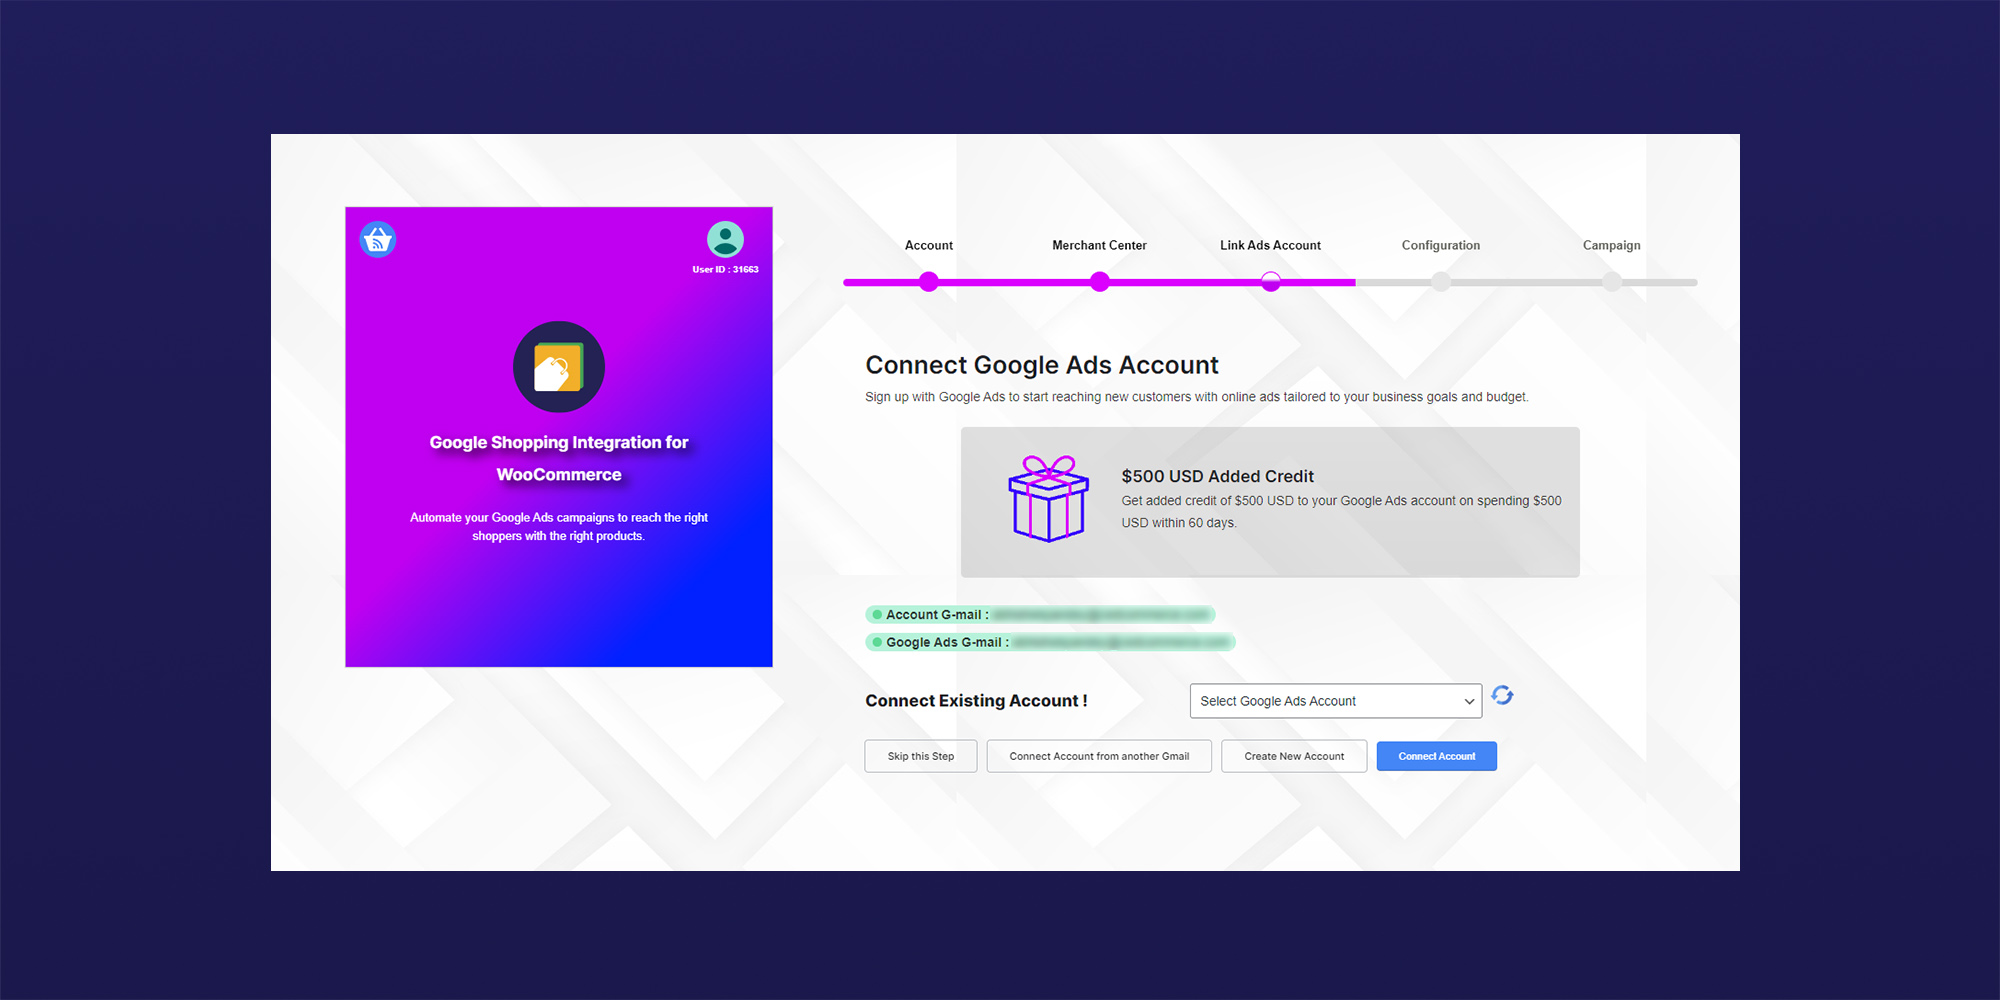
A. Skip and connect the ads account later.
B. Connect the Account from another Gmail:
– Once you click on the feature, you must provide the login details of the Gmail that you want to connect to and simply move ahead.
C. Create a New Account:
Select one from the drop-down menu and click on Connect Account to connect the account.
Account Configuration:
Setting a default configuration for uploading your products is an essential step in ensuring that your inventory is effectively included in the feed. These default settings serve as a baseline for your products and variants, allowing you to streamline the uploading process and save time. By establishing these initial configurations, you can ensure consistency across your product data and make it easier to customize settings for specific items later on.
Note: The default configuration for uploading your products can be customized later to accommodate specific products and variants.

The Account Configuration has the following specifications:
- General:
You will have to select the basic requirements to target the right kind of audience. This includes:- Target country.
- Content Language.
- Currency.
- Gender.
- Age Group.
- Include Destination.
Note: The Include Destination options cover the areas where you want your product to show, such as:
– Surface across Google.
– Shopping.
– Display Ads.
– Shopping Actions.
You are free to select more than one option.
2. Product Section: You can configure your product section here. Fill in the following details:
Plugin Dashboard
↑ Back to topThe dashboard provides a comprehensive overview of your products, notifications, and onboarding details at a glance. It shows the total number of active and inactive products on the Google Shopping platform.
Additionally, the onboarding details section allows you to review and verify the accuracy of the information provided during the onboarding process.
Furthermore, the notifications section informs you about necessary actions taken on your WooCommerce store.
– Reset Setting.
– Reset Product Status.

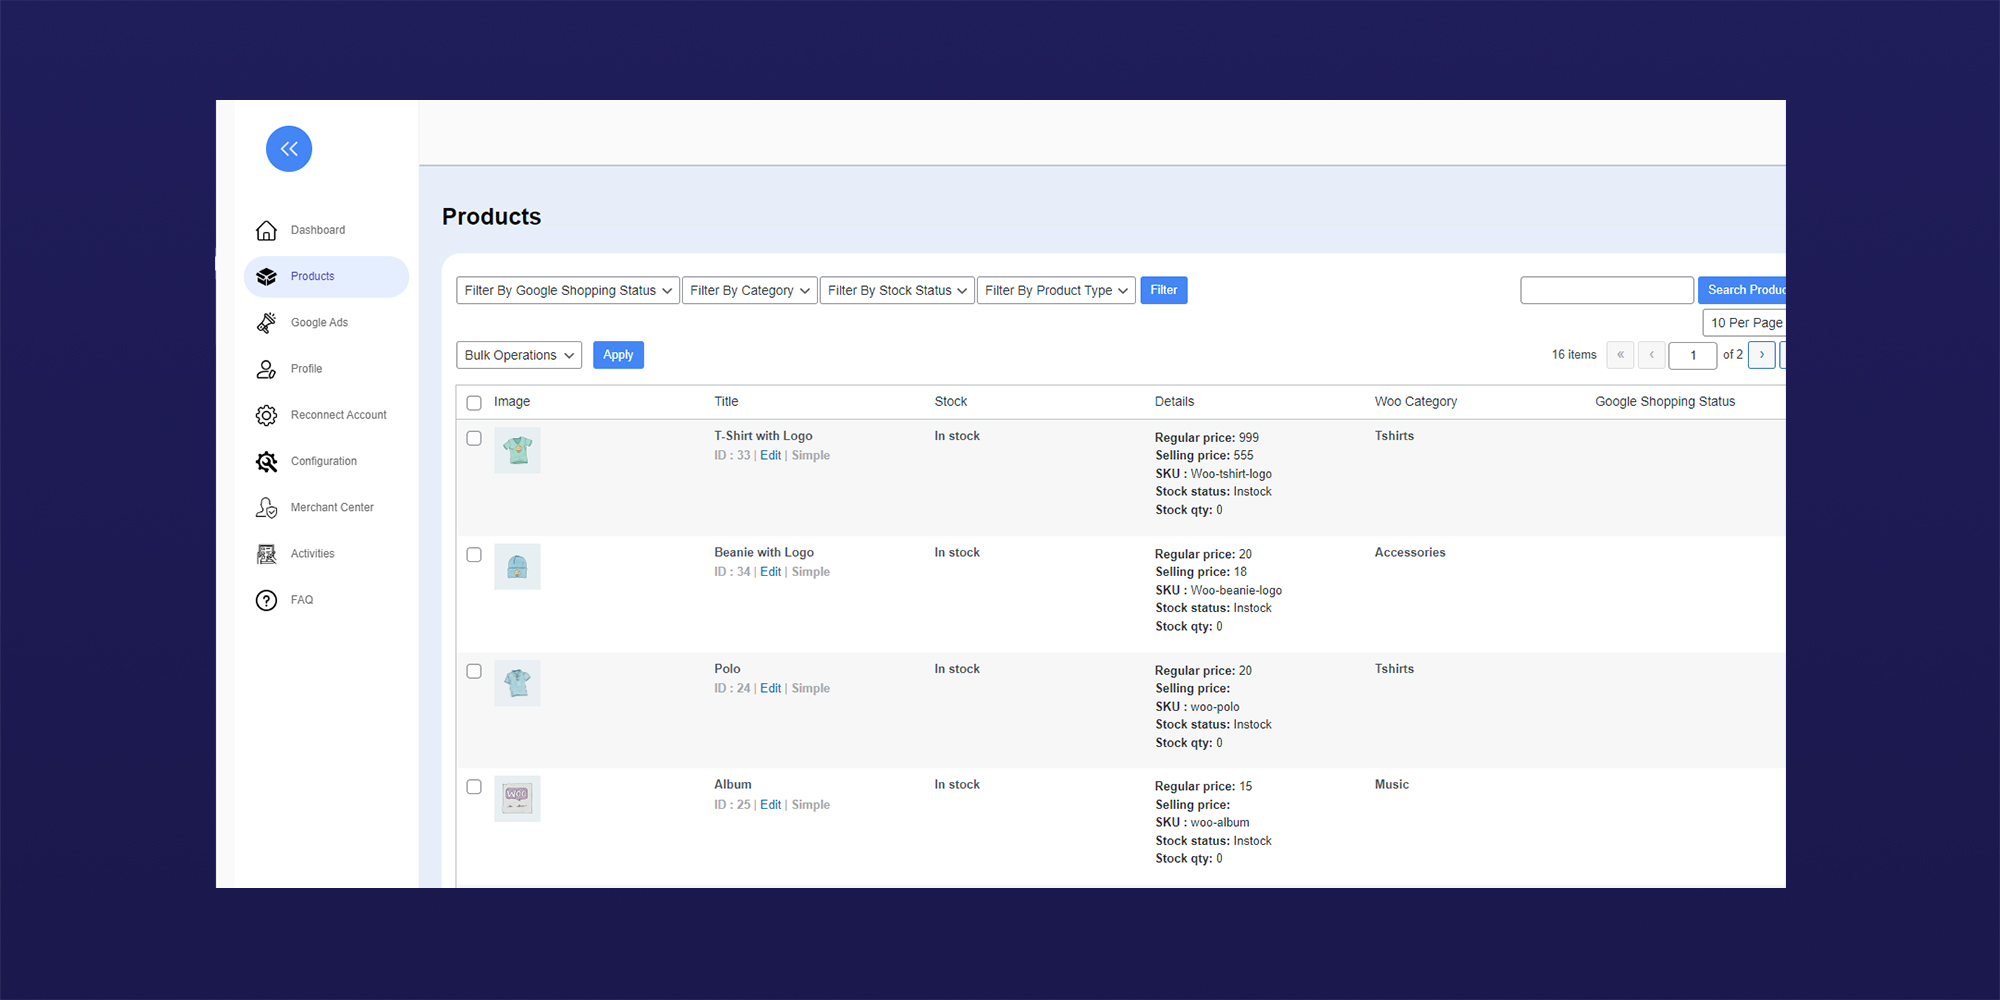
Products section
↑ Back to topIn the products section, you can sort products based on their Google Shopping status, category, stock status, and type. Additionally, you can conveniently upload or delete multiple selected products at once using the bulk operations tab.
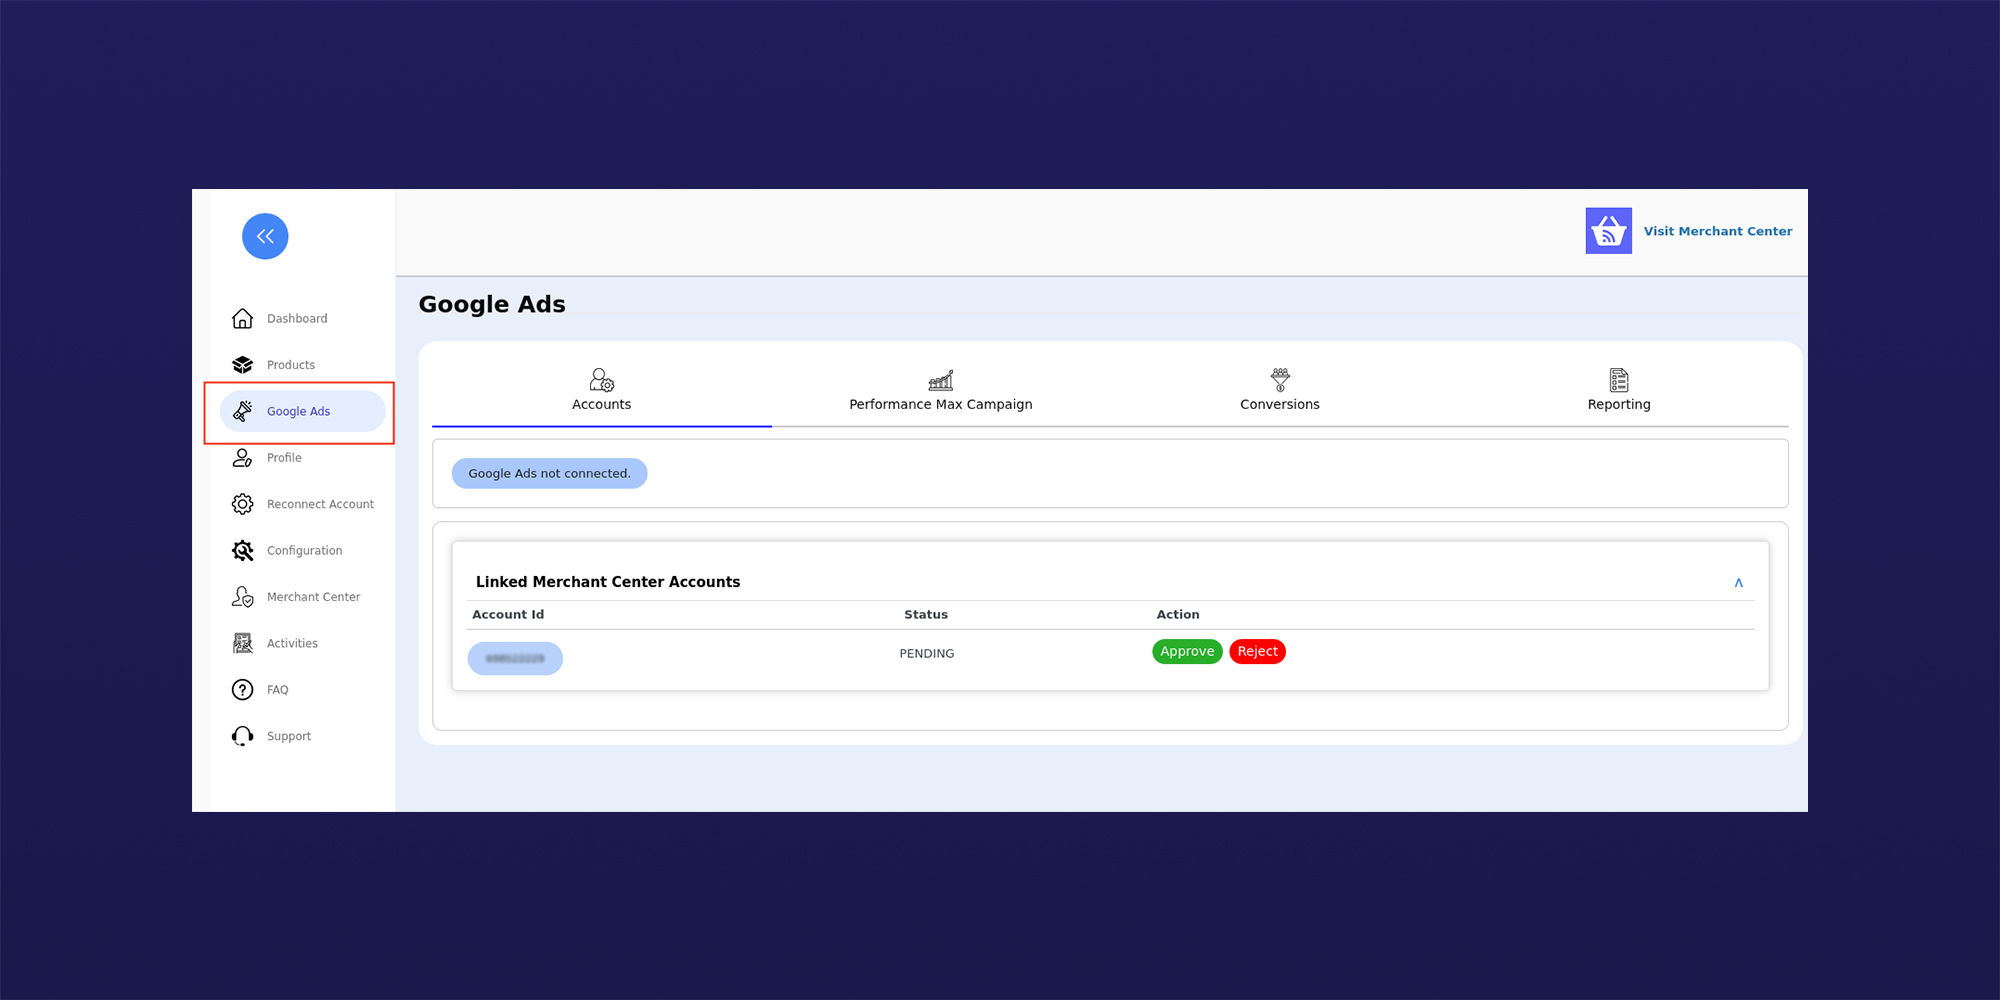
Google Ads
↑ Back to top- Accounts:
In this section, you need to connect your Google Merchant account with your Google Ads account. If you’ve already linked them in one of the previous step (Link Ads Account) then your connected Google Ads account will reflect here automatically, else you can click on Add Account to proceed to connect using your Google Ads Id. - Performance Max Campaign:
You can configure your Performance Max Campaign by providing all the necessary information, such as the Campaign name, Daily Budget, Targeted Location for your ads, and more.
In the advanced section, you can further customize your campaigns by selecting the start and end dates and specifying the expected Return on Ads Spent (ROAS).
Conversions
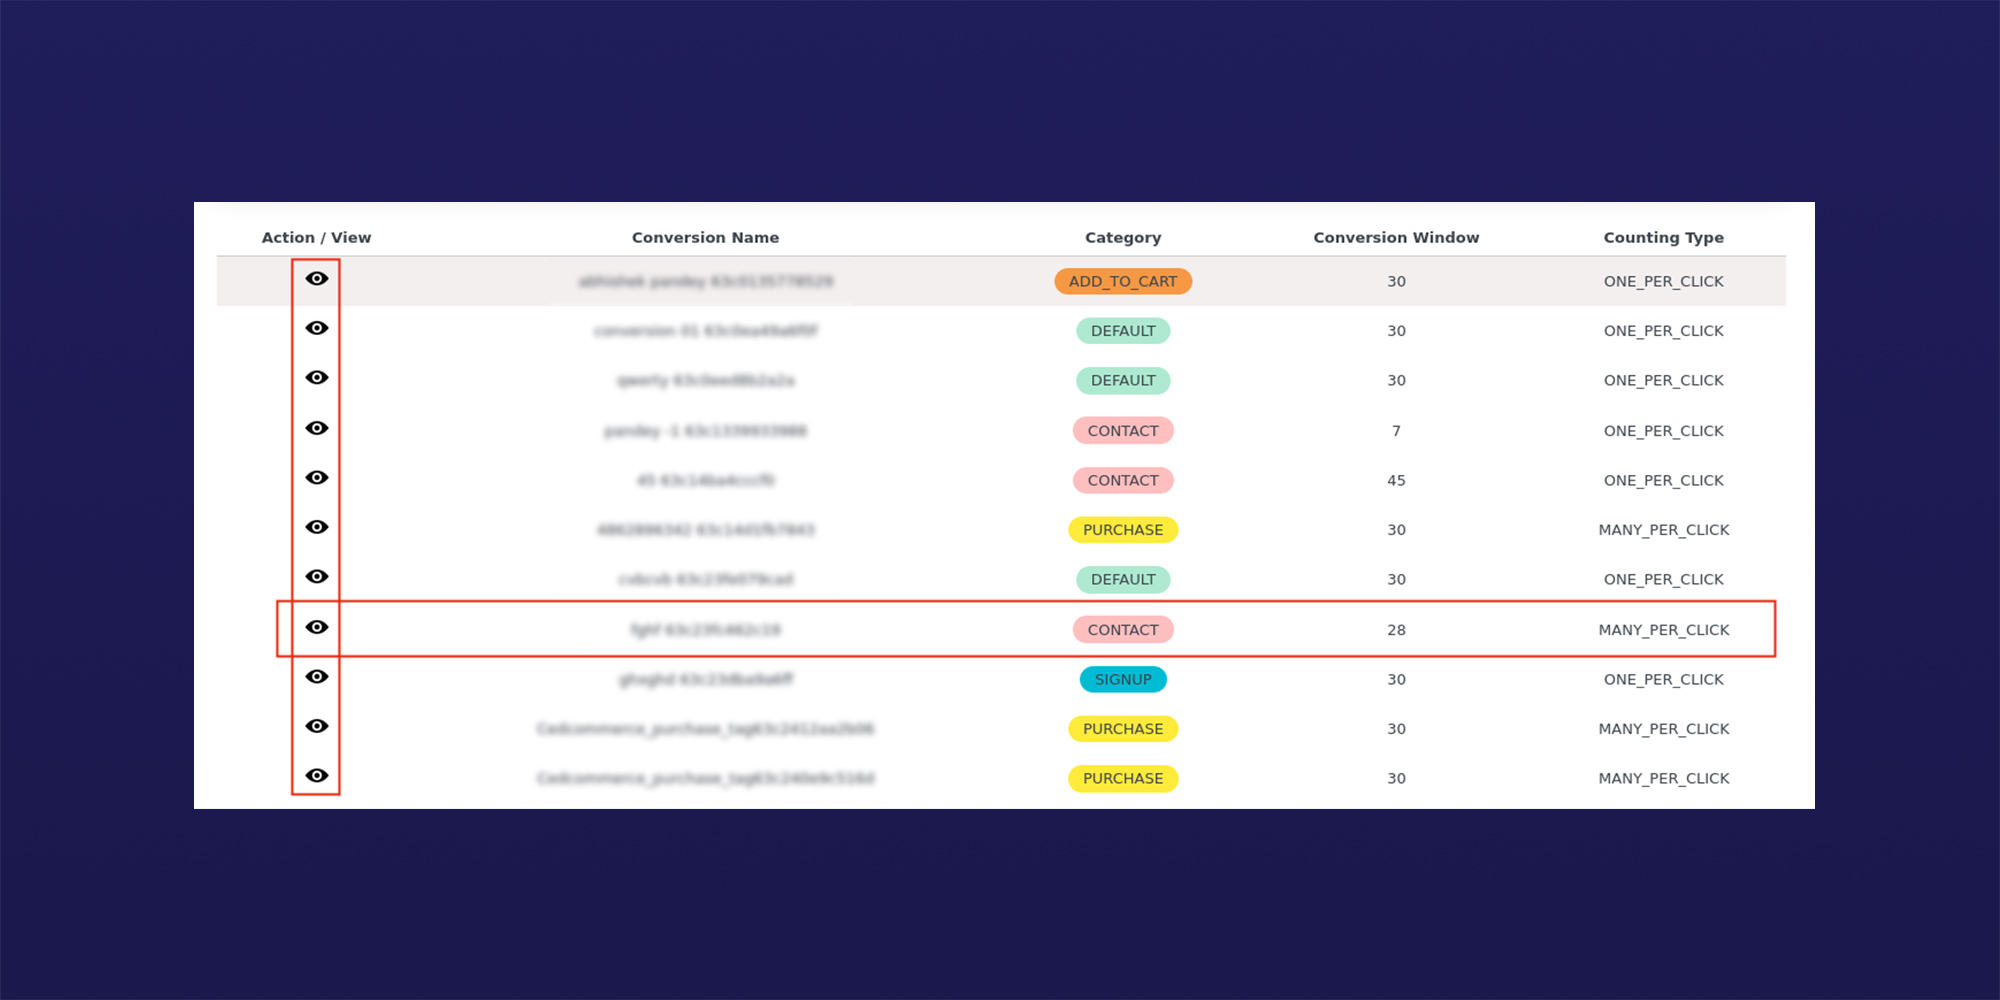
Here you can view all your conversion listings with other multiple fields.
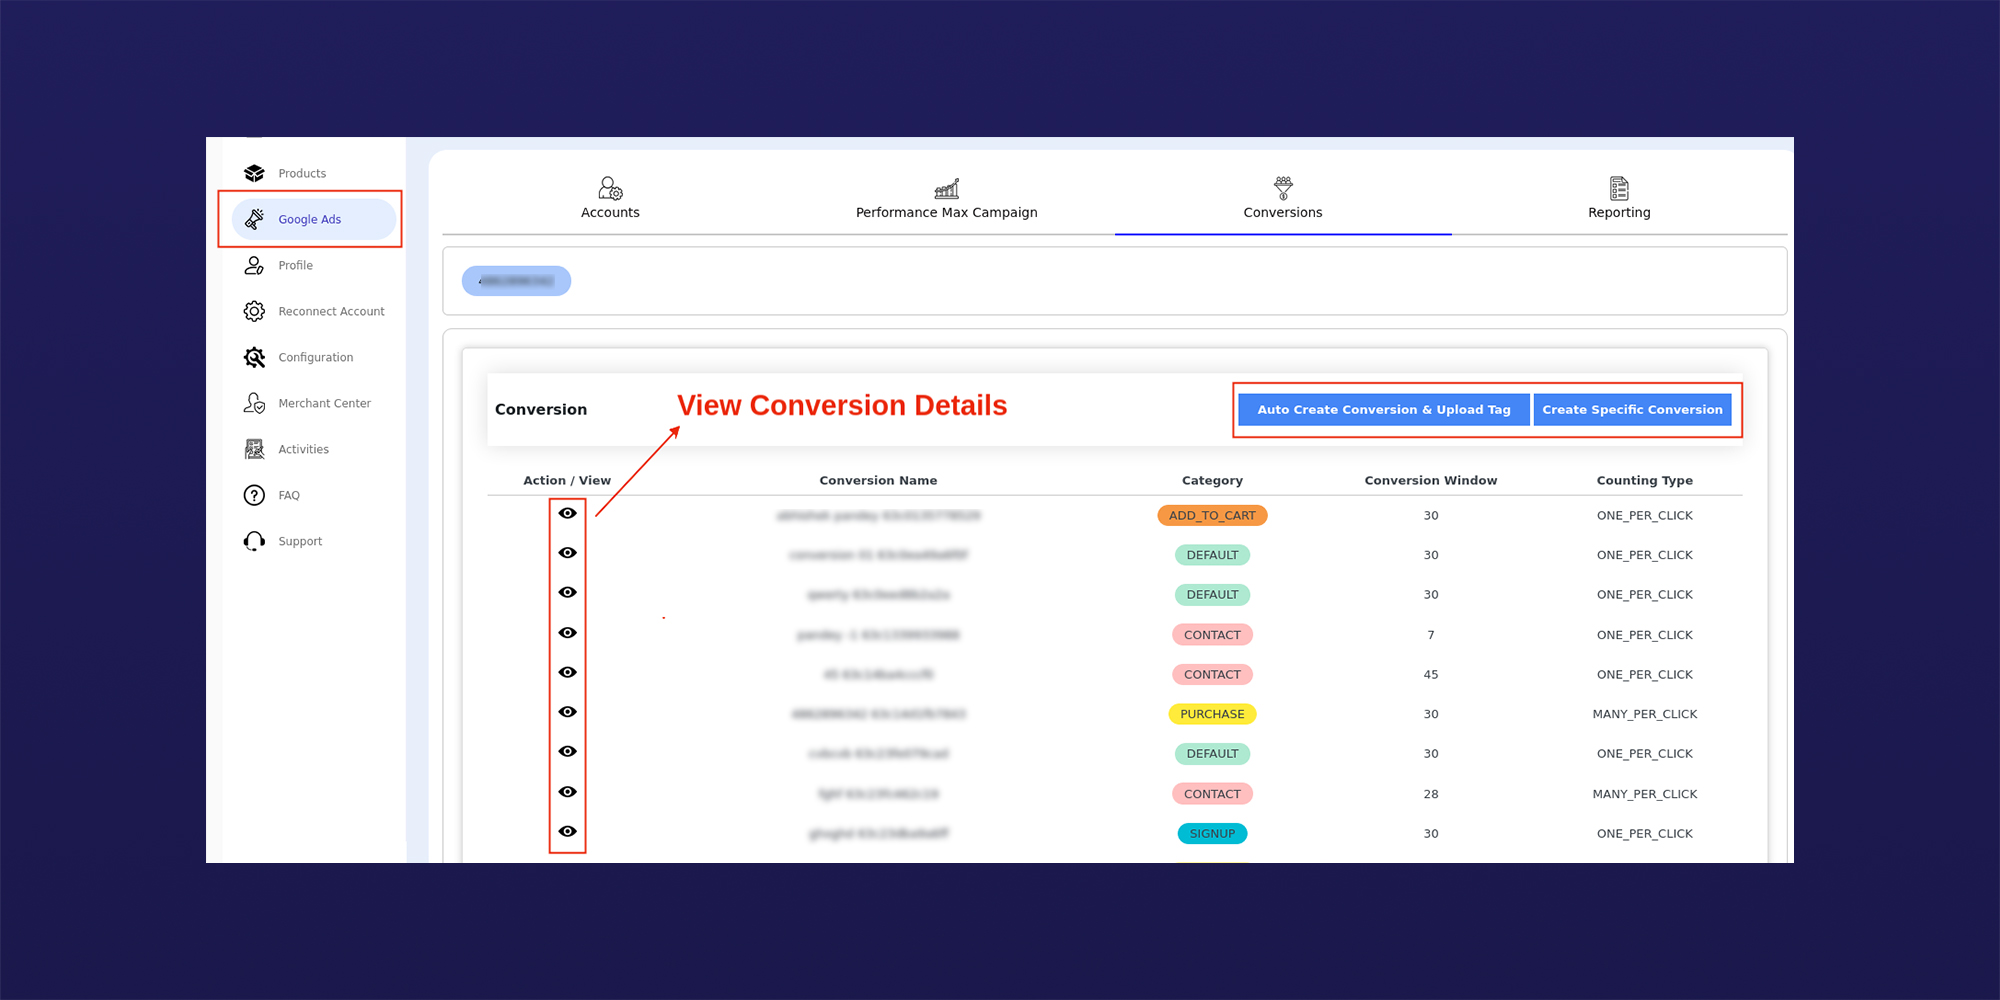
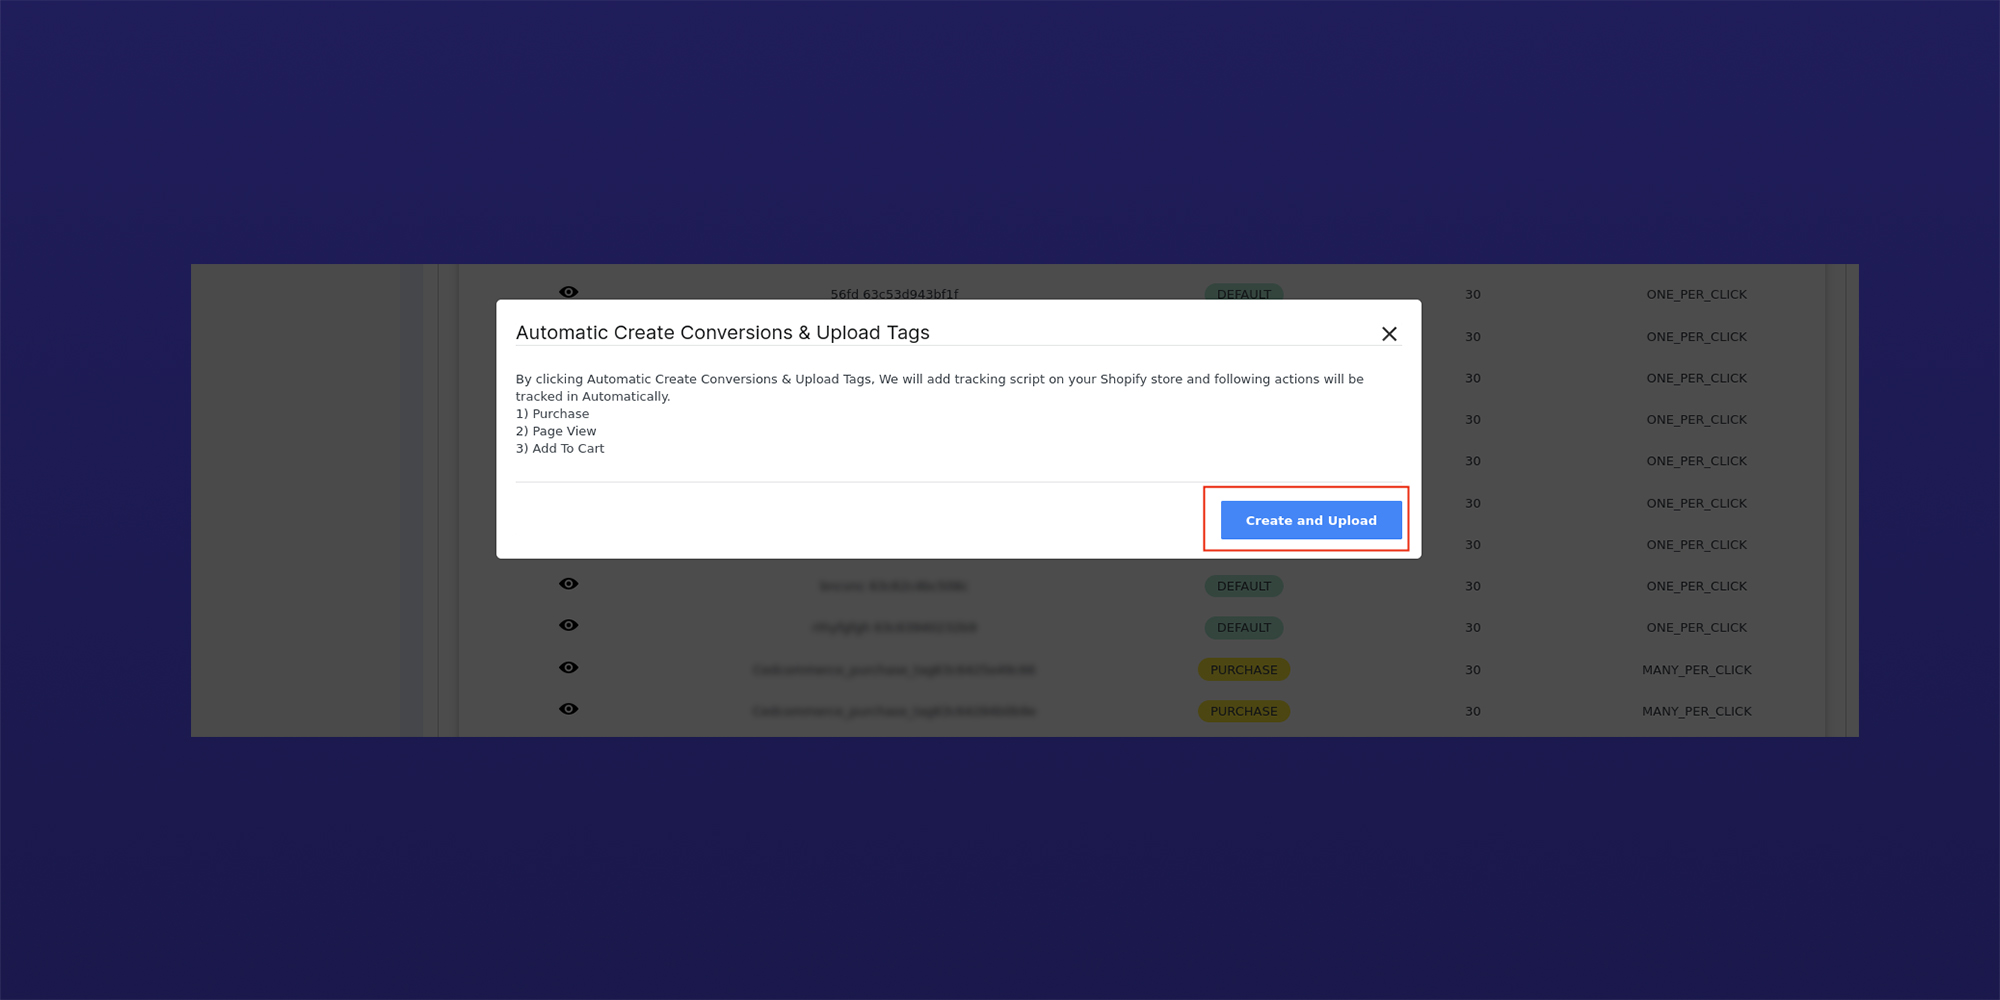
1- Auto create conversion and upload tag
This button will help you create conversions and upload tags on complete automation.
2- Create specific conversions.
To proceed with creating a conversion click Create specific conversion and follow the steps
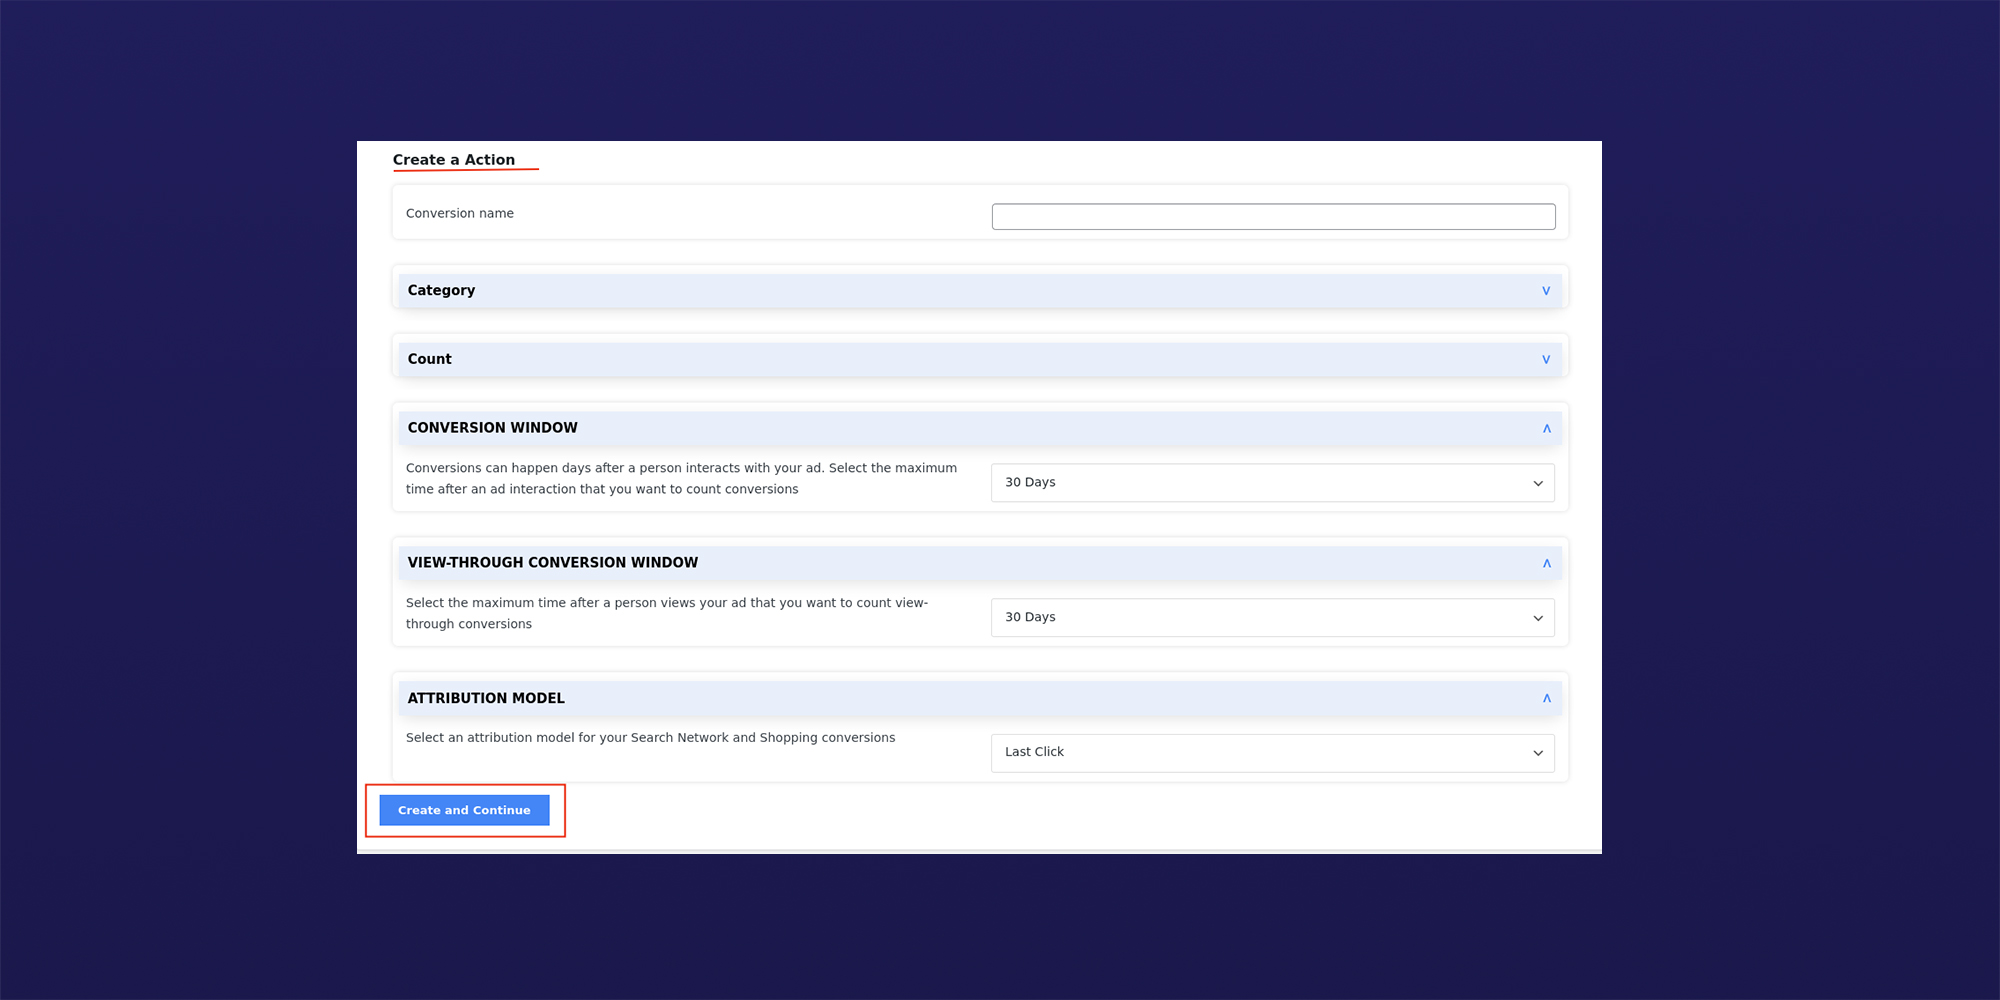
In the next step, you will be prompted to assign a name to your conversion. Here we have named it Test 1. Also, select the action category that you want to track.
The other vital tracking aspects include-
Count (Every, One)
Select every, if you want to track every purchase as unique. This option is more suitable for e-commerce stores that are running ads to directly sell their products.
Select one, if your ads goal is to track the number of leads generated via signups, form fills, downloads etc.
Conversion Window
Conversions often don’t occur immediately after a potential buyer or lead interacts with your ad. With the conversion window you can select the maximum buffer time period to count a conversion after the interaction with the ad.
View-through conversion window
View-through conversions are applicable after an ad impression where the user doesn’t even interact with the ad but later gets converted. With a view-through conversion window you can select the maximum time as per your preference to count a conversion that occurs in a similar way.
Attribution model
You can select the right attributes out of the available options for your search network and shopping conversions. For more detailed information on attribution models, you can simply click here.
Once all the steps are done, click Create and Continue to finish creating the conversion action.
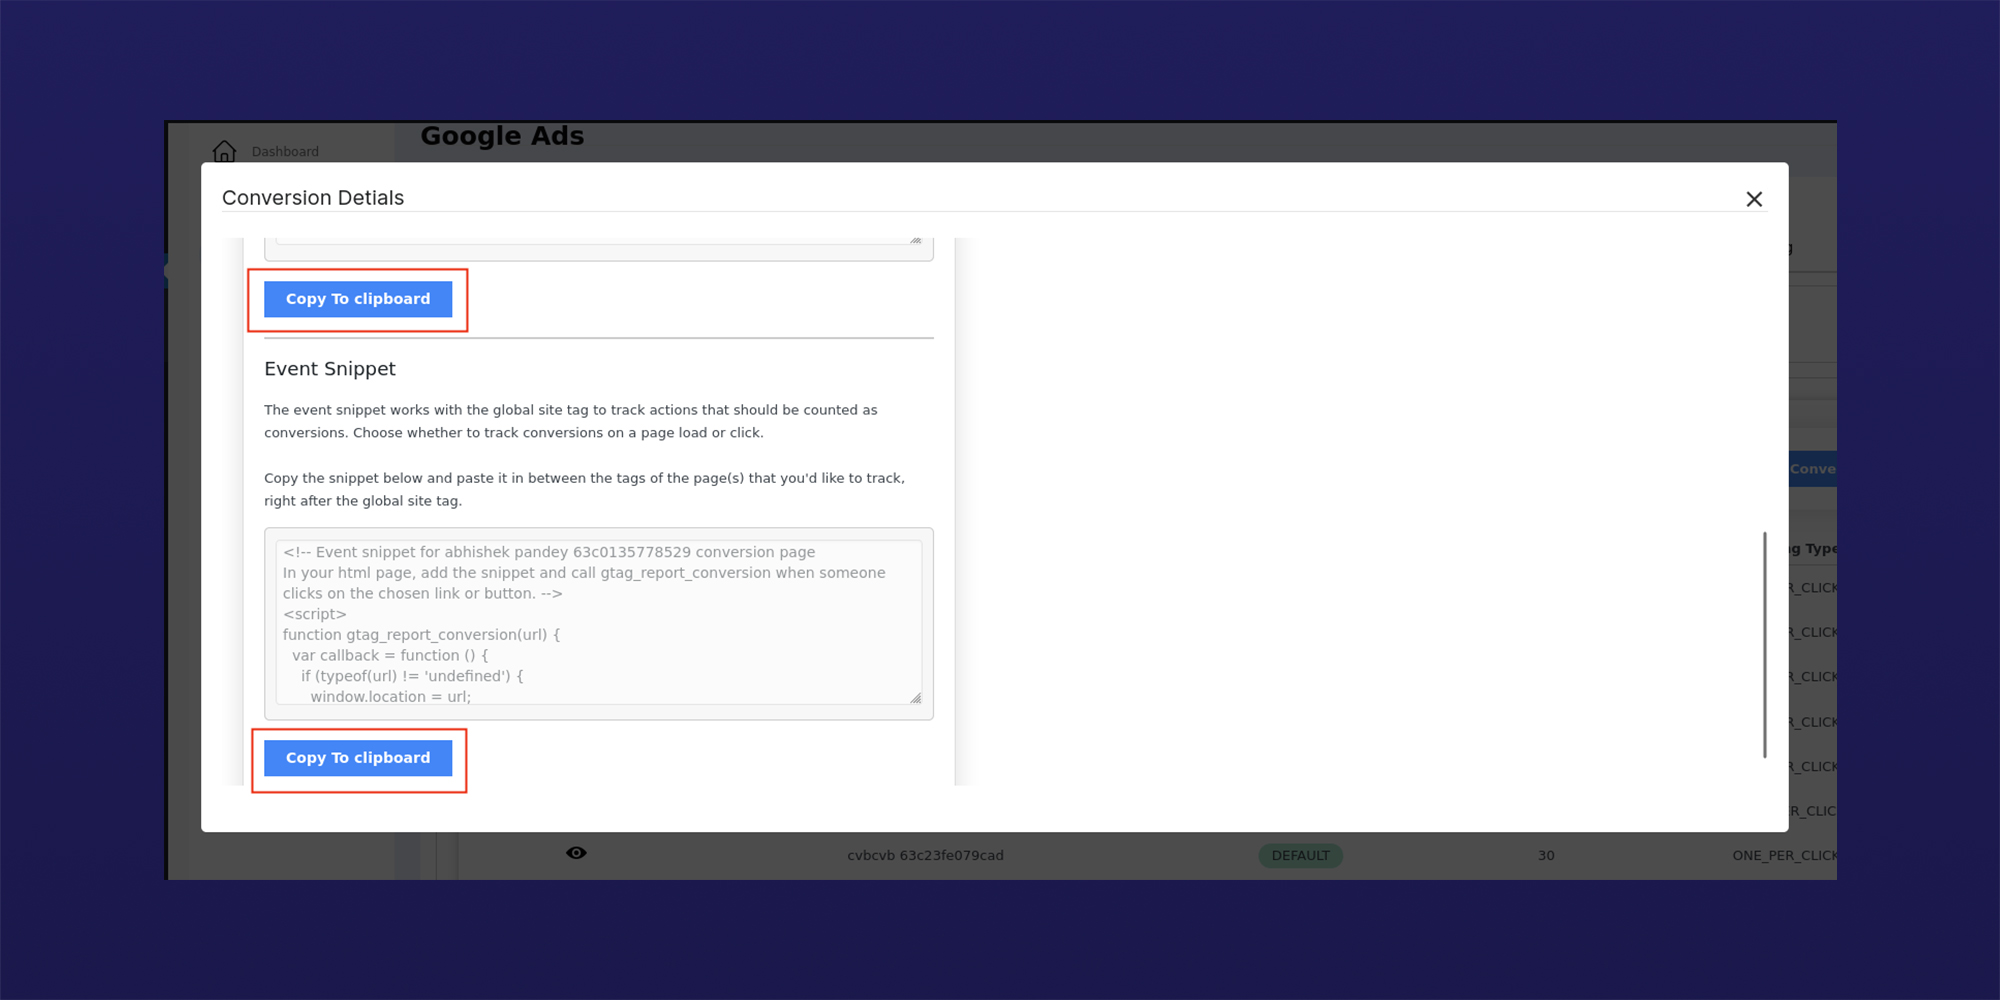
On the next step, you will have your custom global site tag and event snippet codes ready to be attached into your website to enable tracking.
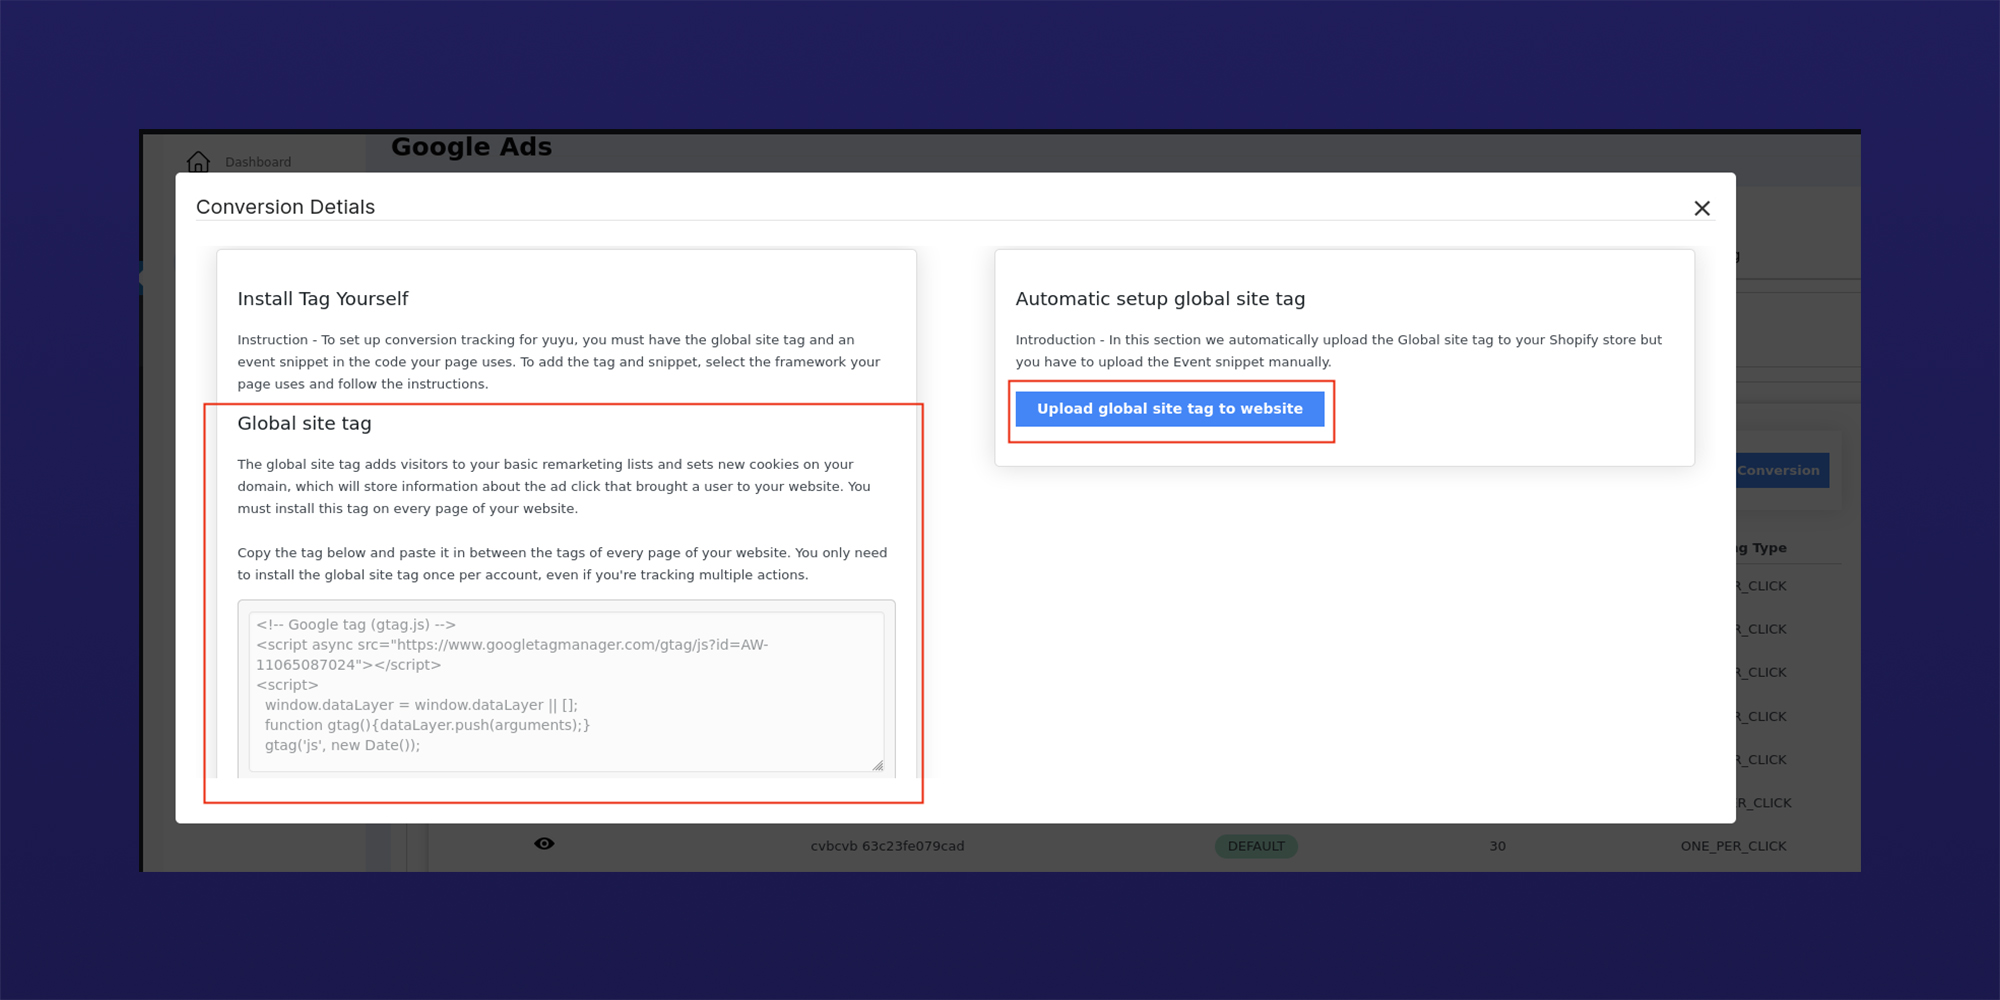
Also, using automatic setup global site tag you can automatically set up global site tags for your website.
Once the site tags are inserted to your website, click Continue and your website conversions are ready to be tracked.
You can view the created conversion Test 1 listed on the conversion tracking dashboard.
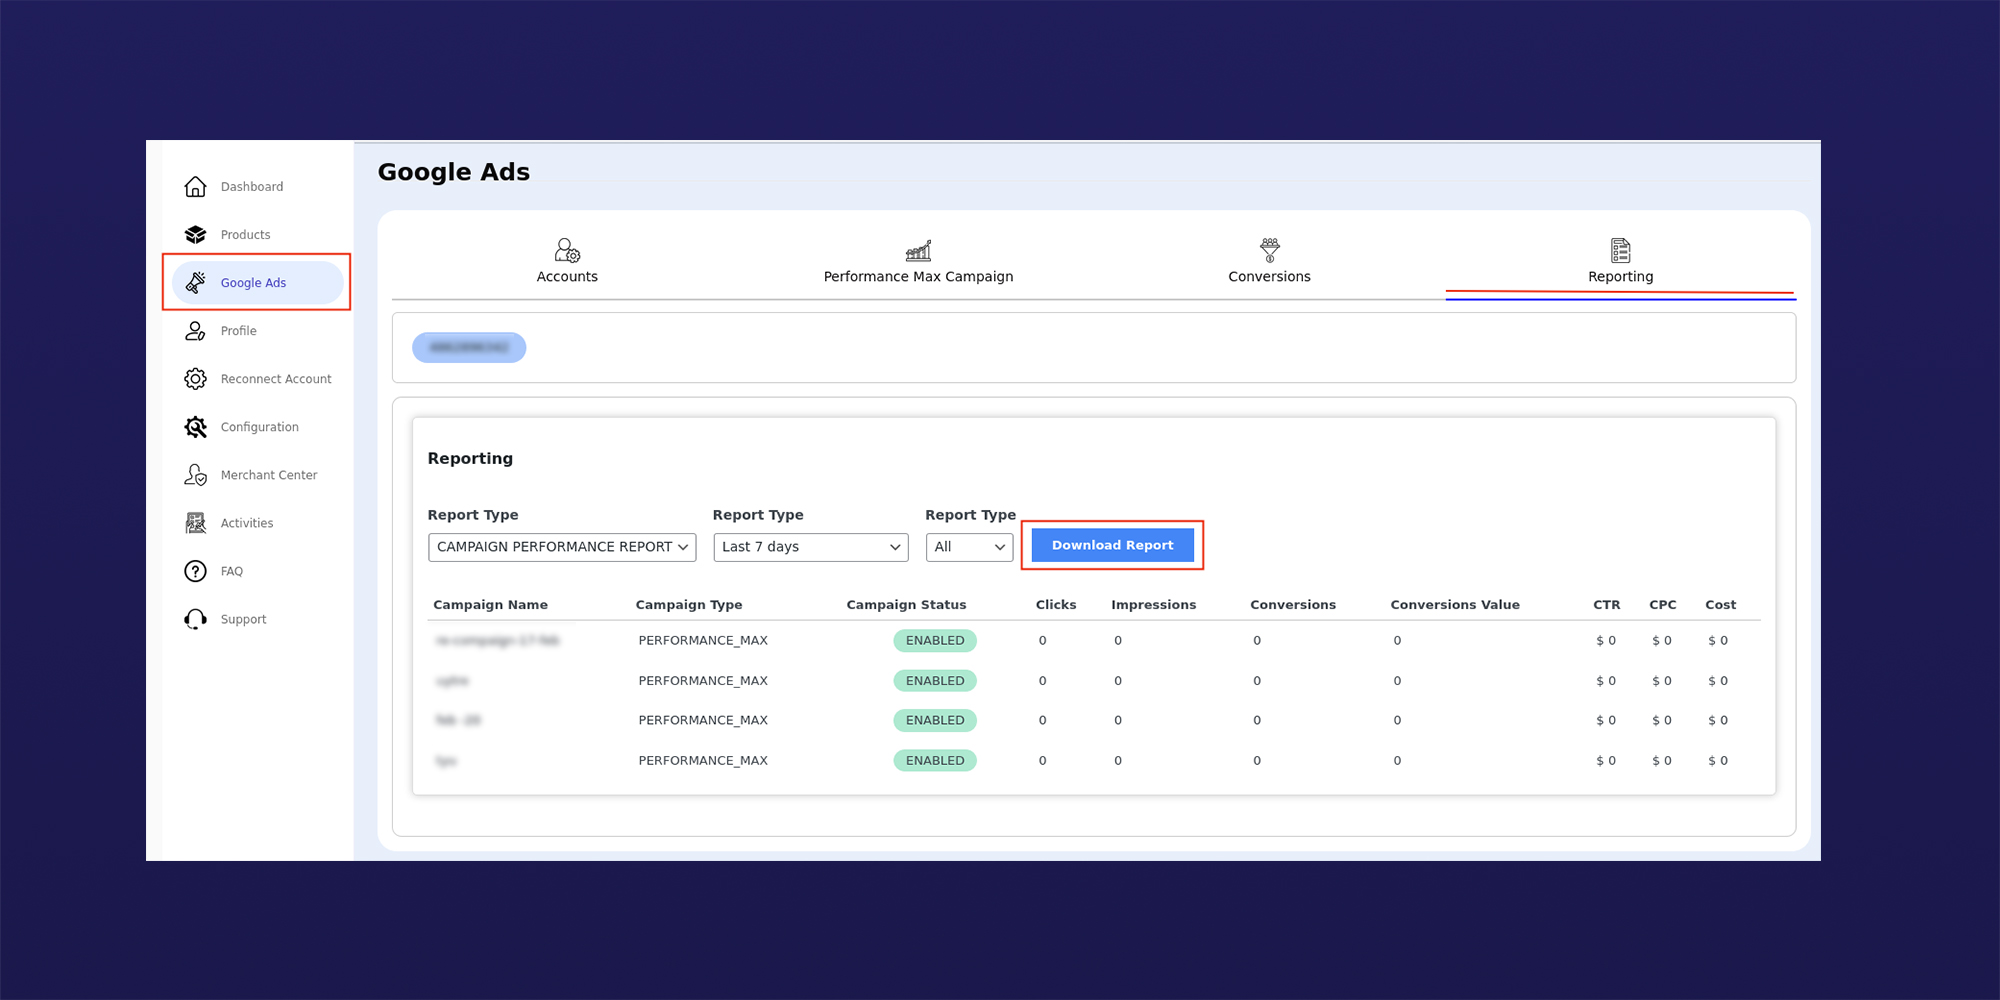
- Reporting
This is where you get to view and download the performance of your ads. To download the report just select the campaign type, report duration, and the status. You can instantly check the downloaded report which is in the form of a csv file.
Profile
↑ Back to topThis section provides you with all the functionalities to map your WooCommerce product categories with the Google Shopping categories in just a few clicks.
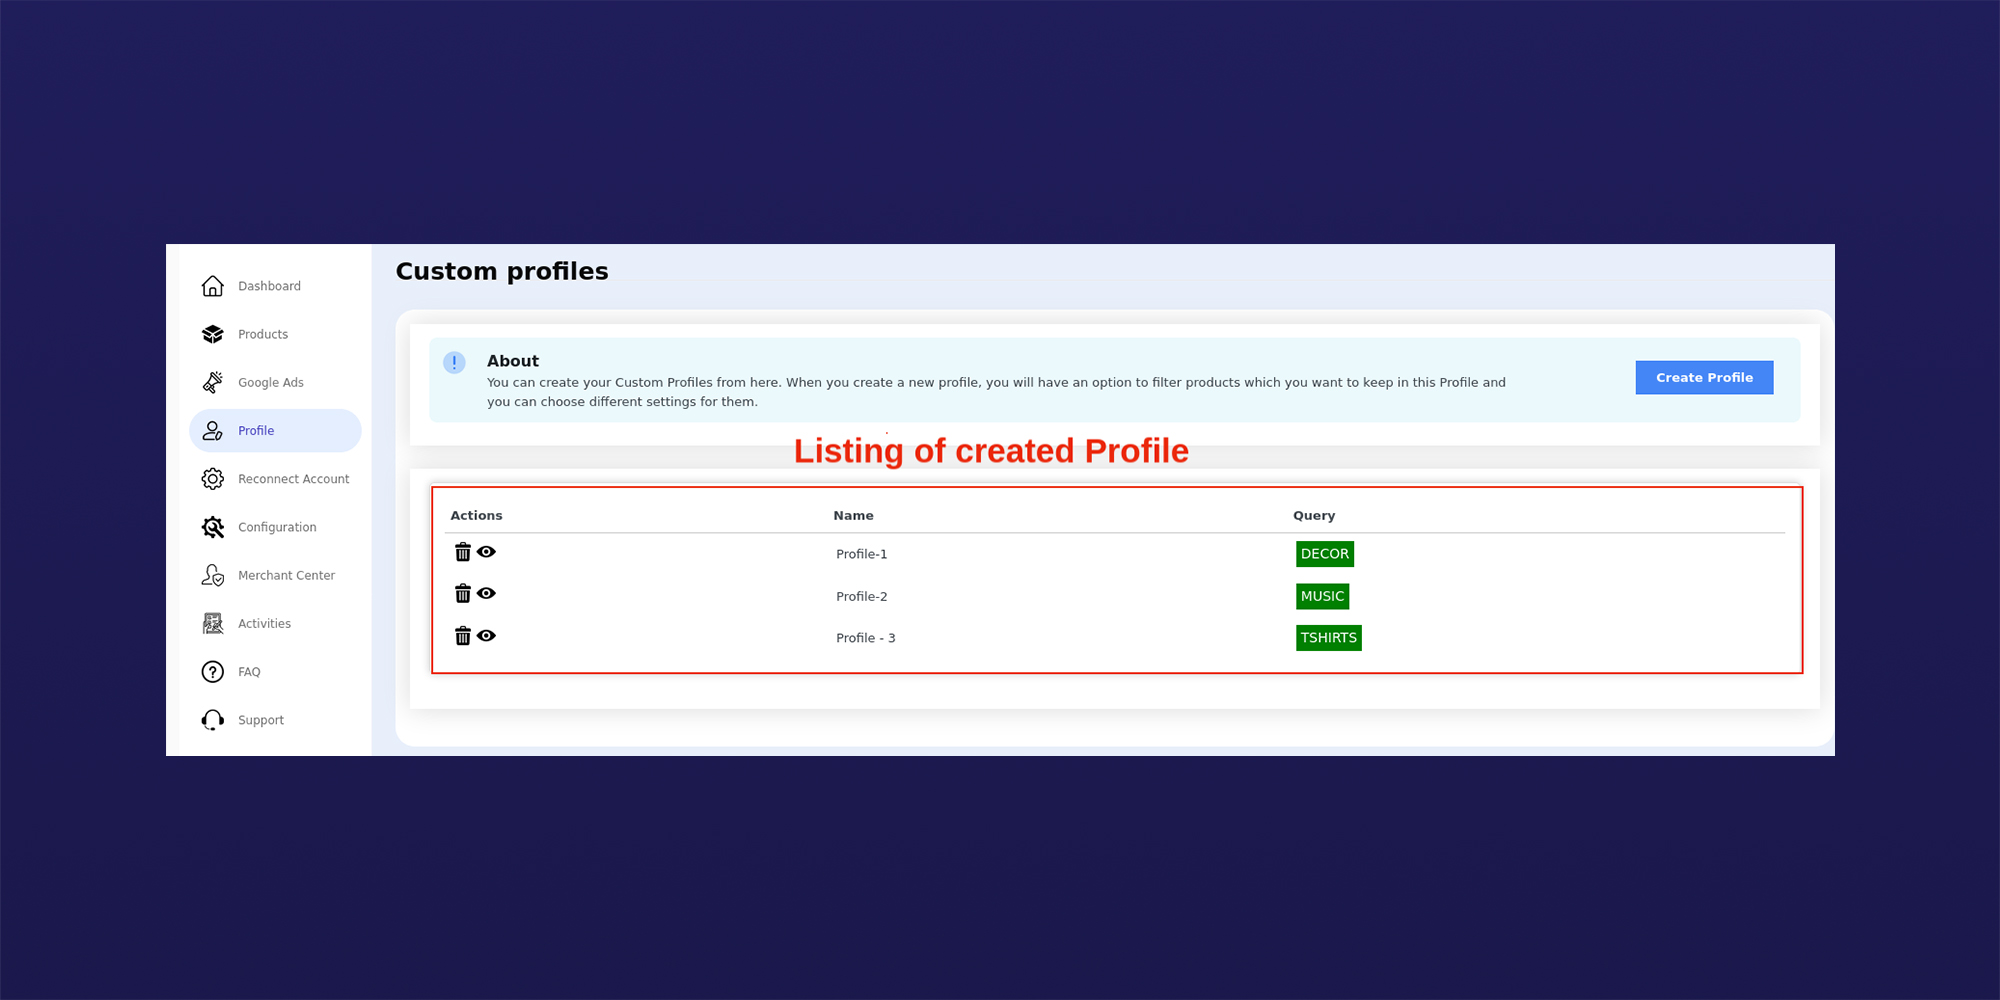
You can view and edit the existing profiles on the main homepage of the profile section itself.
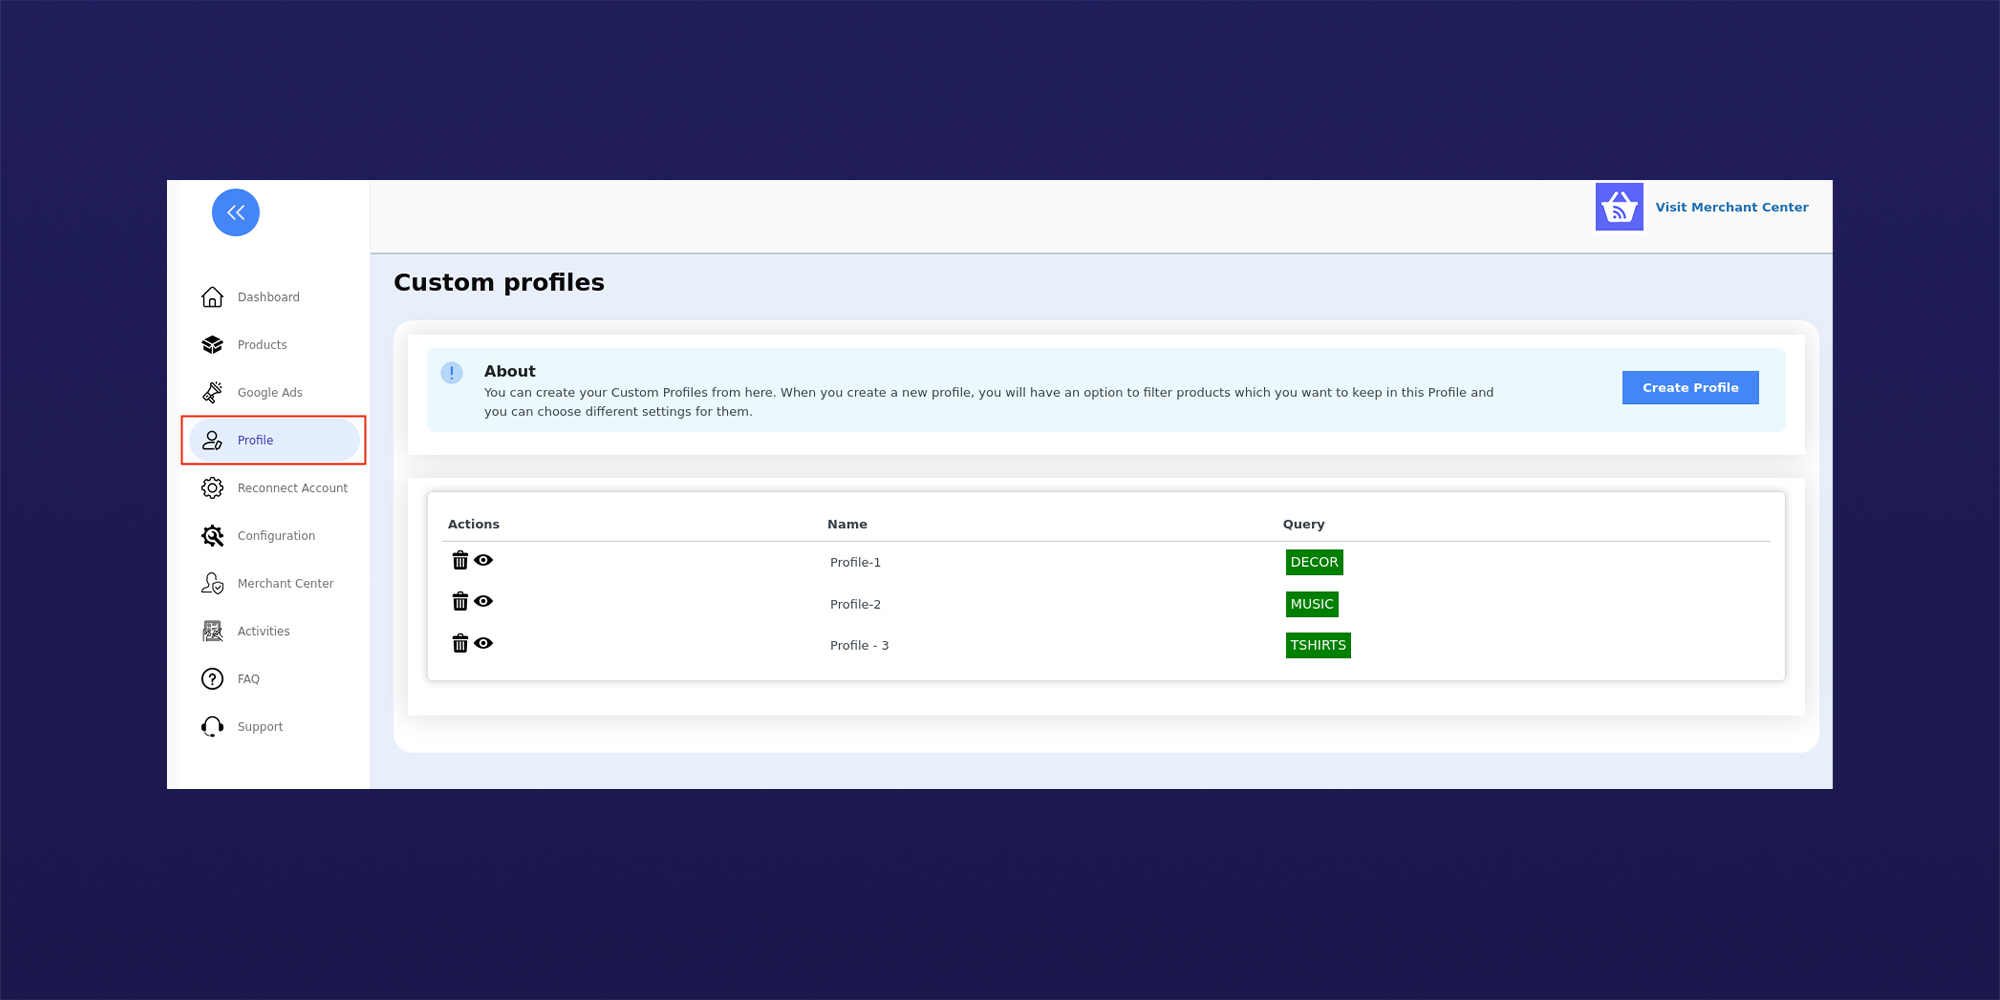
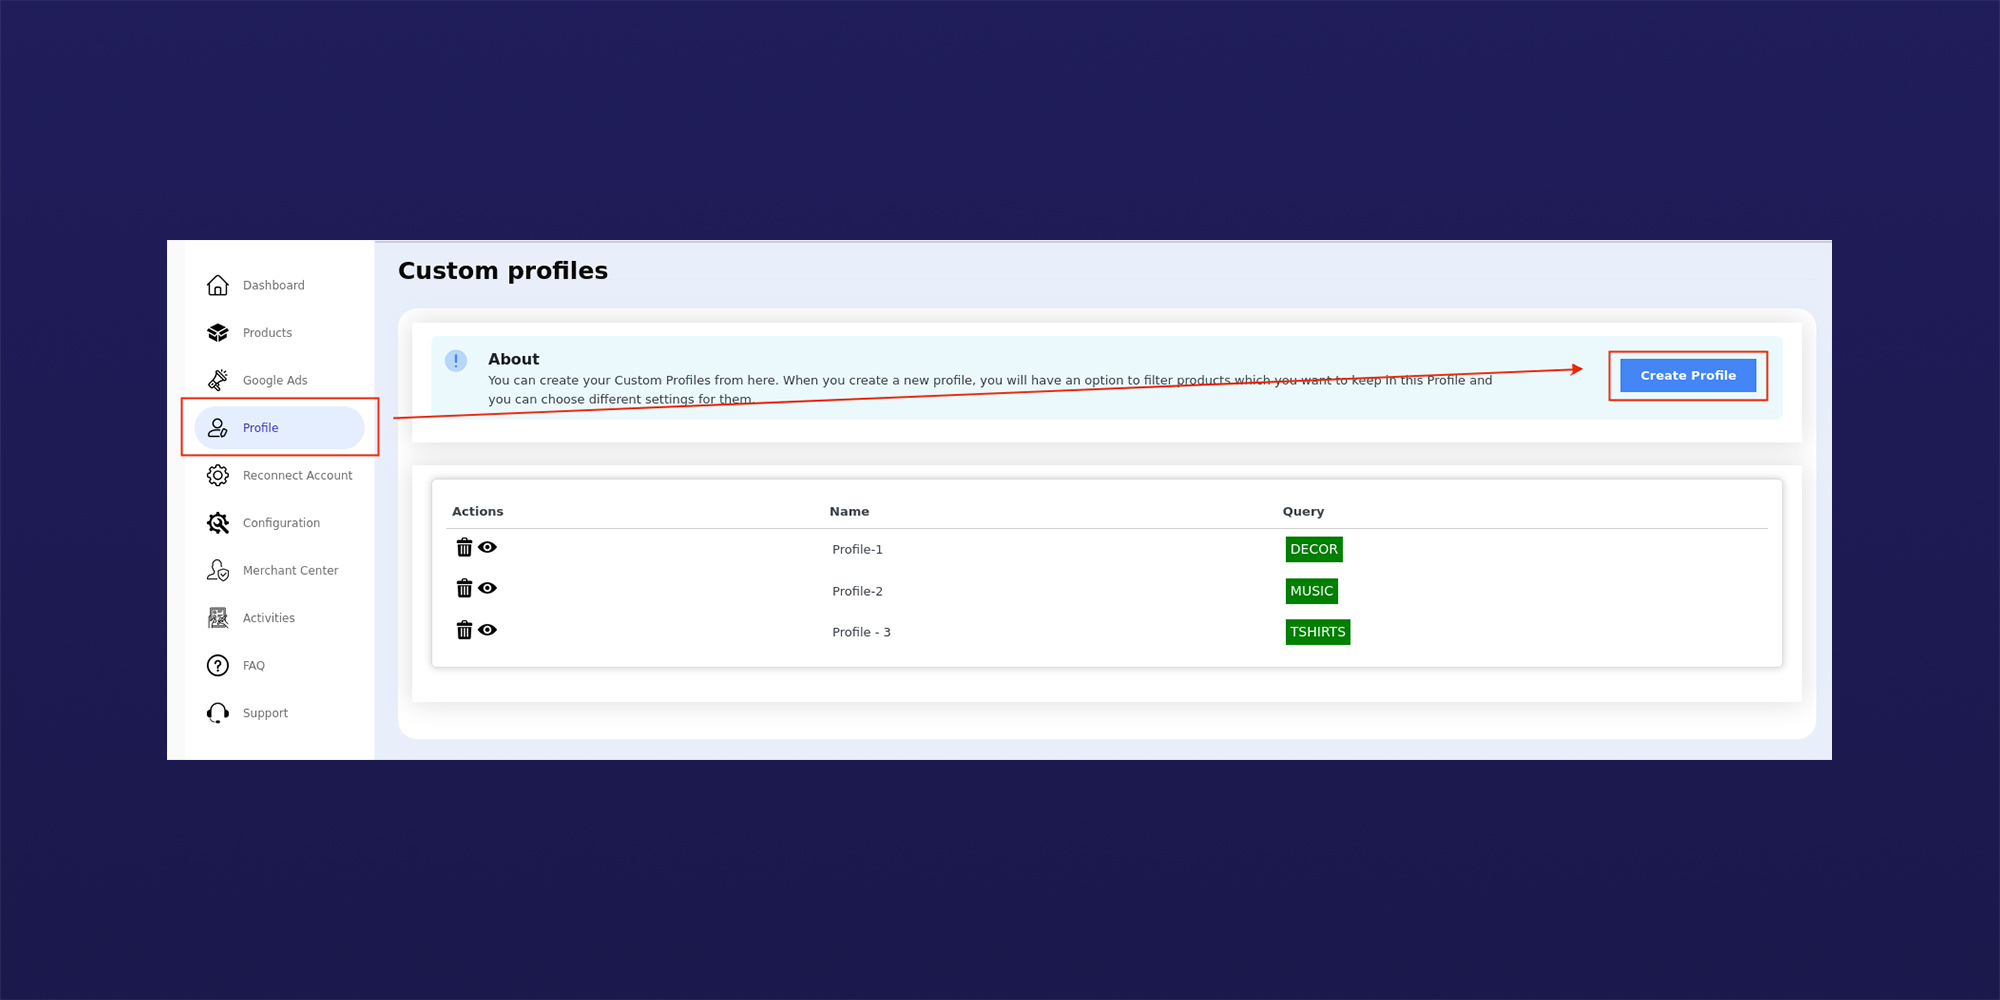
To start with product profiling click Create Profile and proceed ahead.
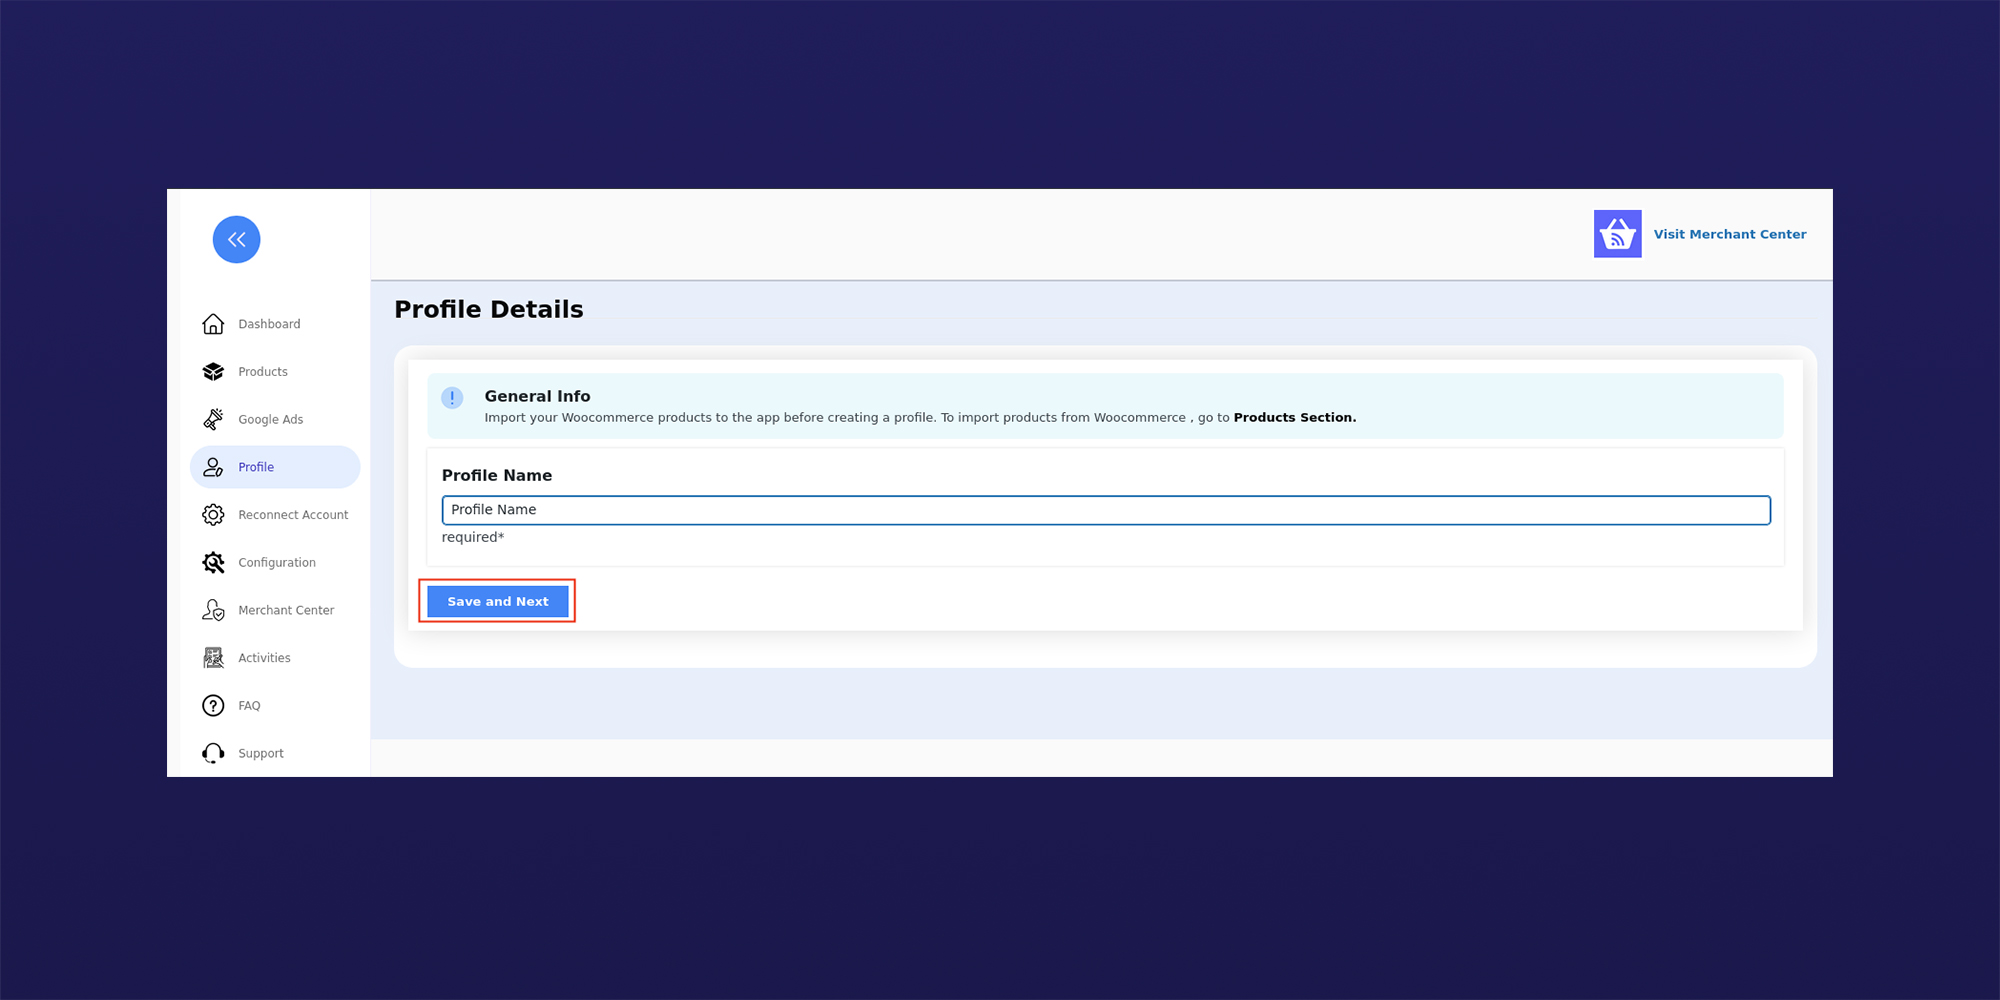
On the next step, you will be prompted to assign a name to the profile which you are about to create in the next steps. Once the profile name is filled, click Save and Next to move on to the detailed profiling.
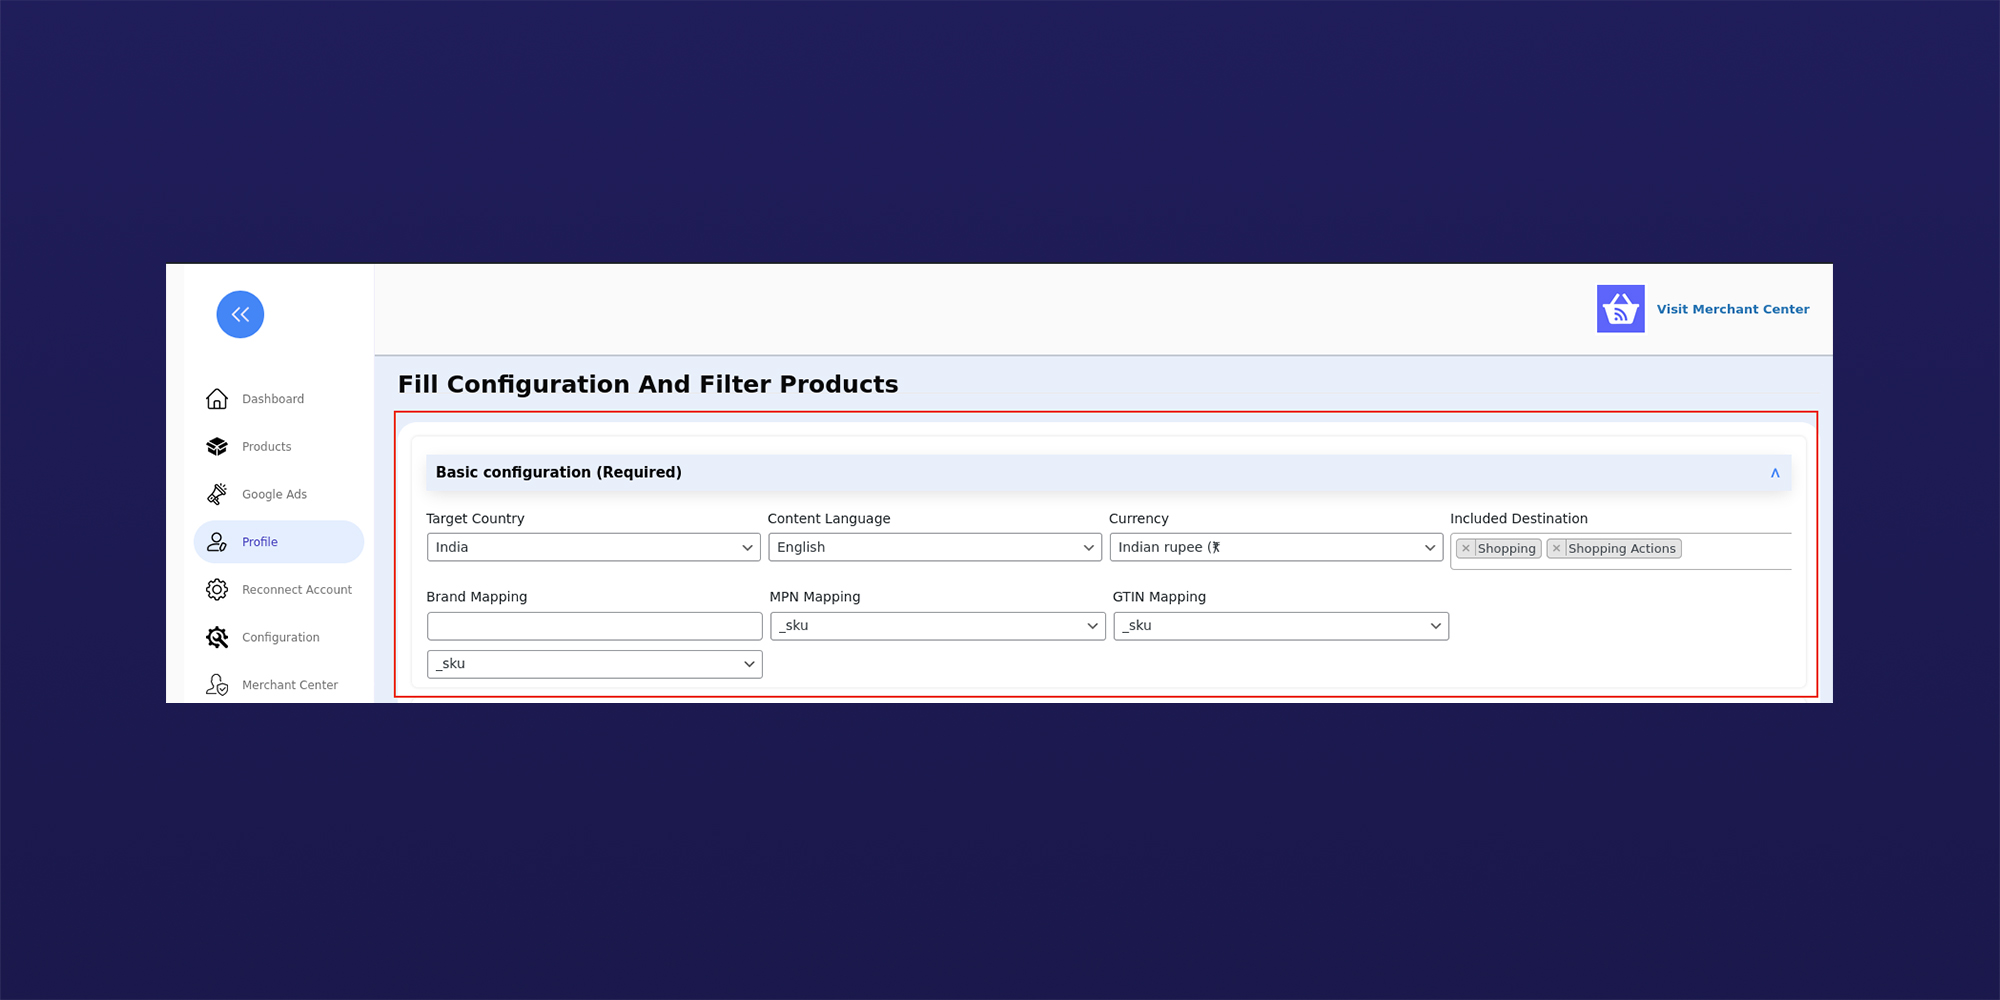
Here, you need to fill up all the mandatory configuration details and filter products based on information such as your target country, content language, currency, and other details as shown in the image below.
The next step is a crucial one where you need to filter out your WooCommerce products that you want to map up with the Google Shopping product category. You can select one or more WooCommerce products to continue with the mapping process.
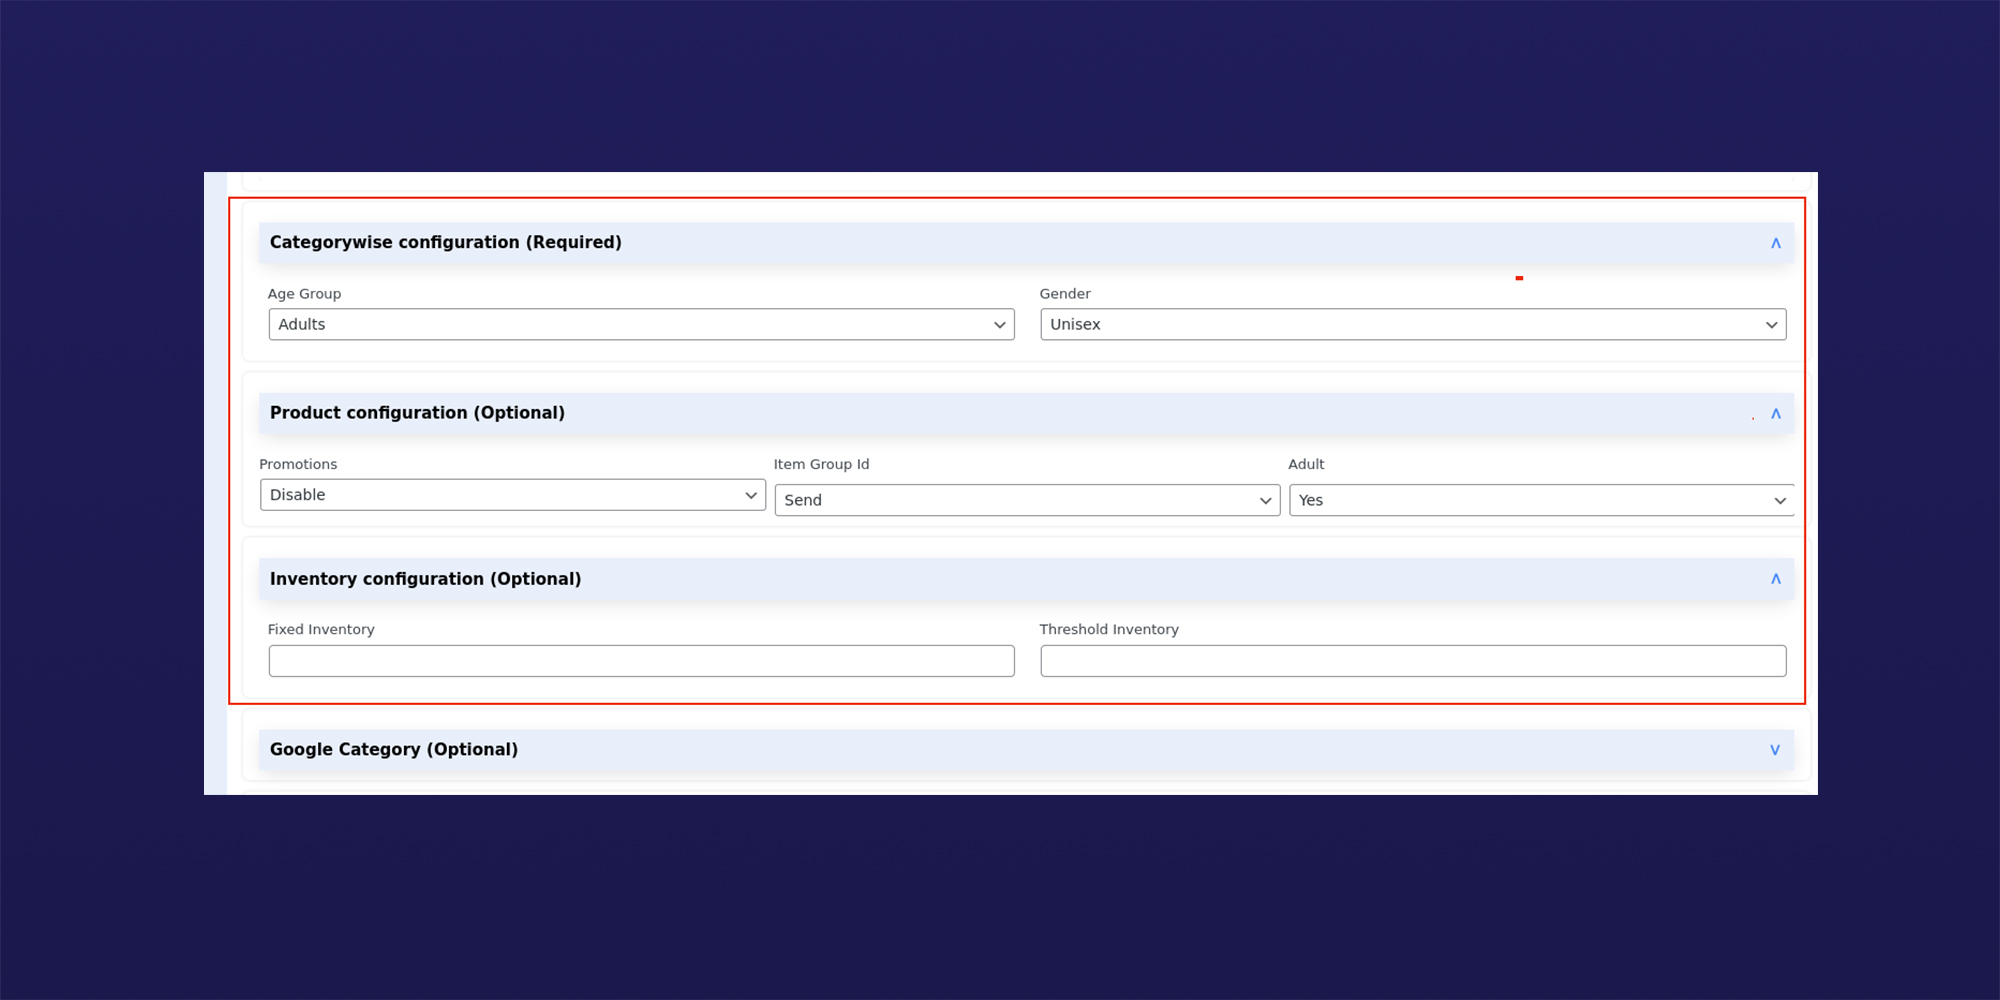
Using category wise configuration you can select the target age group and gender of your audiences.
With product configuration, promotions can be enabled or disabled for that specific category, item group ID can be attached if there is any as well as mark yes/no based upon the suitability of the product for adults.
Also, with inventory configuration setup your fixed inventory and threshold inventory.
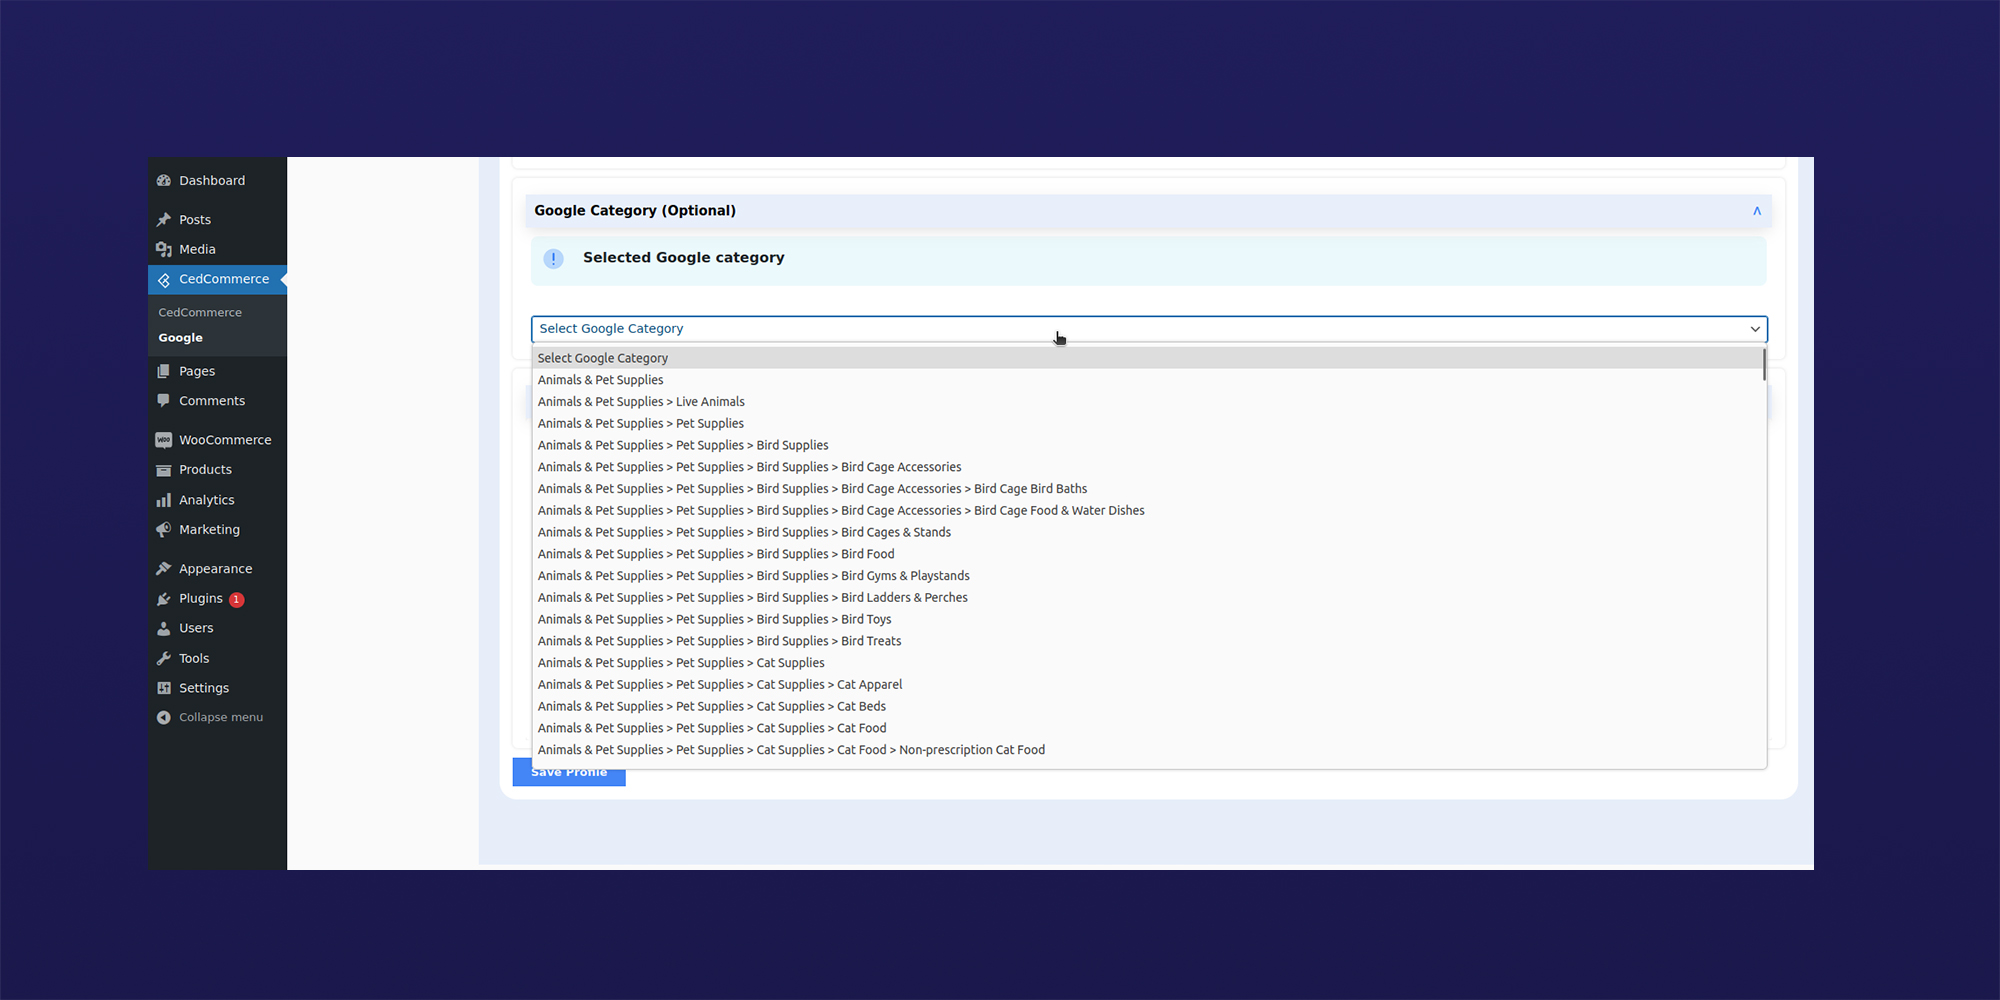
Next, select the Google category that is most suitable for your WooCommerce products. However, selecting Google categories is optional and you can proceed without it.
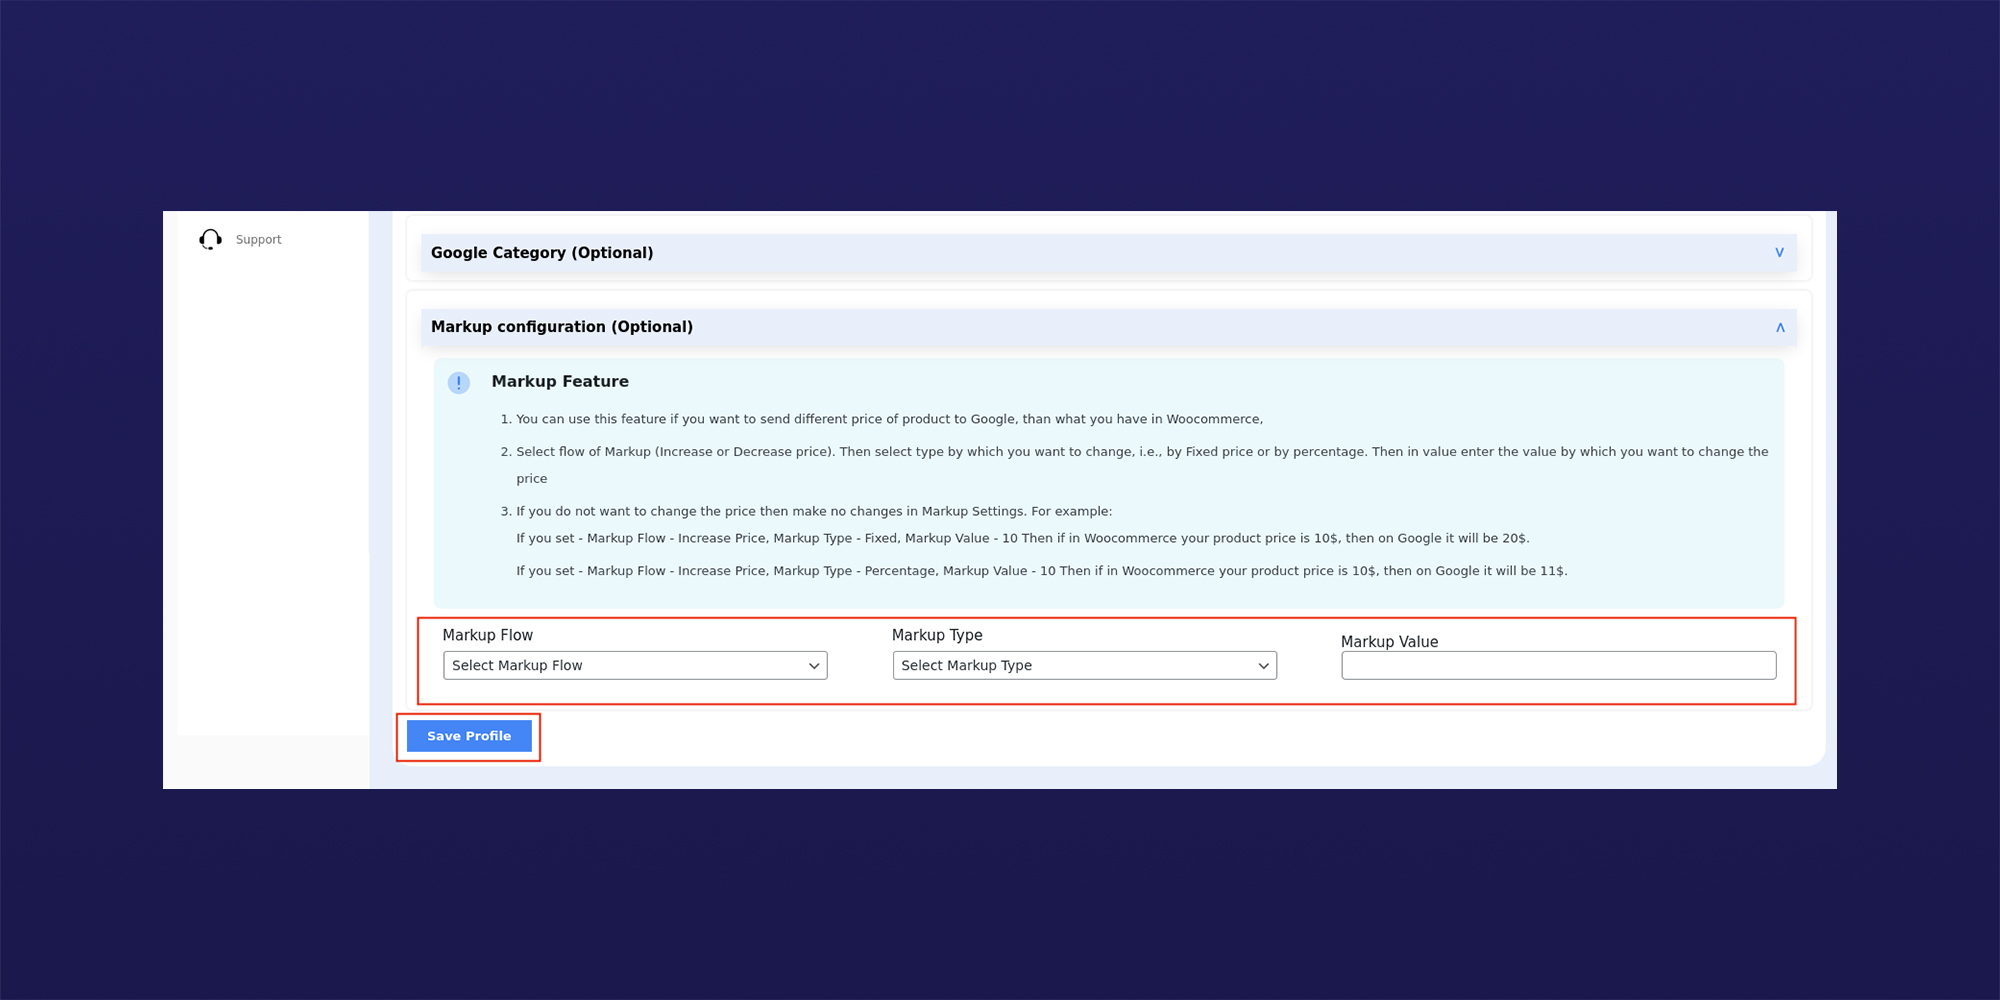
Markup configuration
↑ Back to topMarkup functionality is to assign increased or decreased price margins on your WooCommerce products before they get listed on to Google Shopping platform. After you select the suitable markup flow there are 2 markup types to select from-
- Fixed markup – Assign a fixed value in numbers that remains constant for all your WooCommerce products in that specific category.
- Percentage markup- Assign a percentage value that is calculated based on the listing price of your WooCommerce products in that specific category.
Once all the profiling steps are complete, click Save Profile and a new product profile will be created on the main profile dashboard. Similarly, you can create multiple product profiles as per your preferences.
Your newly created profile will appear as shown in the image below-
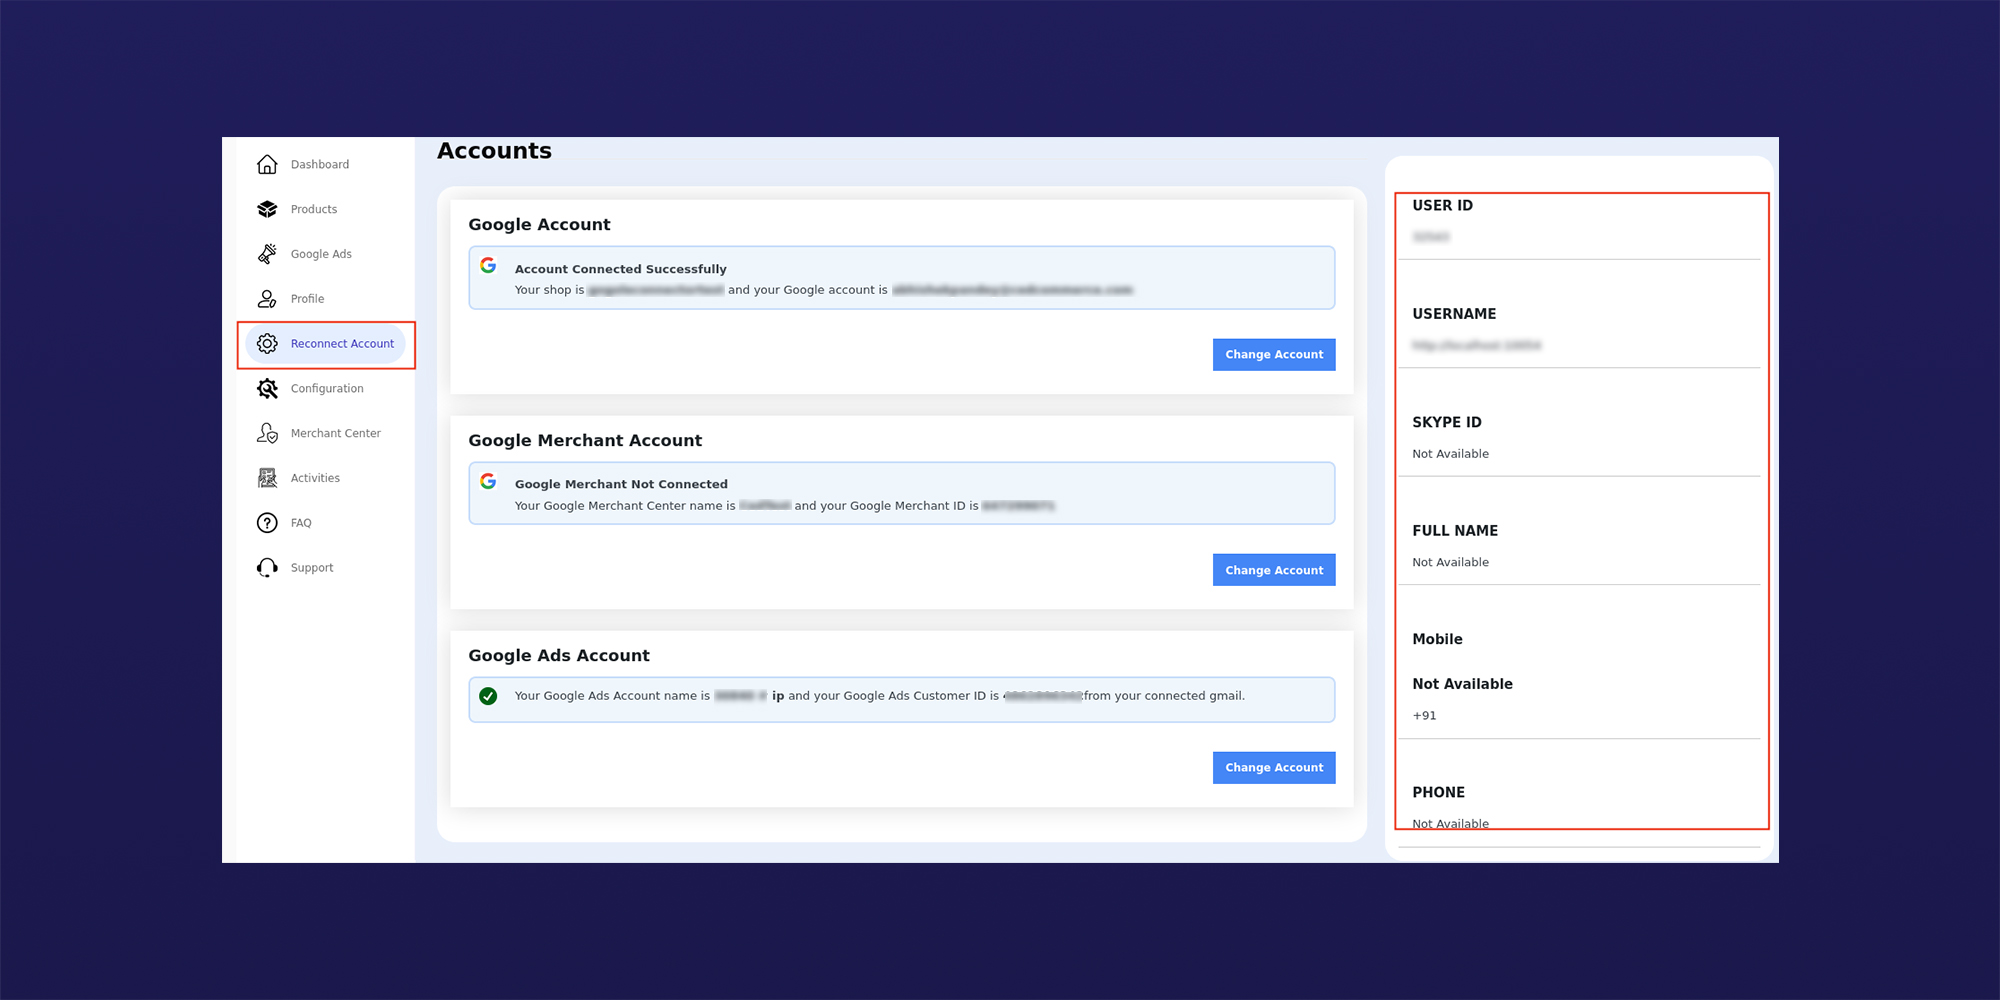
Reconnect Account
↑ Back to topUsing the change account option, you can remove or change your Google Account, Merchant Account, and Google Ads Account. On the right-hand panel are your basic details like- User Id, Username, Skype Id, Full Name and Mobile Number.
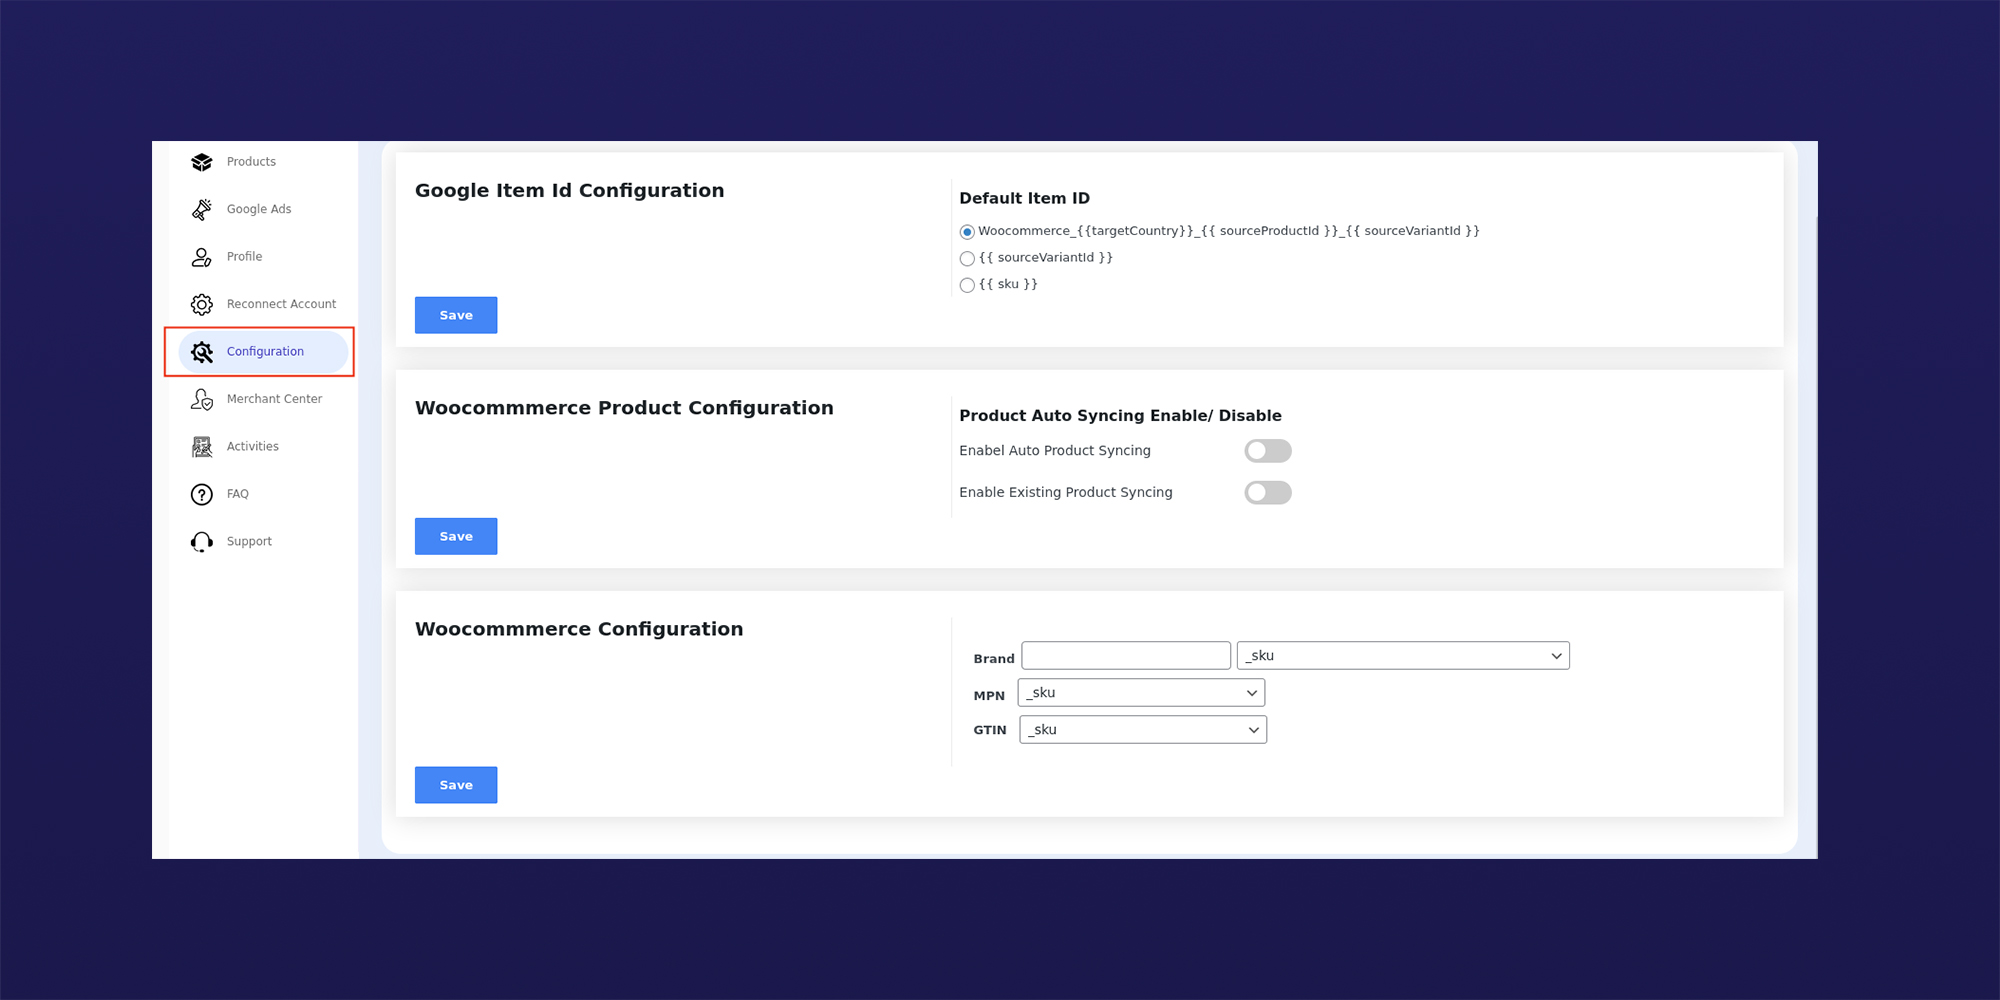
Configuration
↑ Back to topThe configuration section is further subdivided into 3 subsections-
- Google Item Id Configuration
Set up your Google Item Id for all products by selecting from the available default options. Once done, click Save to proceed to the next step. - WooCommerce Product Configuration
Here you can enable/disable auto product syncing for new products and existing products. The automatic scheduler will process 10 products in every chunk size and will run after every 5 minutes. Click Save after you’re done setting up the product configuration. - WooCommerce configuration
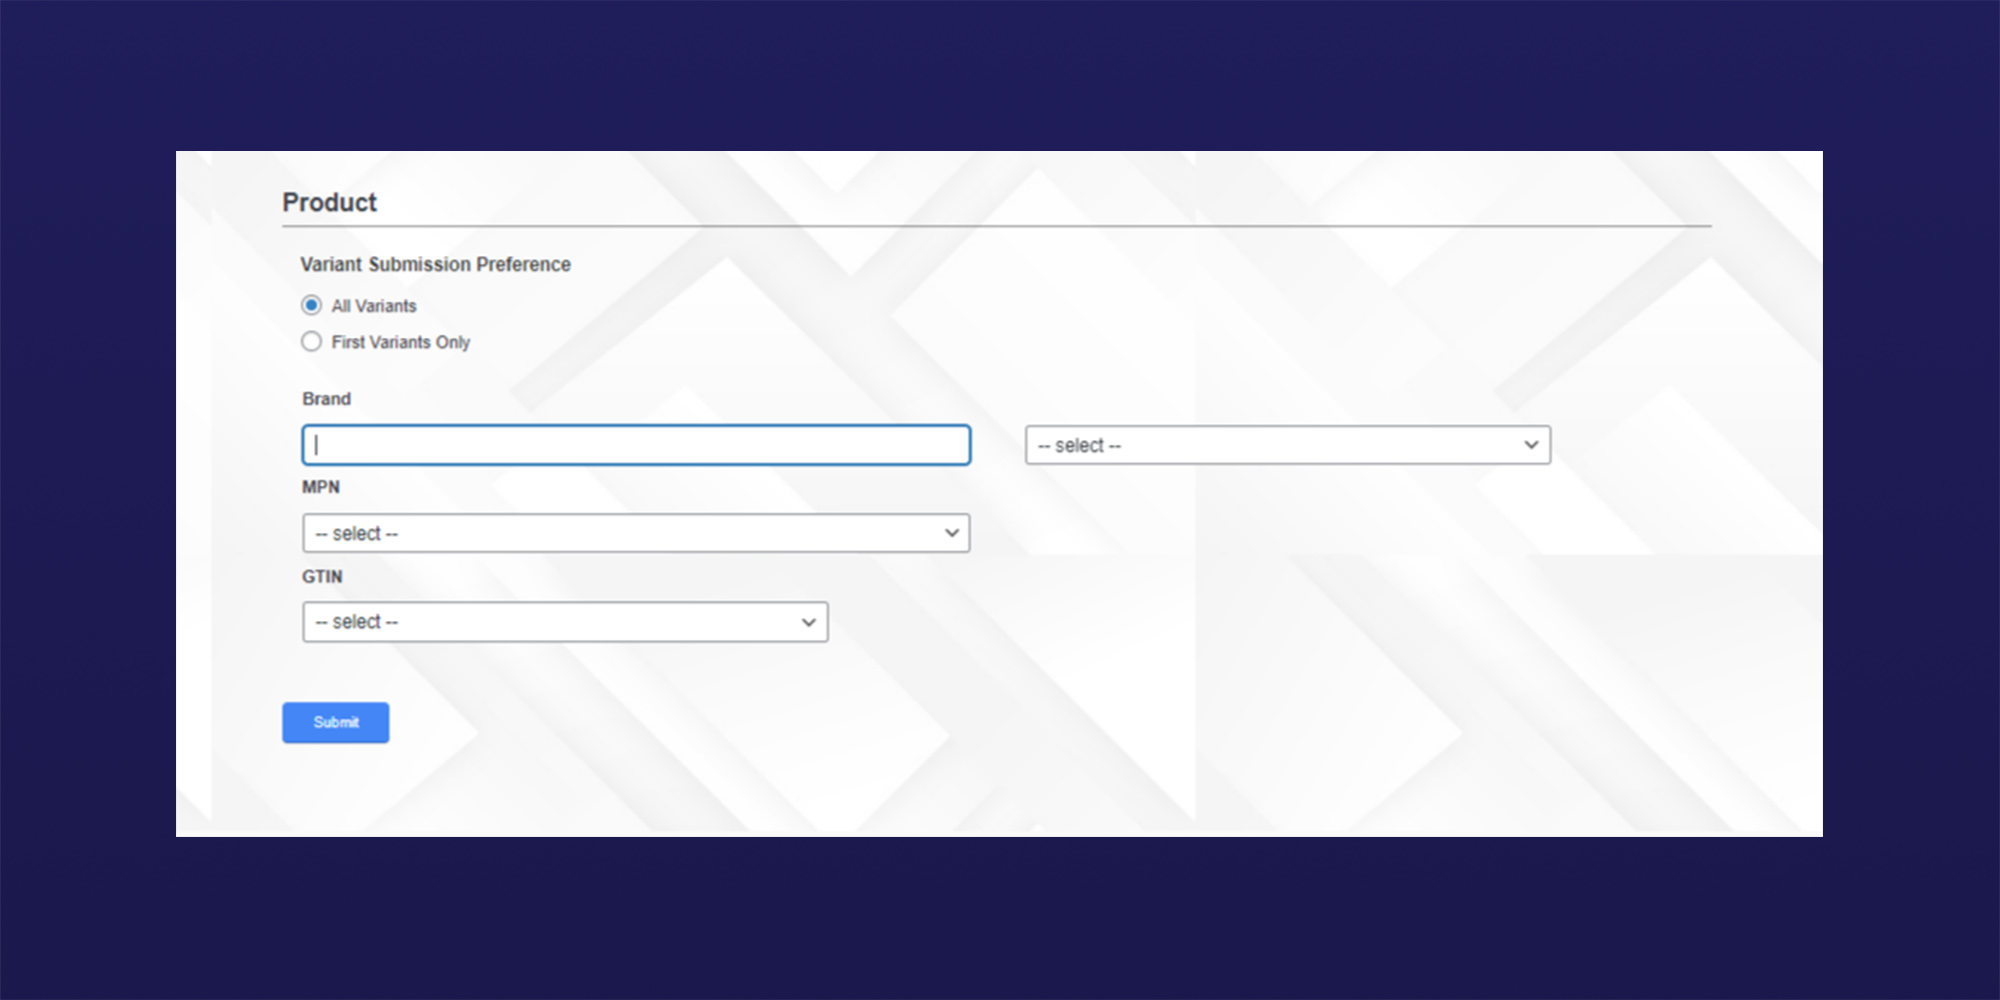
Using WooCommerce configuration you can set up your Brand name, MPN, and GTIN as per the preferences and then click Save to finish the whole process. This configuration is different from the profile configuration of the onboarding process. It applies to only those profiles which were not configured earlier during the onboarding process.
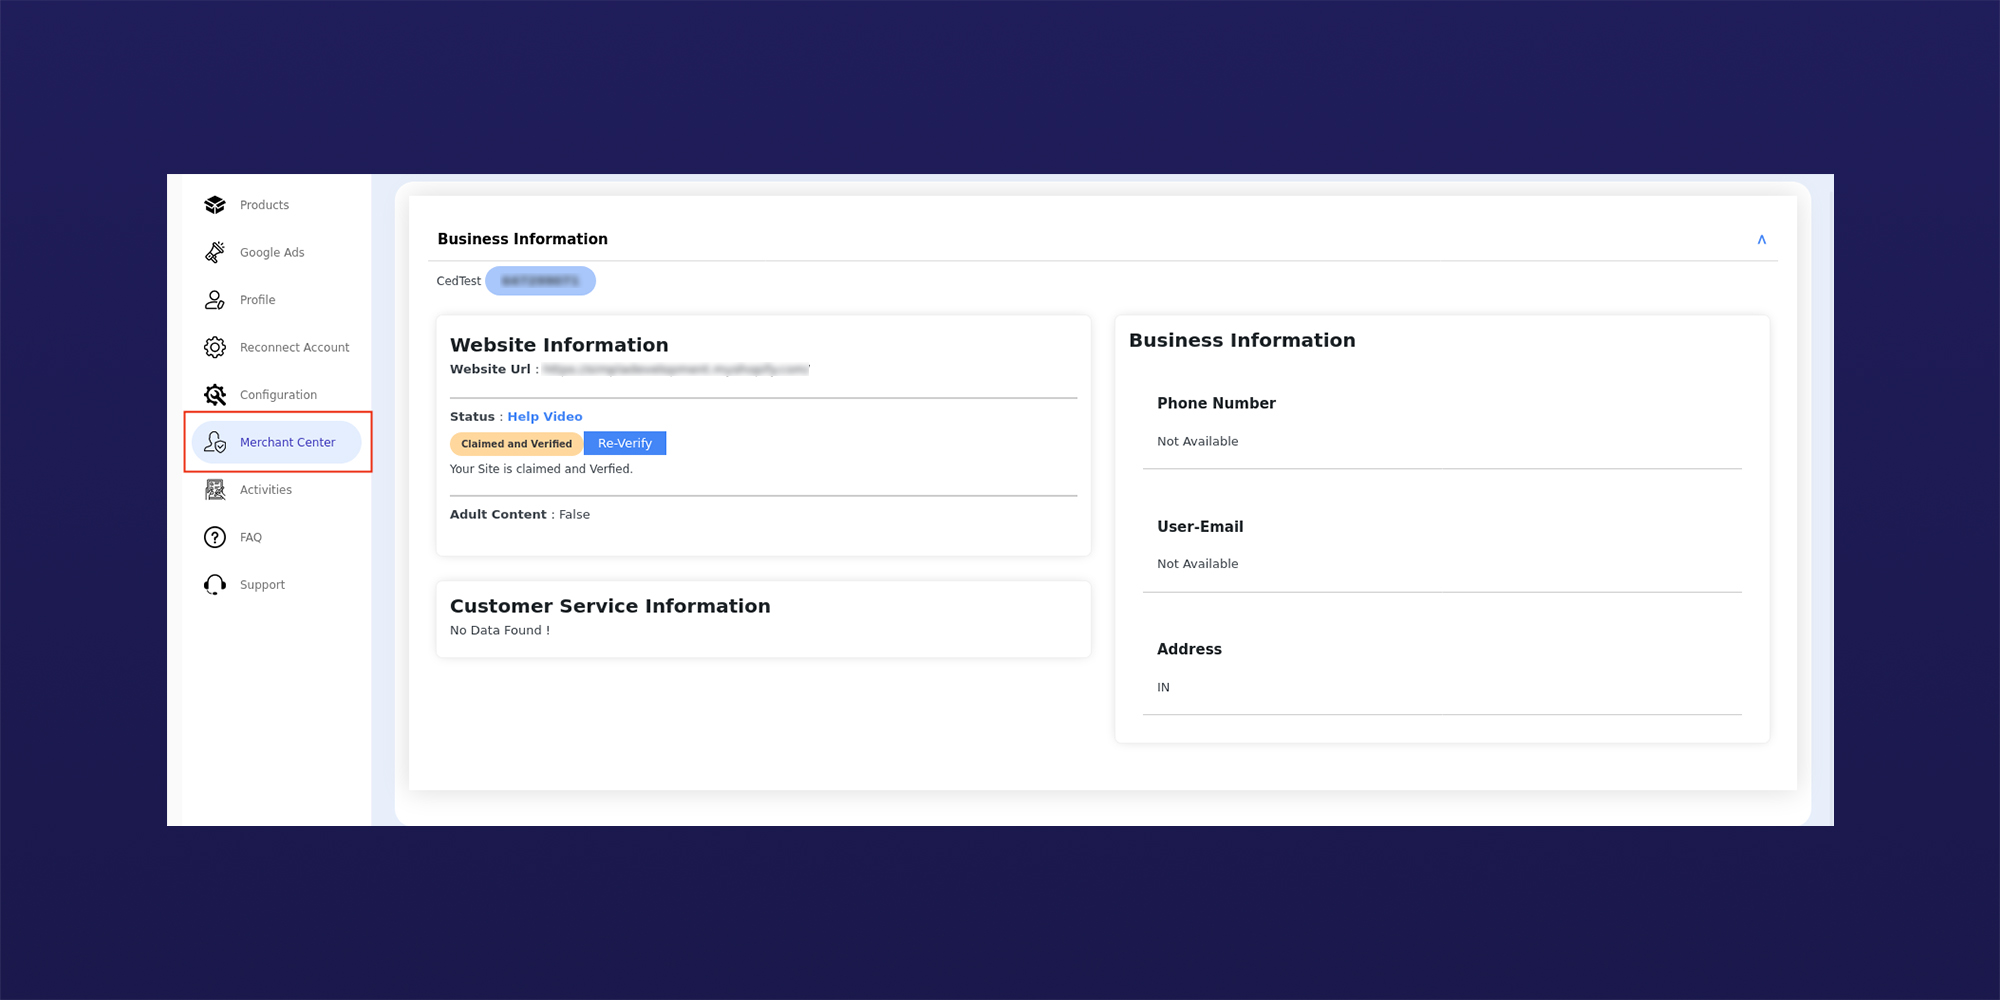
Merchant Center
↑ Back to topThe merchant center consists of all your website and business-related information. You get the option to claim and verify your website by just following a few simple steps.
Apart from this, you can cross-check your business phone number, user email, and address
Activities
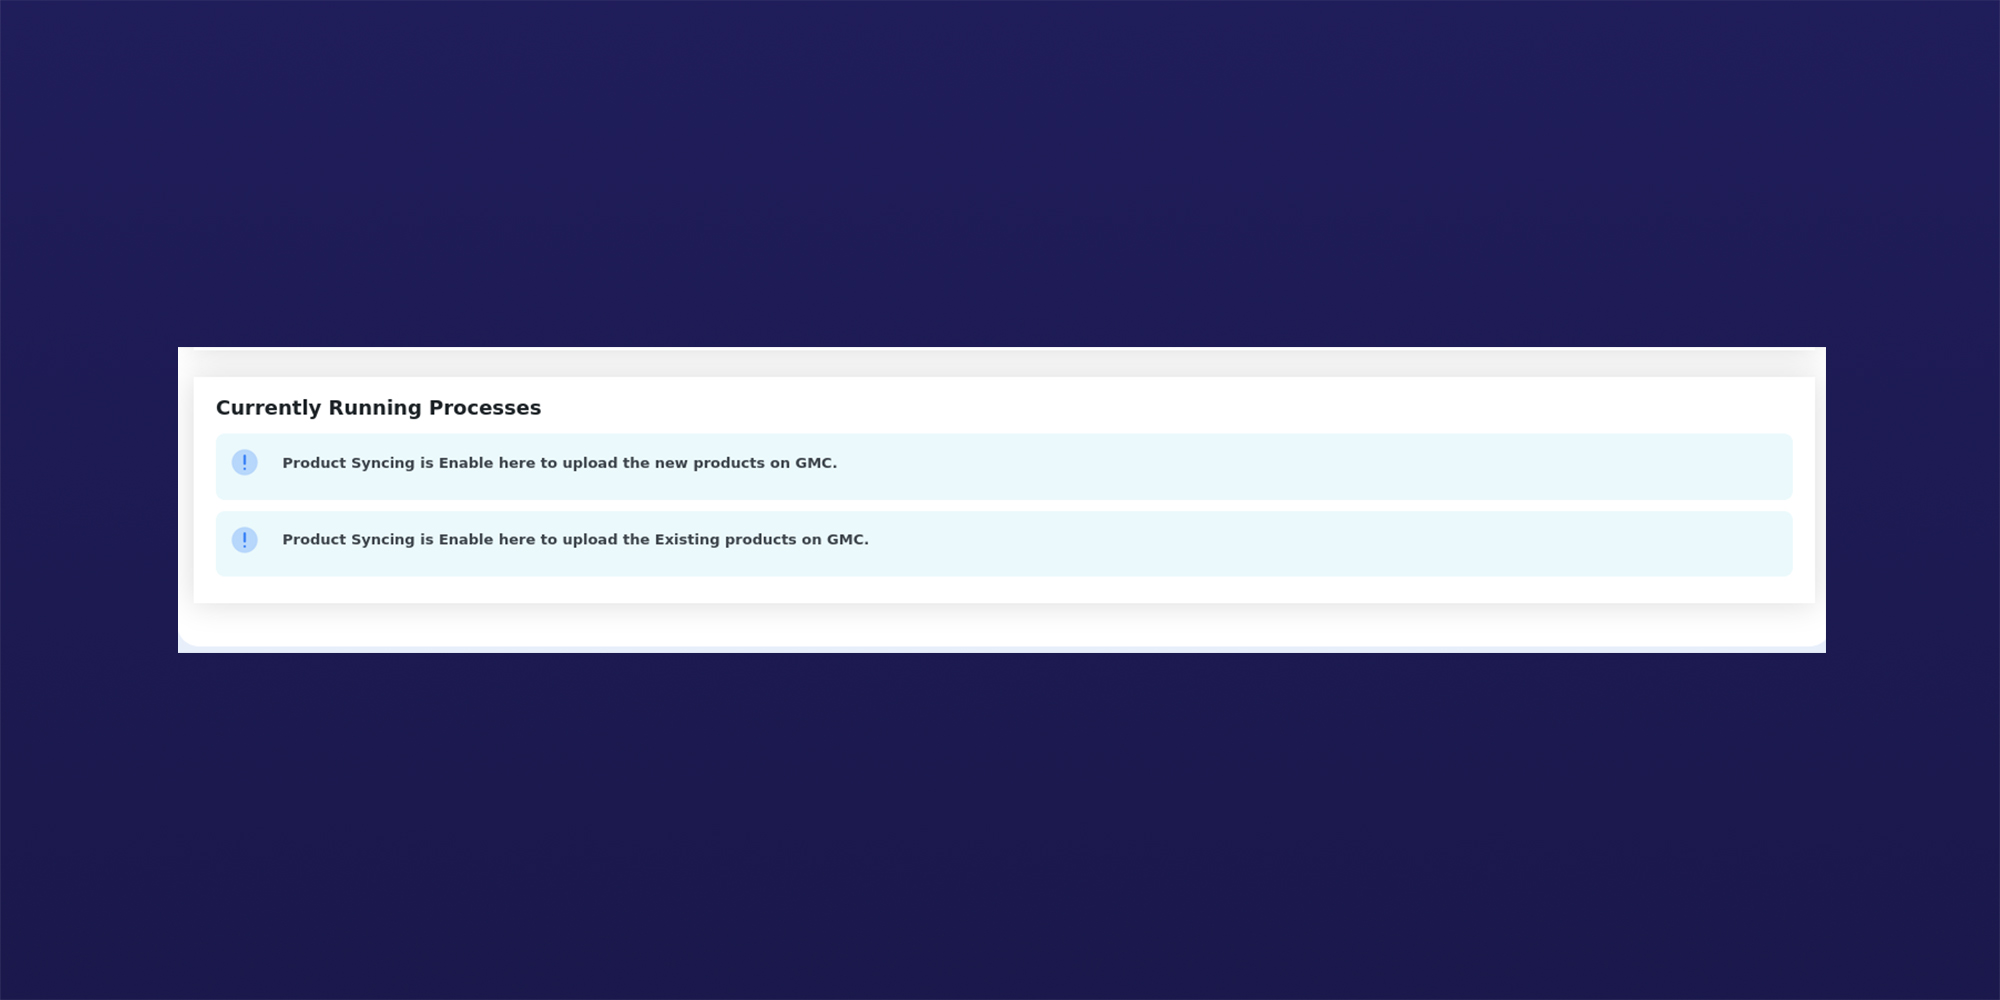
↑ Back to topIn the activities section, a list of all your recently performed product upload activities will be displayed with their status and errors. You get to view the last 5 activities first but, you can view your last 50 activities by clicking on view all activities tab as highlighted in the image below.
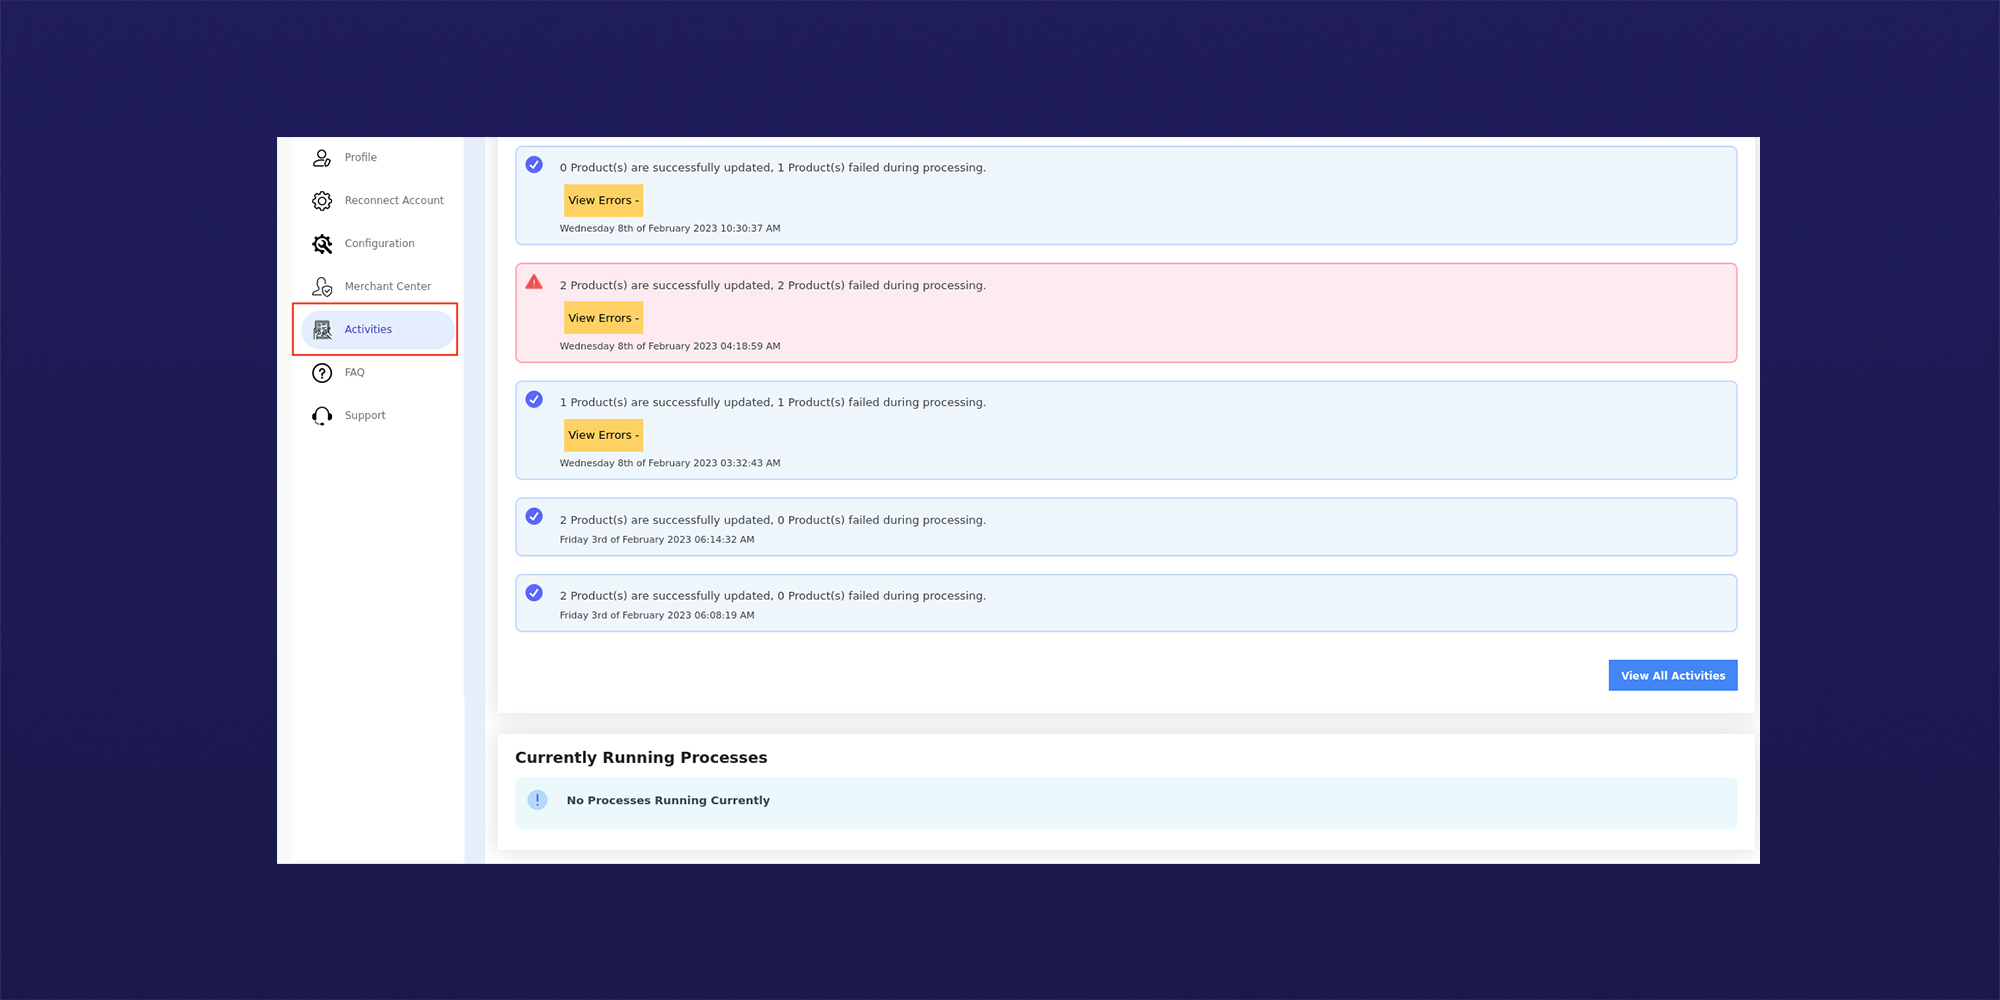
Also, on the activities dashboard, all the currently active processes are shown.
FAQs and Support
↑ Back to top1- Do you have any section where I can find the details regarding the count of products uploaded, remaining, and the ones under progress?
Ans. Yes, inside the Dashboard section, you will be able to view the total count of uploaded products, remaining products, and in-stock and out-of-stock products. Also, under the Notifications tab, you can view the in-progress tasks like upload/update products.
2- Is there any separate view for products already uploaded on Google?
Ans. Yes, in the Products section, there is a tab assigned by the name “Google Shopping Status.” If the product is already uploaded successfully on Google Shopping it will be marked as “uploaded” else it will be null.
3- Is there any way to filter out a product with a specific category and product type?
Ans. Yes, under the Products section, you can filter out products based on-
- Google shipping status
- Category
- Stock Status
- Product Type
4- Do you have any way to reset the onboarding steps in case I want to reset up your account?
Ans. Yes, you can simply click on the “Reset Setting” button on the dashboard page to re-set up your account. It will reset all the saved data and will redirect you to a new onboarding process.
5- What’s the effect on the uploaded products, if I reset my account ?
Ans. It can get affected if you’re resetting your merchant account. However, you might retrieve your uploaded product data if you log back with the same credentials. However, using a different merchant account will lead to the loss of all your uploaded products.
6- What if I want to connect another GMC and Google Ads account? Do you have any option to reconnect or create a GMC account without re-setting up the whole plugin?
Ans. Yes, we do have a “Reconnect Account” section inside the plugin, where you will find your connected GMC and Google Ads account. Also, you can create a new account or connect another account from there.
7- Is there any separate section to manage the Google Ads setup from your plugin only?
Ans. Yes, we do have a separate Google Ads section in the plugin.
You can create a Google Ads account from here and connect a pre-existing account.
You can reject/accept the current added GMC account or you can also add the pre-existing account.
PMAX Campaign – You can create a campaign and be able to find the list of all the pre-existing campaigns. Also, you can change the status of the PMAx campaign.
Conversion – You can create your conversion on your site with this plugin feature.
Reports – You will be able to fetch and download the reports of your campaigns here.
The plugin has FAQ resources to help you find answers to some common questions. Be sure to check it out before raising a support request.
No worries if your query is not listed in the FAQ section. Our experts are available 24/7 to provide you with top-notch assistance. You can connect with our experts for any further queries.