WooCommerce has traditionally utilized shortcodes to easily add dynamic content and features to WordPress pages. With the evolution of WordPress towards the Gutenberg block-based editor, focus has shifted from shortcodes to more interactive and visually integrated blocks. While the block editor offers interactively customizable blocks and enhanced editing capabilities; you can still use the legacy shortcodes in it by adding them inside a shortcode block. This document details the shortcodes included with WooCommerce.
This documentation covers everything from basic usage tips, including where and how to insert these shortcodes, to detailed explanations of the attributes you can use to modify shortcode behavior.
You’ll find details on page-specific shortcodes such as those for:
- Cart,
- Checkout,
- and My Account pages.
as well as in-depth coverage of product-related shortcodes that help in:
- Displaying products,
- Categories,
- and custom sorting options.
Additionally, we provide troubleshooting advice and useful code snippets to enhance your understanding and application of these tools in various scenarios.
WooCommerce comes with several shortcodes that can be used to insert content inside posts and pages.
How to use shortcodes
↑ Back to topWhere to use
↑ Back to topShortcodes can be used on pages and posts in WordPress. If you are using the block editor, there is a shortcode block you can use to paste the shortcode in.

If you are using the classic editor, you can paste the shortcode on the page or post.
Args (or Arguments)
↑ Back to topSeveral of the shortcodes below will mention “Args”. These are ways to make the shortcode more specific. For example, by adding id="99" to the [add_to_cart] shortcode, it will create an add-to-cart button for the product with ID 99.
Page Shortcodes
WooCommerce cannot function properly without a cart, checkout, and account area being somewhere on your site. These shortcodes add those areas to pages on your site.
Starting with WooCommerce version 8.3, the Cart and Checkout Blocks are the default for new installations. Currently there is not a block based alternative for displaying the My Account area.
woocommerce_cart – shows the cart pagewoocommerce_checkout – shows the checkout pagewoocommerce_my_account – shows the user account pagewoocommerce_order_tracking – shows the order tracking form
In most cases, the necessary shortcodes will be added to pages automatically via our setup wizard and do not need to be added manually.
Cart
↑ Back to topUsed on the cart page, the cart shortcode displays cart content and interface for coupon codes and other cart bits and pieces.
[woocommerce_cart]
Checkout
↑ Back to topUsed on the checkout page, the checkout shortcode displays the checkout process.
[woocommerce_checkout]
My Account
↑ Back to topShows the ‘my account’ area where the currently logged in customer can view past orders and update their information. Guests who aren’t logged in will see a sign in form. As well as a registration form if you have it enabled in your accounts & privacy settings. Currently there is not a block based alternative for displaying the My Account area.
[woocommerce_my_account]
Order Tracking Form
↑ Back to topLets a user see the status and details of an order by entering their order number and billing email. This shortcode is not required.
[woocommerce_order_tracking]
Products
↑ Back to topThe [products] shortcode is one of our most robust shortcodes, which can replace various other strings used in earlier versions of WooCommerce.
The [products] shortcode allows you to display products by post ID, SKU, categories, attributes, with support for pagination, random sorting, and product tags, replacing the need for multiples shortcodes such as [featured_products], [sale_products], [best_selling_products], [recent_products], [product_attribute], and [top_rated_products], which are needed in versions of WooCommerce below 3.2. Review the examples below.
Available Product Attributes
↑ Back to topThe following attributes are available to use in conjunction with the [products] shortcode. They have been split into sections for primary function for ease of navigation, with examples below.
Display Product Attributes
limit– The number of products to display. Defaults to and-1(display all) when listing products, and-1(display all) for categories.columns– The number of columns to display. Defaults to4.paginate– Toggles pagination on. Use in conjunction withlimit. Defaults tofalseset totrueto paginate .orderby– Sorts the products displayed by the entered option. One or more options can be passed by adding both slugs with a space between them. Available options are:date– The date the product was published.id– The post ID of the product.menu_order– The Menu Order, if set (lower numbers display first).popularity– The number of purchases.rand– Randomly order the products on page load (may not work with sites that use caching, as it could save a specific order).rating– The average product rating.title– The product title. This is the defaultorderbymode.
order– States whether the product order is ascending (ASC) or descending (DESC), using the method set inorderby. Defaults toASC.skus– Comma-separated list of product SKUs.category– Comma-separated list of category slugs.tag– Comma-separated list of tag slugs.class– Adds an HTML wrapper class so you can modify the specific output with custom CSS.on_sale– Retrieve on sale products. Not to be used in conjunction withbest_sellingortop_rated.best_selling– Retrieve the best selling products. Not to be used in conjunction withon_saleortop_rated.top_rated– Retrieve top-rated products. Not to be used in conjunction withon_saleorbest_selling.
If you do not include the orderby attribute, the system displays products in the default sorting order, which is by menu order, then title.
Content Product Attributes
attribute– Retrieves products using the specified attribute slug.terms– Comma-separated list of attribute terms to be used withattribute.terms_operator– Operator to compare attribute terms. Available options are:AND– Will display products from all of the chosen attributes.IN– Will display products with the chosen attribute. This is the defaultterms_operatorvalue.NOT IN– Will display products that are not in the chosen attributes.
tag_operator– Operator to compare tags. Available options are:AND– Will display products from all of the chosen tags.IN– Will display products with the chosen tags. This is the defaulttag_operatorvalue.NOT IN– Will display products that are not in the chosen tags.
visibility– Will display products based on the selected visibility. Available options are:visible– Products visible on shop and search results. This is the defaultvisibilityoption.catalog– Products visible on the shop only, but not search results.search– Products visible in search results only, but not on the shop.hidden– Products that are hidden from both shop and search, accessible only by direct URL.featured– Products that are marked as Featured Products.
category– Retrieves products using the specified category slug.tag– Retrieves products using the specified tag slug.cat_operator– Operator to compare category terms. Available options are:AND– Will display products that belong in all of the chosen categories.IN– Will display products within the chosen category. This is the defaultcat_operatorvalue.NOT IN– Will display products that are not in the chosen category.
ids– Will display products based on a comma-separated list of Post IDs.skus– Will display products based on a comma-separated list of SKUs.
If the product is not showing, make sure it is not set to “Hidden” in the “Catalog Visibility”.
Special Product Attributes
These attributes cannot be used with the “Content Attributes” listed above, as they will likely cause a conflict and not display. You should only use one of the following special attributes.
best_selling– Will display your best selling products. Must be set totrue.on_sale– Will display your on-sale products. Must be set totrue.
Examples of Product Scenarios
↑ Back to topIn the following scenarios, we’ll use an example clothing store.
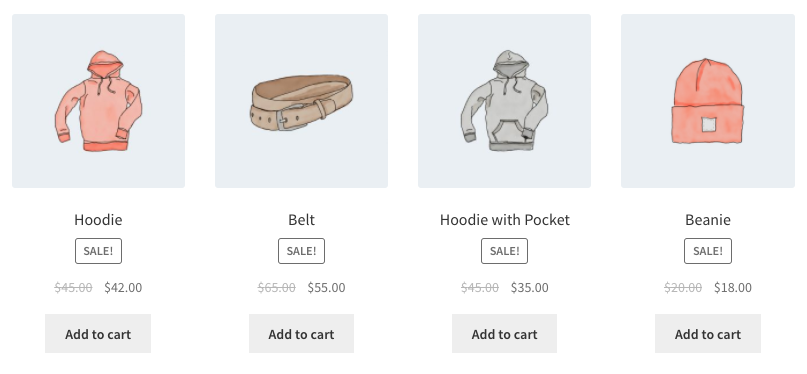
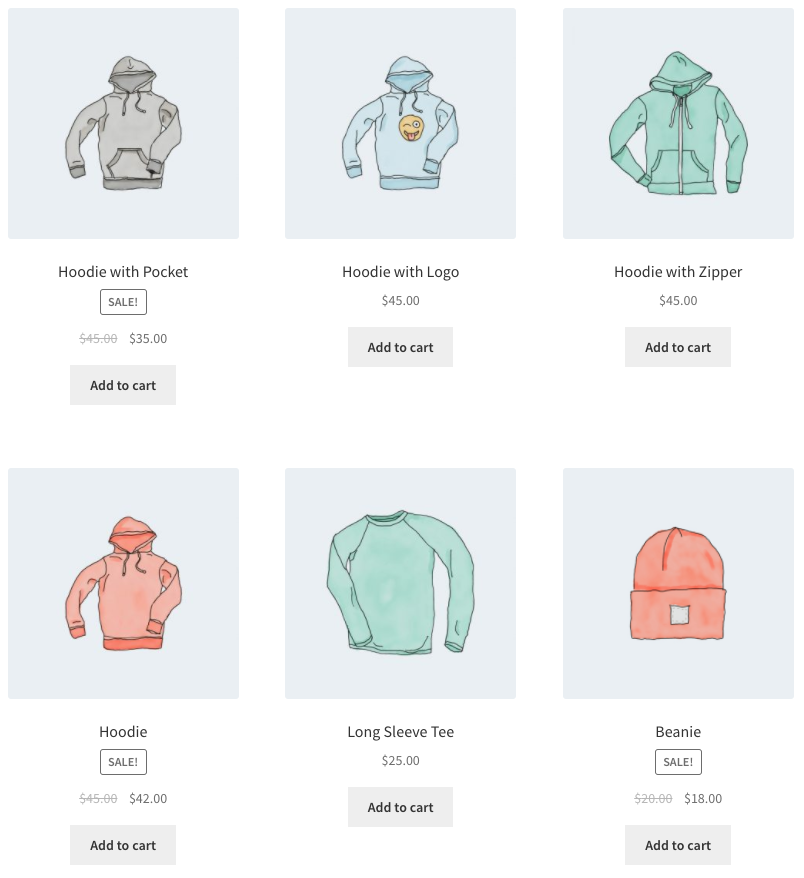
Scenario 1 – Random Sale Items
We want to display four random on sale products.
[products limit="4" columns="4" orderby="popularity" class="quick-sale" on_sale="true" ]
This shortcode explicitly states four products with four columns (which will be one row), showing the most popular on-sale items. It also adds a CSS class quick-sale, which we can modify in our theme.
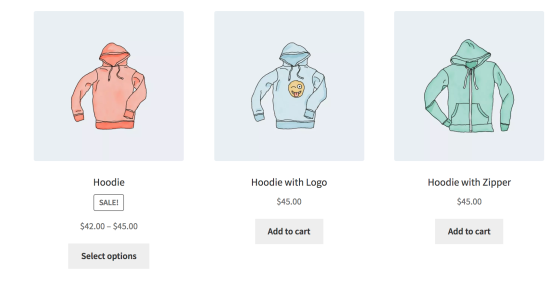
Scenario 2 – Featured Products
We want to display my featured products, two per row, with a maximum of four items.
[products limit="4" columns="2" visibility="featured" ]
This shortcode says up to four products will load in two columns, and that they must be featured. We did not use the orderby attribute. So the shortcode shows products in the default sorting, which is by menu order, then title. (A to Z by default because order is not used).
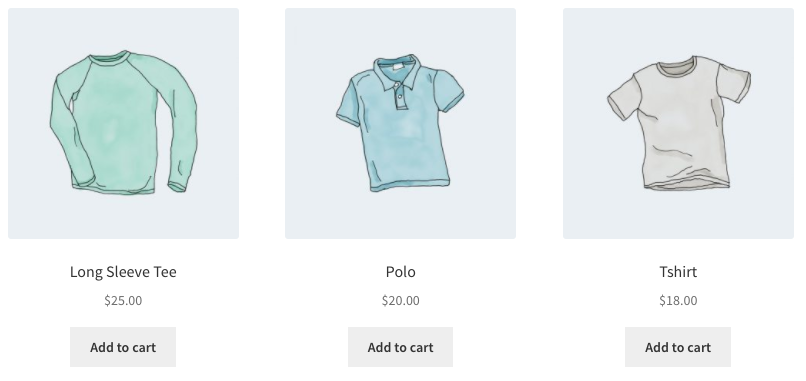
Scenario 3 – Best Selling Products
We want to display our three top best selling products in one row.
[products limit="3" columns="3" best_selling="true" ]
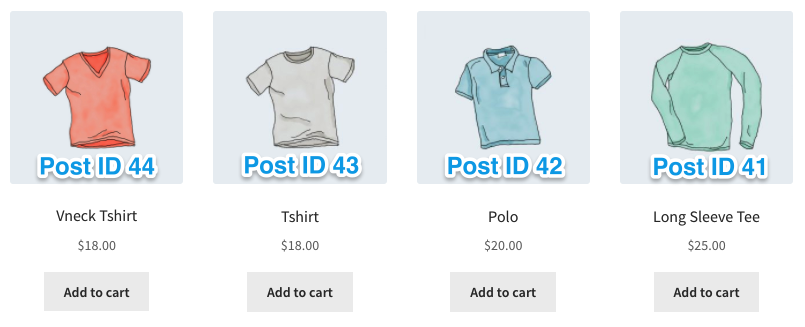
Scenario 4 – Newest Products
We want to display the newest products first – four products across one row. To accomplish this, we’ll use the Post ID (which increases incrementally with new posts, and is generated when the product page is created), along with the order and orderby command. Since you can’t see the Post ID from the frontend, the ID#s have been superimposed over the images.
[products limit="4" columns="4" orderby="id" order="DESC" visibility="visible"]
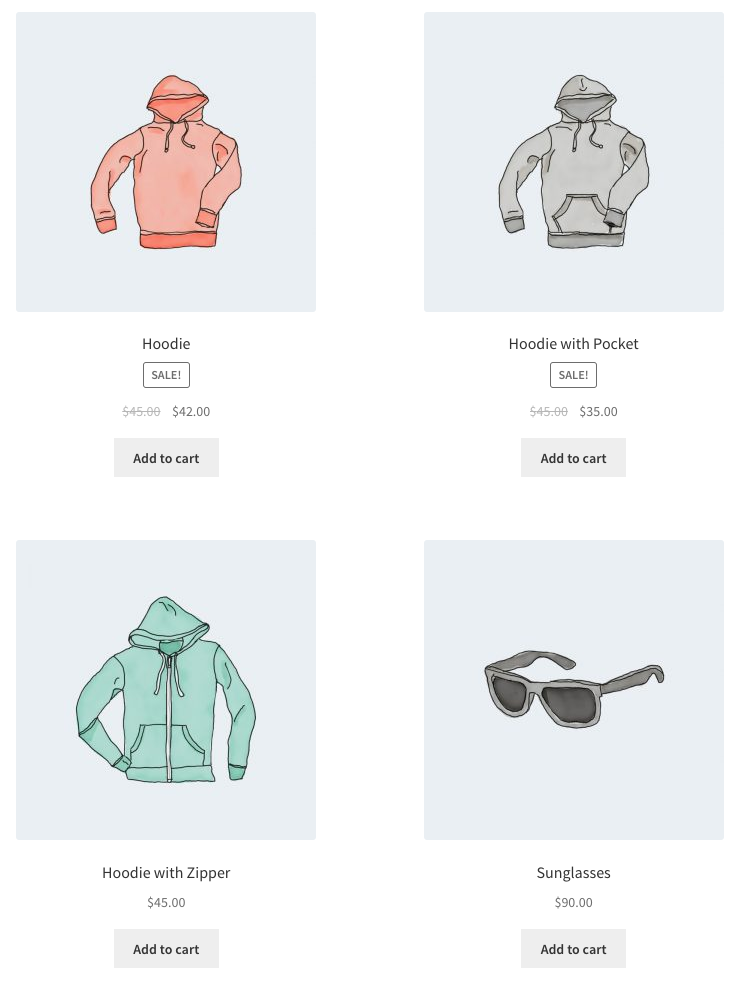
Scenario 5 – Specific Categories
We only want to display hoodies and shirts, but not accessories. we’ll use two rows of four.
[products limit="8" columns="4" category="hoodies, tshirts" cat_operator="AND"]
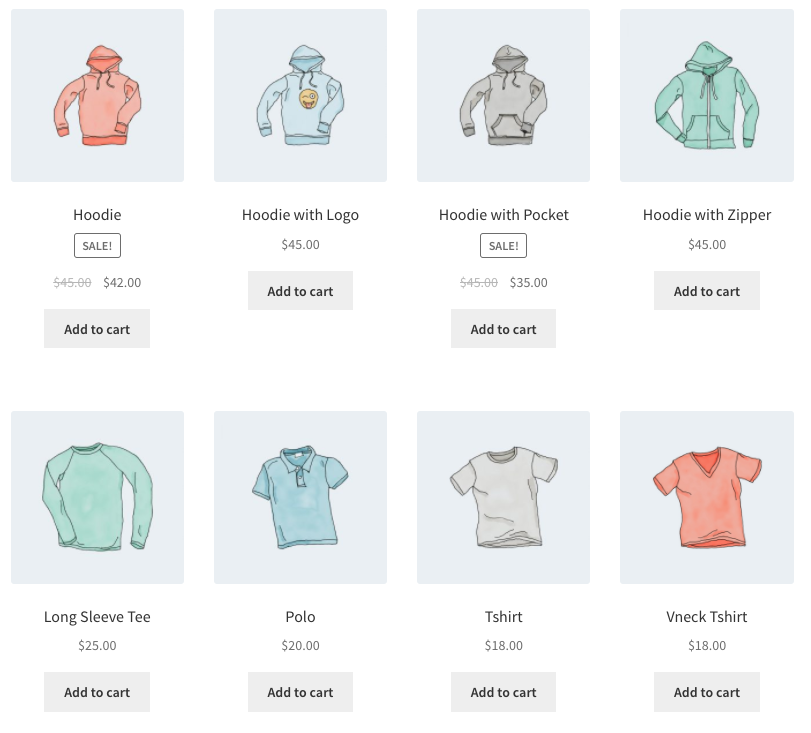
Alternatively, if we only want to display products not in those categories. All I need to change is the cat_operator to NOT IN.
[products limit="8" columns="4" category="hoodies, tshirts" cat_operator="NOT IN"]
Note that even though the limit is set to 8, there are only four products that fit that criteria, so four products are displayed.
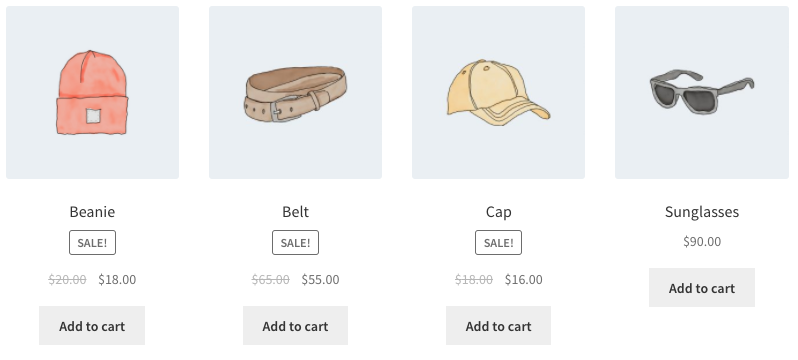
Scenario 6 – Attribute Display
Each of the clothing items has an attribute, either “Spring/Summer” or “Fall/Winter” depending on the appropriate season, with some accessories having both since they can be worn all year. In this example, I want three products per row, displaying all of the “Spring/Summer” items. That attribute slug is season, and the attribute’s terms are warm and cold. I also want them sorted from the newest products to the oldest.
[products columns="3" attribute="season" terms="warm" orderby="date"]
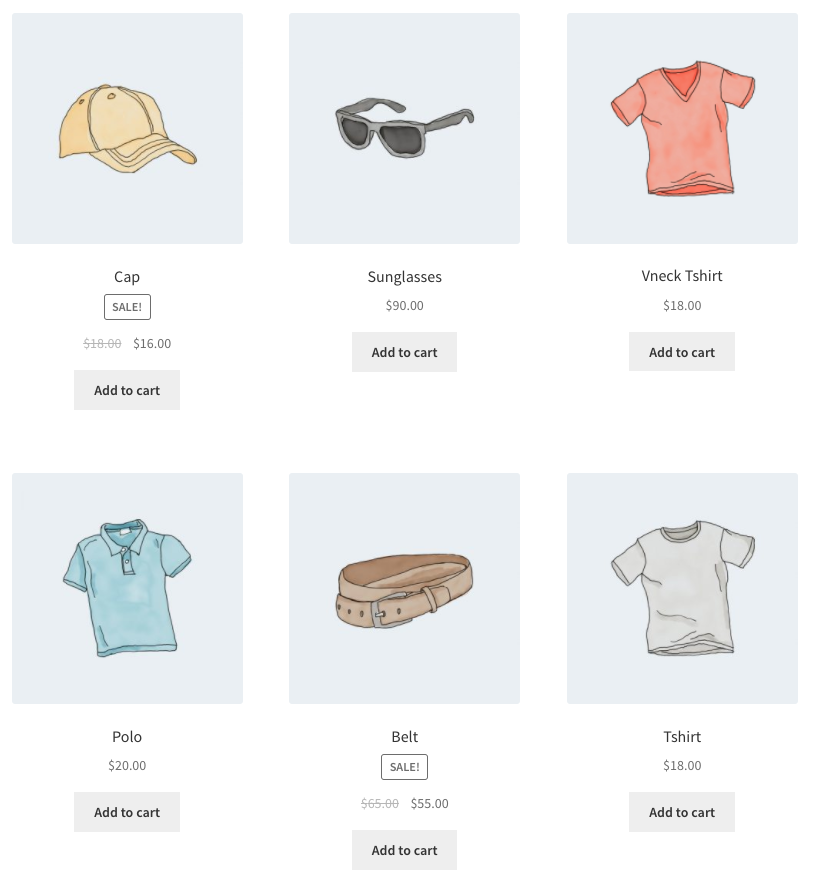
Alternatively, if I wanted to display everything but warm weather products, I could add NOT IN as my terms_operator:
[products columns="3" attribute="season" terms="warm" terms_operator="NOT IN"]
Note that by using NOT IN, I exclude products that are both in “Spring/Summer” and “Fall/Winter”. If I wanted to show all cold-weather appropriate gear including these shared accessories, I would change the term from warm to cold.
Scenario 7 – Show Only Products With tag “hoodie”
[products tag="hoodie"]
Sorting Products by Custom Meta Fields
↑ Back to top
When using the Products shortcode, you can choose to order products by the pre-defined values above. You can also sort products by custom meta fields using the code below (in this example we order products by price):
add_filter( 'woocommerce_shortcode_products_query', 'woocommerce_shortcode_products_orderby' );

function woocommerce_shortcode_products_orderby( $args ) {

    $standard_array = array('menu_order','title','date','rand','id');

    if( isset( $args['orderby'] ) && !in_array( $args['orderby'], $standard_array ) ) {
        $args['meta_key'] = $args['orderby'];
        $args['orderby']  = 'meta_value_num';
    }

    return $args;
}
You need to place this snippet in functions.php in your theme folder and then customize it by editing the meta_key.
Product Category
↑ Back to topThese two shortcodes will display your product categories on any page.
[product_category]– Will display products in a specified product category.[product_categories]– Will display all your product categories.
Available Product Category attributes
↑ Back to topids– Specify specific product category ids to be listed. To be used in [product_categories]category– Can be either the category id, name or slug. To be used in [product_category]limit– The number of categories to display. Entering “0” or leaving undeclared shows all categories. (Interchangable withnumberas shown in example)columns– The number of columns to display. Defaults to 4hide_empty– The default is “1” which will hide empty categories. Set to “0” to show empty categoriesparent– Set to a specific category ID if you would like to display all the child categories. Alternatively, set to “0” (like in the example below) to show only the top level categories.orderby– The default is to order by “name”, can be set to “id”, “slug”, or “menu_order”. If you want to order by the ids you specified then you can useorderby="include"order– States whether the category ordering is ascending (ASC) or descending (DESC), using the method set inorderby. Defaults toASC.
Examples of Product Category Scenarios
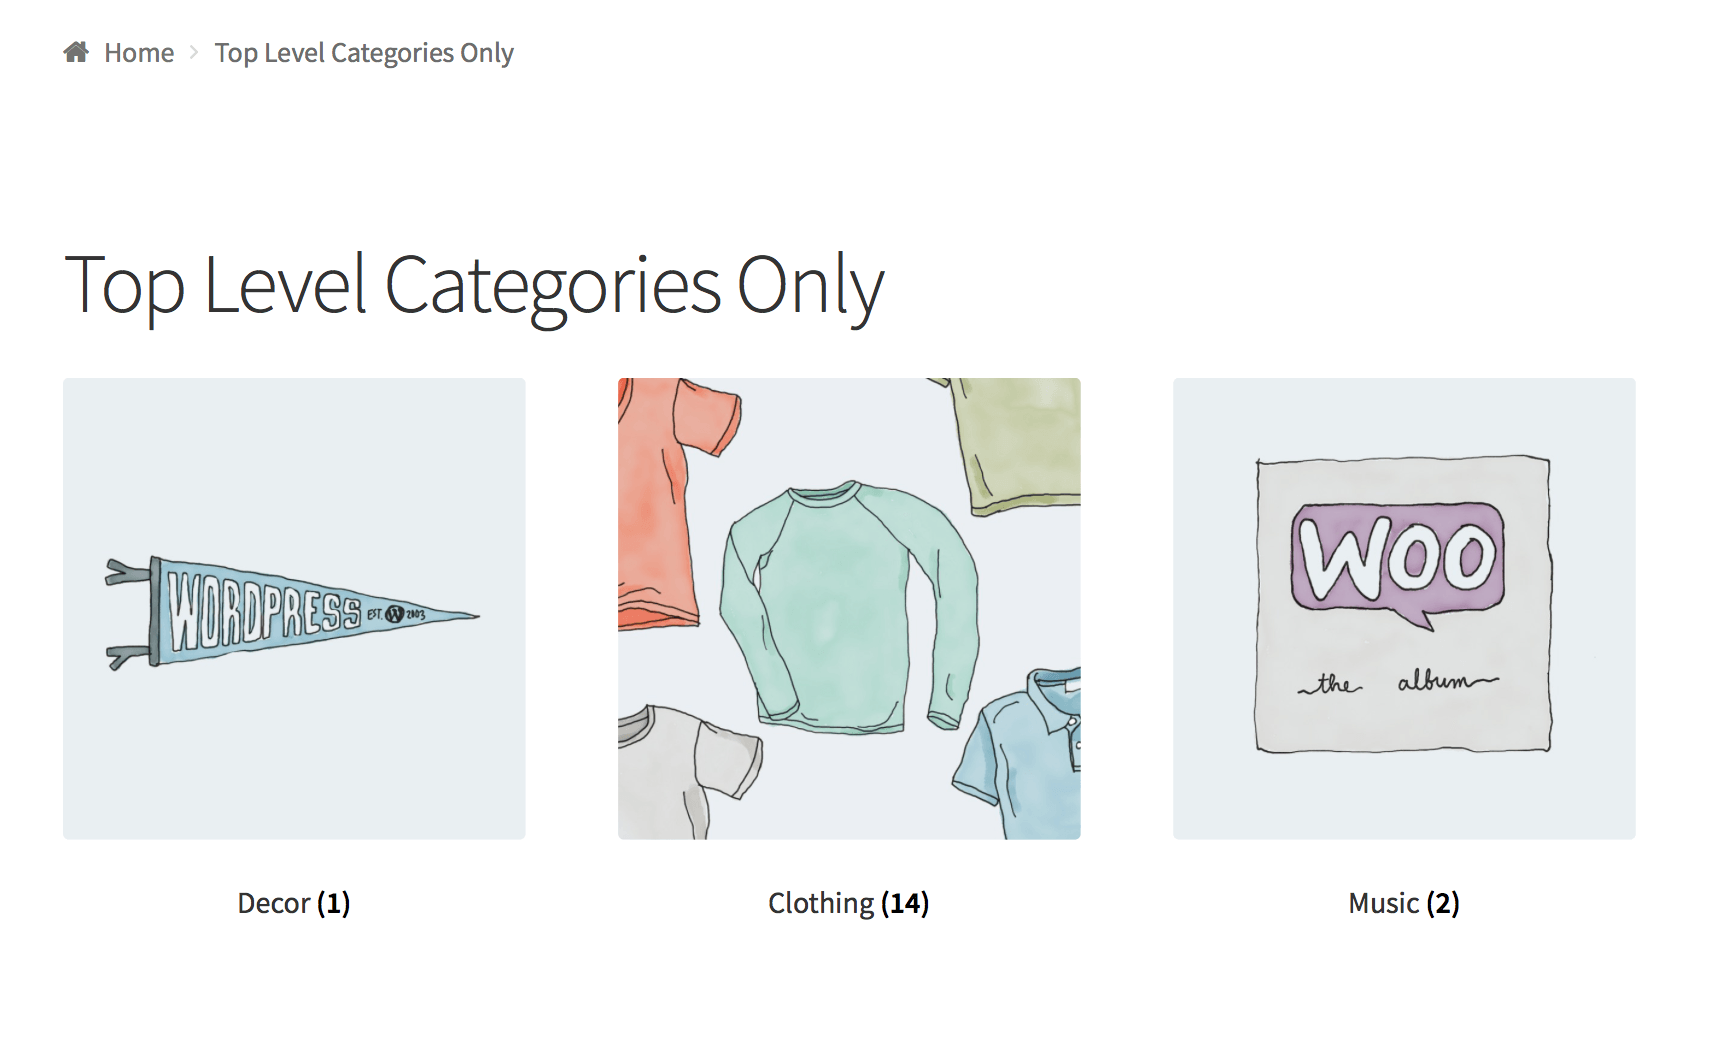
↑ Back to topScenario 8 – Show Top Level Categories Only
Imagine you only wanted to show top level categories on a page and exclude the sub categories, well it’s possible with the following shortcode.
[product_categories number="0" parent="0"]
Product Page
↑ Back to topShow a full single product page by ID or SKU.
[product_page id="99"]
[product_page sku="FOO"]
Related Products
↑ Back to topList related products.
Args:
array(
     'limit' => '12',
     'columns' => '4',
     'orderby' => 'title'
 )
[related_products limit="12"]
limit Argument
Add to Cart
↑ Back to topShow the price and add to cart button of a single product by ID.
Args:
array(
      'id' => '99',
      'style' => 'border:4px solid #ccc; padding: 12px;',
      'sku' => 'FOO'
      'show_price' => 'TRUE'
      'class' => 'CSS-CLASS'
      'quantity' => '1';
 )
[add_to_cart id="99"]Add to Cart URL
↑ Back to topDisplay the URL on the add to cart button of a single product by ID.
Args:
array(
      'id' => '99',
      'sku' => 'FOO'
 )
[add_to_cart_url id="99"]
Display WooCommerce notifications on pages that are not WooCommerce
↑ Back to top[shop_messages] allows you to show WooCommerce notifications (like, ‘The product has been added to cart’) on non-WooCommerce pages. Helpful when you use other shortcodes, like [add_to_cart], and would like the users to get some feedback on their actions.
Troubleshooting Shortcodes
↑ Back to topIf you correctly pasted your shortcodes and the display looks incorrect, make sure you did not embed the shortcode between <pre> tags. This is a common issue. To remove these tags, edit the page, and click the Text tab:

Another common problem is that straight quotation marks (") are displayed as curly quotation marks (“). For the shortcodes to work correctly, you need straight quotation marks.
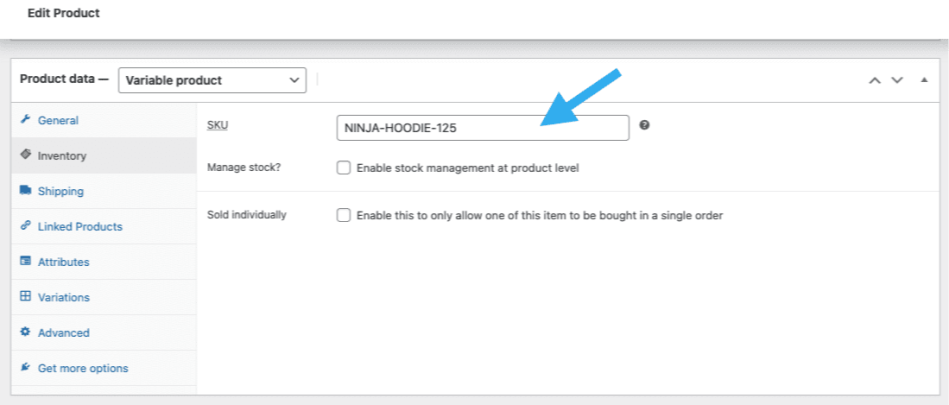
Variation Product SKU Not Shown
↑ Back to topIn regards to the use of SKU shortcode like [products skus="sku-name"], the variation product SKU isn’t intended to be displayed by itself, as opposed to the parent variable product SKU. Therefore it is expected that if we use an SKU from: Product data > Variable product > Variations > Variation name > SKU, it will not get displayed.
However, if we use an SKU from the parent variable product: Product data > Variable product > Inventory > SKU, it will get displayed.
Code Snippets
↑ Back to topNote: We are unable to provide support for customizations under our Support Policy. If you need to customize a snippet, or extend its functionality, seek assistance from a qualified WordPress/WooCommerce Developer. We highly recommend Codeable, or a Certified WooExpert.
Top-level Product Category List
↑ Back to topThe Product Categories List block can, as the name suggests, display a list of product categories. However, it doesn’t currently (April 2023) have the option to display only top-level categories and will display all categories, top-level and sub-categories alike.
This snippet adds a new shortcode [top_level_product_categories_list] that outputs a bulleted list of top-level product categories only. It can be added to a child theme’s functions.php file or via a code snippets plugin.
wc-shortcode-top-level-product-category-list.php content:
<?php
/*
 * The shortcode is [top_level_product_categories_list]
 */
add_shortcode('top_level_product_categories_list', 'wc_shortcode_top_level_product_categories_list');

function wc_shortcode_top_level_product_categories_list() {

   ob_start();

   $args = array(
        'taxonomy' => 'product_cat',
        'parent' => 0
    );

    $product_categories = get_categories($args);

    echo '<ul>';

    foreach ($product_categories as $category) {
        echo '<li><a href="' . get_term_link($category->slug, 'product_cat') . '">' . $category->name . '</a></li>';
    }

    echo '</ul>';

    return ob_get_clean();
}
Questions and Support
↑ Back to topDo you still have questions and need assistance?
This documentation is about the free, core WooCommerce plugin for which support is provided in our community forums on WordPress.org. Searching there you’ll often find that your question has been asked and answered before.
If you haven’t created a WordPress.org account to use the forums, here’s how.
- If you’re looking to extend the core functionality shown here, we recommend reviewing available extensions in the Woo Marketplace.
- Need ongoing advanced support, or a customization built for WooCommerce? Hire a WooExpert agency.
- Are you a developer building your own WooCommerce integration or extension? Check our Developer Resources.
If you weren’t able to find the information you need, please use the feedback thumbs below to let us know! 🙏